Hello everyone. It’s Amanda from Twiddler’s Nook joining you again. Today I’ve got a set of 4 cards that I made fairly quickly and would be a great design to mass produce or pull together if you needed something in a flash.
![](https://i2.wp.com/blog.birchpressdesign.com/wp-content/uploads/2020/08/20200811_142910-1.jpg?resize=700%2C700&ssl=1)
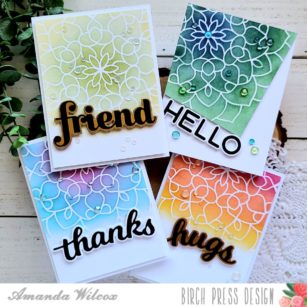
Here’s a peek at all of them. But let’s back things up and I’ll show you how I created them.
![](https://i1.wp.com/blog.birchpressdesign.com/wp-content/uploads/2020/08/20200811_114802-scaled.jpg?fit=700%2C700&ssl=1)
I used removable adhesive on the back of my panel and stuck it to my glass mat. Then I used post-it tape to tape my stencil in place.
![](https://i0.wp.com/blog.birchpressdesign.com/wp-content/uploads/2020/08/20200811_115130-scaled.jpg?fit=700%2C700&ssl=1)
Then I used blending brushes and dye inks to ink up my panels one at a time. I did them all back-to-back, assembly line style.
![](https://i2.wp.com/blog.birchpressdesign.com/wp-content/uploads/2020/08/20200811_121029-scaled.jpg?fit=700%2C700&ssl=1)
Here is a look at all of the panels before I trim them down at all.
![](https://i0.wp.com/blog.birchpressdesign.com/wp-content/uploads/2020/08/20200811_134548.jpg?fit=700%2C700&ssl=1)
I trimmed the 3 panels down to 4×5.25 and trimmed the one along the stencil lines. Then I backed them all with foam tape. Next, I grabbed my sentiment dies and cut the shadow and words from various cardstock and adhered them together with liquid glue. Then I added foam tape to the back of these as well.
![](https://i2.wp.com/blog.birchpressdesign.com/wp-content/uploads/2020/08/20200811_142417.jpg?fit=700%2C700&ssl=1)
At this point I popped all the panels on white card bases and also added the sentiments that I chose.
![](https://i1.wp.com/blog.birchpressdesign.com/wp-content/uploads/2020/08/20200811_142531.jpg?fit=700%2C700&ssl=1)
I went through my stash of embellishments and chose a different one for each card, adhering them differently for each design.
![](https://i0.wp.com/blog.birchpressdesign.com/wp-content/uploads/2020/08/20200811_142344.jpg?fit=700%2C700&ssl=1)
This card is my absolute favorite from today. Something about those colors together and the simple confetti bits adding interest here and there.
![](https://i1.wp.com/blog.birchpressdesign.com/wp-content/uploads/2020/08/20200811_142616.jpg?fit=700%2C700&ssl=1)
And I love how different this one turned out as well. So many possibilities with this simple design. Did you have a favorite?
I appreciate you sharing your time with me. I hope you have been inspired to create something wonderful. Have a fabulous day!
![](https://i1.wp.com/blog.birchpressdesign.com/wp-content/uploads/2020/04/Amanda-Signature-copy.png?resize=600%2C200&ssl=1)
Supplies
Comments by birch press
Two Cards from One Die Cut | by Tracey McNeely
"Thanks Lisa! Do you know which one was my original idea? lol"
Light-Up Christmas Cards with Layering Dies | by Ardyth Percy-Robb
"Thanks so much! The lights are from PearBlossom Press."
2 for 1 Rainbow Thank You Card Design | by Ardyth Percy-Robb
"Brilliant inking Ardyth! These cards are stunning!"
Lovely Butterflies Card | By Leigh Houston
"Thank you so much, Andre!"
Gate Fold Thank You | by Kimberly Wiener
"I love the tri fold card.. what a treat waiting inside!..."