
Hello and welcome to November!

Supplies
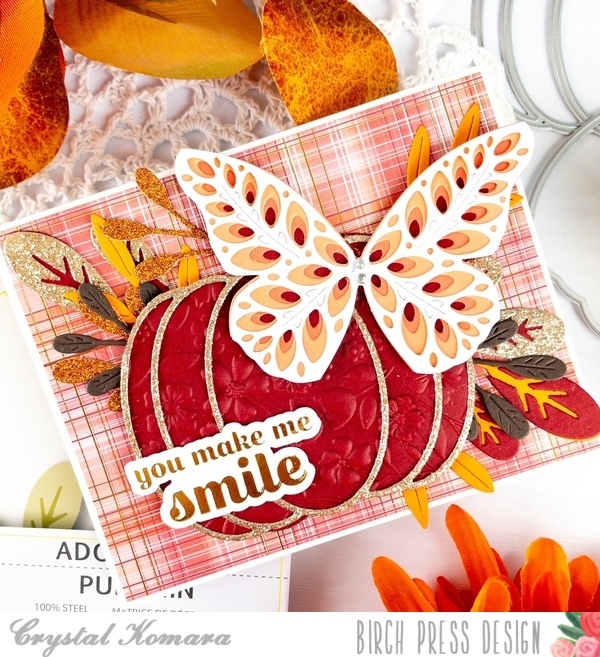
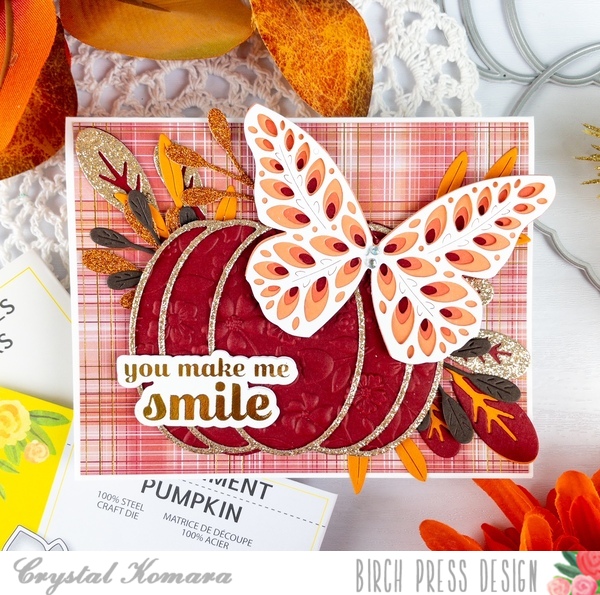
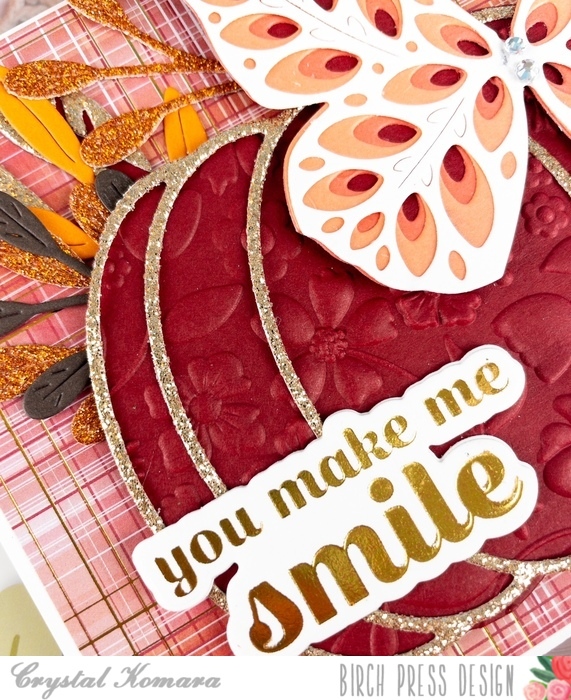
Hello crafty friends! This is Design Team member Crystal Komara here with you today sharing the first of a few fall themed pumpkin cards that I have made featuring the Adornment Pumpkin Set.
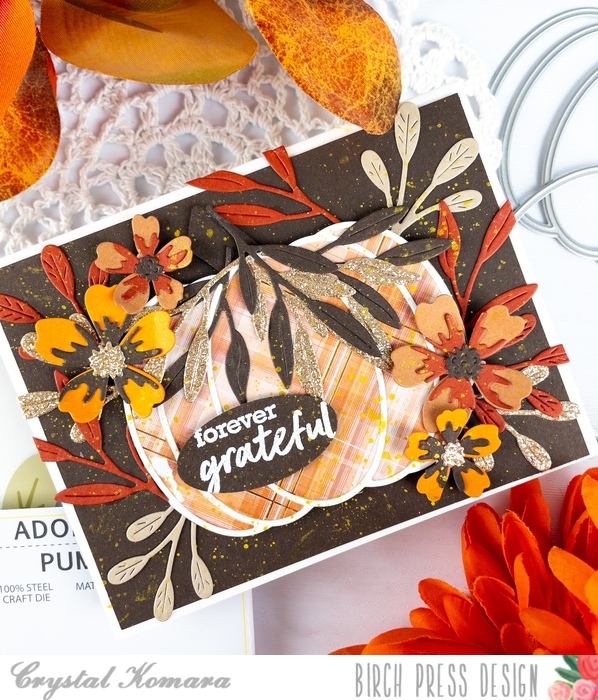
The Adornment Pumpkin Layer Set is one of my go-to products for fall cards. I love the large size of the layering pumpkin. Plus, it comes together easily with only two dies – a solid inside layer and a thin outline layer. For this card, I combined it with a variety of other products from Birch Press Design to include:
~Phlox Blooms and Leaves Contour Layers
Card details:
There is a lot to this card, so let’s break it down:
I know at first glance that a lot of these intricate layered cards can seem intimating, but all it really entails is a LOT of die cutting. My little tip* – I don’t even count or measure as I’m die cutting, I just keep cutting until it seems like I have a lot. Any extra pieces can be used on the inside or saved for another card!
Thanks for visiting and have a wonderfully creative day!

Supplies
Supplies

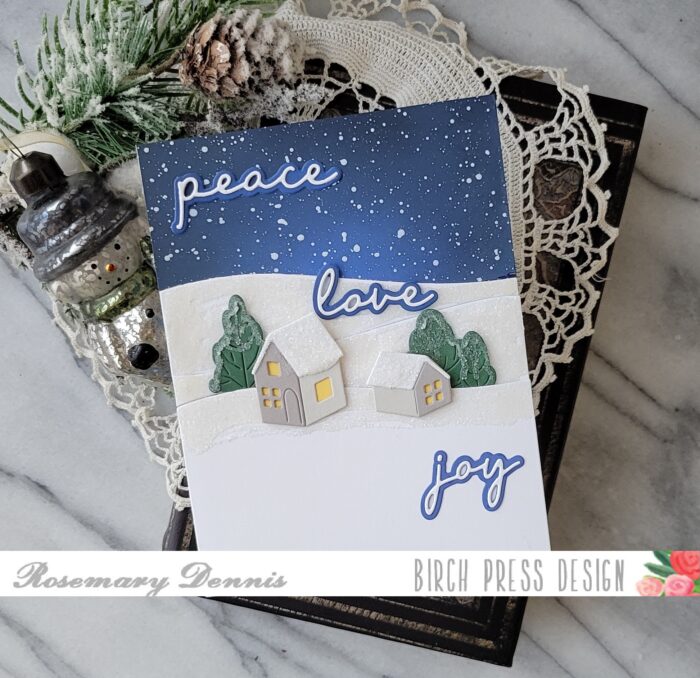
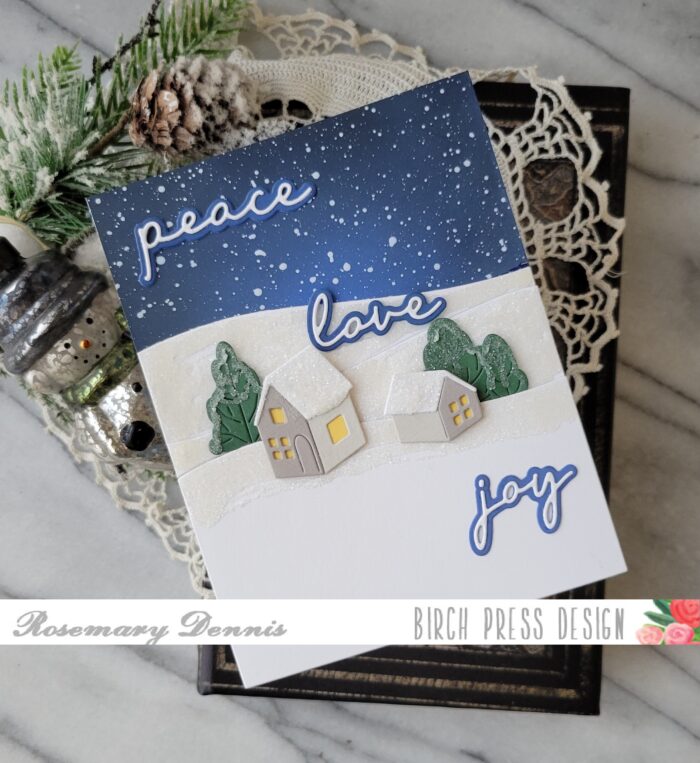
Hello, hello! Rosemary here on the blog today with a snowy scene card that was so much fun to make! Let’s have a look.
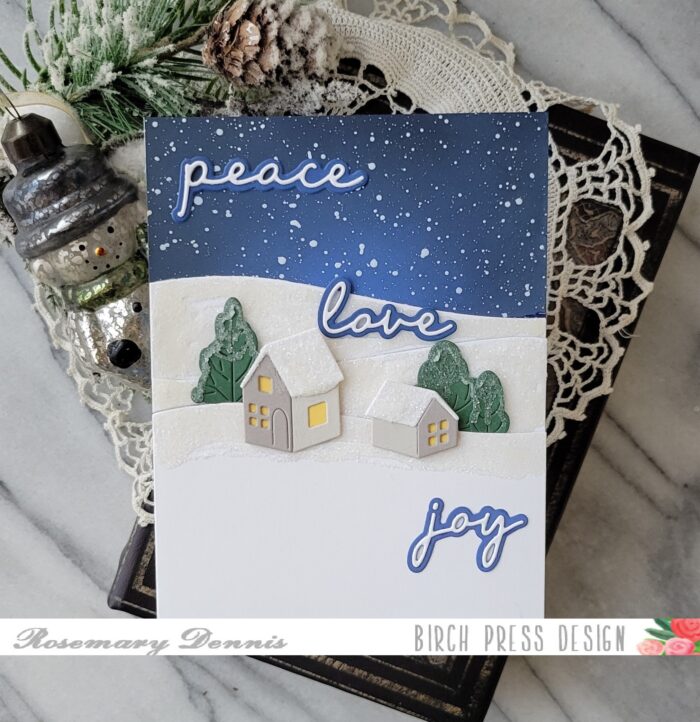
For my card I used the new Littletown Home, Wavy Hillside, and Peace Love Joy word die sets. The next few photos will show a little bit of my process for creating the card. I try to remember to take these kinds of photos, but sometimes get so involved in the process that I forget. This time I remembered!

I started by cutting piece of light blue cardstock from the Lagoon 6×6 cardstock pad to 5 1/2 by 4 1/4. I pulled out several distress oxide inks in shades of blue and blended them onto the top of the cardstock. I knew I would be covering up the bottom so no need to waste time and ink there! Once I had the blues blended to my liking I added in some black using Black Soot distress oxide. I used Blueprint Sketch, Prized Ribbon and Chipped Sapphire for the blues (could only fit the Chipped Sapphire in the photo).
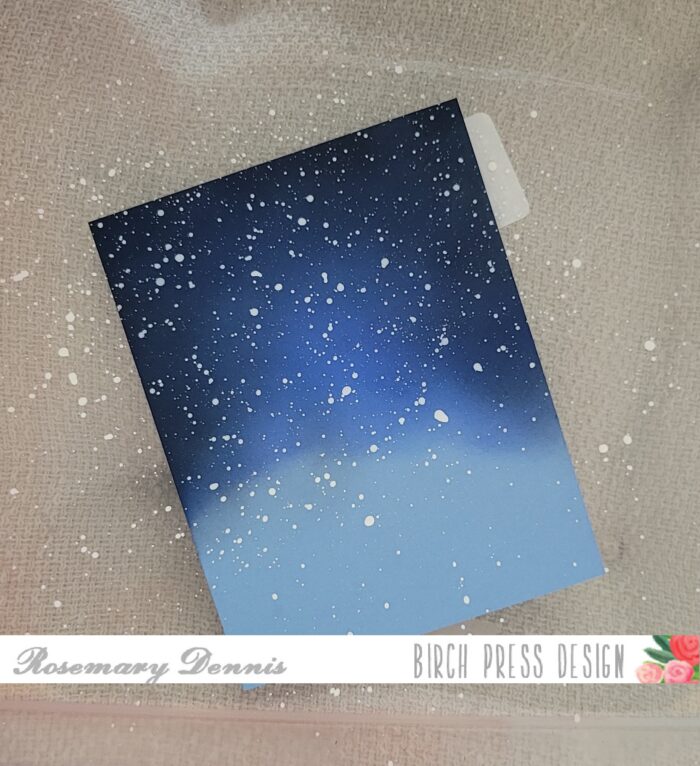
Once the ink blending was done I put the panel into my splatter box and liberally splatted the panel with white acrylic paint. I let the panel dry and moved on to the next step in my card process: creating the wintry hills for my little houses!

I used Glossy Accents to cover the hill pieces, but I didn’t cover the cardstock pieces completely as you can see in the above photo. I did this because I wanted a more realistic snow look to each piece. Giving it the look of high and low areas in the snow that are there in real life. I then covered each piece with Rock Candy glitter and let them dry.
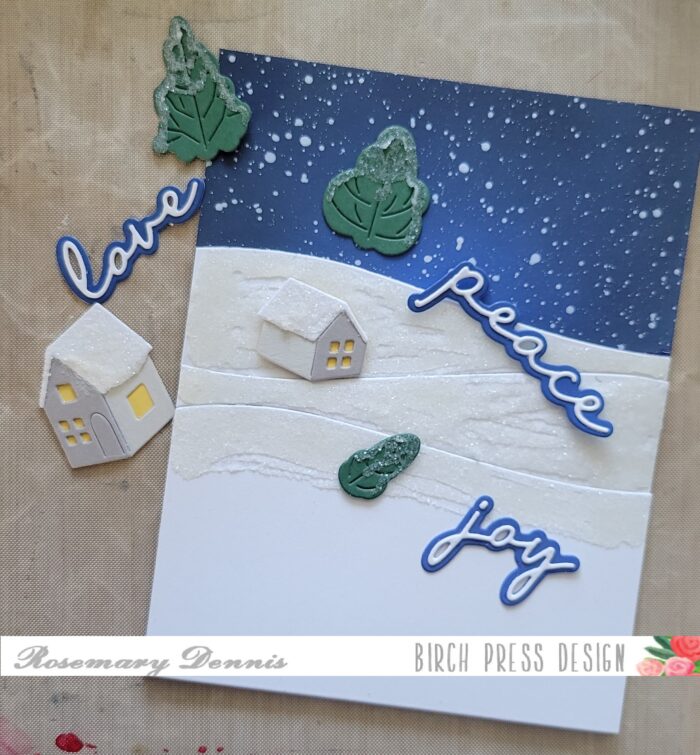
Now it was time to make the little houses, trees and sentiments. I die cut the houses from white, grey and yellow cardstocks and then adhered them together. Glossy Accents was added to the roofs and then Rock Candy glitter for that icy, snowy look. For the trees I simply added some liquid adhesive and then sprinkled on the Rock Candy Glitter. I had a scrap of the light blue cardstock so I ink blended that with the blue distress inks I used and die cut the shadow layer of each word from that. The words were die cut from white and then adhered to the shadow layer with liquid adhesive.
For the snowy hills I adhered the bottom one with foam tape. The middle layer was adhered with thin foam squares and the top layer with liquid adhesive. I layered the hills this way so that I could tuck the trees behind the bottom hill layer and the houses. The trees were adhered with a combination of liquid adhesive and thin foam squares. The houses were adhered in the same manner. The sentiments were adhered simply with liquid adhesive.
I hope you enjoyed today’s card and seeing a little bit of the process I used to create the card. Thanks for stopping by and have a wonderful day!

Supplies
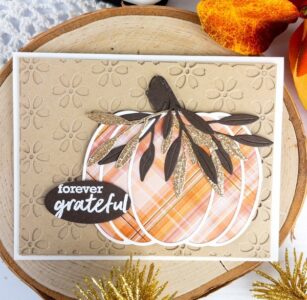
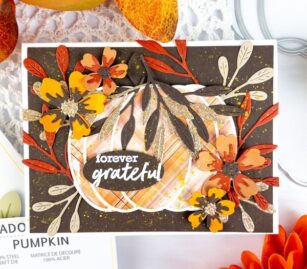
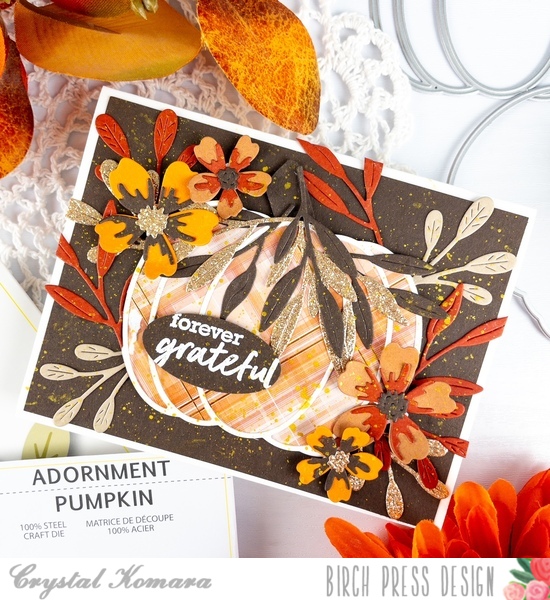
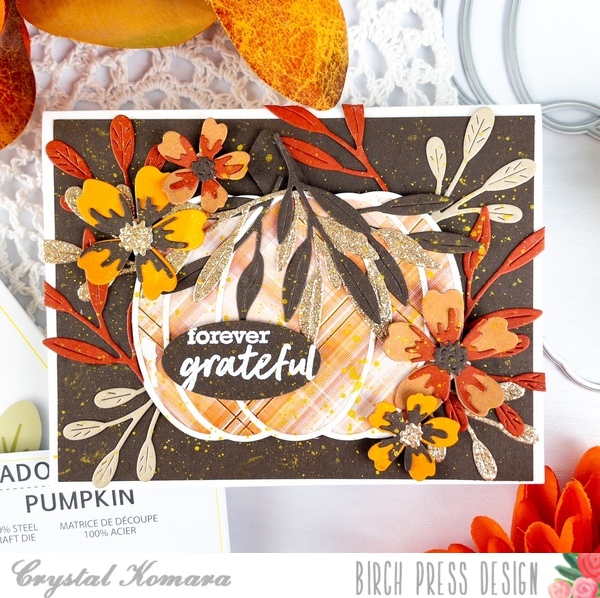
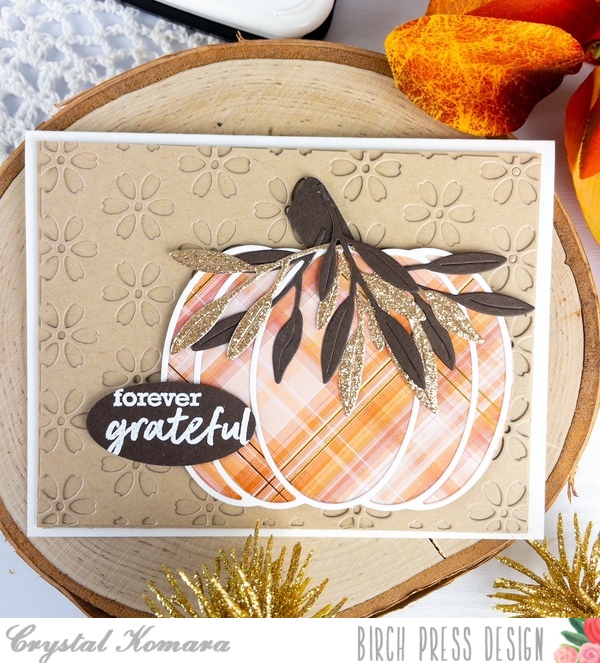
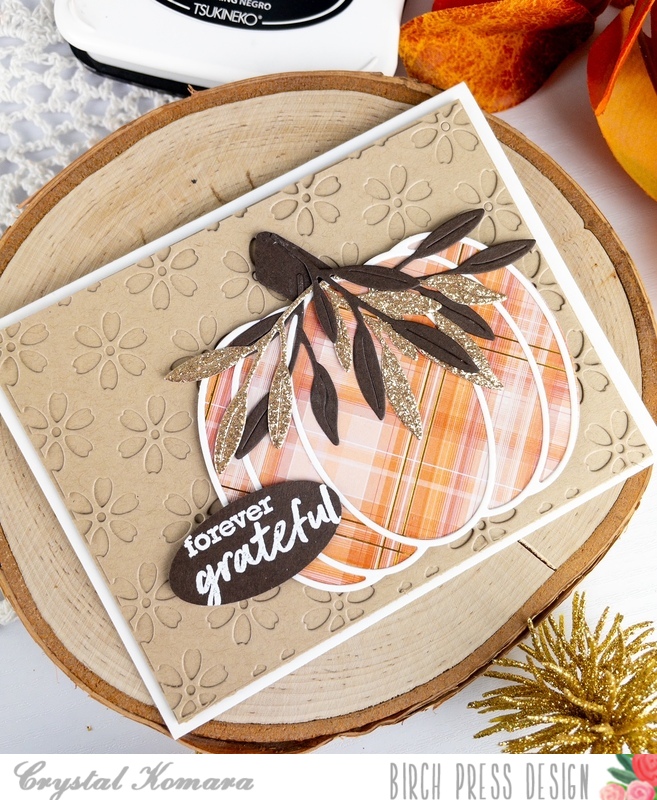
Hello fall friends! This is Design Team member Crystal Komara here to inspire you today! I have been sharing a lot of detailed intricate die cut cards lately, so today I thought I would keep my card a little more simple. I know that those intricate contour dies can be intimidating to some (as they were to me at first), but Birch Press Design makes so many gorgeous products, that you can cater the level of detail to your own personal taste.
Card details:
The base of this A2 sized card is made from 80 lb. Neenah Solar White smooth cardstock. I cut a 5 1/4 x 4″ piece of Kraft cardstock and adhered it directly to the card base. Then, using Layer Plate B of the Flora Plate Layer Set, I die cut that from Kraft cardstock and adhered it directly to the previous Kraft layer (so it’s kind of see through).
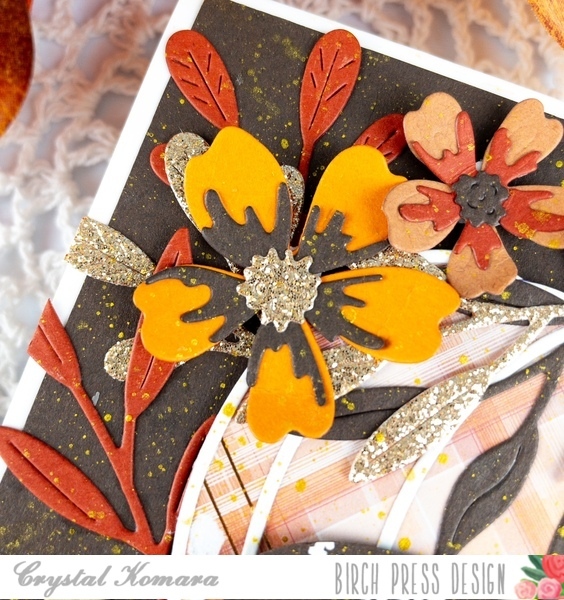
I die cut the base of Adornment Pumpkin from plaid cardstock from the Gladiola paper pack by Memory Box Company (a sister company of Birch Press Design). I LOVE their paper packs, they are all stunning. I cut the outline of the Adornment pumpkin from white cardstock. I layered the two together using a fine-tip liquid glue before adhering the pumpkin to the card with 3M foam adhesive for dimension.
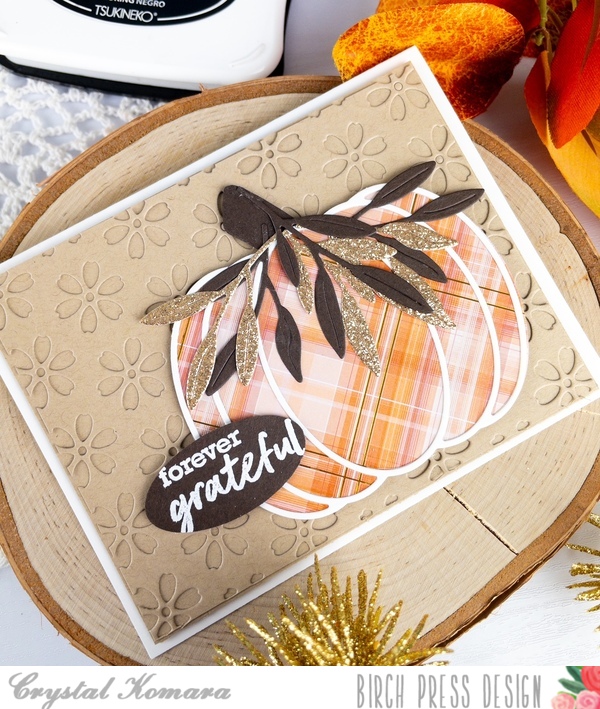
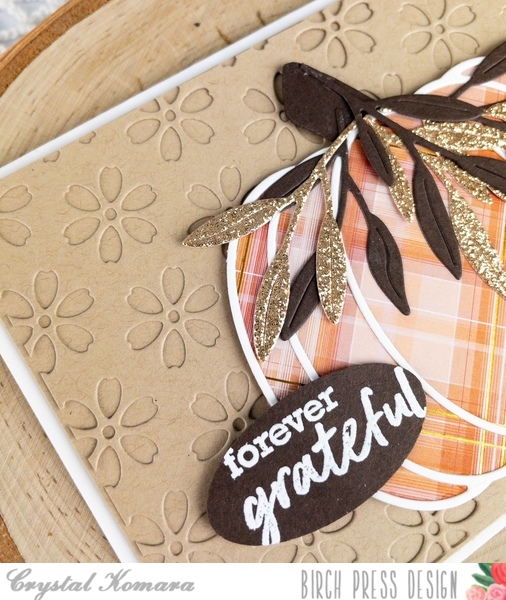
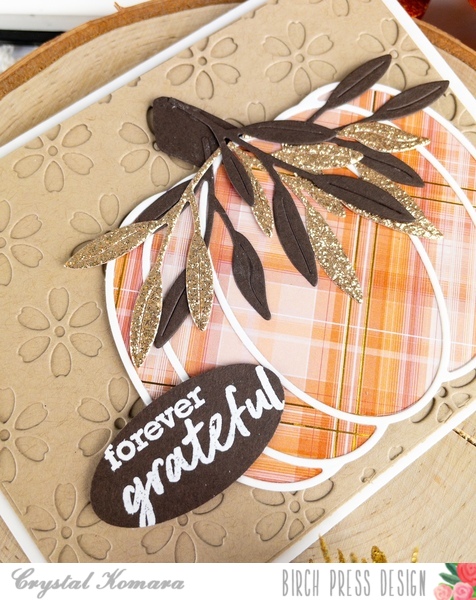
I die cut a bunch of leaves using the Tiny Tufts Leaves and Flowers contour set. I die cut these leaves in both a dark brown and gold glitter cardstock. I adhered the leaves to the top stem of the pumpkin. Lastly, I stamped the sentiment “forever grateful” from the Brush Sentiment clear stamp set. I stamped the sentiment in Versamark ink on dark brown cardstock and heat embossed the sentiment with white embossing powder. I then used an oval punch to punch out the sentiment. I adhered the sentiment to the pumpkin using 3M foam adhesive.
Fall is one of my favorite seasons to make cards for. I promise you will be seeing lots more ways to use this Adornment Pumpkin in the very near future!
Thanks for visiting and have a wonderfully creative day!

Supplies
Supplies
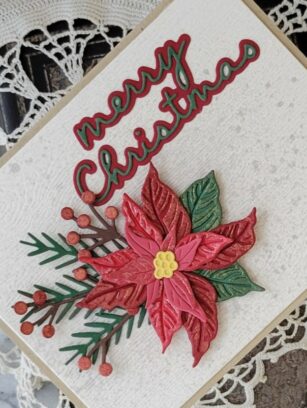
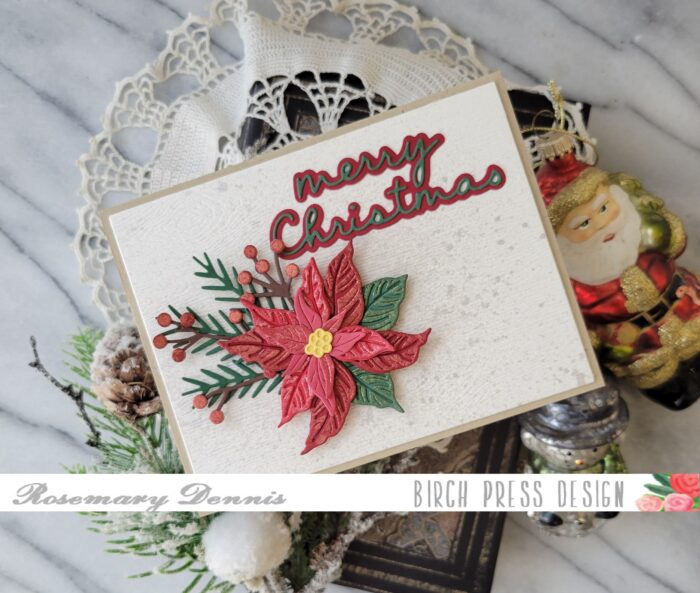
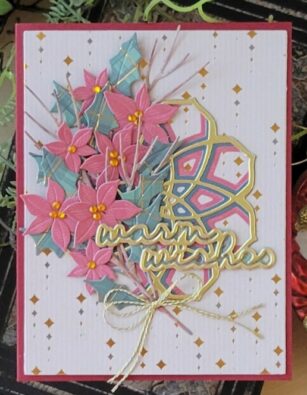
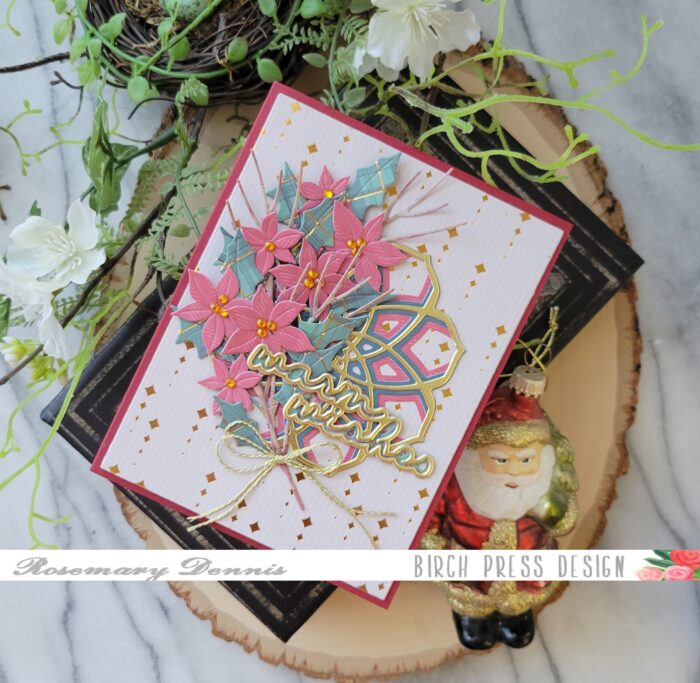
Hello everyone! Rosemary here on the blog today. Can you believe it is already September? I can’t. Today I have a Christmas card to share with you that I made with several new Birch Press Design products. Let’s have a look at what I made.
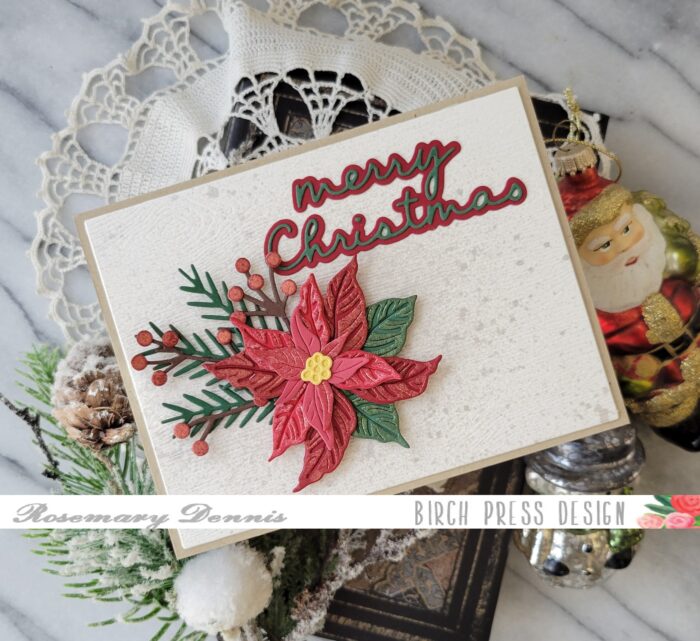
I love the Birch Press Design Poinsettia Contour Layer dies and the new Classic Poinsettia Contour Layers die set is no exception. It is so beautiful! I started by die cutting the layers from three shades of red Memory Box cardstock and one shade of green Memory Box cardstock. I then took the the top layer of each layer of the poinsettia and sprayed them with either Tart Cranberry or Peppermint Stick distress mica sprays. The top layer of the leaf was sprayed with Tree Lot distress mica spray.
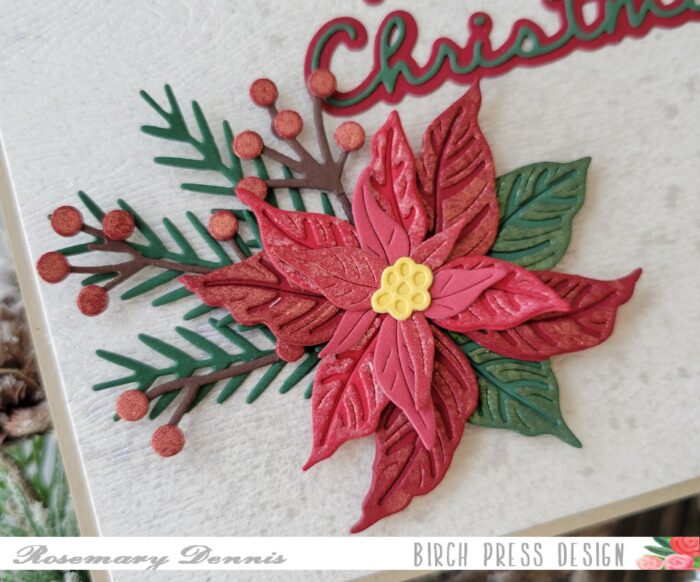
Once the layers were dry I adhered them together with liquid adhesive. The center of the flower was die cut from yellow Memory Box cardstock and layered together with liquid adhesive. I did the same with the leaves. All the layers of the flower were then adhered together with liquid adhesive, as well as the leaves.
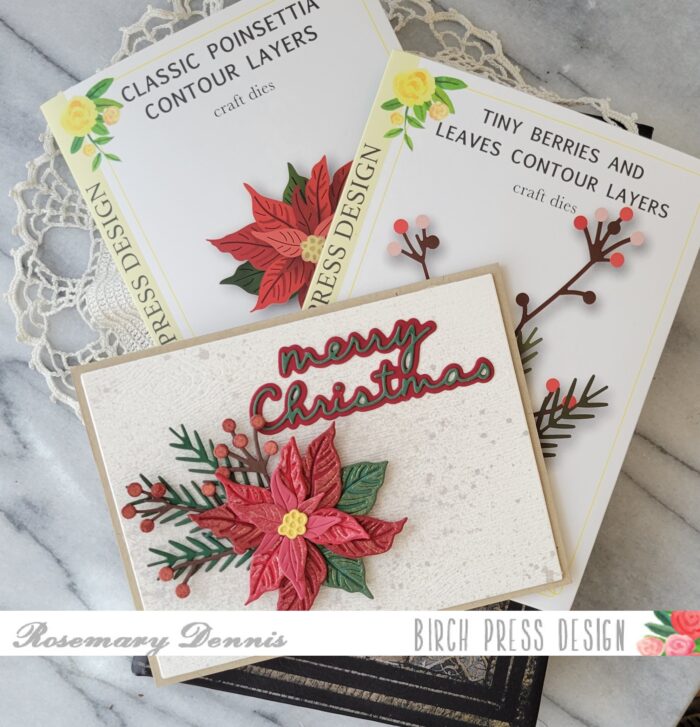
I die cut the pieces from the Tiny Berries and Leaves Contour Layers die from dark green and brown cardstock. The berries were die cut from dark red Memory Box cardstock and sprayed with Tart Cranberry mica spray. I cut down the berry stems to fit my design and then adhered the little berries to the stems with liquid adhesive.
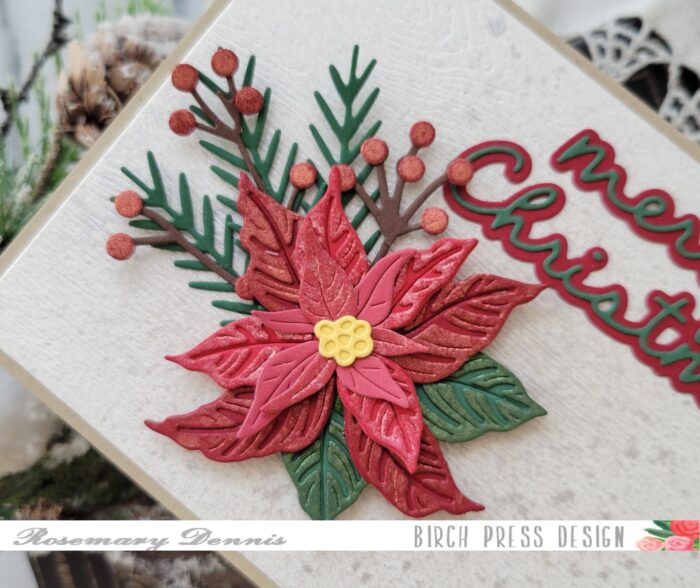
In the close up photos you can see some of the pretty shimmer from the mica sprays. I arranged the leafy stems and the berry stems and then glued them together with liquid adhesive. I did have to trim off a bit of the bottom before apply liquid adhesive to the piece and adding the flower on top as you see in the photos. The sentiment is the new Merry Christmas Confection Script die set and it was die cut from the same cardstock used for the poinsettia and leaves. I adhered the two pieces with liquid glue and let it dry.
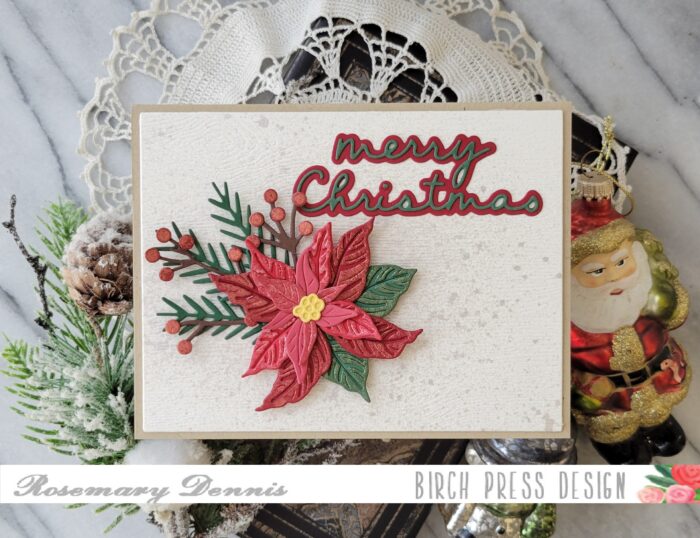
For the background I die cut some cream woodgrain Memory Box cardstock with a rectangle die and then sprayed the piece with Frozen Fog distress mica spray. Once the panel was dry I adhered two additional die cut rectangles behind it for a bit of dimension and then adhered it to my kraft cardstock base with double sided tape. The flower cluster and the sentiment were added to finish the card. Now I have another Christmas card to add to my stash!
I hope you enjoyed today’s card. Thanks for stopping by and have a wonderful day!

Supplies
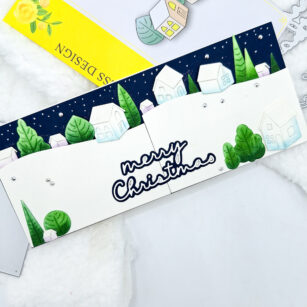
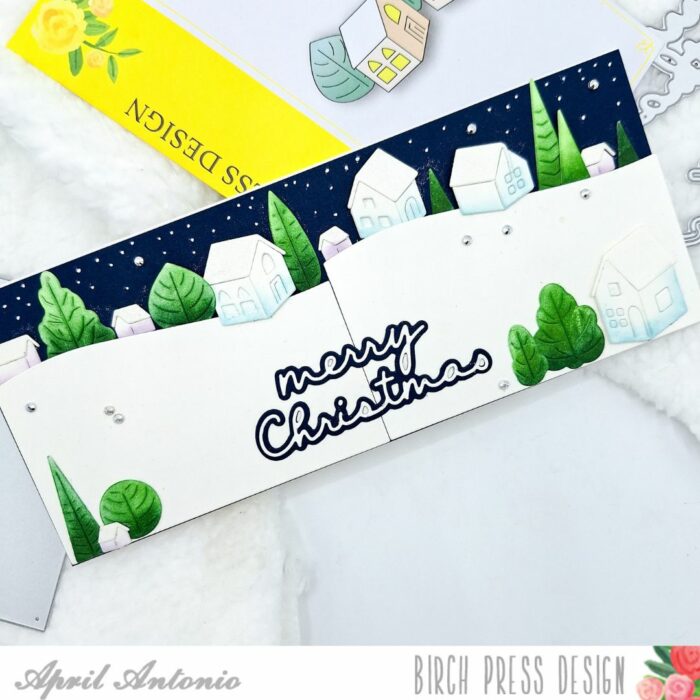
Hello friends! Design Team member April here today sharing an early Christmas card using some of the products from the new holiday release. With Autumn almost upon us, everything is about to speed up, so why not start on creating some holiday cheer?! Also, these new dies are just too cute to put down!
Here’s how I pulled this card together:
I grabbed a pre-cut slimline card base in white, and glued a dark blue cardstock mat to the background to represent the night sky. I used the new Wavy Hillside die set and cut the largest die from white cardstock twice. I glued the die cuts twice to the front of the slimline card using foam tape, and made sure to leave a little room at the top so that I could later tuck in some of the houses and trees.
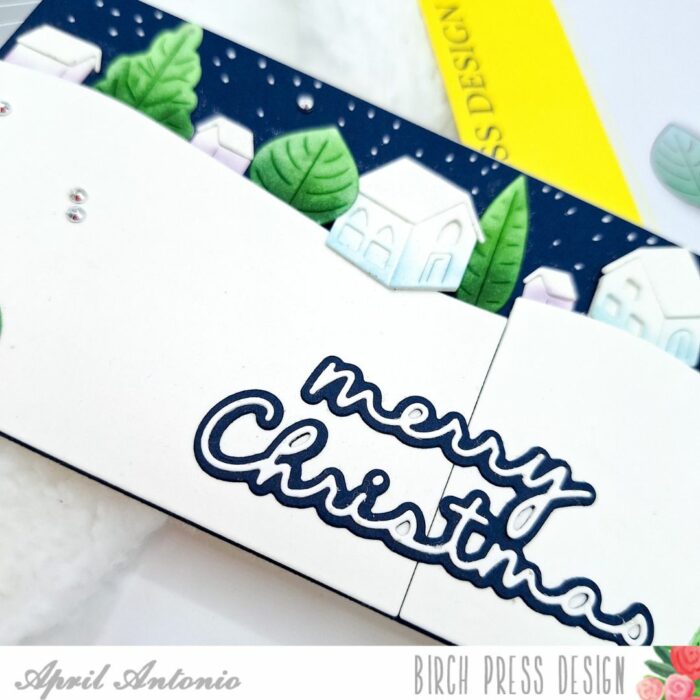
I cut the Littletown Village, Littletown Church, and Littletown Home die sets all from white card stock, and assembled them accordingly. I then did some light ink blending in blue and purple on the bottom of each building, and did some darker ink blending in green on the trees. I then arranged the trees and houses across the hillside tucking some behind the ‘snow’ and placing some on top. I also added some to the bottom of the card front in either corner.
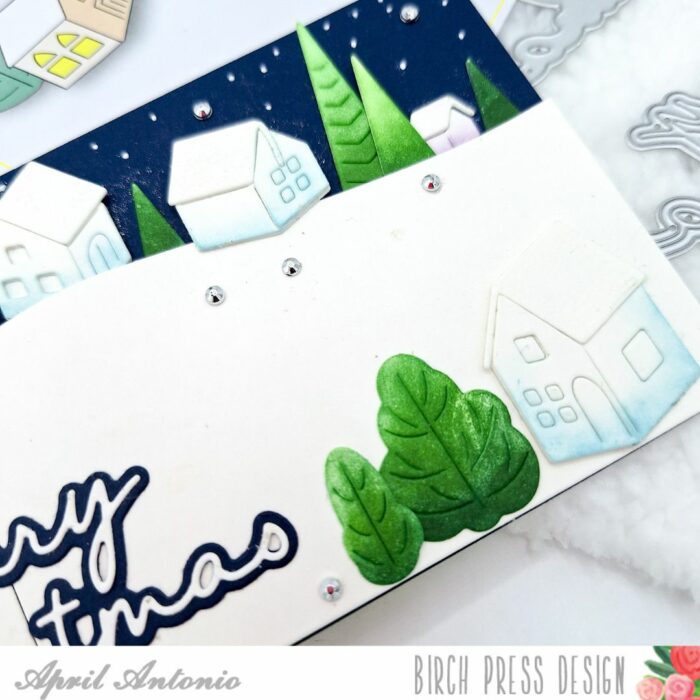
For my sentiment I used the Merry Christmas Confection Script die with the shadow in the same dark blue as my background and the letters cut out from white cardstock.
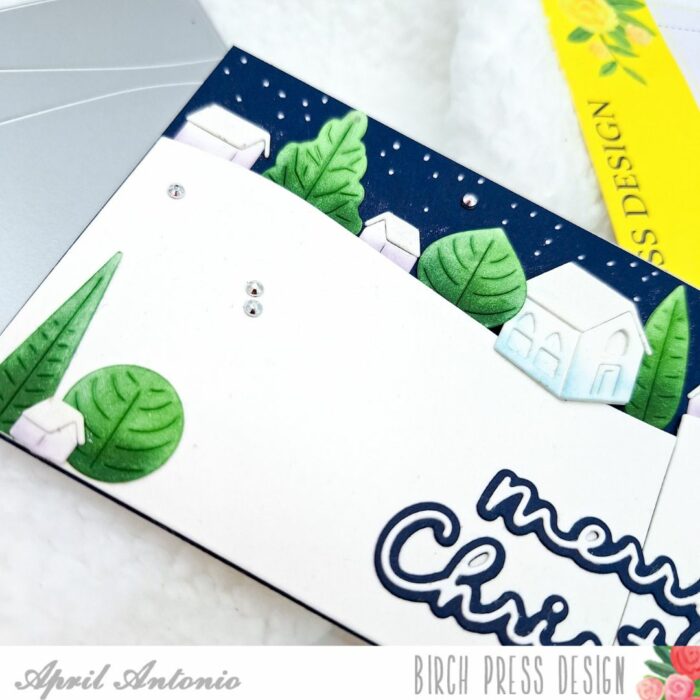
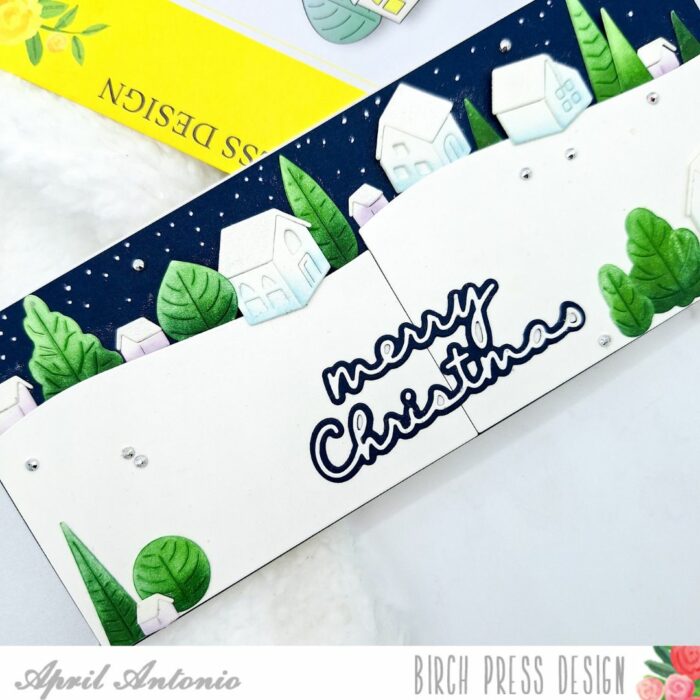
Finishing touches: I used a white gel pen to add some ‘falling snow’ to the dark blue background. I also added some silver jewels from the Memory Box Christmas Fairy Jewels set, and used a glitter pen to add some sparkle to the roofs of the buildings.

Supplies
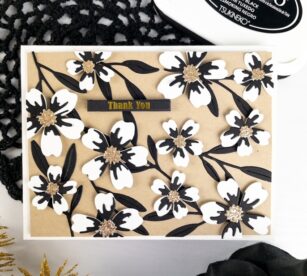
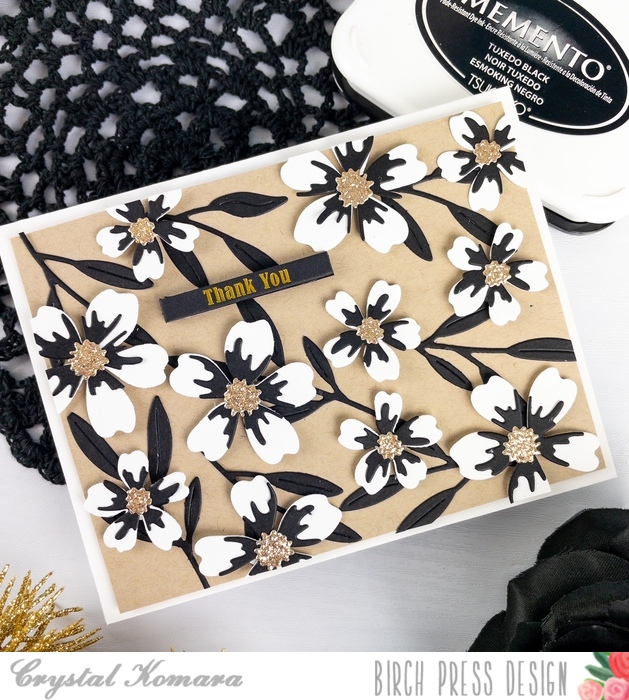
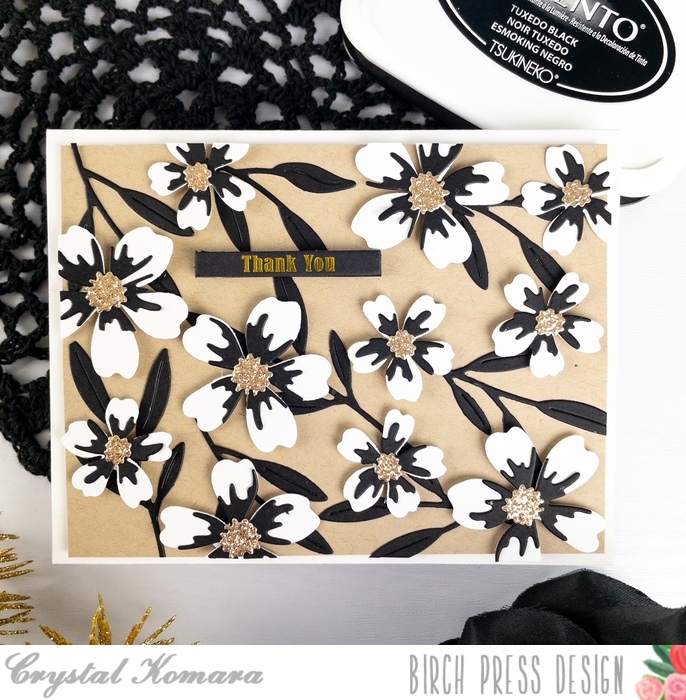
Hello friends! I’m so excited that fall is finally here in New England, it’s my favorite time of the year! This is Design Team member Crystal Komara here today to inspire you with with a black and white garden of thanks!
You know when you have an idea in your head and then when it times to execute the plan, you don’t always have the desired result? Well, this card came out exactly as I envisioned and I was so happy with it that I can’t wait to create similar cards in other colors.
Card details:
The base of this A2 sized card is made from 80 lb. Neenah Solar White Smooth cardstock. I cut a 5 1/4x ” x 4″ piece of Kraft cardstock and adhered it directly to the card base. Then I went to work die cutting a bunch of flowers using the Phlox Blooms and Leaves Contour Layers. I die cut all the flower bases from white cardstock and all the 2nd layer of the flowers from black cardstock. I die cut the centers from gold glitter cardstock. I also die cut all the leaves in black cardstock.
First, I adhered the leaves to the card and then I added the flowers as I deemed visually appealing. Lastly, I left enough space to add the sentiment. The sentiment strips are actually heavy cardboard foiled tabs from Memory Box Co. (a sister company to Birch Press Design). You can find the Thank You Foiled Greetings Tabs here.
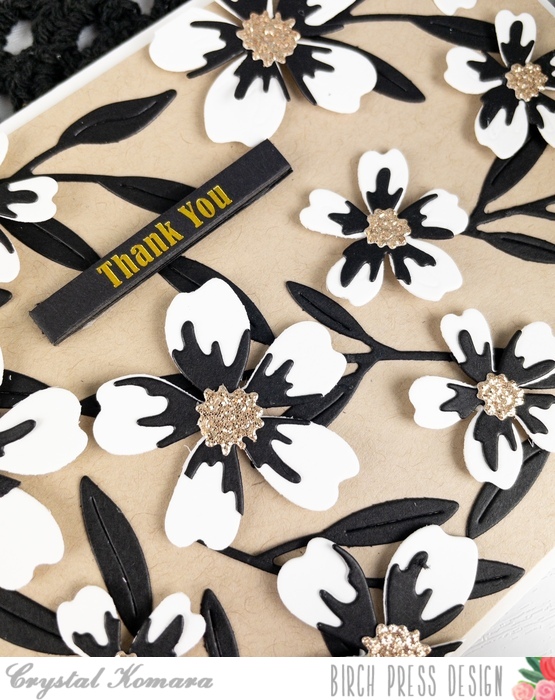
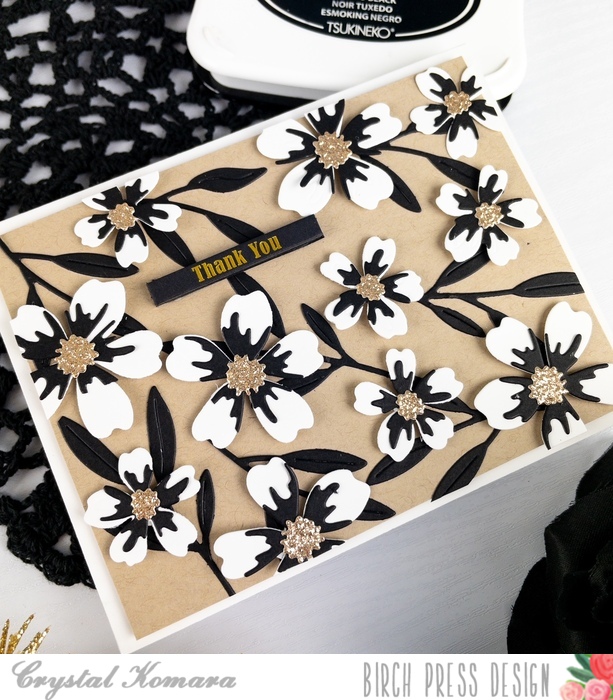
I think a black and white card is so elegant. If you add a touch of gold glitter or foil, it even ups the WOW factor. This card would work really well as a wedding or sympathy card too.
Thanks for visiting and have a wonderfully creative day!

Supplies
Supplies
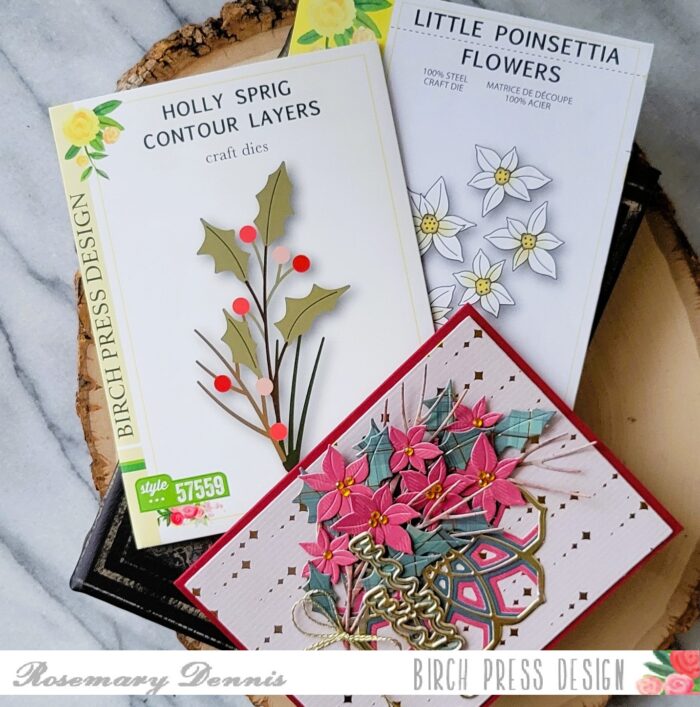
Hello, hello! Rosemary here today with a holiday card to share that I made using the following products from the new release: Holly Sprig Contour Layers, Little Poinsettia Flowers and Warm Wishes Confection Script. I also used the tried and true Cora Layering die set. Let’s have a look.
As I was looking through the new die set I noticed that the Little Poinsettia Flowers would work perfectly with the Holly Sprig Contour Layers die set. To create my little flowers I used patterned paper from the new Yuletide Cheer 6×6 pad from Memory Box. The die is all one piece allowing you to die cut as many flowers as you need very quickly. I cut the die twice in order to make enough flowers for three holly sprigs. I adhered the flowers using liquid adhesive and added yellow fairy jewels to the center of the flowers.

I then die cut the holly sprigs from a green plaid paper from the Memory Box Yuletide Plaid 6×6 pad. Since there are touches of gold foiling on all the papers I decided to die cut the sprigs from that side of the patterned paper for that little bit of added sparkle and shine. There are also little pine like sprigs in the Holly Sprig die set. I die cut those from the reverse side of another piece of Yuletide Plaid that had a brown hue to it. I adhered the flowers to the Holly Sprigs on the spots where the berries are supposed to be. I really like the look!
For the background I decided to use another piece of paper from the Yuletide Cheer pad that featured gold foiling. I tried just layering the three holly sprigs on to the background but decided I needed a little something else. So I went through my layering die sets and settled on the Cora Layering set. I die cut the bottom and middle layers from the patterned papers I used for the flowers and stems and the top layer from gold metallic cardstock. I adhered the layers with liquid adhesive and then added it to the background paper. Because the patterned paper is thin I die cut additional rectangles of the same size from white cardstock and adhered them behind the patterned paper rectangle using liquid adhesive. I weighted everything down so it would dry flat.
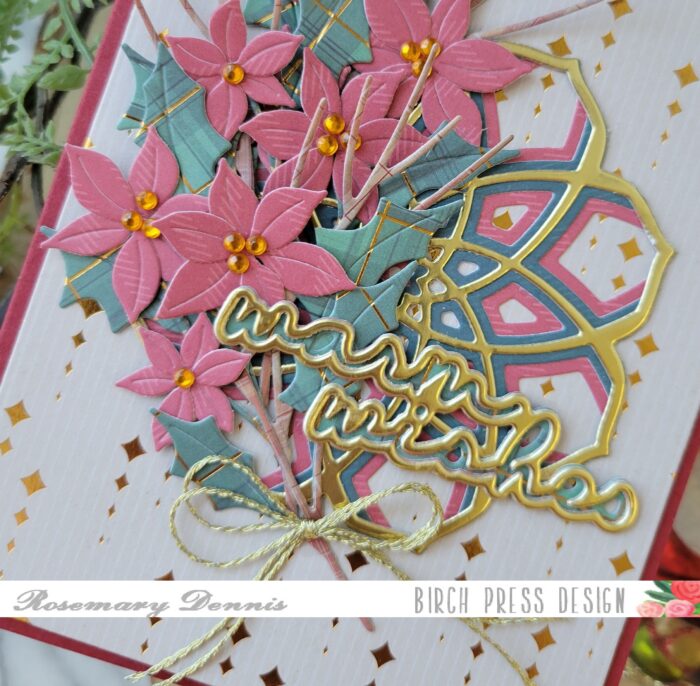
I die cut the Warm Wishes Confection Script from the green plaid paper, as well as from the gold metallic cardstock and adhered the layers together with liquid glue. Once the background was dry I layered on the holly sprigs that I created with liquid glue. I tucked some of the little pine sprigs into the arrangement at various points. I finished off the card with a bow tied from gold metallic thread and the sentiment.
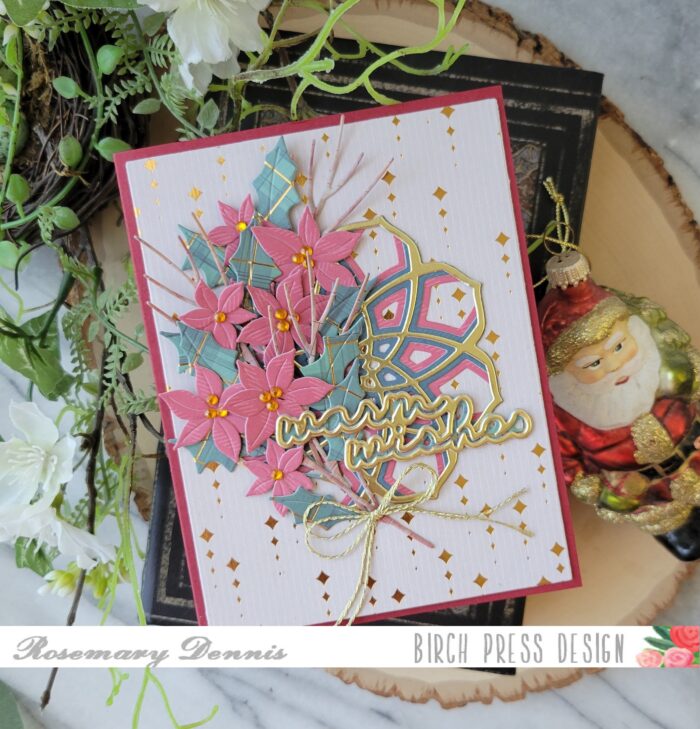
I really like die cutting using patterned papers, especially papers with a subtle pattern to them, as it adds so much texture and interest to a card. I hope you enjoyed today’s card. Thanks for stopping by and have a wonderful day!

Supplies
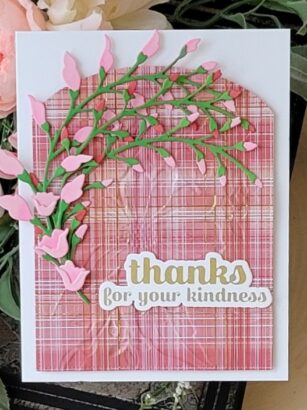
Hello everyone! Rosemary here on the blog today. I have a card today that I made using the new Floral Arch Contour Layers die set. When I pulled the package for this die set out of the box I gasped at how beautiful it is! I couldn’t wait to make a card with it.
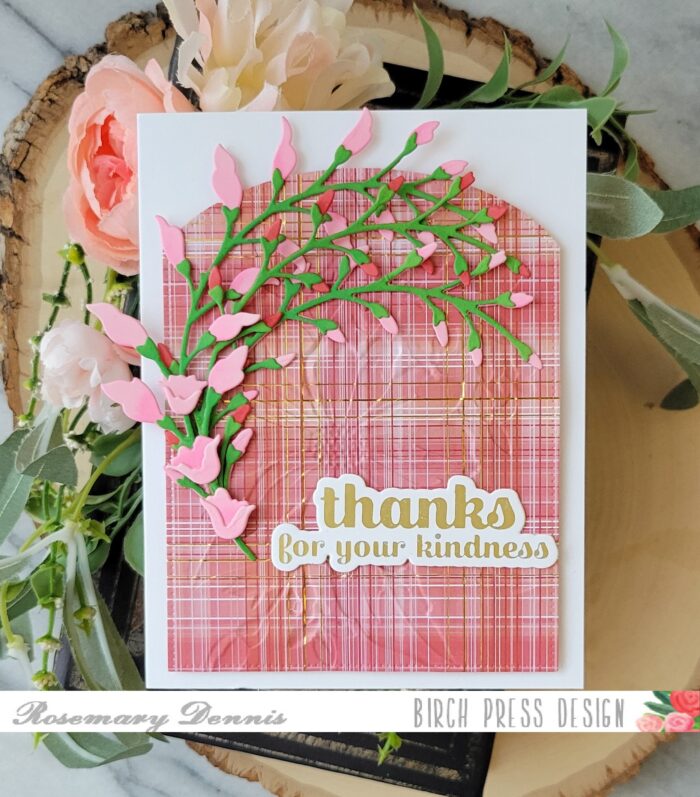
On the packaging the image is shown in shades of pink and that is what I went with initially. As I was making the card I decided to throw a little red into the mix since there is red in the patterned paper I used.

I decided to die cut the pieces from colored cardstock and then to blend on some additional ink for more color. The green cardstock I used to die cut the top stems was a lot lighter when I started out, but I love the deeper green color I acheived!
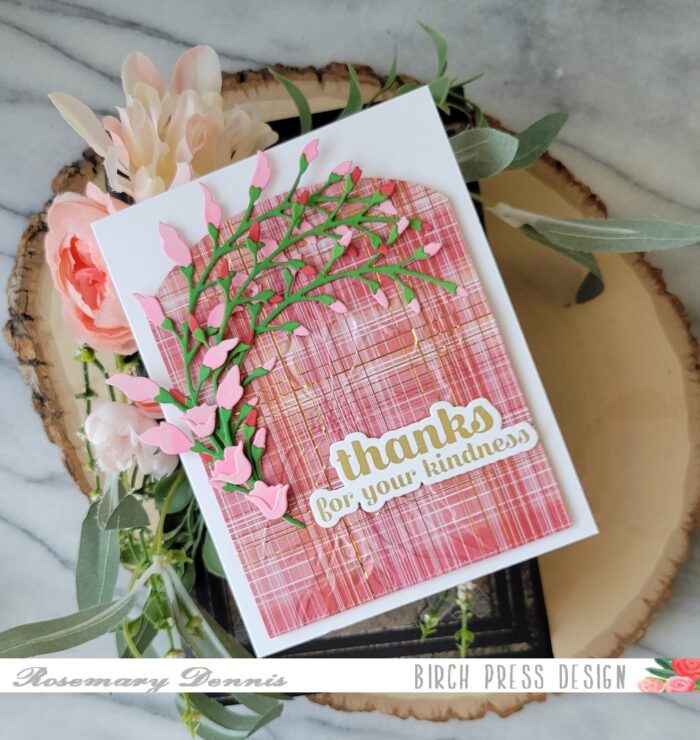
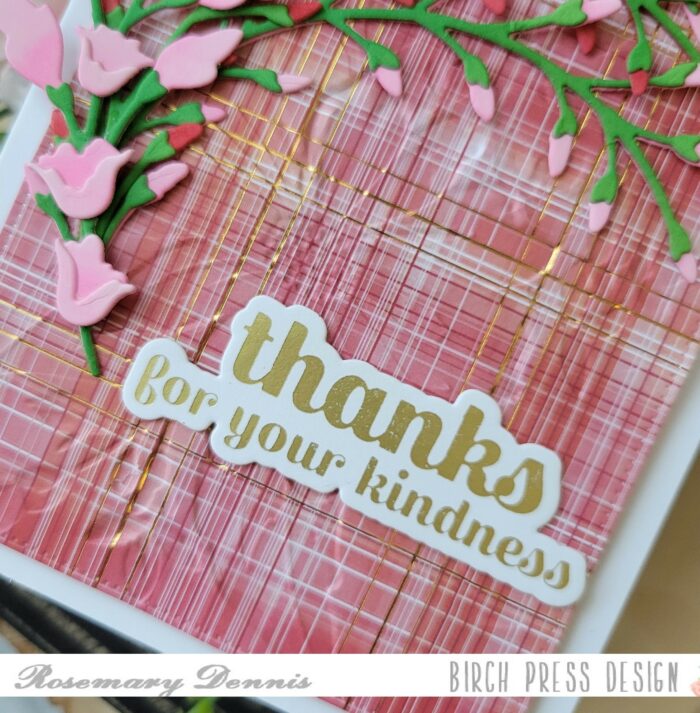
After die cutting and inking all the pieces I adhered everything together using liquid adhesive. I thought that the second largest dies from Memory Box Curved Cap Pinpoint Layers die set would be perfect for the floral arch. I die cut it from a sheet of paper from the Gladiola Plaid 6×6 paper pad and then embossed it with the Open Studio Gracious Floral embossing folder. When I embossed the paper I actually embossed the wrong side, but decided that I liked the debossed side as it was a bit subtler. I adhered the panel to a white cardstock base with strong double sided tape.
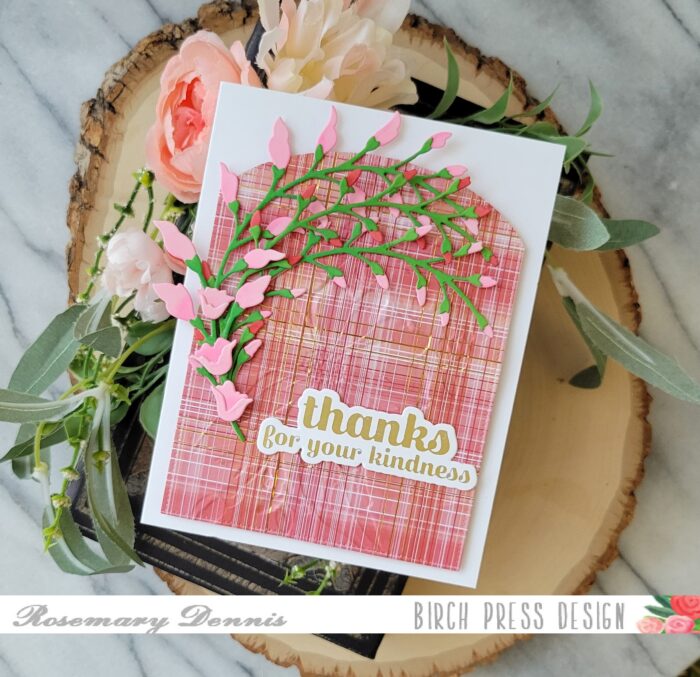
I adhered the floral arches with liquid adhesive and then added the sentiment from the Sugar Script Sentiments 2 hot foil set. I’m almost out of these sentiments so time to foil some more! The foiled sentiment worked perfectly since as you can see there are little touches of foiling in the plaid paper.
I hope you enjoyed today’s card. Thanks for stopping by and have a wonderful day!

Supplies

Hello crafty readers! This is Design Team member Crystal Komara here sharing a very detailed card using the beautiful Tropical Hibiscus Contour Layers. Now, contour layering dies have been around for a while now, but in all honesty, it’s taken them a little while to grow on me. I go through my love ’em and hate ’em phases. Well, I am currently in my die cutting era right now! I can’t stop, because each card comes out so elegant and gorgeous, it just makes all that die cutting and piece work worth it!
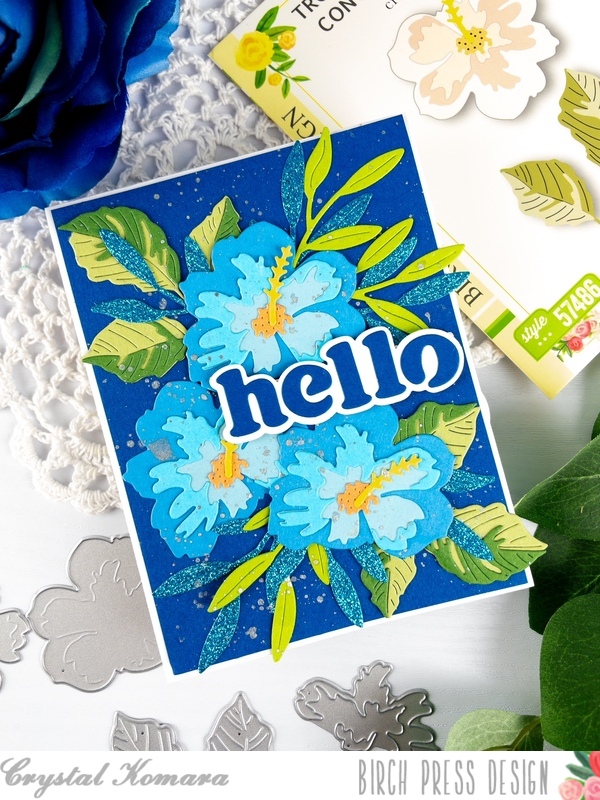
Card details:
The base of this A2 sized card is made from 80 lb. Neenah Solar White Smooth cardstock. I then cut a 5 1/4″ x 4″ piece of royal blue cardstock and adhered it directly to the card base.
Next, I went to town just die cutting all those hibiscus layers (from three different colors of blue) and then the leaves in two shades of green. Really, I don’t measure or count anything as I’m doing all that die cutting, I just keep cutting and then put it all together in the end. Yes, I always have leftover and mismatched pieces, but I just add a couple of the “extras” to the inside of the card and any leftover pieces go in my scrap bin for another time.
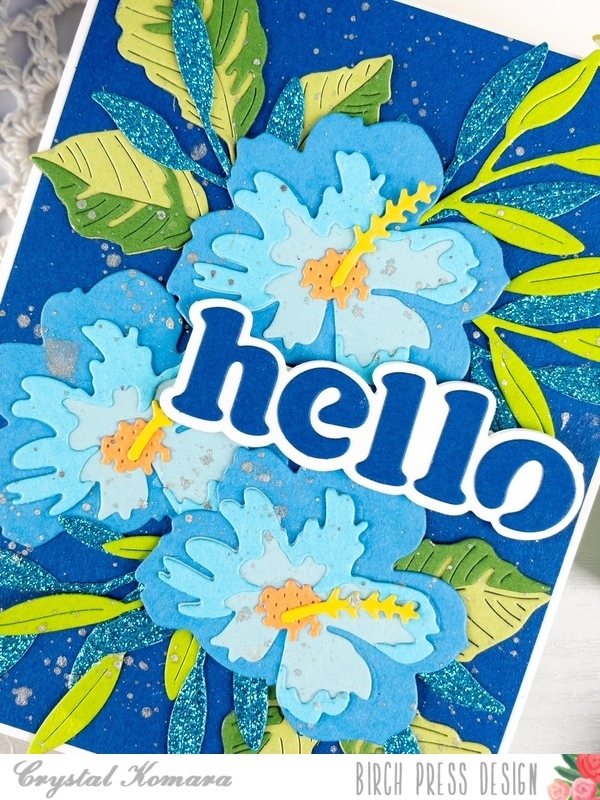
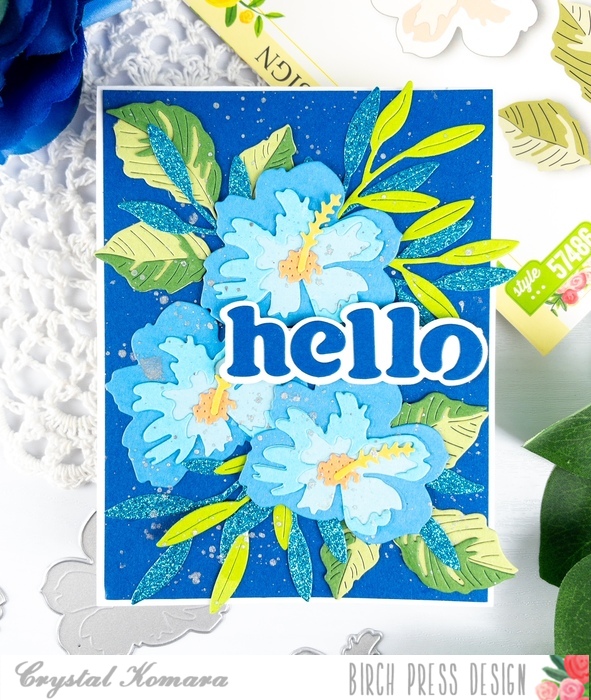
Once I adhered all the flowers and leaves together and situated them on the card in a visual appealing way, I added the sentiment. I used the Big Hello Vintage Sentiment die. I die cut the bottom layer from white cardstock and the top layer from royal blue cardstock. I adhered both layers together with a fine-tip liquid adhesive. Lastly I adhered the entire sentiment to the card using 3M foam for added dimension.
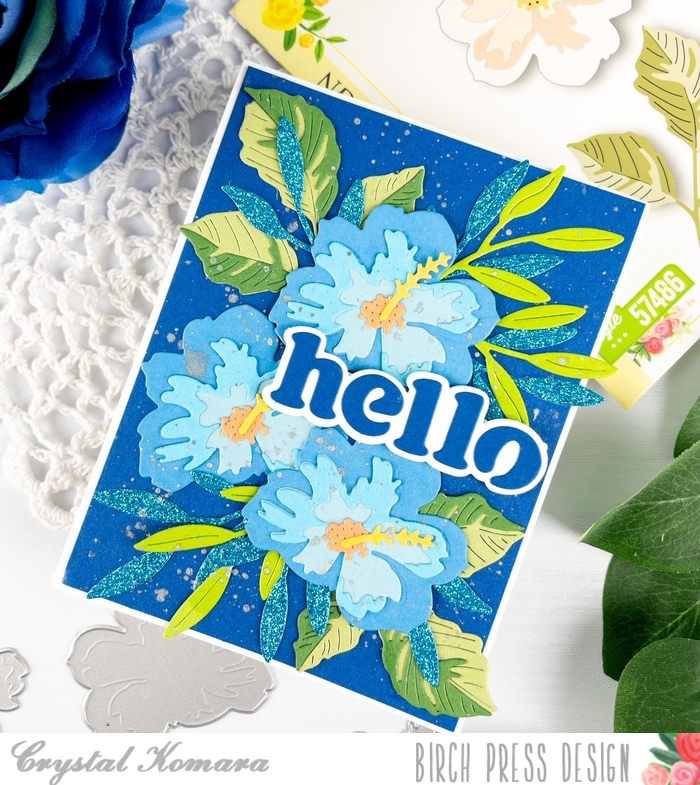
Now, is this card “perfect” – goodness NO! I bet you didn’t realize that I splattered silver ink all over the card when I intended on splattering gold. Do I love it? No. But there was already so much work done that I wasn’t about to start all over. And, let’s be real, no one would ever know but me! Shhhh. . .
Thanks for visiting and have a wonderfully creative day!

Supplies


