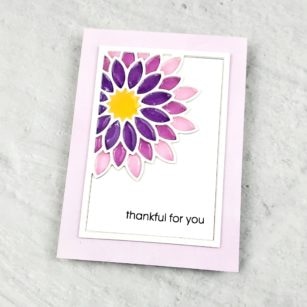
Hi crafty friends, thanks for coming by! Today I’m sharing a clean and simple card with an unexpected detail, a faux stained glass effect. This card features the Dahlia Mini Frame Layer A die, and a sentiment from the You Are Awesome stamp set.
I started by using the die to cut a piece of 80# white cardstock. Instead of letting all of the little pieces fall out, I kept all of the pieces together by adding several strips of paper tape across the back of the panel. Then, using Copic markers V12, V15, V17, and Y18, I quickly and messily (!) colored in the petals and the center of the dahlia. I also stamped the sentiment in black pigment ink.
Next, I used the die three more times on heavier 100# cardstock. I stacked and adhered the three layers together with a Zig 2-way Glue Pen and then adhered the stacked piece over my Copic-colored layer.
For my background, I used a foam blending tool to blend Milled Lavender Distress Oxide ink around the edges of a 4-bar sized piece of bristol smooth cardstock. I adhered the dahlia frame to the background and adhered the card front to an 4-bar card base. For the last touch, I added Ranger Glossy Accents to each petal and the center of the dahlia, using a craft pick to help push the Glossy Accents into nooks and crannies.
Hello there creative and awesome Birch Press Fans. We are still celebrating the newest release with a Giveaway!
We will be having giveaways on our Instagram Account March 21-29, 2020. One comment will be chosen at random from each of the Instagram posts during the blog blitz. Only one prize per person per giveaway. We use a random number generator to select winners from comments. You have until midnight US EST April 1 to leave a comment on each and every Instagram post that you want to enter. Winners will be announced on the Instagram posts on April 3.
For a chance to win the Honeycomb Bevel Layer Set…..
1.) Follow Birch Press Design on Instagram 2.) Double Tap (LIKE) the post with this giveaway 3.) Tag A Friend in the comments Good luck! And thanks for joining us!
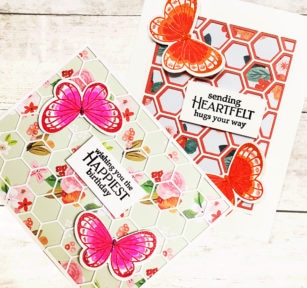
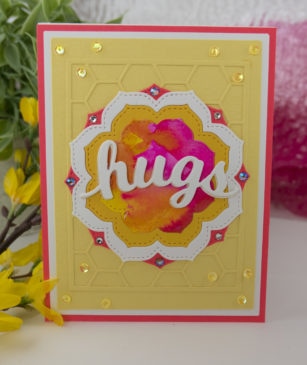
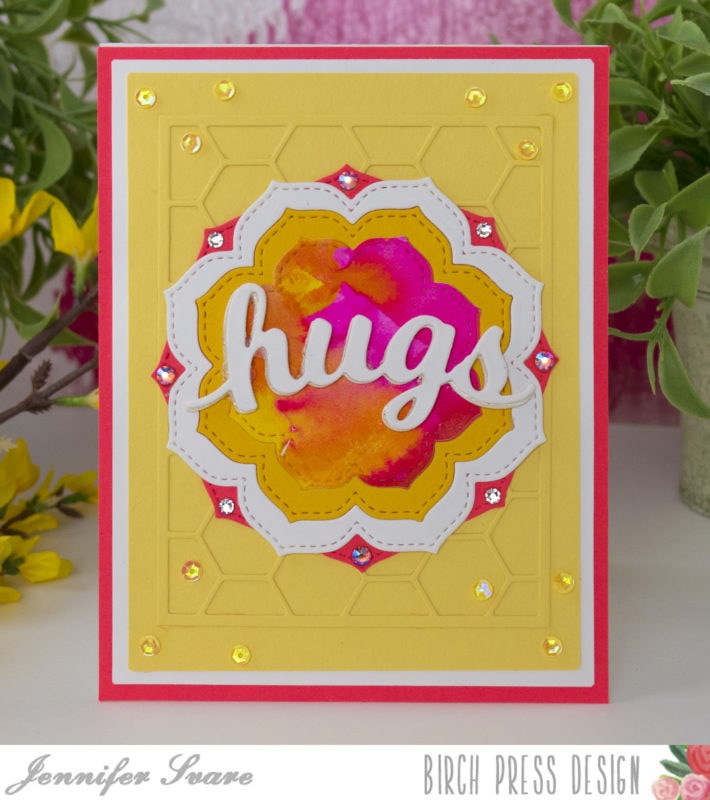
I have created two spring themed cards for you using the Honeycomb Bevel Plate Layer Dies.
I have used the backdrop of a few of the lovely spring and floral papers in the new Memory Box Cottage Meadow Paper Pack.
The Honeycomb Bevel Plate Layers Set can be used as a single card cover die as well as in layering. For the “Happiest Birthday” card you will die cut the “C” die twice and cut to piece across the entire A2 size card front.
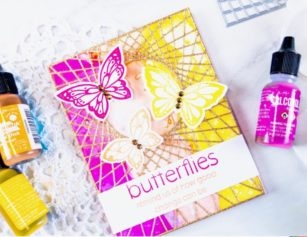
Have you seen the new Fairy Sugar Glitter Glues? I have had some sparkly fun by adding some onto the Lovely Butterflies Clear Stamp Set.
I really loved all the various sentiments from the Poppystamps Greetings Basics Clear Stamp Set and used one for each card.
The butterflies were embossed and colored in bright colors matching the papers. Drops of glitter glue in Pansy, Strawberry Ice, and Goldenfinch were placed on the edges of the butterfly wings.
The sentiments and butterflies were popped up on double sided foam tape for extra dimension.
I hope you are enjoying the Spring paper colors, sparkle-licious glitter glue collections, clear stamps, and amazing dies, offered in this newest release!
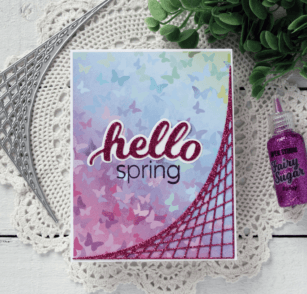
Hi there it’s Tracey here today and I’m so excited to introduce the newly released String Art Corner die! This week we re having a Blog Blitz and today I have a short video tutorial about using the corner die cuts along with patterned paper!
Have a closer look at how gorgeous this intricate die cut is with the patterned paper and cut with the the glittery cardstock!
We will be having giveaways on our Instagram Account March 21-29, 2020. One comment will be chosen at random from each of the Instagram posts during the blog blitz. Only one prize per person per giveaway. We use a random number generator to select winners from comments. You have until midnight US EST April 1 to leave a comment on each and every Instagram post that you want to enter. Winners will be announced on the Instagram posts on April 3.
For your chance to win the String Art Corner die…
1) Follow Birch Press Design on Instagram 2) Double Tap (LIKE) the post with this giveaway 3) Tag A Friend in the comments Good luck! And thanks for joining us for the Blog Blitz!
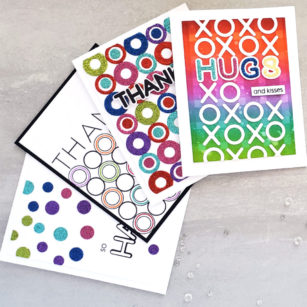
Good morning! It’s Ardyth here with 4 ideas for using the new Mod Alphabet Stamps & Dies!
The stamp set has regular and outline letters and the die set has matching sets for both letter styles, making layering fun and easy!
I created a blended plaid background using the Bold Stripes stencil and this helped guide the placement of my letters. My little sentiment comes from the You Are Awesome stamp set.
For this card, I used the new Twinkling Jewels Glitter Pad and cut LOTS of ‘fat’ and ‘skinny’ o’s. My sentiment is from Lingo Thanks stamp set along with the coordinating die.
Cutting all those O’s also gave me lots of dots from the O centres, which I used to create another card! This sentiment is also from You Are Awesome, along with the Big Lingo Type Happy die.
Finally, I used the O stamps to create a similar pattern, and added colour by stamping the regular O inside the outline O. My sentiment was created with the regular THANKS letters!
Here’s a video showing how all these cards came together:
We will be having giveaways on our Instagram Account March 21-29, 2020.
One comment will be chosen at random from each of the Instagram posts during the blog blitz. Only one prize per person per giveaway. We use a random number generator to select winners from comments. You have until midnight US EST April 1 to leave a comment on each and every Instagram post that you want to enter. Winners will be announced on the Instagram posts on April 3. For a chance to win the Mod Alphabet Clear Stamp and Die set:
1.) Follow Birch Press Design on Instagram
2.) Double Tap (LIKE) the post with this giveaway
3.) Tag A Friend in the comments Good luck! And thanks for joining us!
Hello! Today I’m excited to share some bright, happy cards that are super easy and fun to make! I’ve used the brand new Vivid Bloom Stitched Layer Set to create a couple of different looks with the same basic design. The video below will show the techniques and how-to’s for these cards.
The Honeycomb Beveled Layer Plate made a great, subtle background that was tone-on-tone for just a little bit of dimension and interest. I also used crystals on each of the base petals. These petals are simply staggered to create a unique look.
These nested dies can be stacked on top of each other to reveal the layer below, but in this case I created frames by running two of the nested dies through the die cutting machine at the same time. This creates a frame that can be nested in one layer.
Different looks can be achieved with the same basic design just by using different color combinations and frame sizes. I used a scrap piece of a watercolor. Patterned paper also makes a beautiful center! I used the Cottage Meadow 6×6 paper pad from Memory Box for the middle card above.
Check out the video below for more info, and keep reading for giveaway info!
We will be having giveaways on our Instagram Account March 21-29, 2020. One comment will be chosen at random from each of the Instagram posts during the blog blitz. Only one prize per person per giveaway. We use a random number generator to select winners from comments. You have until midnight US EST April 1 to leave a comment on each and every Instagram post that you want to enter. Winners will be announced on the Instagram posts on April 3.
For a chance to win the Vivid Bloom Stitched Layer Set…..
1.) Follow Birch Press Design on Instagram 2.) Double Tap (LIKE) the post with this giveaway 3.) Tag A Friend in the comments Good luck! And thanks for joining us!
Hello crafty readers! Thank you for visiting during our exciting Blog Blitz celebration! All week long the Creative Team is inspiring you with their amazing designs, but also giving YOU a chance to win some of these fun NEW products!
This is Crystal here today sharing two vividly detailed cards using the new String Art Frame. Read all the way to the end of today’s post to see how you can win this die!
For this first A2 sized card, I used a base of Neenah Solar White Smooth 80 lb. cardstock. I created a background from alcohol inks in the colors of Raspberry, Salmon and Valencia. I die cut the new String Art frame from gold glitter cardstock and adhered it directly over the alcohol ink background.
Using the Lovely Butterflies stamp set, I stamped three of the smaller butterflies in similar ink colors (Raspberry, Salmon and Yellow). I die cut the butterflies and adhered them to the card using 3M foam adhesive for added dimension. I also added a couple gold rhinestones to the bodies of each butterfly for added sparkle.
Using the Garden Bloom stamp set, I stamped the “butterflies” sentiment in Raspberry ink on Neenah Solar White Smooth cardstock and the “remind us of how good change can be” in salmon ink just below it. I trimmed the sentiment strip to 4 1/4″ x 1 3/4″ to fit the card just below the butterflies.
I have created a video for you showing how I made each of today’s cards. I hope you will enjoy it seeing the step-by-step process.
For this second card, I used an alcohol ink background filled with blues and greens that resembled the ocean. When I die cut the String Art frame in silver, I realized it kind of looked like a fishing net! So, I went with it and created an “Ocean Fantasy” scene.
I stamped many of the images from the Ocean Fantasy stamp set in Versamark ink on a variety of blue and green colored cardstocks. I heat embossed the images with white embossing powder and then fussy cut each image (there is no coordinating die set). I adhered the images to the card with 3M foam adhesive for added dimension. I even added a coat of clear Wink of Stella to the images for even more sparkle!
We’ll be having giveaways on our Instagram account March 21-29, 2020. We’ll use a random number generator to select a winner from the comments on each of the Instagram posts during the blog blitz. Only one prize per person, per giveaway. You have until midnight US EST on April 1 to leave a comment on each and every Instagram post that you want to enter. Winners will be announced on the Instagram posts on April 3.
Hello, crafty friends, I’m so glad you’re here! Today I’m sharing two cards that feature the pretty Petal Triangles Layer die set, and sentiments from the You Are Awesome stamp set.
I started by creating two square ink-blended panels. Starting with Strathmore bristol smooth cardstock, I used foam blending tools to blend on Squeezed Lemonade, Wild Honey, and Picked Raspberry Distress Oxide inks. On one panel, I started with yellow in the middle and blended out to pink at the edges, and on the other panel, I started with pink in the middle and blended out to yellow.
Next, using white cardstock, I used the Petal Triangle Layer die set to die cut four full sets of layers (each set has three layers, A, B, and C) for my first card. I also cut four additional top layers (layer A) for my second card.
Using the same pink ink, I inked all of my middle layers (layer B). Then I stacked the four sets of layers and adhered them together.
I adhered these finished layered triangles to one of the backgrounds. To the other background I adhered the four top layers (layer A) for a less dimensional, simpler look.
Next I stamped sentiments from the You Are Awesome stamp set in black pigment ink onto white cardstock. I adhered each sentiment to a vellum layer and the use foam tape to adhere the sentiments to each card front.
To finish, I adhered each card front to an A2-sized card base.
We’ll be having giveaways on our Instagram account March 21-29, 2020. We’ll use a random number generator to select a winner from the comments on each of the Instagram posts during the blog blitz. Only one prize per person, per giveaway. You have until midnight US EST on April 1 to leave a comment on each and every Instagram post that you want to enter. Winners will be announced on the Instagram posts on April 3.
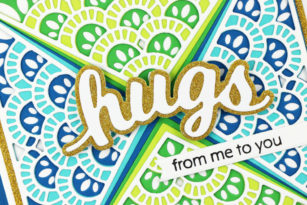
Hi Friends! I hope you’re having a great day! We’re celebrating our new Spring Release with lots of giveaways! My favorite item this release is the new Frilly Triangle Layer Set.
I love the intricate layered design that reminds me of peacock feathers.
My tip for getting these as tightly together as possible is to adhere them one layer at a time to your card base like I did here. Once your bottom layer is in place you can start stacking.
I chose light and dark shades of green and blue for lots of contrast. The top layer is white to repeat the pattern of the bottom layer.
I layered the assembled background on a panel of gold glitter paper, and repeated the gold on the background of the Hugs Honey Script sentiment.
We will be having giveaways on our Instagram Account March 21-29, 2020. One comment will be chosen at random from each of the Instagram posts during the blog blitz. Only one prize per person per giveaway. We use a random number generator to select winners from comments. You have until midnight US EST April 1 to leave a comment on each and every Instagram post that you want to enter. Winners will be announced on the Instagram posts on April 3.
For a chance to win the Frilly Triangle Layer Set…..
1.) Follow Birch Press Design on Instagram 2.) Double Tap (LIKE) the post with this giveaway 3.) Tag A Friend in the comments Good luck! And thanks for joining us!
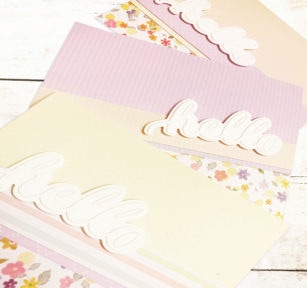
I don’t know about you, but I am ready for Spring! I am glad it is finally here. We are having some great sunbreaks and blooming flowers that been brightening my day.
Lovely lavender, light oranges, spring greens and pops of small bright flowers are so cheerful.
The sweet Hello Honey Script paired with the new paper packs from Memory Box are sure to being smiles. You can easily make a stack of cards with these lovely color combinations.
I have die cut the Hello Honey Script onto a heavy crisp white cardstock and left the negative “bits” inside the letters. I then adhered onto the background word outline layer and added foam mount tape for added dimension.
Lovely dotted and lined papers paired with strips of florals are such a sweet touch.
These cards make me smile. I sure hope that you are enjoying all your creations with the newest Birch Press, Memory Box, Poppy Stamps and Open Studio products.
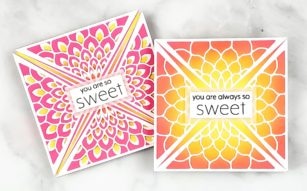
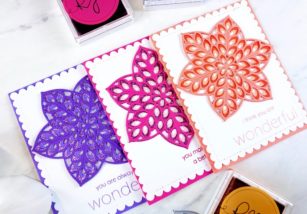
Hello crafty readers! This is Crystal here with you today sharing three cards featuring the beautiful new “Floral Star” Layering Dies. These dies, like all of the Birch Press Design products, are simply gorgeous and after initially making the purple card, I wanted to show you how these dies look in other colors too! This basic flower/star design would well for a variety of occasions.
I have created a video for you to watch and learn how these cards were made. Each A2 sized card was made in a similar monochromatic color tone. Each color was carried throughout the card both in the cardstock base and coordinating ink.
I hope you have enjoyed today’s cards. Thank you for visiting and have a wonderfully creative day!