Category: Hugs

  • Mixed Media Tag | by Rosemary Dennis

    Mixed Media Tag | by Rosemary Dennis

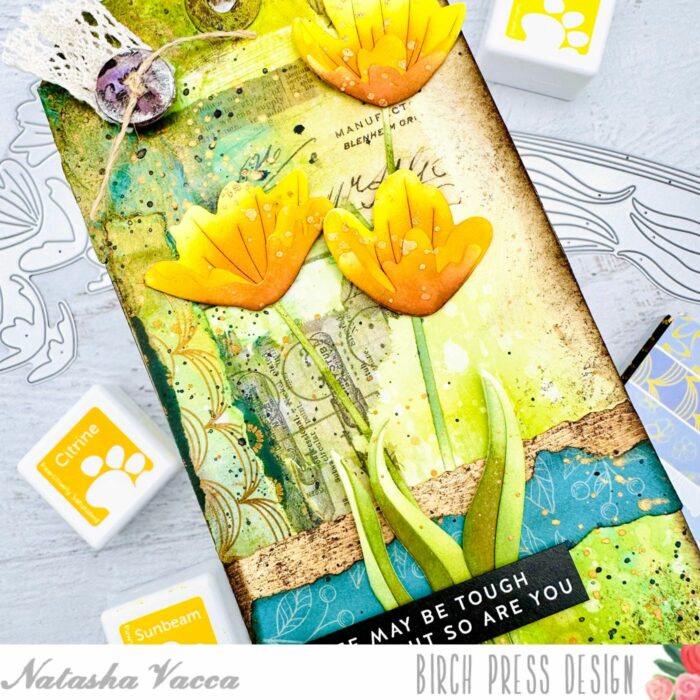
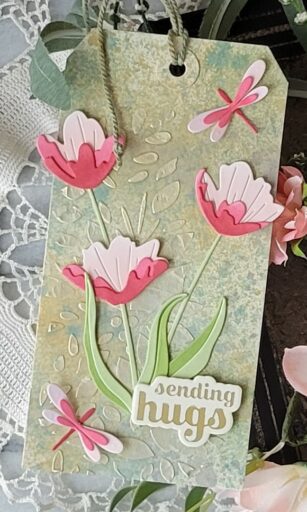
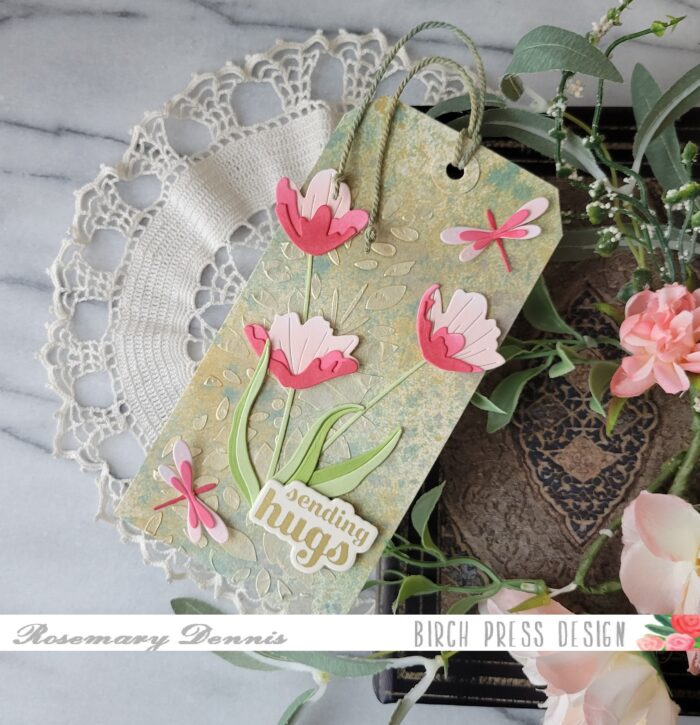
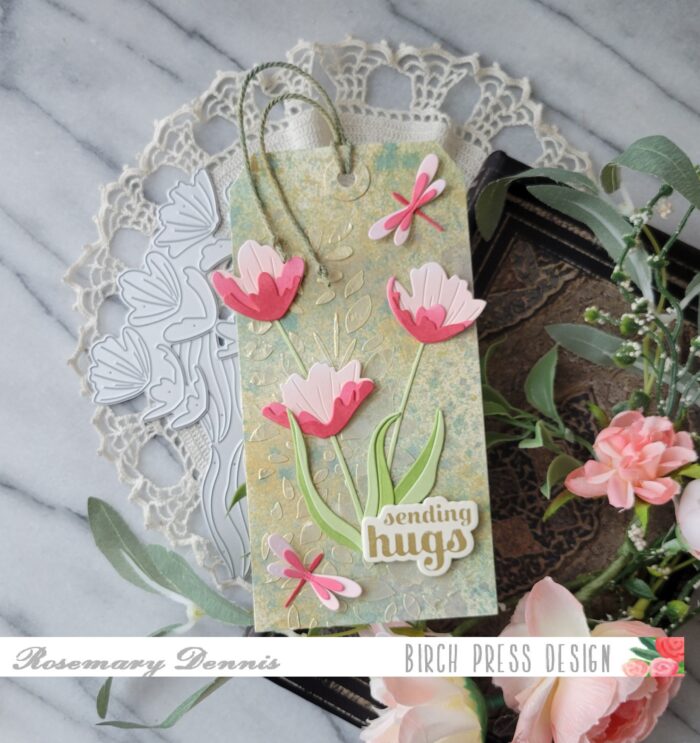
    Hello everyone! Rosemary here on the blog today. Hope everyone had a lovely Valentine’s day. I did as I got several things that I love! Today I’m sharing a tag that I created using several different techinques. I used the new Early Blossom Contour Layers dies, as well as the Simple Dragonfly Contour Layers dies and the layer A of the Herbarium layering die set. I had a lot of fun creating this tag!

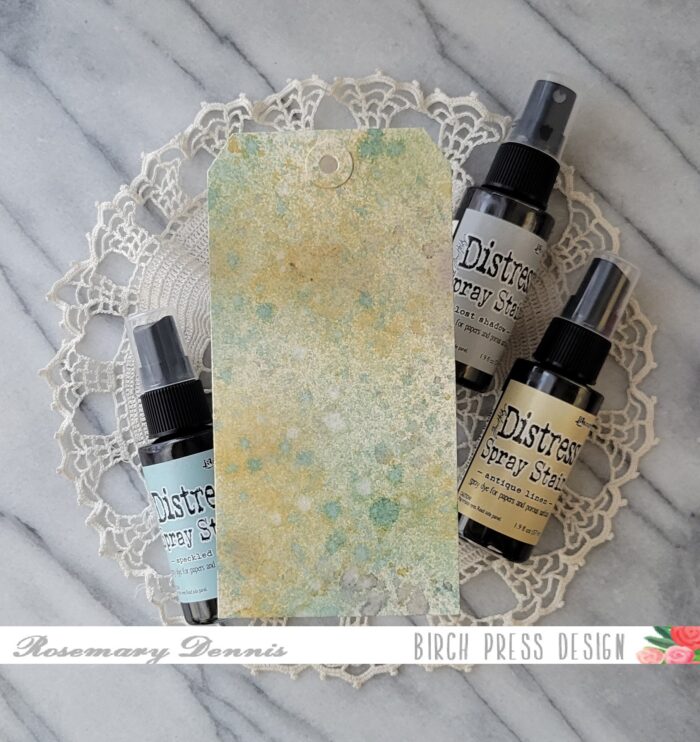
    I started off by spraying my premade cream colored tag with the spray stains that you see in the photo: Speckled Egg, Antique Linen and Lost Shadow. I sprayed on each stain individually and then spritzed the tag with a little bit of water. I didn’t want too much movement of the colors. I did dry the tag a bit with my heat tool in between each layer of color. Once I had the background to my liking I set it aside to fully dry.

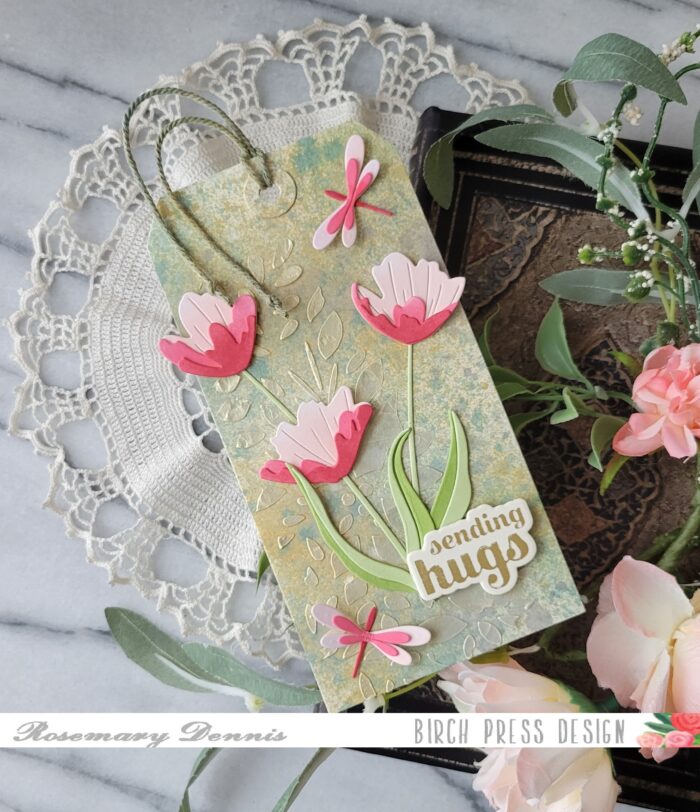
    As the tag dried I got to work on my flowers and dragonflies. I die cut them from white cardstock and used a grip mat to hold all the pieces in place while I blended on the inks in a color family that moves from the light pink to a more reddish color for the flowers and dragonflies. The leaves were inked in two shades of green. I used liquid glue to adhere all the pieces together. While they were drying I moved onto the next layer for the tag.

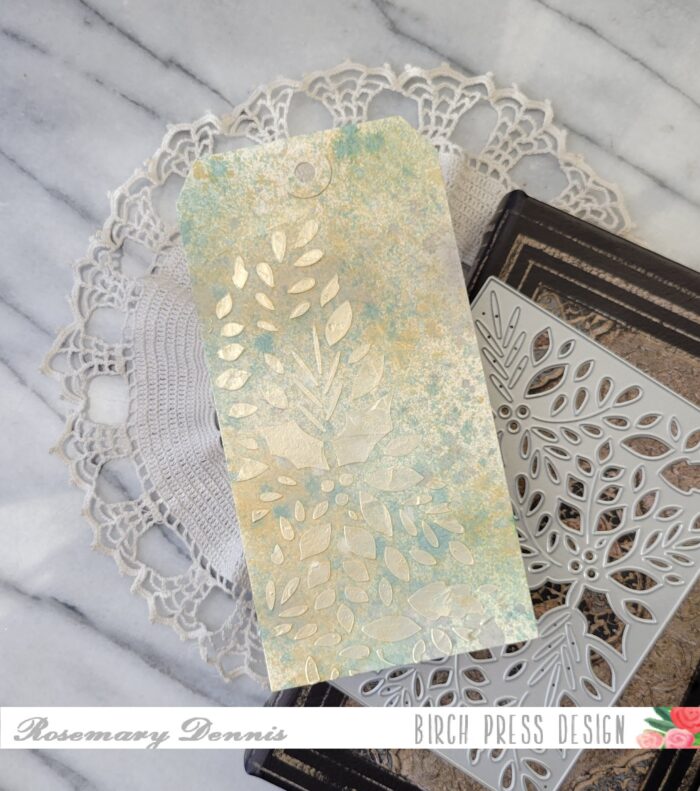
    I have a small jar of Solar Paste in the color Golden Hour and I thought it would look perfect with the background on the tag. I used the A plate from the Herbarium set to create a stencil and then added the embossing paste. I was right that the embossing paste would look nice with the background. I just love how it turned out. As the tag was drying I decided to custom color some chunky white twine I had using two of the spray stains. I used Speckled Egg and Antique Linen for the twine.

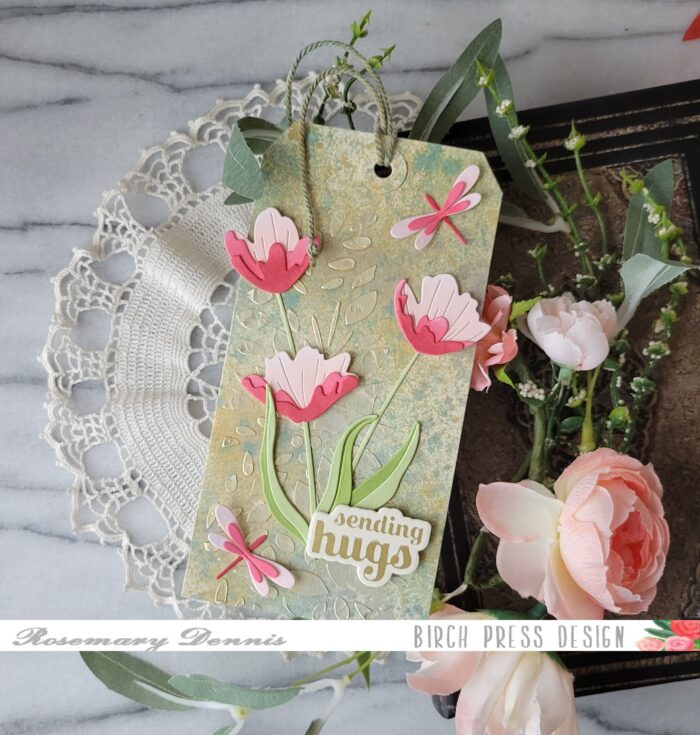
    Once the paste was dry I began adding all my elements to the tag. I must admit that I was a little worried that the pinks in the flowers wouldn’t play well with the background colors. But as I added the flowers to the tag I realized that the colors worked perfectly! I finished off the tag with the sentiment the Sugar Script Sentiments 1 set and the twine. I had previously hot foiled it on cream woodgrain cardstock and so it worked perfectly with the tag. The tag is large enough that in the future I can turn it into a card!

    I hope you enjoyed learning how I made my mixed media tag. Thank you for stopping by and have a wonderful day!

    Supplies

  • Forest Canopy Shaker | by Allison Frazier

    Forest Canopy Shaker | by Allison Frazier

    Hello, Birch Press friends. I am excited to be on the blog today sharing this fun shaker card. I have been wanting to make a shaker card with the Forest Canopy Layer Set for awhile. When I ran across this heart-shaped confetti in my stash recently, I knew that it was finally time!

    This shaker card was really quite easy to put together. I started by die cutting my back panel with the Pinpoint Contour Plate. I set that aside and proceeded to die cut my two Forest Canopy layers. I cut a piece of pink card stock with Layer B, and I cut a piece of red card stock with Layer C. I did not use Layer A.

    I cut a piece of acetate to 4.25″x5.5″ and glued that to the back of the red layer. I trimmed the pieces off of the branches on the pink layer that hold berries, since I did not want to include berries on this card. I then glued the pink layer on top of the red layer.

    I trimmed foam tape into thin strips so that I could hide them under the thin frame that is created by the Forest Canopy layers. The one piece of advice that I have for cutting your foam tape into thin strips is to have a good pair of scissors that have a non-stick coating. I placed these foam tape strips directly onto the acetate layer. I then put my heart shaped confetti into the “well” that is created by the foam tape. Since this confetti is completely flat, I did not need to double up my foam tape. Once my confetti was in, I peeled off the release tape and added my white back panel to seal up the shaker. I then glued this onto an A2 card base.

    I used the Hugs Honey Script die set for my main sentiment. I cut the detail layer from red glitter card stock. To finish the card, I added a simple sub-sentiment strip from my stash. That’s it for my card today. I hope it brings a smile to your face. Take a look in your stash for dies to make a non-traditional shaker! Thank you so much for joining us today.


    Supplies


  • Sending Hugs | Dilay Nacar

    Sending Hugs | Dilay Nacar

    Hello and Happy Valentine’s Day, friends! Dilay here with you today, sharing a clean and simple yet intricate ‘sending hugs’ card. This card showcases the beautiful Banner Heart Layer Set, Kinsley Heart Layer Set, and Rose Bunch Contour Layer dies!

    To begin, I created the background by die-cutting each piece of the Kinsley Heart Plate Layer Set (A, B, and C), adhering them together, and then onto a top-folding card base.

    Following that, I cut the Banner Heart Layer Set from various shades of pink cardstock and pink glitter cardstock, then adhered the heart on top of the Kinsley Heart Layers.

    Afterwards, I fashioned a single rose using the Rose Bunch Contour Layers in various pink and teal cardstock colors. I assembled the layers and placed the rose on top of the heart. To complete the look, I added a pink foiled sentiment from the Sugar Script Sentiments 1 Hot Foil Plate and Die Sets.


    Supplies


  • Early Blossom | By Natasha Vacca

    Early Blossom | By Natasha Vacca

    Hello Crafty Friends! I hope you had a great weekend! I am excited to be up on the blog today sharing a new release from Birch Press Designs with you – the beautiful Early Blossom Contour Layers die set! I love florals and these dies make it so easy to create with! So let’s get started!

    I started by die cutting the florals using Hammermill white card stock. I then ink blended each of the layers using a combination of dye inks. Once all the inking was complete, I adhered each of the layers together using liquid glue.

    Next I started to work on the background tag for my floral die cuts. I started with a pre-made tag then added papers and collage paper to the tag. I used the Anemone Grove Paper pad, as well as collage paper from my stash. I ripped pieces of paper for a distress look, then adhered them with collage medium. I allowed this to dry, then inked up the background using Distress Oxide Inks. I used: Antique Linen, Pumice Stone, Peacocks Feathers, Vintage Photo, Walnut Stain, and Mustard Seed. I layered these on, as well as splattered with water droplets for added texture.

    Next I added Translucent Crackle Paint to sections of the tag, allowed this to dry, then applied Distress Crayons over the top of the crackle paint. I also added some paper glaze to sections for added texture. I then added splatters to the tag using black and gold. I then adhered all the layers together using liquid glue and foam tape. The wood grain paper paper in the center of the tag is from Memory Box and it is in the color cream. I applied ink and sponging to the paper for added texture.

    I chose a pre-made sentiment from my stash and adhered this to my tag as well. I darkened the edges of the tag using Distress Ink in Ground Espresso using a blending tool, as well as additional texture using a sea sponge. The tag was completed with twine for the top, as well as lace and a button.

    I had a lot of fun putting this together! I encourage you to use your pattern paper in new ways to add texture to your card bases and backgrounds too! Thanks so much for stopping by today! I will be back soon!


    Supplies


    Supplies


  • Sending Love | By Natasha Vacca

    Sending Love | By Natasha Vacca

    Hello Birch Press friends, I am excited to be back up on the blog today sharing a fun and easy card using the Banner Heart Layering die set! So let’s get started!

    For today’s card I started with the Banner Heart Layering die set. I die cut layer A and C using white card stock. I then die cut layer B using the Festive Glitter paper pad. For the glitter layer I chose a dark blue shade from the paper pad. I then ink blended layer A and C using Distress Oxides. I used a combination of Distress Oxides: Saltwater Taffy, Picked Raspberry, Seedless Preserves, Shaded Lilac, and Villainous Potion. Once the layers were ink blended I set these aside to dry.

    Next on layer B, I wanted to add a bit more texture to the glitter paper pad. I used a combination of paper glaze, as well as embossing powder! I love the texture this provides. Once the other heart layers were completely dry, I added Gilded Foundry wax to sections of the heart. I then adhered all the heart layers together using liquid glue.

    Next I chose a gelli print from my background stash and dry embossed the background using the Ringadings embossing folder from Memory Box. I then applied white pigment ink to sections of the folder and ran it through one more time. I like this effect and the random texture this provides the dry embossed background. I allowed the ink to dry, then trimmed the panel using my paper trimmer for my card base.

    I completed my card by stamping a sentiment from the Contempo Greetings stamp and die set. I stamped the sentiment in purple, trimmed using the coordinating die, then applied foundry wax and ink on the edges as well. I then adhered the card panel, heart, and sentiment to my card base.

    Thank you so much for stopping by today! I will be back soon!


    Supplies


    Supplies


  • You’re in My Heart | by Crystal Komara

    You’re in My Heart | by Crystal Komara

    Hello crafty readers! This is Design Team member Crystal Komara here today and I’m excited to start making some Valentine’s Day cards. It seemed like this holiday season I had started Christmas cards back in October, so I’m really for a change! And who doesn’t love love themed cards?

    Card details:

    The base of this A2 sized card is made from 80 lb. Neenah Solar White smooth cardstock. I cut a 5 1/4″ x 4″ piece of magenta cardstock to use as the base layer, adhering it directly to the white card base. Using the Viola Layering Plates, I die cut Layer B from white cardstock. I layered this over the magenta pink cardstock, so the pink shows through the die cut layer.

    Next using the Banner Heart Layering dies, I die cut three hearts from dark pink, light pink and white cardstock. I only die cut Layer A from the Banner Heart dies and layered it onto a solid piece of the corresponding cardstock. I adhered the three hearts to the card using foam adhesive for added dimension.

    Lastly, I stamped the sentiment “you’re in my heart” in pink ink on a thin strip of white cardstock. I notched the left side of this sentiment strip before adhering it to the top right of the card using 3M foam adhesive. This sentiment is from the Lingo Thanks stamp set.

    I wish you all a season filled with love and happiness! Thanks for visiting and have a wonderfully creative day!

    Supplies

  • A Card and a Tag | by Rosemary Dennis

    A Card and a Tag | by Rosemary Dennis

    Hello friends! Hope everyone here in the United States had a wonderful Thanksgiving with family and friends! Christmas will soon be upon us and I am here for it. I love Christmas! As my blog title indicates, I am sharing a card and a tag. Let’s have a look.

    You can just see the tag tucked down in the right corner of this photo. When I originally started my card I wasn’t going to make a tag, but decided to create one with the center pieces that were left over when I die cut the Tranquility Layer dies for my wreath.

    I wanted a wreath to layer the Forest Leaf and Berries Contour Layers die cuts on, but thought it would be fun to use something other than one of the stem and berry die sets. I settled on the Tranquility set because the center piece is separate from the outer more wreath like piece. My color scheme came from the patterned paper that I pulled from the Memory Box Jolly Christmas 6×6 pad. I die cut the plaid piece with a rectangle die and adhered it to the card front. The wreath was die cut from burgundy, dark green and gold metallic cardstocks and adhered together with liquid glue. I used the dark green and the burgundy to die cut the leaves and berries for the little swag I added to the wreath. Some distress collage medium was added to parts of the leaves and berries and then I added distress rock candy glitter. Everything was set aside to dry.

    Initially I hadn’t intended to use the center pieces that resulted when I die cut the Tranquility layers, but decided I couldn’t let them go to waste. I created my little tag using a small arched rectangle die and cut the same plaid paper. I also die cut a piece of the burgundy cardstock with the same die and then adhered it to the back of the patterned paper one with liquid glue. A whole was die cut in the top to add the ribbon and gold twine. I used the Holiday Hugs Vintage die set to die cut the sentiment from the patterned paper and gold metallic cardstock. They were adhered together and attached to the tag along with the center medallion. I finished with a red fairy jewel to the center of the medallion and the dark green ribbon/twine combo.

    For the card I die cut the Merry Christmas Vintage die set from the patterned paper and gold metallic cardstock and layered them together with liquid glue. All the other pieces were dry so it was time to layer everything on the card front. Everything was adhered in place with liquid glue. Because of where I placed the sentiment I did have to use some small foam squares on the back of the sentiment so everything would be the same height. Before adding the sentiment I did create a bow from the gold twine and adhered that with a dot a glue.

    I hope you enjoyed today’s projects and that I gave you some inspiration to use your Birch Press Design Layering dies in a new or different way. Thanks for stopping by and have a wonderful day!

    Supplies

  • Pumpkin Hugs | by Toni M Maddox

    Pumpkin Hugs | by Toni M Maddox

    Hello, Birch Press fans! Toni here with you today with another fall-inspired card. Yay, fall!

    I used the Adornment Pumpkin dies as separate dies rather than using the outline die to create an impression. So clever to be have such a versatile die in the package, right?!

    I sponged the Memory Box Cream Woodgrain cardstock with Distress Oxide Salvaged Patina and Uncharted Mariner–love that “glow.”

    On top of that I added the Enchantment Plate Layer A in a stone cardstock that I distressed with a sand eraser.

    I love the softly colored Memory Box Vintage Pastel 6×6 Mirror cardstock I used for the pumpkin and sentiment. By the way, I added a bit of shading to the cardstock using my Copic airbrush with G17 and R32.

    I hope you enjoyed today’s card and have a great rest of your week!

    Supplies

  • hugs | by Rosemary Dennis

    hugs | by Rosemary Dennis

    Hello everyone! Rosemary here today sharing a card made with the pretty new Adornment Wreath die from the latest release.

    As I thought about what I wanted to make with products from the new release I started to wonder if I could use cardstock from the Vintage Pastel Mirror with alcohol inks. The cardstock does have a slick finish just like glossy cardstock or Yupo paper. So I decided to give it a try and it worked! I used a bluish-green piece of cardstock from the pad along with several green and one blue alcohol ink. I used my Tim Holtz puffer tool (I don’t know if that it what it is called, lol, but it works for me) to move the ink around until I had it to my liking. Once dry I die cut the solid wreath from that panel.

    As you can see I still have some left over to die cut smaller pieces from or maybe add more alcohol ink. There are two sheets of each color in the pad so I decided to use the second one to die cut the top layer from and adhered that with liquid adhesive.

    For the sentiment I used one of the circle sentiments from the Contempo Greetings stamp and die set. I stamped the sentiment on a corner of the panel I die cut the adornment layer from using watermark ink and then heat embossed in white. I used the circle die from the set to die cut the sentiment. As I have said before the Memory Box woodgrain cardstock is great for adding just a little bit of interest and texture to your background. I think the wreath looks lovely layered on top!

    One of the alcohol inks I used is a pearlescent one. I tried to capture some of the shine it creates with the above photo. Not sure if it worked or not! I used thin foam squares to pop up the wreath and then thicker foam squares doubled up on the circular sentiment. I added the panel to a white cardstock base and then finished with tiny clear Memory Box fairy drops.

    I hope you enjoyed today’s card. If you have some Memory Box mirror cardstock try out your alcohol inks on it. You just might like how things turn out! Thanks for stopping by and have a lovely day!

    Supplies

  • Vibrant Cosmos | by Allison Frazier

    Vibrant Cosmos | by Allison Frazier

    Hello, Birch Press friends. Today, I am sharing this vibrant card using the new Large Cosmos Contour Layers set. Since tomorrow is the 4th of July, I decided to use red, white and blue! I am also using the brand new Gracious Floral 3D embossing folder for the background.

    I started out by embossing an A2 sized panel of light blue card stock with the Gracious Floral Embossing Folder. After taking the card stock out of the folder, I ran my white pigment ink pad over the embossed edges of the floral design. I then took a couple shades of darker blue ink and blended the edges of my card panel. This creates a glow effect in the middle.

    There is one die that cuts the larger petals for the Cosmos. I cut that from two different shades of red card stock and used one petal from each shade. So, one of those bottom layers is slightly darker than the other. I cut the smaller petals from a lighter shade of red. For all the petals, I inked up the edges with some dark red ink, and even a little bit of black ink for the darker petals. I cut the smallest die from white card stock – that cuts the two small pieces in the center. I ink blended the edges of the white piece with some red ink, and I ink blended the very center yellow. After glueing all the pieces together, I splattered it with white acrylic paint. I then adhered it to my panel over the large embossed flower from the Gracious Floral design.

    I hot foiled my sentiment onto black card stock with white opaque foil. You can’t even tell that it’s foil – it just looks perfectly smooth. The sentiment comes from the Sugar Scripts Sentiment 1 Hot Foil Plate set. I finished my design by scattering my favorite embellishment – clear fairy drops.

    I hope this card puts a smile on your face. Happy (early) 4th of July to those who celebrate! Thank you so much for joining us today.

    Wishing you a crafty day,
    Allison


    Supplies


    Supplies