Category: Hugs

  • Butterfly Hugs | By Dilay Nacar

    Butterfly Hugs | By Dilay Nacar

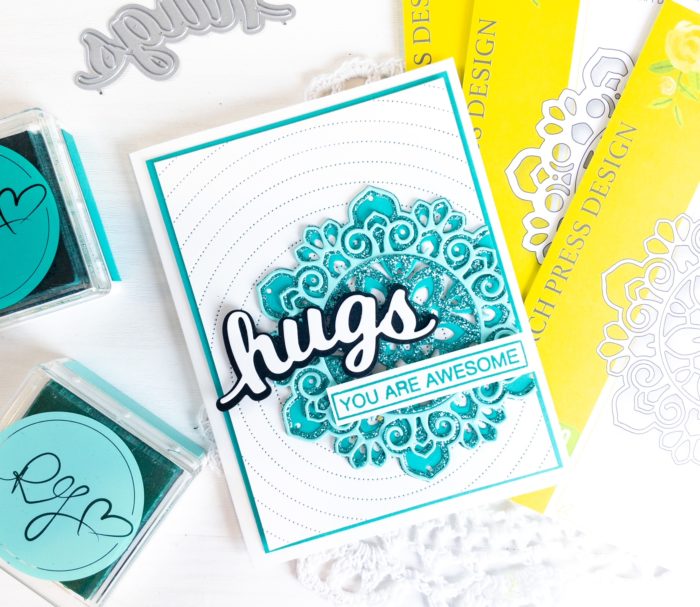
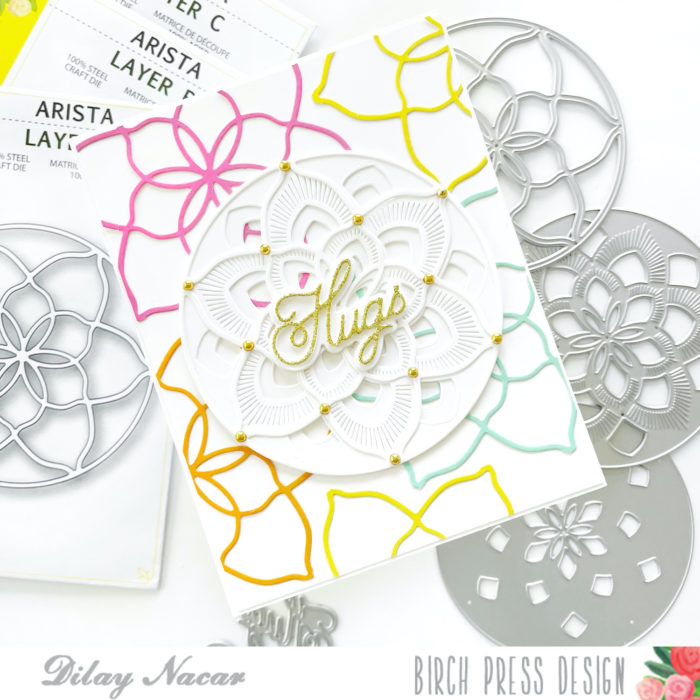
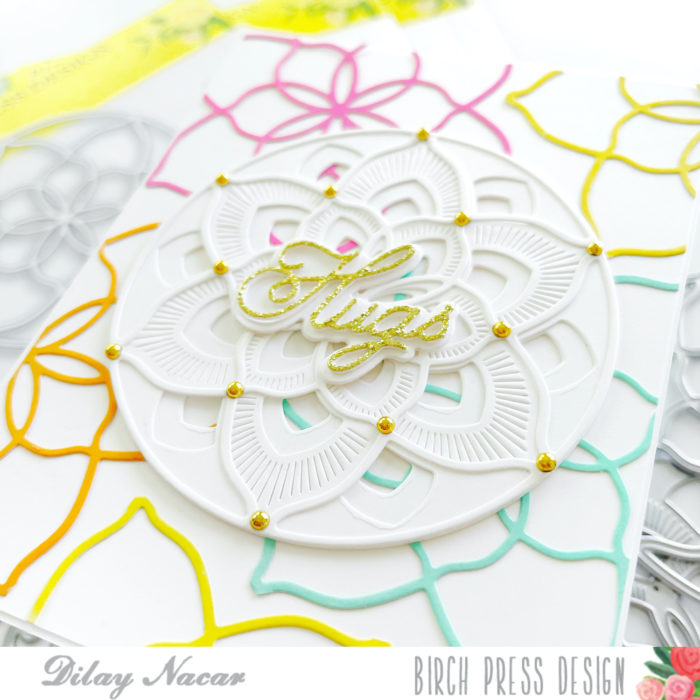
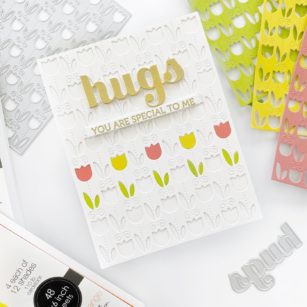
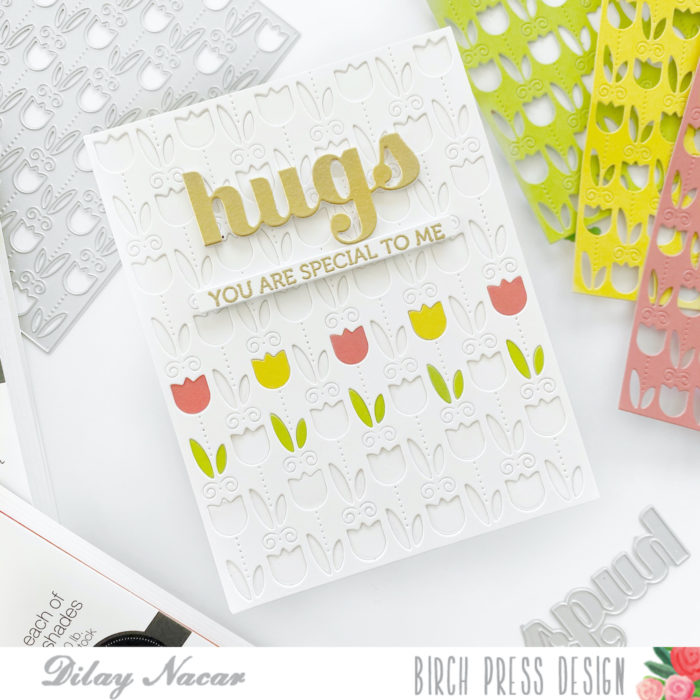
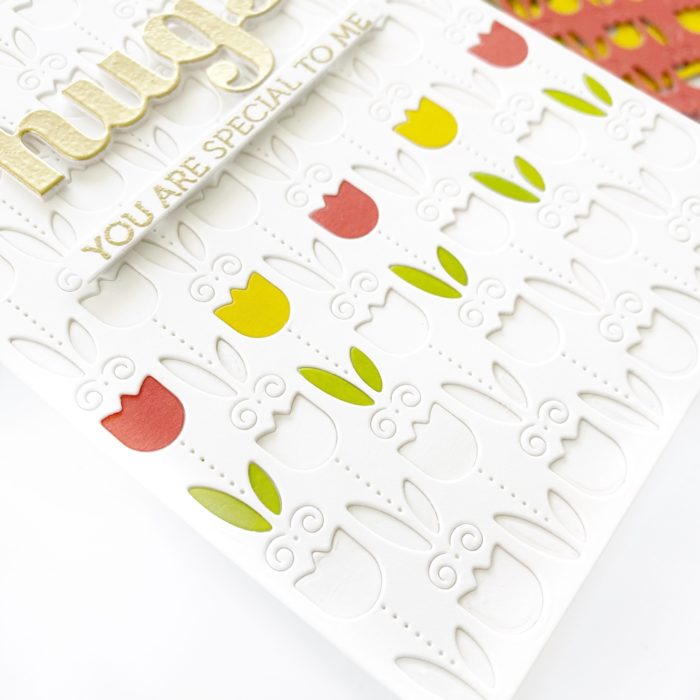
    Hi friends and welcome back! Dee here today sharing a card featuring the Viola and Eloquent layered dies that I combined with a simple ink blending combo for pops of color!

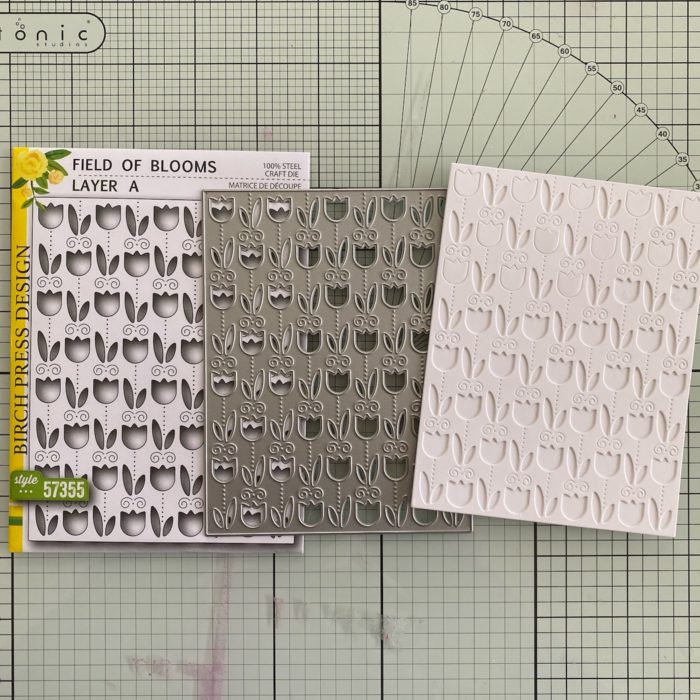
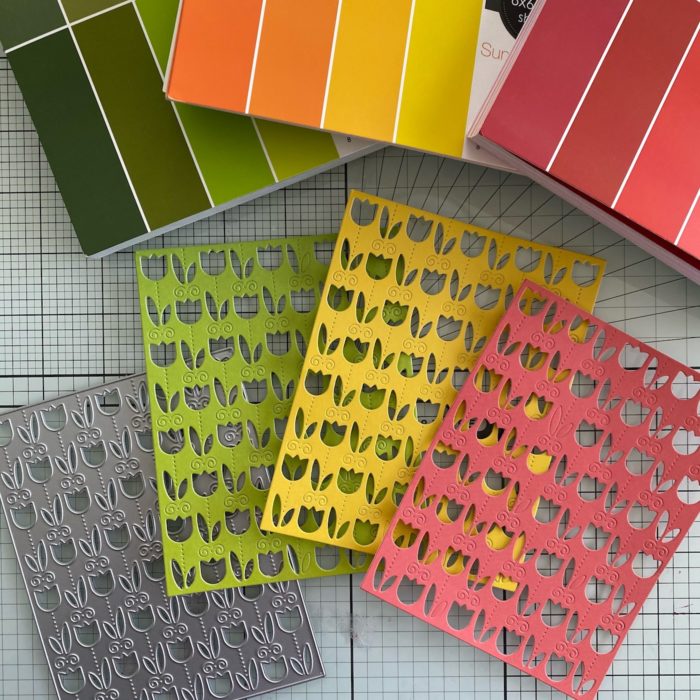
    To begin, I first cut the Viola Plate dies (layers a, b, and c) in white, then stacked and adhered them together. Next, I watered colored two A2-panels in yellow, To begin, I cut the Viola dies (layers a, b, and c) in white, then stacked and adhered them together.

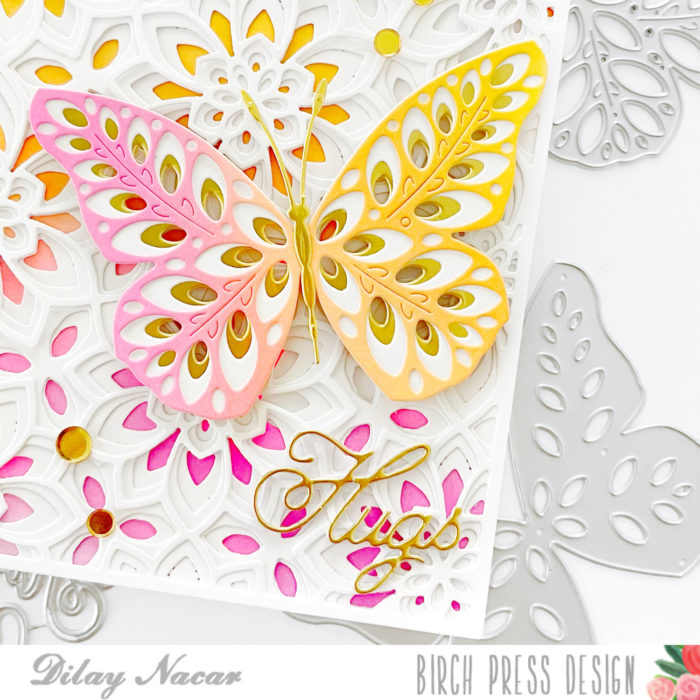
    Next, I watered-colored two A2-panels in yellow, orange, and pink, adhering one panel behind the Viola layers and die cutting the other panel with layer a of the Eloquent butterfly set. I then die cut layers b and c of the Eloquent set in gold and white, then adhered the three layers together.

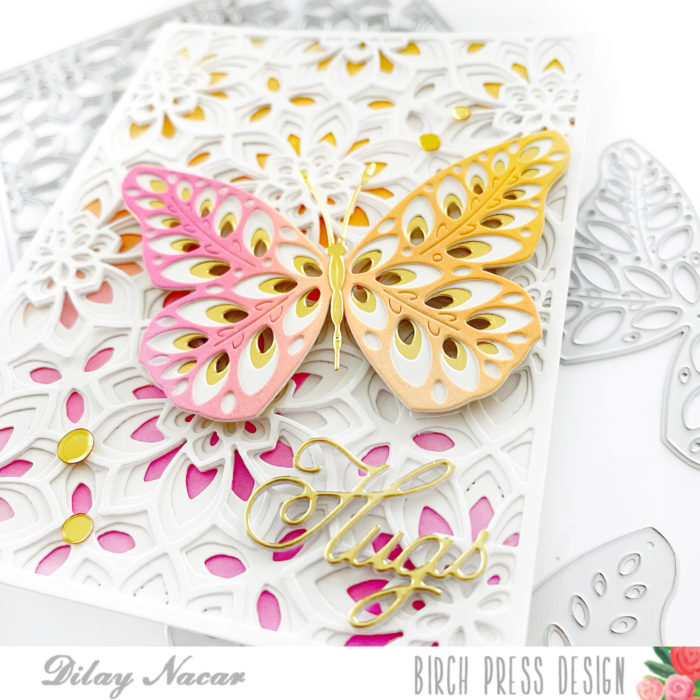
    I then die cut layer b and c of the Eloquent set in gold and white then adhered the three layers together. To finish the butterfly, I die cut the body of the butterfly from the Butterfly Basics set in gold and adhered it to the center. 

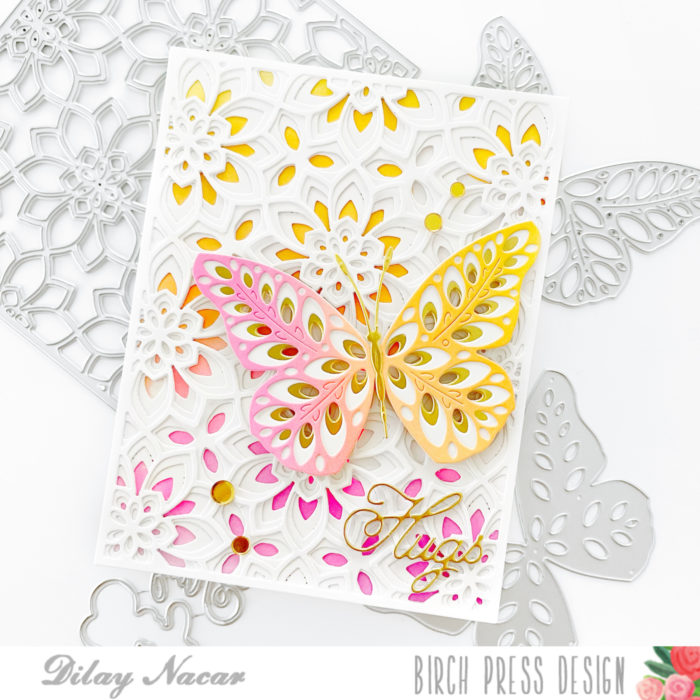
    Once the layers were complete, I adhered the butterfly to the front with foam adhesive. To finish, I die cut the sentiment from the Handwritten Hugs in gold, added gold embellishments, and mounted the panel onto an A2-sized card base. 

    Thanks so much for joining me today!

  • Sending Rainbow Wishes | By Amanda Wilcox

    Sending Rainbow Wishes | By Amanda Wilcox

    Happy Saturday everyone! It’s Amanda from Twiddler’s Nook popping in today. I hope your day is starting off splendidly! I have been itching to watercolor this gorgeous rainbow image since it released and I finally made it happen.

    To create my card today, I started by pulling my stamps out and playing around with images and sentiments. I found that the rainbow and clouds from Rainbow Days Lingo Notes worked fabulous with the extra large sentiments in the Happy Lingo set!

    I stamped and heat embossed the images on Bristol smooth cardstock with clear embossing powder. Then I watercolored them with Zig Clean Color Real Brush markers and a water brush pen.

    I used the coordinating dies to cut the images out and moved on to my background. For that I blended distress oxide ink in tumbled glass and mermaid lagoon on a white panel. I spritzed it with water and flicked some pearl watercolor on it.

    When I ink blend I tend to use a larger panel so I can choose how to cut it down. After everything was dry, I trimmed it down to A2 size and adhered it to a white card base.

    I added foam squares to the back of my rainbow and some clouds and adhered them to the background. Then I added the HUGS sentiment the same way. I adhered the clouds in the background with liquid glue next.

    At that point I thought there was something missing so I took a look at the sentiments in the Rainbow Days Lingo Notes and was so excited to see “sending rainbow wishes!” I stamped and heat embossed it on a strip of black cardstock and adhered it with a foam strip.

    I love adding general purpose cards to my stash and this one will be amazing for a huge variety of occasions, or just because, which is my very favorite to send!

    I appreciate you sharing your time with me. Have a fabulous day!

    Supplies

  • Tranquility | by Crystal Komara

    Tranquility | by Crystal Komara

    Hello friends and happy Monday! I hope you all had a pleasant weekend. This is Crystal Komara here with you today sharing a fun design featuring the Tranquility Layering Set.

    Card details:

    The base of this A2 sized card is made from 80 lb. Neenah Solar White Smooth cardstock. I cut a 5 1/4″ x 4″ piece of Bermuda Bay cardstock as the first mat. I used the Pinpoint Radial Plate to die cut a piece of white cardstock that I adhered directly to that Bermuda Bay cardstock. I die cut the three layers of the beautiful Tranquility Layering Set using the Fresh Aqua 6 x 6″ paper pack. The top layer, Layer A was die cut from a light blue-green color. Layer B, the middle layer, was cut from a turquoise piece of cardstock from the Twinkling Jewel Glitter Pad. Layer C, the bottom layer, was also cut from the Fresh Aqua paper pack.

    I adhered the three layers of the die together using Lineco Neutral ph bookbinding glue ,my go-to liquid adhesive. I adhered the three layers to the card using 3M foam adhesive for added dimension. I die cut the word “hugs” using the Hugs Honey Script dies. I die cut the bottom shadow layer from black cardstock and the top layer from white cardstock. I adhered both layers together before adhering them to the card. Lastly I stamped the sentiment “you are awesome” in Bermuda Bay ink from the Ticker Tape stamp set. I cut out the sentiment and adhered it just below the word “hugs.”

    I hope you have enjoyed today’s card. I simply love using the layering dies from Birch Press Design because they are so unique! Thank you for visiting and have a wonderfully creative day.

    XO, Crystal

  • Using Layering Dies for Dimension | By Renee Moran

    Using Layering Dies for Dimension | By Renee Moran

    Hi Everyone, It’s Renee’ from Delaney Jane Cards here with a Dimensional card using small layering dies.I wanted to create something that could feel a little Christmas but could be used any time of year. I also enjoyed the challenge of using these small dies to make an entire card. Sometimes it is about stretching your dies to make them really worth owning.

    I keep reaching for this small square layering die set called Honeycomb Mini Tile Layer Set. I often pull this out and then set it aside thinking, This can’t make that much impact on a card, can it? It can!

    I die cut the three pieces of this honeycomb mini tile layer set from white cardstock, four times. I layered those all together to create four individual layered tiles.

    I used the Happy Lingo Stamp and Die set to create the Hugs sentiment. I die cut it from white cardstock and stamped in some deep green ink. I chose to stay away from black in this card design because I felt it was a softer look.

    I also used the Classic Sentimental Wreath Stamp and Die set to create a wreath with the layer stamping stamps. And I cut the wreath out with the coordinating die. I stamped the sentiment from the same Classic Sentimental Wreath Stamp set in that deep green to finish my design.

    I added shine with some glitter cardstock from the Memory Box 6×6 Graceful Garden Glitter Pad and green and red jewels from the Open Studio Fairy Jewels Bright Jewels Pack.

    I’d love to know what you think of my design and of this super fun attempt at creating an entire card using a small die and layered die cuts. And if you have any ideas on creative ways to use the Honeycomb Mini Tile Layer Set. Please let me know in the comments below.

    Also, if you’d like to see how my card came together, you can click on the video below.

    Thank you so much for checking out my card today.

    As I always say,

    Give Cards Generously

    -Renee’

    Supplies

  • Arista Hugs | By Dilay Nacar

    Arista Hugs | By Dilay Nacar

    Hello again, friends! Dee here today sharing a simple to recreate, yet delicately detailed, card featuring the new Arista layering dies! 

    To begin, I die cut the Arista layers (A, B, and C) from white cardstock, then stacked and adhered them together. Next, I die cut layer A only in 4 different colors of cardstock and adhered each onto an A2-sized card base, trimming off the excess and using that to fill in any gaps/holes for a fuller background. 

    Next, I adhered the white Arista layers onto the center of the panel, and added gold bobbles for a bit of extra dimension and sparkle! To finish, I die cut the Handwritten Hugs in gold glitter and the outline in white cardstock, adhered them together then onto the center of the card using square foam adhesive. 

    Simple, right? If you’ve seen my cards, you already know that I love stretching my supplies and using dies to create my own backgrounds. The possibilities really are endless! Thank you so much for stopping by!

  • Monochromatic Torus Rings | by Crystal Komara

    Monochromatic Torus Rings | by Crystal Komara

    Hello friends and happy Monday! I hope you all had a wonderful weekend. This is Crystal Komara here with you today sharing two cards using the Torus Ring Die by Birch Press Design in monochromatic colors to create some cheerful greeting cards. I’ll admit that I didn’t love this geometric shaped die initially, but after creating these cards, I’m now giving it a second chance!

    For this first card, I used the Ocean Blues Paper Pack and Twinkling Jewel paper pack to create a monochromatic blue color palette.

    The base of this A2 sized card is made from 80 lb. Neenah Solar White Smooth cardstock. I die cut just Layer Plate A from the Viola Layering Plates out of white cardstock and adhered it directly to my card base using Lineco ph bookbinding glue, my go-to liquid adhesive.

    I die cue the Torus Ring outline from white cardstock. Using the second small die in the Torus Ring set, I die cut various pieces of blue paper that I adhered behind the white frame. I adhered the entire Torus Ring to the card with 3M foam adhesive for added dimension. For the sentiment I used the Big Hello Sugar Script die. This is a two-piece layering word die that creates a shadowlike effect. I die cut the large base layer from white cardstock and the top layer from blue cardstock. I adhered both layers together with liquid glue and then adhered the entire sentiment to the card using 3M foam adhesive.

    I added the word “hello friend” from the Ticker Tape stamp set. I stamped the sentiment in blue ink and fussy cut the block outline. I adhered this sentiment below the word “hello” with 3M foam adhesive.

    For the second card, I used all of the same steps as the first, but I changed my colors to a pink monochromatic look using the Berry Red Paper Pack and the Graceful Garden Glitter Pad.

    I die cut the Torus Ring outline from white cardstock. Using the second small die in the Torus Ring set, I die cut various pieces of pink paper that I adhered behind the white frame. I adhered the entire Torus Ring to the card with 3M foam adhesive for added dimension. For the sentiment I used the Big Hugs Sugar Script die. I die cut the large base layer from white cardstock and the top layer from pink cardstock. I adhered both layers together with liquid glue and then adhered the entire sentiment to the card using 3M foam adhesive.

    I added the word “thank you” from the Ticker Tape stamp set. I stamped the sentiment in pink ink and fussy cut the block outline. I adhered this sentiment below the word “hello” with 3M foam adhesive.

    I hope you have enjoyed today’s cards and hopefully I have inspired you to step outside of your comfort zone, because that’s when amazing things can happen! Thank you for visiting and have a wonderfully creative day!

    Supplies

  • Easter Egg Hugs | By Amanda Wilcox

    Easter Egg Hugs | By Amanda Wilcox

    Hello everyone! It’s Amanda from Twiddler’s Nook today and I have a trio of cards to share featuring the petal egg layering set and a few different backgrounds to pair it with.

    To start off today’s cards, I just pulled out a variety of cardstock colors – glitter and not – and started cutting the layers of the petal egg. It was so fun to mix and match, and just play, with all of them once they were cut out.

    After I decided on the layers that I wanted to use together, I ended up with three complete eggs and thought it would be fun to make three cards to share with you today.

    For my backgrounds, I used layer A and C of the Field of Blooms set. Then for my third card I pulled out the Memory Box spring plaid paper pad and chose one of the beautifully foiled pieces to use.

    I used liquid glue to adhere all of my egg layers together and decided I wanted the backs to be solid so the background panels didn’t show through. Since there isn’t a solid egg shape I traced one of the dies three times and cut inside the tracing line and glued it to the back of my layers. If anything hung over, I just used my scissors to trim off the excess. Super easy and forgiving if you don’t fussy cut well.

    I used liquid glue to adhere the Field of Blooms backgrounds to white card bases and then used foam tape to add the plaid paper, which I had trimmed down to 4×5.25 inches. Then for my sentiment, I went with the hugs honey script dies. I cut the shadow from vellum and then the words from the same paper as the bottom layer of the egg it was coordinating with.

    I adhered the sentiments with liquid glue and the popped the eggs up on each background with foam tape. For finishing touches I added baubles to each one. This first one has gold to play off the gold foiling in the patterned paper.

    Then I used silver baubles for this one because I thought the bright colors worked well with the bright silver.

    And for this final card, I chose pearls because it’s got a bit softer colors and I just loved how they worked with the pink glitter paper on the top layer of the egg.

    I appreciate you sharing your time with me. Have a fabulous day!

    Supplies

  • You Are Special To Me | Dilay Nacar

    You Are Special To Me | Dilay Nacar

    Welcome back, friends!

    Today I am excited to be sharing a sweet and simple card with all of you that features the new Field of Blooms layering die set! This layering die set is perfect for the upcoming season! In today’s card, I’ve used it a bit differently because I love finding unconventional ways to use things – not to mention how much I love sharing ways to stretch your supplies! Let’s get started! 

    Although this layering set consists of 3 plates, I only used Layer A to create this card! I began by die cutting it once in heavyweight white cardstock and once each in green, coral, and yellow cardstock – making sure to keep all of the negative pieces to use for the inlay – then adhered the white layer onto a white A2-sized card base.

    Next, I added a row of colored tulips, using liquid adhesive to inlay the green negative pieces for the leaves and the yellow and coral negative pieces for the tulips. Since I love a clean, white background, I chose to make a single row of tulips but if you wish to add more tulips to the panel, I’d recommend using a low tack tape such as PostIt or PressNSeel to keep all of the negative pieces together. 

    For the sentiment, I die cut the Big Hugs Sugar Script die three times in white cardstock, heat embossed one of them in gold, then stacked all three together, adhering it to the panel with liquid glue. For the sub-sentiment, I heat embossed the ‘You are special to me’ stamp from the Crystal Lingo clear stamp set and adhered it to the panel with foam squares. 

    That’s it! Simple right? This is just one of the ways to use this great layering die set, and the best part is that you have plenty of die cuts leftover that you can use to add some color to other cards! Thank you so much for stopping by! Until next time!

  • Any Time Layered Hearts

    Any Time Layered Hearts

    Hi there, it’s Tracey here today with a couple square cards using the Layered Hearts dies. These began as cards for Valentines, but time got away from me. So they were finished after the 14th as cards that you can send any time of the year. Both of today’s cards are 4 1/4″ x 4 1/4″ square and although the cards are different, they both use the same process.

    The Kinsley Heart and the Petal Heart layer sets are beautiful whether you use all three layers together or just the top for a delicate look! I love this die set because even with all three layers you can still see the amazing stitched lines on the bottom layer!

    To make the pink heart using all three layers of the Kinsley Heart layers dies. I began by blending a panel with Distress Oxide Inks–Spun Sugar, Picked Raspberry and Seedless Preserves. This will be the background for the layered heart and the bottom layer of the letter dies. It was cut with the largest heart in the Perfect Hearts die set. The layers of the Kinsley heart were cut from white cardstock and glued together. The ‘xoxo’ was cut using the Mod Alphabet die set. The bottom layer from the ink blended panel and the top from white cardstock.

    Before attaching the layered heart and ‘xoxo’ to the card base it was spritzed with Distress Oxide Spray in Picked Raspberry. I sponged a bit a pink ink on the centre of the heart for interest.

    The green card used the Petal Layers die set, but only Layer A for a more delicate design.

    Just like with the pink card I blended a panel with Distress Oxide Inks, this time I used Tumble Glass, Cracked Pistachio and Peacock Feathers. I used the panel once again for the layered heart and the bottom layer of the letter dies. Layer A of the Petal Heart layer set was cut from white cardstock. The ‘xoxo’ was cut using the Mod Alphabet die set. The bottom layer from the ink blended panel and the top from white cardstock.

    This time before attaching the heart and ‘xoxo’ to the card base it was spritzed with Cracked Pistachio and Peacock Feathers Distress Oxide Spray.

    So quick and so fun to use similar supplies and the same basic techniques to make two cards to you can use to Share Handmade Kindness!

    Thank you so much for stopping in to craft with me, see you next time.

    Supplies

  • Black & White Valentine’s Day Cards | by Crystal Komara

    Black & White Valentine’s Day Cards | by Crystal Komara

    Hello readers and happy Monday! This is Crystal here with you today. I hope you all found a little time to do something crafty over the weekend. Today I am sharing two simple and classic black and white themed Valentine’s Day cards using Layer A of the beautiful Kinsley Heart Layering Plates.

    Both of these cards were created the same way, I just alternated the background colors, so they look slightly different. Here is the first card I created:

    And here is the second card I created using the same products, just alternating the background cardstock layers:

    Here is a step-by-step breakdown of how I created these cards:

    Step 1: Die cut the Kinsley Heart Layering Plate A once in black cardstock and once in white cardstock.

    Step 2: Layer the white die cut Kinsley Heart background over a piece of black A2 sized cardstock.

    Step 3: Layer the black die cut Kinsley Heart background over a piece of white A2 sized cardstock.

    Step 4: Cut out two large hearts from red glitter cardstock.

    Step 5: Cut out the sentiments using the Big Hugs Sugar Script dies and the Handwritten Love You Outline dies from black cardstock and white cardstock. Adhere the two layers of the word dies together with a thin liquid adhesive.

    Pop up the large red glitter hearts using 3M foam adhesive for added dimension and then add your sentiments and you have two classic and elegant Valentine’s Day cards!

    Thanks for visiting and have a wonderfully creative day!

    Supplies