Category: Layered Background Die

  • Friend, You Are Awesome | By Amanda Wilcox

    Friend, You Are Awesome | By Amanda Wilcox

    Thanks for stopping by today. This is Amanda from Twiddler’s Nook visiting with this fun card and a new way to look at some of your full cover plate dies.

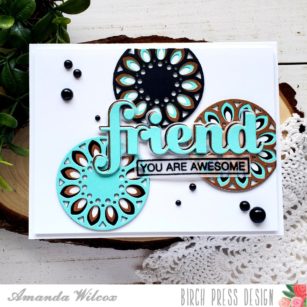
    I started with all 3 Grace cover plates and a stack of 2 1/4 inch square pieces of cardstock in teal, gold and black. I used them to die cut just the center circle from each layer. I cut each layer out of each color one time. This gives me 3 completed circles.

    I arranged the completed circles on my card front and used the sugar script big friends die to help my decide on placement.

    I die cut the shadow from vellum and the word friend from each of the 3 colors I used on the circles.

    I glued the black word to the vellum and then followed it by the gold shifted just a bit and finally the teal on top shifted just a bit more so you can see all of the colors. I love this look! I also stamped and heat embossed a sentiment from Awesome Ticker Tape Messages and cut it out. I ran this strip through my Xyron sticker maker. Coating the back of vellum with adhesive makes so the adhesive doesn’t show because it’s all the same.

    I adhered everything to a white panel that measured 4×5.25 and added some black flat-back baubles for a little extra interest. I trimmed anything hanging off the side and popped the panel up with foam tape on a white card base.

    This fabulous card is all finished. I hope you enjoyed it and found some inspiration to look at your dies a little differently and create something beautiful.

    I appreciate you sharing your time with me. Have a fabulous day.

    Supplies

  • Birch Press Designs Stitched Dahlia Heart Cards | By Leigh Houston

    Birch Press Designs Stitched Dahlia Heart Cards | By Leigh Houston

    Hello, crafty friends! I am so happy to be here today sharing two stitched cards I created with Birch Press Designs’s Dahlia Heart die. I had so much fun making these cards!

    I created these cards using Dahlia Heart Layer A. I started my first card by die cutting the heart with a scrap piece of cardstock. I then used this scrap piece as a stencil, coloring in the segments with alcohol markers. I then cut a fresh piece of the heart shape with clean cardstock and affixed it over the colored base with strong liquid adhesive. After the glue dried, it was time to stitch! I poked holes along the inner edges of each segment then used a simple backstitch in coordinating thread.

    After the stitching was complete, I trimmed around the perimeter of the heart. I affixed it to a cardstock base I made with Birch Press’s Amour Layer A die. I die cut my sentiment from gold foil cardstock using Birch Press’s Hugs Sugar Script die.

    My second card takes the stitching to another level. I started my card in the exact same way as the first, coloring in the segments using the stencil then affixing a clean heart over top. I then filled in the flower segments using a brick stitch. This stitch is another simple backstitch in rows, with each row staggered. This was the perfect project for a night of watching bad TV! LOL To finish this card, I embossed a white cardstock base using Birch Press’s Ring Tile Stencil and added a stitched coral cardstock strip behind the heart. The gold Sugar Script Smile sentiment finished the card off perfectly!

    I hope you enjoyed these projects as much as I loved making them! Links to the products I used are below. I’ll see you soon with more card projects!


    Supplies


  • Enchantment by Jeanne Jachna

    Enchantment by Jeanne Jachna

    Hi friends! I hope you’re all safe and well! Now more than ever I’m turning to crafting for a sweet escape and a way to deal with stress.

    Today I’m sharing a card made with the beautiful new Enchantment layered die set. The set includes three full size (A2 4.25 x 5.5″) cover plates with lots of versatility.

    Not only can you mix and match the three layers , you can also switch out the colors of the half circles on the left margin of the die. I cut the die from shades of red, yellow and orange and layered them over a glittery panel of card stock from the Memory Box Pastel Glitter Pad. TIP: When layering dies always complete the entire bottom layer first, then the entire middle layer etc. This allows you to fit the die cuts tightly together with no gaps.

    I die the the Thanks Honey Script word die from three shades of blue. I chose a contrasting color so the word die would contrast with the background.

    This die set has so much potential – imagine all the different shades and colors you can assemble the layers in!

    Finished Size 4.25 x 5.5″

    Supplies