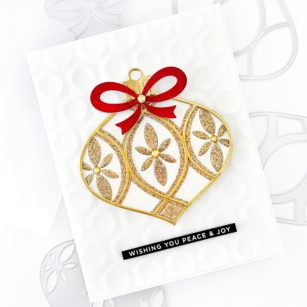
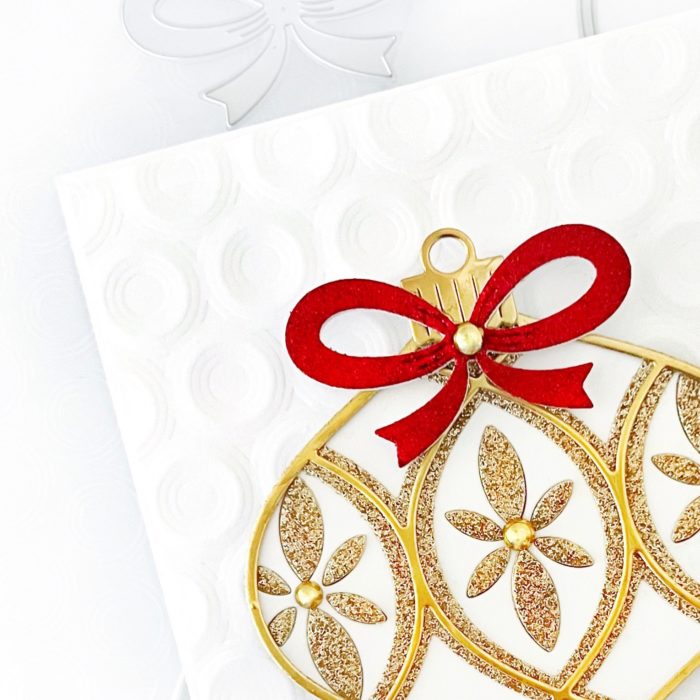
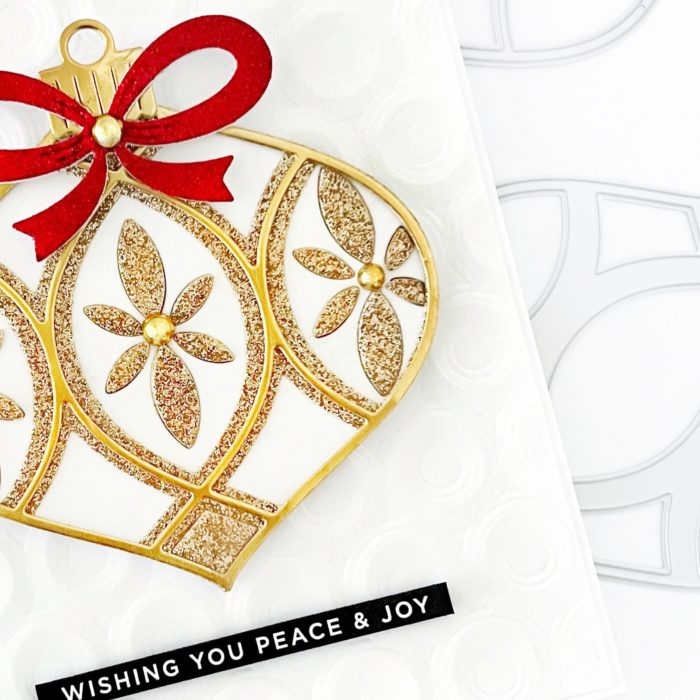
Hello and welcome back, crafty friends! Dee here today, sharing this clean and simple card featuring the gorgeous Meridian Ornament Layer Set!
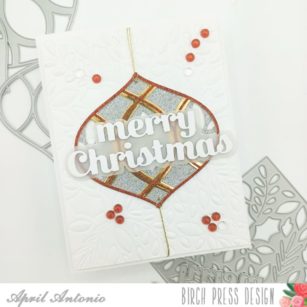
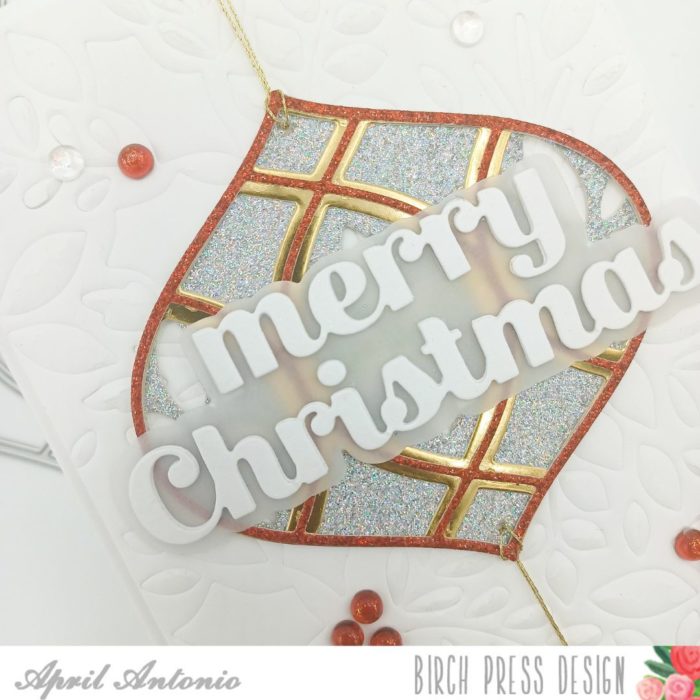
To create the base, I embossed an A2-sized white panel using the Memory Box Ringadings embossing folder, then adhered it onto the top folding card base.
Next, I cut the Meridian Ornament Layer dies in white, mirror gold, and gold glitter cardstock. Once complete, I adhered the layers together and then onto the center of the background. I cut the bow and ornament cap from the Christmas Ornament Pop-Up Easel set, then adhered them onto the ornament. To finish, I added a few gold embellishments and a simple sentiment strip from my stash!
Hello Birch Press friends! I am excited to be back on the blog today sharing a couple holiday tags using the beautiful Piped Icing Star dies! These are so beautiful and I couldn’t wait to make some holiday tags! So let’s get started!
I started by die cutting 2 of the background star dies from the Piped Icing Star die set. I die cut 2 stars using the Memory Box Earth Neutral Collection. I chose a deep brown card stock from the collection. I added a bit of distress oxide ink to each star for added texture and dimension. Next I added some embossing glaze to various spots on the star, then added a bit of ink blending for added texture and a few metallic splatters. I set these aside to dry.
Next I die cut piped icing for each star. I die cut the icing 6 times from a kraft color card stock from the Earth Neutral Collection. Once die cut I adhered them together using liquid glue. Next I embossed the piped icing using an Antique Gold Powder. I applied embossing ink to each star and then heat set the powder.
Next I adhered the piped icing star to the brown star die cut with liquid glue. I then looked in my stash for a pre-made background to add behind the star. I then die cut the star using the selected background. Then I added a bit of distress ink to the star backgrounds.
To complete my tags I tied them together with twine! I then chose a couple of pre-made sentiments to complete the tags!
I had a lot of fun making these sweet tags! The Piped Icing Star dies have a fun rustic feel! I can’t wait to add these to some holiday gifts this season!
I will be back soon! Thanks so much for stopping by today!
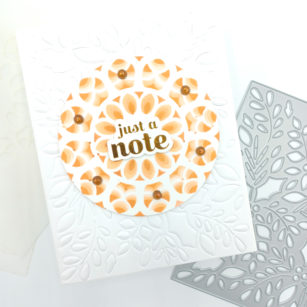
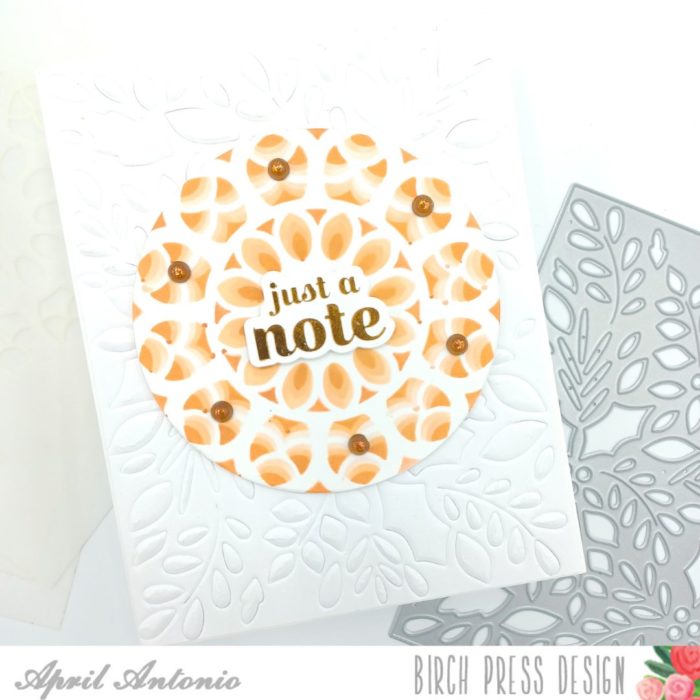
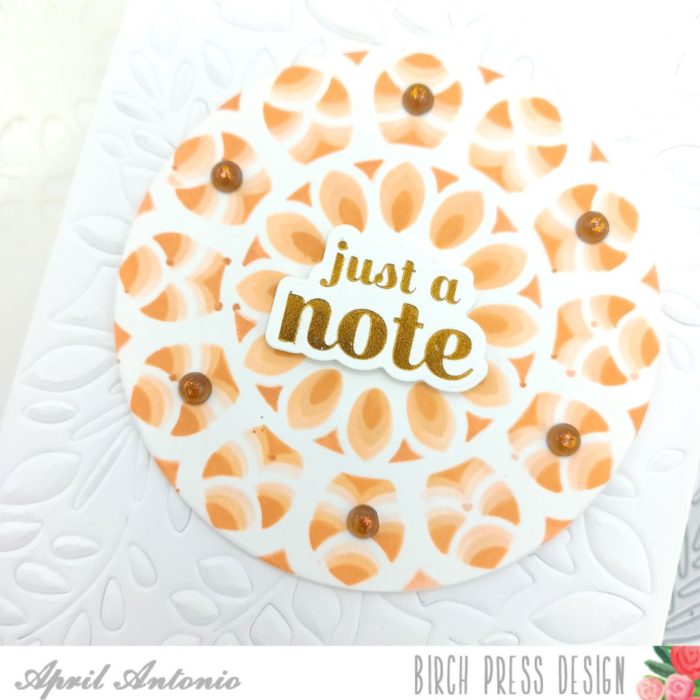
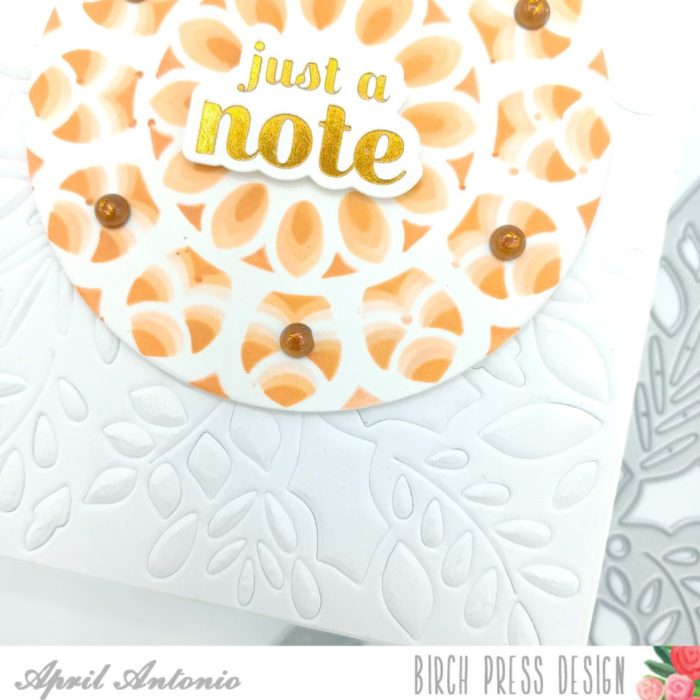
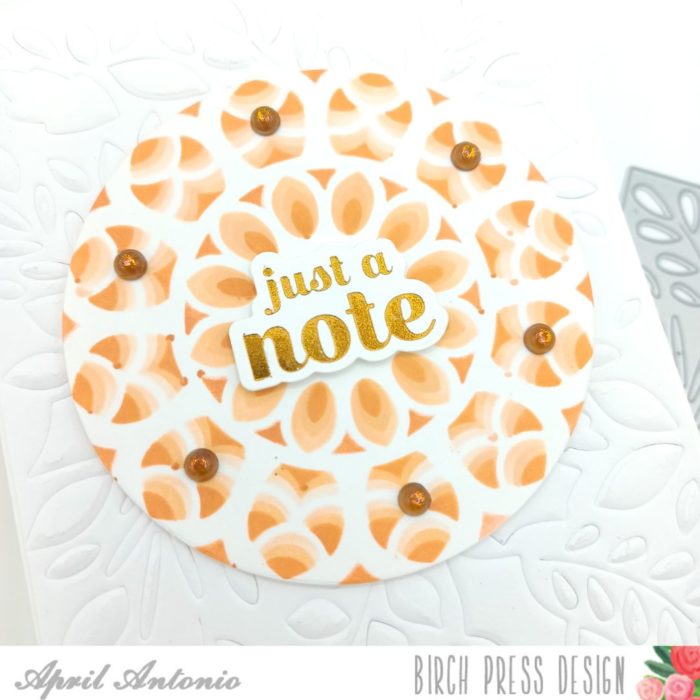
Happy Thursday! Today I am sharing a project using the beautiful, Gilded Grace Inside stencil set using some beautiful warm, Fall colors. I’ve been on a stenciling kick lately and am really excited about this stencil set.
To start this card I used the Herbarium Plate Layer A die with an embossing mat to dry emboss it onto the a piece of A2 white cardstock.
Next, I took a piece of white cardstock along with a stencil mat (I like the Waffle Flower one) and put the most open, top stencil layer from the Gilded Grace Inside Stencil set and secured the edges with tape. I used my lightest color ink to fill in the stencil with my blending brushes.
Next, I took the middle stencil and used my medium ink, and then used my darkest ink with the last stencil (the one that is the least open).
I then used a larger stencil die and cut out the stenciled circle.
I am also fairly new hot foiling and am loving it! I used the Hot Foil Sugar Script Sentiments 1 and hot foil the ‘just a note’ sentiment with gold foil on white cardstock.
I adhered the stenciled circle to my embossed card front, and the sentiment on top of that.
If you have not tried some of the Fairy Crystals I would highly recommend using them! I used some sparkle brown crystals from the Autumn Fairy Crystals set at set places around the circle.
That is it! I hope this project has inspired you to go and have fun creating!
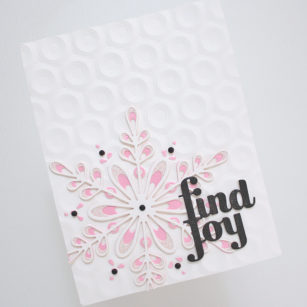
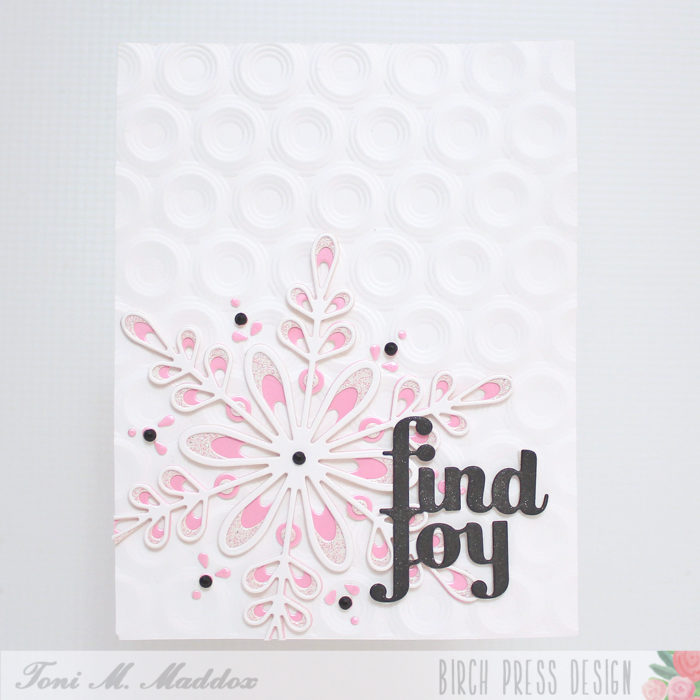
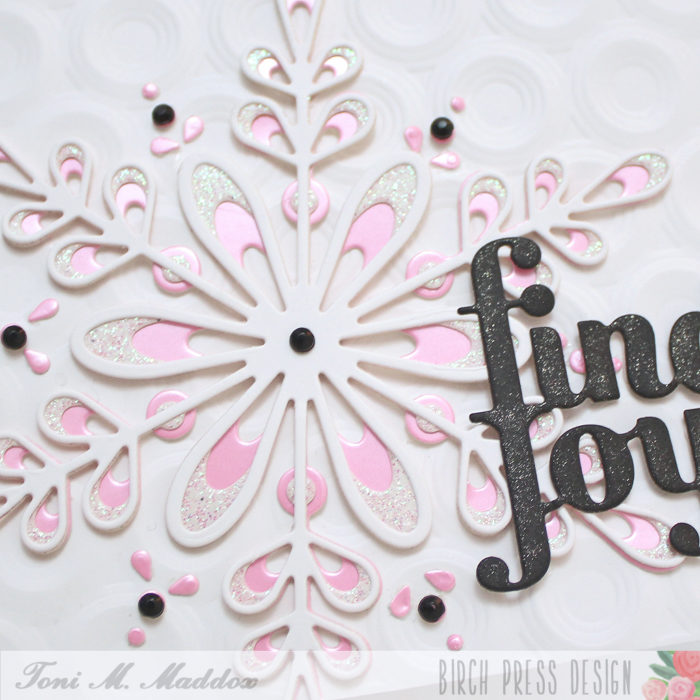
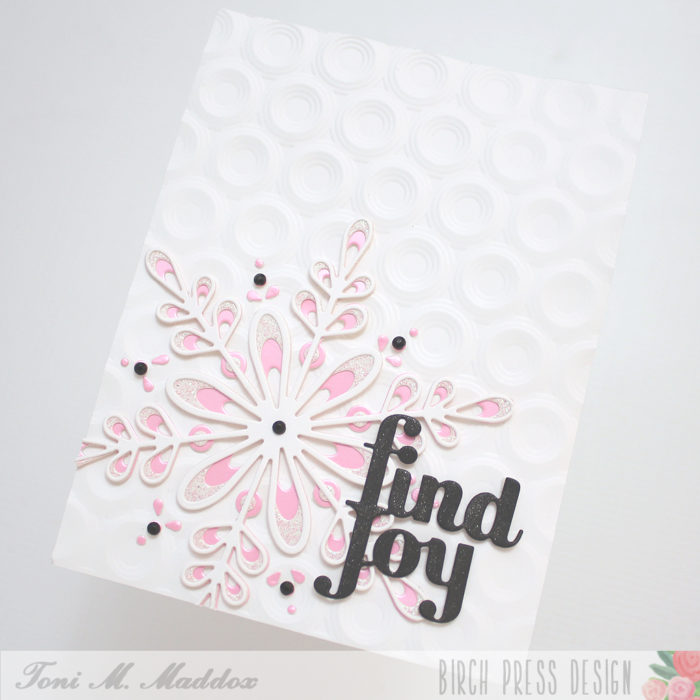
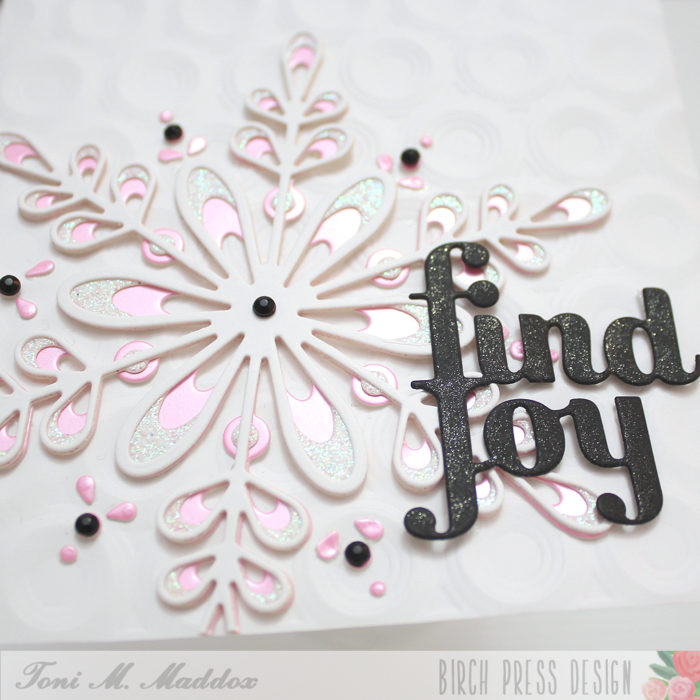
Hello, Birch Press fans! Toni here with you today sharing a (relatively) clean and simple holiday/winter card in pink and black. I love that color combination, don’t you?
I cut out the BPD Crochet Snowflake using the Memory Box Delicate Pastel Glitter and Vintage Pastel Mirror Pads along with white cardstock.
I adhered that to the card front which I had embossed using the Memory Box Open Studio Ringadings 5 3D Embossing Folder.
To finish the card, I added a few Memory Box Open Studio Autumn Jewels and the BPD Find Joy that I coated in clear Wink of Stella.
It would be really easy to mass produce this design, changing out the colors, for a series of unique cards.
I hope you enjoyed today’s card and have a great rest of your week!
Today we’re having an Instagram hop featuring the wonderful products of @wowembossing and @birchpressdesign You’re going to love how well they work together! Designs from the Birch Press Design team will be detailed on the blog throughout the month of October so you can get a closer look.
Designers from both teams have come together to share a whole bunch of inspiration, using products from both companies.
To celebrate this fun collaboration both companies will be giving away a gift voucher for their stores!
WOW! will be offering a £/$15 voucher for either their US or UK sites and Birch Press Design will be giving a $15 voucher to their store! We don’t want you to miss out so head on over to instagram for a chance to win.
Here’s a complete list of all the designers with projects to share today!
Hello Birch Press friends! I am excited to be back today to share a birthday card using the beautiful Prime Peony Duo Contour Layers dies! I had a lot of fun and enjoyed using fall colors for my card today! So let’s get started!
For today’s card I started with the Prime Peony Duo layers dies and the Sunny Orange paper pad collection from Memory Box. I chose 3 shades of orange from the pad (dark, medium, and lighter shade). Prior to die cutting I added some distress oxide ink in similar shades to add a bit more contrast to my paper. I added water droplets to the paper for added texture as well. I die cut the larger peony, as well as the smaller peony from each color. This allowed me to create 6 Peony flowers in total. Once the floral images were die cut, I worked to arrange each flower. Using 3 different shades of card stock allowed me to create contrast within each floral bud.
Next I adhered the floral die cuts together using liquid glue. To add a bit more interest and depth to the flowers I used dye inks with a sponge dauber to add more texture and depth to each flower.
Next I die cut the stem and leaf for each flower using the Lush Green paper pad collection from Memory Box. On the stem I also added some ink blending using oxide ink, as well as dye inks for more depth. I then adhered the leaf die cuts together using liquid glue.
Next I trimmed a piece of wood grain white card stock to an A2 panel. I then adhered this to an A2 card base. I then adhered a coordinating strip of paper on the left side of the card front. I then adhered my flowers, stems, and leaf images to the front card panel. I added foam tape to each flower. To add a bit more texture I added a twine bow to the card panel and completed the birthday card with a sentiment from my stash.
Thank you so much for stopping by today! I had a lot of fun and I will be back soon!
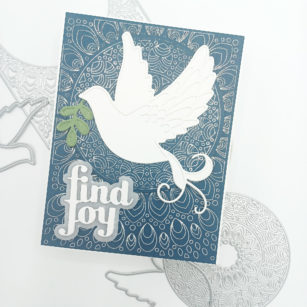
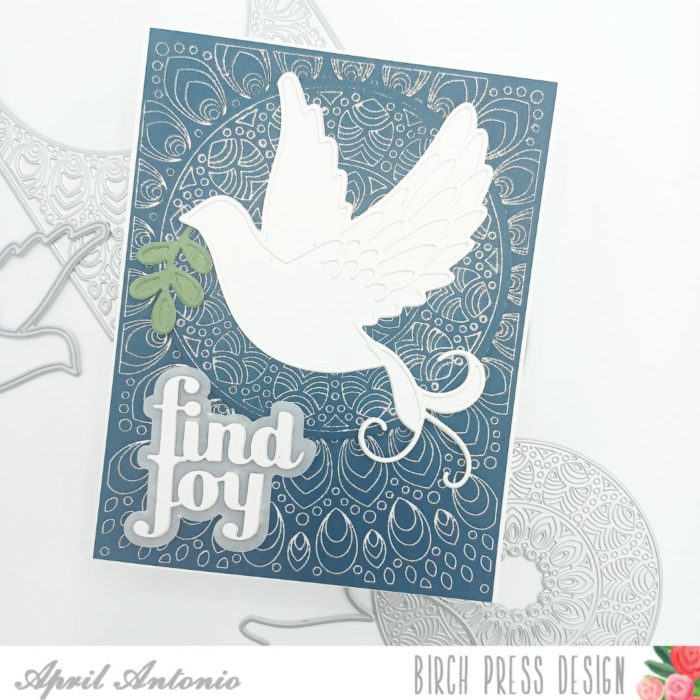
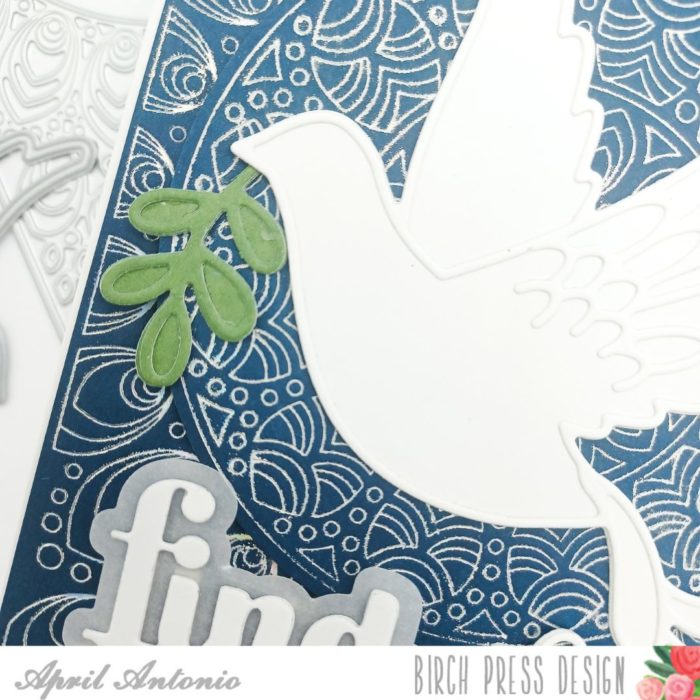
Happy Saturday Birch Press family! Today I’m leaning far into pre-Christmas card prep and sharing a project using some supplies from the newest release.
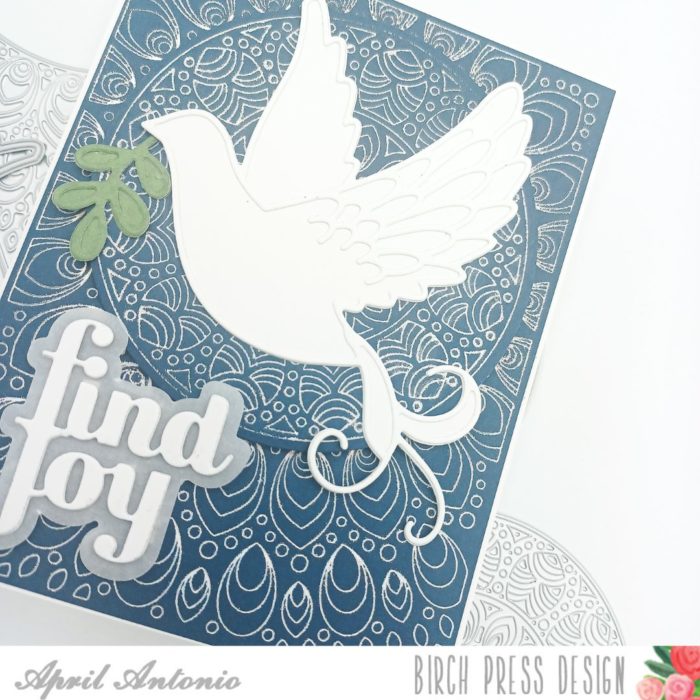
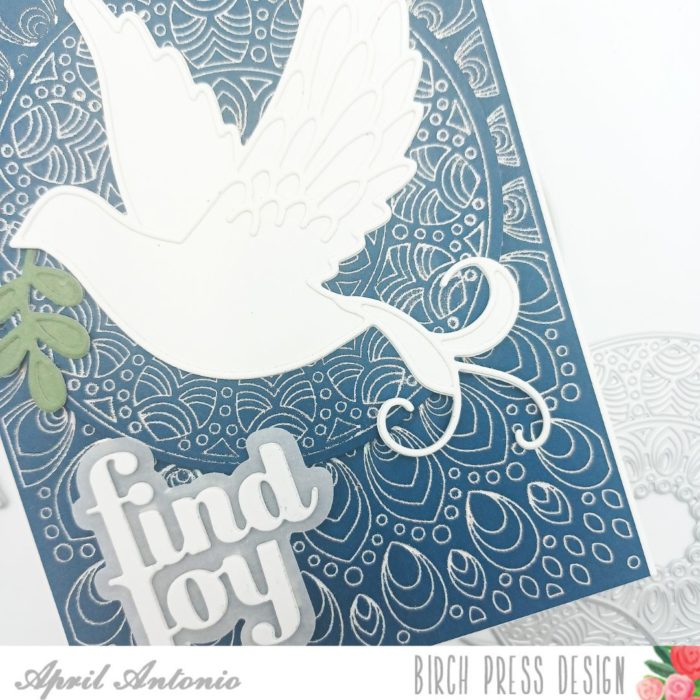
I’m fairly new to hot foiling and have definitely caught the foiling bug. I started this card by hot foiling the Gilded Grace hot foil set — both the cover plate and the insert circle, with Silver foil. I like to use the Spellbinders Silver or Gemini Aurora foil colors for silver. I trimmed the cover plate hot foil sheet down to slightly smaller than an A2 sized card, and then cut out the circle using the coordinating circle die.
Next I used heavy weight white cardstock to die cut the Adornment Dove. I die cut both the outline and the solid piece. But before cutting out the outline piece, since it is so thin, I covered the cardstock with a double sided adhesive sheet.
I also cut out the green sprig that came with the Adornment Dove set, using the Lush Green paper pad set.
For the sentiment, I used the Find Joy die set that comes with the phrase ‘find joy’ and shadow. One thing that is really nice is that all of the words are connected to create only once piece. I cut this out twice and glued them together with liquid glue. I cut the shadow from vellum, and layered it behind the words.
Lastly, I assembled everything together. I used a white A2 card base, put the background on first, adhered the hot foil circle with foam tape, glued the dove and green sprig on top and adhered the ‘find joy’ with small foam strips.
Usually at this point I will add some sort of sparkle, but the hot foil background is so decadent this card didn’t need anything else!
Keep on coming back to see more amazing projects by my fellow design team members, and have a great weekend.
Hello crafters! I am excited to be back on the blog today sharing the beautiful new Crochet Snowflake layering die set! Let’s get started!
For today’s card I am using the beautiful Crochet Snowflake layering die set. This is truly beautiful and has many possibilities! I started by die cutting all 3 layers. I die cut each layer 3 times for added dimension. I die cut Layer B and C using white card stock. I die cut layer A, 2 times using white card stock and one time using a glitter card stock from the Glitzy Glitter paper pad. Once all my layers were die cut I adhered them together with liquid glue.
I set my snowflake aside and started to work on the card panel background. As I shared in my title I wanted to create a rustic feel for today’s card. I used a gelli print from my stash for the card panel. I also used a distress tool and distressed the edges of the panel. I love the added feel this provides.
I added additional texture by adding distress ink, as well as embossing glaze to a couple corners of the card panel. Next I added a piece of twine from my stash. I wrapped this around the card panel twice and tied the twine. Next I adhered the card panel to a brown card base. I then added foam tape behind the Crochet Snowflake for additional dimension. I adhered this on top and then added a sentiment strip from my stash to the center of the snowflake!
Today’s card was a lot of fun! I love layering dies! They are truly beautiful and the Crochet Snowflake has so many possibilities! Thank you for stopping by! I will be back soon!
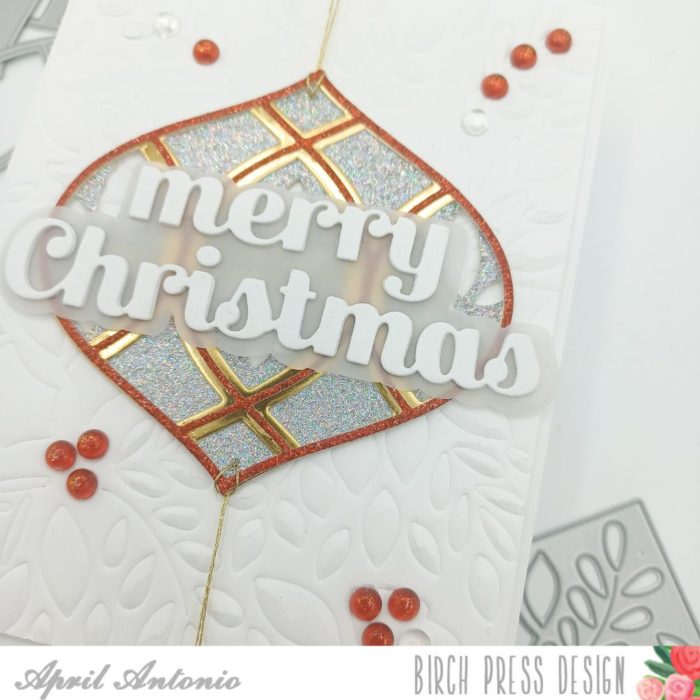
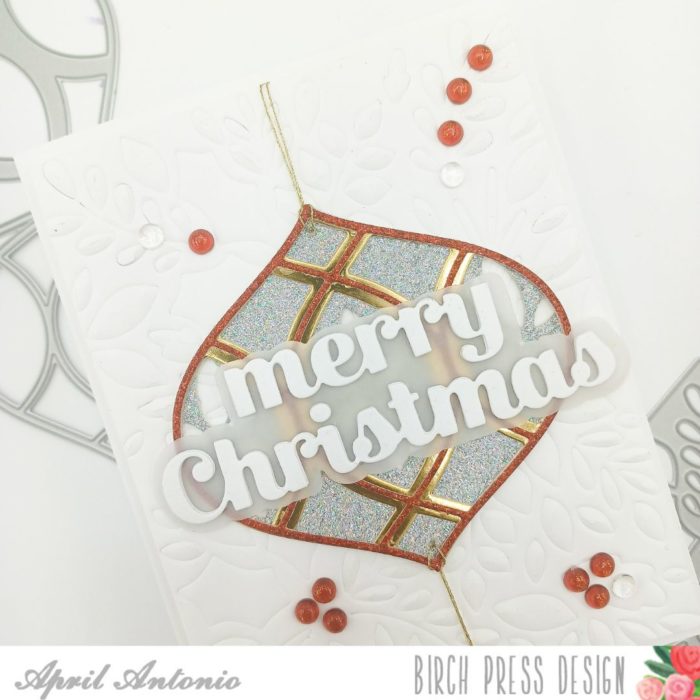
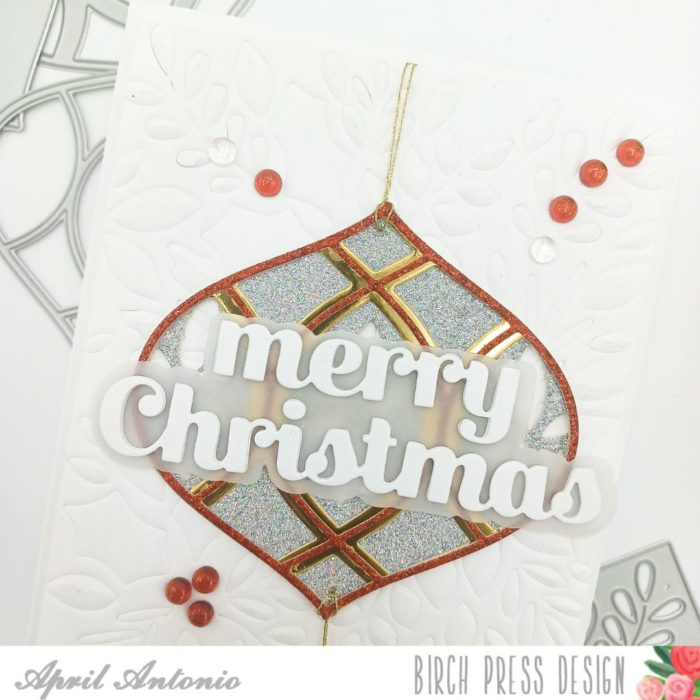
Happy Saturday! Birch Press recently had an amazing release of a lot of Christmas goodies, and I am so excited to be sharing a card using just a few of the new supplies with you today.
I created a card using the new Meridian Ornament layering set. As with all Birch Press supplies, this layering set is beautifully detailed.
I started by cutting out layers A, B and C with three different cardstocks. Layers A and C use cardstocks from the new Glitzy Glitter Pad, and the gold layer B uses a piece from the Rainbow Reflections Mirror Pad.
Next, I took another new goody — the Herbarium Plate layering set and used only Layer A (the top layer) to dry emboss onto white cardstock. I wanted to make an impression, not cut, the entire layer. I cut 1/4″ off each side to create a nice border.
I used my Tim Holtz poky tool to poke holes into the top and bottom of the ornament and threaded gold thread through each hole. I tucked the thread behind the dry embossed panel and secured it with tape on the back.
I put the entire panel onto an A2 sized cardstock, and then used yet another new goody — the Merry Christmas Sugar Script, to die cut the sentiment.
For the sentiment, I die cut the shadow from vellum, and die cut the words twice from white cardstock and then layered them together.
Lasty, you know I needed some bling, so I used the Christmas Fairy Crystals self-adhesive jewel set to add red and clear crystals across the card. That is it!
Honestly, I am just getting started with making Christmas cards with this newest release — and it is AMAZING!!
I hope this has inspired you to go craft and I can’t wait to come back with more crafty goodness.
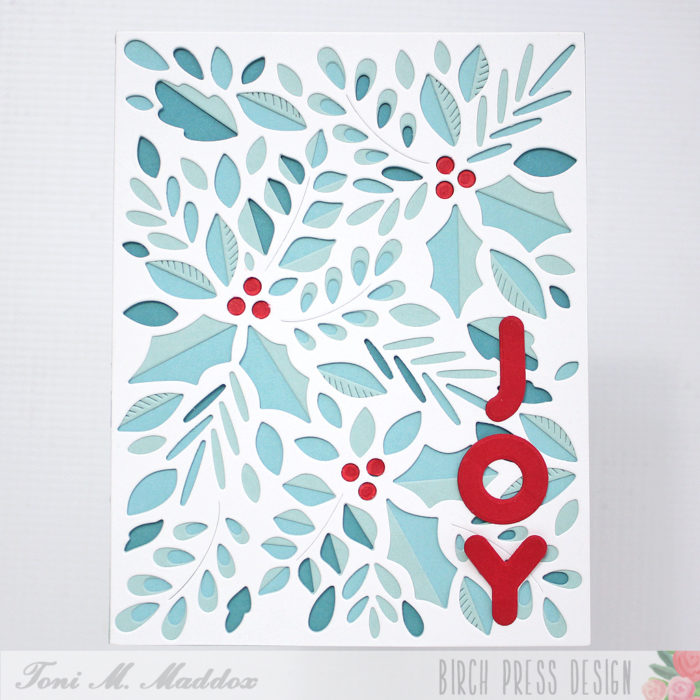
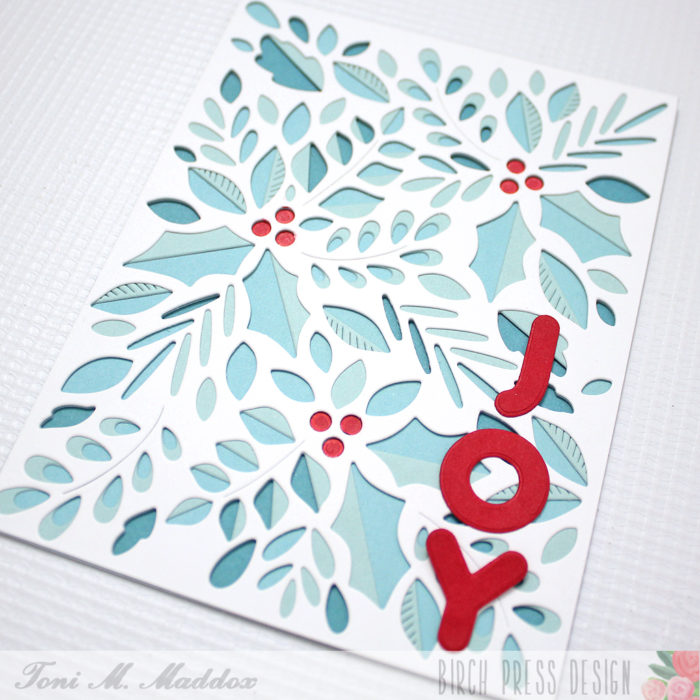
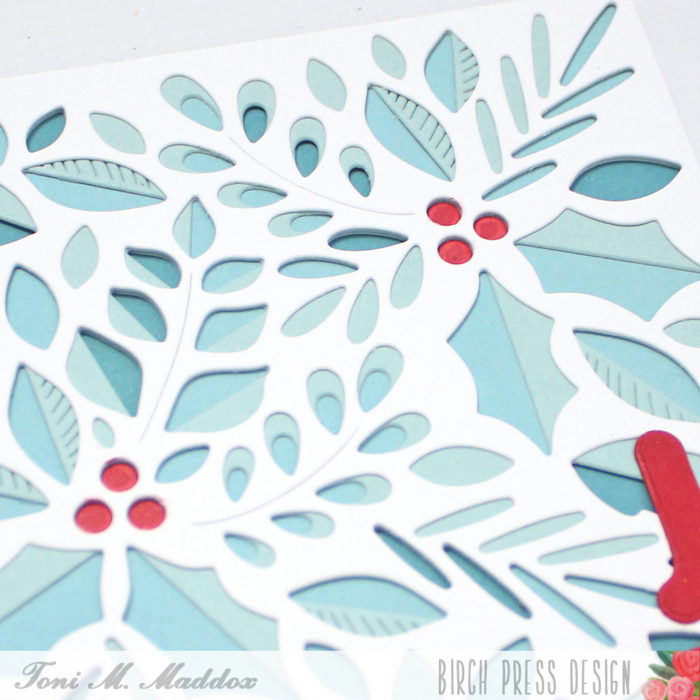
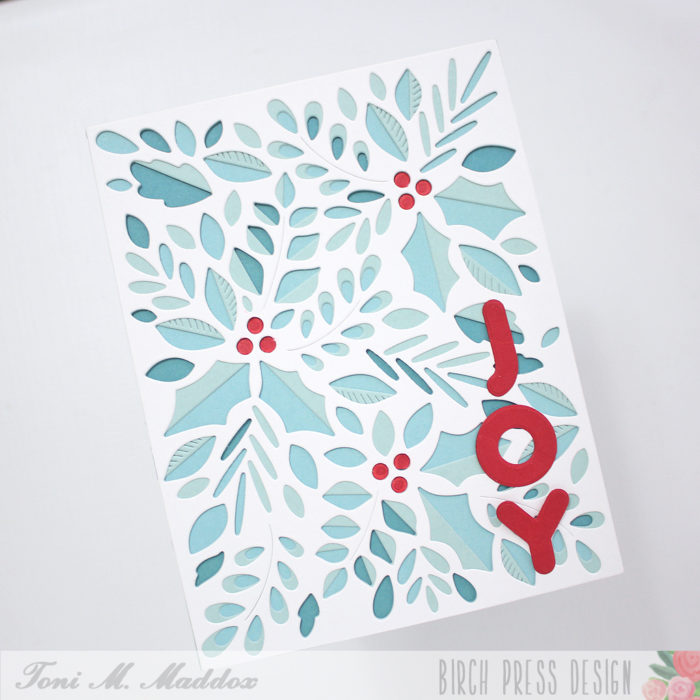
Hello, everyone! Toni here with you today sharing a card using my beloved blue and red combo, this time for a holiday card.
I cut out the two bottom layers of the BPD Herbarium Plate Layer Set out of Memory Box Fresh Aqua 6×6 cardstock and the top layer out of white. I mounted this on a dark aqua base.
I love the faux shading the layers and paper create. Did you notice the shade lines as well? Brilliant!
I used a Copic to color the berries red and added “Joy” cut from the BPD Mod Alphabet die set.
I hope you enjoyed today’s card and have a great rest of your week!