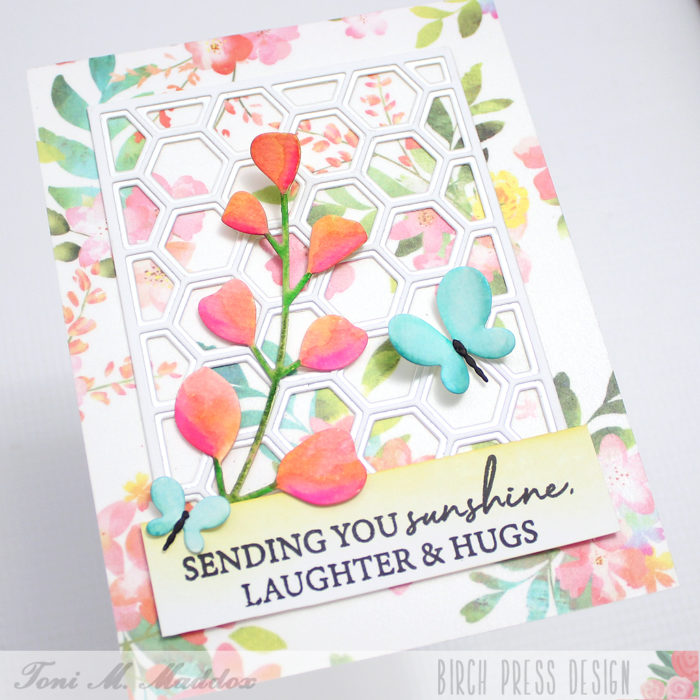
Hello, Birch Press fans! Toni here with you today sharing a watercolor floral card featuring a mix of the new and the old.
I watercolored the base layer of the Eucalyptus Stem and Berries Contour Layers dies using Zig Real Brush Markers.
I also watercolored the smaller of the Simple Butterfly Contour Layers dies, keeping them separate so I’d have two butterflies.
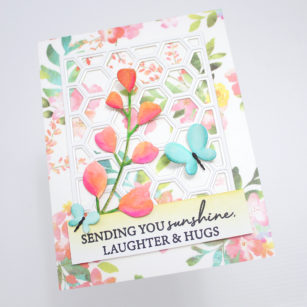
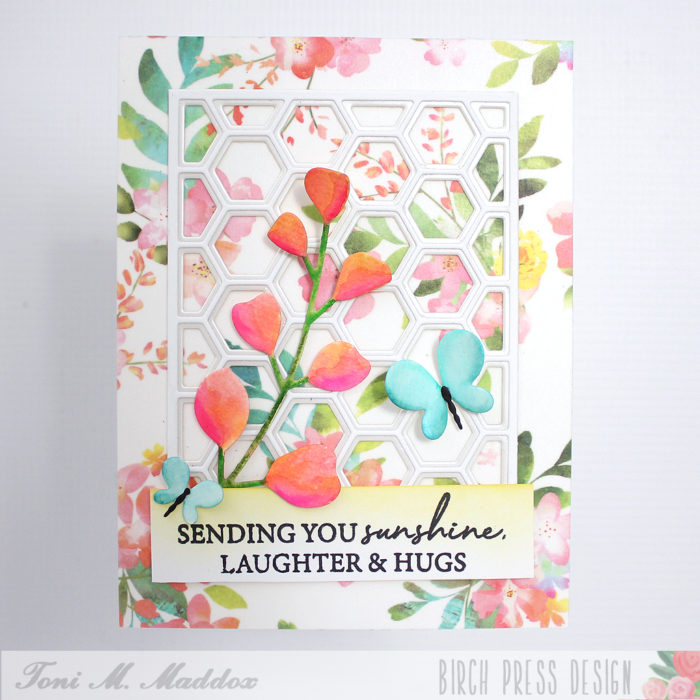
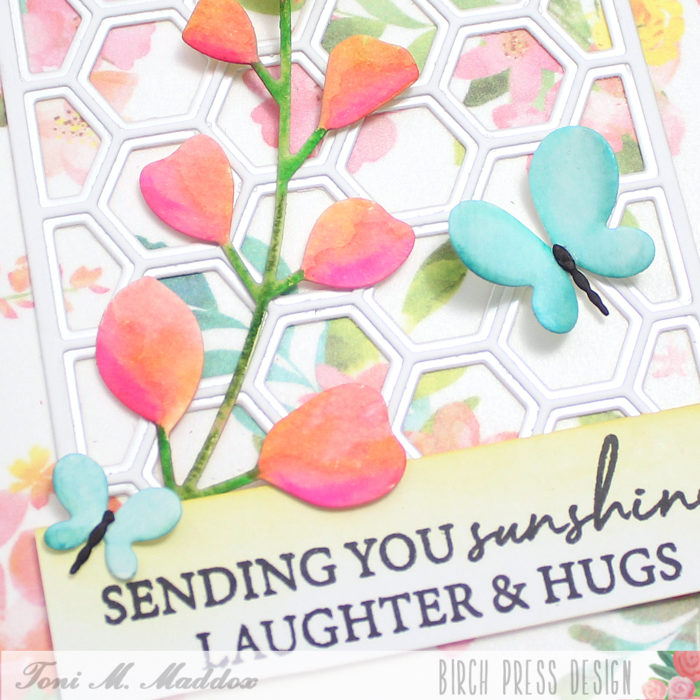
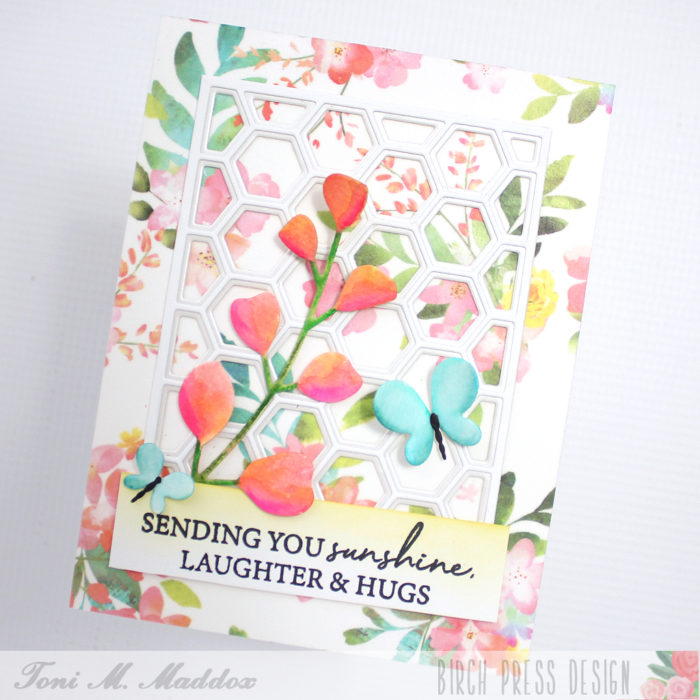
On the card base, I applied Memory Box Sunset Blush Wide Washi Tape, smoothing out air bubbles as I went along. It’s a lot like working with wall paper but stickier–LOL!
I next cut out the Honeycomb Bevel Plate Layer Set with the lower layer in Vintage Pastel Mirror Pad 6×6 paper and the upper in white.
I adhered the honeycomb layers to the card front and added the Kind Hearts sentiment which I had stamped onto white cardstock sponged with a touch of Distress Oxide Mustard Seed.
I tucked the blossom in place behind the sentiment and added the butterflies for a lovely spring/summer scene.
I hope you enjoyed today’s card and have a great rest of your week!
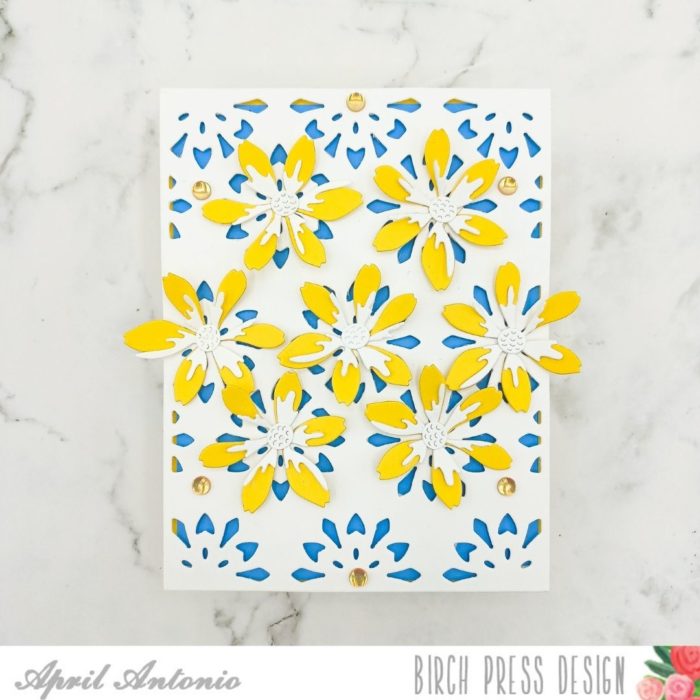
Hello and welcome back to the Birch Press Design blog! Today I am sharing a quick to create card, centered around the concept that sometimes the best sentiment, is no sentiment at all.
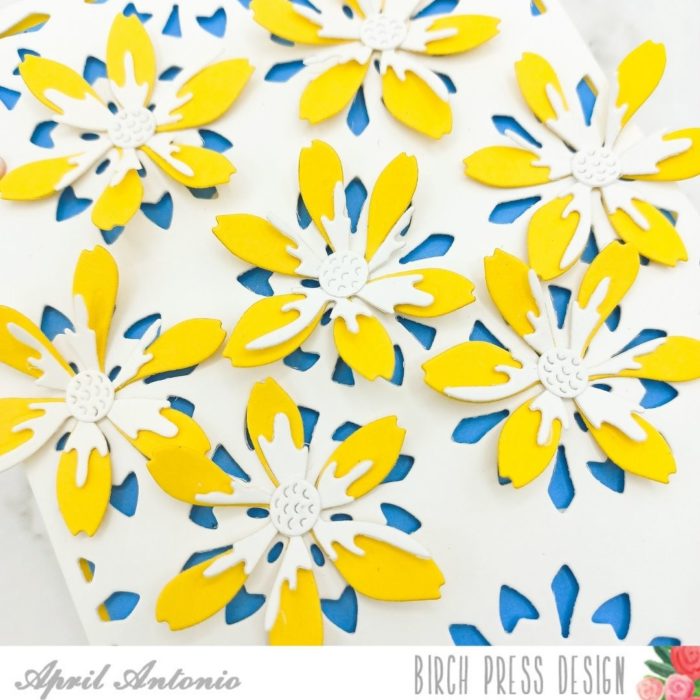
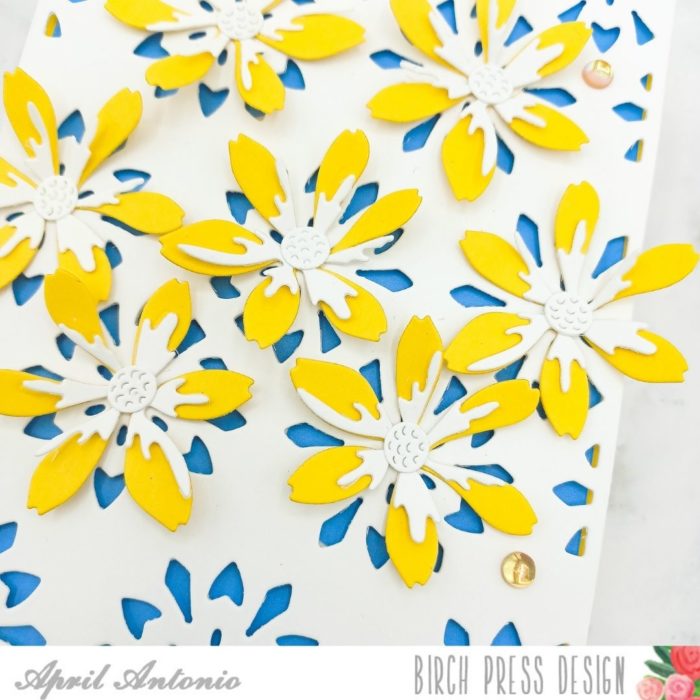
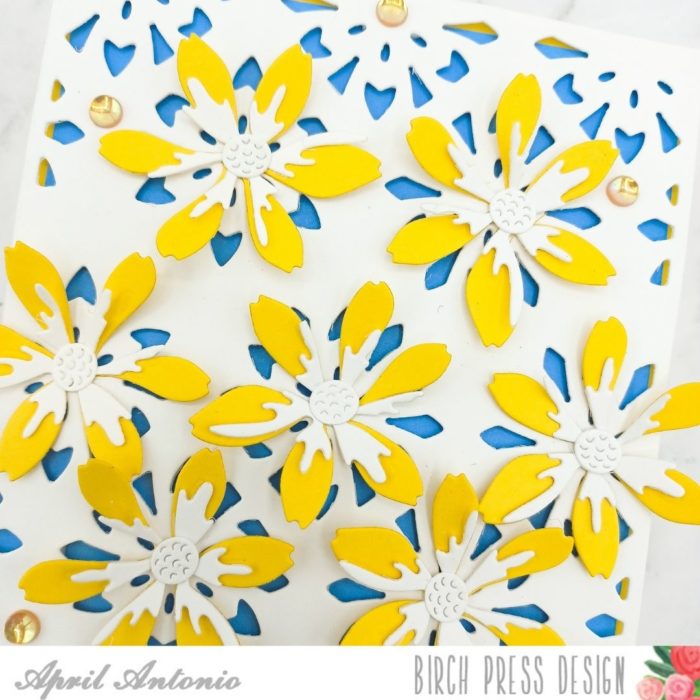
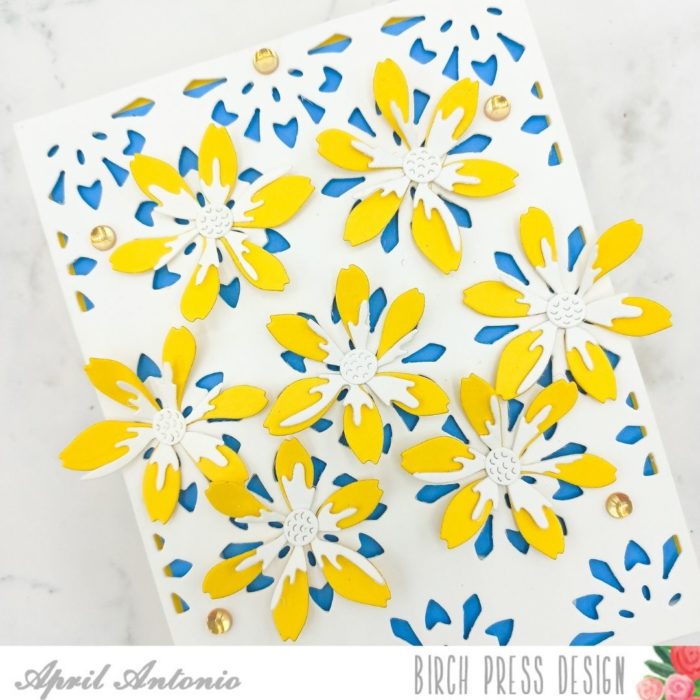
I had a busy week and wanted to create a quick, colorful card. One thing I love about the Birch Press layering plate dies is that the layers work on their own. For this card I used only Layer C from the Kinsley Heart Plate Layering set and cut it from heavy weight white cardstock.
One thing I love to do when making a quick card is to pair complementary colors. In this case I used a bright yellow and blue. I placed a bright blue from the Memory Box Ocean Blue Collection behind the layer I cut and made sure to pop up the layer with thin strips of foam tape.
PRO TIP: Have thicker foam tape? Cut it in half to make DIY thin strips.
Next, I used some leftover flowers I had from the Star Flowers Contour layers set to cut the flowers from yellow and the contour and stamen from white. I glued these onto the card front using liquid glue, and glued only the center of the flowers so I could gently lift the petals and add a lot of extra dimension to the card.
Lastly, I can hardly get away from finishing off a card without adding some bling! I love the Open Studio gems and I used some from the Treasure Chest Fairy Gemstones set. As featured, this card has no sentiment. I love the look of the flowers on the front, and being in a time crunch, I opted to keep the delicate flowers and not add any words on the front or inside.
That is it! I promised a quick card and this card took my about 10 minutes to pull together. (15 if I count the times I stopped to watch TV!)
I hope, as always, this short tutorial and card have inspired you to keep on crafting. Have an amazing day!
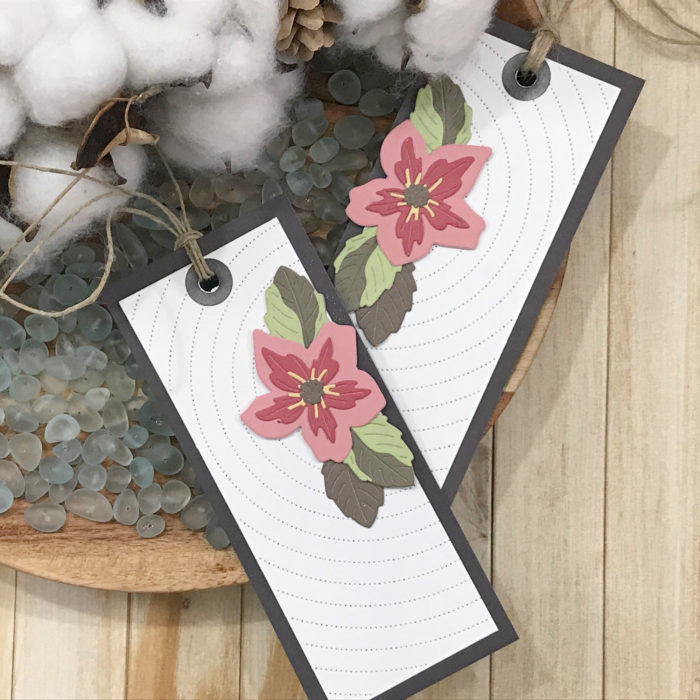
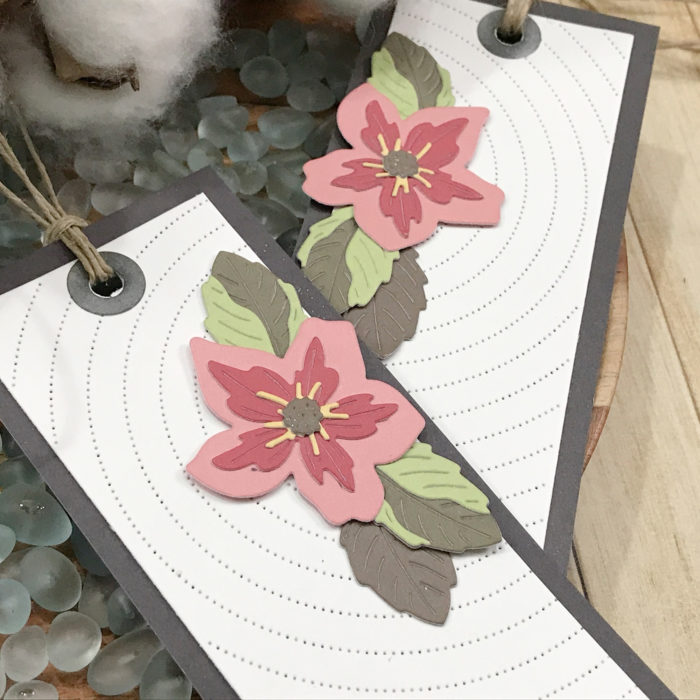
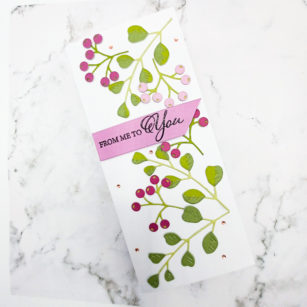
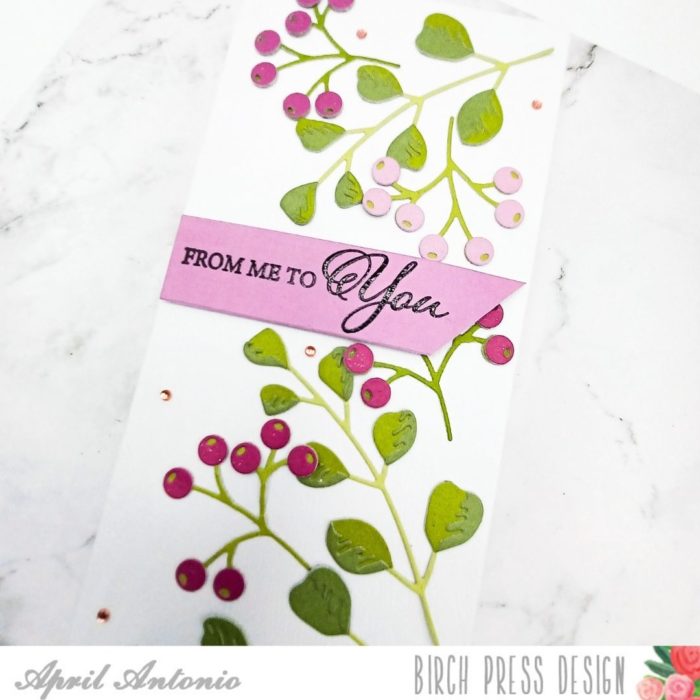
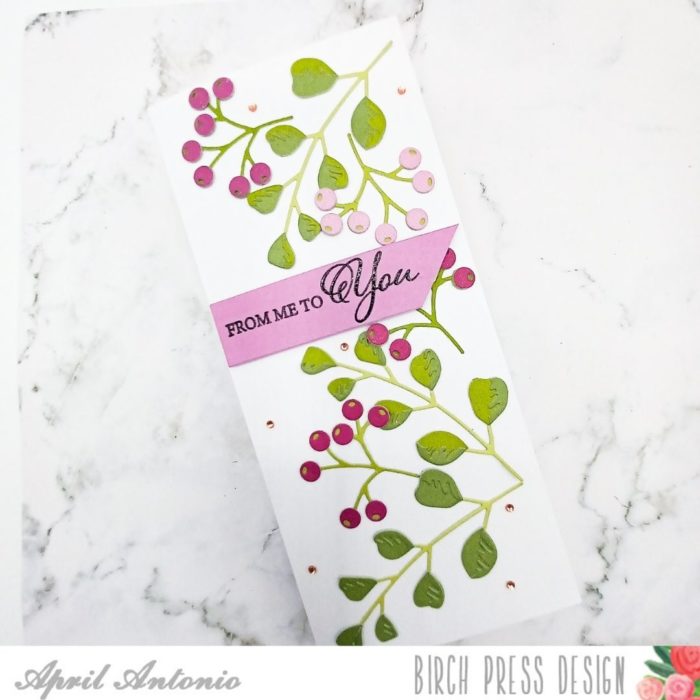
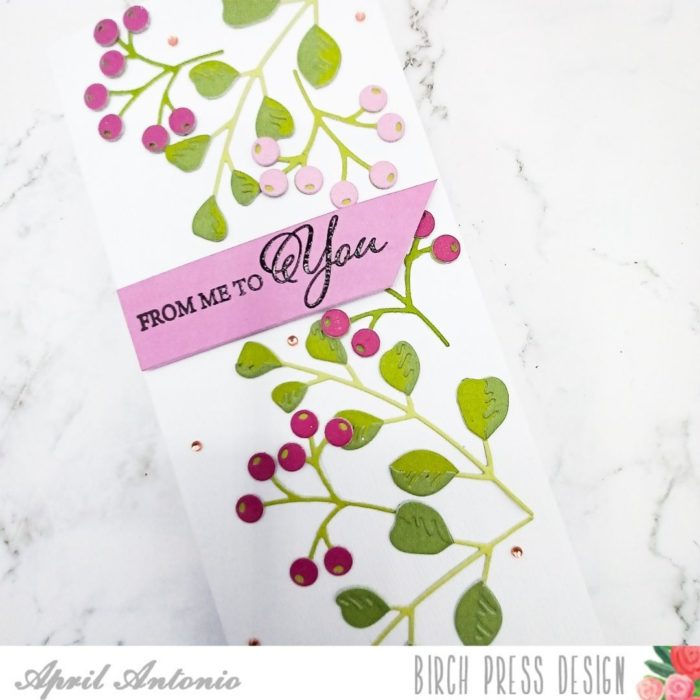
Little surprise for today! We are NOT going to create a card, LOL! Our stash can be so much more… So, today we are going to make a couple bookmarkers in no time featuring the Pimpernel Contour Layering Die Set along with the Pinpoint Radial Cover Plate!
Start by getting your elements all die cut and get them arranged in front of you!
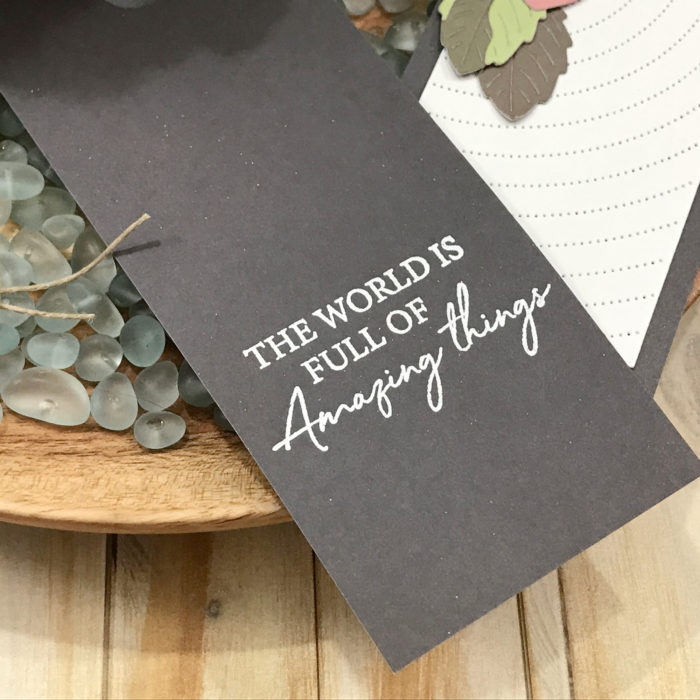
Start by taking the panel you die cut with the Pinpoint Radial and cut it along the 4 1/4in side at 2 1/8 inches. You will then cut two panels at 2 ½ in x 6in from a piece of solid card stock. I chose the Black from the Memory Box 6×6 card stock pad from the Neutrals set.
Next, on the back of the solid card stock panel we want to emboss our sentiment. I pulled a sentiment from the Kind Hearts Stamp Set and heat embossed it in white.
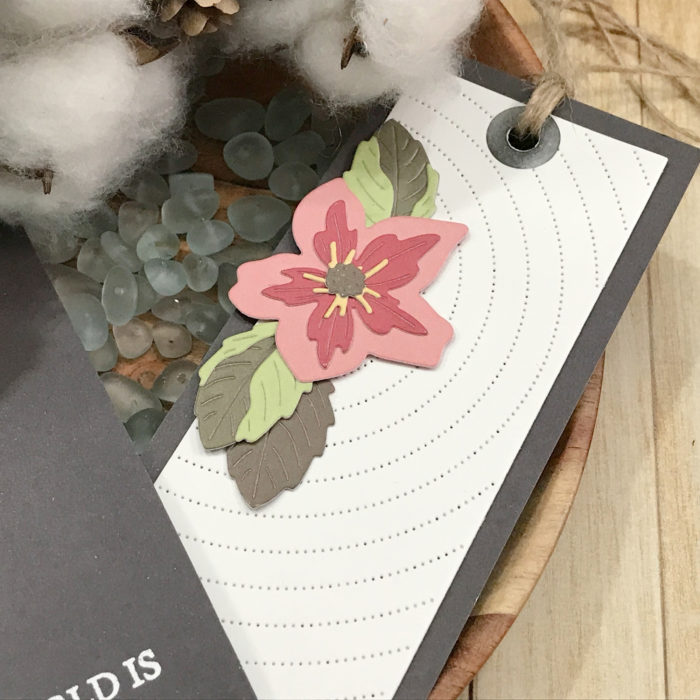
We can now get our floral layers prepared for placement on our panels. What I find absolutely wonderful with these die sets is you do not always have to layer them, they can stand alone!
Placed my florals and leaves usin liquid adhesive and then placed the layered panel on top of my solid card stock panel.
Punched a hole in the top section and added some scrap twine for a tassel, and there we have it! A perfect gift for the someone who still loves to hold a book!
Hope you enjoyed today’s project!
Make sure you stay tuned for more wonderful projects coming soon!
Hi crafty friends! I am excited to be back up on the blog today! Today I am sharing a bright and colorful birthday wishes card using the Floral Balloon layering dies! I adore these beautiful balloon dies and there is so much you can do with this set! I had fun creating a bright and colorful card using this set! So let’s get started!
I started by die cutting each layer of the Floral Balloon set. I started by die cutting layer C (solid balloon) on white card stock. I then cut layer B using the Memory Box Rainbow Reflections Mirror Pad using a black piece of card stock from this pad. I love the subtle shine on this paper. I then cut layer A using white card stock. I repeated this process 2 times for each ballon.
Next I adhered both layer B and C together on the balloons using a liquid adhesive. I then wanted to add a bit more color to layer A on the balloon. I used a combination of acrylic sprays and set them aside to dry. Once they were dry, I adhered layer A on top and my balloons were complete!
Next I chose a background for my colorful balloons! I chose a gelli print from my stash! I love the added pop of color behind my balloons with a bit of texture! I trimmed my background and then adhered this to an A2 card base.
Next it was time to create my sentiment. I am using the beautiful Sugar Script Make a Wish set. I love the font on this set and it adds a whimsical touch to my card. I die cut the base layer in white card stock. Then I die cut the script inner layer 3 times using a white card stock. I then adhered the inner word layers together using liquid glue. Next I heat embossed the sentiment to add more texture to my card. Finally I glued this to the shadow layer.
To complete my card I added twine to my balloons by adhering the twine to the back of each balloon with a piece of tape. Once I determined the placement for the balloons I trimmed the excess of the yellow and green balloon with my paper trimmer. I then adhered the balloons to the card front using both liquid glue and foam tape. I added the sentiment to the bottom of the card front using foam tape carefully placing the twine behind the letters!
I had so much fun with these balloons! They are such an adorable set and create such fun birthday cards for family and friends! Thank you so much for stopping by today! I will be back soon!
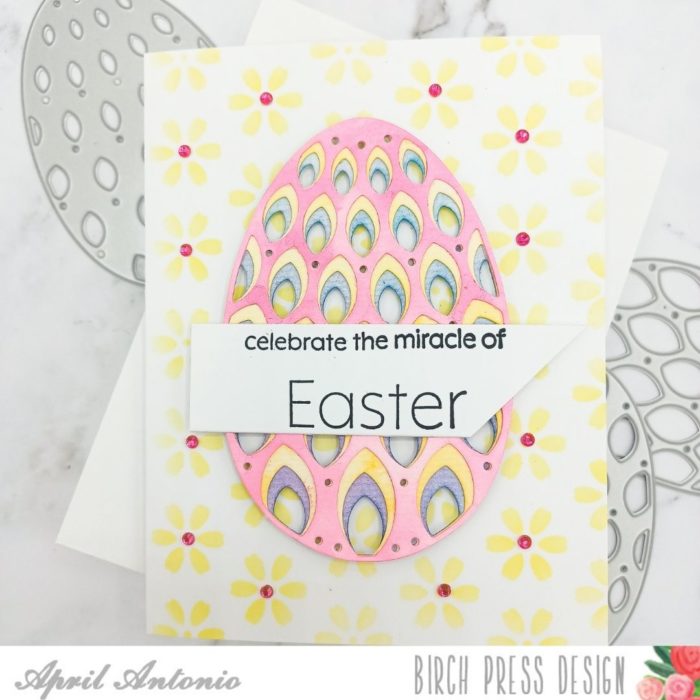
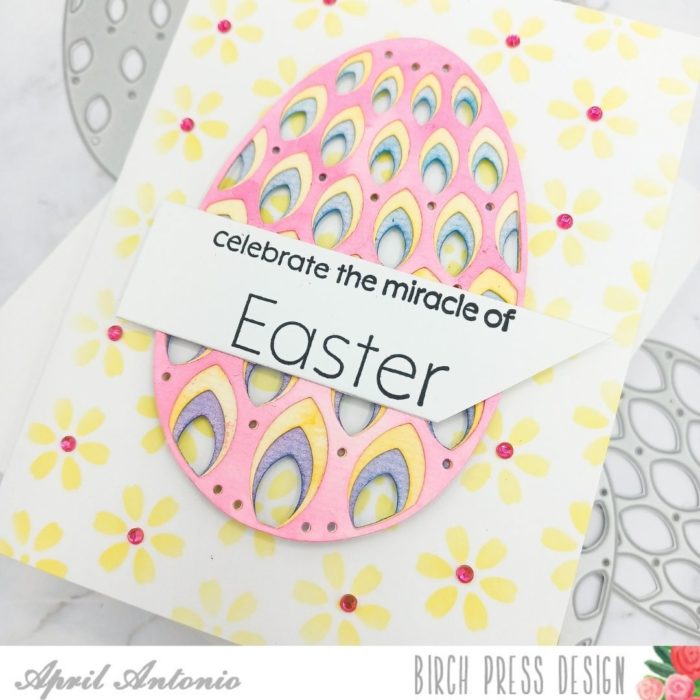
Happy Thursday and welcome back to the Birch Press Design blog! I am excited to be sharing another Easter themed card this week using the Petal Egg Layering die set.
I wanted to change up how I used the layering dies, so I have a couple of ideas on how to stretch your supplies. Read on to find out how and to see how I pulled this card together!
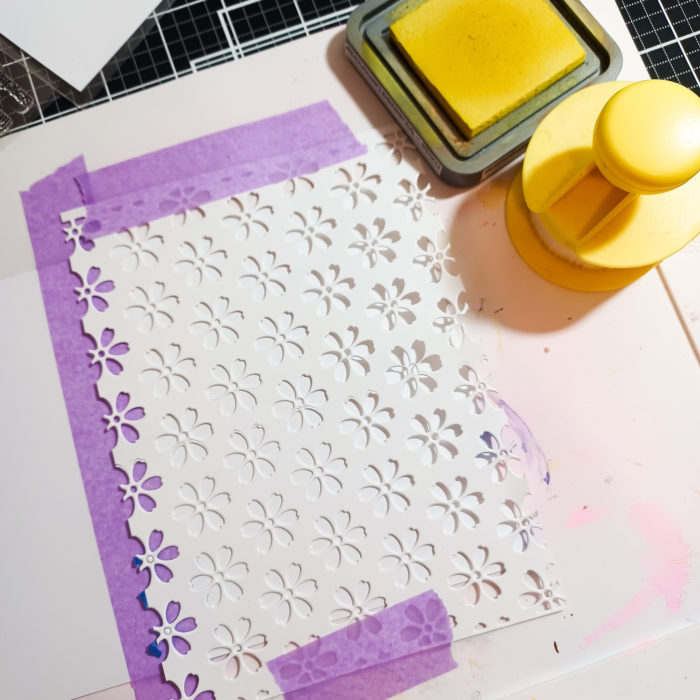
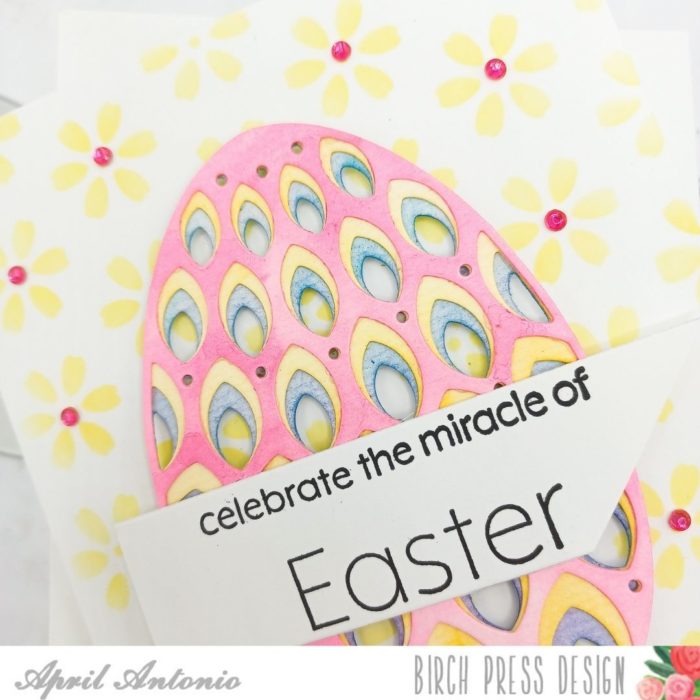
To create this card, let’s start with the background. One way I have found to stretch my layering dies is to use them as stencils. I die cut Layer Plate B from the Flora Player Layering set from heavyweight cardstock.
I cut it from a 5″x7″ piece of cardstock by die cutting then lining up the die and die cutting a 2nd time. I used this piece of cardstock as a stencil to create this stenciled background with Squeezed Lemonade Distress Oxide ink.
I made sure to tape off the edge of the card with a low tack tape so I wouldn’t accidentally stencil the back of the card as well.
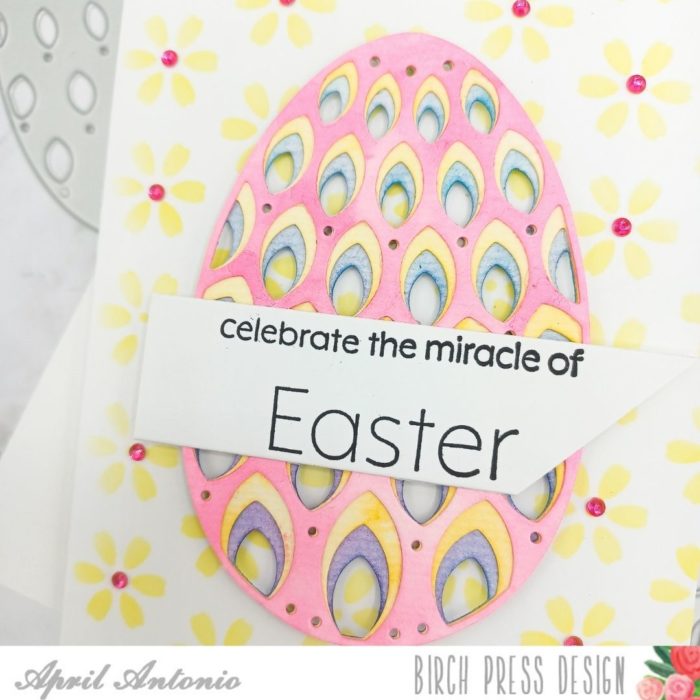
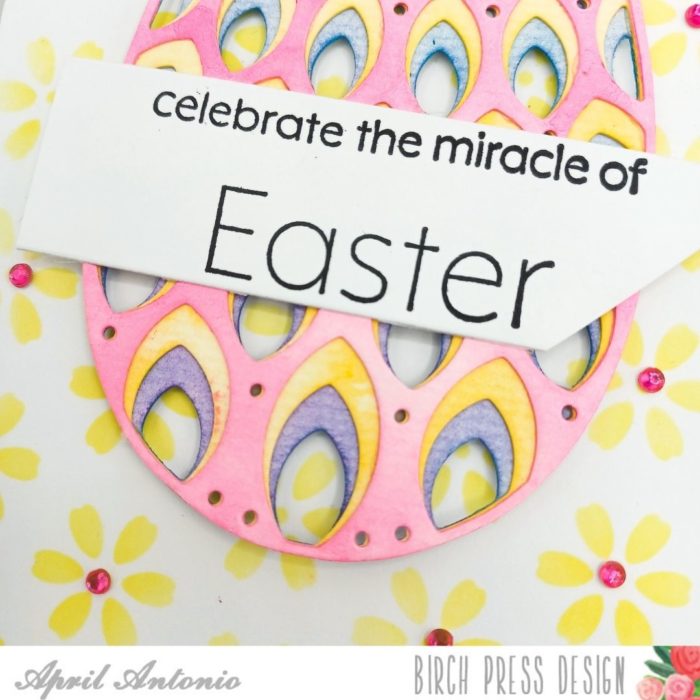
To create the Easter egg, I first die cut each layer of the Petal Egg Layer set from Open Studio #140 watercolor paper. I made sure to die cut first, then watercolor. Doing this the other way around would mean the paper might still be kind of soft and wet when I’m trying to die cut.
Next I used a large paintbrush to watercolor each layer using some watercolors that I had on hand. I used a heat tool to dry each layer some, then applied a 2nd layer of watercolor to really get a more vibrant look.
I dried each layer fully using a heat tool, then glued them together using liquid adhesive. Next, I put thin pieces of foam tape on the back of the egg and adhered it to the stenciled card front.
To create my sentiment, I put together two of the sentiments found on the Blooming Spring Stamp Set which is my new favorite! I cut the cardstock down to a strip, and then cut the right edge at a diagonal to add some interest.
My final touches were to add pink jewels to the center of the flowers on the stenciled background. I love that this card didn’t take a long time, and allowed me to use some different crafting techniques when it came to layering cards. I hope you found some inspiration today and will keep on crafting!
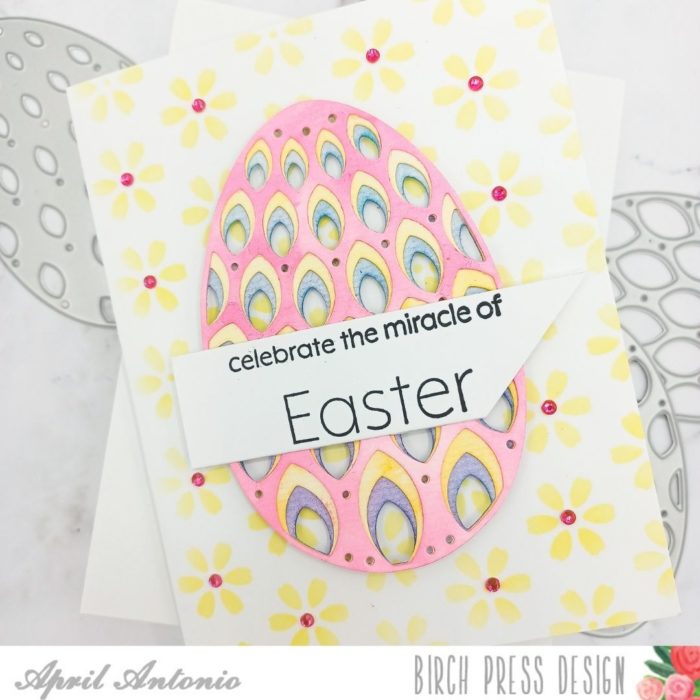
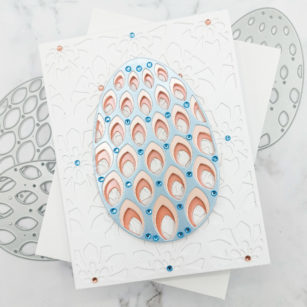
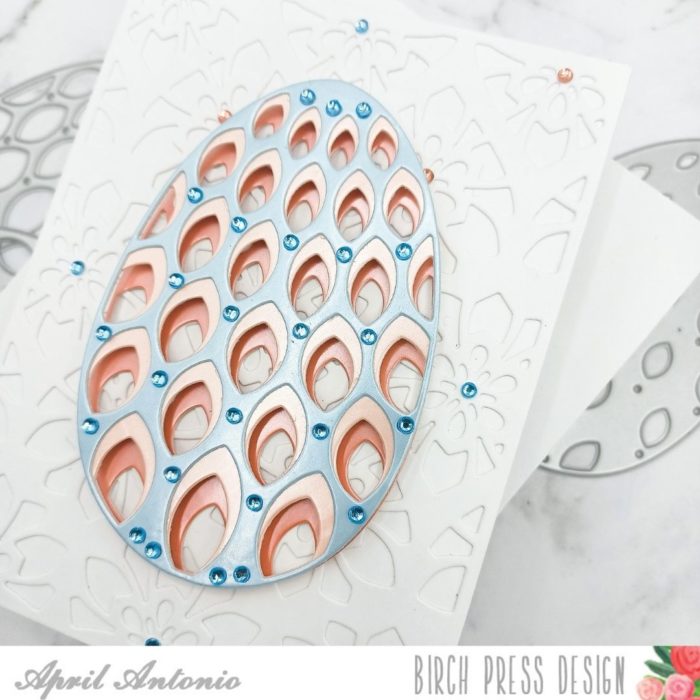
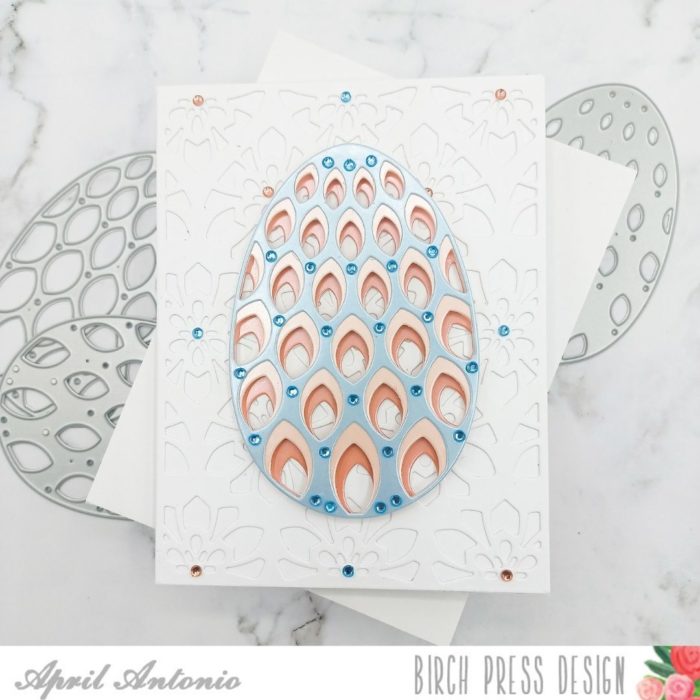
Happy April! This month is not only my namesake, but my birthday month and I always get really excited! Also this month, many will be celebrating the Easter holiday. Whether you’ll be celebrating Easter or Spring break, the card I’m sharing today is festive enough for the entire month.
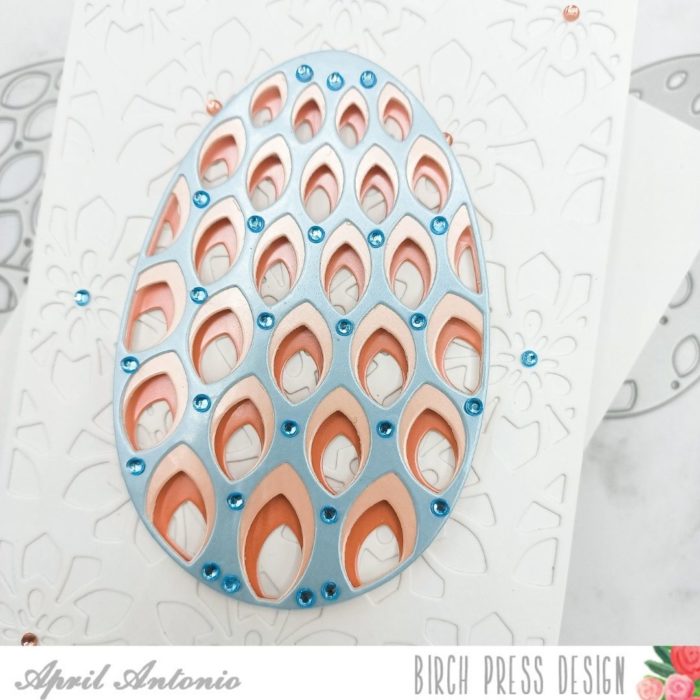
To start this card, I wanted a subtle yet interesting background. I took Layer B from the Kinsley Heart Plate Layering set and cut it from heavyweight white cardstock. I took this layer and glued it down to an A2 card panel.
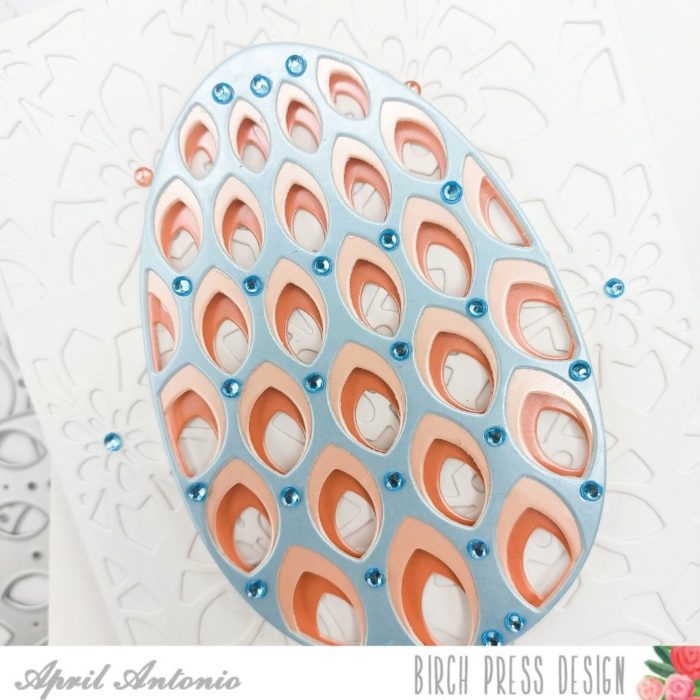
Next, I grabbed the Memory Box vintage Pastel Mirror pad. I have been LOVING this pad that has a mix of foil cardstocks and have used up so many of the colors. I chose blue, light pink and peach colors from the set. I cut layers A, B and C from the Petal Egg Layer set — one layer from each color.
PRO TIP: Want to add some dimension to your layering cardstock pieces? Add some foam dots behind one of the layers.
To add dimension to my card I glued layer A directly to layer B for the egg. Then I added foam dots to the back of layer B and adhered it to layer C. This helped pop up the top two layers. This technique would also work well for creating a shaker element on a card.
I finished off the front of the card by adding jewels from the Memory Box pastel jewel pack, to every section of the egg that had a small dot cut out. I then added a few jewels to the background of the card front as well.
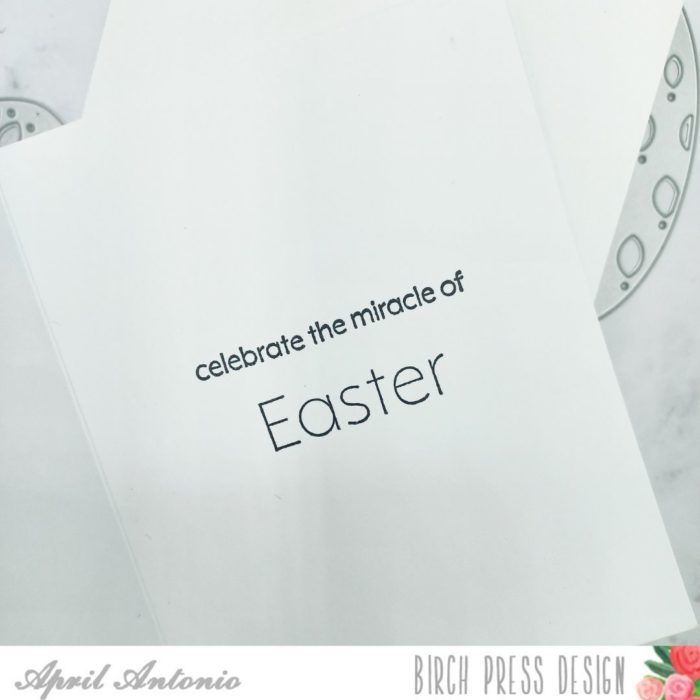
Lastly, I thought the front looked great as is, so I added the sentiment on the inside. I used two sentiments ‘Easter’ and ‘celebrate the miracle of’ from the Blooming Spring Stamp set.
That is the card for today! If you are in a rush, you can definitely skip adding the jewels and just put the layers of the egg together for a look that is still very elegant.
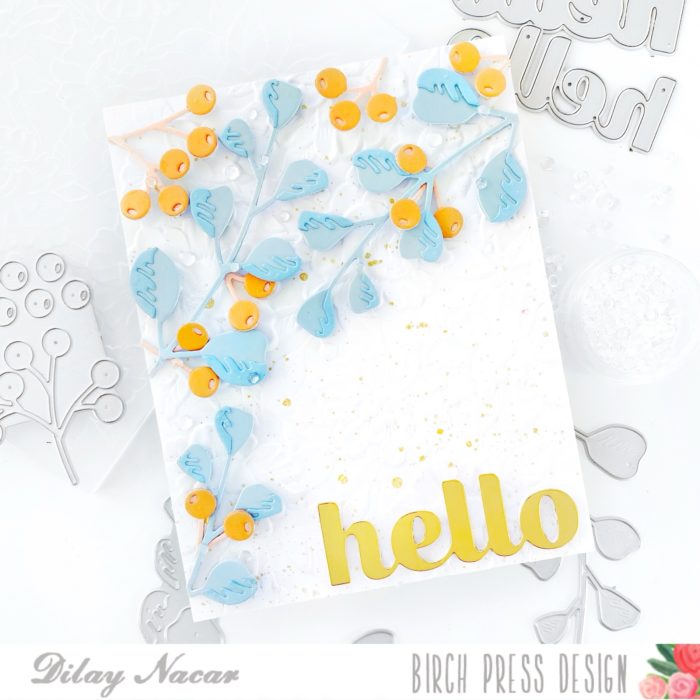
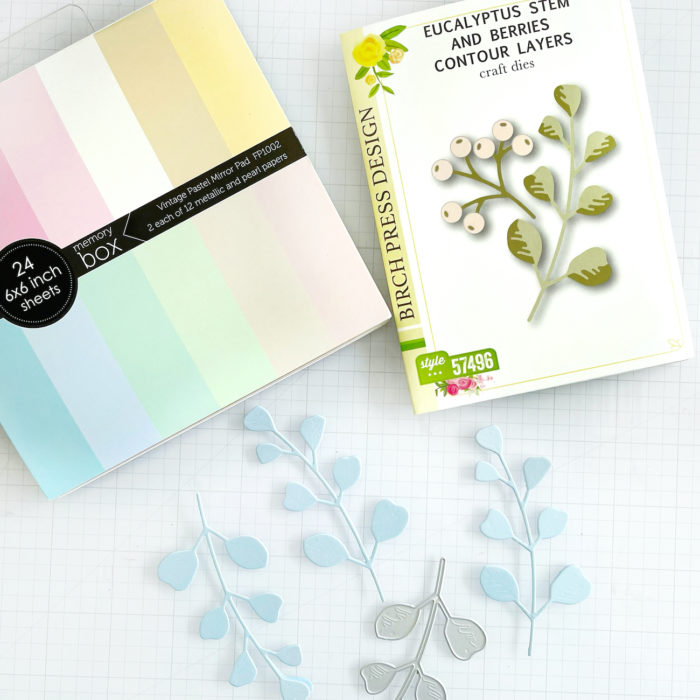
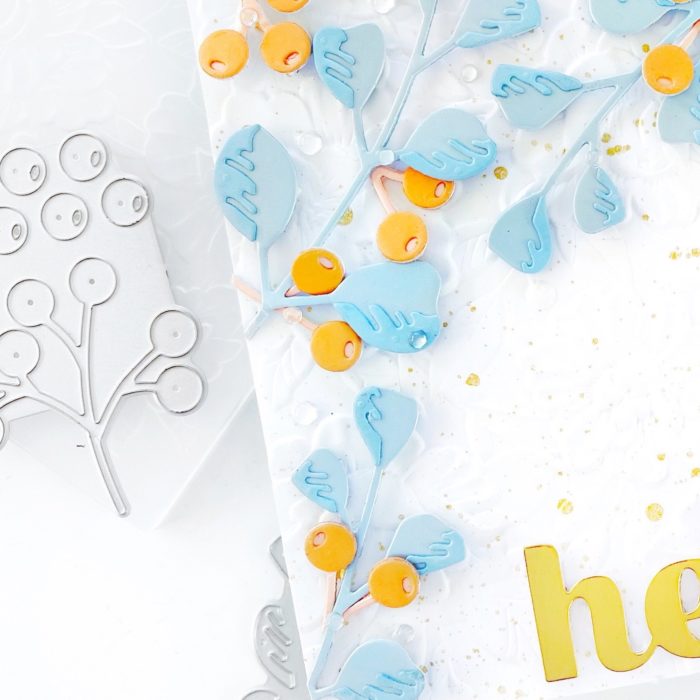
Hello, crafty friends! Dee here today sharing a card that features one of my favorite new die sets, Eucalyptus Stem and Berries Contour Layers, combined with the new Vintage Pastel Mirror Paper pad! Let’s get started!
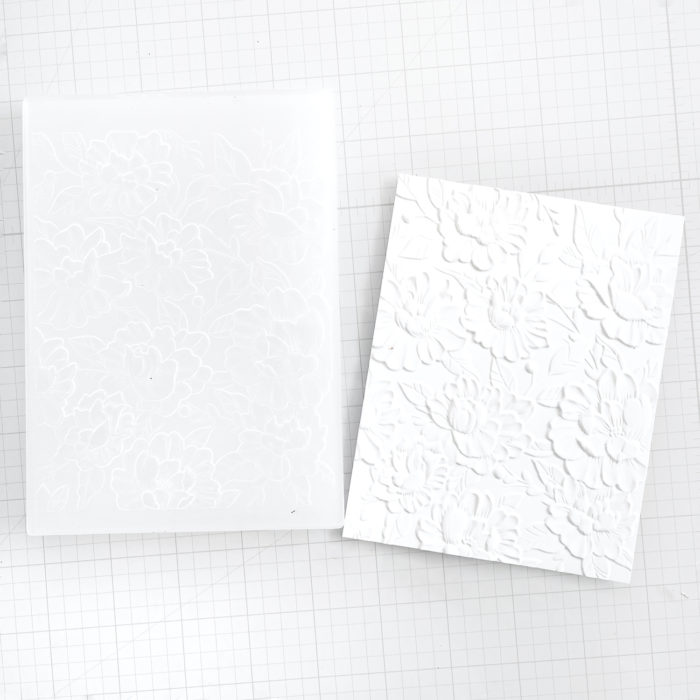
To create the base, I embossed an A2-sized white panel using the Memory Box Blooming embossing folder, then splattered it with metallic gold watercolor paint, setting it aside to dry.
Next, I cut each of the stems and berries three times, using the lovely new Vintage Pastel Mirror Paper pad for the base and regular cardstock for the detail dies. Once complete, I adhered the pieces together.
Once the panel was dry, I adhered the stems to it using thin foam tape (trimming off any excess) then adhered the berries, cutting some apart to scatter throughout the stems.
For the sentiment, I die cut the Sugar Script ‘hello’ from the gold paper included in the Vintage Pastel Mirror Paper pad, then adhered it to the bottom corner. As a finishing touch, I added Memory Box Clear Fairy Drops embellishments and mounted the card onto a top-folding card base!
Thanks so much for stopping by! I hope you enjoyed reading more about my card today!
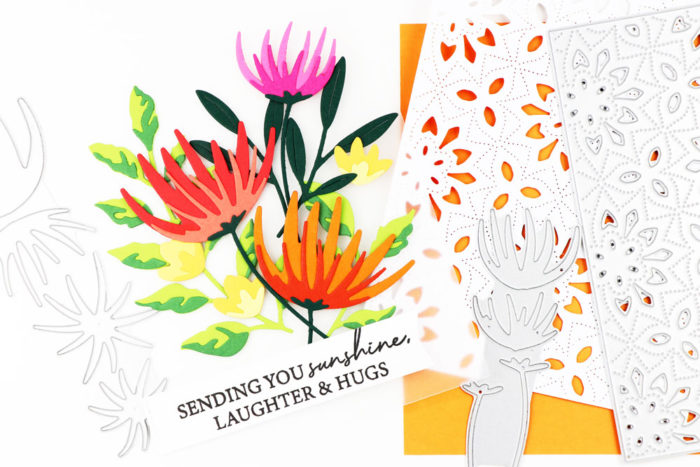
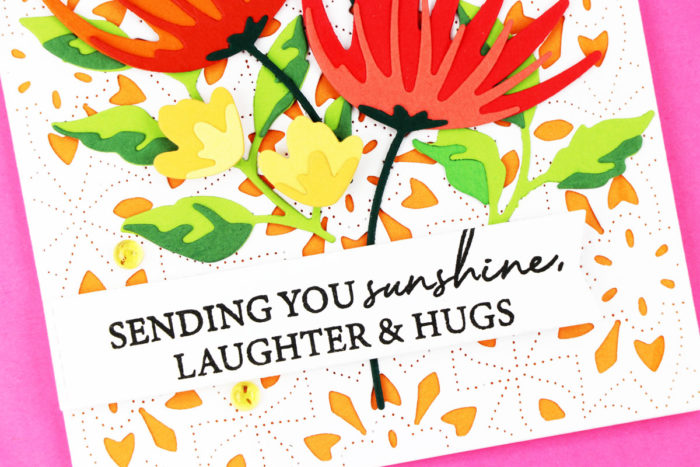
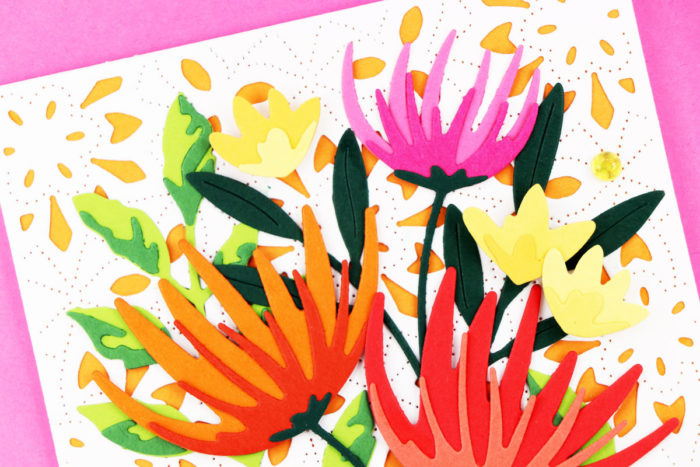
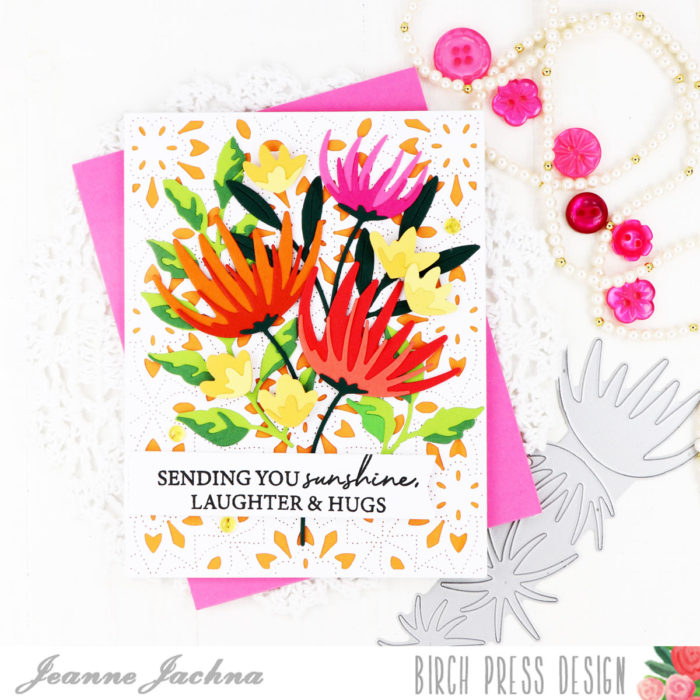
I’m so excited with the latest Birch Press Design Release because it’s all about FLOWERS! I am anxious for spring to arrive, and until I have some blooms of my own in the garden I’m making away in my craft room with these beauties.
I love that the new florals are sized perfectly for arranging together. And each layered floral die set comes with a fold out graphic showing you how to assemble each one so there is no guessing.
I always start by laying out images on a clear sheet of plastic the size of my card base. I can slide different color panels underneath to see exactly what the card will look like when it’s assembled.
My card features the Wispy Blooms, Fuddled Leaf and Tiny Tuft Flowers. The sentiment is from the Kind Hearts stamp set that has a mixed pretty handwritten and print font.
My background is just a single layer of the Viola Plate die trio background set. It’s gorgeous enough with it’s pinpoint print to leave all on it’s own.
The new layered blooms are absolutely stunning and have you smiling like the real thing! The only thing you’ll miss is their fragrance!
Happy Monday! I am so excited to be with you today sharing a floral card in celebration of Springtime.
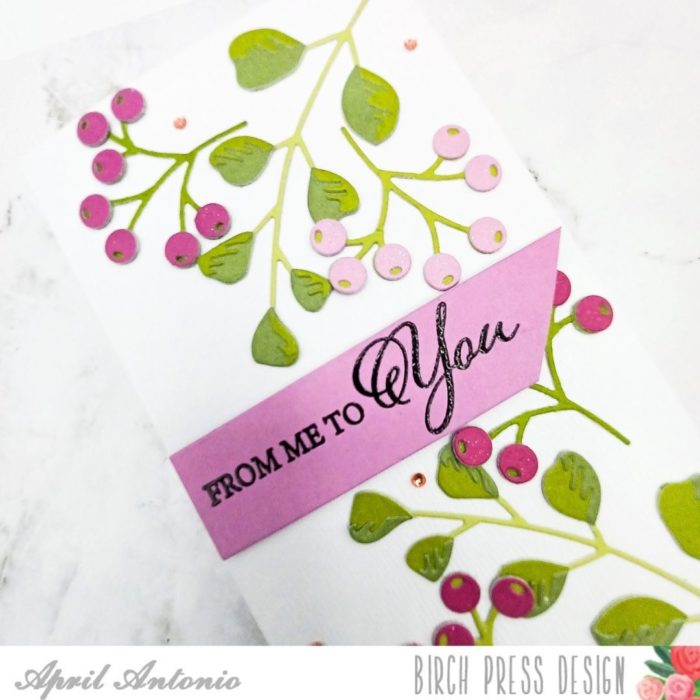
I used the Eucalyptus Stem & Berries die to create fresh, green leaf and berry sprigs. I used two shades of green, and three shades of purple and magenta from the Lush Green aand Vibrant Violet 6×6 paper pads.
I used double sided adhesive sheets on the back of the cardstock before diecutting the leaf and berry pieces to make the layering that much easier.
Once I had all the leaf and berry sprigs cut out and and assembled, I used a sheet of the white woodgrain cardstock from Open Studio to cut a 4″ x 9″ piece of cardstock. I folded this in half to get a slimline card base on which I arranged the floral sprigs.
For my sentiment I used the beautiful Kind Hearts stamp set and heat embossed it with Versafine black pigment ink. I finished the card off with some twinkling jewels scattered around the card.
That’s it! I hope you have a great rest of your day, and can find time to create during your week.
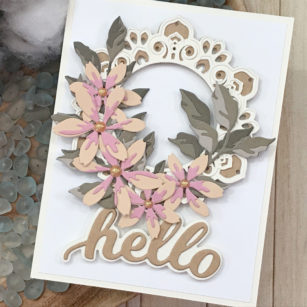
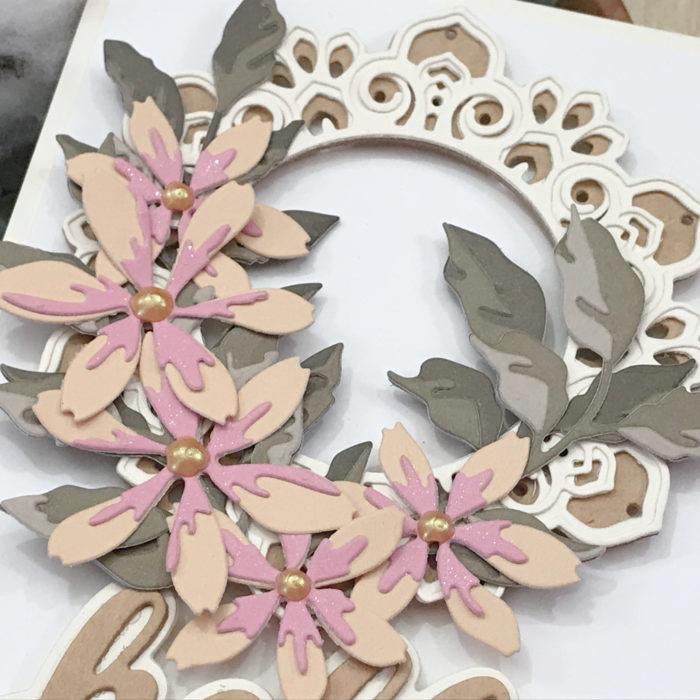
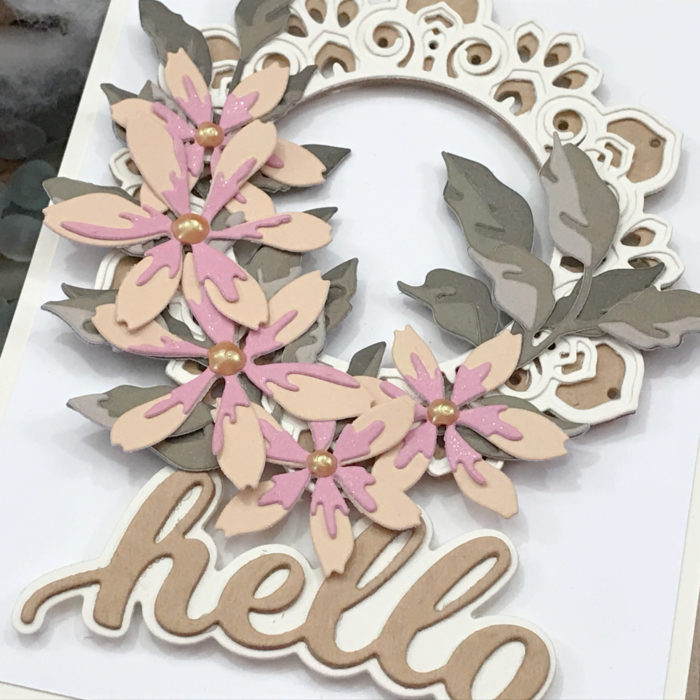
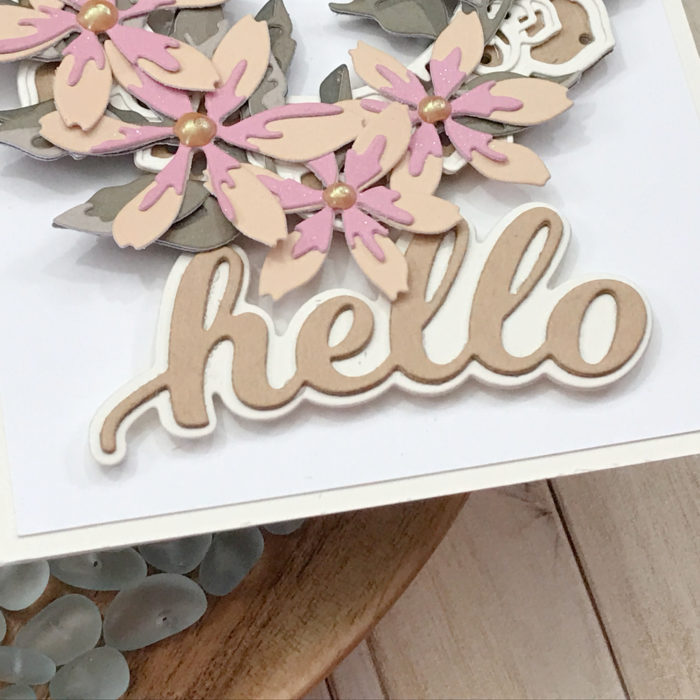
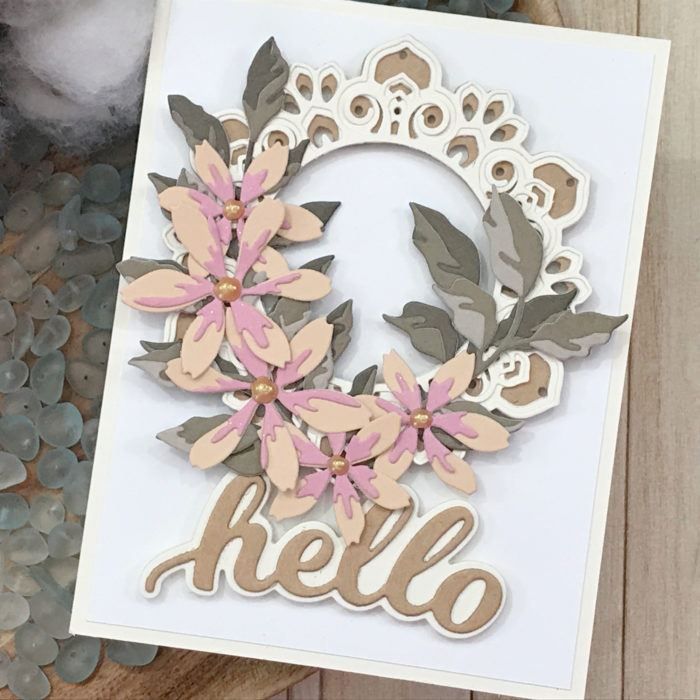
We are always finding ways to stretch our supplies, so I figured I would add to your list! The Tranquility Layering Die Set has a center circle that is separate when die cutting! This is the perfect opportunity to not only get multiple card fronts, but to also create a wreath design! So, that is what we are going to do and add a few flowers and leaves from the Contour Layers Collection!
Complete all your die cutting at once and then start layering!
I chose very neutral colors, ivory and kraft, for the outer ring of the tranquility layering set. I also cut multiples of each layer to add more dimension!
Our flowers and leaves are die cut from the Earth Neutral and Berry Red Card Pads. I always completed my layering with liquid adhesive first before going to my card front panel.
Using double sided foam tape I placed my wreath in the center towards the top of my panel and then started adding my leaves first and then my florals on top!
I then used the Hello Honey Script die for my sentiment and placed just below the wreath and allowing some of the florals to overhang the hello. This just adds a little more interest!
To finish our card I placed this panel on an ivory card stock cut to 4 1/4 in x 5 1/2 in and adhered this to a Standard A2 size card base that measures 4 1/4 in x 5 1/2 in.
Hope you enjoyed today’s project!
Make sure you stay tuned for more wonderful projects coming soon!