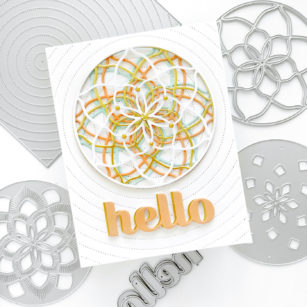
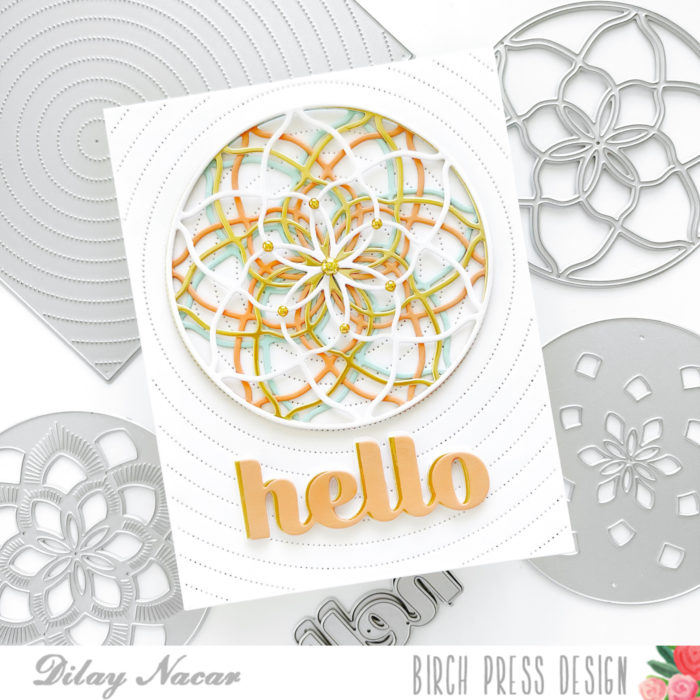
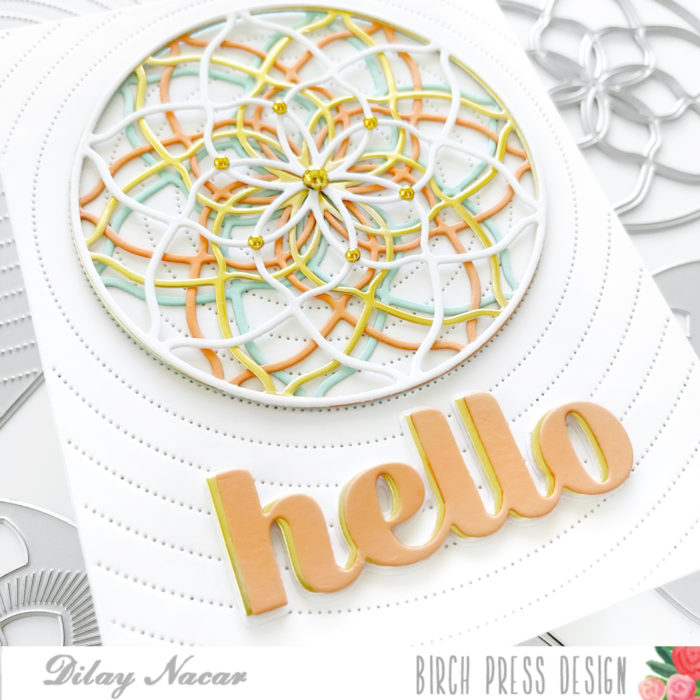
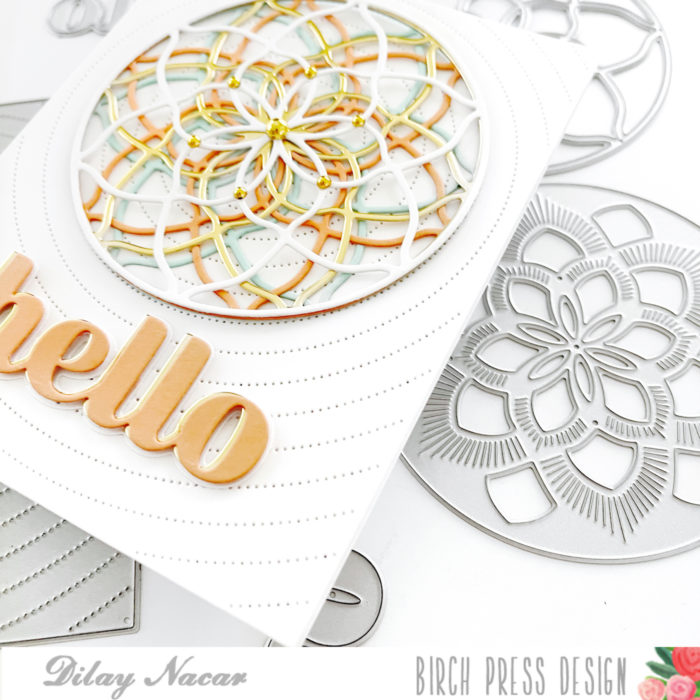
Welcome back, crafters! Dee here sharing a card that combines the Arista and the Pinpoint Radial plate dies for a clean and simple geometric design! Let’s get started!
I began by cutting the Pinpoint Radial plate die with white cardstock, then die cutting Layer A of the Arista layering dies four times – once in white and three in different colored cardstock. I stacked all four together, offsetting each one, and adhered them together for a kaleidoscope effect, then adhered it to the center of the Pinpoint Radial background.
To finish, I cut the Big Hello Sugar Script die once in colored cardstock and once in gold, stacked and adhered them together (offset), and adhered it to the background. For a little extra shine, I added gold embellishments to the center of the Arista circle!
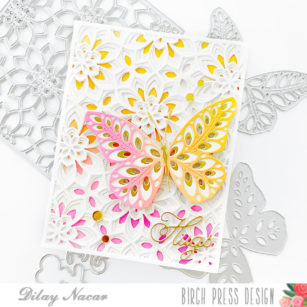
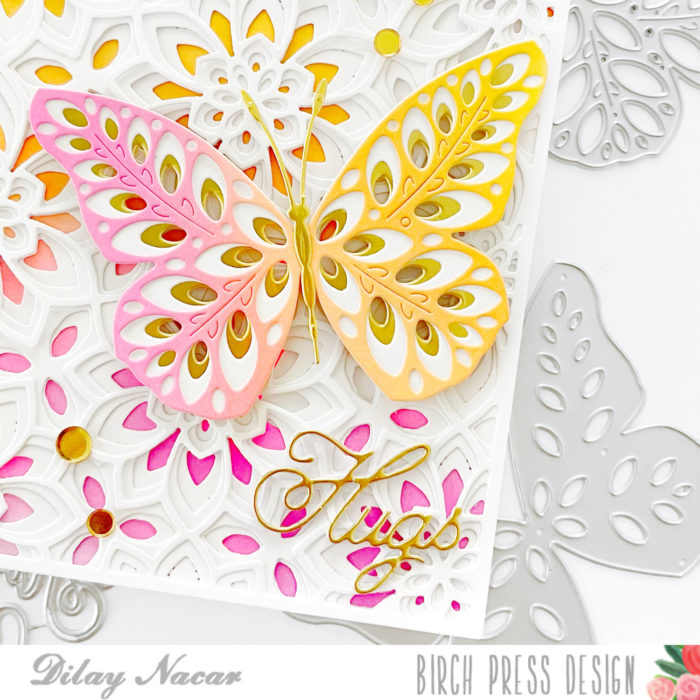
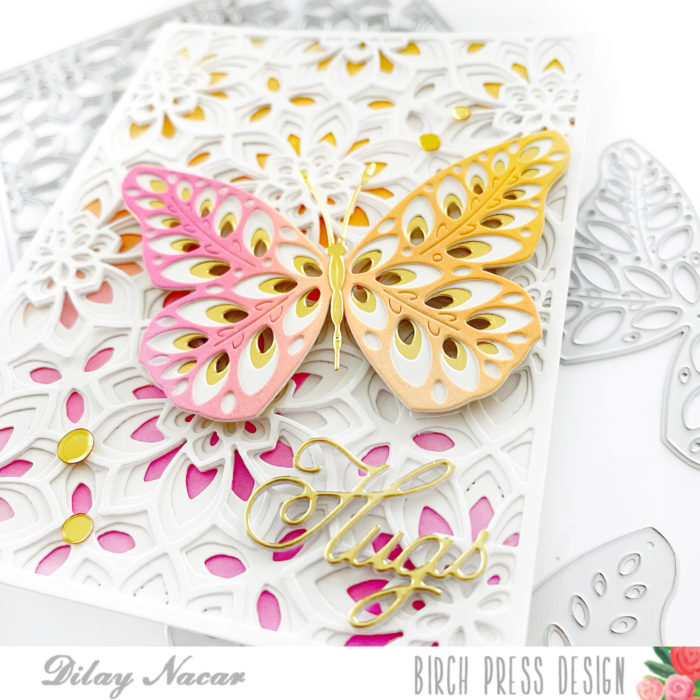
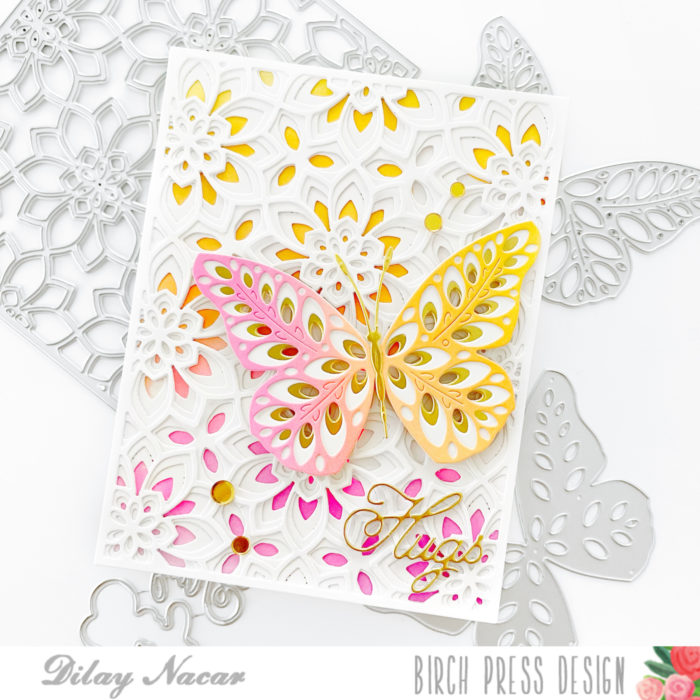
Hi friends and welcome back! Dee here today sharing a card featuring the Viola and Eloquent layered dies that I combined with a simple ink blending combo for pops of color!
To begin, I first cut the Viola Plate dies (layers a, b, and c) in white, then stacked and adhered them together. Next, I watered colored two A2-panels in yellow, To begin, I cut the Viola dies (layers a, b, and c) in white, then stacked and adhered them together.
Next, I watered-colored two A2-panels in yellow, orange, and pink, adhering one panel behind the Viola layers and die cutting the other panel with layer a of the Eloquent butterfly set. I then die cut layers b and c of the Eloquent set in gold and white, then adhered the three layers together.
I then die cut layer b and c of the Eloquent set in gold and white then adhered the three layers together. To finish the butterfly, I die cut the body of the butterfly from the Butterfly Basics set in gold and adhered it to the center.
Once the layers were complete, I adhered the butterfly to the front with foam adhesive. To finish, I die cut the sentiment from the Handwritten Hugs in gold, added gold embellishments, and mounted the panel onto an A2-sized card base.
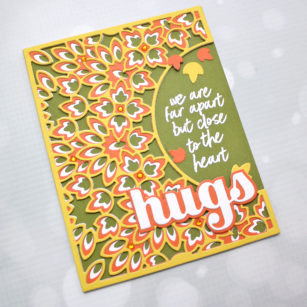
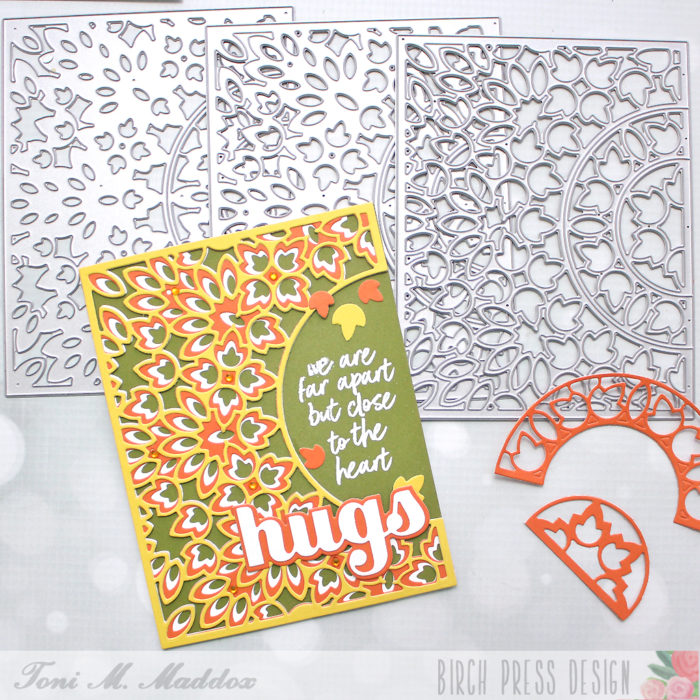
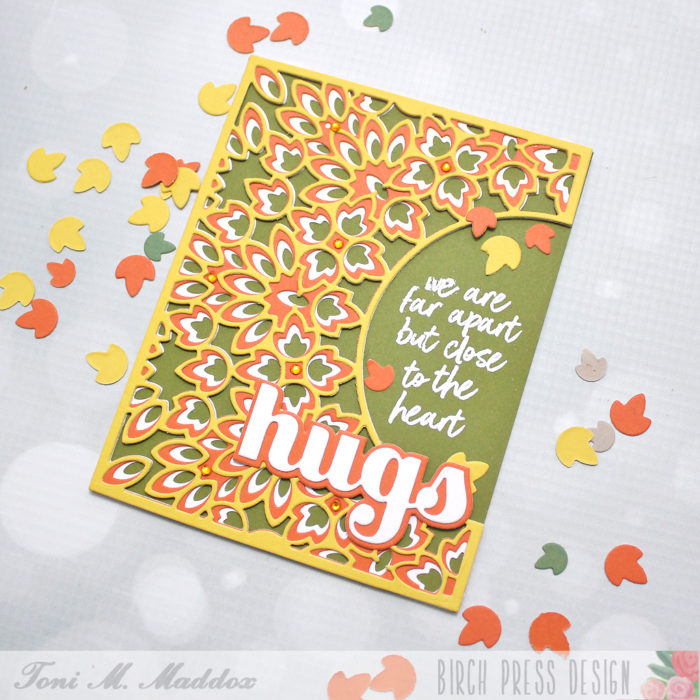
Hello, crafty friends! Toni here with you today to celebrate fall, my favorite season.
I’ve used the Enchantment Layering Dies to form the leafy design on the card. I used papers from the Sunny Orange pad: layer A = yellow, layer B = orange, layer C = off white. The green is from my stash. I love these rather retro colors!
I left off the interior arch of the Enchantment Layering Dies which created the perfect spot to emboss the Brush Sentiment in white. I also used the Big Hugs Sugar Script dies to supplement the Brush Sentiment.
To finish off the card I used a few Bright Jewels as well as a few of the leaves leftover from cutting the Enchantment Layering dies. I’ll be saving the other leaves for more fall cards for sure. What an easy way to create a pile of leaves!
Thanks for visiting today and have a wonderful rest of your week!
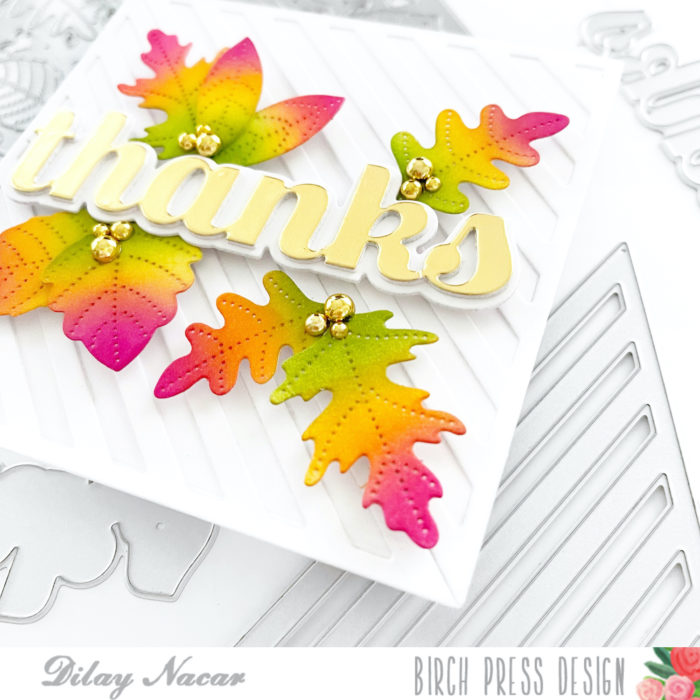
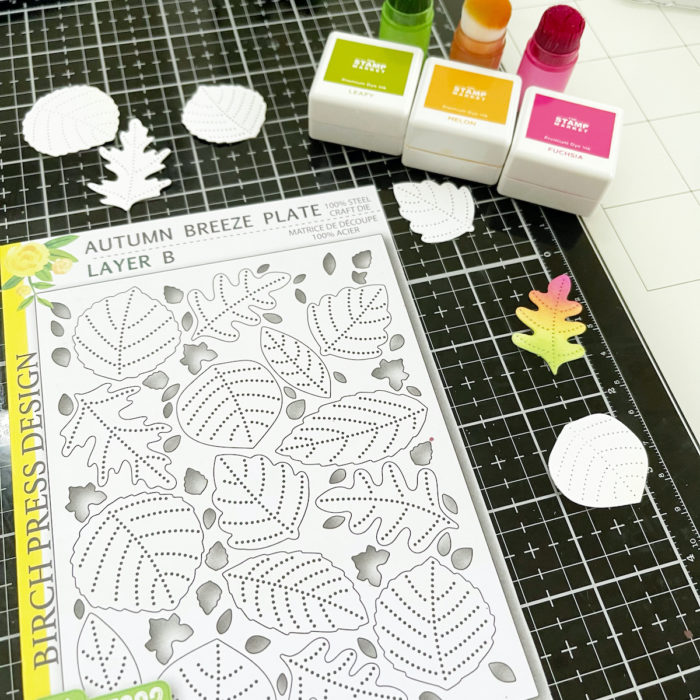
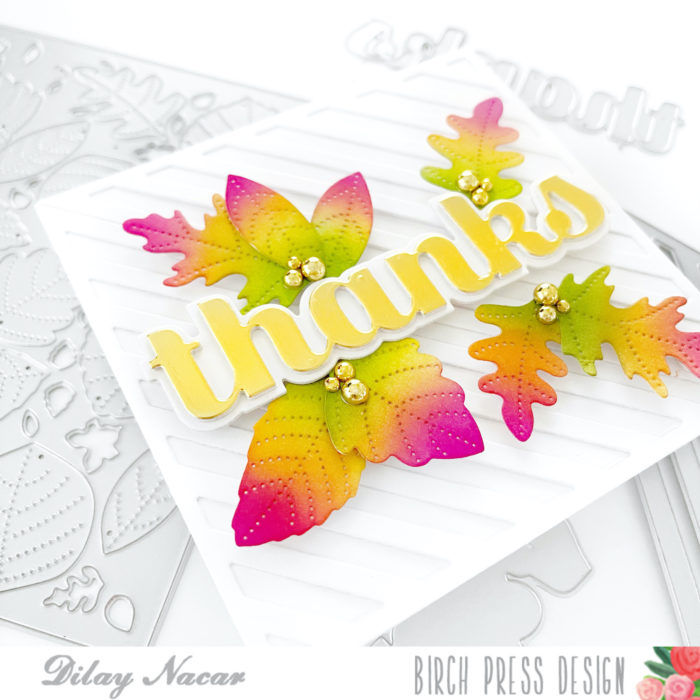
Dee (justcallmedee.com) here, and I am back today with another fall-themed card using some of my favorite dies! This square card features the Linear Triangle and Autumn Breeze Plate dies! Let’s dive right in!
First, I trimmed down a piece of white cardstock down to a 4.25” x 4.25” size. Next, I die cut two of the Linear Triangle’s and adhered one to each corner, covering the entire panel.
For the leaves, I die cut layer B from Autumn Breeze Layer die set and used only the negative pieces (in this case, the leaves) to ink blend! I blended each pink, orange, and green with small ink dangers and then set them aside to dry.
Before assembling the leaves, I first die cut the Big Thanks Sugar Script die and shadow in white, then stacked and adhered them together. I die cut it once more in gold and adhered that over the top.
To begin assembling, I adhered the ‘thanks’ to the center then added the leaves with foam adhesive. Finally, I added gold metallic pearls and mounted the card onto a 4.25” x 4.25” top folding card base.
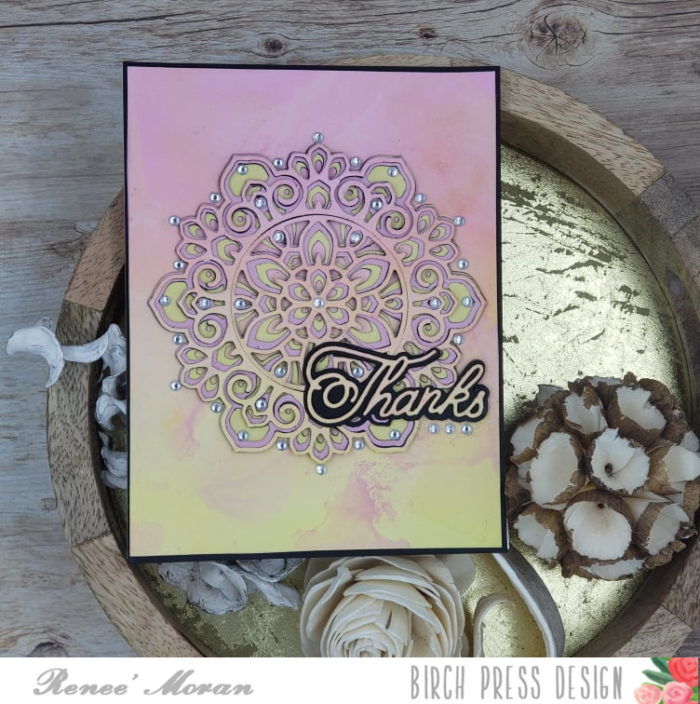
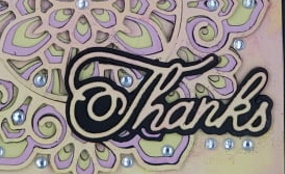
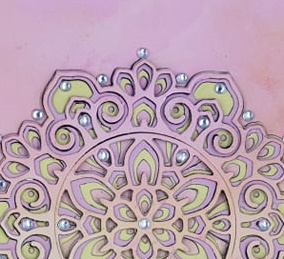
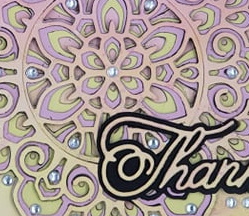
Hi Everyone, It’s Renee’ from Delaney Jane Cards here with a different take on the eclipse technique. Many times we see it done with words but I thought I could achieve something similar with the beautiful Tranquility Layering Dies and Handwritten Thanks. When I’m feeling stuck I often try to use a favorite technique or product in a new way.
Today that technique was similar to the Eclipse technique but could also qualify as Inlay. These layering dies, they create so much opportunity for experimenting and stretching not only your supplies but skills as well!
For this card I ink blended an 8 1/2″ x 5 1/2″ piece of cardstock using the Kitch Flamingo and Squeezed Lemonade Distress Oxide Colors. Then I trimmed this into two separate panels.
I die cut the Handwritten Thanks die from the panel where I wanted it to be on the finished card.
I removed the die cut and placed the tranquility Layer A from the same piece of cardstock where the final piece will be on that card panel.
This cut the place holder for the finished layered tranquility layered die set. I die cut each of the layers from both black and a coordinating cardstock. Layer C from yellow and Layer B from Pink.
I die cut the shadow layer from the Handwritten Thanks from black cardstock when I did all my die cutting. After I had all my layers, I adhered each layer to a coordinating black piece of cardstock. This will create additional drama in the final die cut design. These layers will not only add additional depth but by using black it will add a visual outline for each layer as it is viewed from the side.
By cutting the top layer, Layer A, from that initial panel, this creates the basic eclipse pattern. If I had simply stacked black die cuts under the top layer and then put it back exactly where I die cut it from, I’d have created an eclipse design. By putting the entire stack of die cuts in this layer die set together, I also achieve the inlay die cut technique, the eclipse technique and I create additional depth in the design.
I finished this card off by layering that thanks onto the edge of the tranquility medallion and added sparkle and shine with the fairy jewels in clear by Open Studio.
I’d love to know what you think of my design and of this super fun attempt at adding a twist to the eclipse technique. Please let me know in the comments.
Also, if you’d like to see how my card came together, you can click on the video below.
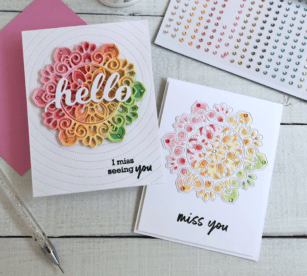
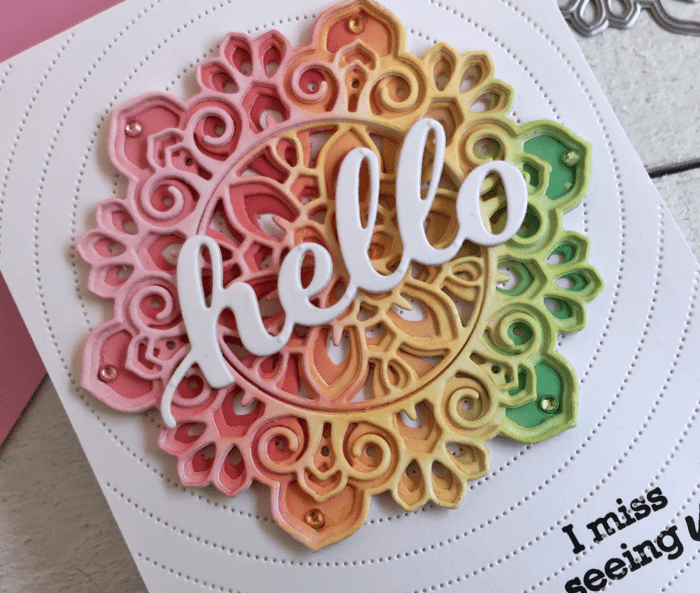
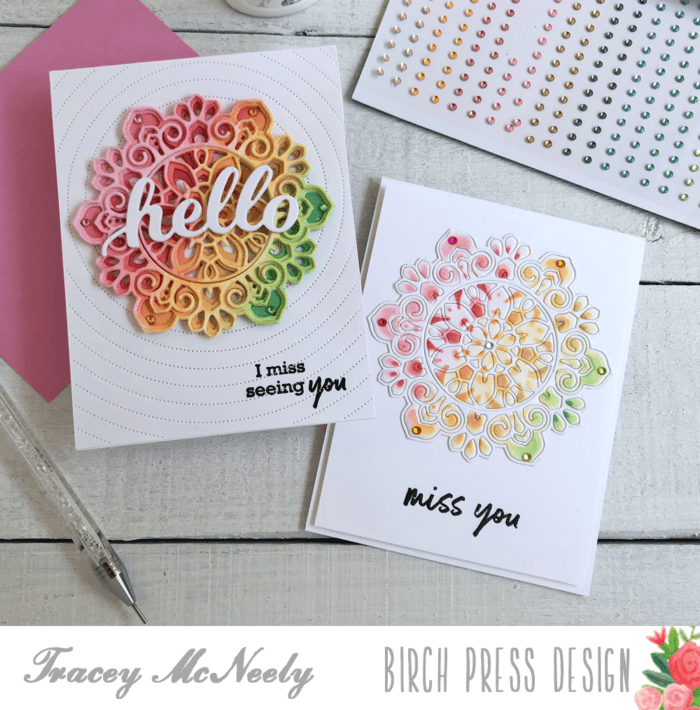
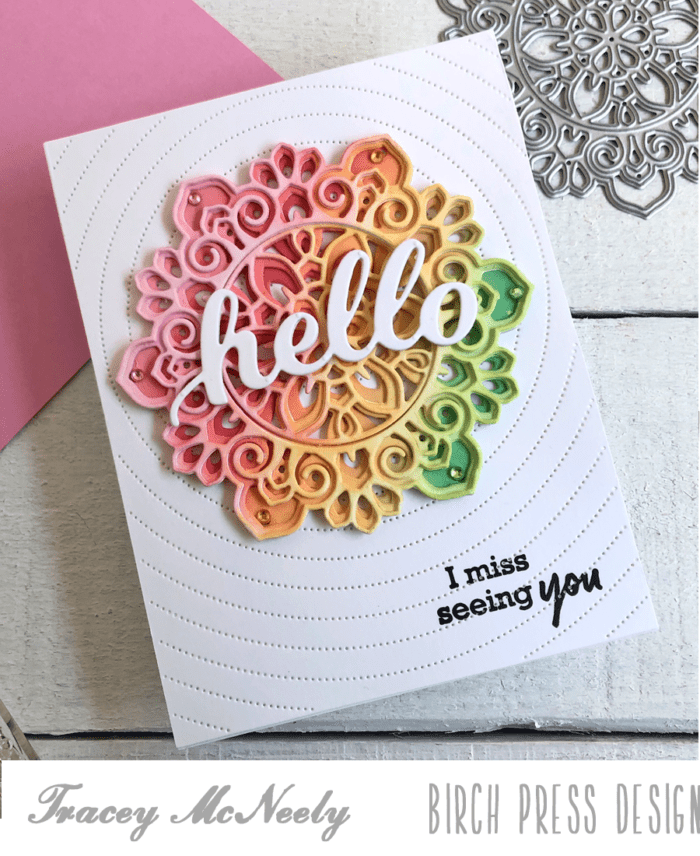
Hi There, it’s Tracey back today with a couple of cards that are perfect to send out to someone that you have been missing throughout the pandemic!
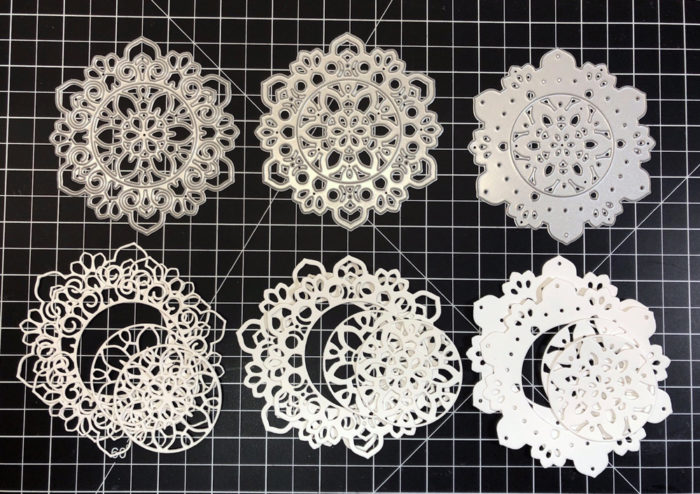
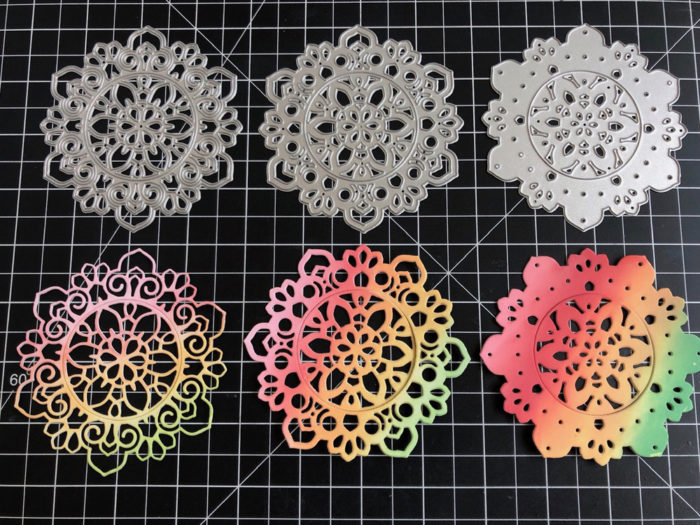
I began by cutting two each of the Tranquility Layers die set using white heavyweight cardstock. I usually save this cardstock for my card bases. However when I want the main die cut image or sentiment to really stand out I do use the heavier weight cardstock.
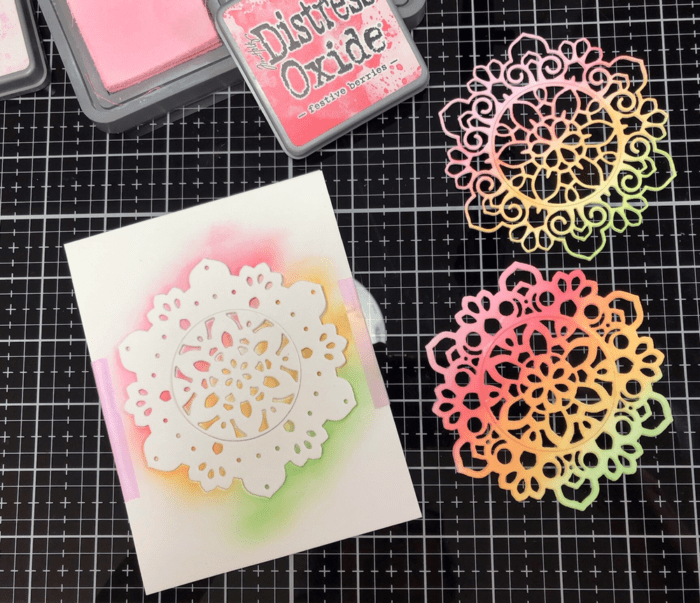
I cut one die from the Tranquility Layers die set through a 5 1/2″ x 4 1/4″ panel of white cardstock. Then I taped the panel to another panel of the same size with low tack tape. This creates a well for the die cuts for blending colour on to them.
I glued each layer together before I added colour to them, I usually do the gluing after but I am trying something different. Starting with Layer A, the one with the largest openings, I set the die cut into the well so that it doesn’t move around while I blend colour on to it. I kept the centre in place when blending my colours. You could do the centres in a completely different colour but for today I am treating it as a whole. I started with a very light hand blending a rainbow of pink, red, peach, yellow and green on a diagonal. I used Distress Oxide inks.
Next I moved Layer B into the well and did the same colours this time putting more colour down but still not heavy handed.
Finally I put Layer C into the well, this is the die cut that has the smallest size of holes. I used the same colours but I put these on with a heavy hand to really show the depth of the colours.
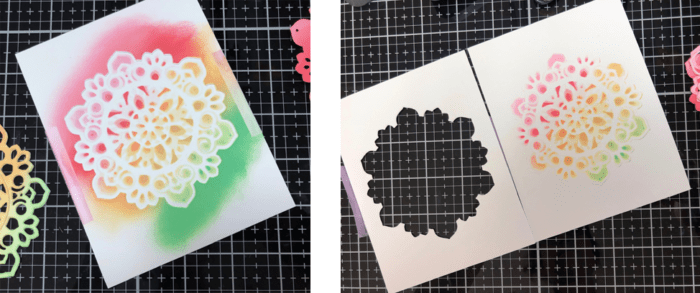
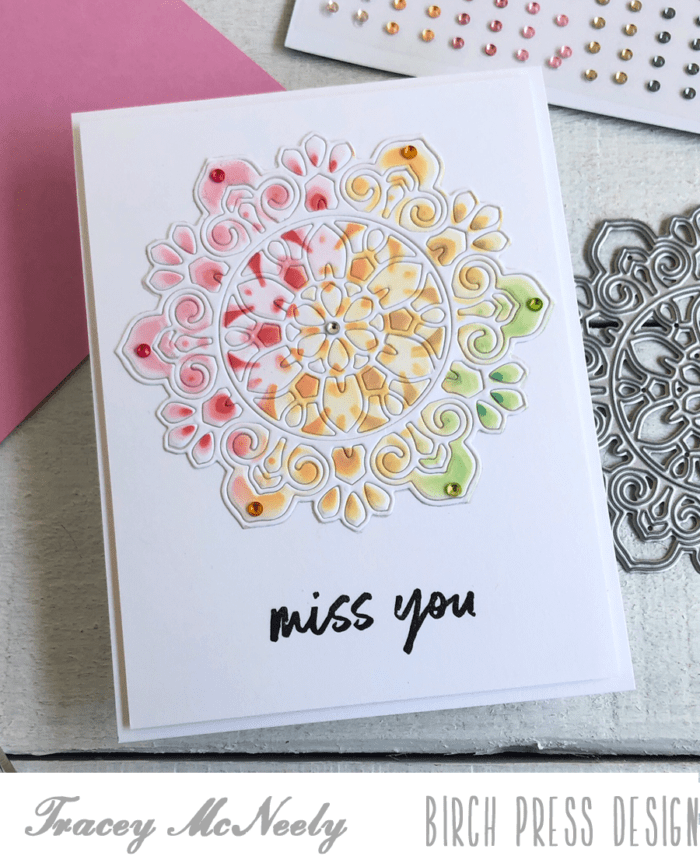
This is what my stencil well looked like after blending. then after I removed the top panel! To pretty to toss away. Can you see that while I was blending over the layers that it created another image on the bottom panel under the well. We will get to that later on. I will set it aside for now.
To finish out this card I glued the three thick layers together and the results are gorgeous. The double thick die cuts add so much more dimension. Thanks Jennifer McGuire for the tip!
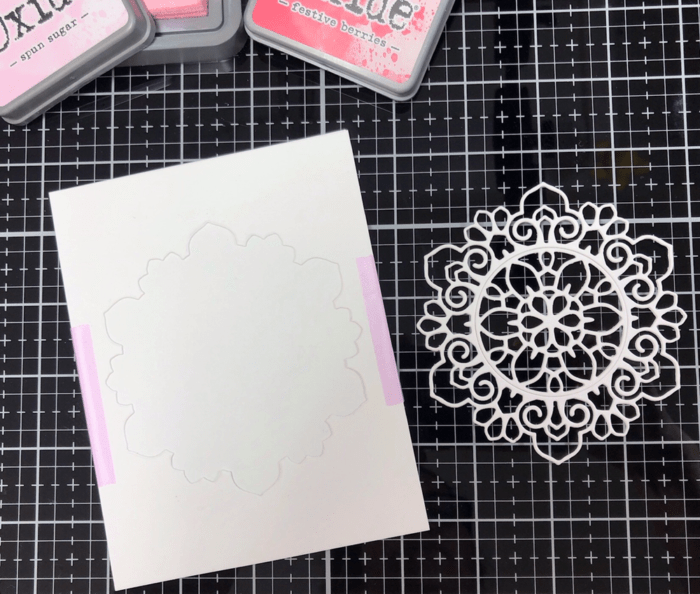
I cut a 5 1/4″ x 4 1/4″ panel using Radial Pinpoint cover die as a background for my mandala. Next I cut the Hello Honey Script die three times with heavyweight while cardstock and glued it together. I did not use the shadow, only the word. This will sit in the centre of the mandala. Before gluing everything down I stamped the sentiment “I miss seeing you’ from the Brush Sentiments clear stamp set on the bottom right corner of the Radial Pinpoint cover die. I added a few Pastel Fairy Jewels to finish it off.
I didn’t think I was going to use the panel that underneath my well, but it was too pretty not to use. what happened next was an embossing mistake I think all of us have made at one time or another. I had my plates mixed up in my sandwich and instead of embossing over the image I cut it with the Layer A die and all the teeny tiny pieces! I was too far into it now to back out, so I put a piece of double sided adhesive paper on to the back of the die cut to pick all the pieces up together. That worked great but now the front of my die cut was surrounded by adhesive. Out came the scissors and I fussy cut around the outside of the die to get rid of it. Then I put the mandala onto a panel of cardstock that was a bit smaller than the card base, added a sentiment also from the Brush Sentiments clear stamp set and added some Bright Fairy Jewels.
So the process yielded two beautiful and yet similar cards. Thank you so much for joining me today and crafting with me. Have a fabulous day.
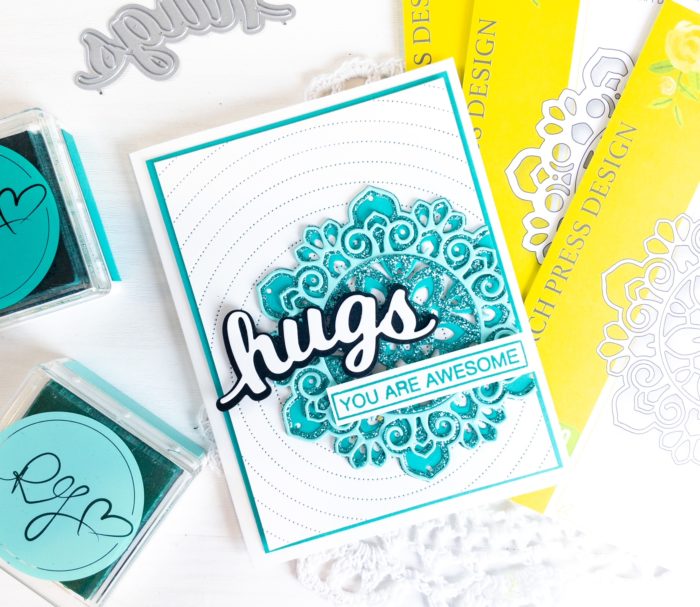
Hello friends and happy Monday! I hope you all had a pleasant weekend. This is Crystal Komara here with you today sharing a fun design featuring the Tranquility Layering Set.
Card details:
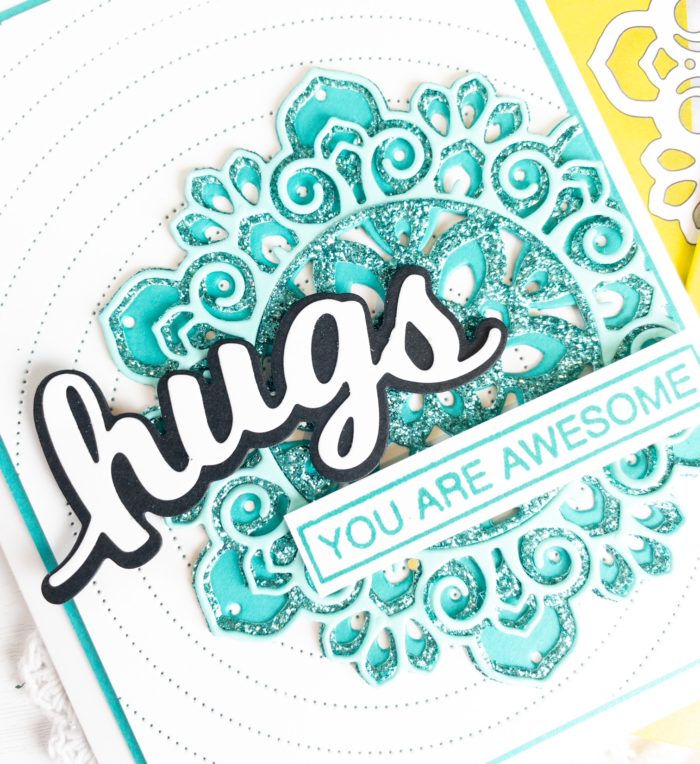
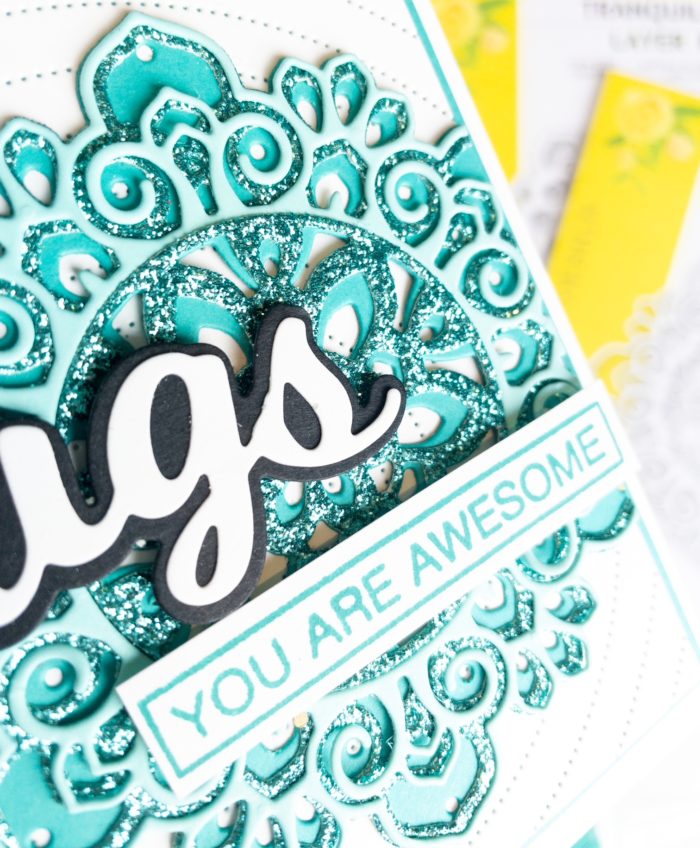
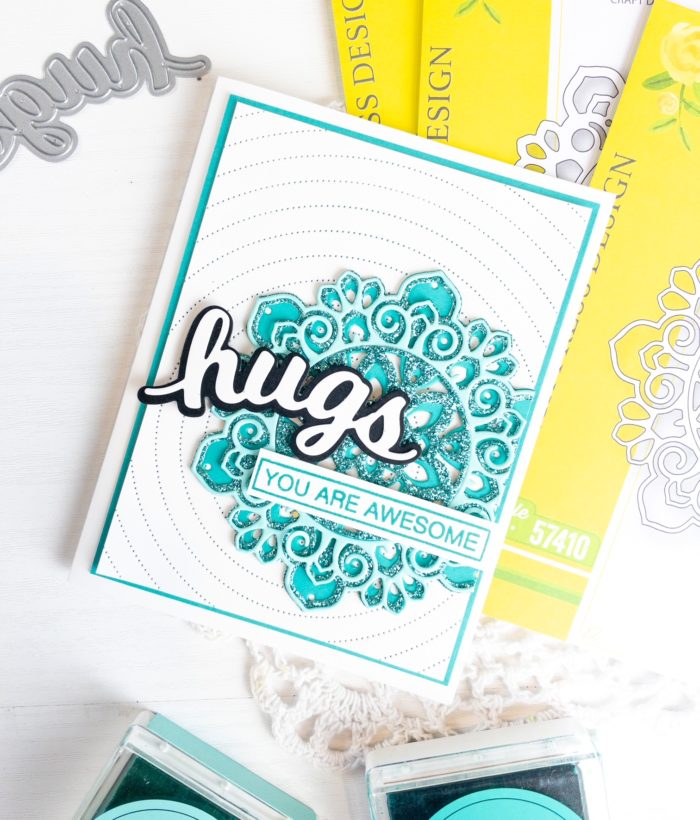
The base of this A2 sized card is made from 80 lb. Neenah Solar White Smooth cardstock. I cut a 5 1/4″ x 4″ piece of Bermuda Bay cardstock as the first mat. I used the Pinpoint Radial Plate to die cut a piece of white cardstock that I adhered directly to that Bermuda Bay cardstock. I die cut the three layers of the beautiful Tranquility Layering Set using the Fresh Aqua 6 x 6″ paper pack. The top layer, Layer A was die cut from a light blue-green color. Layer B, the middle layer, was cut from a turquoise piece of cardstock from the Twinkling Jewel Glitter Pad. Layer C, the bottom layer, was also cut from the Fresh Aqua paper pack.
I adhered the three layers of the die together using Lineco Neutral ph bookbinding glue ,my go-to liquid adhesive. I adhered the three layers to the card using 3M foam adhesive for added dimension. I die cut the word “hugs” using the Hugs Honey Script dies. I die cut the bottom shadow layer from black cardstock and the top layer from white cardstock. I adhered both layers together before adhering them to the card. Lastly I stamped the sentiment “you are awesome” in Bermuda Bay ink from the Ticker Tape stamp set. I cut out the sentiment and adhered it just below the word “hugs.”
I hope you have enjoyed today’s card. I simply love using the layering dies from Birch Press Design because they are so unique! Thank you for visiting and have a wonderfully creative day.
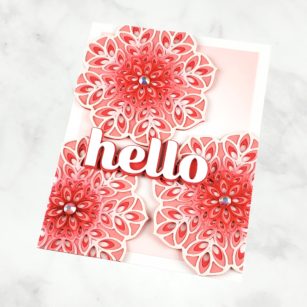
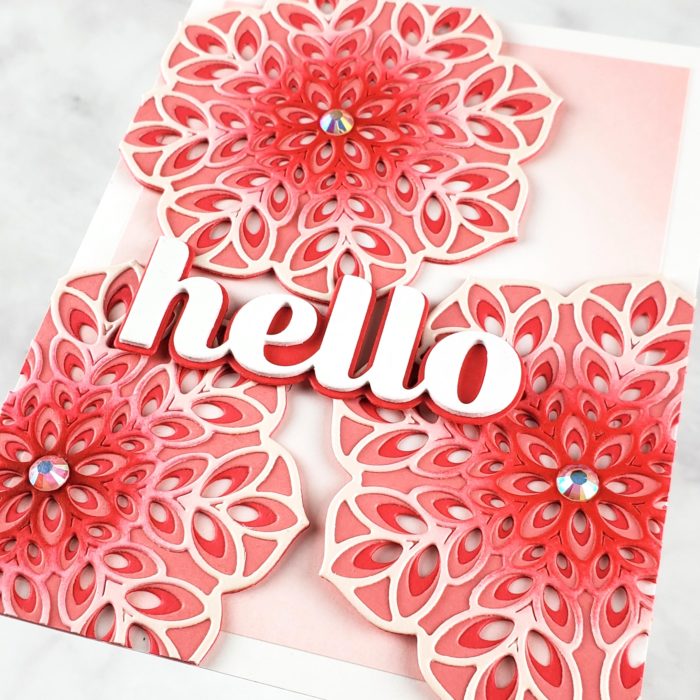
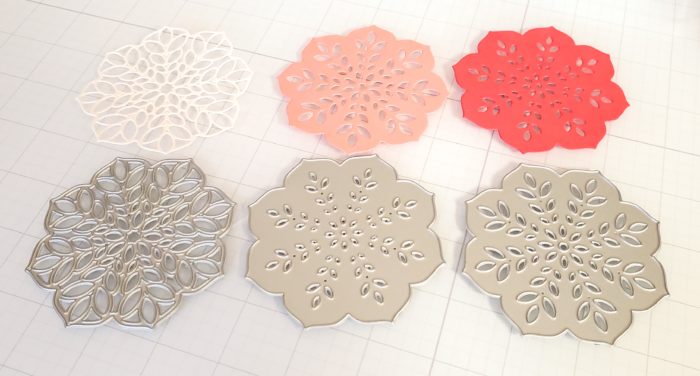
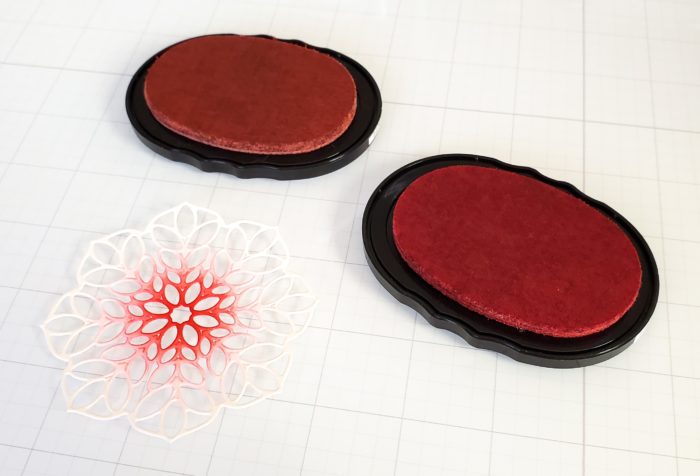
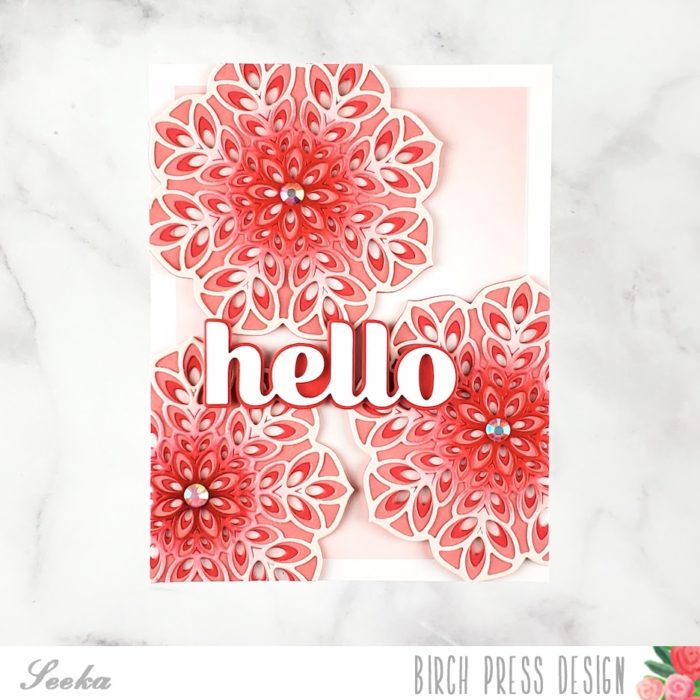
Today I’m sharing a card featuring the Delight Layer Die Set in pretty coral pink colors.
I started off by selecting three coordinating colors of cardstock and cutting three sets of layers, using the lightest color of cardstock for the topmost intricate layer.
Next, I used a blending brush to blend a light red dye ink into the center of the lightest layer. Then, I deepened the color at the very center of the die cut with a darker red.
I repeated this three times and then stacked and adhered each set of three layers together.
Next, I used the Big Hello Sugar Script die to cut the sentiment from white cardstock four times. I stacked and adhered these layers together, for dimension, and then adhered the piece to the shadow layer which I cut from coral cardstock.
For the background, I blended some of the light red ink around the border of a 3.75″ x 5″ panel of white cardstock. Then, I adhered that panel to a 4.25″ x 5.5″ panel of white cardstock.
To assemble the card, I adhered the three layered Delight die cuts to the background and then trimmed off anything hanging off the edge of the panel. I added the sentiment and jewel embellishments and then finished by adhering the card front to a card base.
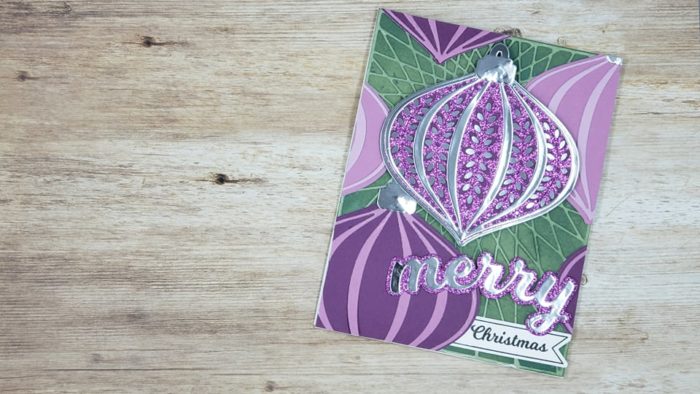
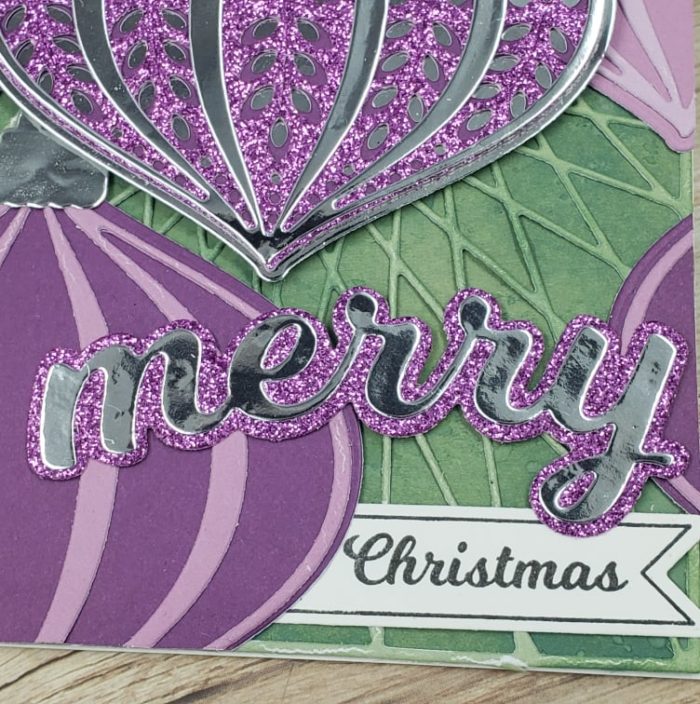
Hi Everyone, It’s Renee’ from Delaney Jane Cards here with a Christmas in July card! Yes, Christmas in July. I also used an unexpected background die to create the “tree”! Sometimes it is about stretching your dies to make them really worth owning.
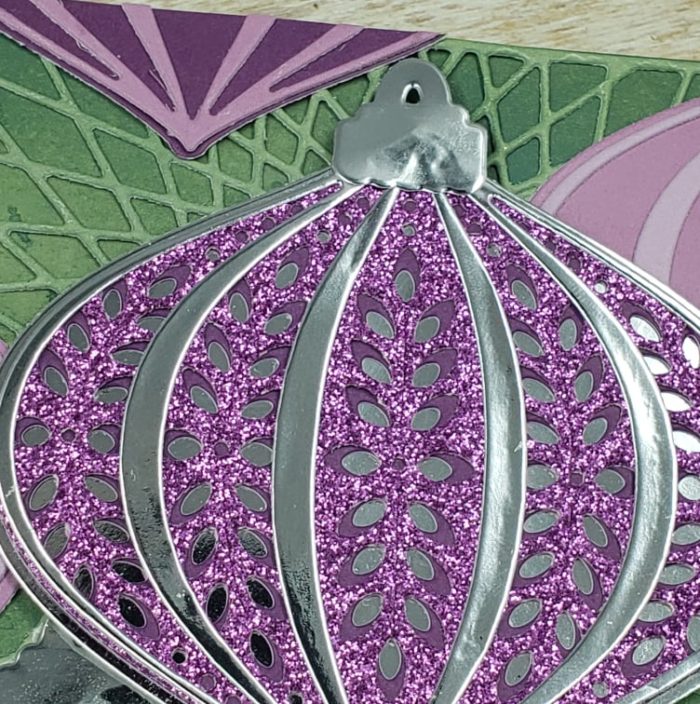
I really wanted to use the Marisol Ornament layering dies because, let’s face it, they are so beautiful!!! I decided on purple, silver and green for my color scheme.
I picked out some glitter cardstock, polished cardstock and some purple and green from the cardstock 6×6 stacks.
I created one entire Marisol Layering Die set and used the top layer (a) to create two other ornaments. The Christmas Ornaments and Labels Stamp and Die set has this solid die that works so well with the Marisol Ornament Layering Dies and the topper for the ornament. I used that solid die to back all three ornaments.
I added foam tape to the main image and adhered the other two down using liquid adhesive. Then snipped the excess off and adhered them to to other areas on the card. No need to create multiple ornaments when you can use just a few and place the bits and pieces in the blank spaces.
By being creative with how I layered them atop of the String Art Nativity Star background die I was able to “hide” the star and create the look of the branches of a pine tree. What a cool way to stretch that die, am I right?
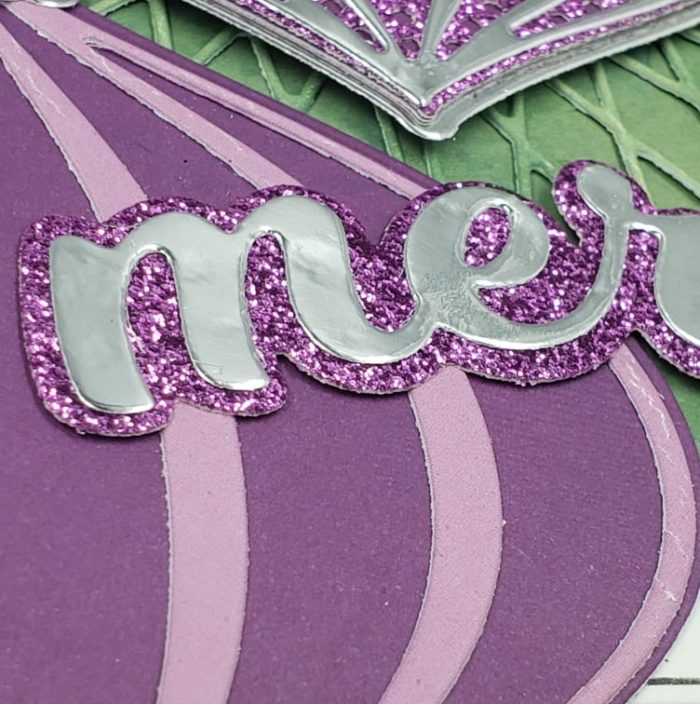
I even stretched the Christmas Ornament and Label Stamp and Die Set and to selectively stamp the sentiment. I wanted to use the Merry Die so I only stamped the word Christmas.
You’ll have to let me know if you think this “feels” like a closeup of a Christmas tree because I think it does. Also, if you’d like to see how my card came together, you can click on the video below.
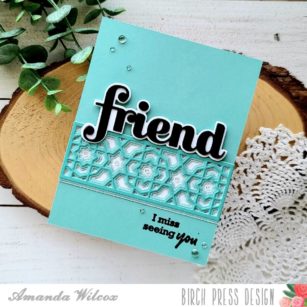
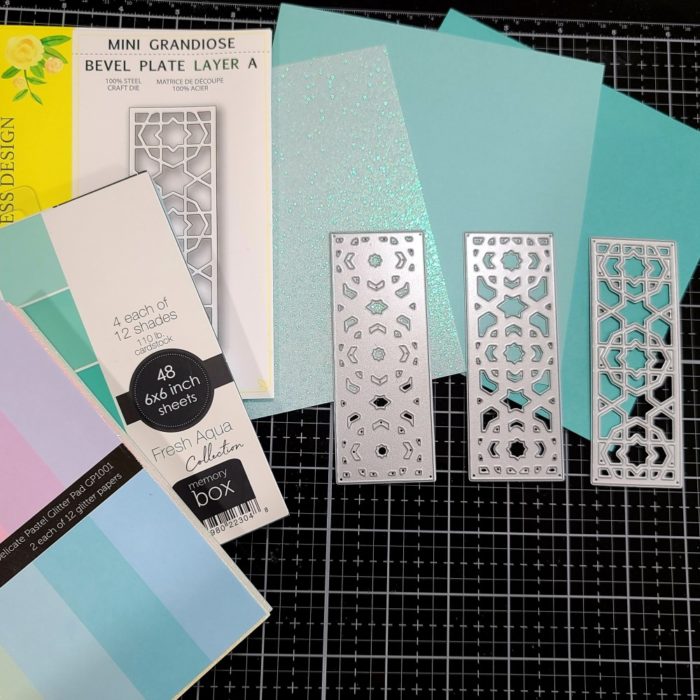
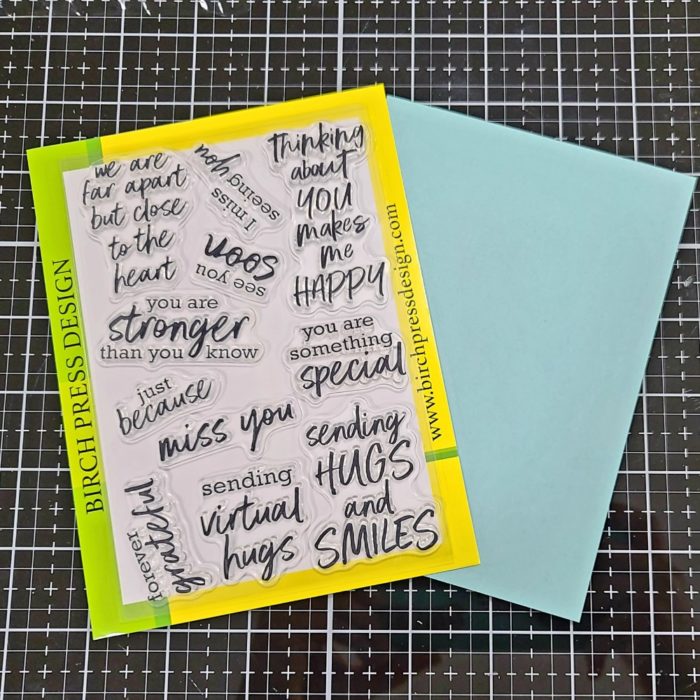
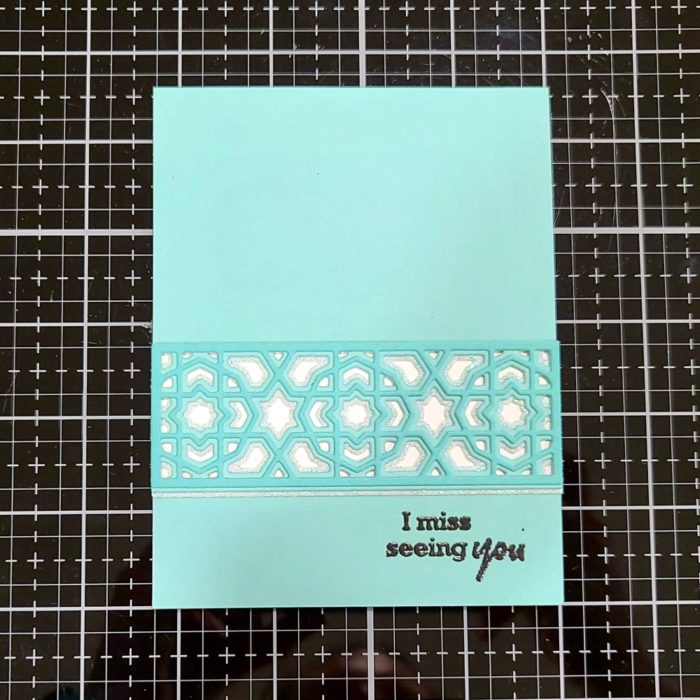
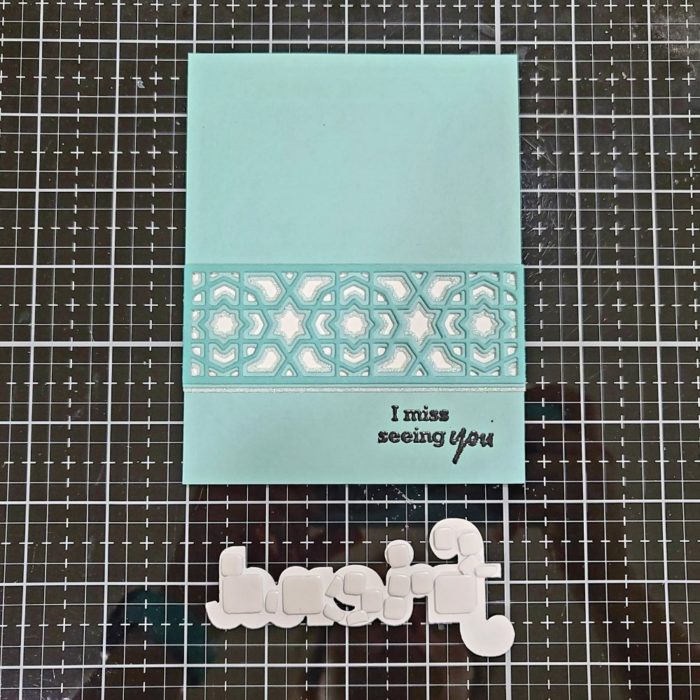
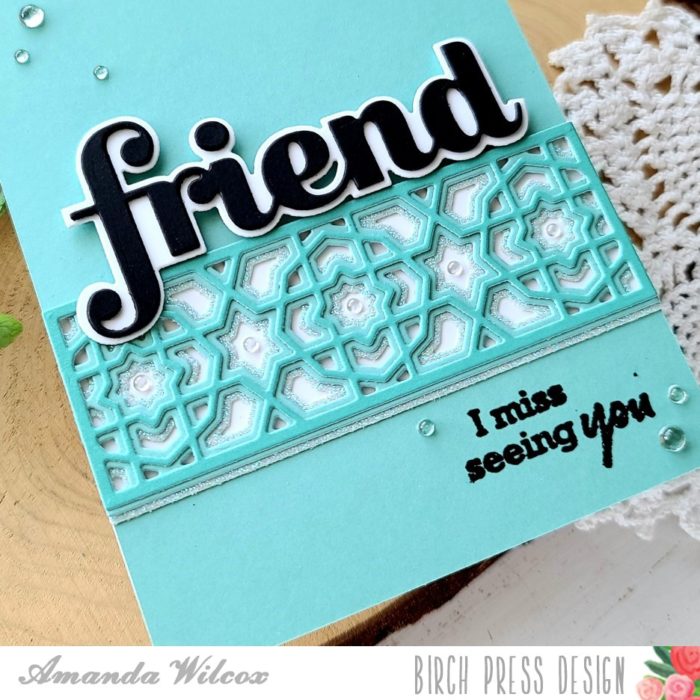
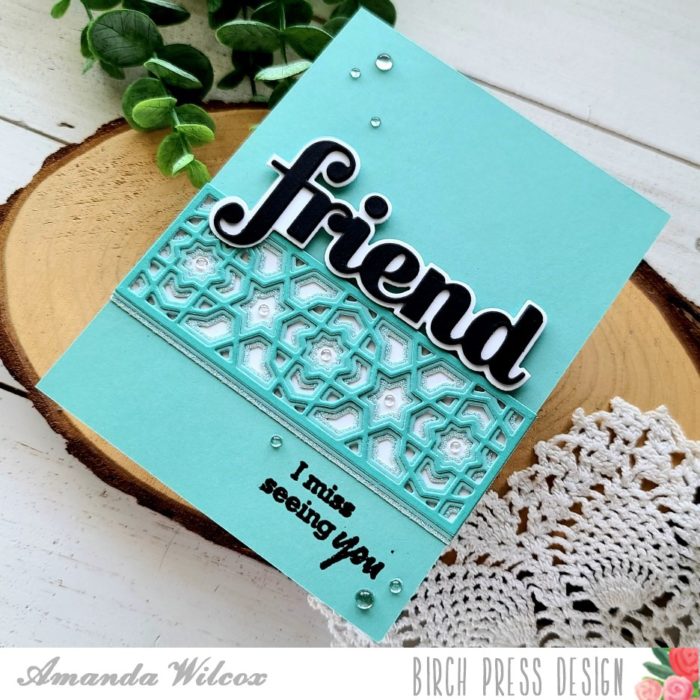
Happy weekend everyone! It’s Amanda from Twiddler’s Nook with a simple missing you card that I made for a friend that I haven’t seen since before the pandemic. I hope you like it!
I started today’s card by choosing cardstock and cutting the layers for the Mini Grandiose Bevel layers.
Then I took the mid-tone cardstock color and trimmed it down to A2 size. I stamped and heat embossed a sentiment from the Brushed Sentiments stamp set in black.
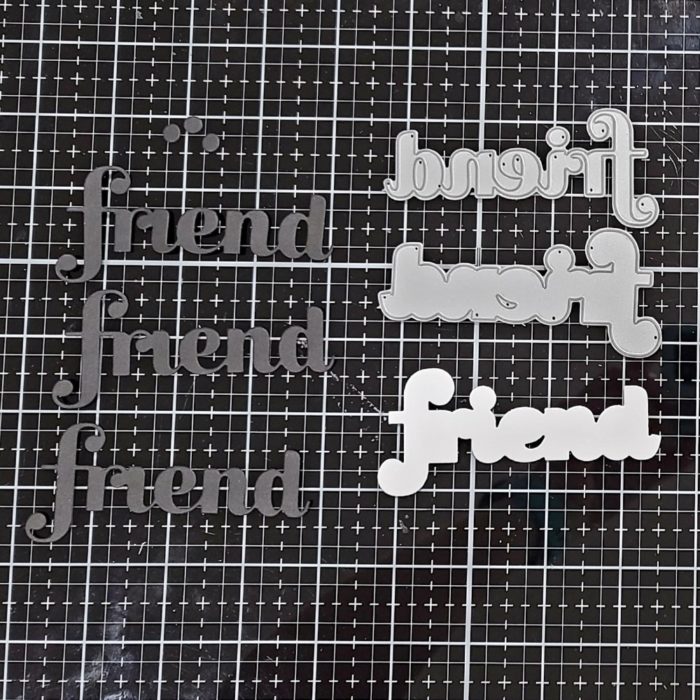
Next, I die cut the Big Friend Sugar Script word from black cardstock 3 times and the shadow from white cardstock once. I used liquid glue to adhere all the layers together and put an acrylic block on top while it dried.
I took the heat embossed panel and actually decided to trim it down to strips and adhere them to a white card base with the Mini Grandiose Bevel layers.
I trimmed the heat embossed sentiment into a 1 1/4 inch strip and then also cut another strip of that teal to 2 3/4 inches. I used liquid glue to adhere these to a white card base and then adhere the layered strip in the opening.
Next, I added foam squares to the back of the friend die cut with the exception of the bottom of the “f” because it overlaps the layers and doesn’t need the extra lift to lay flat. I removed the release paper and placed it above the layered strip.
To finish things off I added the smallest size of fairy drops to the center points of the layered strip and then a scattering of various sizes across the design for a little extra interest.
I hope you enjoyed today’s project and found inspiration to create something wonderful and share it with someone!
I appreciate you sharing your time with me. Have a fabulous day!