

Hello there, everyone! It’s Ashlea back with you today with this fun card using the Amour Arch layer set in a way you may have not thought of before. But before we get into that, let’s just address this sentiment. I love a good pun and this one was just a sitting duck while I was putting this card together. A “boo”, of course, is a loved one or a significant other and putting that together with “rainbow” to create the new word “rainboo” is definitely one of my proudest moments of the day. For this I used the Lingo Alphabet dies which made creating my own sentiment a breeze.
Moving right along, let’s get into the images. I started by cutting out each layer from the same piece of card stock. Because they’re curved it made it easier to fit them all onto one. I took the hearts that each layer cut out and put them into their own little piles of layer A hearts, layer B hearts, and layer C hearts just to be sure to not mix them up. This will become important in just a moment.

I started to pull the image together by choosing my Copic colors. I chose R29, YR16, Y08, YG08, B29, V17 and V06 for my ROYGBIV rainbow. Obviously, there are only 3 layers here, so I improvised and created ombre hearts by blending red, orange and yellow onto the layer A hears, green and blue on layer B, and my two purple colors on layer C hearts. This ensured all colors of the rainbow were used and represented. TO assemble these hearts onto my card front, I used the arch cut out of the Amour Arch layer A and placed it over a 4″ x 5 1/4″ near the bottom. I made sure that it was evenly centered on the lower half of my card front, and then used the openings as a guide and stencil for where to adhere my layer A hearts. I placed a very small bit of glue into each open heart and then placed a heart into each opening. Once I removed my arch stencil, I was left with an arch of beautifully colored rainbow. hearts
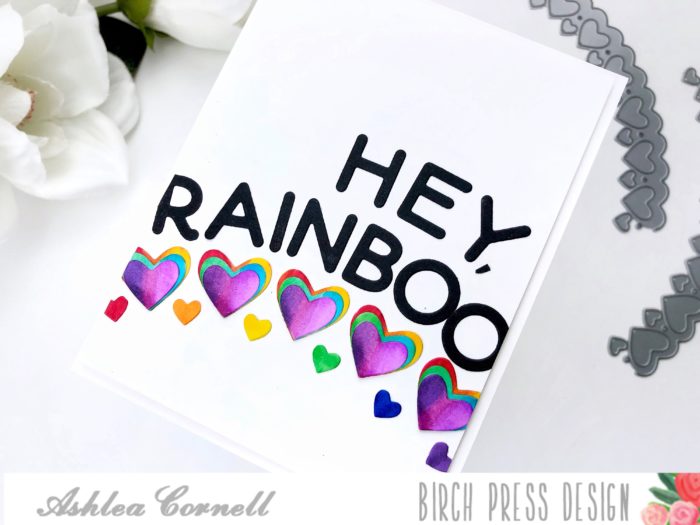
I then used glue to adhere layer B hearts so that the bottom of the heart matched up with the bottom of layer A hearts and repeated this method with layer C hearts. To create a bit more of a true rainbow, I colored six of the smaller hearts that each layer cuts in rainbow colors and adhered them between each heart, approximately where they are positioned on the die.
Finally, I created my sentiment which I explained earlier in the post, and arched it a bit over the hearts. I hope that I’ve inspired you to create outside of the box with your layering dies! Thank you so much for stopping by today, I’ll see you again very soon!

Comments
One response to “Using Die Cuts as a Stencil Guide for Negatives with Ashlea Cornell”
Supper CUTE! I didn’t know that BOO refered to a loved one or significant other…that explains why we always called my favorite aunt Bootie (I always thought it was because she was so beautiful and we little kids mispronounced it)