
Hello Everyone and Welcome Back!
For today’s project lets pull out our pattern paper and vellum along with the Floral Layering Die Set to set the stage for our focal point…
First gather your materials and then let’s get to cutting our die cuts, focal and sentiments and paper backgrounds!


Using your liquid adhesive, we can layer our die cuts and sentiment and set them aside to dry!

You want to cut from your pattern paper a 4 ¼ inch x 5 ½ inch panel and from your vellum you can to cut a 4-inch x 5 ¼ inch panel. Now your vellum can be cut to any size you want based on your focal point!
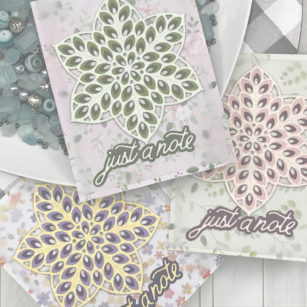
We are ready to get our cards together! First, you want to attach your Floral Star to the front of your vellum along with your sentiment just below. Once you have your pieces in place and they are dry, you can then use those areas to adhere your vellum panel onto your pattern paper. All panel were set onto a Standard A2 size top folding card base (4 ¼ inch x 5 ½ inch)!


We will be having giveaways on our Instagram Account March 21-29, 2020. One comment will be chosen at random from each of the Instagram posts during the blog blitz. Only one prize per person per giveaway. We use a random number generator to select winners from comments. You have until midnight US EST April 1 to leave a comment on each and every Instagram post that you want to enter. Winners will be announced on the Instagram posts on April 3.
For a chance to win the Floral Layer A Die…..
1.) Follow Birch Press Design on Instagram
2.) Double Tap (LIKE) the post with this giveaway
3.) Tag A Friend in the comments
Good luck! And thanks for joining us!
As always, I hope you enjoyed today’s project… and if you want to see more details just click on the video below and see how these projects come together step by step!
Make sure you stay tuned for more wonderful projects coming soon! Have a great day and always remember… Be Creative!

Supplies


Comments
2 responses to “The Floral Star UpFront + A GIVEAWAY! | By Desiree Kuemmerle”
Amazing dies , such a useful set both of them
These cards are so elegant. The dies are gorgeous. I also love the sentiment dies.