Hello readers! This is Crystal here with you today sharing some rainbow cards featuring the Lovely Butterflies stamp set. I’ve been creating a lot of rainbow themed cards lately, because I find them very cheerful and uplifting and I think we could all use more sunshine (and rainbows) in our lives right now!


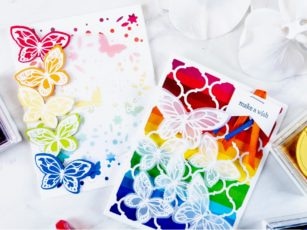
The base of this first card was made using 80 lb. Neenah Solar White smooth cardstock. Using the Delfina Layering Plate A, I die cut the lattice background from white cardstock. I adhered a piece of rainbow paper behind the lattice using a Tombow dot runner before adhering both layers to the card base. I stamped the sentiment “Make a wish” in Memento Tuxedo black ink on a piece of scrap paper and notched the bottom end. I adhered thin pieces of orange, red and blue ribbon behind the sentiment and stapled it together. Yes, stapled! Why not?! It’s art!

I stamped a variety of butterflies from the Lovely Butterflies stamp set on vellum cardstock in Versamark ink and heat embossed them with white embossing powder. I die cut the butterflies using the coordinating Lovely Butterflies dies and adhered them to the card small pieces of 3M foam adhesive for added dimension.

To create the second card, I die cut the Butterfly Garden Layer Plate C from white cardstock. I adhered this over a piece of rainbow patterned paper. I stamped one butterfly on each of five different colored cardstocks (red, orange, yellow, green and blue) and heat embossed the butterflies with white embossing powder. I used the coordinating Lovely Butterflies dies to die cut the butterflies out.

I die cut a circle of vellum cardstock and stamped the sentiment in the middle of the circle in Versamark ink. I heat embossed the sentiment with white embossing powder and adhered it to the center of the card. I adhered the die cut butterflies down the left side of the card in a rainbow pattern. I adhered the butterflies to the card using small pieces of 3M foam adhesive.


I have created a YouTube video tutorial for you to watch and learn how both cards were created!
Thanks for visiting and have a wonderfully creative day!

Supplies


Comments
One response to “Lovely (Vellum) Butterflies | by Crystal Komara”
Beautiful cards,
love the butterflies!
Carla from Utah