Hello everyone. It’s Amanda from Twiddler’s Nook joining you today for a trio of cards. I started with one in mind and just couldn’t stop creating! These were so fun to create!

We’re going to start with the process I used to create the Thanks card first and then I’ll touch on some differences with the other 2. Let’s dive in!

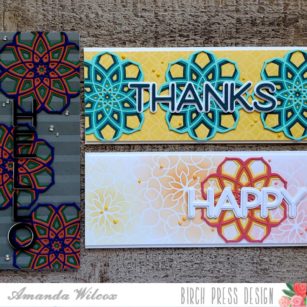
To create all of these cards, I chose my 3 colors and cut 3 of each of the Cora layers and assembled them with liquid glue.

For this first one, I used the Ring Tile stencil with a yellow dye in and blending brush. I just did half, then shifted the stencil and did the other half. It was super easy!

Then I glued the Cora layers to the stenciled panel, trimmed the excess off and adhered the panel to a white card base measuring 3.5×8.5. I die cut the letters from the Jumbo Lingo Thanks from white and the darkest teal and adhered them all together. Finishing off by adding them to the top of my card and adding some Nuvo Crystal Drops in dandelion yellow scattered about.

Here’s a look at the finished product. I absolutely love these colors together! And that sentiment is so bold and wonderful! I love it! Let’s keep going with the HAPPY card next.

I created my Cora layers the same way with different colors and moved on to stenciling a panel with the Midnight Mandala stencil this time. I started on one end with my blending brush and some melon dye ink, then moved the stencil and used peach ink and finally moved it one more time and ended with yellow so it all coordinated with my cardstock colors.

This time the sentiment is white on white with 3 layers of the letters on top for dimension.

Now for this design, although I created 3 of the Cora layers up front, I only used one because I love the stencil showing through. I adhered everything and popped the panel on a white card base. For finishing touches this time, I used Nuvo Crystal Drops in dandelion yellow, sugared almond and bubblegum blush.
Now, let’s check out that bold masculine version.

Again, I created the Cora layers with those awesome bold colors and set them aside to stencil my background.

For the sentiment this time, I decided not to use the shadow and try moving the letter vertical though. It looks so cool this way!

I adhered my stenciled panel to a card base and then adhered the Cora layers and trimmed the excess. For placement on the sentiment I used a T-ruler to keep it all straight. Notice how the “O” is funny because of the curve…I adhered all the other letters, removed the stencil and eyeballed centering the “O” under it all. It looks much more balanced.
Then I finished this one off with some cool bubble embellishments and it’s done.
I know this was a really long post and I appreciate you sticking with me. I hope you found some inspiration to create something wonderful. Have a fabulous day!

Supplies


