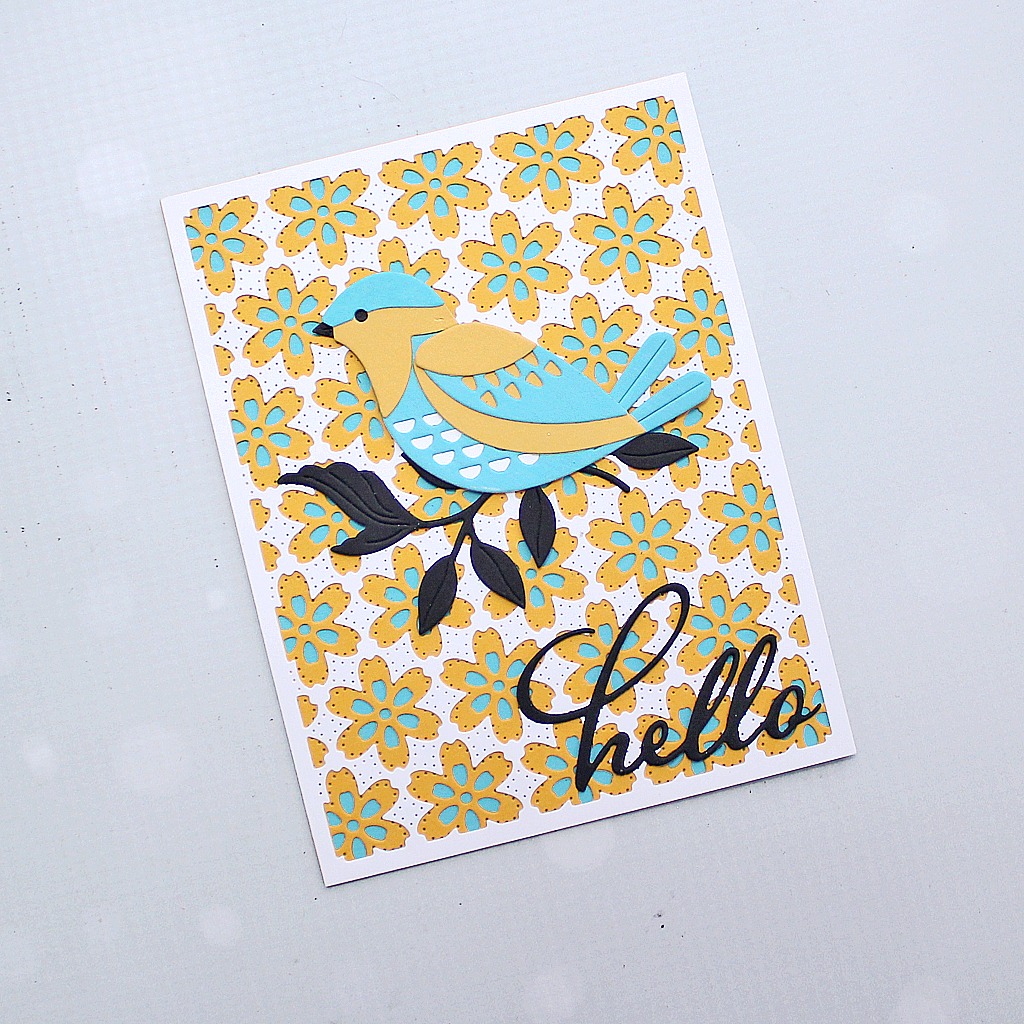
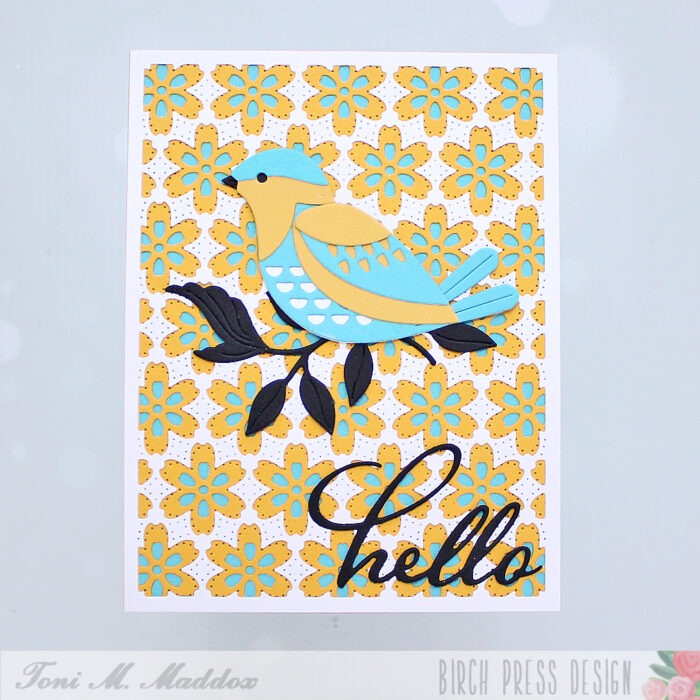
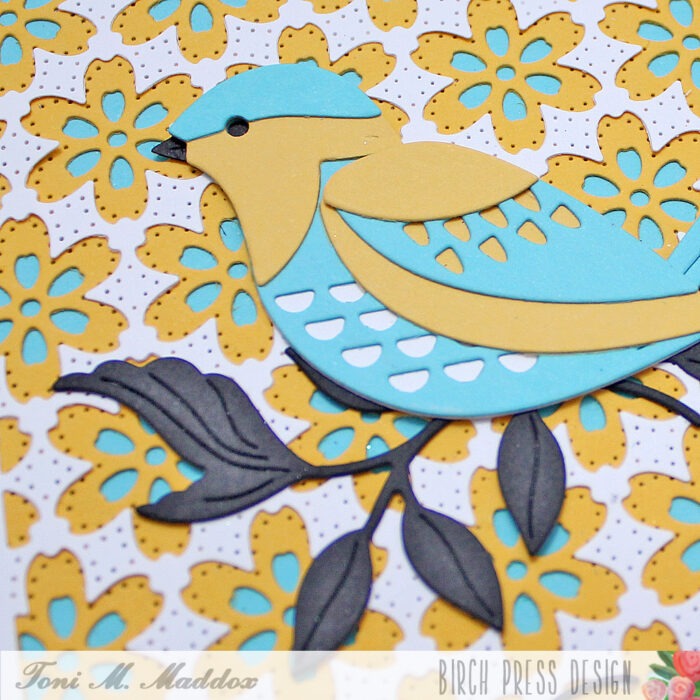
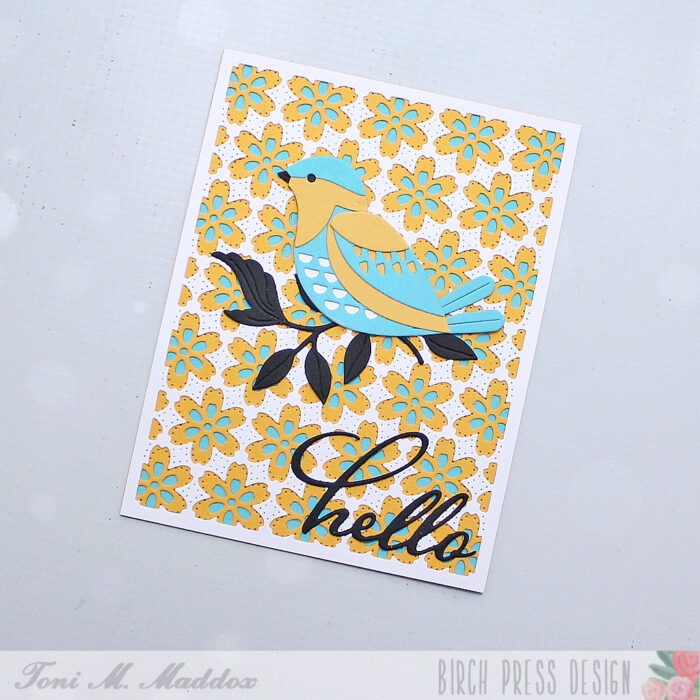
Hello, friends! Toni here today and I’m still loving the Block Print Birds. They lend themselves to all sorts of card designs.
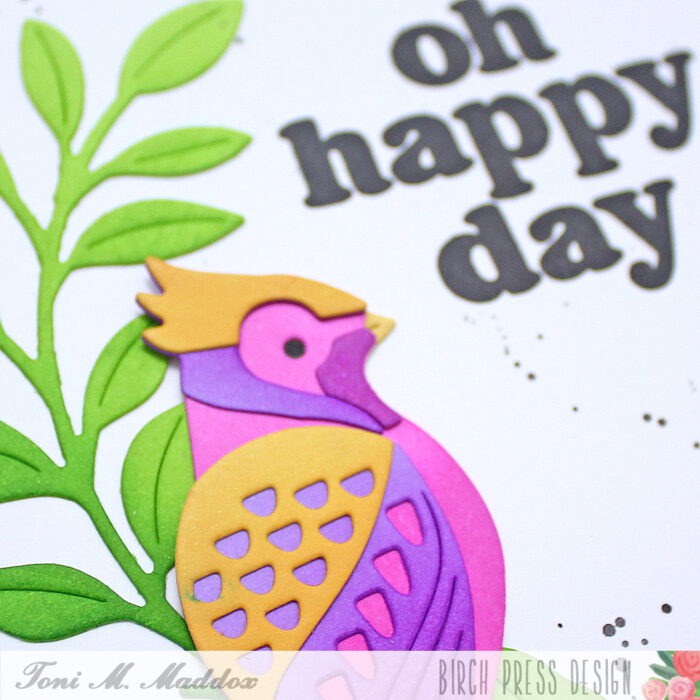
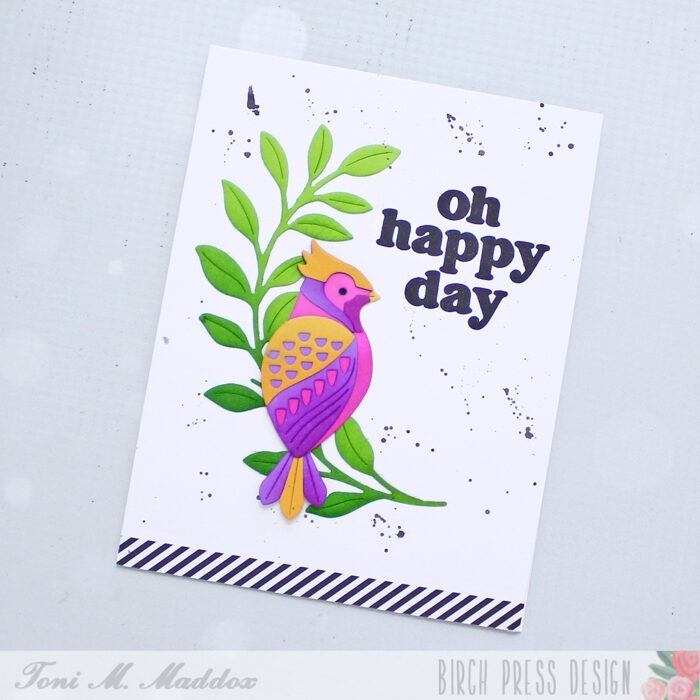
For this one, I created a Scandinavian folk style of sorts using the Block Print Bright Bird, Foliage Bunch, and Hello Scripted on the Flora Plate Layer Set.
I love the boldness of the black against the more muted Memory Box Muted Squash and Pool Party colors.
I hope you enjoyed today’s card and have a great rest of your week!
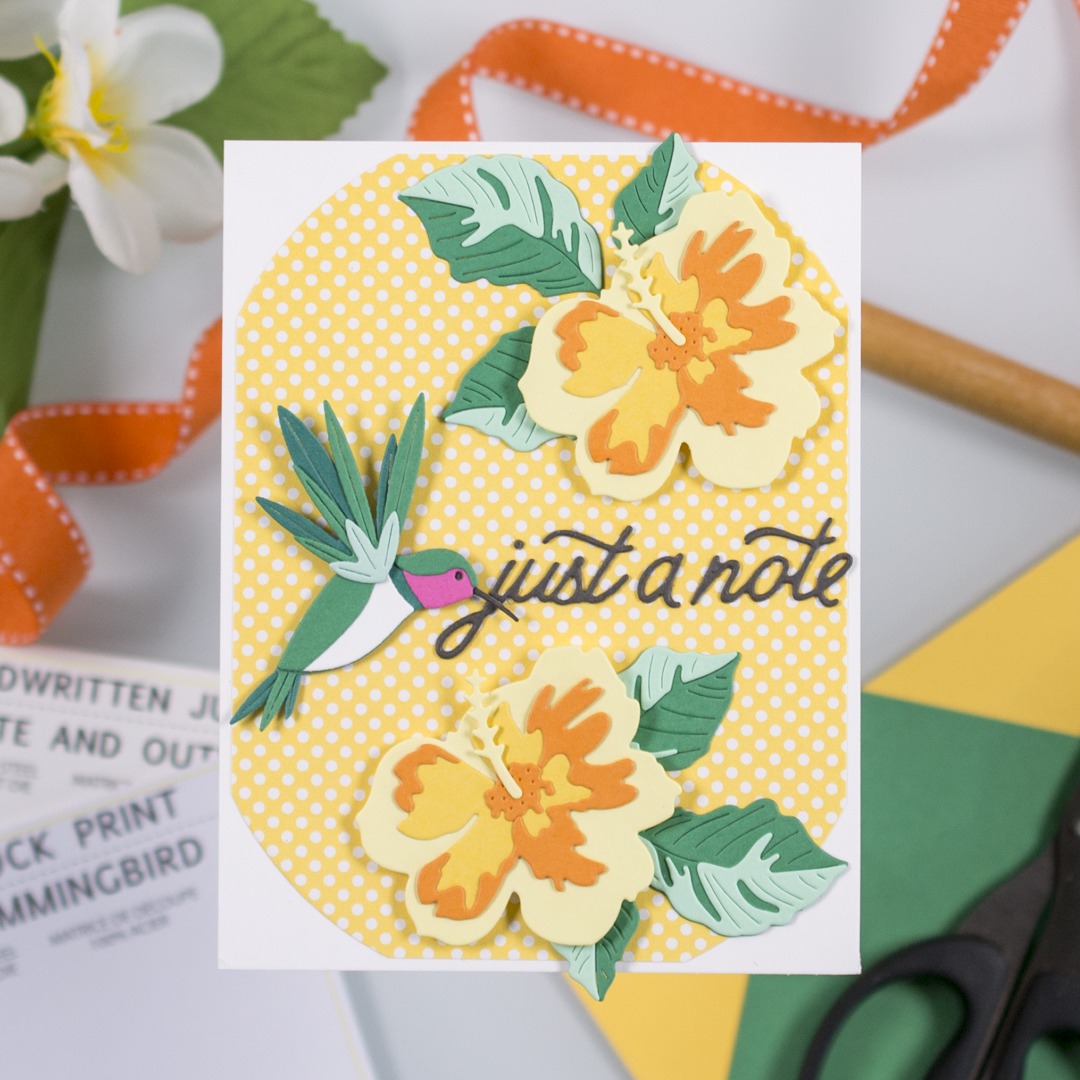
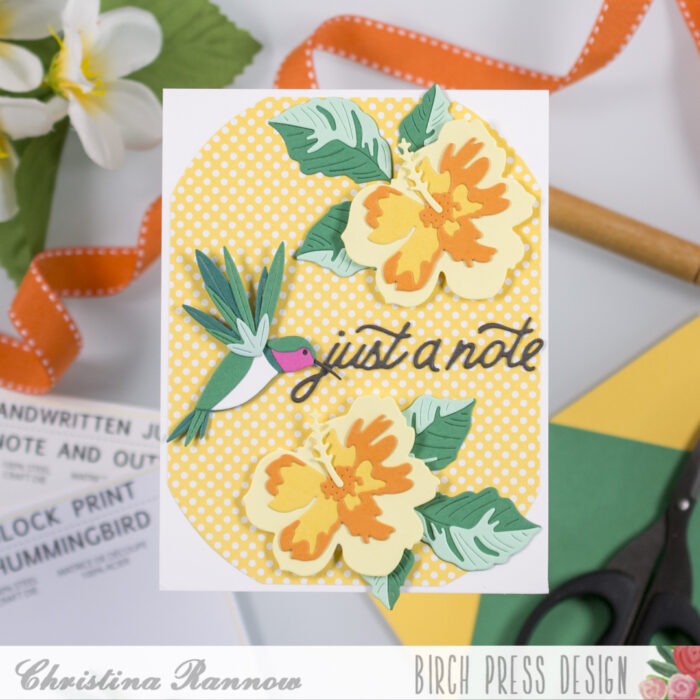
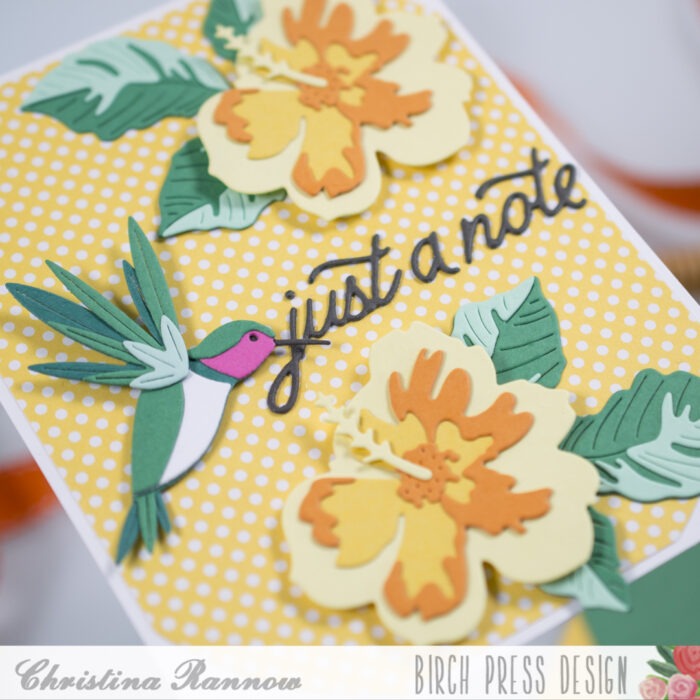
Hello! Christina here to share a sunny tropical card perfect for sending a quick note of happiness to someone. For this card I paired the beautiful new Block Print Hummingbird with the Tropical Hibiscus Contour Layers and added a fun polka dot patterned paper as the backdrop. Keep reading to get all the details for this sunny notecard!
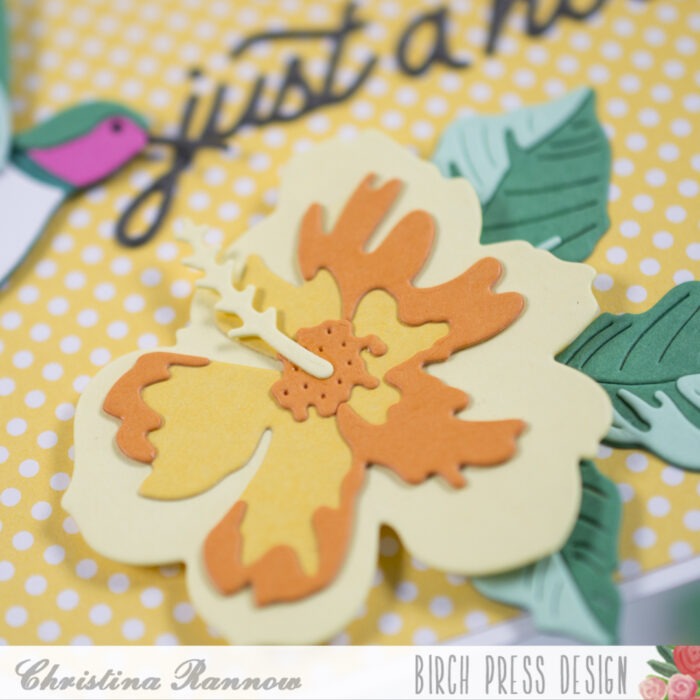
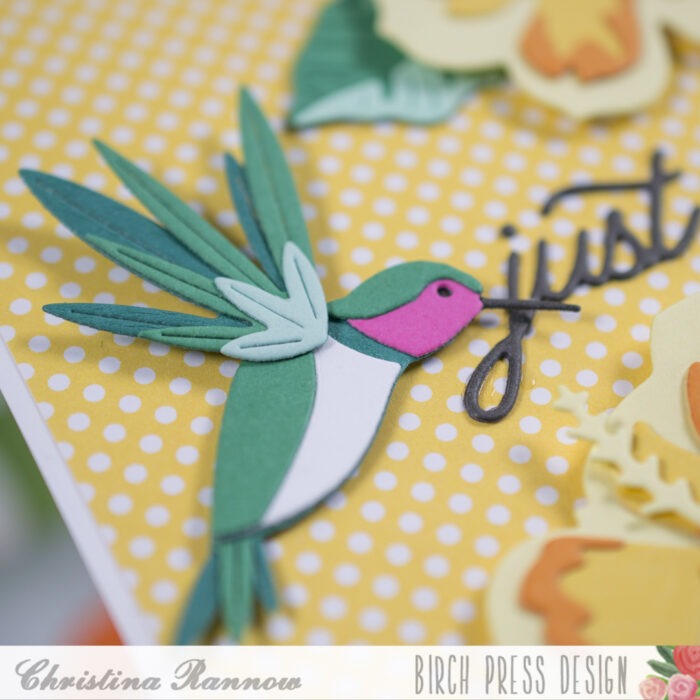
I started by die cutting all the hummingbird and hibiscus elements for my design from brightly colored cardstock. I used yellows, oranges, and teals, with a pop of fuchsia on the hummingbird. All of the die cuts layered together beautifully, plus the Tropical Hibiscus flowers come with a layering guide to make assembly super easy too.
After I assembled and secured my die cut elements with liquid adhesive, I created a simple background. I trimmed a piece of yellow polka dot patterned paper to approximately 4 x 5 ¼ inches and then used a large circle die to round the corners. A corner rounder paper punch would work great for this step if you have one! Then I adhered this rounded panel to an A2 top-fold card base.
Next, I attached the flowers to the card base with foam squares and tucked the leaves under them, securing the leaves with liquid adhesive. I attached the hummingbird with thin foam squares, giving my design multiple levels of dimension. The last step was to die cut the sentiment, the Handwritten Just a Note, from a dark gray cardstock and secure it to my card.
And that completes this sunny tropical card using the Block Print Hummingbird and the Tropical Hibiscus sets. See you again soon!
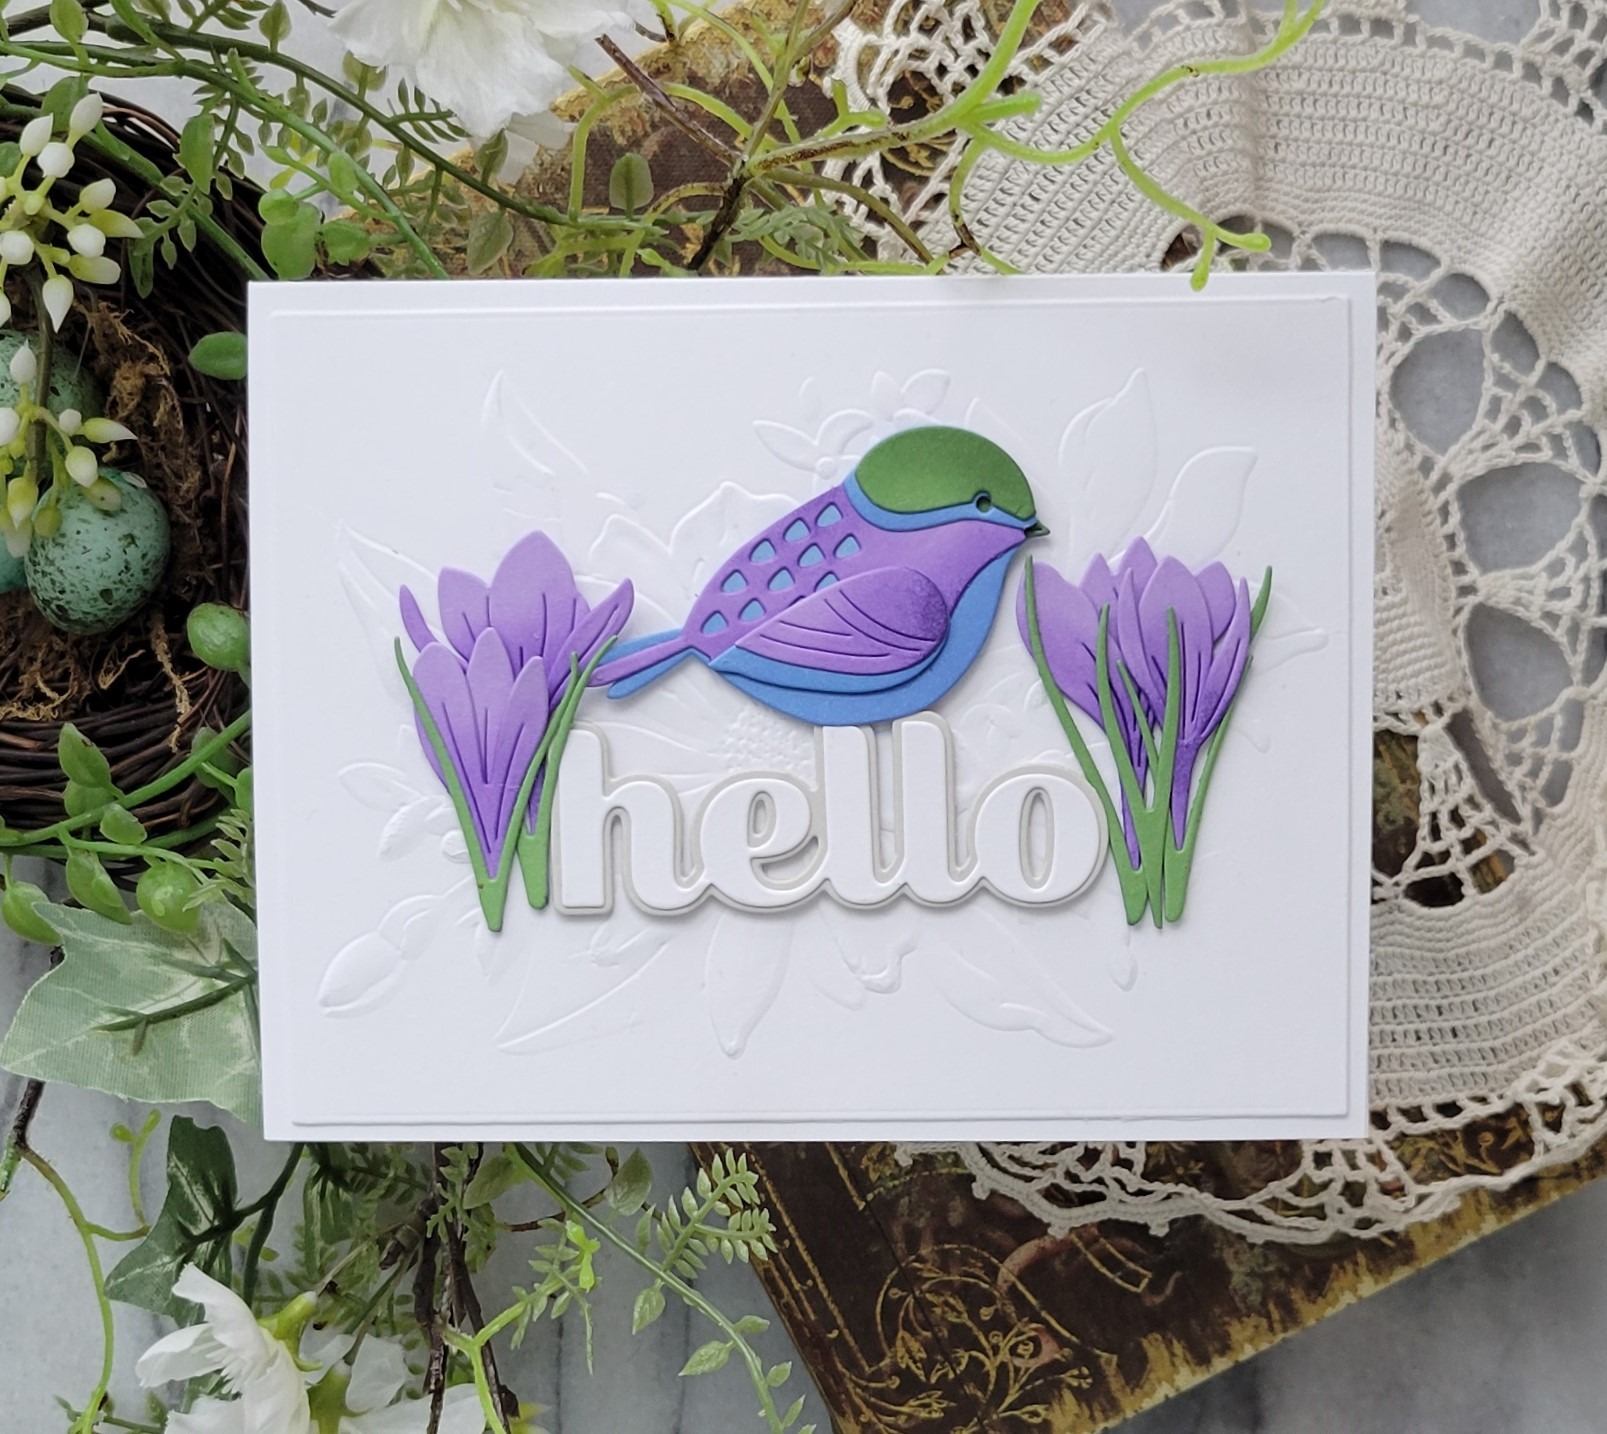
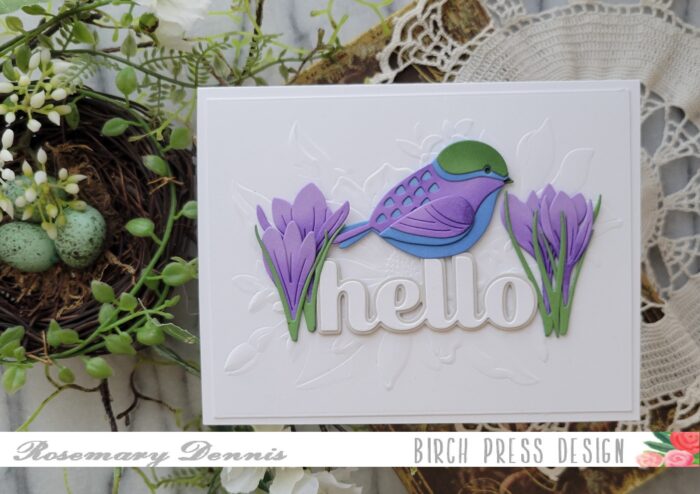
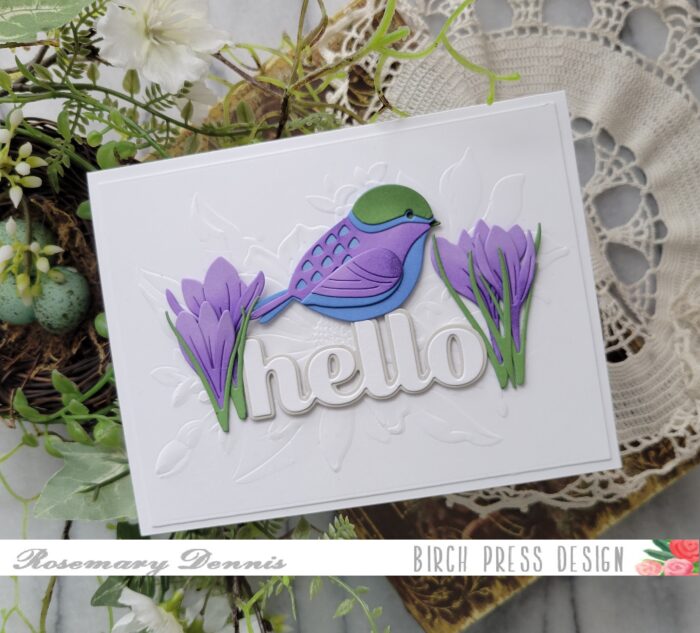
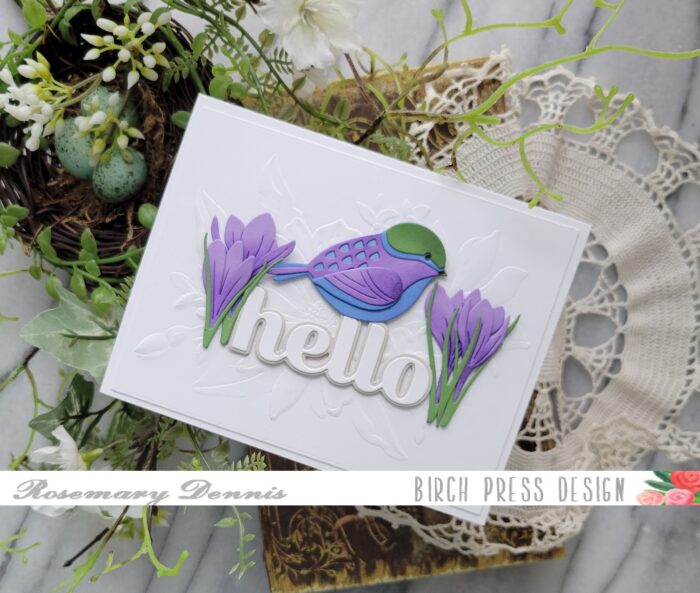
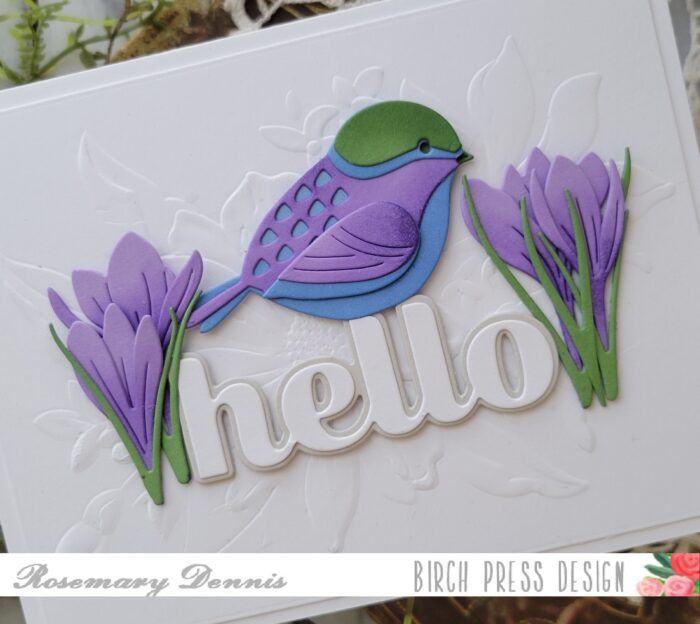
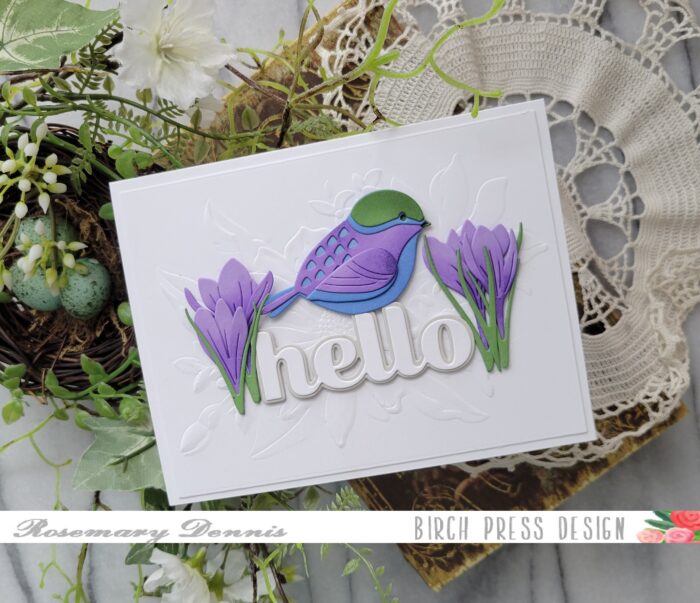
Hello, hello! Rosemary here today and I am back with a card featuring another super sweet Block Print die set. This time I’m using the Block Print Perched Bird. Let’s have a look at what I made.
I knew I wanted to perch my little bird on one of the big Sugar Script die sets and settled on the Big Hello die set. I die cut the word from white cardstock and the shadow from a light gray. I did this because I wanted the focus to be on my little bird.
I decided to go with a blue/purple/green color combo because I thought it would be fun to add some flowers around the word and little bird. Since spring is on the way I decided to use the Sprouting Crocus Contour Layers dies.
I pulled out the colors of cardstock I wanted to use and then die cut all the pieces. To add some depth to the diecuts I did a little bit of inking to each piece with an ink color that was about two shades darker than the cardstock. Once everything was inked up I let the pieces dry a bit before adhering them together with liquid adhesive.
I wanted to add more interest to the background that my little scene would be sitting on. I initially had a different idea, but as I was looking through my products I saw the Memory Box/Open Studio embossing folders and decided to use one of them. I went with the Gracious Floral embossing folder. I embossed the white cardstock and then die cut it with a rectangle die. I did this because I wanted the embossing to be flattened just a little bit.
Now it was time to put it all together. I adhered the embossed panel to a white cardstock base and then arranged all my elements as you see. I used a combination of liquid adhesive and thin foam squares to adhere everything.
Well, that is it for me. I hope you enjoyed today’s project. Thanks for stopping by and have a wonderful day!
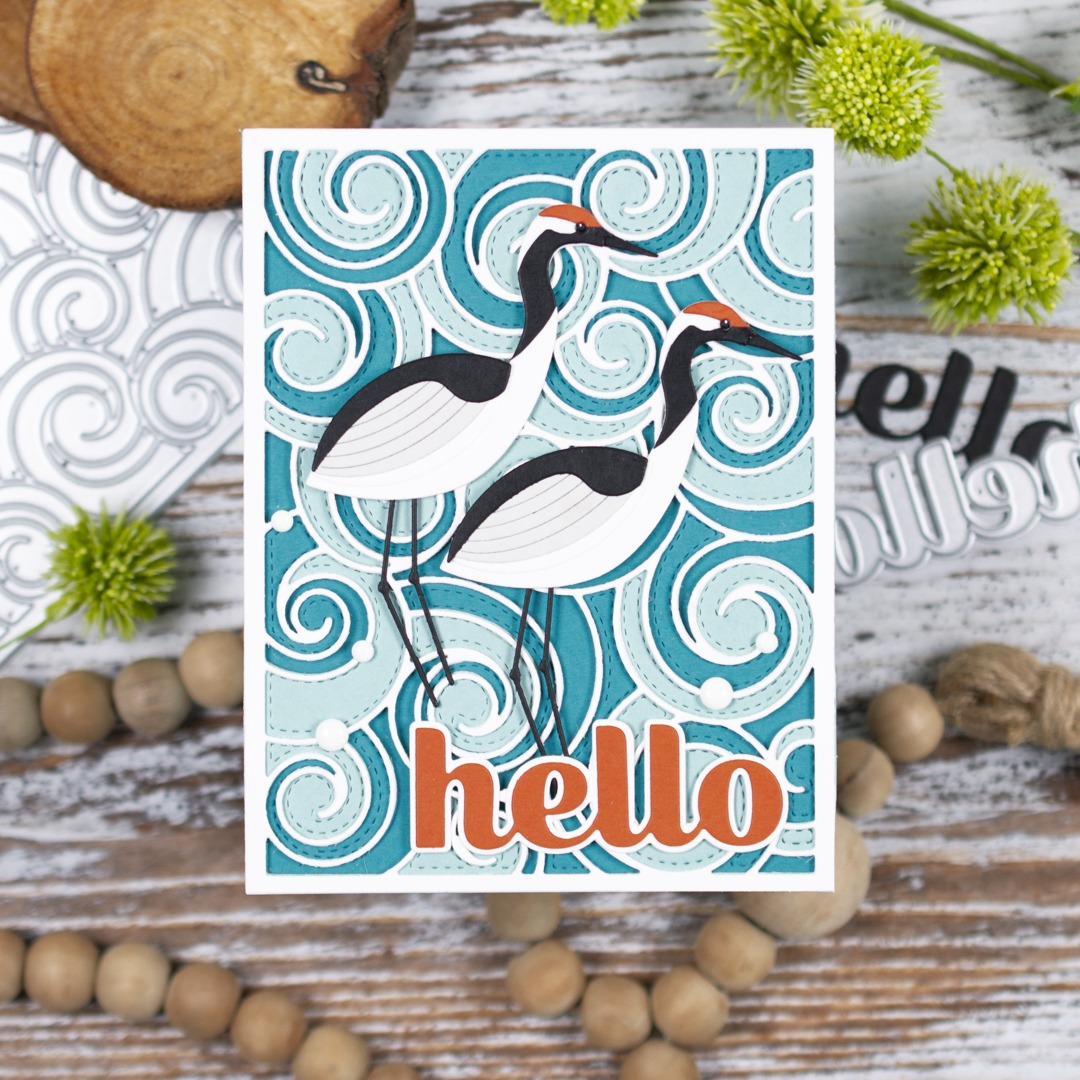
Hi friends! Christina here to share a project featuring the new Block Print Crane. I used red-crowned cranes as my inspiration for this lovely duo, and I paired them with the Waves Plate Die Set for a background reminiscent of Japanese woodblock art. I finished my design with the simple Big Hello Sugar Script and a few white enamel dots from my stash. Follow along below with the steps I took to create this elegant card featuring the Block Print Cranes.
I started by die cutting the layers for the background. The Waves Plate set has three plates that die cut different layers. You can use the layers individually or together to create many different designs. I chose to use all three layers. I used white cardstock for layer A, teal cardstock for layer B, and Deep Turquoise for layer C. I secured the layers together and then mounted them on an A2 Deep Turquoise card panel.
With the background finished, I got to work on the other elements. I started with die cut the pieces for the cranes. I used a combination of white, black, gray, and orange cardstock. To create the black necks of the cranes, I die cut the body a second time from black cardstock and used a pencil to lightly mark where I needed to cut with small scissors. I googled images of red-crowned cranes to get an idea of where the coloring was on their necks. I assembled the cranes, securing everything with liquid adhesive, and then attached them to my background. I used an acrylic stamp block to weigh them down a bit while the adhesive set. Next, I die cut the hello greeting from orange cardstock and the shadow from white cardstock and then attached it using the same process as I did with the cranes: liquid adhesive and an acrylic block for a little weight.
To finish up my design, I added a few white enamel dots from my stash and the tiniest white highlights to the eyes with a gel pen. And that’s all there is to this elegant card design. I hope you’re inspired to create something beautiful today!
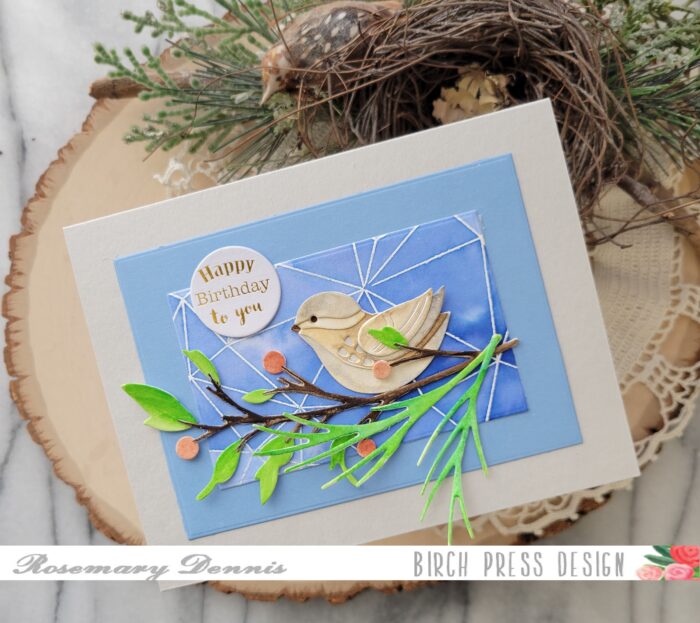
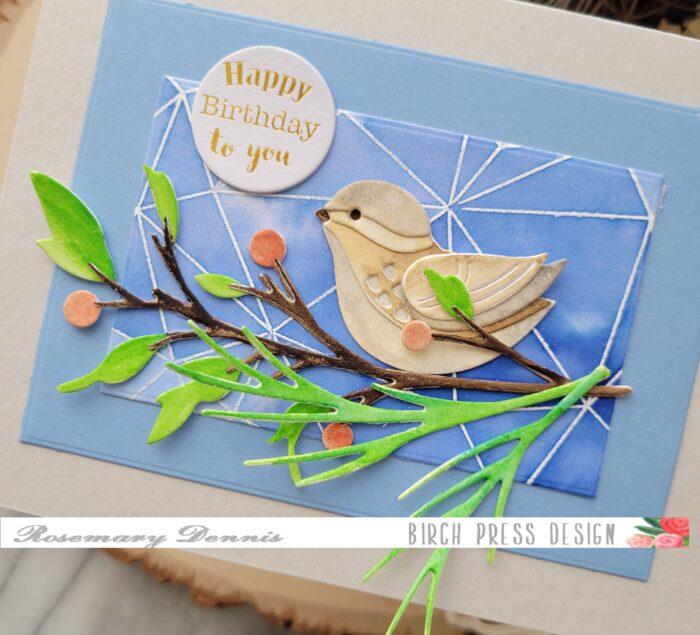
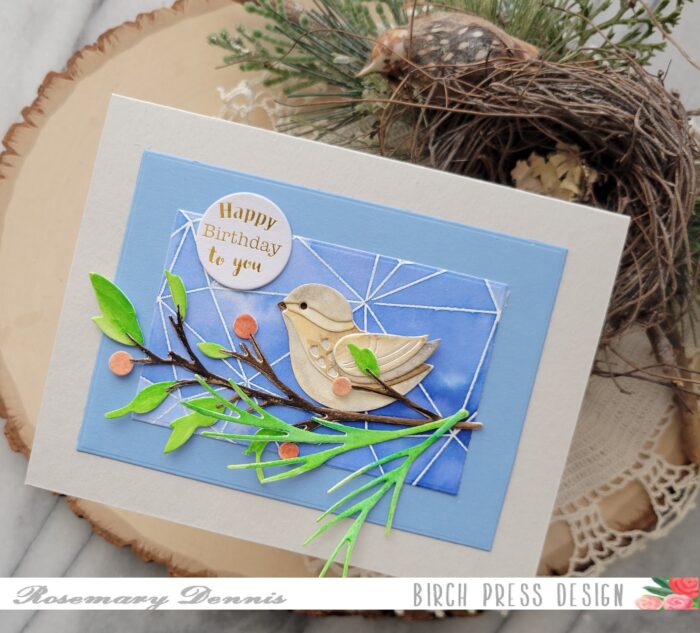
Hello everyone! Rosemary here on the blog today with a birthday card featuring the new Block Print Little Bird. Let’s have a look at what I created.
When I saw the new collection of Block Print birds I was so excited! I just love them and can see so many possibilities. For today’s card I decided to create a little wren. Besides papercrafting I enjoy cross-stitching and one of my favorite fabrics to stitch on is 32 count Lugana in the color Wren. So that was my starting point for my little “wren”. I die cut water color cardstock using the Little Bird die, as well as the Hillside Branch and Bramble Contour Layers die set. I then colored each of the pieces with various watercolors.
My coloring is very simple, but I did spend more time on the bird in an effort to achieve variation in the colors on the bird. Once I was done I set everything aside to dry.
I pulled out the watercolor panels I had created months ago using the Crystal Lingo stamp set. I had two different blue panels, one dark and one light. I went with the lighter version and die cut it down with a Memory Box A2 Rectangle Frames die. I found a complimentary piece of blue cardstock in the Memory Box Lagoon solid core cardstock pack and die cut it with a larger A2 Rectangle Frames die. The two rectangled were then layered together.
With all my pieces dry I adhered everything together using liquid adhesive and then determined how I would arrange all the pieces on my panels. I used liquid adhesive to adhere everything and then added my panels to a light gray cardstock card base.
I finished the card with a Memory Box Birthday Greetings Tab. I really love how my sweet little “wren” turned out. I can see creating other types of birds with the Block Print Little Bird die set. Thanks for stopping by and I hope you have a wonderful day!
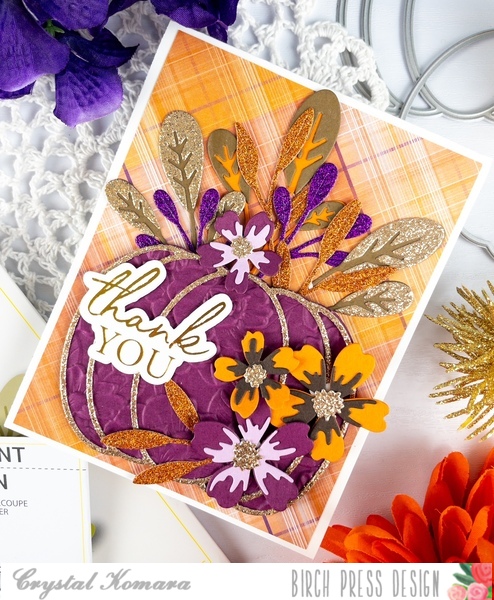
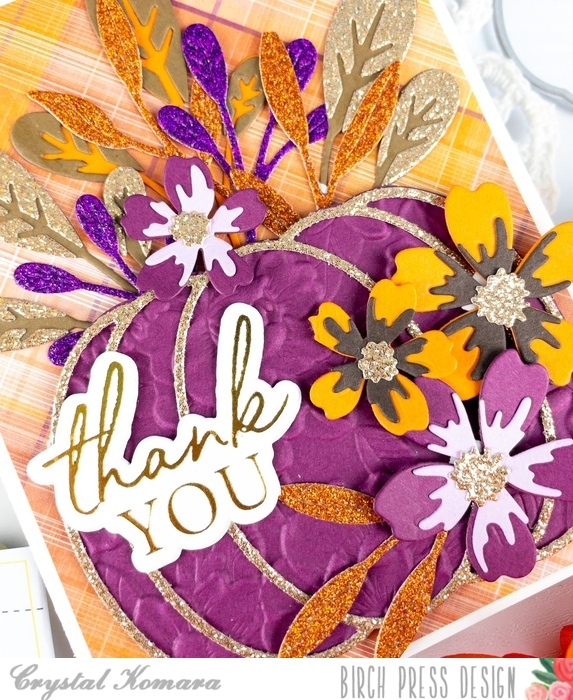
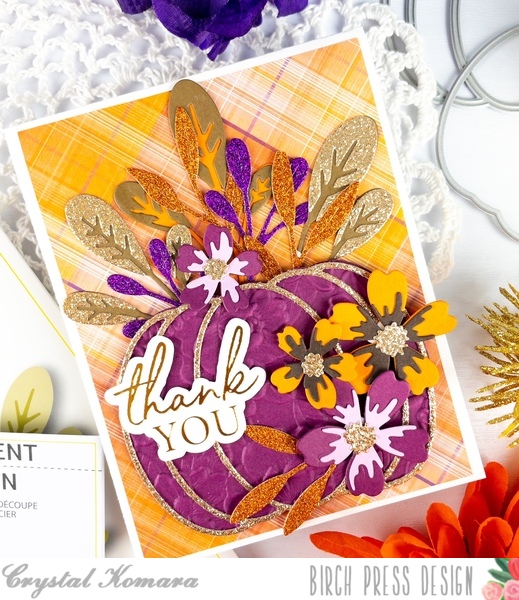
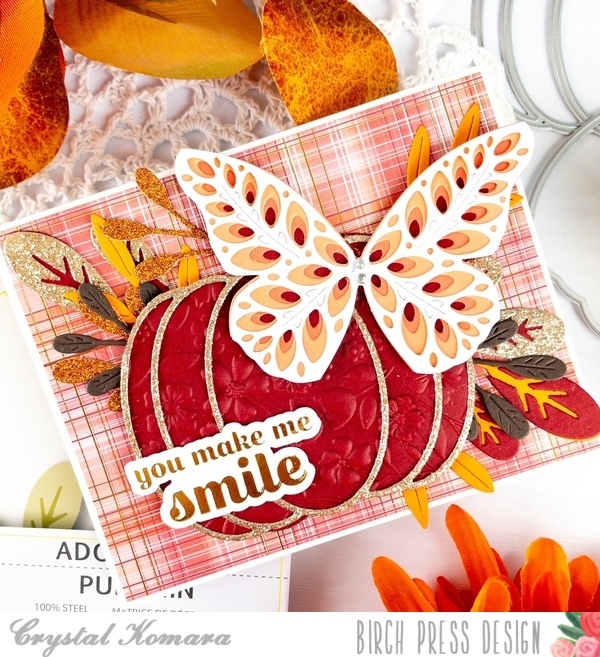
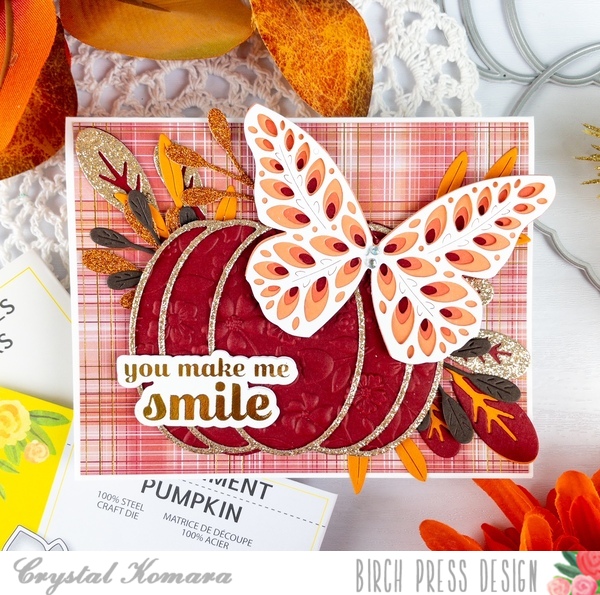
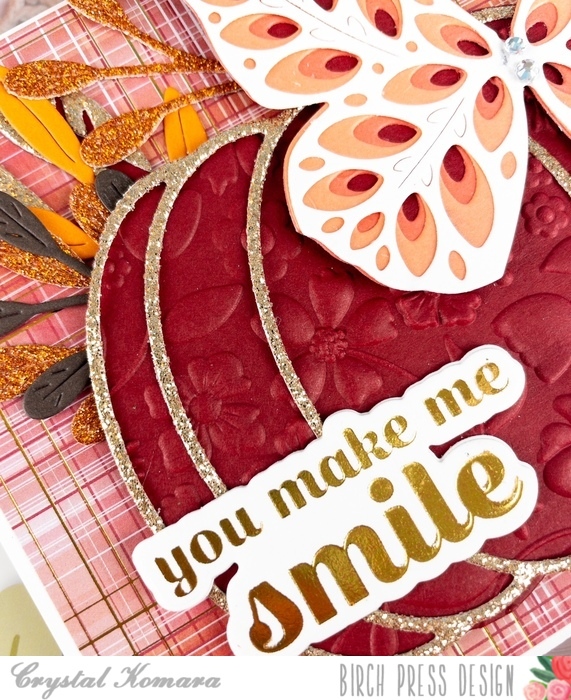
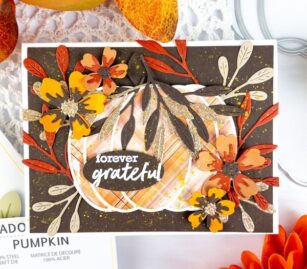
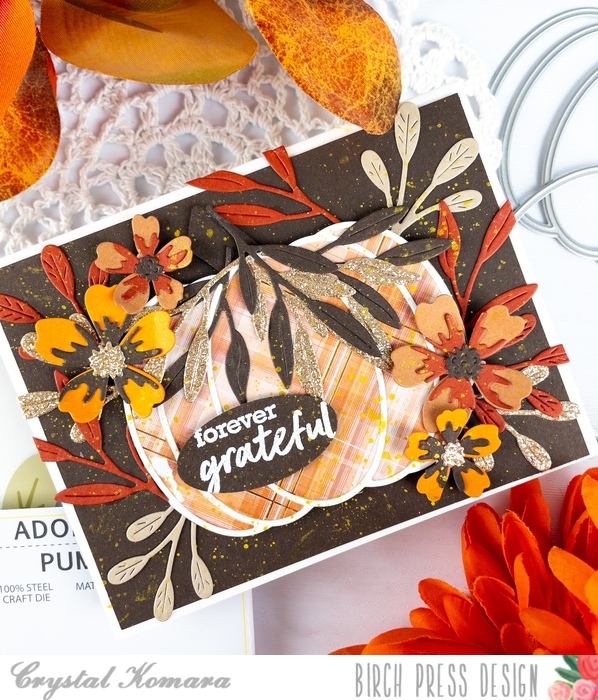
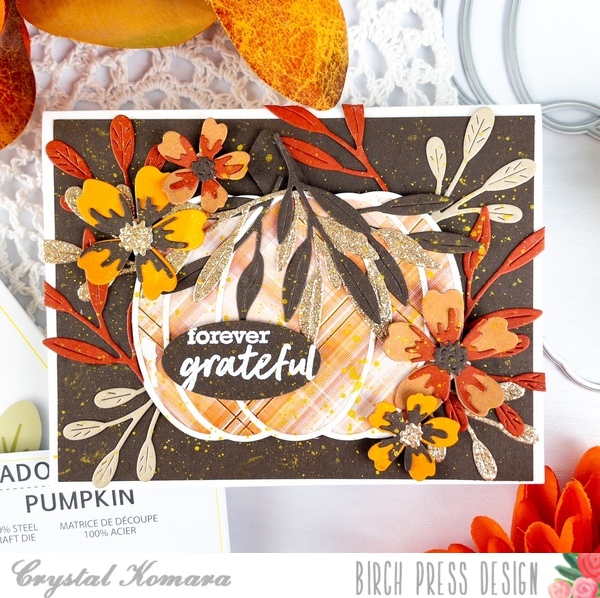
Hello crafty friends! This is Design Team member Crystal Komara here with you today sharing the first of a few fall themed pumpkin cards that I have made featuring the Adornment Pumpkin Set.
The Adornment Pumpkin Layer Set is one of my go-to products for fall cards. I love the large size of the layering pumpkin. Plus, it comes together easily with only two dies – a solid inside layer and a thin outline layer. For this card, I combined it with a variety of other products from Birch Press Design to include:
There is a lot to this card, so let’s break it down:
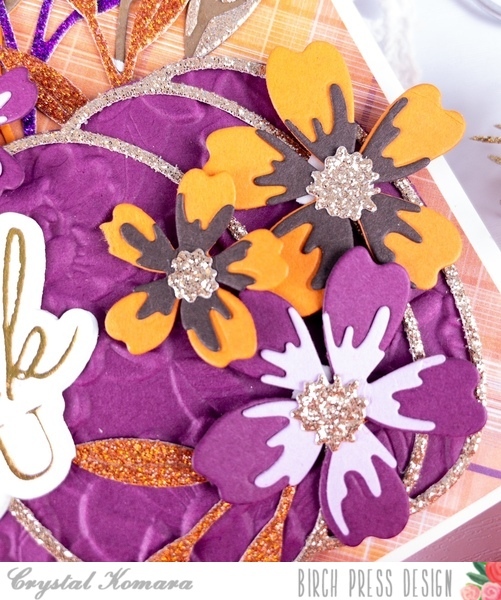
To create the pumpkin, using the Adornment Pumpkin die, I die cut the large solid pumpkin from the 6″ x 6″ Gladiola paper pack from Memory Box Company. I die cut the outline layer from white cardstock. I adhered the two together with a fine tip liquid glue.
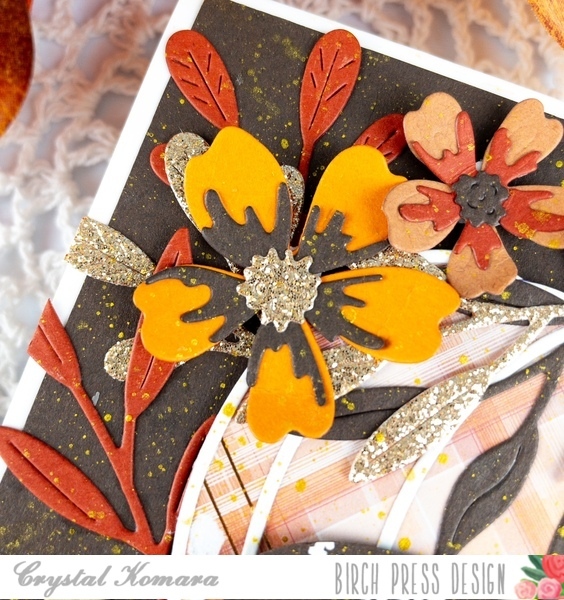
Using the Phlox Blooms and Leaves contour layer set, I die cut a bunch of flowers from a mustard orange and rust colored cardstock. I also cut the inside of the flowers from chocolate brown cardstock and the center of of the flowers from gold glitter cardstock. For each flower, I layered the three colors togethers with a fine-tip liquid glue.
Next I simply die cut a bunch of orange, yellow, mustard, gold and brown leaves from the Tiny Tufts Flowers and Leaves contour die and tucked them in and around the pumpkin.
I splattered gold paint all over the card for some “distressing” or a “mixed media” look.
Lastly, I stamped the sentiment “forever grateful” using the Brush Sentiment stamp set. I stamped the sentiment in Versamark ink and heat embossed it with white embossing powder. I used an oval punch to punch the sentiment out and adhered it to the card using foam adhesive for added dimension.
I know at first glance that a lot of these intricate layered cards can seem intimating, but all it really entails is a LOT of die cutting. My little tip* – I don’t even count or measure as I’m die cutting, I just keep cutting until it seems like I have a lot. Any extra pieces can be used on the inside or saved for another card!
Thanks for visiting and have a wonderfully creative day!
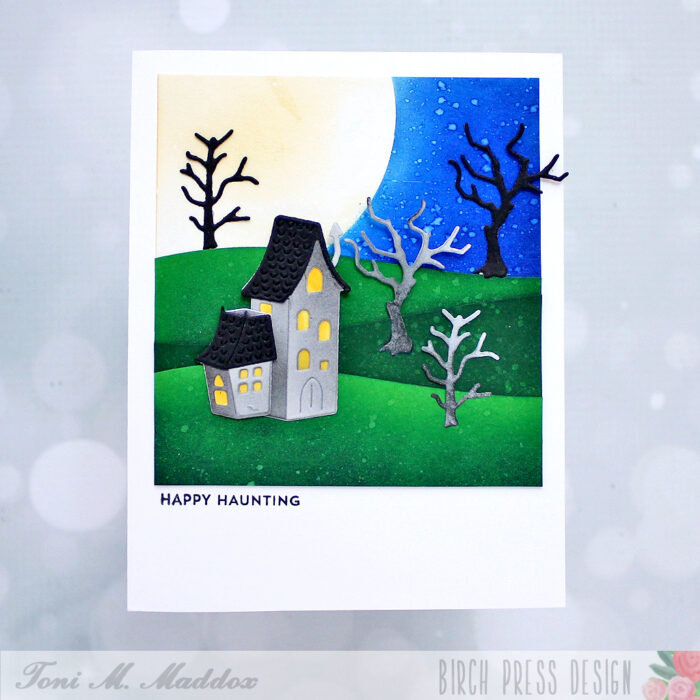
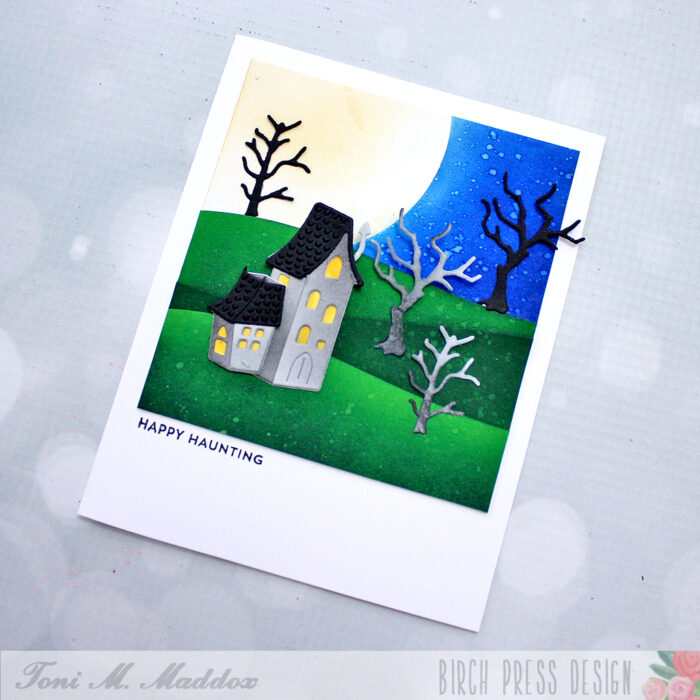
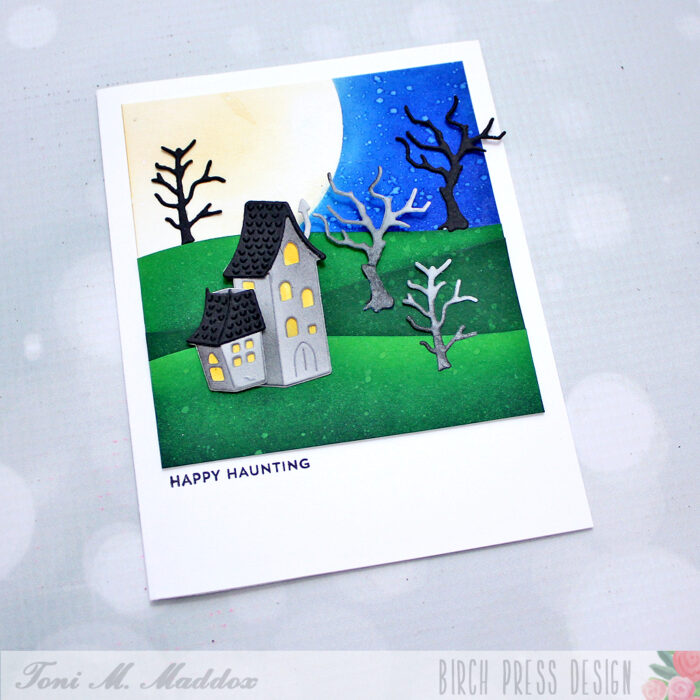
Hello, friends! Toni here with you today sharing my love of all things spooky!
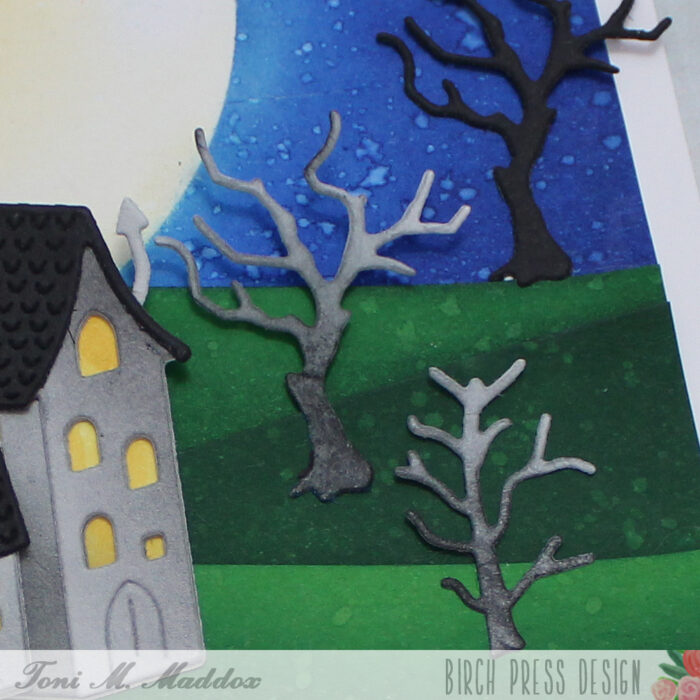
I masked a moon on the card front and sponged around it with Catherine Pooler Something Borrowed, Suede Shoes, and Dress Blues.
I cut out the Littletown Spooky Manor and Wavy Hillside dies. I used white cardstock for most of it but used Memory Box Cilantro cardstock for the hills.
I really like the Wavy Hillside layers as you can easily adjust their position as needed to create the vertical height you want.
I used Catherine Pooler Grass Skirt and Deck the Halls for the hills. For the trees and house, I used Catherine Pooler Midnight along with Distress Oxide Weathered Wood and Mustard Seed. Of course, I spattered the lot with a tiny bit of water for that worn look I love.
For a full list of products used and to see my other projects, feel free to visit my blog, Frankie Helps Craft. Have a great rest of your week!
I hope you enjoyed today’s card and have a wonderful rest of your week.