Greetings, friends! We can never have too many birthday cards on hand, right? Toni here sharing two birthday cards, one quite feminine and the other cheerfully unisex.
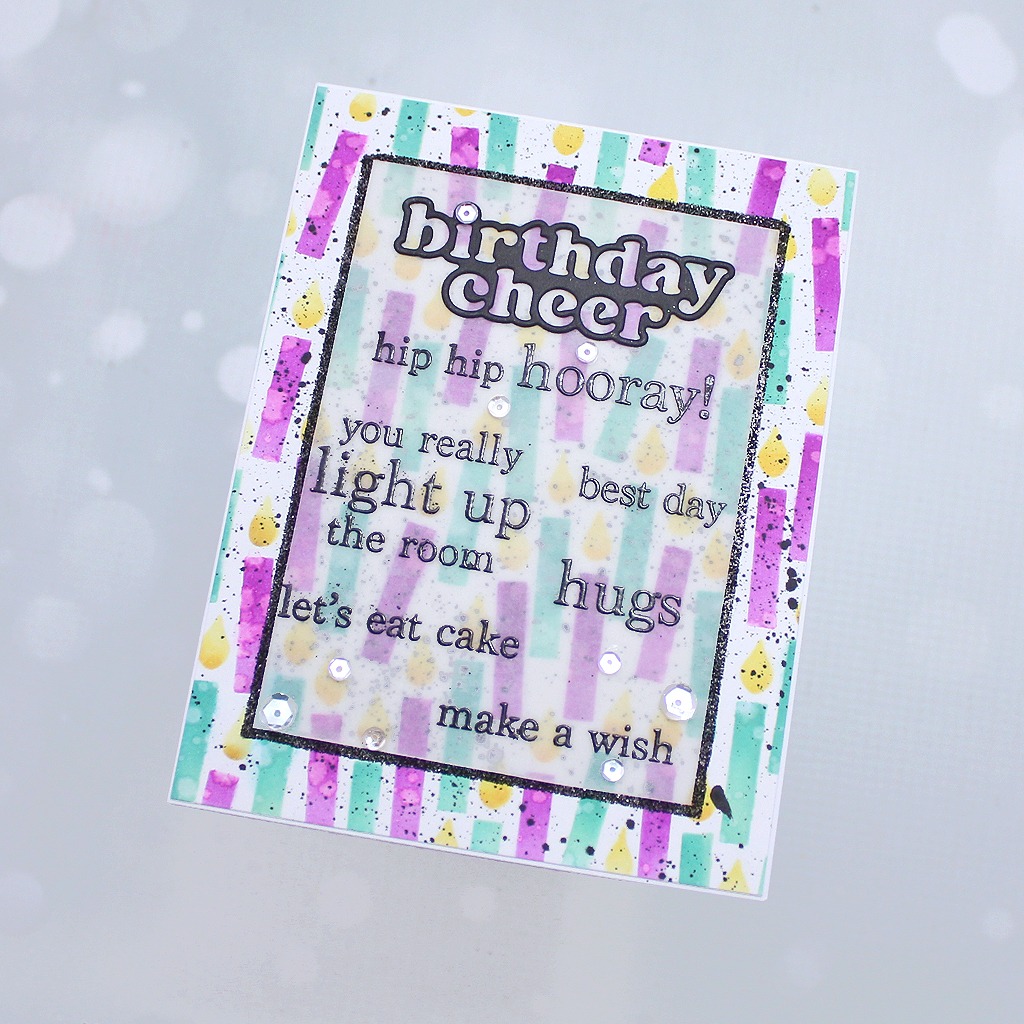
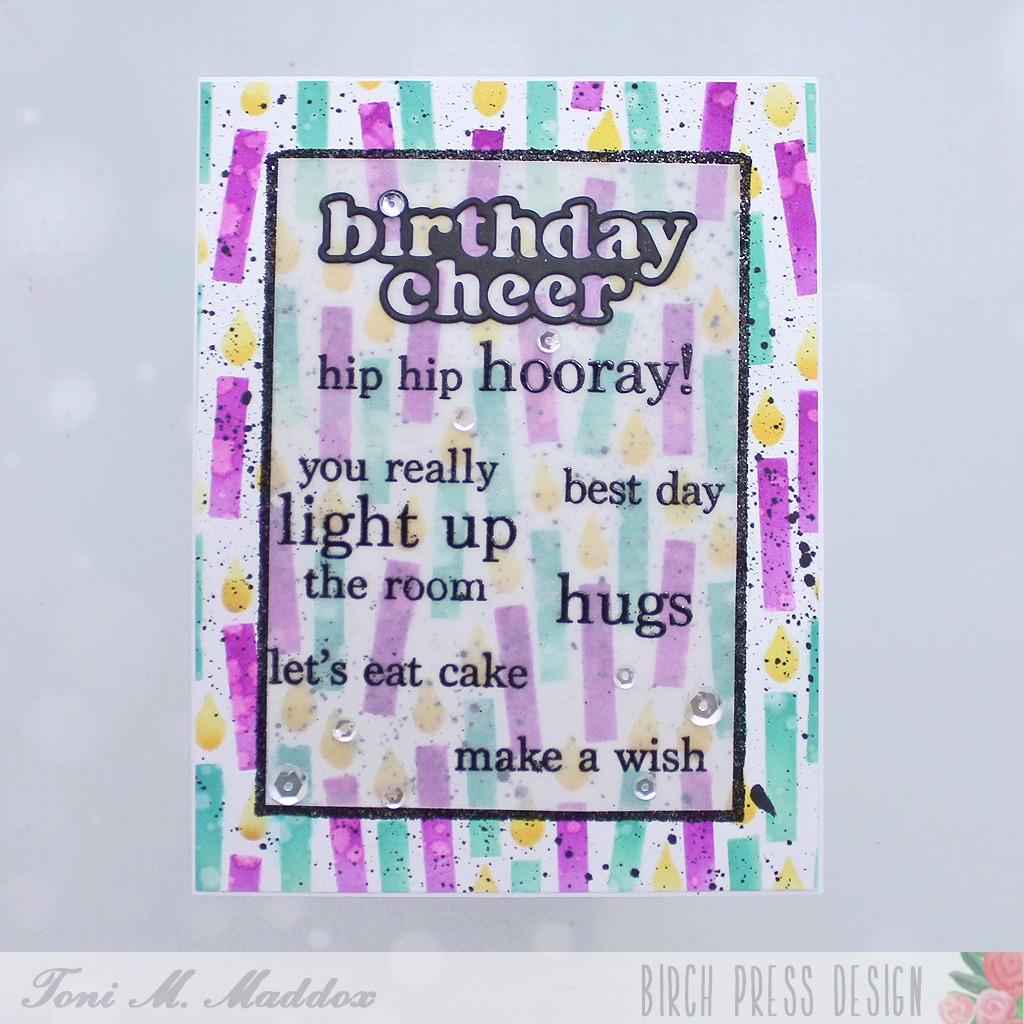
I created the background of my first card using the Birthday Candle Blowout Stencils. I spattered that with ink for a funky vibe.
Next, I arrange some of the Plain & Simple Birthday Greetings on my MISTI and embossed them on sturdy vellum. I left a space at the top to add the Plain & Simple Birthday Greetings sentiment diecut.
I covered the back of the vellum panel with double-sided tape, leaving a small margin that I burnished with black glitter.
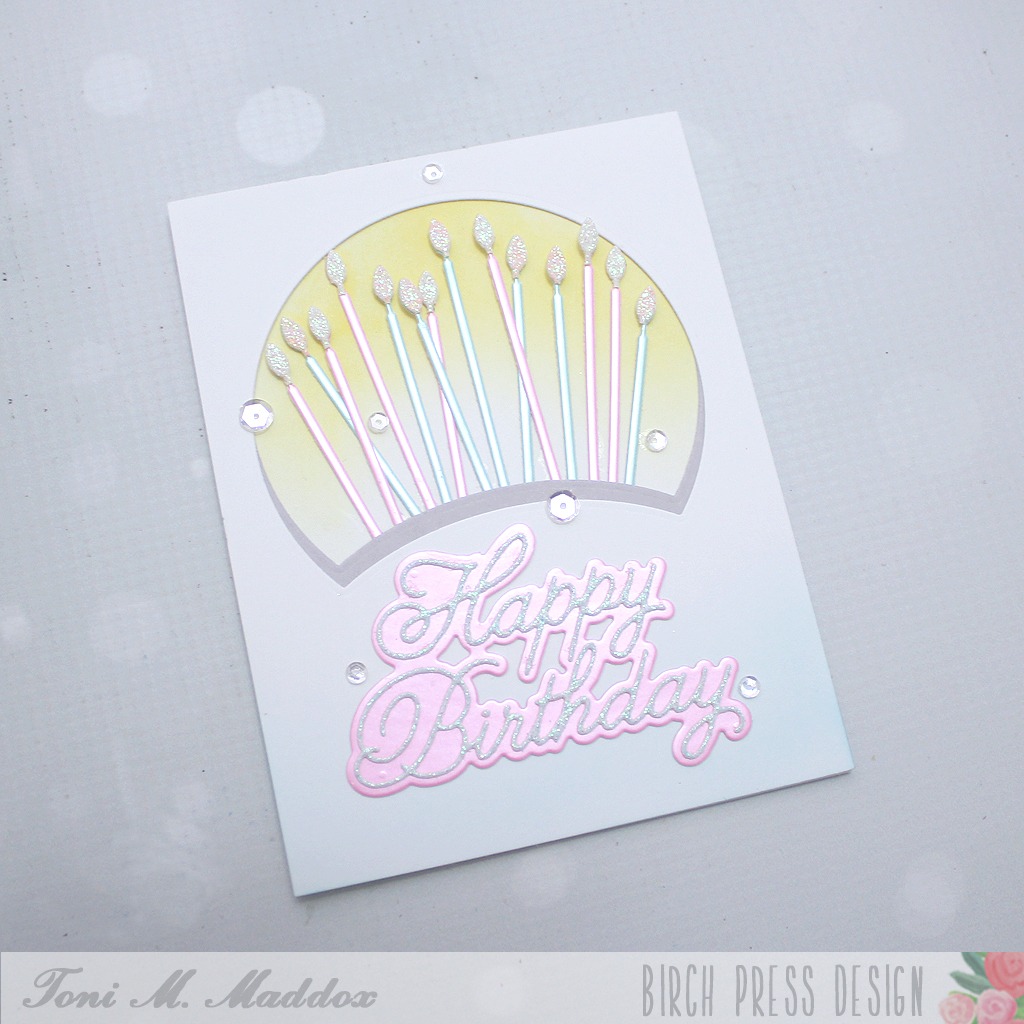
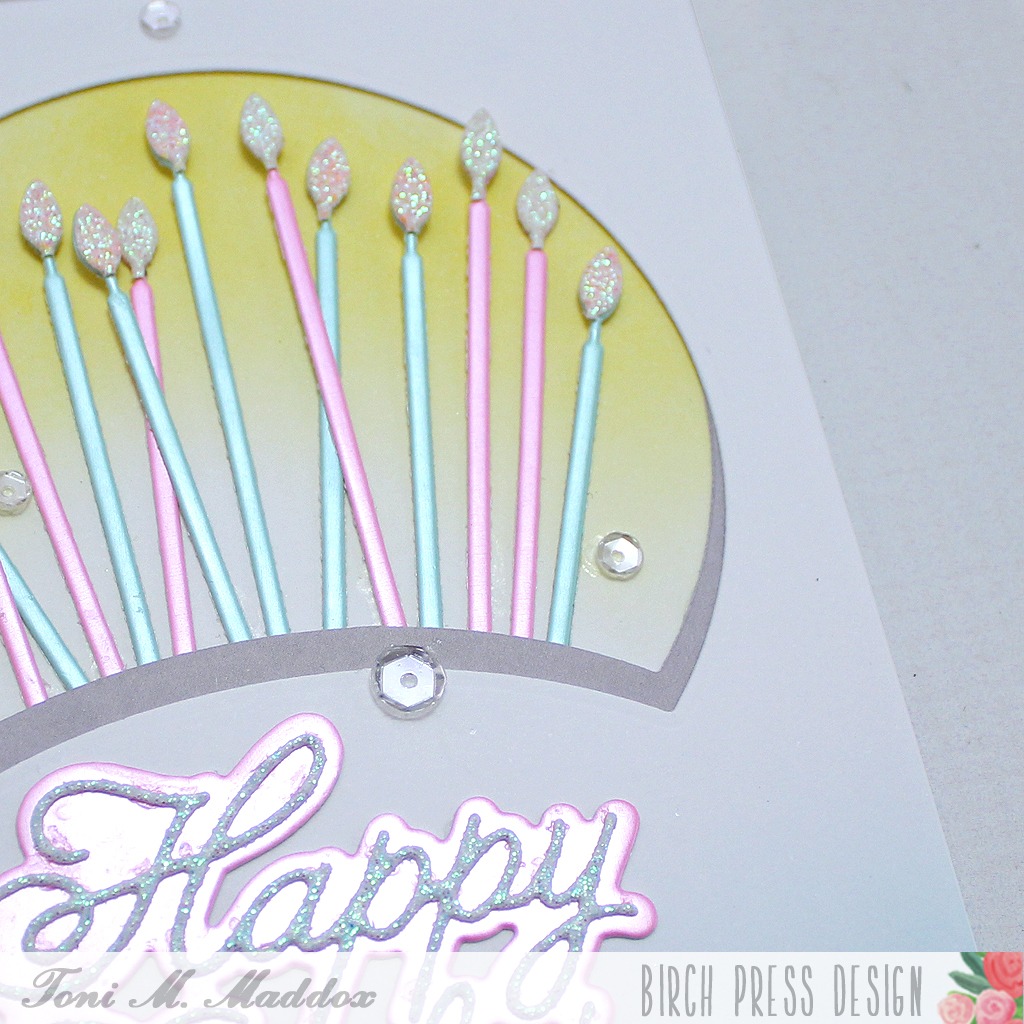
My second card definitely has a more feminine feel to it, don’t you agree?
I created an aperture and shadow with the Block Print Forest Scene die. A random assortment of Tall Party Candles cut from mirror and glitter cardstocks fill the space.
Finally, I sponged a bit of blue at the bottom of the card front before adding the Handwritten Happy Birthday & Outline. Pretty!
I hope you enjoyed today’s card and have a great rest of your week!
Feel free to visit my blog, Frankie Helps Craft, for a full list of supplies used and to check out my other creations.
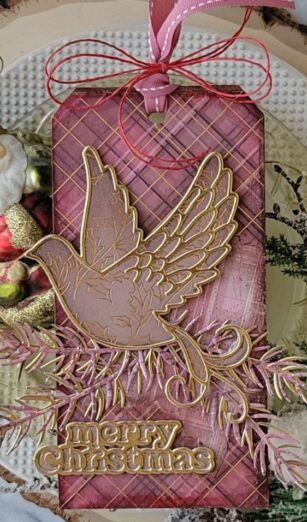
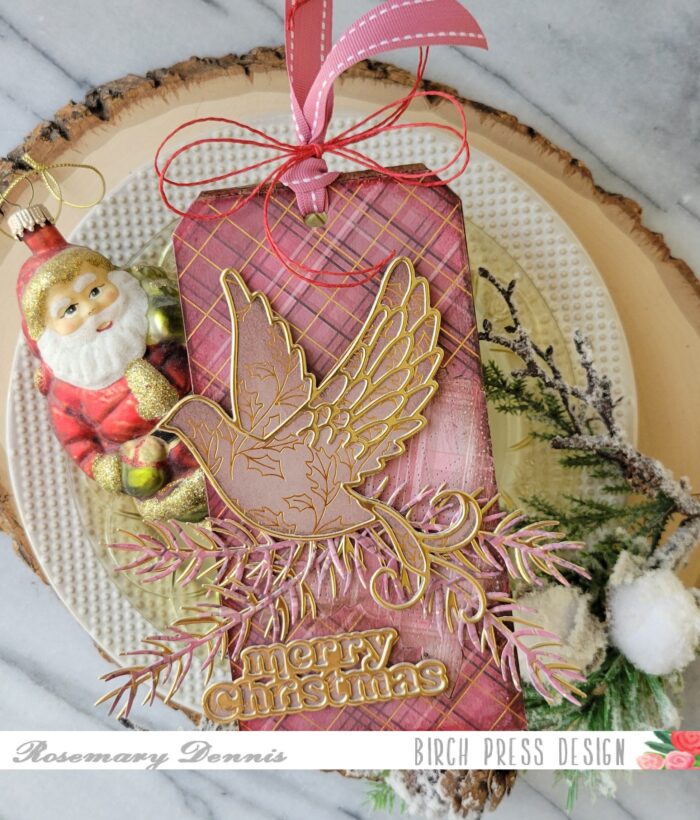
Hello! Rosemary here on the blog today. Today is July 25th and so I decided to make a “Christmas in July” project. I used several older products and one newly released product for today’s project. Let’s have a look at what I made.
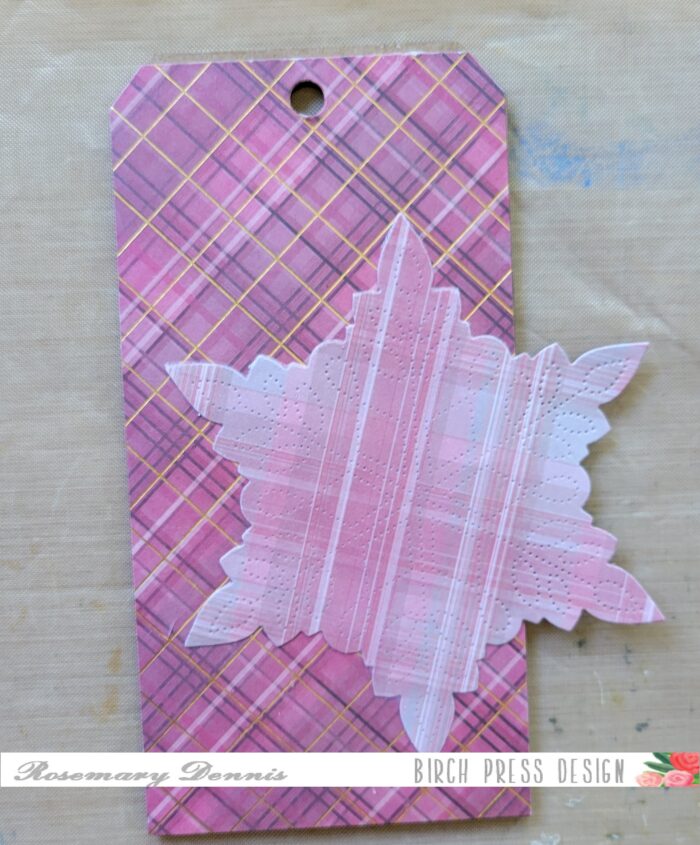
Today’s project is a large tag that can be used as a deco piece at Christmas time. I really enjoy making these kinds of projects to share. I started with a Tim Holtz thickboard tag. I pulled out a piece of plaid paper from the Poinsettia Plaid 6×6 pad that had various shades of red in it and trimmed it down to fit the tag. The top of the paper has a hole in it so that the pad can be hung and I used that to my advantage. I aligned the hole in the paper with the hole on the tag, trace around the tag and then trimmed out the paper. There was a little bit of the tag not covered at the very top, but in the end you don’t really notice it.
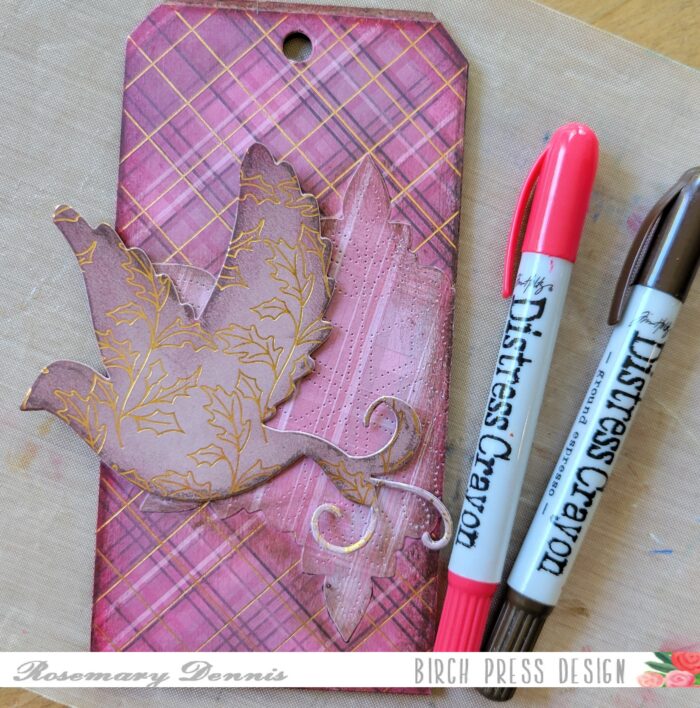
I then adhered the paper tag to the thickboard tag using distress collage medium and let it dry. I then decided to add another layer of texture to the tag by adding the large Pinpoint Snowflake that I die cut from the reverse side of the paper used for the tag. I adhered the snowflake to the tag using the collage medium, as well, and once things were dry trimmed off the one side. Once I had the base of my tag put together I worked on the focal point of the tag. For this I used the pretty Adornment Dove die set. Initially I die cut solid layer of the dove from three different papers from the Poinsettia Garland 6×6 pad and determined which one I wanted to use. As you can see I went with the lightest paper dove.
I then die cut the top layer from gold foil cardstock from the Vintage Pastel Mirror 6×6 pad. To give the base layer of the dove a little more stability I adhered the other two doves I wasn’t using behind the main one. The Vintage Merry Christmas sentiment was also die cut from the same papers and adhered together. I used liquid adhesive for both. Then I got out distress crayons in festive berries and ground espresso to blend onto the edges of the dove, the tag and around the snowflake. Once I had done that the small gap at the top of the tag almost completely disappeared!
As I was working on my tag the newest release from Birch Press Design landed in my mailbox. It is absolutely gorgeous! So I decided to make sure to incorporate one of the new products from the release into my project. I made the decision to use the Pine Needle Twigs Contour Layers dies. I die cut them from scraps of the paper I used, as well as the gold foil cardstock and then layered them together using liquid adhesive.
Once they were dry I began layering the elements on to my tag. I started with the Pine Needle Twigs using liquid adhesive to attach them. I used a combination of liquid adhesive and foam squares to attach the dove. Foam squares were also used to attach the sentiment. I finished off my tag with some ribbon looped through the hole in the top and then tied with some red twine.
I hope you enjoyed today’s project. I had a lot of fun making it! Thanks for stopping by and have a wonderful day!
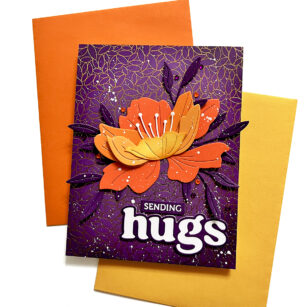
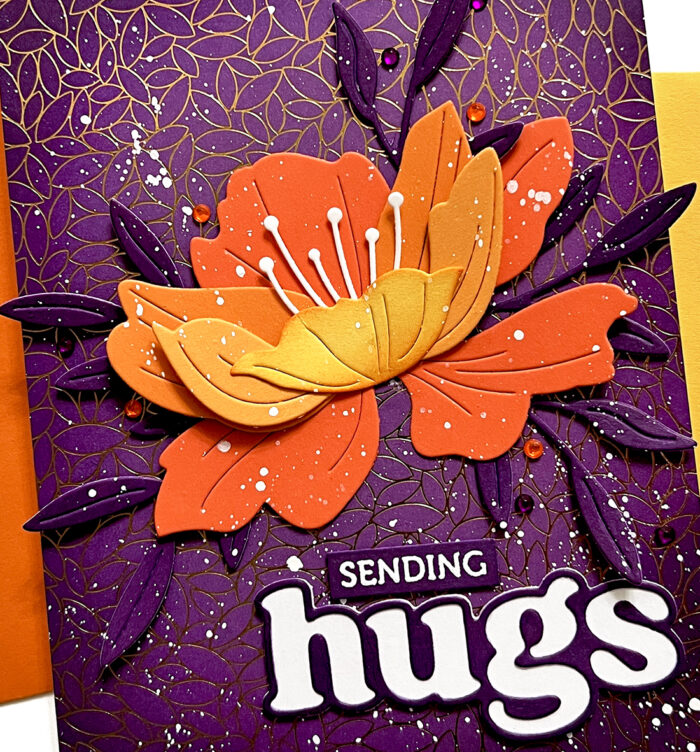
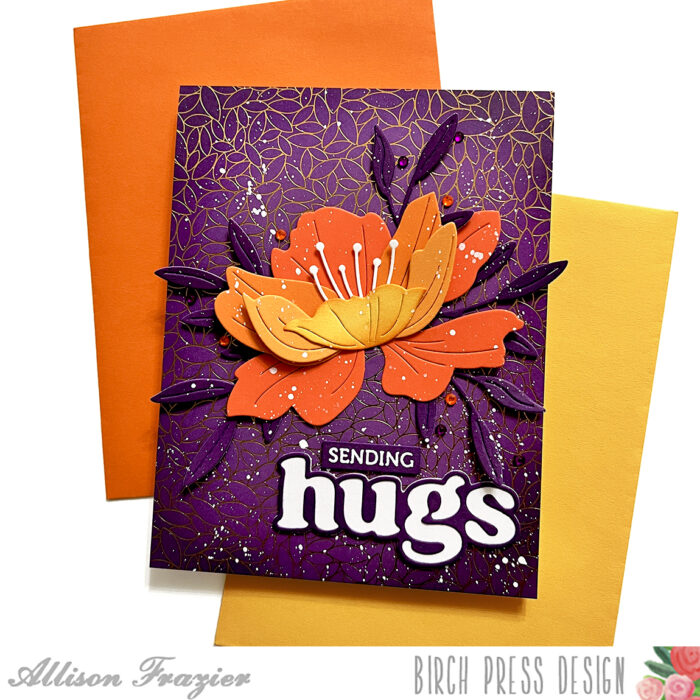
Hello, Birch Press friends. I am excited to be back on the blog today sharing this bold card featuring some new products! There are some great new word dies that just came out, and I chose one of my favorite sentiments of all time – hugs.
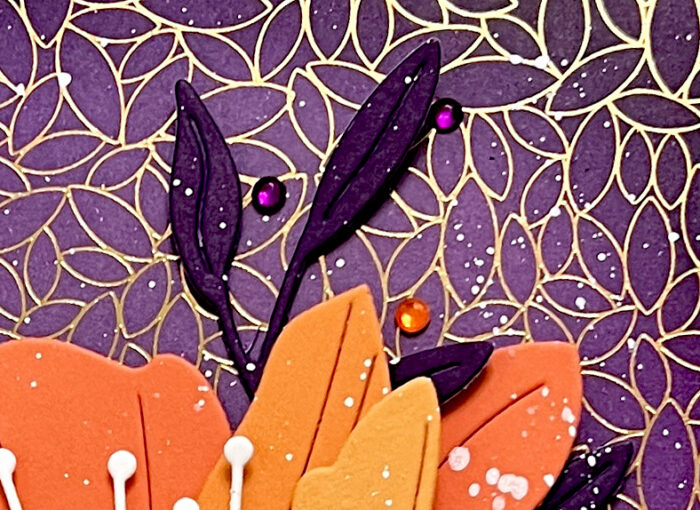
I really was in the mood for a different and bold color palette, and the new Glimmering Gladiola paper pack from Memory Box was just what I needed as a jumping-off point. I chose some purple paper with a gold foil leaf design as my background. I took some darker purple ink and blended that around the edges of the panel before glueing it onto an A2 card base.
Next, I used the new Sunrise Cardstock pack to pick four different colors of orange/yellow to create the layers for the Perky Bloom. This flower is so easy to assemble, and I love it in these colors! Instead of choosing large leaves to complement the flower, I chose some smaller leaves from the Tiny Tuft Flowers and Leaves die set. I cut these out of purple card stock and adhered them to the card base underneath the flower.
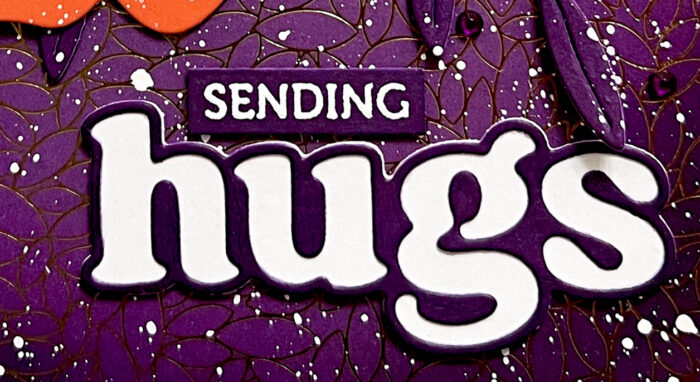
The Big Hugs Vintage Sentiment is fun because you can assemble it in different ways. For my card today, I used the base layer die to cut purple card stock. I then took that base layer and die cut it with the detail layer die in order to create the purple outline. Finally, I glued that outline onto a white base layer. I stamped the subsentiment “sending” with VersaMark ink onto purple cardstock and then heat embossed it with white embossing powder. I splattered the card with white paint before adhering both of the sentiments with liquid glue.
To finish the card, I added some purple and orange fairy jewels around the design. I hope this card brings a smile to your face! Thank you so much for joining us today.
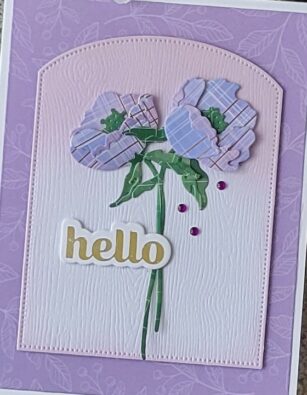
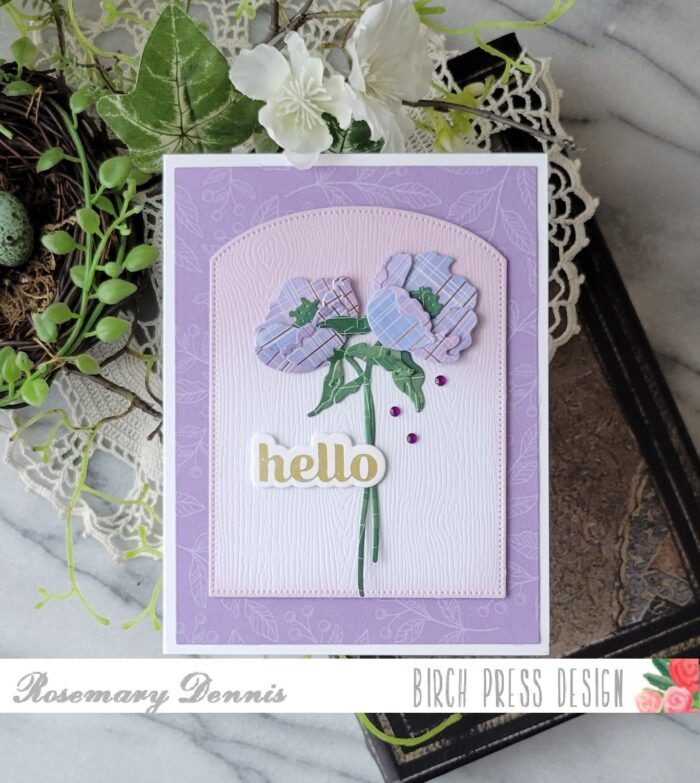
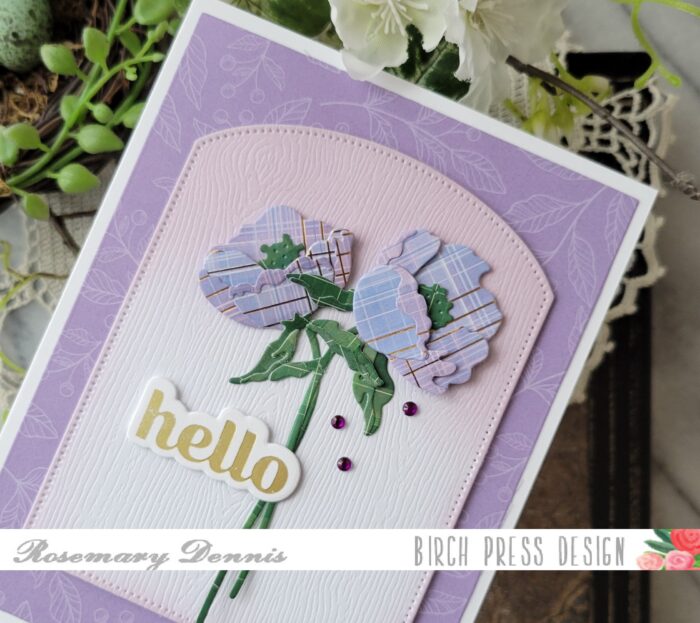
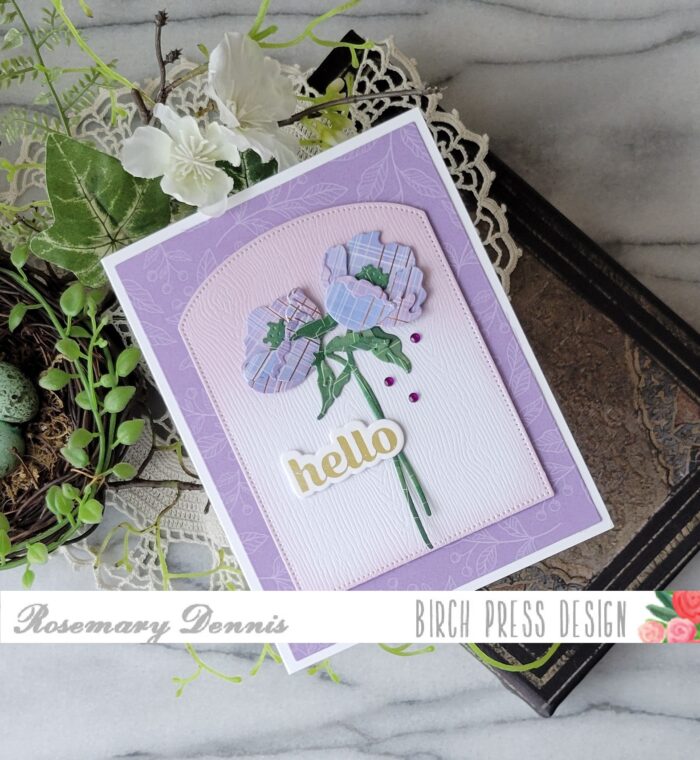
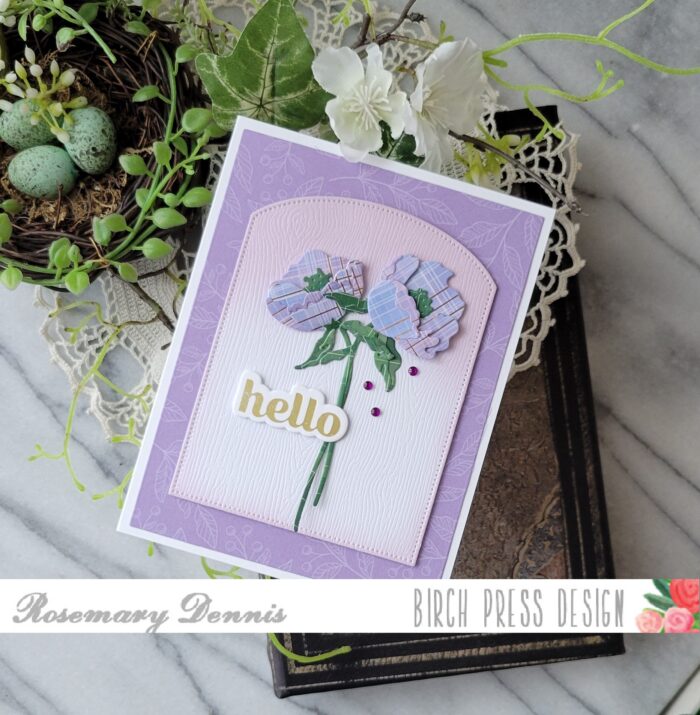
Hello everyone! Rosemary here on the blog today. Hope your April is off to a great start. It is a little bit of a cold start to April here in the Pacific Northwest, but that is the PNW for you, lol! Today I’m sharing a card created using the sweet Prime Peony Duo Contour Layers dies and a foiled sentiment from the new Sugar Script Sentiments 2 set. Let’s have a look at what I created.
I started off my card by deciding that I wanted to use some pretty patterned papers and do a little bit of inking on the papers once I had them die cut. I pulled out the lovely Memory Box Anemone Plaid and Anemone Grove 6×6 pads and went with a purply-blue plaid for the flowers and a dark green plaid for the stems. I die cut all the pieces and then added some distress ink in Milled Lavendar to some of the pieces.
I didn’t add any additional color to the stems as they were dark enough already. I then adhered all the pieces together. For the flowers I used a combination of liquid adhesive and thin foam squares to provide lift to some of the petals. Liquid adhesive was used soley on the leaves. I also decided to use the green flower centers that were die cut when I die cut the stems as I liked the look. In the close up photo above you can see the shading on flowers that was added with the distress ink.
After the glue had set on the flower for a little bit I adhered the stems with additional liquid adhesive. I die cut a piece of the Anemone Grove paper with a rectangle die and adhered that to a white cardstock base. I then die cut Memory Box white woodgrain cardstock with a Curved Capped Pinpoint Layers die and added some Milled Lavendar distress ink to the top portion of the die cut and then lightly around the edges. I adhered that piece with thin foam squares.
The flowers were then adhered to the panel using liquid adhesive. I finished the card with the sentiment that I foiled in matte gold and a few purply blue fairy gems.
I hope you enjoyed today’s project. Thank you for stopping by and have a lovely day!
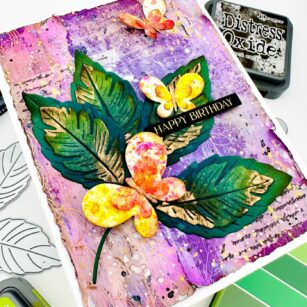
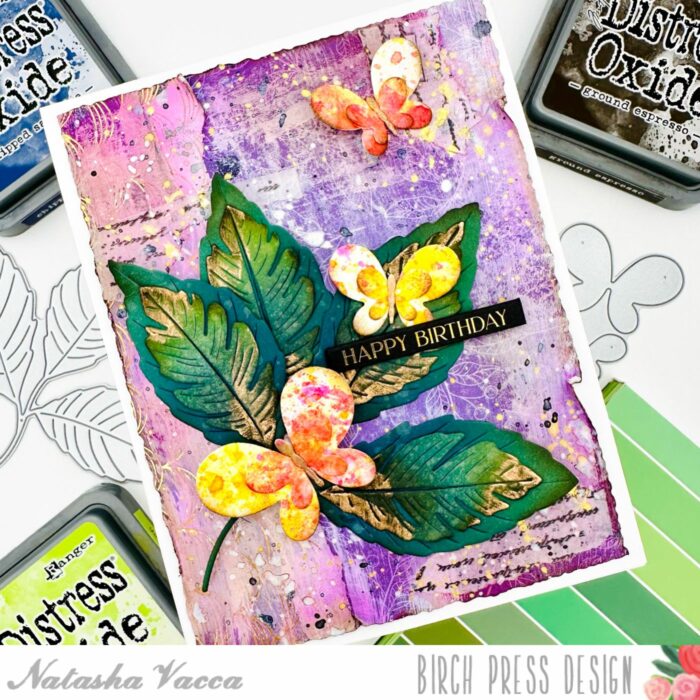
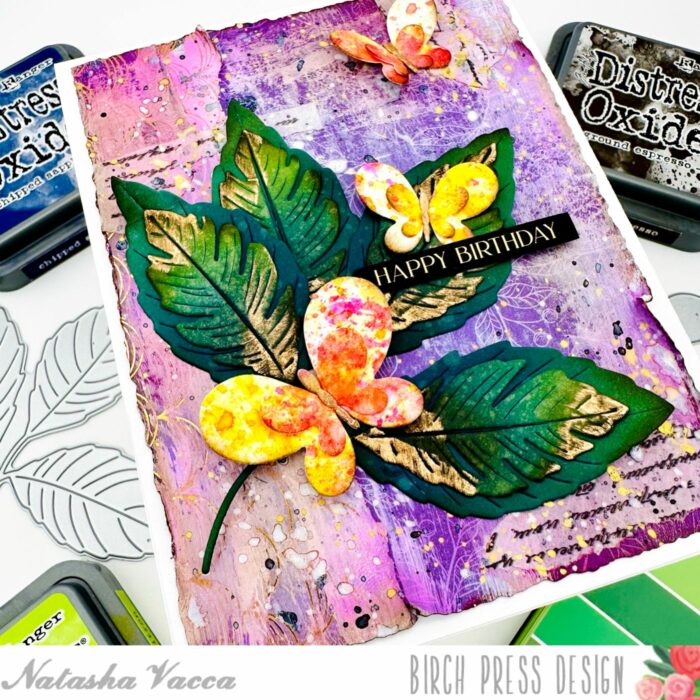
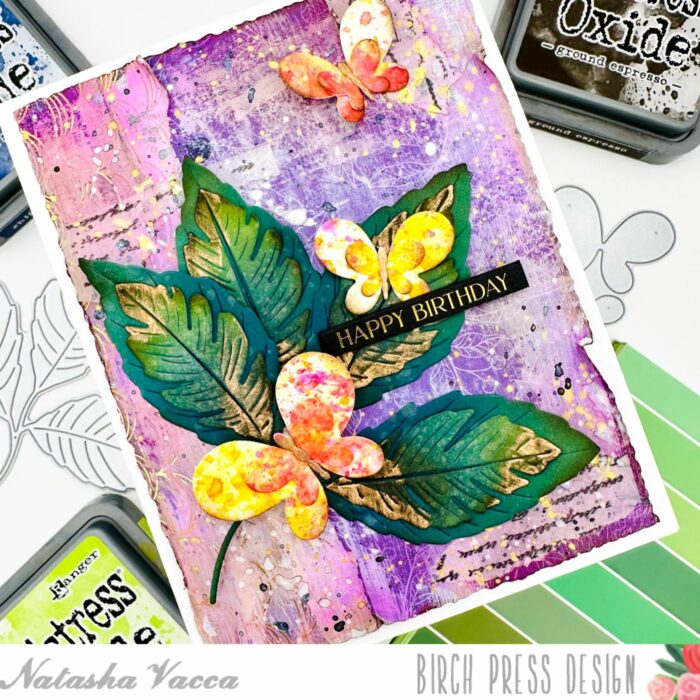
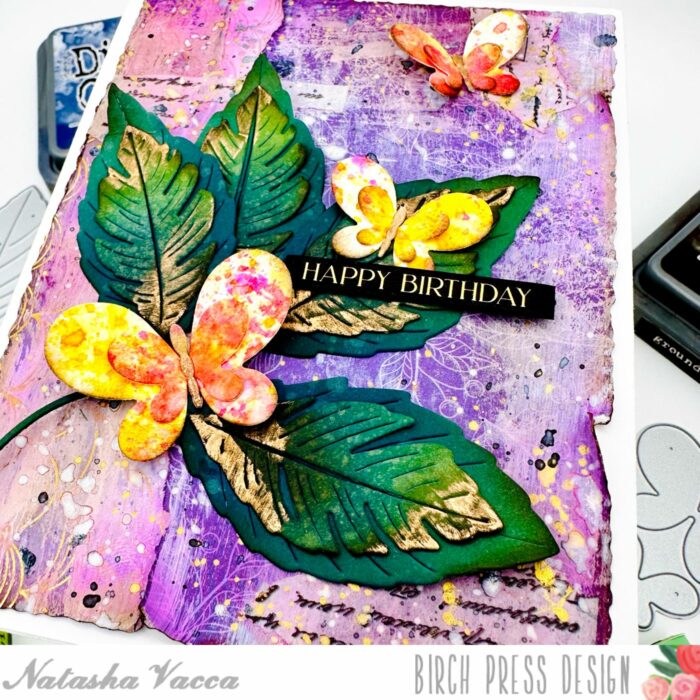
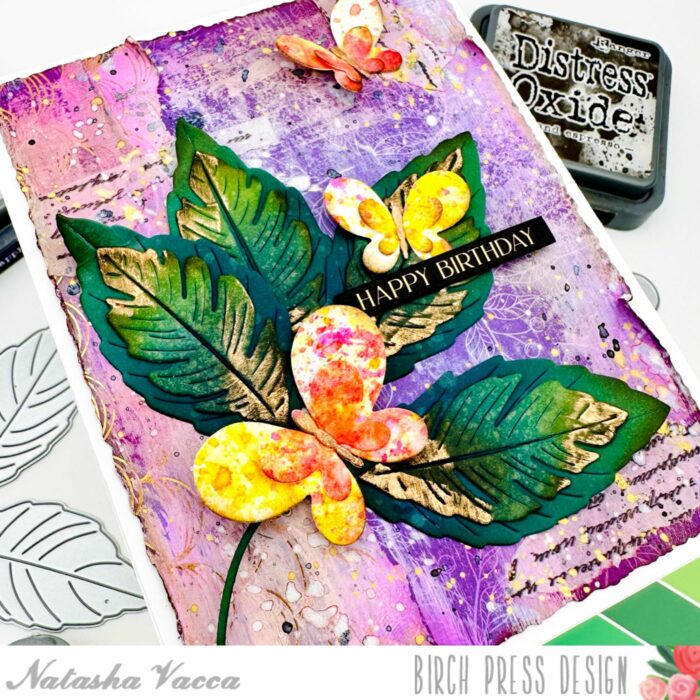
Hello Crafty friends, it is Natasha here and I am excited to be back today! Today I am sharing a gorgeous new die in the Birch Press Collection – Wiegela Leaf Contour Layers! I paired this with a few other favorites for a fun mixed media style card! So let’s get started!
I started with the Wiegela Leaf Contour Layers die set. I die cut 2 leaves using the new Greenery Solid Core Cardstock pack! I love these new pads! Once the leaf was die cut, I added Distress Oxide Inks to each layer of the leaf for added texture and color! I used: Pine Needles, Chipped Sapphire, Twisted Citron, & Ground Espresso. Once the inking was completed I added water droplets and picked up the color with a paper towel. Next I added Foundry Wax to sections of the leaf in the color Statue. I also darkened the edges of the leaves with a dye ink in brown. I then adhered these together with liquid glue and set them aside to dry.
Next I die cut the butterflies using a leftover background I recently made using inks. I die cut 3 butterflies using Simple Butterfly Contour Layers. I added Foundry wax to the antennae as well for added texture. I also inked up the edges of the butterfly and adhered the layers together with liquid glue. I set these aside to work on my background.
For the background I chose a few pieces of pattern paper from the Anemone Grove paper pad. I trimmed one panel to a bit smaller than an A2 card base. I then used my deckle trimmer on the edges for a worn look. I then tore a couple other pieces and adhered them to the left side of the panel. Next I applied White gesso to the panel in sections using a small paint brush and then a brayer. I apply the gesso in several directions for added texture. Next I added a few pieces of text washi tape on the panel. I then added ink blending to sections using Distress Oxide in Seedless Preserves.
Next I added splatter to my pattern paper background. I used a combination of black, white, and gold splatters. Once the panel was dry I adhered the pattern paper background to my A2 top folding card base. I then adhered the leaves and butterflies to my card front. I chose a birthday sentiment from the new Greeting Tabs from Memory Box – I love these so much!!!!! I love the black with foil lettering, there are several to choose from!
Thanks so much for stopping by today! I will be back soon with more crafty inspiration!
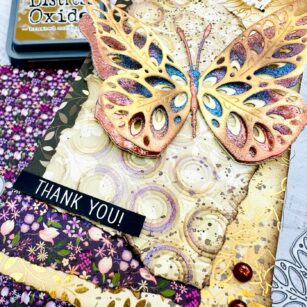
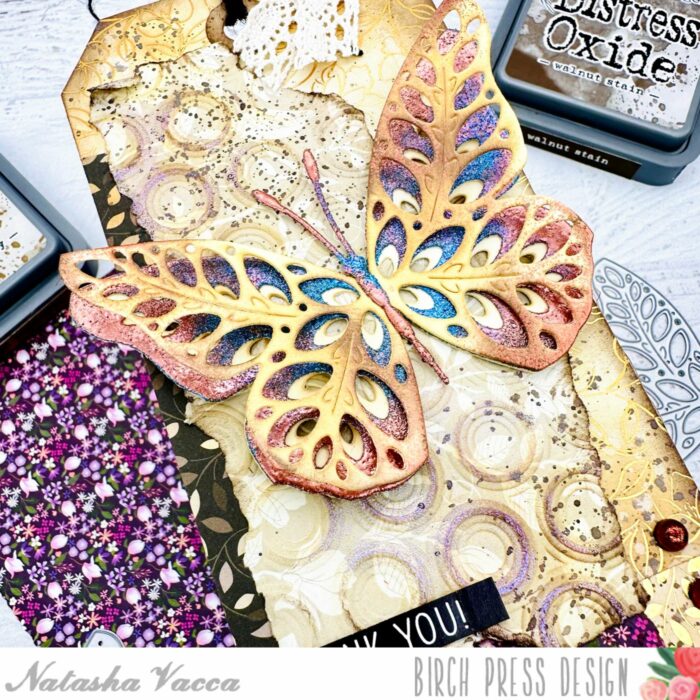
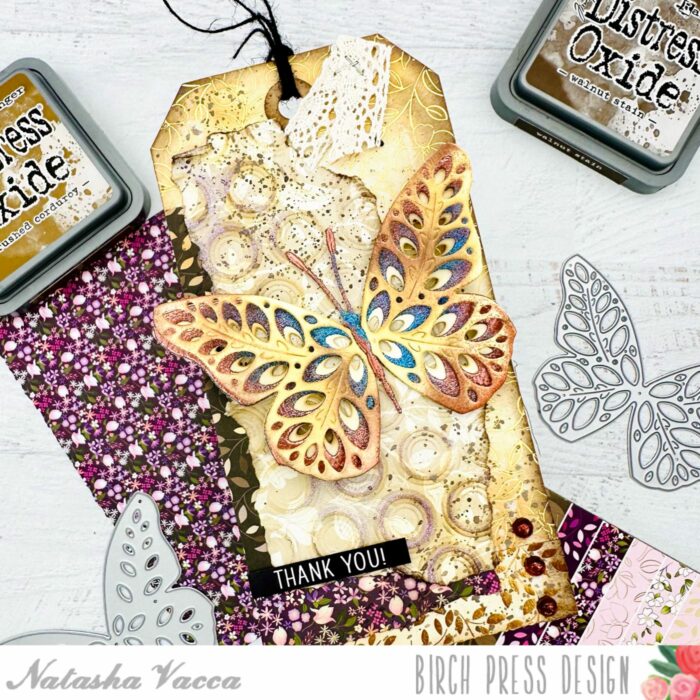
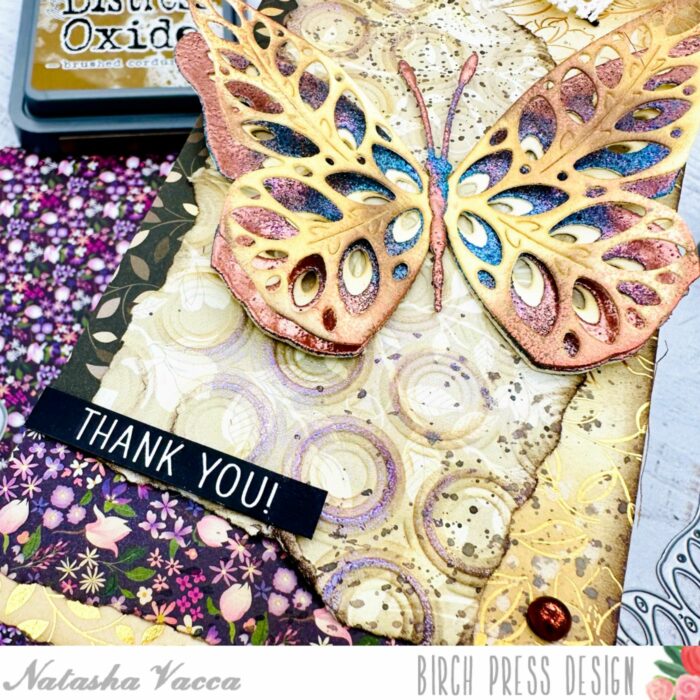
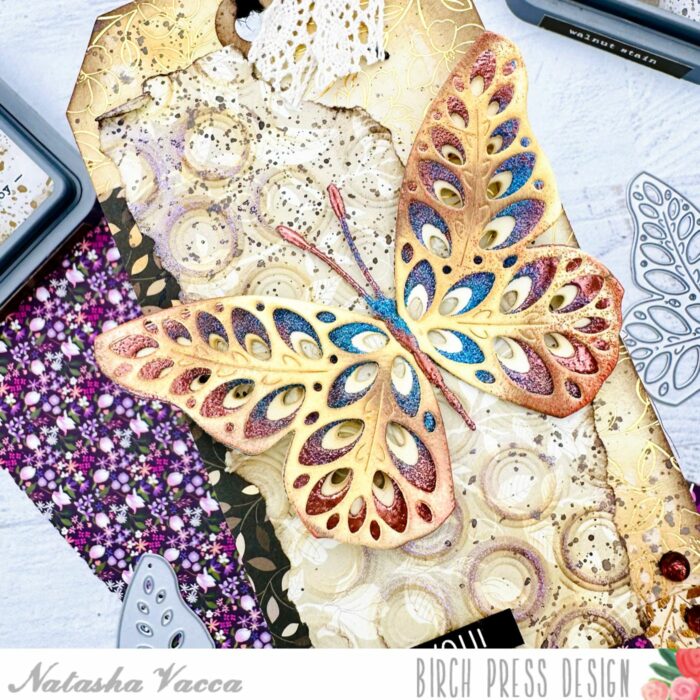
Hello crafty friends, It is Natasha and I am excited to be up on the blog with you today! Today’s project combines the beautiful Eloquent Butterfly layered set, paired with beautiful papers from Memory Box! So let’s get started!
I started by die cutting each layer (A and C) from the Eloquent Butterfly onto white cardstock. Once it was die cut, I added Distress Oxide Ink (Brushed Corduroy and Walnut Stain) to layer A and C. For layer B I die cut the butterfly using the Memory Box Glitzy Glitter pad using a piece of blue glitter paper. Then on layer B I added a couple colors of embossing powder. I do one color at a time, adding layers and not fully covering the butterfly with one color of powder. I also added a bit of embossing powder to layer A to add more interest and texture. I then adhered the butterfly together using liquid glue and set it aside.
Next I started to work on my tag background using a pre-made tag from my stash. I then chose a few pieces of beautiful pattern paper from the Memory Box Magnolia Grove paper pad. I love these papers, they are so beautiful! I adhered the layers onto my tag, then dry embossed one of the papers using the Memory Box Ringadings embossing folder. Once this was dry embossed I tore the pattern paper to give a distressed look. I then added the same distress oxide inks to the paper. I added a bit more texture by applying an iridescent embossing powder to sections of the dry embossed paper. I then adhred the layer onto my tag,
Next I added splatters to the tag panel using a brown spray from my stash. I allowed the panel to dry, then distressed the edges using my distress ink pad. I chose a sentiment from my stash and adhered this with foam tape, then adhered the butterfly to the tag using liquid glue.
I completed the project with a twine at the top of the tag and a few gems from the Christmas Fairy Drops collection!
Thank you so much for stopping by today! I will be back soon!
Hello, Birch Press fans! Toni here with you today sharing an elegant and rather unexpected holiday card.
I used a variety of Neenah metallic shimmery papers to cut out the Splendid Poinsettia Contour Layers. So so pretty.
I used the same shimmer paper for the bottom layer of the Herbarium Plate with the second layer in an iridescent foil and black for the top.
I tucked a few Oval Leaf Branches in white for a pop of contrasting color. To finish the card I cut out Holiday Hugs in shimmer paper and layered that on top of a black layer for oomph.
Talk about a statement card. Modern. Elegant. Fabulous!
I hope you enjoyed today’s card and have a great rest of your week! Happy holidays!
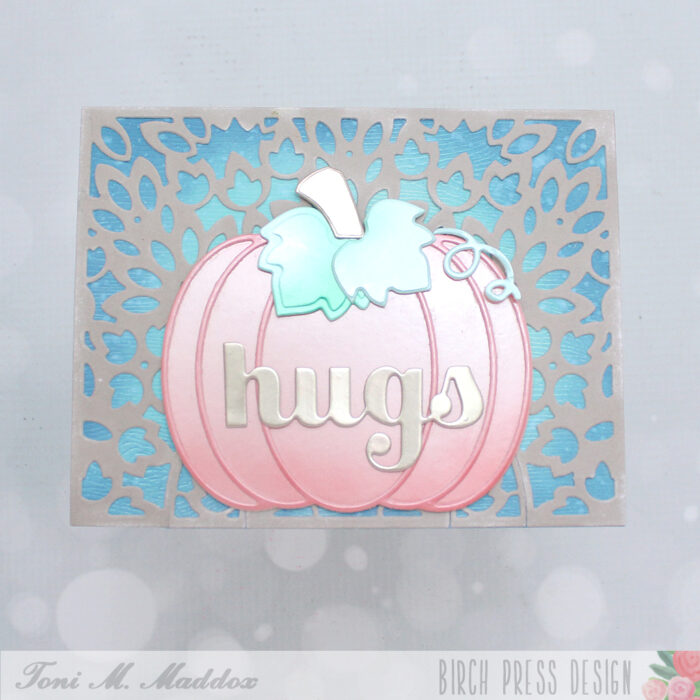
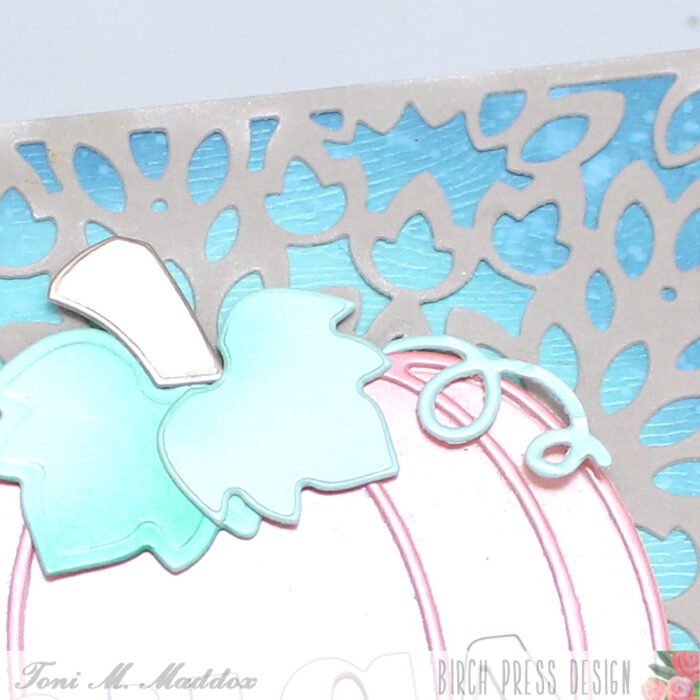
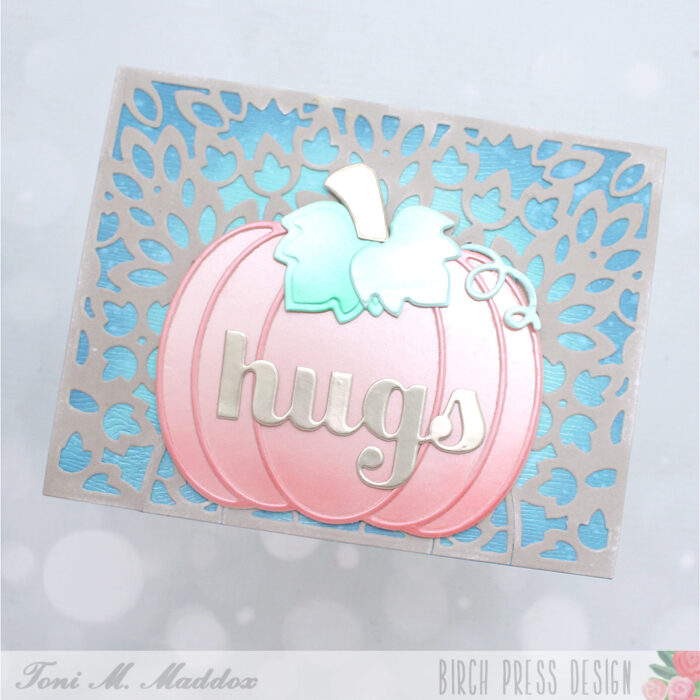
Hello, Birch Press fans! Toni here with you today with another fall-inspired card. Yay, fall!
I used the Adornment Pumpkin dies as separate dies rather than using the outline die to create an impression. So clever to be have such a versatile die in the package, right?!
I sponged the Memory Box Cream Woodgrain cardstock with Distress Oxide Salvaged Patina and Uncharted Mariner–love that “glow.”
On top of that I added the Enchantment Plate Layer A in a stone cardstock that I distressed with a sand eraser.
I love the softly colored Memory Box Vintage Pastel 6×6 Mirror cardstock I used for the pumpkin and sentiment. By the way, I added a bit of shading to the cardstock using my Copic airbrush with G17 and R32.
I hope you enjoyed today’s card and have a great rest of your week!
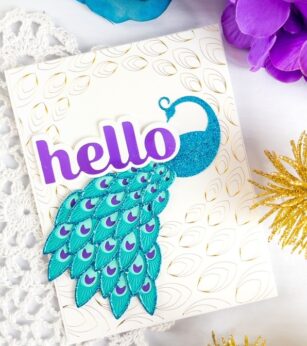
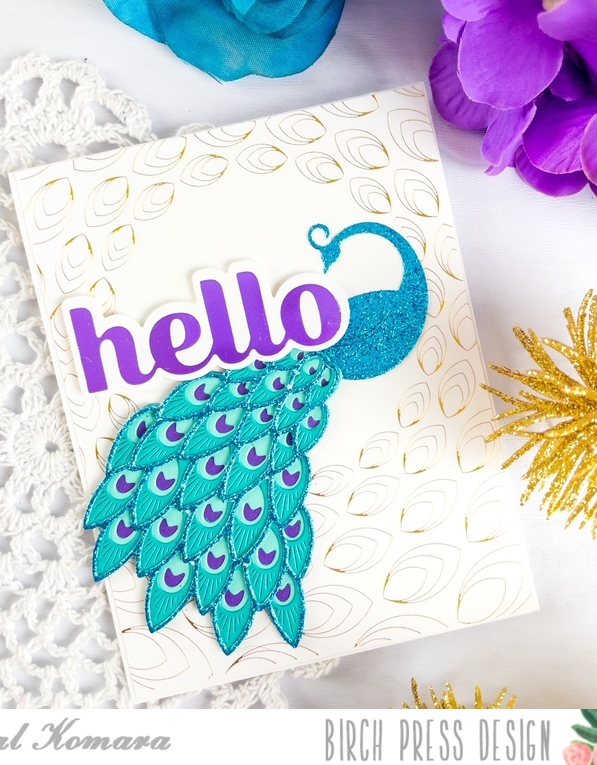
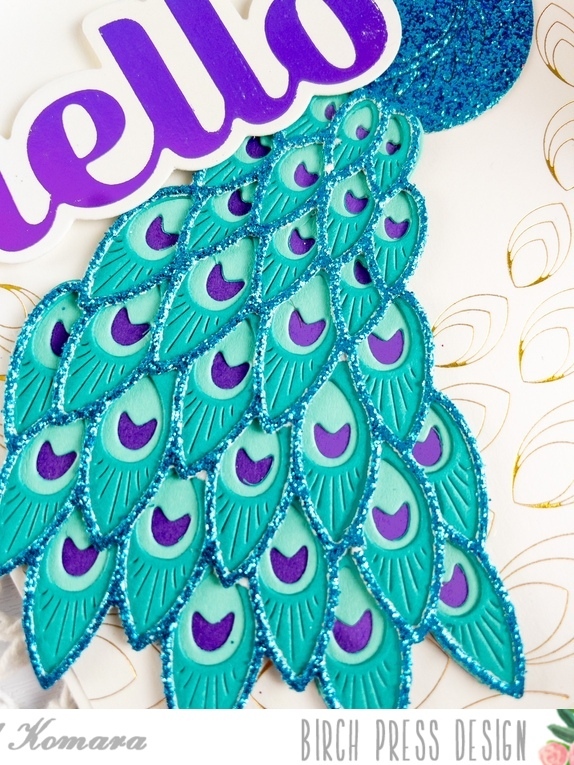
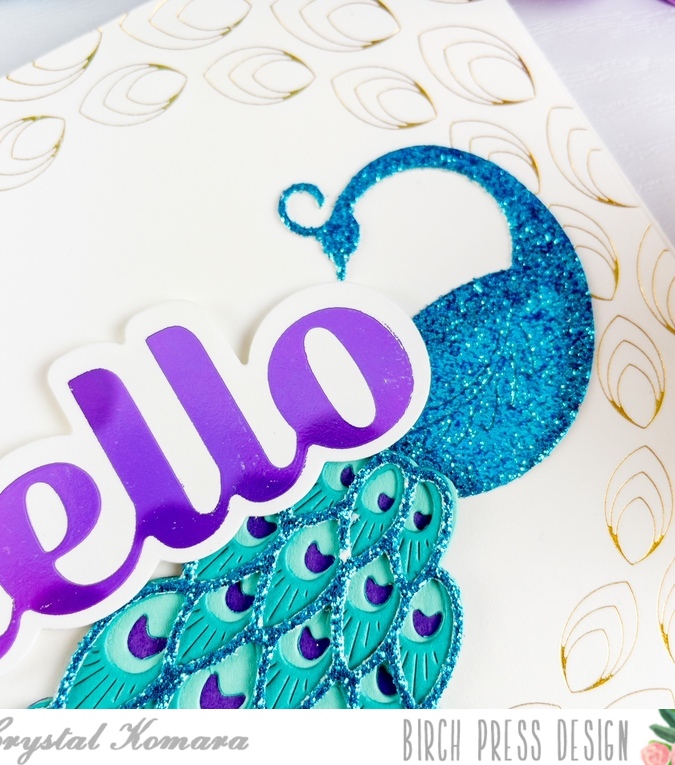
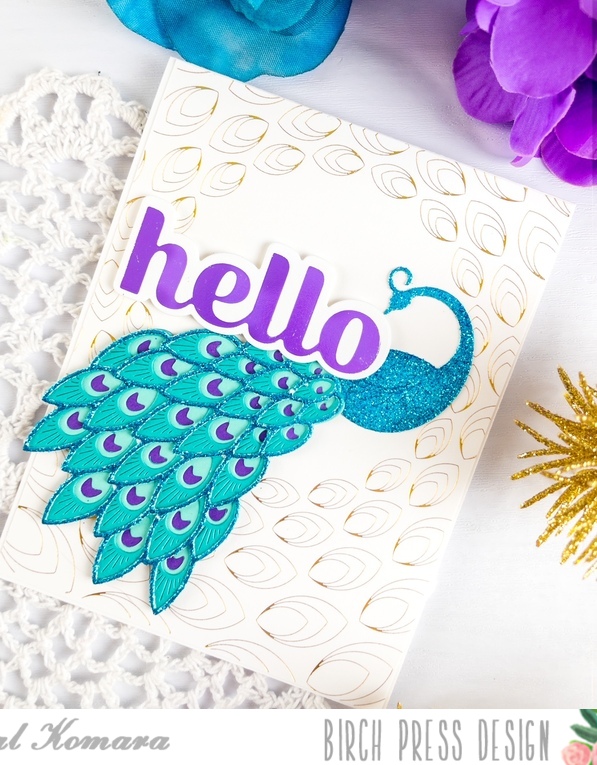
Hello readers! This is Design Team member Crystal Komara here today sharing one of my “oldie but goodie” favorite dies. As much as I despise birds (shhhhh!), I do admire the peacock simply for the gorgeous plumage of its quills. I mean who wouldn’t want to shake their booty and BOOM! Instant wow factor! : )
Just look at the details in those tail feathers!
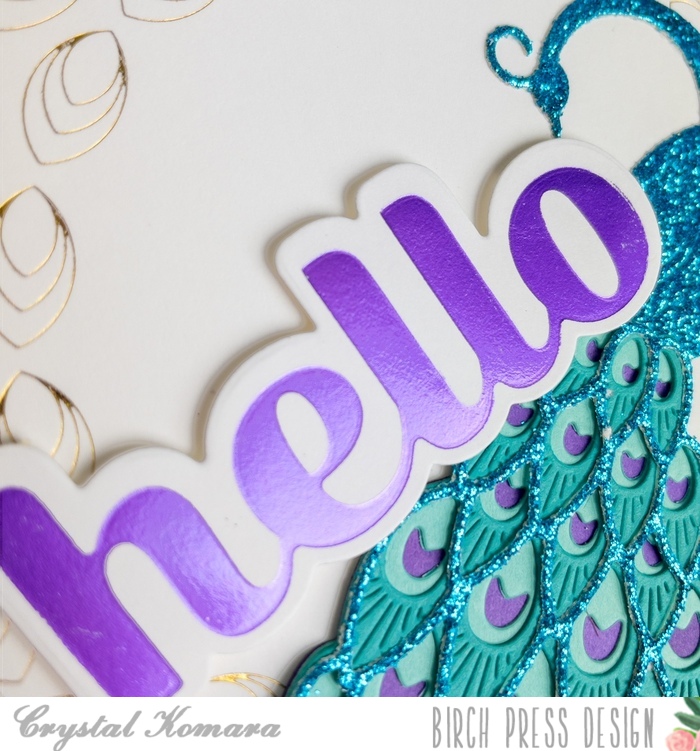
The base of this A2 sized card was made from 80 lb. Neenah Solar White Smooth cardstock. On a 5 1/4″ x 4″ piece of the same white cardstock, I heat foiled the Gilded Grace Hot Foil plate with gold foil. I only used the large background piece (and not the center cut outs) for this card. Then I created the layers of the peacock using a variety of teal and purple cardstock from the Ocean Blue 6 x 6″ paper pack and Vibrant Violet 6″ x 6″ paper pack. For the top layer (Layer A) and the main body of the peacock I used a teal glitter paper from the Glitzy Glitter 6″ x 6″ paper pack.
I then adhered the peacock to the card using 3M foam adhesive for added dimension.
For the sentiment I heat foiled the Hello Sugar Script with purple foil on white cardstock. I used the coordinating die to cut it out and adhered it to the card with foam adhesive.
Ahhhh, she’s so pretty! I hope you have enjoyed today’s card! Be sure to come back tomorrow for more inspiration from my fellow design team members!
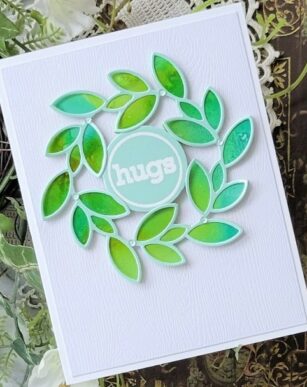
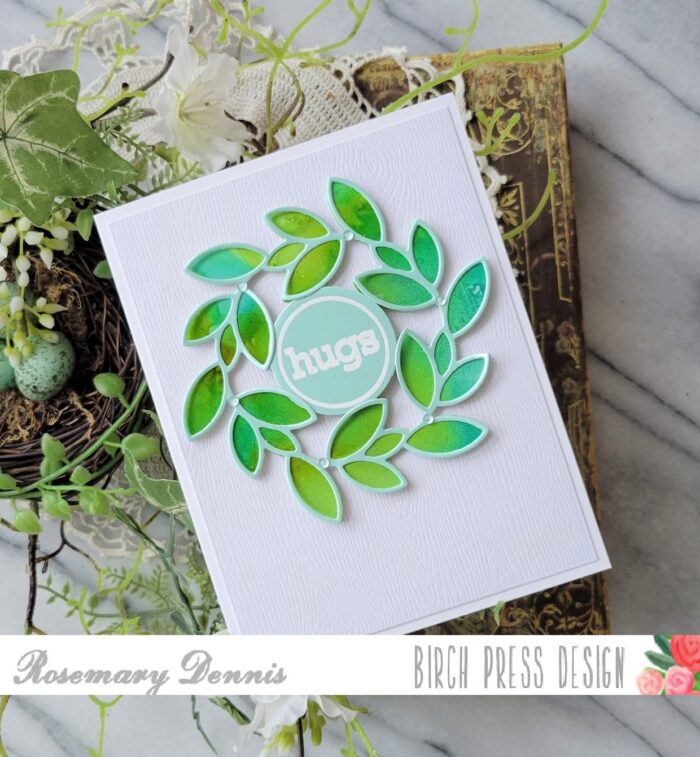
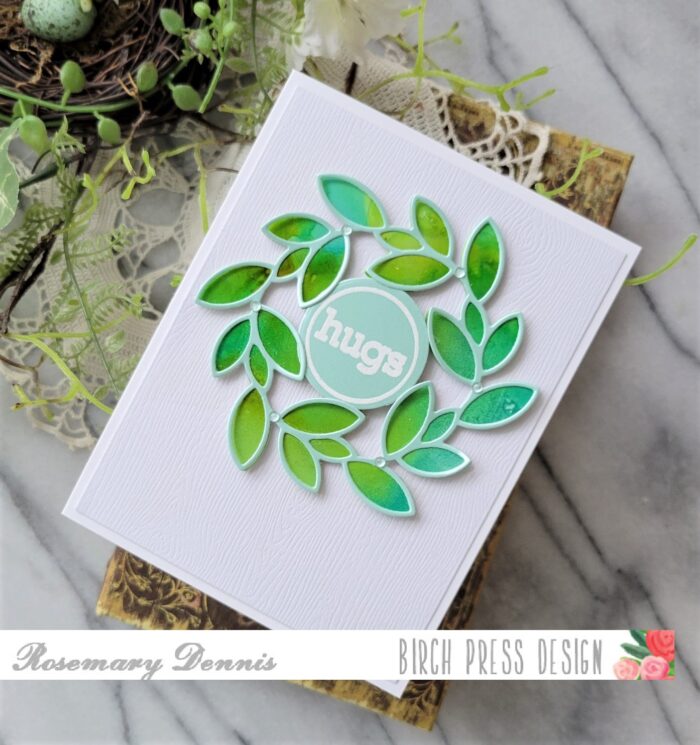
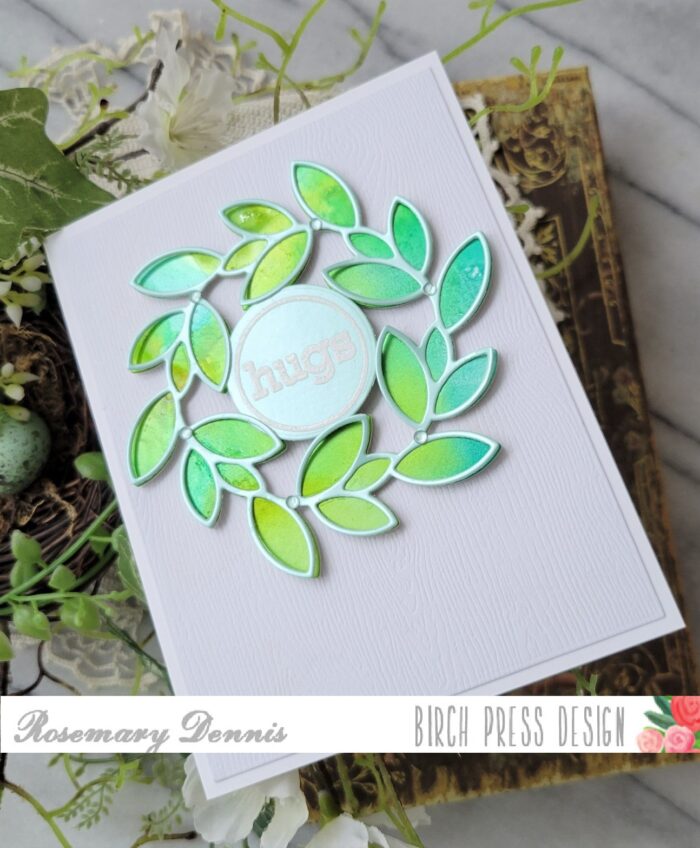
Hello everyone! Rosemary here today sharing a card made with the pretty new Adornment Wreath die from the latest release.
As I thought about what I wanted to make with products from the new release I started to wonder if I could use cardstock from the Vintage Pastel Mirror with alcohol inks. The cardstock does have a slick finish just like glossy cardstock or Yupo paper. So I decided to give it a try and it worked! I used a bluish-green piece of cardstock from the pad along with several green and one blue alcohol ink. I used my Tim Holtz puffer tool (I don’t know if that it what it is called, lol, but it works for me) to move the ink around until I had it to my liking. Once dry I die cut the solid wreath from that panel.
As you can see I still have some left over to die cut smaller pieces from or maybe add more alcohol ink. There are two sheets of each color in the pad so I decided to use the second one to die cut the top layer from and adhered that with liquid adhesive.
For the sentiment I used one of the circle sentiments from the Contempo Greetings stamp and die set. I stamped the sentiment on a corner of the panel I die cut the adornment layer from using watermark ink and then heat embossed in white. I used the circle die from the set to die cut the sentiment. As I have said before the Memory Box woodgrain cardstock is great for adding just a little bit of interest and texture to your background. I think the wreath looks lovely layered on top!
One of the alcohol inks I used is a pearlescent one. I tried to capture some of the shine it creates with the above photo. Not sure if it worked or not! I used thin foam squares to pop up the wreath and then thicker foam squares doubled up on the circular sentiment. I added the panel to a white cardstock base and then finished with tiny clear Memory Box fairy drops.
I hope you enjoyed today’s card. If you have some Memory Box mirror cardstock try out your alcohol inks on it. You just might like how things turn out! Thanks for stopping by and have a lovely day!