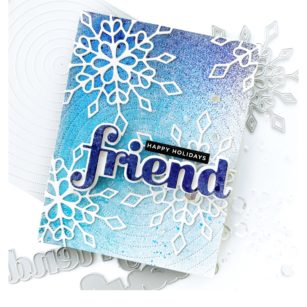
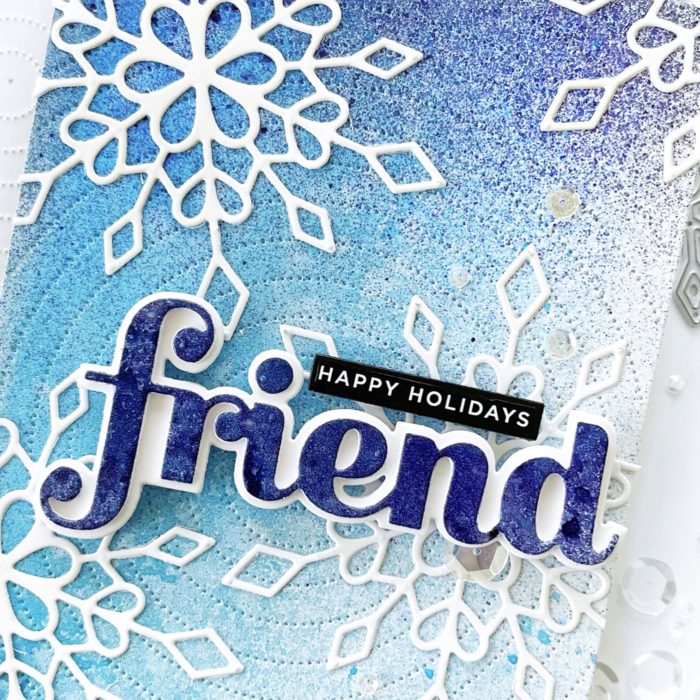
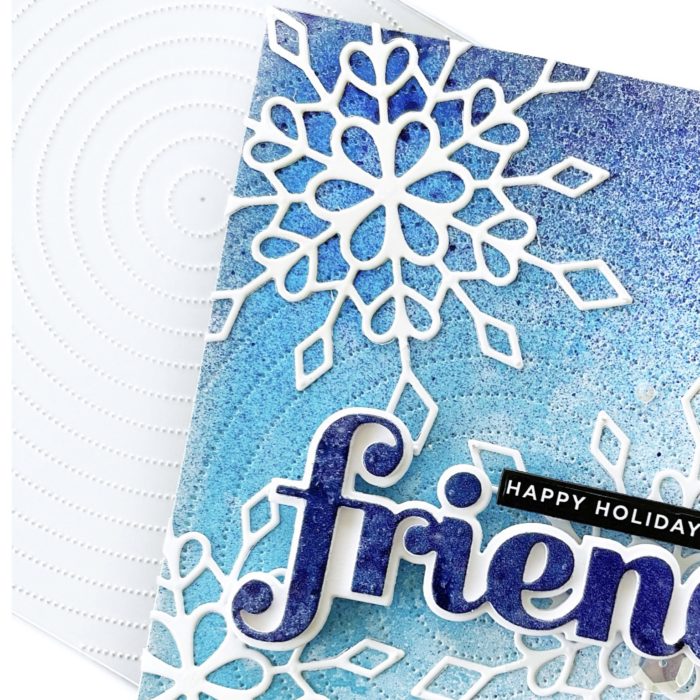
Dee (@dilaynacar) here today sharing a fun snowflake card featuring one of my favorite layering dies and a background that I created using acrylic sprays and die cuts! Let’s get started!
To begin, I took an extra background that I had previously created and cut it with the Pinpoint Radial background die (you can use any background that you like!) Next, I die cut three of the Frosty Flake snowflake die (only Layer A), adhered them to the background, and trimmed off the excess.
Next, I cut the Big Friends Sugar Script die with the leftover acrylic-sprayed cardstock and the shadow die in white, then adhered them to the card using foam tape. To finish, I added a sub-sentiment from my stash and some clear sequins for a little extra sparkle!
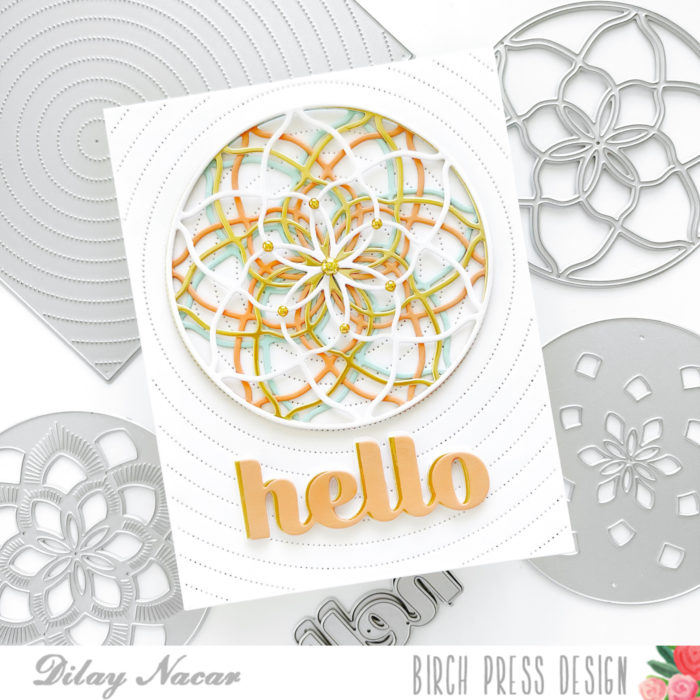
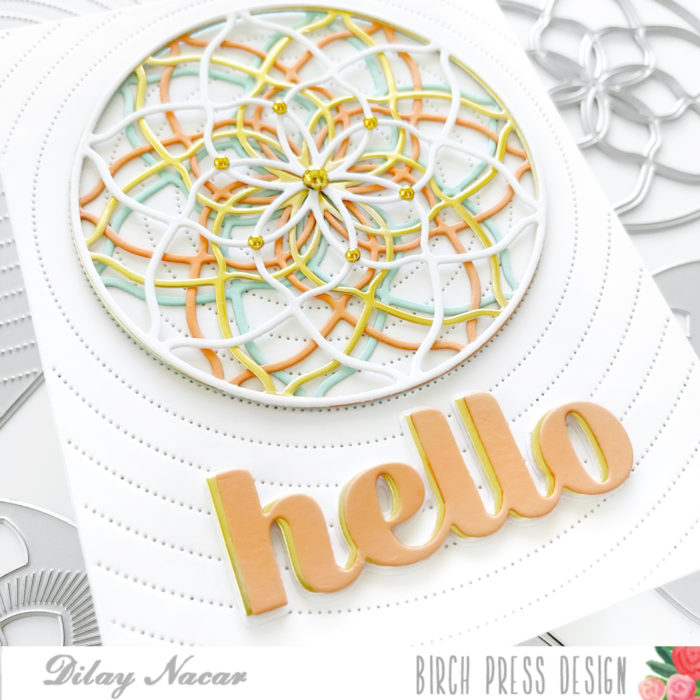
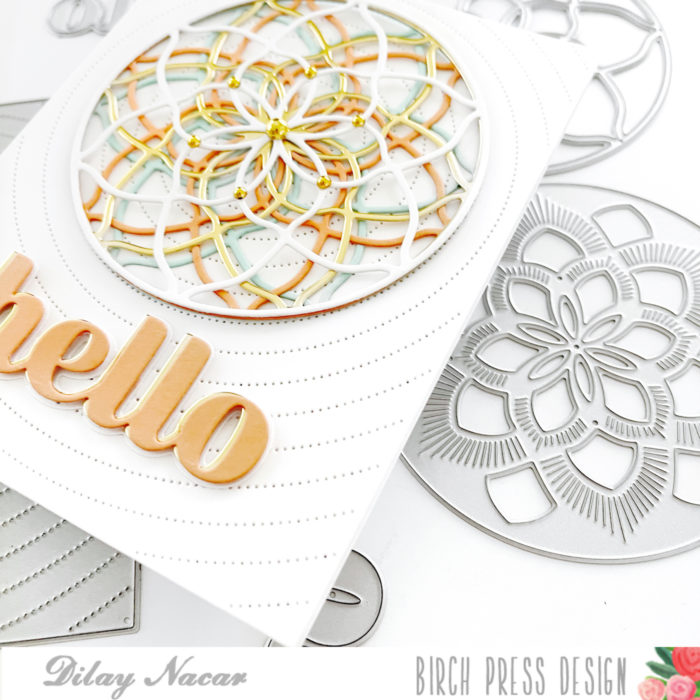
Welcome back, crafters! Dee here sharing a card that combines the Arista and the Pinpoint Radial plate dies for a clean and simple geometric design! Let’s get started!
I began by cutting the Pinpoint Radial plate die with white cardstock, then die cutting Layer A of the Arista layering dies four times – once in white and three in different colored cardstock. I stacked all four together, offsetting each one, and adhered them together for a kaleidoscope effect, then adhered it to the center of the Pinpoint Radial background.
To finish, I cut the Big Hello Sugar Script die once in colored cardstock and once in gold, stacked and adhered them together (offset), and adhered it to the background. For a little extra shine, I added gold embellishments to the center of the Arista circle!
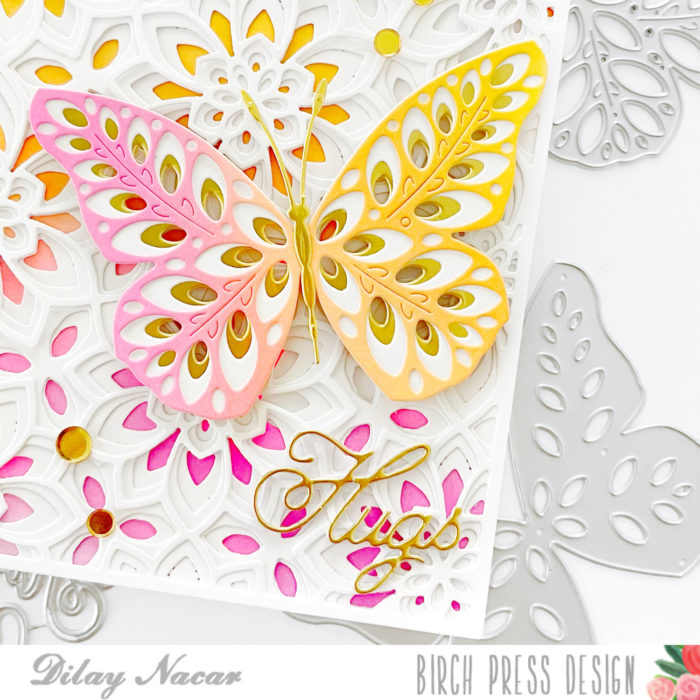
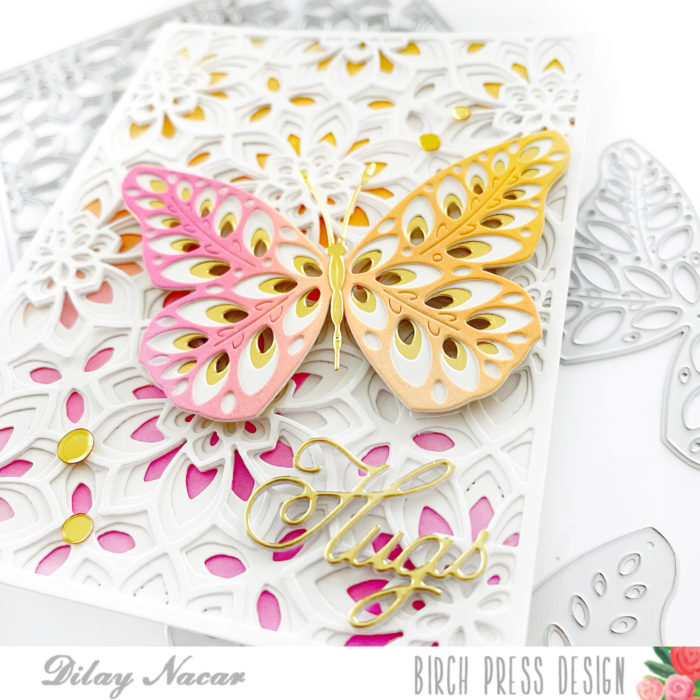
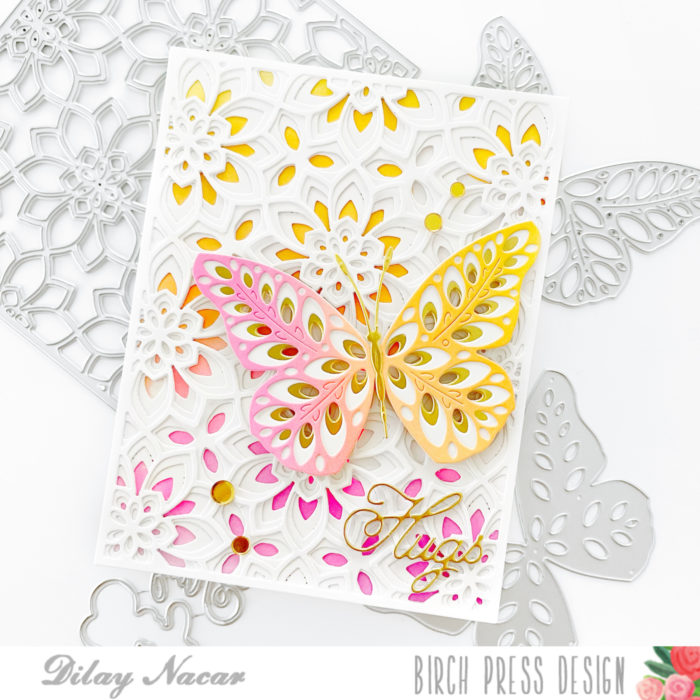
Hi friends and welcome back! Dee here today sharing a card featuring the Viola and Eloquent layered dies that I combined with a simple ink blending combo for pops of color!
To begin, I first cut the Viola Plate dies (layers a, b, and c) in white, then stacked and adhered them together. Next, I watered colored two A2-panels in yellow, To begin, I cut the Viola dies (layers a, b, and c) in white, then stacked and adhered them together.
Next, I watered-colored two A2-panels in yellow, orange, and pink, adhering one panel behind the Viola layers and die cutting the other panel with layer a of the Eloquent butterfly set. I then die cut layers b and c of the Eloquent set in gold and white, then adhered the three layers together.
I then die cut layer b and c of the Eloquent set in gold and white then adhered the three layers together. To finish the butterfly, I die cut the body of the butterfly from the Butterfly Basics set in gold and adhered it to the center.
Once the layers were complete, I adhered the butterfly to the front with foam adhesive. To finish, I die cut the sentiment from the Handwritten Hugs in gold, added gold embellishments, and mounted the panel onto an A2-sized card base.
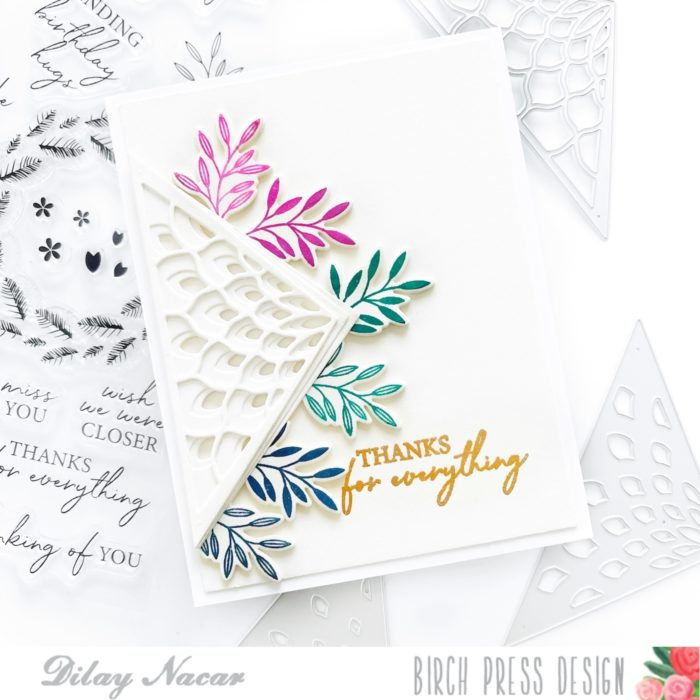
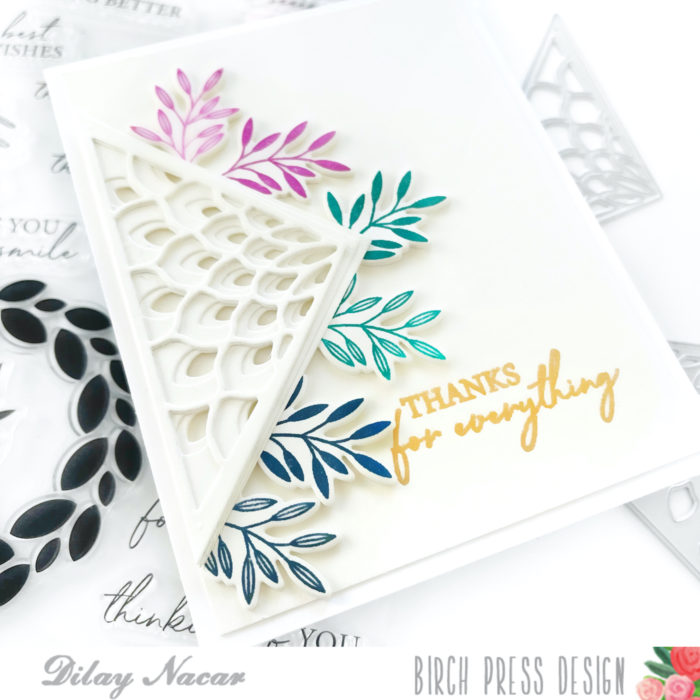
Hello, friends! Dee here and today, I’m sharing a clean and simple fall-themed card that features the Classic Sentimental Wreath stamp and die set combined with the Petal Triangle layer dies. Let’s get started!
To begin, I cut down a piece of ivory cardstock to 4” x 5.24” then stamped and gold heat embossed a sentiment from the Classic Sentimental Wreath stamp set.
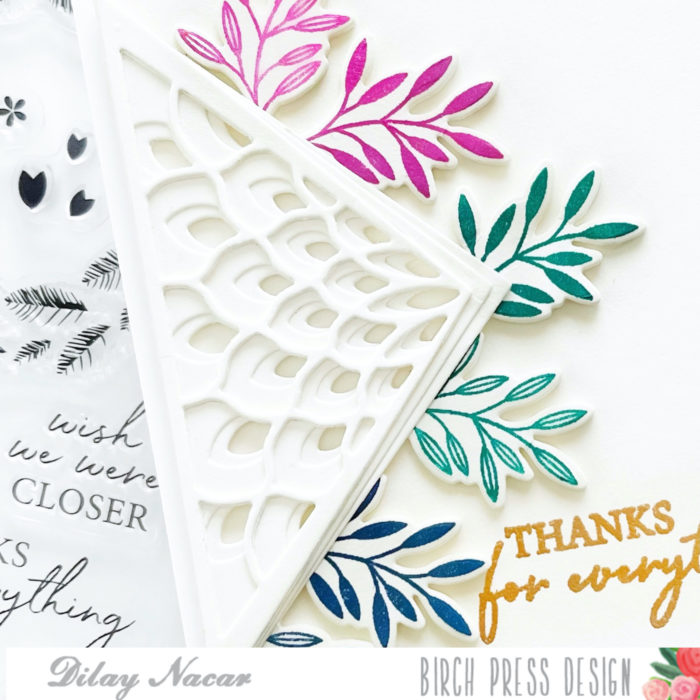
Next, I cut the Petal Triangle layer dies (A, B, and C) in the same ivory-colored cardstock, stacked and adhered them together, then mounted them onto the panel with foam adhesive.
For the leaves, I stamped each in three different colors then tucked and adhered them behind the Petal Triangle layers.
To finish, I mounted the completed panel to an A2-sized, top-folding card base!
I hope that you liked this clean and simple design! Thank you so much for stopping by, until next time!
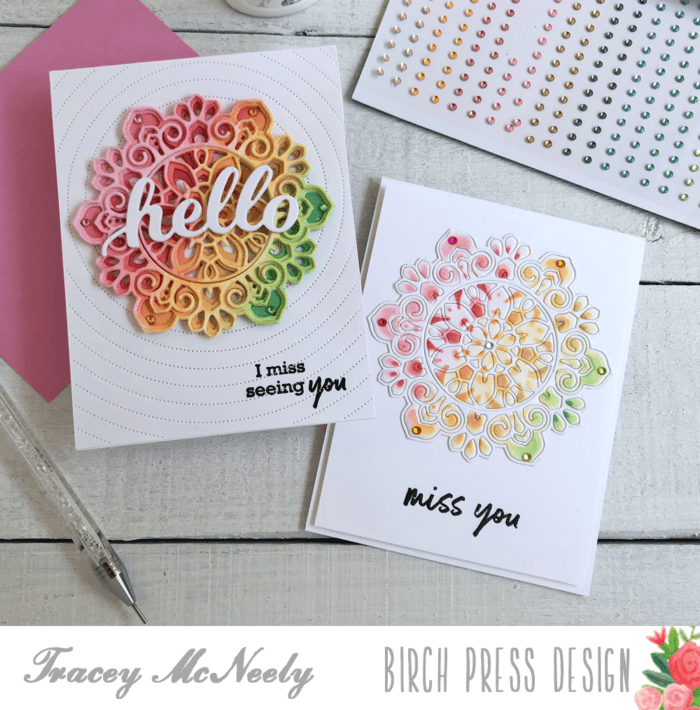
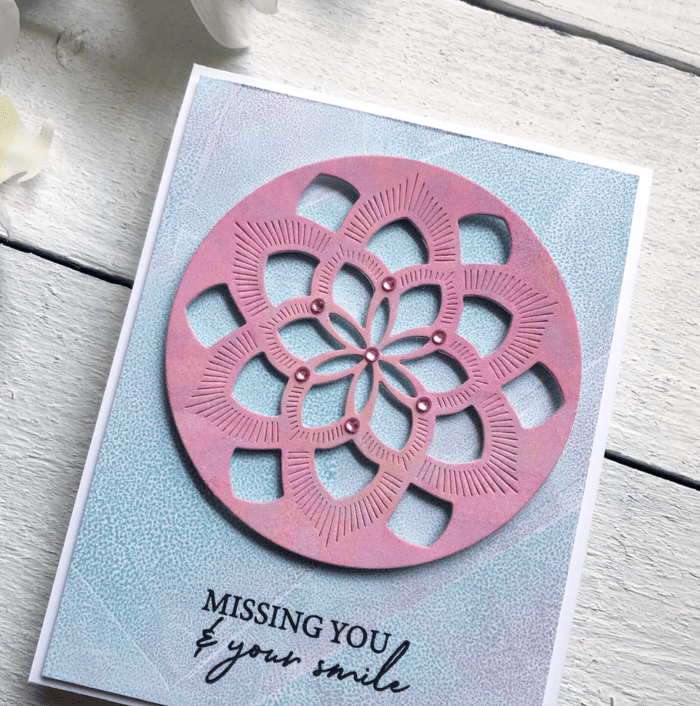
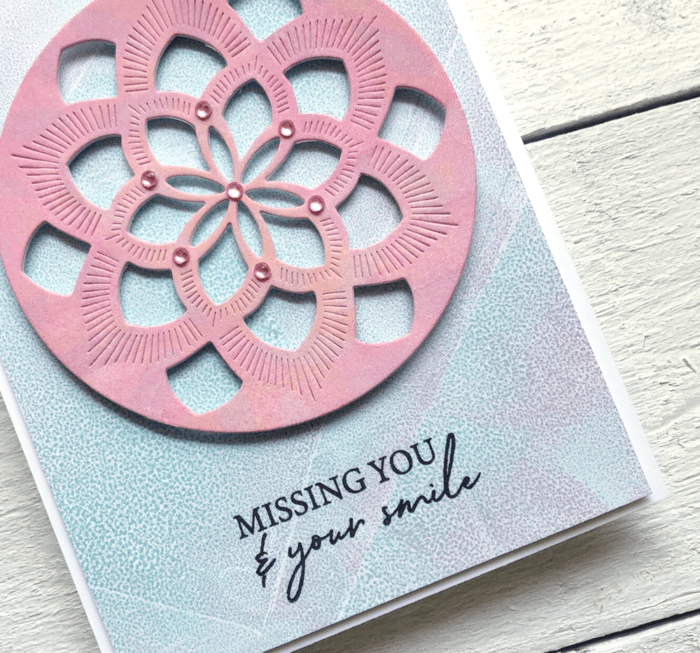
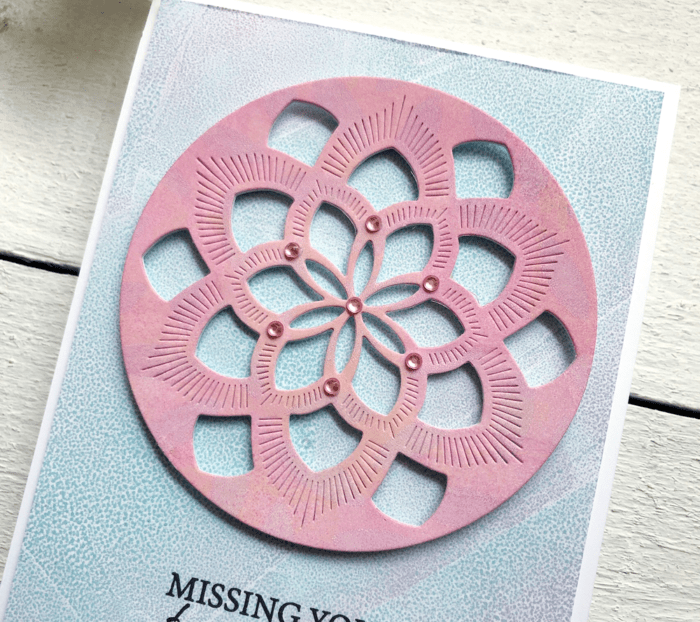
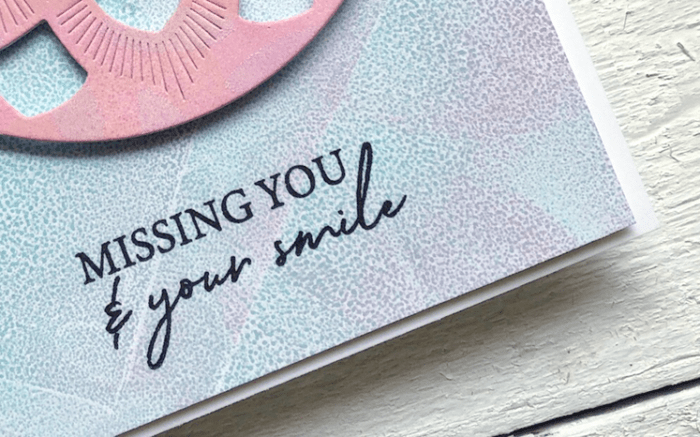
Hi There, it’s Tracey back today with a couple of cards that are perfect to send out to someone that you have been missing throughout the pandemic!
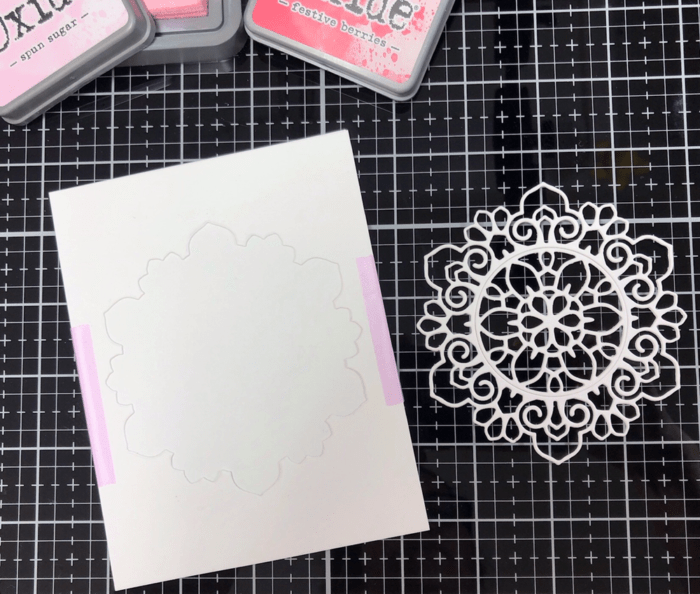
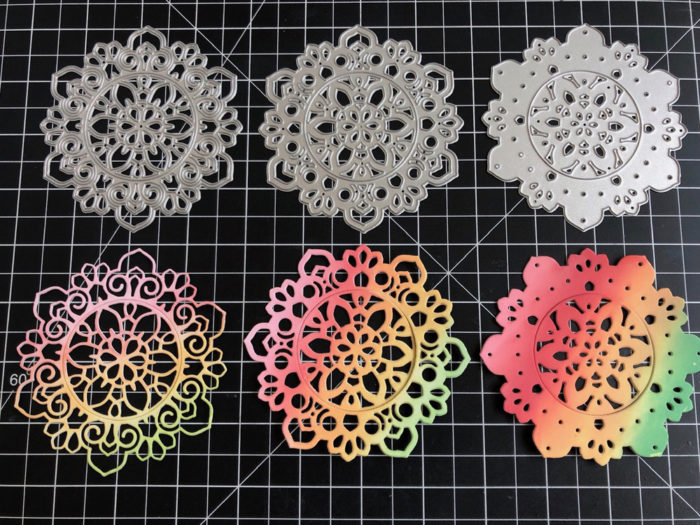
I began by cutting two each of the Tranquility Layers die set using white heavyweight cardstock. I usually save this cardstock for my card bases. However when I want the main die cut image or sentiment to really stand out I do use the heavier weight cardstock.
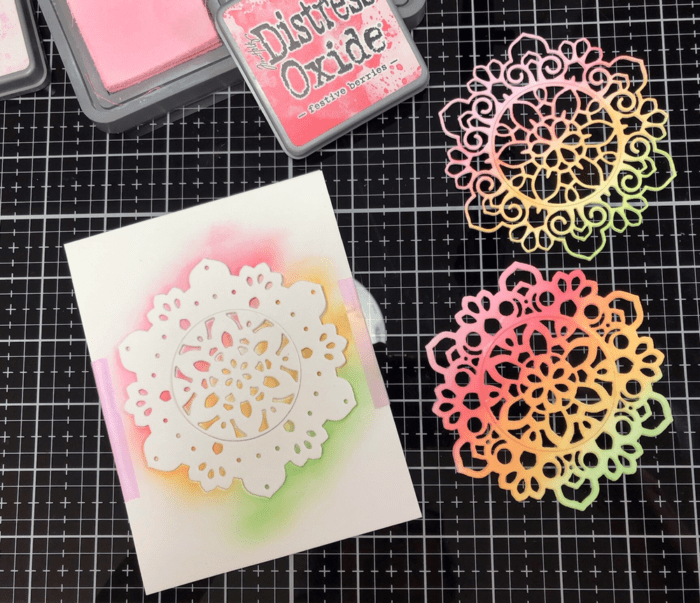
I cut one die from the Tranquility Layers die set through a 5 1/2″ x 4 1/4″ panel of white cardstock. Then I taped the panel to another panel of the same size with low tack tape. This creates a well for the die cuts for blending colour on to them.
I glued each layer together before I added colour to them, I usually do the gluing after but I am trying something different. Starting with Layer A, the one with the largest openings, I set the die cut into the well so that it doesn’t move around while I blend colour on to it. I kept the centre in place when blending my colours. You could do the centres in a completely different colour but for today I am treating it as a whole. I started with a very light hand blending a rainbow of pink, red, peach, yellow and green on a diagonal. I used Distress Oxide inks.
Next I moved Layer B into the well and did the same colours this time putting more colour down but still not heavy handed.
Finally I put Layer C into the well, this is the die cut that has the smallest size of holes. I used the same colours but I put these on with a heavy hand to really show the depth of the colours.
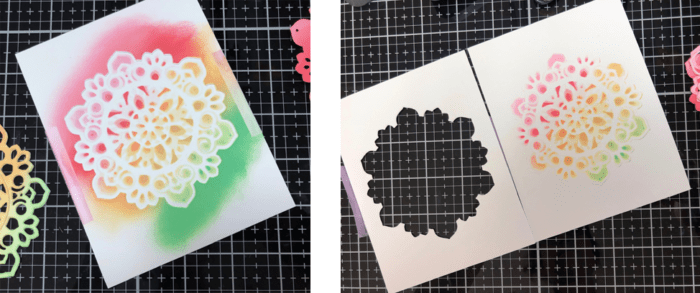
This is what my stencil well looked like after blending. then after I removed the top panel! To pretty to toss away. Can you see that while I was blending over the layers that it created another image on the bottom panel under the well. We will get to that later on. I will set it aside for now.
To finish out this card I glued the three thick layers together and the results are gorgeous. The double thick die cuts add so much more dimension. Thanks Jennifer McGuire for the tip!
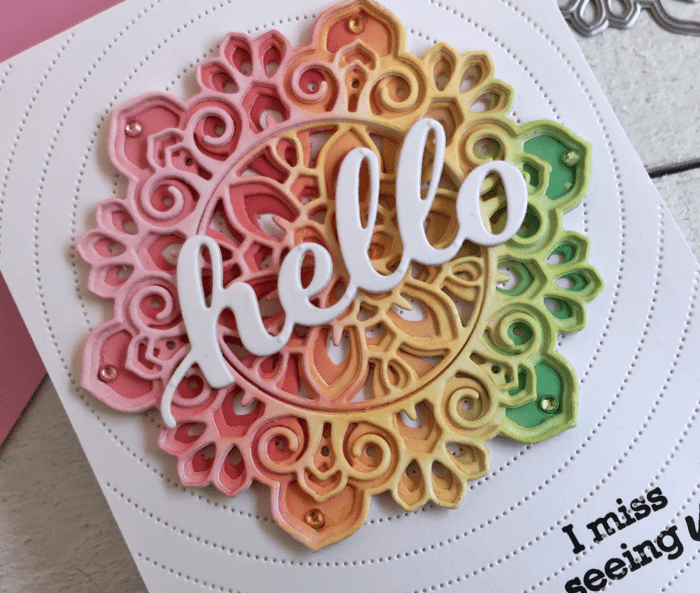
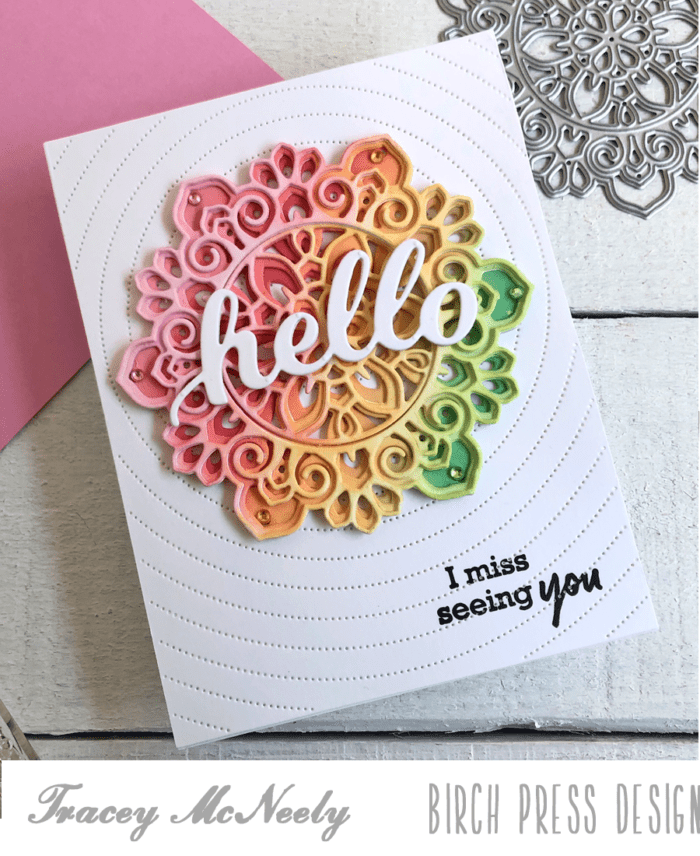
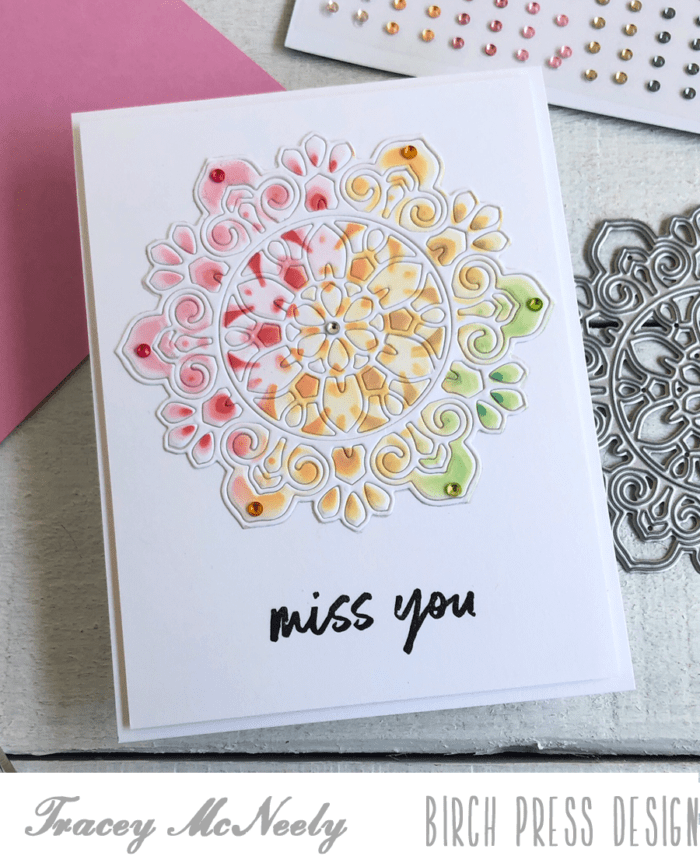
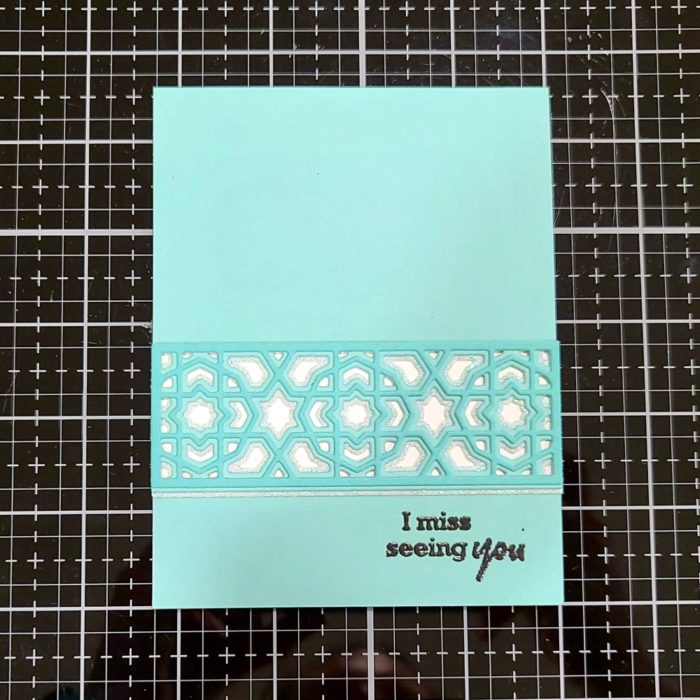
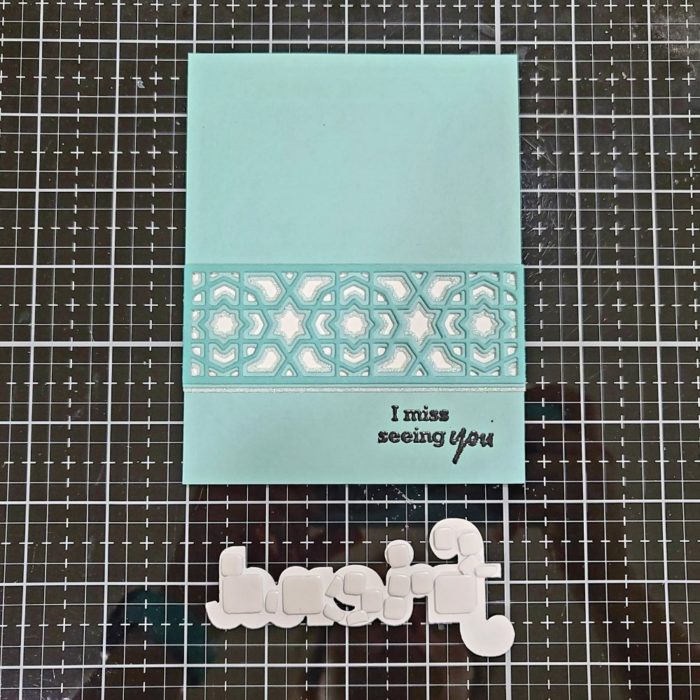
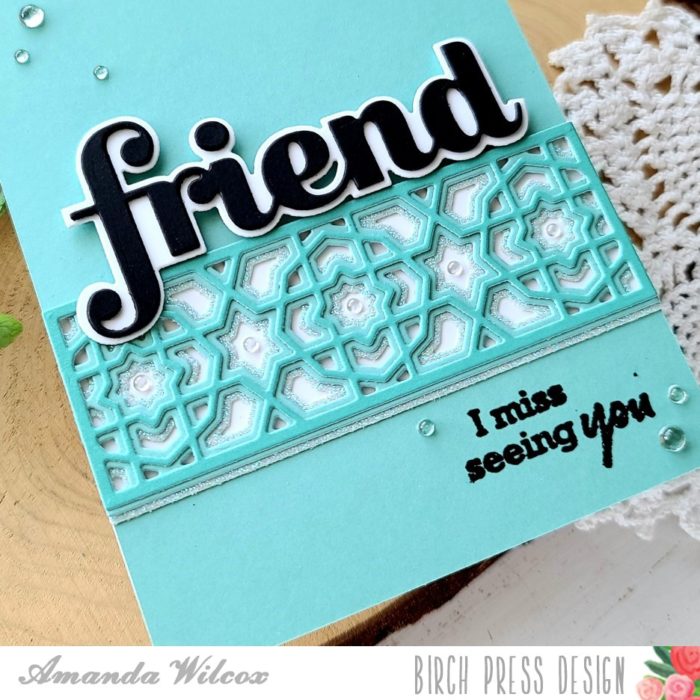
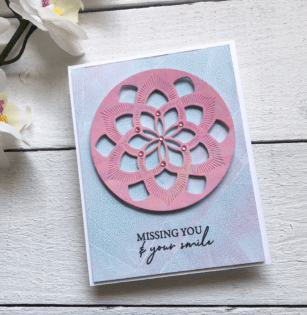
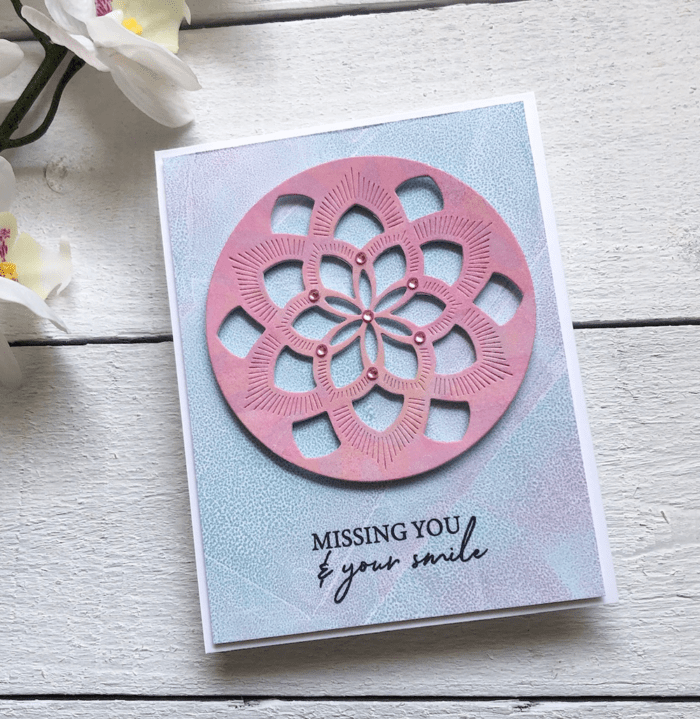
I cut a 5 1/4″ x 4 1/4″ panel using Radial Pinpoint cover die as a background for my mandala. Next I cut the Hello Honey Script die three times with heavyweight while cardstock and glued it together. I did not use the shadow, only the word. This will sit in the centre of the mandala. Before gluing everything down I stamped the sentiment “I miss seeing you’ from the Brush Sentiments clear stamp set on the bottom right corner of the Radial Pinpoint cover die. I added a few Pastel Fairy Jewels to finish it off.
I didn’t think I was going to use the panel that underneath my well, but it was too pretty not to use. what happened next was an embossing mistake I think all of us have made at one time or another. I had my plates mixed up in my sandwich and instead of embossing over the image I cut it with the Layer A die and all the teeny tiny pieces! I was too far into it now to back out, so I put a piece of double sided adhesive paper on to the back of the die cut to pick all the pieces up together. That worked great but now the front of my die cut was surrounded by adhesive. Out came the scissors and I fussy cut around the outside of the die to get rid of it. Then I put the mandala onto a panel of cardstock that was a bit smaller than the card base, added a sentiment also from the Brush Sentiments clear stamp set and added some Bright Fairy Jewels.
So the process yielded two beautiful and yet similar cards. Thank you so much for joining me today and crafting with me. Have a fabulous day.
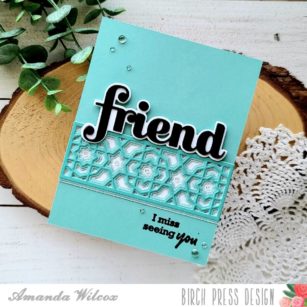
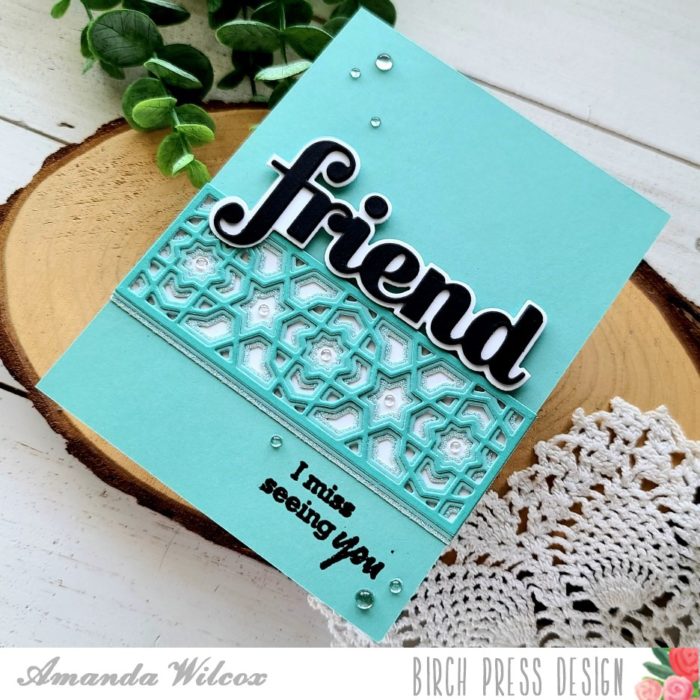
Happy weekend everyone! It’s Amanda from Twiddler’s Nook with a simple missing you card that I made for a friend that I haven’t seen since before the pandemic. I hope you like it!
I started today’s card by choosing cardstock and cutting the layers for the Mini Grandiose Bevel layers.
Then I took the mid-tone cardstock color and trimmed it down to A2 size. I stamped and heat embossed a sentiment from the Brushed Sentiments stamp set in black.
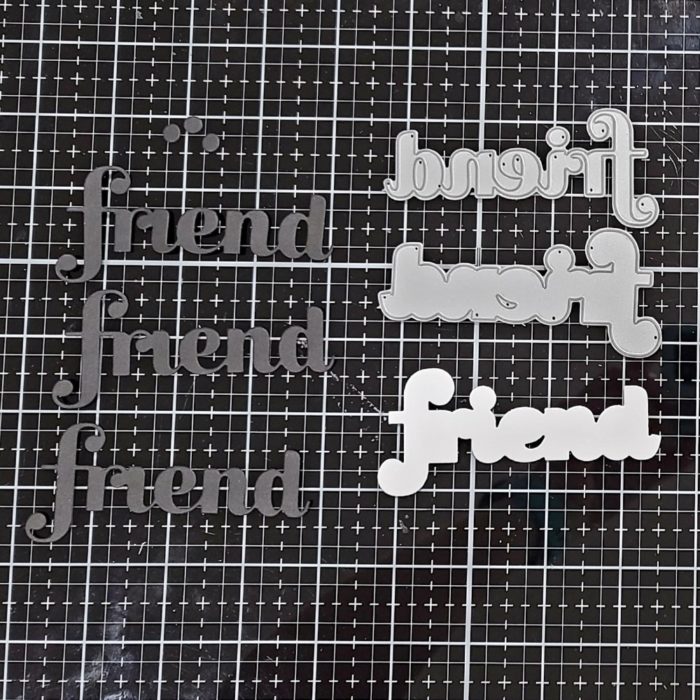
Next, I die cut the Big Friend Sugar Script word from black cardstock 3 times and the shadow from white cardstock once. I used liquid glue to adhere all the layers together and put an acrylic block on top while it dried.
I took the heat embossed panel and actually decided to trim it down to strips and adhere them to a white card base with the Mini Grandiose Bevel layers.
I trimmed the heat embossed sentiment into a 1 1/4 inch strip and then also cut another strip of that teal to 2 3/4 inches. I used liquid glue to adhere these to a white card base and then adhere the layered strip in the opening.
Next, I added foam squares to the back of the friend die cut with the exception of the bottom of the “f” because it overlaps the layers and doesn’t need the extra lift to lay flat. I removed the release paper and placed it above the layered strip.
To finish things off I added the smallest size of fairy drops to the center points of the layered strip and then a scattering of various sizes across the design for a little extra interest.
I hope you enjoyed today’s project and found inspiration to create something wonderful and share it with someone!
I appreciate you sharing your time with me. Have a fabulous day!
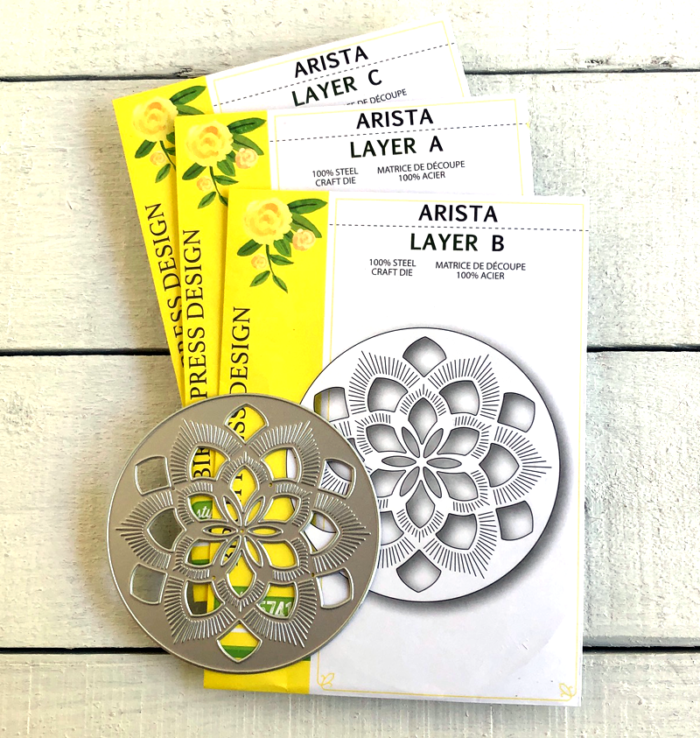
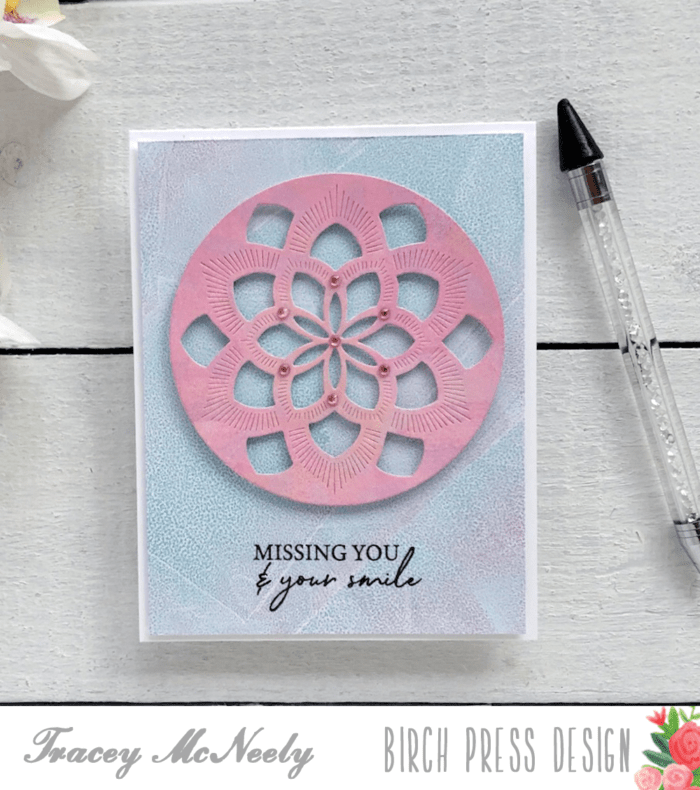
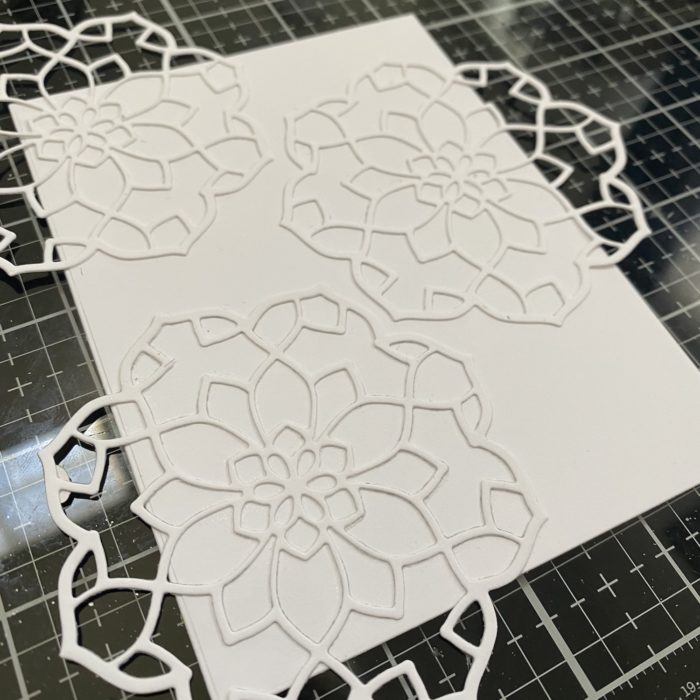
Hi there crafty friends, it’s Tracey here today and I have the pleasure of sharing a card I made using the new Arista Layer die set!
I created my own paper to use on my project using a gel press.
After making my card I realized that a lot of people are unfamiliar with what a gel press is? It is literally a clear piece of gel that you can put ink on, then lay your paper down on it and when you lift it up it transfers the ink to the paper in unique ways! I made a quick little video to show you the process I used for my background.
I used using Kitsch Flamingo and Salvaged Patina Distress Oxide inks to create the background panel. The fun with using the gel press is that every single print you make will be 100% unique. I set the panel aside to work on the focal die cut.
I had already made a panel using pink and yellow Distress Oxide inks–Kitsch Flamingo and Scattered Straw . I cut the Arista medallion, using only Layer B to showcase the amazing embossed detail on the die. I die cut it once from the pink/yellow panel and then two more times in white. I glued the three layers together to give it a bit of dimension.
The background was trimmed down to 5 1/4″ x 4″ and adhered to a white top folding card base for foam tape for even more dimension. Trimming the panel down leaves a nice 1/8″ border around it. A simple detail that really steps up your overall clean and simple card design.
A sentiment from the new Classic Sentimental Wreath stamp set was stamped on the front of the card, leaving room above for the Arista medallion.
The medallion was attached using foam tape which gives it even more fabulous dimension. I added a few of the pink Open Studio Fairy Jewels to the medallion for just a bit of sparkle! These self adhesive jewels are a great addition to your craft supplies.
Thank you so much for crafting with me today and I hope I’ve inspired you to make something pretty!
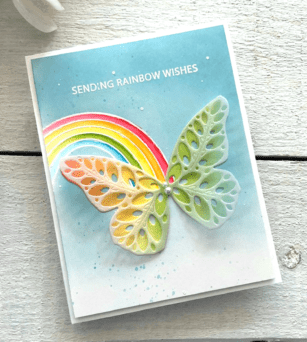
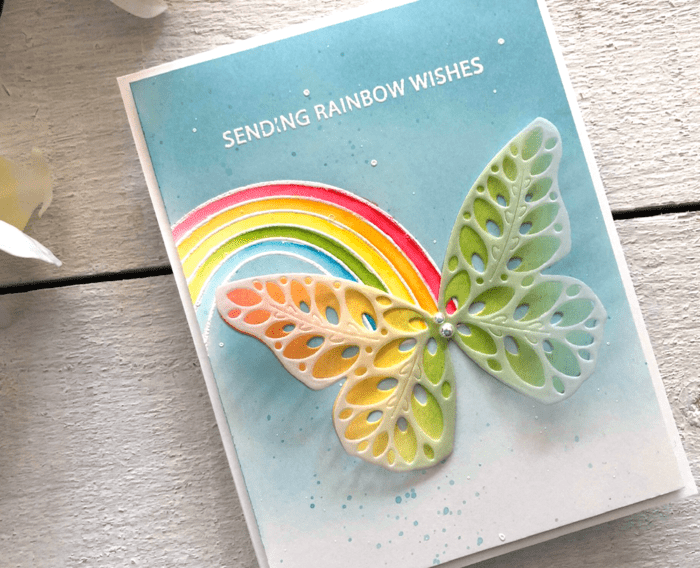
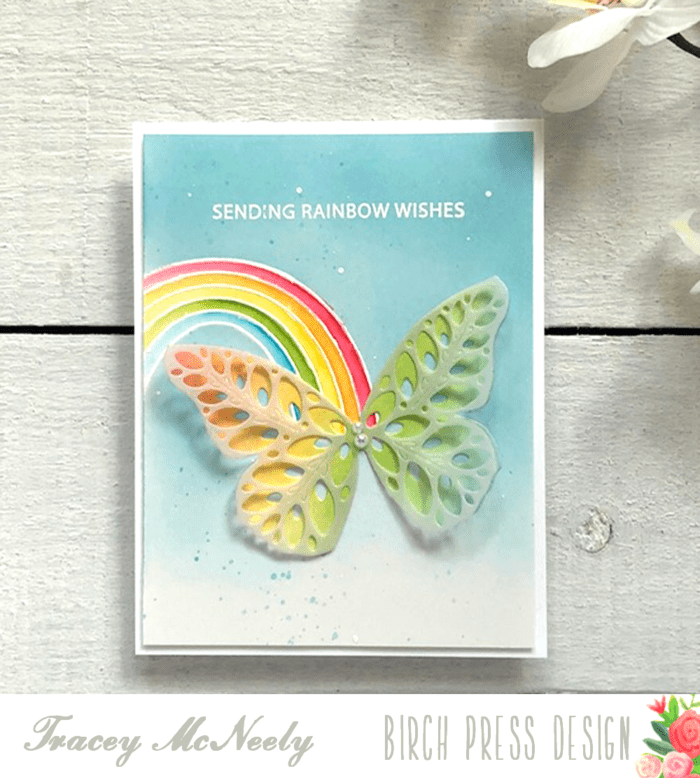
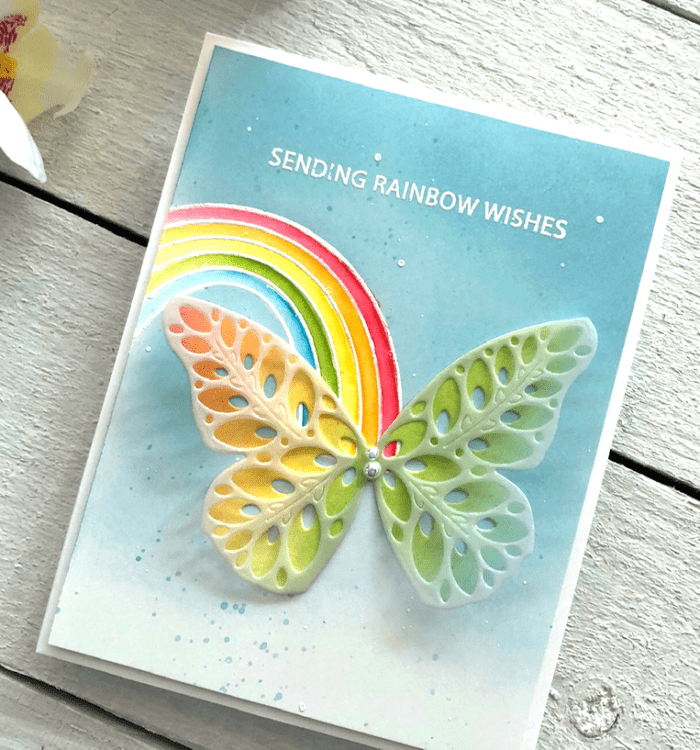
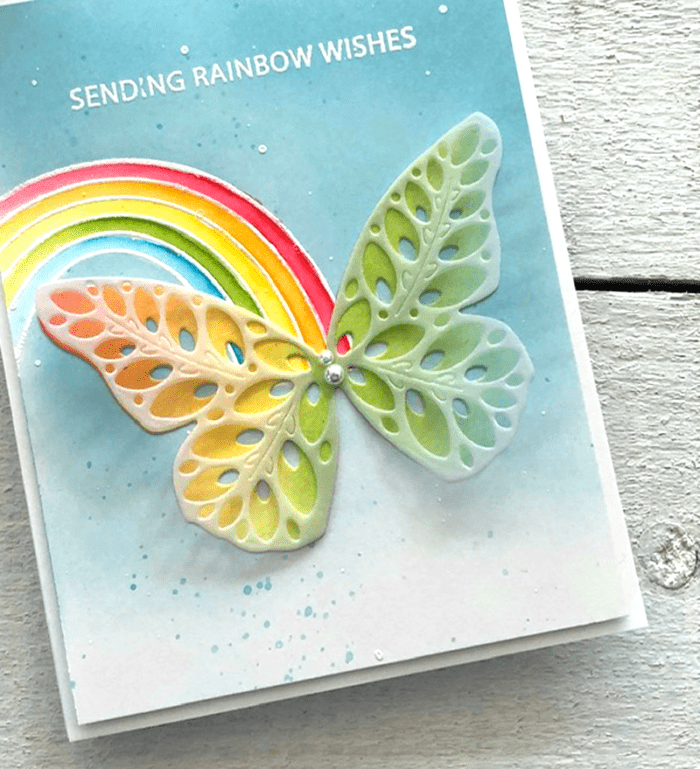
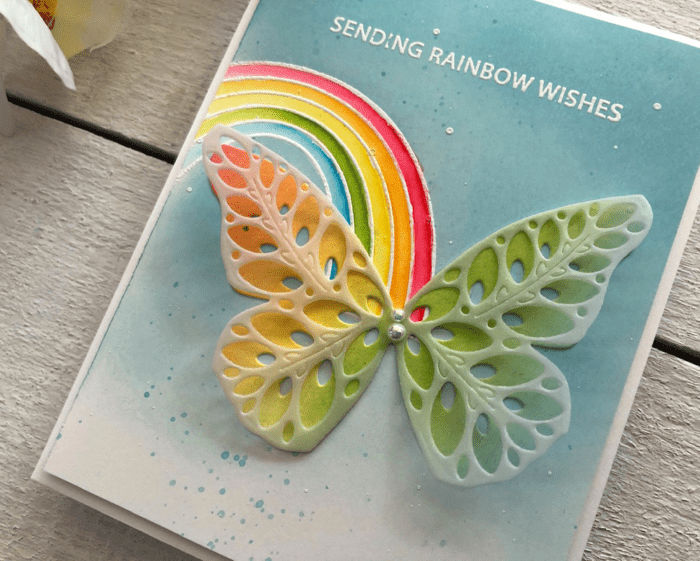
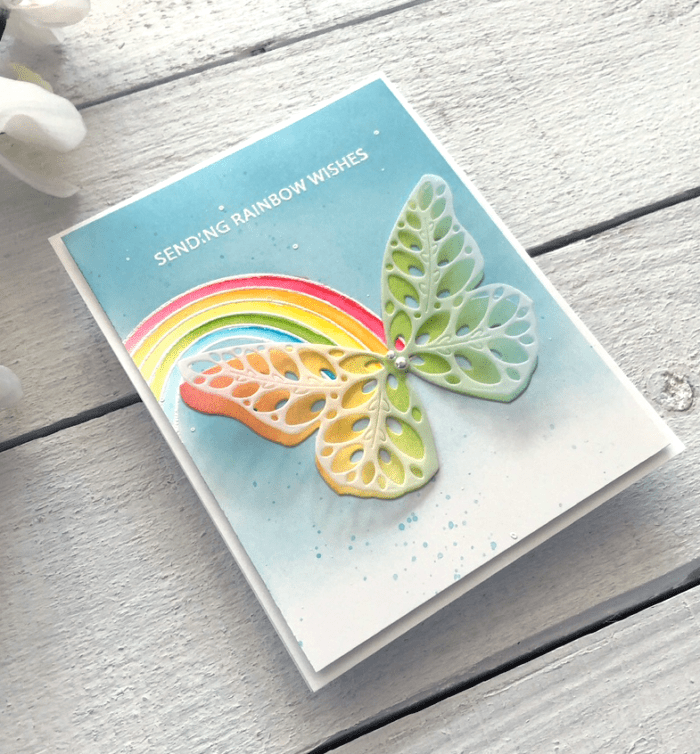
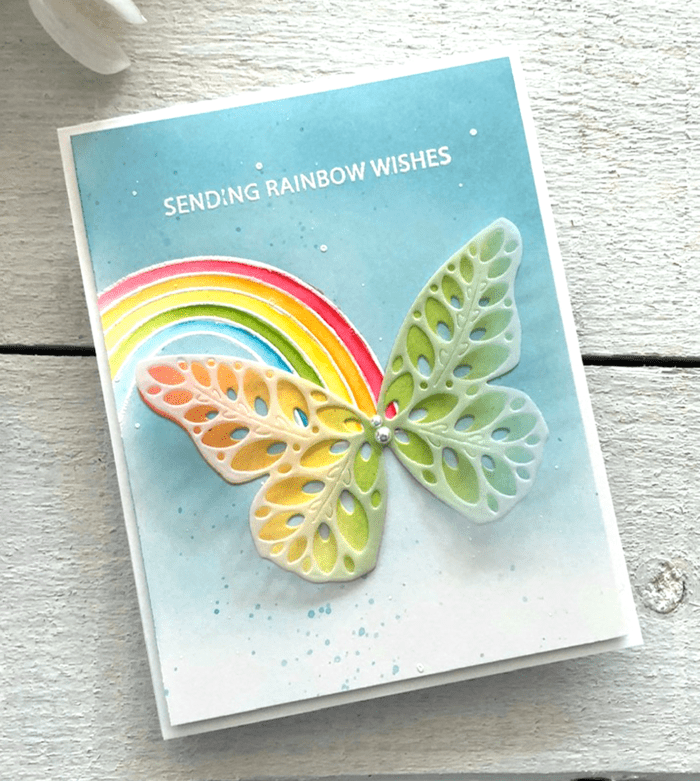
Hi there and Happy Mother’s Day to all the mother’s visiting here today. It’s Tracey and I am very excited to share a project using a couple of newly released products from Birch Press Design!
The new Rainbow Days Lingo Notes stamp set was starting point for my card. I stamped the rainbow off the card on the left side with embossing ink and white heat embossed it.
I stamped the rainbow on to a full adhesive Post-it Note and trimmed it use as a mask. I masked off the rainbow and then ink blended a sky with Broken China and Tumbled Glass Distress Oxide inks. Once the blend was done I splattered some diluted white acrylic paint on to the panel. When that was dry I smooshed some Broken China Distress Oxide ink on to an acrylic block with a bit of water and then splattered that on to the panel.
Once the mask was removed I coloured the bands of the rainbow using my ZIG Clean Color Real Brush watercolor markers blending the colours out with a water brush and set aside to dry.
I blended a panel of Bristol Smooth cardstock about the size of the butterfly in the Eloquent Butterly Layer die set. I blended on an angle a rainbow of Festive Berries, Spiced Marmalade, Wild Honey, Mowed Lawn and Tumbled Glass Distress Oxide inks. I cut Layer C of the Elequent Butterfly from the ink blended panel. Then I cut Layer A of the Eloquent Butterfly from Vellum. Layer A has beautiful embossed details on it that look stunning on the vellum. It was glued to the centre of the Layer C ink blended butterfly and set aside.
Now that all the pieces were completed I white embossed a sentiment from the Rainbow Days Lingo Notes stamp set on the top centre of the sky. Then the butterfly was attached to the end of the rainbow on a slight angle.
The panel was attached to a white top folding card base with foam tape for some life and the final touch was to add to pearls to the body of the butterfly.
This was such a fun card to make, a few different techniques with such a pretty end result.
Thank you so much for crafting with me today and enjoy the rest of your weekend.
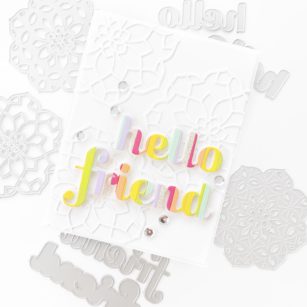
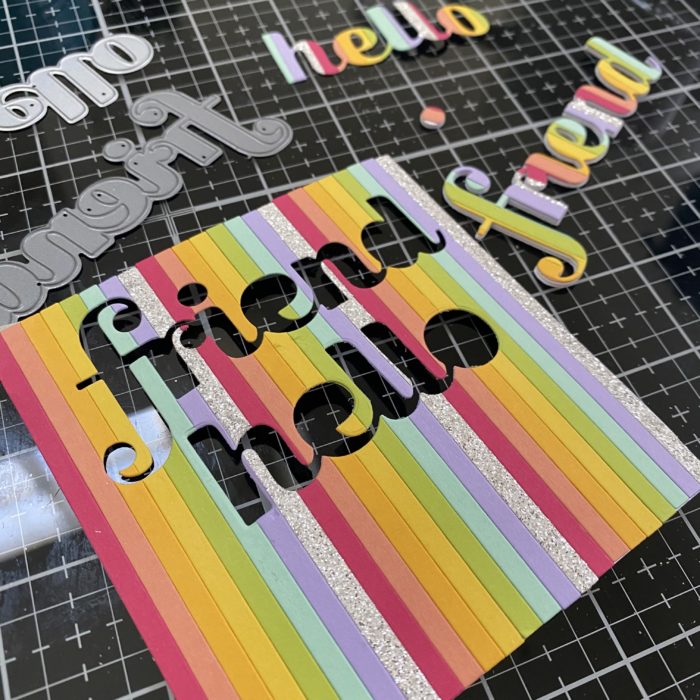
Welcome, friends! Dee (@dilaynacar) here and today I will be sharing a clean and simple card with pops of color, perfect for any occasion!
To get started, I cut multiple shades of colored and silver glitter cardstock (you can use any color for this step) into thin strips. I then used tape runner to adhere the strips onto a piece of white cardstock to create a background design to later die cut. I then set this aside to dry and started on the next step.
For the background of the card, I cut a piece of heavyweight white cardstock to an A2 size base as the panel. Next, I die cut only the ‘Kinsley Layer A’ die 3 times in white cardstock and adhered the 3 onto the panel in a design that I liked, trimming off any extra.
Next, I die cut hello and friend Big Sugar Script dies from the striped cardstock and the shadow dies in white, then adhered them together. I then mounted the word dies onto the card with foam squares.
To finish, I added a few silver sequins for extra sparkle! I hope you you enjoyed my post today and found some inspiration!
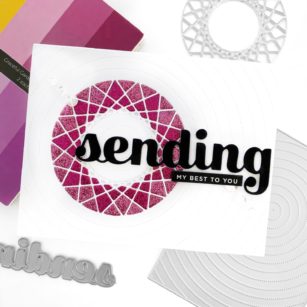
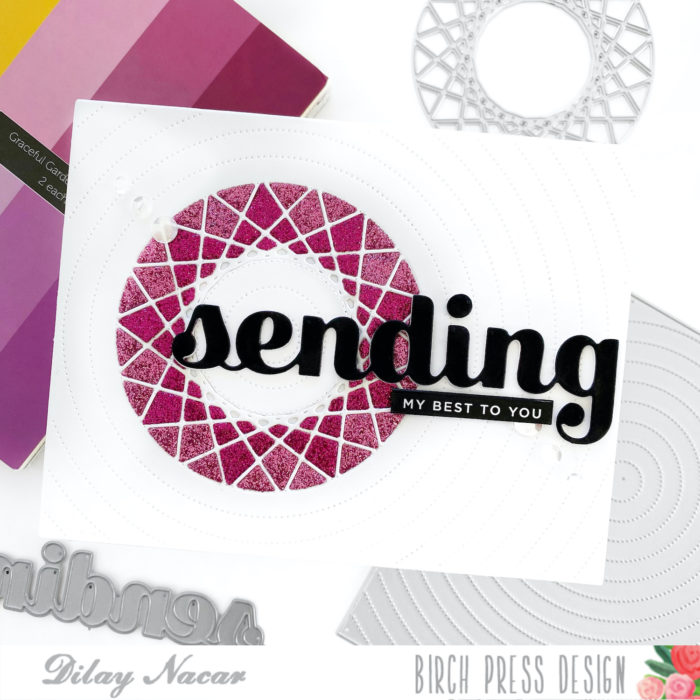
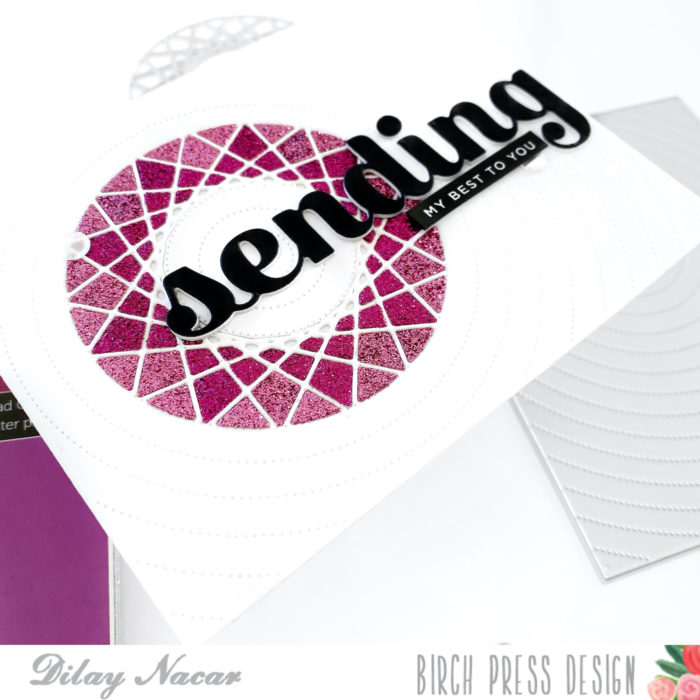
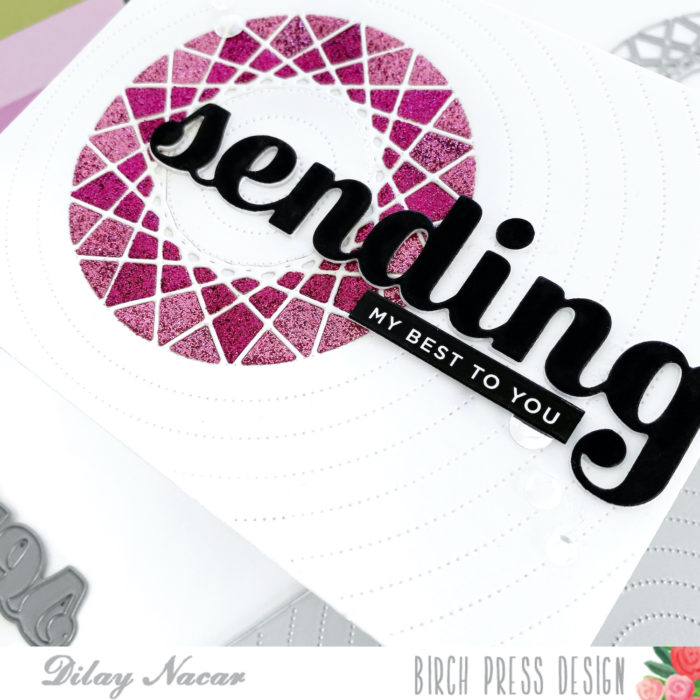
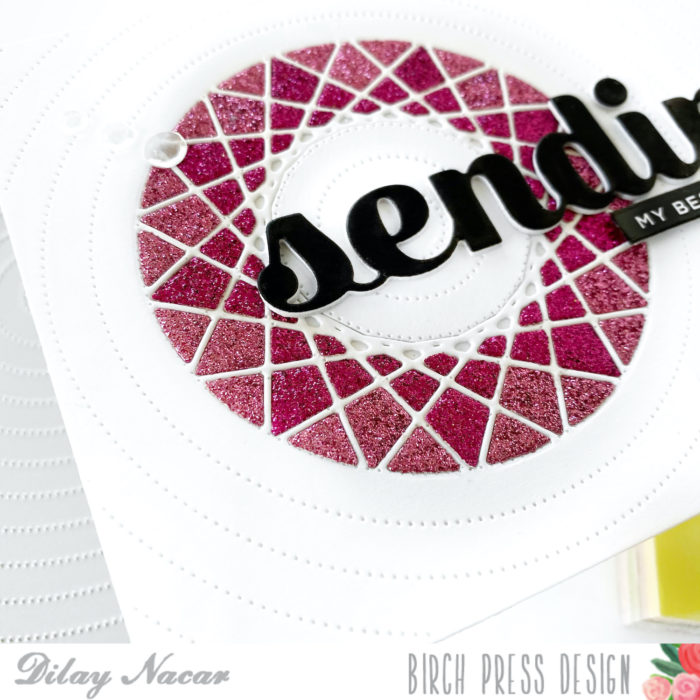
Welcome, Crafters! Dee (@DilayNacar) here and today I am sharing a clean and sparkly encouragement card that features the new String Art Circle Collage die combined with two favorites of mine! Let’s get started and go over how to make this simple yet elegant card!
I began by die cutting the background out of white cardstock using with the Pinpoint Radial die, then die cut directly through the circle using the String Art die. Next, I die cut the String Art die twice more using two different shades from the Memory Box Graceful Garden glitter pad and used the negative pieces to fill in the circle on the background panel.
For the sentiment, I die cut the Big Sending Sugar Script die twice in white and once in black cardstock, stacked them for extra dimension, and adhered it to the card. To finish, I chose a sub sentiment from my stash to add underneath and added some clear sequins as an extra touch!
I hope that you enjoyed my card today! Be sure to check back for more inspiration, and visit us on Instagram @BirchPressDesign and me @DilayNacar for more inspiration. Thanks so much for stopping by today!