Category: Kimberly Wiener

  • Ombre Viola Plate Layers | by Kimberly Wiener

    Ombre Viola Plate Layers | by Kimberly Wiener

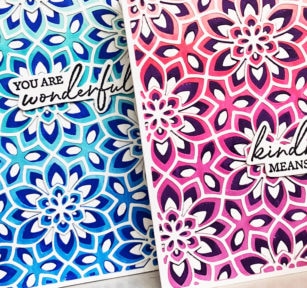
    Hello Birch Press Design Fans! Today I bring you two cards that are designed by layering blended colors on the middle layer of a three part layering die set, creating a stunning ombre effect.

    This effect can be done with any of the many layering Birch Press Design die sets. I chose to showcase the gorgeous Viola Plate Layer Set.

    First I selected the darkest of the layering colors for the bottom layer. The middle layer was colored in four colors in varying shades from lightest to darkest and blended with a final layer of the lightest color over the entire panel for a more unified blended look.

    As you will see, you don’t have to worry about perfect color blending, the die layering will hide any imperfections, and the blending will appear seamless. In fact, any darker or lighter variations in the colors will create a more unique stunning effect!

    I used alcohol markers for coloring, however colored pencils or watercolor used with water color paper would also bring lovely results.

    The top final layer in a crisp white card stock showcases the vibrancy of the colors so brilliantly. For the sentiments, I chose from the Memorybox Open Studio Peony Corner Garden Clear Stamp Set. This set has several lovely sentiments, large floral sprays, and butterflies too!

    I am very pleased with the ease of use and the versatility of this layering set. Each layer can be used alone or in many different combinations. The pierced bottom layer is stunning on its own. This set is a new favorite. I already have some ideas for different looks and am excited to create again with this set!

    Supplies


    Supplies

    Supplies
  • Many Thanks | by Kimberly Wiener

    Many Thanks | by Kimberly Wiener

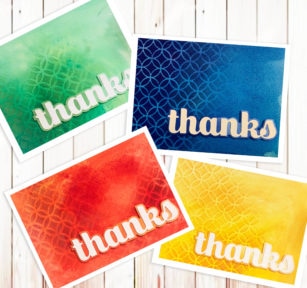
    Hello Birch Press Design fans! Today I am featuring the same design in variations of color. This is a great design to make multiple cards.

    On watercolor paper I created several water colored backgrounds using two shades of Brusho color crystals. Once I created several backgrounds, I cut them down to 4 x 5.25. In coordinating colored inks, I chose a medium shade as well as a dark shade of ink to use for the Ring Tile Stencil layer. Ink was brushed onto the stencil from light to dark in an ombre effect, and only onto the card in certain areas creating a lovely fading effect.

    The sentiments I chose are the Big Thanks Sugar Script. I adore this font! The outline layer of the word dies was also ink blended in a light to dark and faded effect that really makes the inner die layer stand out quite nicely.

    The inner die was adhered with glue and the outline layer was affixed to the base with double sided foam mount tape and the entire card front panel was added to a standard A2 (4.25 x 5.5) card base.

    I had a lot of fun creating a total of four cards in striking blue, red, green, and yellow.

    I just love the washed out and faded effect that the water color layer gives the to the stencil layer.

    I sure hope that you are encouraged and inspired to create some wonderful backgrounds of your own and experiment with stencils!


    Supplies


  • Dad you rock! | by Kimberly Wiener

    Dad you rock! | by Kimberly Wiener

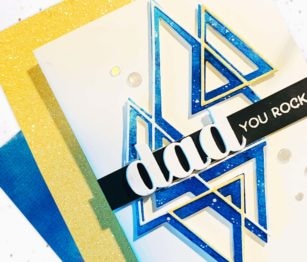
    Hello Birch Press Design fans! How about this for a great modern masculine card? The Prismatic Triangle Layers Set is perfect for any Father’s Day card. Which, I might add is currently on a great sale!

    The sentiment that I used for this card is the Big Birthday Sugar Script. I ran the die six times cutting and piecing, making the word dad, and then layered it three times.

    The stacked word was added to a 1/2 inch black card stock strip that was embossed in white with the “You Rock” sentiment from the Best Friend Clear Stamp Set.

    I used Layer C for the brilliant blue bottom layer. The coloring medium is Brusho Color Crystal Inks in Turquoise and Ultramarine spritzed with water onto Open Studio Watercolor Paper. This layer was cut in half and splatters were added with a white gel pen.

    I ran the Layer A die onto white card stock and once again onto the gorgeous yellow Jewel Glitter Paper. I cut this layer in half. Two triangles were cut from the glitter paper and added to the white layer for a subtle sparkle of color.

    Once the white and yellow glitter layer are affixed to the blue layer, I added double foam tape on both pieces as well as the sentiment strip that I nestled in between them. I sure hope that you will experiment with this fun and versatile die set.


    Supplies


  • Midnight Mandala Stencil | by Kimberly Wiener

    Midnight Mandala Stencil | by Kimberly Wiener

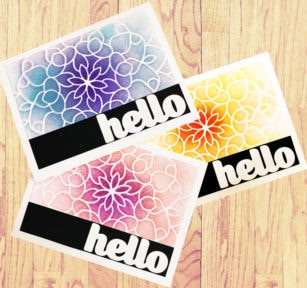
    Hello there creative Birch Press fans! Today I bring you a very simple and easy way to make multiple cards without stamping or coloring. My supplies are the Mandala Stencil and the Big Hello Sugar Script die.

    Stencils are an excellent way to quickly add color and dimension to your projects. I really like to have several shades to my blended colors and stencils are very forgiving in that you don’t have to be perfect. The imperfections are what adds to the wonderful uniqueness of your creations.

    To create a set of these cards for yourself you will need to cut several 4 x 5 white cardstock panels. Center the Midnight Mandala Stencil onto the panels and blend your colors darkest to lightest rotating outward in a circling motion.

    Cut the stencilled panel to 3.5 x 5 and adhere to upper postion of a standard A2 (4.25 x 5.5) card base, leaving equal distance between the top edge and doth sides of the card base. Onto the lower base of the card, add a black card stock strip 5 x 2 and add the Big Hello Sugar Script word die.

    For these samples I have used distress inks, however any ink used with the newest blender brush type of blending tools will be just as striking. I hope that you are inspired to enjoy experimenting with stencils and finding out just how easy and fun it is!


    Supplies


  • You are So Awesome: Glittered Stencil and Butterflies | by Kimberly Wiener

    You are So Awesome: Glittered Stencil and Butterflies | by Kimberly Wiener

    Hello Birch Press Design fans! I am sticking with the “Spring” theme in my creations today. This design is a total glitter-ful stunner that will please any receiver.

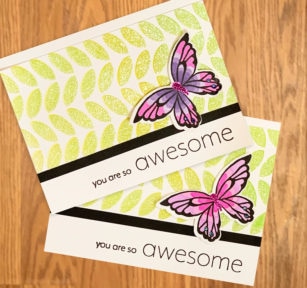
    I stamped and die cut the Lovely Butterflies clear stamp and die set in black versafine ink. The gorgeous wings were colored with blendable alcohol markers in bright pinks and lavender shades. Drops of Pansy and Topaz Gleam Glitter Glue were added to the body as well as the circle details on the wings.

    The Leafy Rows Stencil was blender brushed on a heavy weight white cardstock in a light citron green, a darker green shade, and a muddy yellow amber distress ink.

    A layer of clear glitter gel paste was stenciled over the ink layer. Once dry, the stenciled cardstock is trimmed to 5.5 x 4 to make two card front panels.

    The sentiments from the You are Awesome Clear Stamp Set stamped in black ink and a .25 inch strip of black card stock placed beneath the stencil layer.

    I just love this soft and very Spring ombre effect that shines through. You will love the results too if you are able to try this technique. Happy crafting!


    Supplies

  • Honeycomb Bevel Plate & Giveaway | by Kimberly Wiener

    Honeycomb Bevel Plate & Giveaway | by Kimberly Wiener

    Hello there creative and awesome Birch Press Fans. We are still celebrating the newest release with a Giveaway!

    We will be having giveaways on our Instagram Account March 21-29, 2020. One comment will be chosen at random from each of the Instagram posts during the blog blitz. Only one prize per person per giveaway. We use a random number generator to select winners from comments. You have until midnight US EST April 1 to leave a comment on each and every Instagram post that you want to enter. Winners will be announced on the Instagram posts on April 3.

    For a chance to win the Honeycomb Bevel Layer Set…..

    1.) Follow Birch Press Design on Instagram
    2.) Double Tap (LIKE) the post with this giveaway
    3.) Tag A Friend in the comments
    Good luck! And thanks for joining us!  

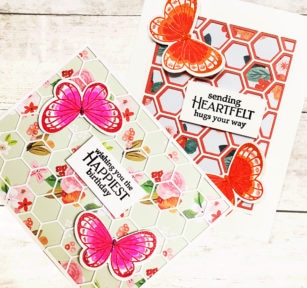
    I have created two spring themed cards for you using the Honeycomb Bevel Plate Layer Dies.

    I have used the backdrop of a few of the lovely spring and floral papers in the new Memory Box Cottage Meadow Paper Pack.

    The Honeycomb Bevel Plate Layers Set can be used as a single card cover die as well as in layering. For the “Happiest Birthday” card you will die cut the “C” die twice and cut to piece across the entire A2 size card front.

    Have you seen the new Fairy Sugar Glitter Glues? I have had some sparkly fun by adding some onto the Lovely Butterflies Clear Stamp Set.

    I really loved all the various sentiments from the Poppystamps Greetings Basics Clear Stamp Set and used one for each card.

    The butterflies were embossed and colored in bright colors matching the papers. Drops of glitter glue in Pansy, Strawberry Ice, and Goldenfinch were placed on the edges of the butterfly wings.

    The sentiments and butterflies were popped up on double sided foam tape for extra dimension.

    I hope you are enjoying the Spring paper colors, sparkle-licious glitter glue collections, clear stamps, and amazing dies, offered in this newest release!


    Supplies


  • Hello Spring  | by Kimberly Wiener

    Hello Spring | by Kimberly Wiener

    I don’t know about you, but I am ready for Spring! I am glad it is finally here. We are having some great sunbreaks and blooming flowers that been brightening my day.

    Lovely lavender, light oranges, spring greens and pops of small bright flowers are so cheerful.

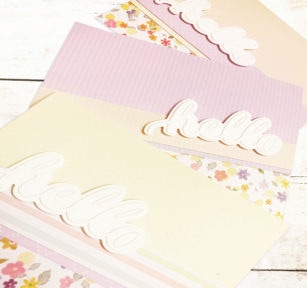
    The sweet Hello Honey Script paired with the new paper packs from Memory Box are sure to being smiles. You can easily make a stack of cards with these lovely color combinations.

    I have die cut the Hello Honey Script onto a heavy crisp white cardstock and left the negative “bits” inside the letters. I then adhered onto the background word outline layer and added foam mount tape for added dimension.

    Lovely dotted and lined papers paired with strips of florals are such a sweet touch.

    These cards make me smile. I sure hope that you are enjoying all your creations with the newest Birch Press, Memory Box, Poppy Stamps and Open Studio products.


    Supplies


  • String Art Frame in Pinks and Jewel Tones | by Kimberly

    String Art Frame in Pinks and Jewel Tones | by Kimberly

    Hello Birch Press fans! Today I bring you two cards using the amazing String Art Frame Die.

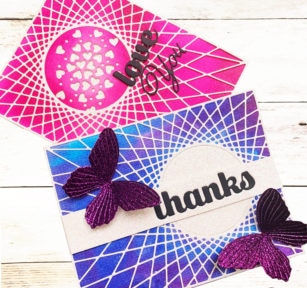
    I love the radiating lines. I have selected some wonderful sparkle colors to match the jewel tones in the glitter papers. I water brushed blended them for my background onto the watercolor paper that is now available in the shop.

    I cut the String Art Frame in a light shade of the lovely delicate pastel glitter paper for both cards.

    Some gorgeous purple glitter paper from the Twinking Jewel pad was perfection for the butterflies.

    For the Love you card I die cut the heart sprinkles die directly onto the background and added the word dies.

    The purple glitter papers, as well as all of the jewel paper pad colors are divine!

    I am loving all of the newest release this Spring, and I hope you are enjoying it as well!


    Supplies


  • Gate Fold Thank You | by Kimberly Wiener

    Gate Fold Thank You | by Kimberly Wiener

    Hello Birch Press fans. Today I bring you a clean and simple gate fold card with a lovely, slightly more elaborate interior.
    I am so thrilled to be working with these gorgeous dies. If you are not already impressed with their lovely intricate dies, and impeccable craftmanship, I’m sure that it will not take very long with all of the design team creations coming your way soon.

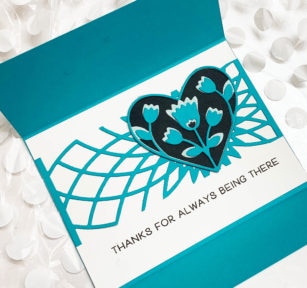
    The solid card stock base is cut at 8.25 x 4.25 and scored and folded starting from the left at 2.10 and again at 6.25 inches. The Hello Topper die is a perfect closure for the gate fold style type of card and was cut on white card stock and trimmed to 1 inch, then adhered to the bottom layer of the bottom fold. The Hello word die was cut in black and turquiose and adhered slightly offset against the white backing strip.

    The lovely more layered inside was fitted with a white 4 x 5.5 panel. A solid 5.25 x 2.25 strip was center cut on the Dazzle A die and adhered 1.25 inches from the bottom of the white panel. Some portions of the Dazzle strip was trimmed to have uniform open spaces.

    The sentiment from the Best Friend stamp set was centered .5 inches below the Dazzle strip.

    The lovely heart was cut with the Folk Art Heart layer A in shimmer pastel blue glitter paper and the layer B in the solid turquoise. After adhering the solid layer to the glitter layer, both layers were adhered to black cardstock, hand cut, and affixed to the center of the Dazzle burst.

    I am so smitten with this card and all of the creations I have made so far using Birch Press products. I can’t wait until you see the next release!


    Supplies