Tag: mixed media

  • Bold and Bright Florals | By Natasha Vacca

    Bold and Bright Florals | By Natasha Vacca

    Hello Birch Press friends, it is design team member Natasha back on the blog today. Today I am sharing a colorful floral design with you using a few favorites from Birch Press! So let’s get started!

    I started by die cutting 3 die sets: Star Flowers Contour Layers, Rose Leaves Contour Layers, and the Peeking Flower and Leaves set. I die cut each of these sets using watercolor cardstock. Once they were die cut I added color to each of the florals and leaves using Lindy’s Magicals. I allowed each layer to dry before adding more color. I then added shine to each of the layers using gold magicals.

    I made sure each layer was completely dry, then I added more depth to each layer by adding dye ink to the edges of the leaves, as well as the floral layers. I then adhered all the layers together using liquid glue. I added foam tape behind the large leaves and then set these aside to work on my card panel background.

    I started with a piece of pattern paper from the Gladiola Plaid paper pad from Memory box. I then found 2 coordinating pieces of paper from my stash. I ripped each of these peices for a distressed look and inked the edges using Vintage Photo distress ink. I adhered the layers of pattern paper together using liquid glue and then trimmed the panel with my deckle trimmer. I inked the edges using Vintage Photo Distress ink and then adhered the panel onto a top folding card base.

    I then arranged the florals and leaves onto the card panel and once I was happy with the layout I adhered the layers using foam tape and liquid glue. I chose a Happy Birthday sentiment from the Happy Birthday Foil Greetings White Tabs set. I also inked the edge of the sentiment with Vintage Photo and then adhered this with foam tape. I had a lot of fun putting today’s card together and I hope this card inspires you to combine your die sets!

    Thank you so much for stopping by! I will be back soon with more crafty inspiration!


    Supplies


    Supplies


  • Thank You Card and ATC Duo | By Sandhya Iyer

    Thank You Card and ATC Duo | By Sandhya Iyer

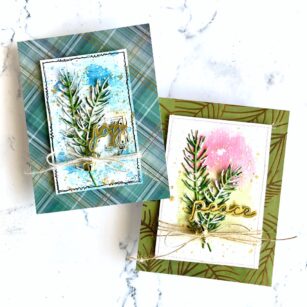
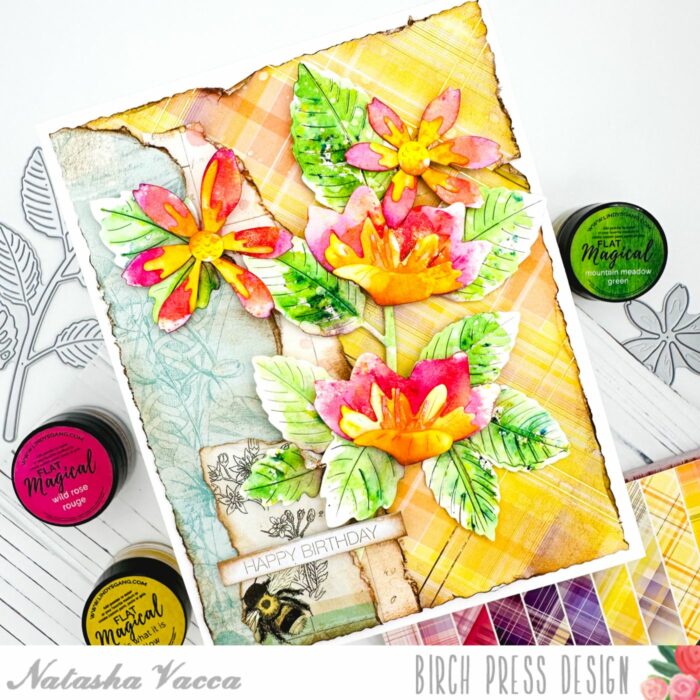
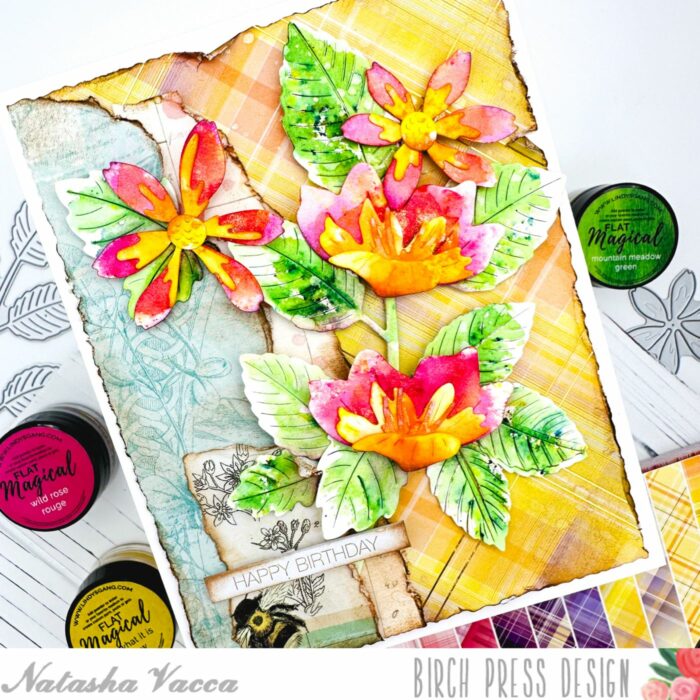
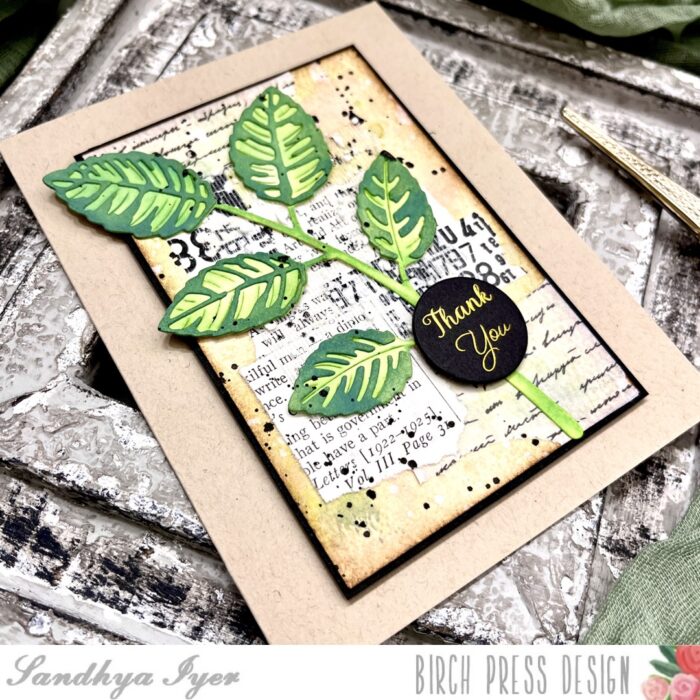
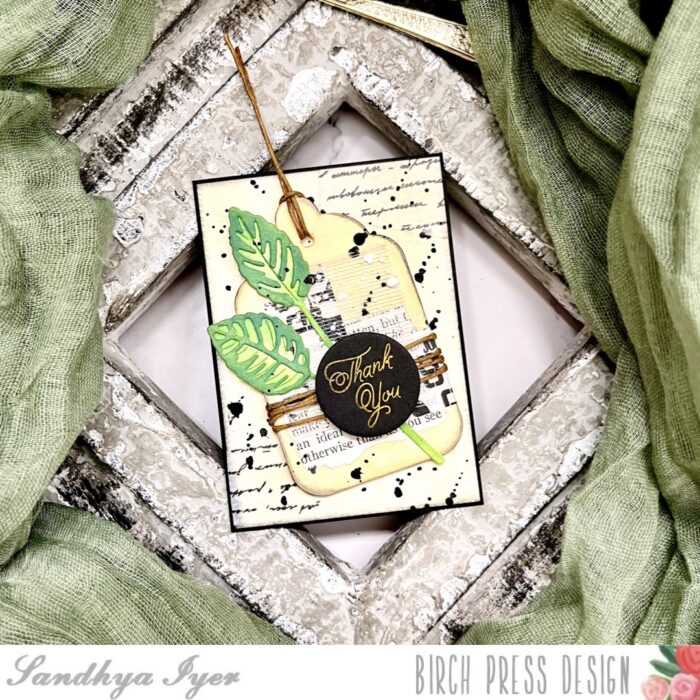
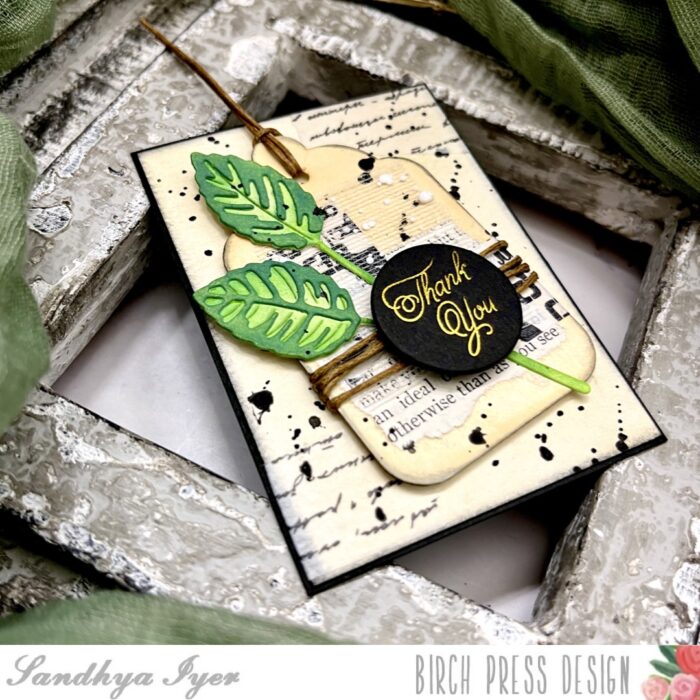
    Hello, friends! This is Design Team member Sandhya Iyer and I am sharing a thank you card and Artist Trading Card (ATC) duo. For my focal point, I chose the Rose Leaves Contour Layers die set. I used the Thank You Foil Greetings black circle tabs for the sentiment.

    I started by die-cutting the Rose Leaves Contour Layers out of watercolor cardstock. Next, I pulled out Distress Oxide inks in varying shades of green and used a blending brush to ink the leafy layers. For the delicate and more detailed pieces, I leave them attached to the area around them after die-cutting and ink them before popping them out.

    Next, I smooshed some green and pink ink on my craft mat and inked a watercolor panel. I layered on Antique Linen Distress ink over that for a vintage look. Then I added more interest and texture to the background using pages from an old book, washi tape, and snow gauze.

    I adhered the larger leaf to the panel and added the thank you sentiment tab. Then I added a generous splatter of black ink. Finally, I added a black mat to the panel and attached it to a kraft card base.

    I repeated the same process with tiny variations to create my ATC. Instead of the watercolor panel, I picked a small tag from my stash and inked it with Distress ink.

    As this is a mini tag, I added some twine for added interest and assembled the focal cluster with the mixed media tag, the inked die-cut leaves, and the sentiment tab.

    This brings us to the end of today’s post. Thank you so much for stopping by and I hope you have fun crafting today!

    Supplies:

  • Happy Birthday Vintage Sentiments with Florals |By, Natasha Vacca

    Happy Birthday Vintage Sentiments with Florals |By, Natasha Vacca

    Hello Crafty friends, it is Design Team Member Natasha Vacca here today. Today I am sharing the beautiful new Happy Birthday Vintage Sentiment die set. I paired this with the beautiful Anemone Bunches 3D embossing folder from Memory Box. So let’s get started!

    I started by creating the floral card panel using the beautiful Anemone Bunches 3D embossing folder. I ran the folder with a piece of Hammermill cardstock through my die cutting machine. Once the paper was dry embossed I started to ink the floral background card panel. I used a combination of Distress Oxide Inks, as well as some Dye Inks to color the florals, leaves, as well as the background.

    I continued to color the dry embossed background, until I had the colors and texture I was looking for. Once the background was complete, I trimmed the panel using my deckle trimmer. I then added more distressing using my distress tool and then inked the edges with Vintage Photo Distress Ink.

    Next I added splatters to the card panel using gouache from my stash. Once the splatters were dry, I adhered the panel to a top folding card base. Next I die the the sentiment – Happy Birthday Vintage Sentiment. I die cut the shadow layer using white cardstock. I then inked the shadow layer using Distress Oxide Ink. Next I die cut the Happy Birthday sentiment 3 times using a green cardstock from my stash. Before I die cut the 3rd layer, I heat embossed the panel, then die cut the sentiment from the embossed panel. I then adhered the letters together from the Happy Birthday sentiment and added the sentiment to my card front.

    I had a lot of fun creating today’s card and I hope you enjoyed it! I will be back soon!


    Supplies


    Supplies


  • Let’s Create ATC’s |By, Natasha Vacca

    Let’s Create ATC’s |By, Natasha Vacca

    Hello Birch Press Friends, it is Design Team member Natasha here today! Today I am sharing ATC’s – Artist Trading Cards! I had a lot of fun creating these, so let’s get started!

    For today’s project I started by creating the background for my ATC’s using the Anenome Bunches Embossing Folder. I used the folder on my gelli plate to create the background. The background was created using acrylic paint and a dry embossed panel using the embossing folder. I just love the texture this provides and it gives you another idea and way to use your folders!

    I trimmed down the panel I created into 2 ATC size pieces. Next I took a piece of scrap paper I had saved from the Magnolia Grove Paper pad. I used my fingers to tear the paper. I love the distressed look this gives! I then adhered this to my ATC panel and added splatters to the background using black and gold ink. I then inked the edges of each panel with a dye ink. I then set these aside.

    Next I started to work on my flowers using the Prime Peony Duo Contour Layers die. I die cut the flowers and stems using the Greenery and Blush Paper Pads from Memory Box. Once these were die cut I used dye inks in my stash to add more depth to each die cut. On the center of the flower I heat embossed this piece using gold embossing powder. Once everything was inked, I adhered all the layers together using liquid glue. I completed the ATC’s with Birthday Sentiments from the Happy Birthday Foil Greetings Black Tabs set. I love these foiled sentiment strips!

    Thank you so much for stopping by today! I will be back soon with more crafty inspiration!


    Supplies


    Supplies


  • Lush Leaves with a Gelli Print | By, Natasha Vacca

    Lush Leaves with a Gelli Print | By, Natasha Vacca

    Hello Birch Press Friends, it is Natasha here and I am excited to be back on the blog today! Today’s card was inspired by a fellow design team member, Seeka! She shared a creative way to use embossing folders on a gelli plate and I had so much fun giving this a try! So let’s get started!

    For today’s card I started with the beautiful Lush Leaves Contour Layers die set! I die cut 2 leaves using an alcohol ink background from my stash. Once the leaves were die cut, I added Distress Ink to the edges and then adhered foam tape on the back of each leaf and set them aside. Next I die cut 2 more leaves using the Twilight Purple paper pack from Memory Box.

    Next I created a gelli print background using the Geometric Crystals embossing folder. I added paint to my gelli plate and then added a piece of paper with a dry embossed background using the embossing folder. I pressed the paper lightly onto my gelli plate, then I removed the background. My gelli plate now had small squares from the folder. I added a bit more paint, then pressed a new piece of paper onto my gelli plate. This was such a cool background and such a fun way to use my gelli plate!

    Next I trimmed the gelli plate panel using my deckle trimmer. I distressed the edges, then applied Distress Ink to each of the sides. I then adhered this onto a green panel and then added this to an A2 card base. Next I adhered the purple leaves, as well as my alcohol ink printed leaves to the card front. I used both liquid glue and foam tape.

    Next I die cut the new Big Hugs Vintage Sentiment using white card stock. I die cut this 2 times, then adhered each letter together with liquid glue. I then heat embossed a piece of white cardstock with a green/gold embossing powder. Once this was dry I die cut the hugs sentiment one more time. I then adhered the embossed letters on the top with liquid glue. On the shadow layer I added distress oxides, as well as distress ink to the edges. I adhered my sentiment, as well as a few gems from the Treasure Chest Fairy Gemstones collection.

    I had a lot of fun creating today’s card! I will be back soon with more inspiration!


    Supplies


    Supplies


  • Butterfly Mixed Media Journal | By, Natasha Vacca

    Butterfly Mixed Media Journal | By, Natasha Vacca

    Hello Birch Press friends, it is Natasha here today on the blog! Today I am sharing a mixed media page in my journal! I love using dies in my journal! Today I am using 2 die sets from Birch Press Designs: Butterfly Basics and Rose Leaves Contour Layers die sets! Let’s get started!

    I started by die cutting the Butterfly using the Butterfly Basics die set. I die cut the background using a premade panel from my stash. Next I die cut the top layer using the Memory Box Rainbow Reflections paper pad. Once the top layer was die cut I added embossing ink to the top layer, then added embossing powder. Once the embossing powder was completely dry, I added a paper glaze to sections of the butterfly. I allowed this to dry a bit, then added foil to sections for added texture. I die cut the antennae for the butterfly using the same background panel. I then adhered the layers together using liquid glue.

    Next I created a background panel using a gelli print from my stash. On the gelli print I added a few pieces of handmade tissue in various sections. I applied this with glue. Once this was dry, I ran the gelli print background through my die cutting machine using the Memory Box Ringadings embossing folder. I then added dye ink to some sections of the dry embossed background. Next I die cut the panel using the Rose Leaves Contour Layers die set. Once the leaves were die cut, I distressed the edges using Distress Ink. I allowed this to dry, then added embossing powder to sections of the leaves. I then added additional texture using paper glaze and foil again.

    Next I started to work on my background in my journal. I used Lindy’s Magical Powders to create a colorful background. You can create a colorful background using inks, watercolors, distress inks, as well as pigment powders! I encourage you to look through your stash! I work in layers when creating a background. I allow each layer to dry (I also use my heat tool to speed up the process), spritz the panel with water, pick up color with a paper towel, then I repeat the process until I have the color and texture I am looking for.

    I completed my journal page by adhering the leaves with foam tape. I added a piece of cheesecloth, then adhered the butterfly with liquid glue. I added a sentiment from my stash, as well as gems from the Pastel Jewels collection.

    I had a lot of fun creating today’s project! I will be back soon with more inspiration!


    Supplies


    Supplies


  • Forest Canopy Layer: Mixed Media Tag | By, Natasha Vacca

    Forest Canopy Layer: Mixed Media Tag | By, Natasha Vacca

    Hello Birch Press friends, I am excited to be back up on the blog today! I am sharing a fun mixed media tag using the Forest Canopy Layer die set to create a fun tag! So let’s get started!

    I started today’s project with a pre-made tag base. Next I chose gelli prints from my stash to create a layered background on the tag. I chose several prints, ripped them, then adhered them using liquid glue. Next I chose washi tape from my collection with a printed text. I added this to several sections of the tag background. I then added White Gesso to the background using a paintbrush to sections of the gelli print. I then used a brayer to spread the gesso a bit more.

    Next I die cut Layer B and C of the the Forest Layer Canopy die set. I used white cardstock to die cut each layer. (On today’s project I did only use Layer C). I then added color using Distress Oxide ink in Peeled Paint and Forest Moss. I added water droplets to the leaves and picked up the color with a paper towel. I then darkened the edges of the leaves using Espresso Ink. I applied the ink using a finger dauber. I also added gold metallic ink splatters, as well as an ink spray from my collection. I set these aside to dry.

    Next I die cut 2 dragonflies using the Magnolia Plaid paper pad with the Simple Dragonfly Contour Layers die set. I added embossing powder to the small section of the dragonflies. I then adhered all the layers together using liquid glue.

    To complete my tag I added Distress Ink to the edge of tag using Distress Ink. I then added more texture using a spray in my stash. I added this to the tag background. Once this was dry, I added a piece of small cardboard to the bottom right of the tag. I added a bit of gesso and purple spray to the cardboard for added color and texture. I then adhered all the layers onto the tag using liquid glue (leaves, dragonfly). I added a Greeting Tab and gems to complete my tag, as well as twine, and ribbon.

    Thanks so much for stopping by today! I will be back soon!


    Supplies


    Supplies


  • Mixed Media with Dies and Pattern Paper | Natasha Vacca

    Mixed Media with Dies and Pattern Paper | Natasha Vacca

    Hello Crafty friends, it is Natasha here and I am excited to be back today! Today I am sharing a gorgeous new die in the Birch Press Collection – Wiegela Leaf Contour Layers! I paired this with a few other favorites for a fun mixed media style card! So let’s get started!

    I started with the Wiegela Leaf Contour Layers die set. I die cut 2 leaves using the new Greenery Solid Core Cardstock pack! I love these new pads! Once the leaf was die cut, I added Distress Oxide Inks to each layer of the leaf for added texture and color! I used: Pine Needles, Chipped Sapphire, Twisted Citron, & Ground Espresso. Once the inking was completed I added water droplets and picked up the color with a paper towel. Next I added Foundry Wax to sections of the leaf in the color Statue. I also darkened the edges of the leaves with a dye ink in brown. I then adhered these together with liquid glue and set them aside to dry.

    Next I die cut the butterflies using a leftover background I recently made using inks. I die cut 3 butterflies using Simple Butterfly Contour Layers. I added Foundry wax to the antennae as well for added texture. I also inked up the edges of the butterfly and adhered the layers together with liquid glue. I set these aside to work on my background.

    For the background I chose a few pieces of pattern paper from the Anemone Grove paper pad. I trimmed one panel to a bit smaller than an A2 card base. I then used my deckle trimmer on the edges for a worn look. I then tore a couple other pieces and adhered them to the left side of the panel. Next I applied White gesso to the panel in sections using a small paint brush and then a brayer. I apply the gesso in several directions for added texture. Next I added a few pieces of text washi tape on the panel. I then added ink blending to sections using Distress Oxide in Seedless Preserves.

    Next I added splatter to my pattern paper background. I used a combination of black, white, and gold splatters. Once the panel was dry I adhered the pattern paper background to my A2 top folding card base. I then adhered the leaves and butterflies to my card front. I chose a birthday sentiment from the new Greeting Tabs from Memory Box – I love these so much!!!!! I love the black with foil lettering, there are several to choose from!

    Thanks so much for stopping by today! I will be back soon with more crafty inspiration!


    Supplies


    Supplies


  • Early Blossom | By Natasha Vacca

    Early Blossom | By Natasha Vacca

    Hello Crafty Friends! I hope you had a great weekend! I am excited to be up on the blog today sharing a new release from Birch Press Designs with you – the beautiful Early Blossom Contour Layers die set! I love florals and these dies make it so easy to create with! So let’s get started!

    I started by die cutting the florals using Hammermill white card stock. I then ink blended each of the layers using a combination of dye inks. Once all the inking was complete, I adhered each of the layers together using liquid glue.

    Next I started to work on the background tag for my floral die cuts. I started with a pre-made tag then added papers and collage paper to the tag. I used the Anemone Grove Paper pad, as well as collage paper from my stash. I ripped pieces of paper for a distress look, then adhered them with collage medium. I allowed this to dry, then inked up the background using Distress Oxide Inks. I used: Antique Linen, Pumice Stone, Peacocks Feathers, Vintage Photo, Walnut Stain, and Mustard Seed. I layered these on, as well as splattered with water droplets for added texture.

    Next I added Translucent Crackle Paint to sections of the tag, allowed this to dry, then applied Distress Crayons over the top of the crackle paint. I also added some paper glaze to sections for added texture. I then added splatters to the tag using black and gold. I then adhered all the layers together using liquid glue and foam tape. The wood grain paper paper in the center of the tag is from Memory Box and it is in the color cream. I applied ink and sponging to the paper for added texture.

    I chose a pre-made sentiment from my stash and adhered this to my tag as well. I darkened the edges of the tag using Distress Ink in Ground Espresso using a blending tool, as well as additional texture using a sea sponge. The tag was completed with twine for the top, as well as lace and a button.

    I had a lot of fun putting this together! I encourage you to use your pattern paper in new ways to add texture to your card bases and backgrounds too! Thanks so much for stopping by today! I will be back soon!


    Supplies


    Supplies


  • Sending Love | By Natasha Vacca

    Sending Love | By Natasha Vacca

    Hello Birch Press friends, I am excited to be back up on the blog today sharing a fun and easy card using the Banner Heart Layering die set! So let’s get started!

    For today’s card I started with the Banner Heart Layering die set. I die cut layer A and C using white card stock. I then die cut layer B using the Festive Glitter paper pad. For the glitter layer I chose a dark blue shade from the paper pad. I then ink blended layer A and C using Distress Oxides. I used a combination of Distress Oxides: Saltwater Taffy, Picked Raspberry, Seedless Preserves, Shaded Lilac, and Villainous Potion. Once the layers were ink blended I set these aside to dry.

    Next on layer B, I wanted to add a bit more texture to the glitter paper pad. I used a combination of paper glaze, as well as embossing powder! I love the texture this provides. Once the other heart layers were completely dry, I added Gilded Foundry wax to sections of the heart. I then adhered all the heart layers together using liquid glue.

    Next I chose a gelli print from my background stash and dry embossed the background using the Ringadings embossing folder from Memory Box. I then applied white pigment ink to sections of the folder and ran it through one more time. I like this effect and the random texture this provides the dry embossed background. I allowed the ink to dry, then trimmed the panel using my paper trimmer for my card base.

    I completed my card by stamping a sentiment from the Contempo Greetings stamp and die set. I stamped the sentiment in purple, trimmed using the coordinating die, then applied foundry wax and ink on the edges as well. I then adhered the card panel, heart, and sentiment to my card base.

    Thank you so much for stopping by today! I will be back soon!


    Supplies


    Supplies