
Hello Everyone and Welcome Back!
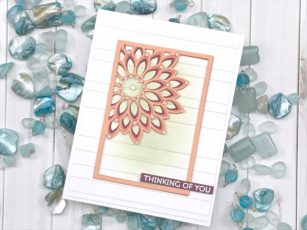
For today’s project, I kept it simple featuring the Dahlia Mini Frame Layering Die Set!

I started by choosing 3 colors in peach tones from light to dark and die cut my dahlia frame, making sure my card stock was positioned in the order I wanted it to be. Using my liquid adhesive, I layered my die cuts together and set aside under an acrylic block to dry.

Next I pulled out a piece of card stock measuring 4 inches x 5 ¼ inches and dry embossed it through my die cutting machine for added texture to my background. Using my blending brush I added some Bundled Sage Oxide ink in the area where my dahlia flower will be positioned.

I used a sentiment from the Lingo Thanks Clear Stamp set and stamped it using my versamark ink, heat embossed it in white fine detail embossing powder and propped it up on my card using some double-sided foam squares in the bottom right hand corner.

Added many sparkle gems to add some sparkle and our card is ready to be a part someone’s day!
Our card is ready to be a part someone’s day!
As always, I hope you enjoyed today’s project… and if you want to see more details just click on the video below and see how these projects come together step by step!
Make sure you stay tuned for more wonderful projects coming soon! Have a great day and always remember… Be Creative!

Supplies


Comments
One response to “The Dahlia Framed | By Desiree Kuemmerle”
simple and very pretty!