Hello Everyone and Welcome Back!

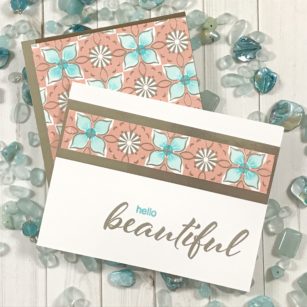
For today, let’s layer some stamps, but this time they are 6 x 6 background stamps! The two sets used are called Hugs Tile and Wishing Tile. Not only do you get a 6 x 6 back ground stamp but also some sentiments and accents that all work together! These sets are perfect on their own, but they work beautifully together!

From the Wishing Tile I pulled the 6 x 6 stamp and used a dye ink to stamp onto my shite card stock. I stamped this twice since it was the first time, I used the stamp.

Once it was set, I then pulled the 6 x 6 stamp from the Hugs Tile stamp set and layered it onto top of my image. These stamp sets layer together perfectly and accent each other well! Instead of ink for this layer, I used my yersamark ink and embossing powder.

Pulled two dye inks and started stamping the small flower stamp into the areas that were open. After I got the first layer down, I used the same stamp and added the dye ink only to the center of the stamp with a sponge dauber. This added a little shading to the center of the flower.
I then finished the flowers with the center circle stamp with the same ink I used to add the shadows.

I cut my stamped image down and was able to make two cards from this one panel. One measured 4 inches x 5 ¼ inches and the other was 1 inch x 5 ½ inch. These were backed onto card stock from my stash and then placed onto my standard A2 size card base.

Stamp a sentiment on one of the cards using due ink and embossing powder.


Here are some close ups of the finished cards!
As always, I hope you enjoyed today’s project… and if you want to see more details just click on the video below and see how these projects come together step by step!
Make sure you stay tuned for more wonderful projects coming soon! Have a great day and always remember… Be Creative!

Comments
One response to “A Hug and a Wish! | By Desiree Kuemmerle”
When will these stamps be available? Wonderful design. Enjoyed the tutorial!