
Hi there it’s Tracey here today and I am going to share with you a wonderful die for inlaying die cuts, the Lotus Flower Layering set which also happens to be on sale in the Birch Press Design store!

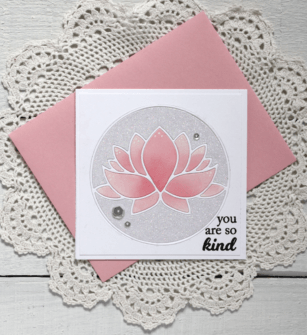
I used just Layer A to achieve all this dimension. I started with a card base for a 4 1/4″ square card. I cut an inside panel to 4″ square and then I die cut the Lotus Flower Layer A die from it and I set all the pieces aside for now. I attached the 4″ panel to the card base. I cut the Lotus Flower Layer A once more using white sparkle cardstock and set those pieces aside. I inlaid the white outlined flower into the circle on the card panel. Once I had that set in I inlaid the top and bottom piece of the die that was cut with the white sparkle cardstock. Once those pieces were snugly in place I knew the rest of my inlaid pieces would fit in.

I use some Spun Sugar and Worn Lipstick Distress Oxide inks to blend the petals of the flower. I sponged the whole petal with the lighter shade and used the darker pink down closer to the centre of the flower. I used liquid glue and I inlaid the remaining pieces of the flower. I chose a sentiment from the Grateful Leaf Frames clear stamp set and stamped it on the the front panel with VersaFine Onyx Black ink.

I added a few clear sequins to add just a bit more sparkle to the card. For a final touch, I put some white dots on the tips of the flower petals with a white gel pen.

Inlaying die cuts is such a fun technique and once you get going on it’s so fun and the results are always gorgeous. Honestly the pictures do not do it justice!

I hope that I inspired you to give inlaid die cutting a try if you haven’t already. The results are always amazing and your card much more ‘mail friendly’ without the extra bulk of layers!

Supplies


Comments
One response to “Inlay Lotus | by Tracey McNeely”
Very pretty Tracey! Love the fabulous sparkle with the soft pinks!