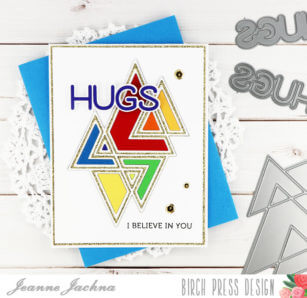
Hi and thanks for stopping by! Today I’m sharing a card I made for my son. He is 23 and loves bold graphic designs. I knew the Prismatic Triangle set would be perfect!
Whenever I use a layered die set I like to cut the first layer into the card base. This makes it easier to line up the die cuts because the first layer is going to fit right inside the die cut opening.
I inlaid all the colored die cut pieces in the bottom layer. Where the color intersect I added a color that was a combination of the two. Just as an example, between the green and yellow triangle (where they overlap) I inserted a touch of lime.
The Prismatic Layer B is cut from gold glitter paper, and I’ve added a gold matt to frame the cover panel. The Big Lingo Type Hugs is cut from white and purple card stock colors. The letters are removable so you can insert whatever colors you like.
The Prismatic Triangles are beautiful and look amazing in any color combination you can imagine!
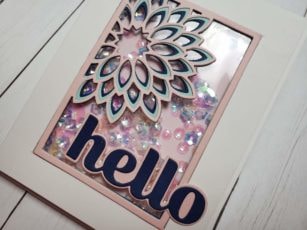
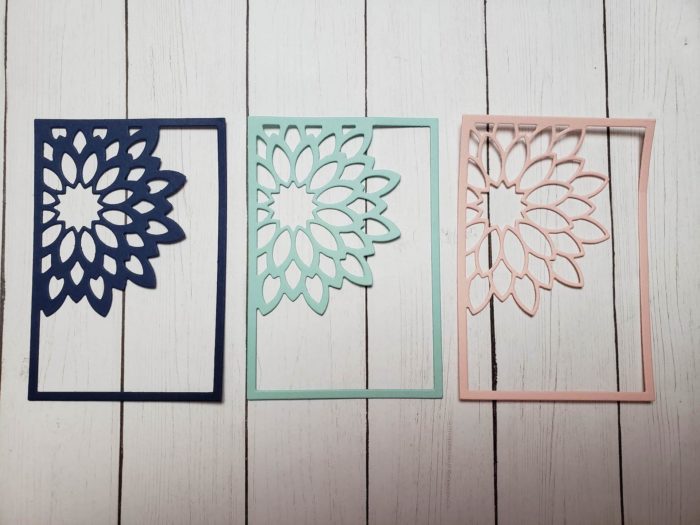
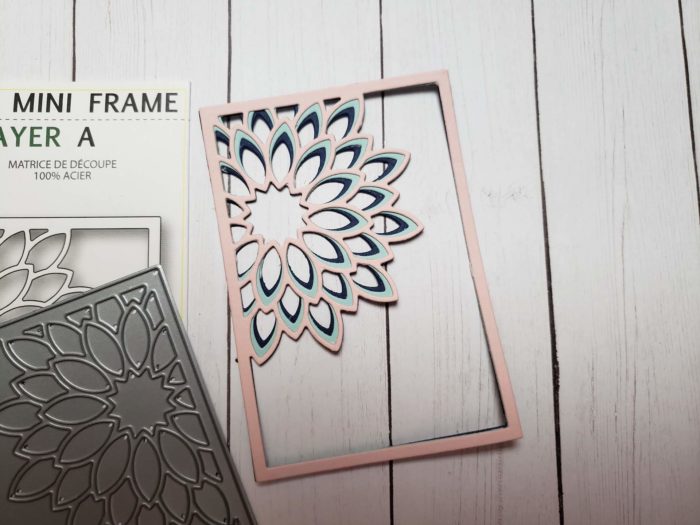
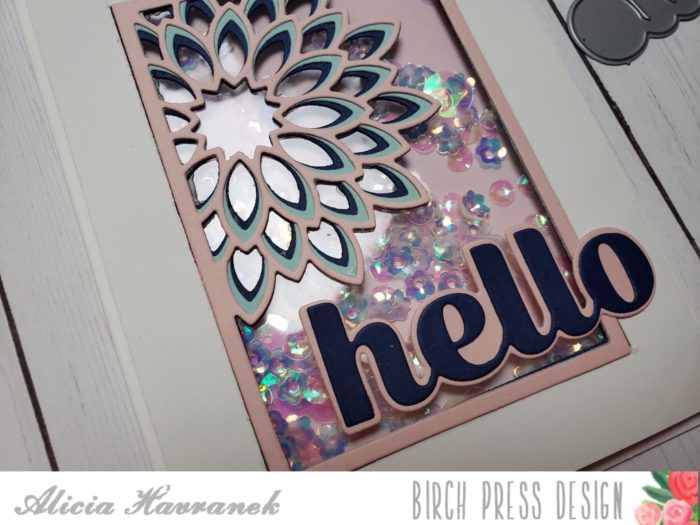
Hello! Today I will be featuring the lovely Dahlia Mini Frame Layering Die. This is a thin delicate die that looks great on its own, but I wanted to create a shaker card with this die. Thin dies can sometimes be difficult or impossible to create shaker cards with, but I will show you how with this die.
I first cut out each layer with 3 coordinating pieces of cardstock. Layer A is to the far right, layer B is in the middle and layer C is to the far left.
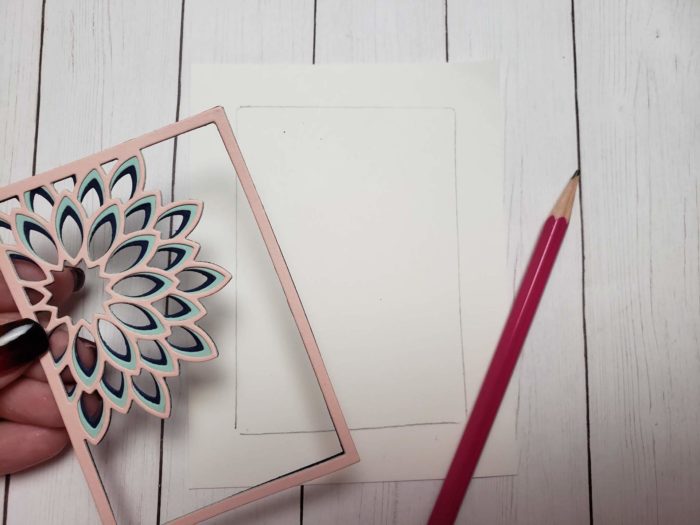
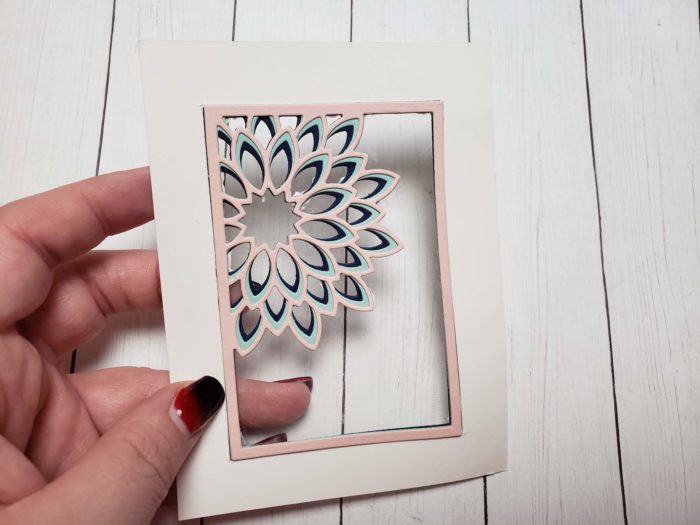
I then glued each layer together. Next, I took my card panel and traced the dahlia frame onto my card panel. I carefully cut out the center of the card panel. After cutting the center piece out, I added acetate to my card panel, then adhered my dahlia layers onto the acetate.
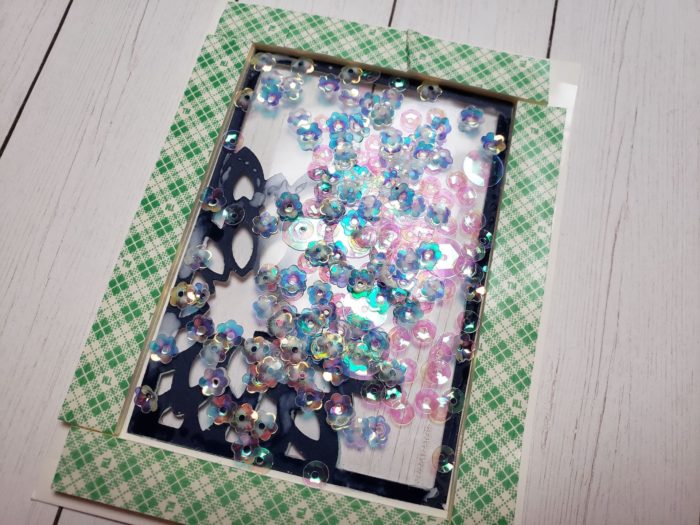
By doing this, I now have the space to add my foam adhesive to my card panel. Add your favorite sequins.
For the back of my panel, or what will be showing through the shaker piece I ink blended some Spun Sugar Distress Oxide Ink. I peeled off my foam backing and adhered the backing to my panel. I then glued my panel to my white card base.
I used the Big Hello Sugar Script Die for my sentiment. I seriously can’t get enough of these Big Sugar Script dies! They are awesome and make mass producing so easy!
I hope you enjoyed this card and it got the wheels turning on how you can create shaker cards using these gorgeous thin dies.
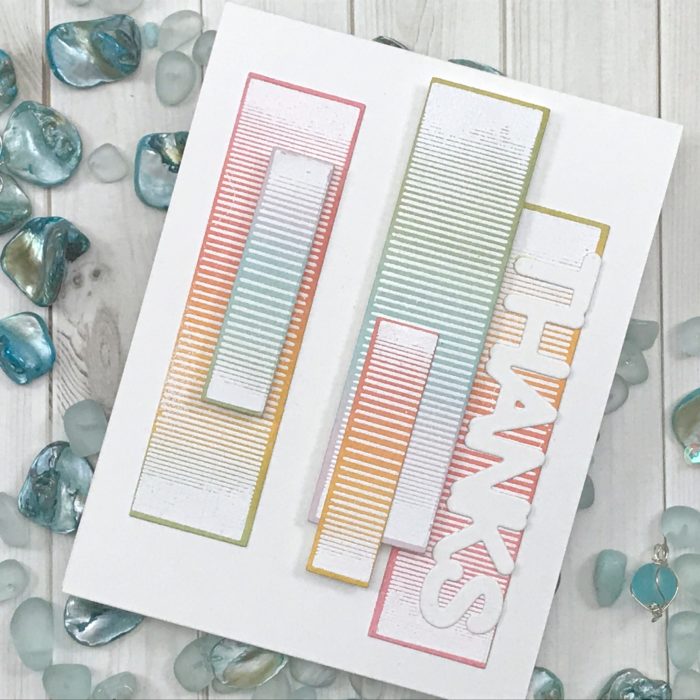
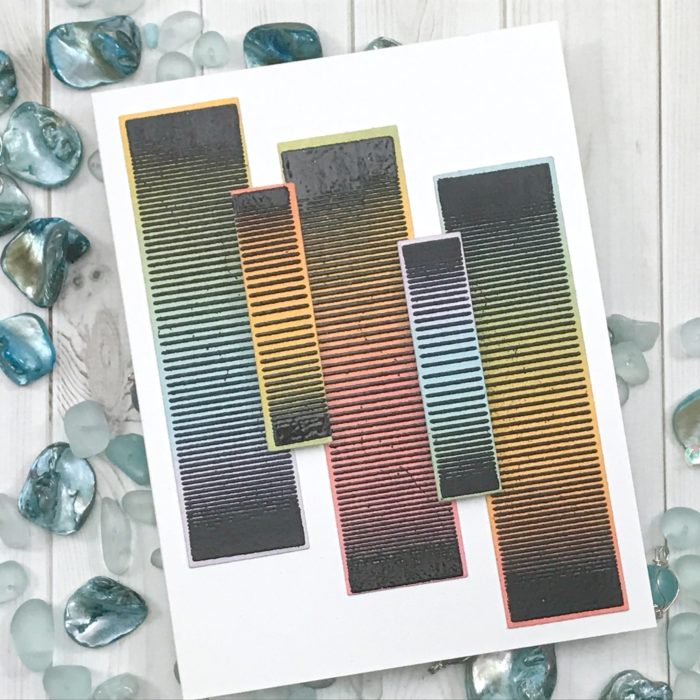
I am back with another project! This one will play tricks on your eyes… For today’s project we will be using the Line Fade Stamp and Die Set.
We want to start our project off by creating to blended backgrounds. I chose to use my distress oxides on white card stock. Using a blending tool, I created two rainbow pattern panels. You do not need to go for a perfect blend but you just want to make sure there are no white spaces between the colors you chose.
After your panels are blended you need to make sure they are dry before our next step. Now remember if you use Distress Oxides these are a pigment/ dye mix so they take time. I used my heat gun and time to allow them to dry completely. You can use your embossing powder to make sure they are ready.
Chose your stamps for your panel and grab your ink you use for your embossing. When you stamp your images you want to stagger the placement so you get all spectrums of the blended background.
After they are stamped you are ready to apply your embossing powder, I started with my white and then my other panel I used my black. A fine detail powder will work best for these because these lines are pretty detailed on the stamp set! Heat set your images.
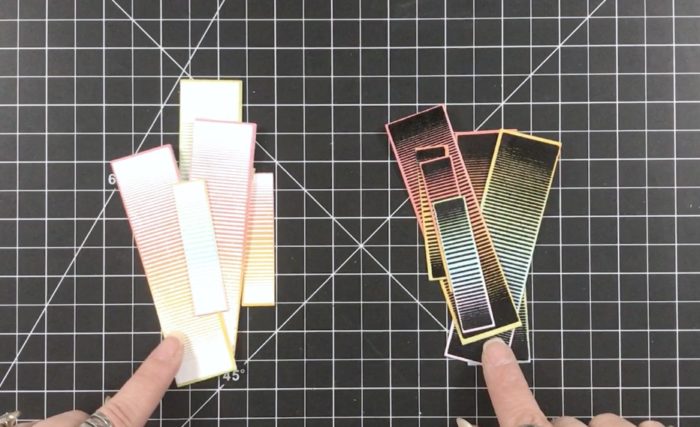
Once they are all set, now we get to die cut our images. Grab the dies that coordinate with your image and run them through your die cutting machine. You see the visible differences between the to sets even though we used the same blended background! It’s the embossing powder that is creating this illusion! Cool right?
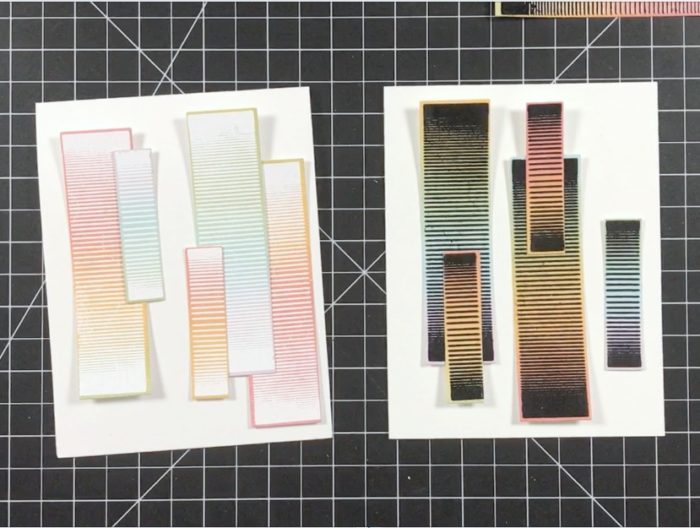
With our pieces die cut we can now set them up on our Standard A2 size card bases.
I used liquid adhesive and double-sided foam tape to give my strips dimension. I also made sure that the colors showing were flipped around from each other.
Now there is always a space you have after you design your card, so we can just add that to the inside of the card!
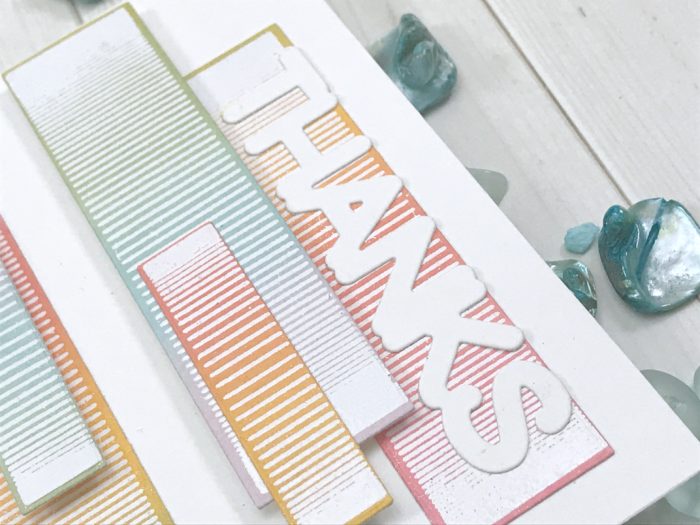
For my sentiment I chose the Big Lingo Type Thanks Die. I cut one in white and the other in black but only using the background piece. Our white sentiment was applied on the outside of our card.
The black sentiment I placed inside the card to add to the dramatic look and feel of this card.
It will be great surprise when the card is open and they see that bold pop of color!
If you want to see more details just click on the video below and see our project come together step by step!
As always, I hope you enjoyed today’s project… Make sure you stay tuned for more wonderful projects coming soon! Have a great day and always remember… Be Creative!
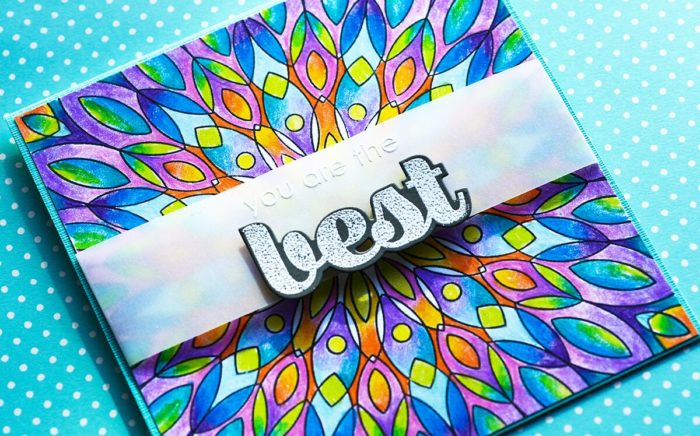
Hello crafters! Our Wishing Mandala Stencils can be used to create some remarkable backgrounds – from simple to complex, they can be used individually or layered to create really unique images.I created a simple background using a single stencil to highlight a word image at the center of the card – some clear glittery embossing paste created a raised textured burst effect that is eye catching!
You can use any type of embossing paste with these stencils – and during the month of February they are on sale as our Item of the Month! In fact they are bundled with the Wishing Mandala Stamp Set at a special price!
Thanks for stopping by! I hope you’re having a great day! Today I’m playing with the new Adora Layer set! I love the versatility and many different looks you can achieve with this die set. You can change the look by stacking the colors of the layers, but you can also remove the center circle design too! I started by cutting a colored card stock panel slightly smaller than my card base. Next I die cut the Adora die from the panel before adhering it to the card base. This creates a clean window to insert the die into. I adhered the layer C die into the open negative space and then adhered the Layers B and A over it creating a neat stack. Make sure you insert the center circle as you go – don’t save them for last. The dies are easier to assemble one layer at a time, vs. inserting the assembled circle stack in the center later. I added a Big Lingo Type Thanks and a few gold glitter hearts as accents. I cut the hearts with the Adora dies. I cut each die layer twice with a total of 6 different colors of card stock and then just swapped the centers to add more interest. Who doesn’t love a rainbow of color? The new Lingo Type word dies are easy to work with.. each set includes a background die as well as an outline word die. The center of the letters on the outline die are removeable so you can use them on other projects or to create personalized messages if you like. You’re going to love the many ways and fun different looks you’ll achieve with these beautiful stackable dies! Finished Size 4.25 x 5.5″
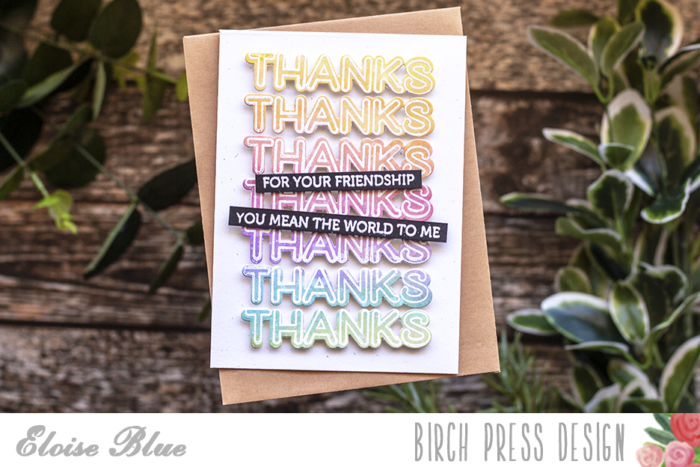
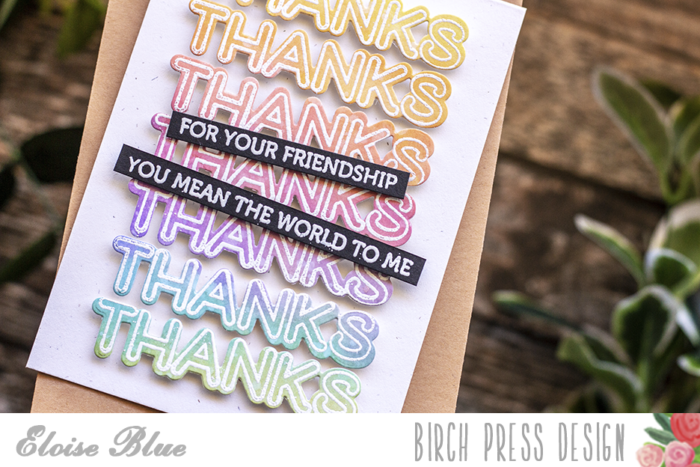
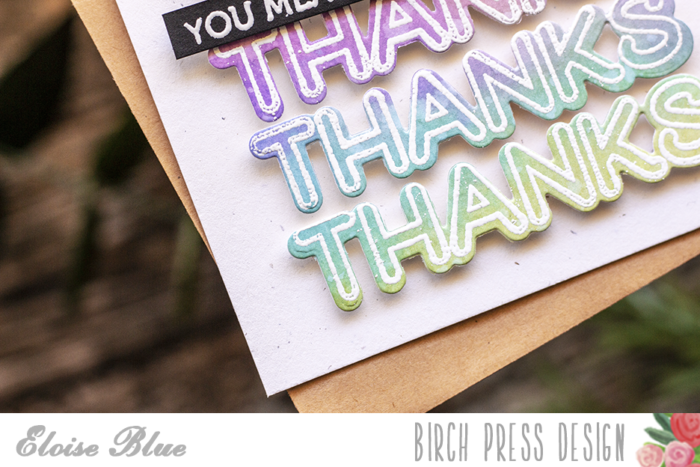
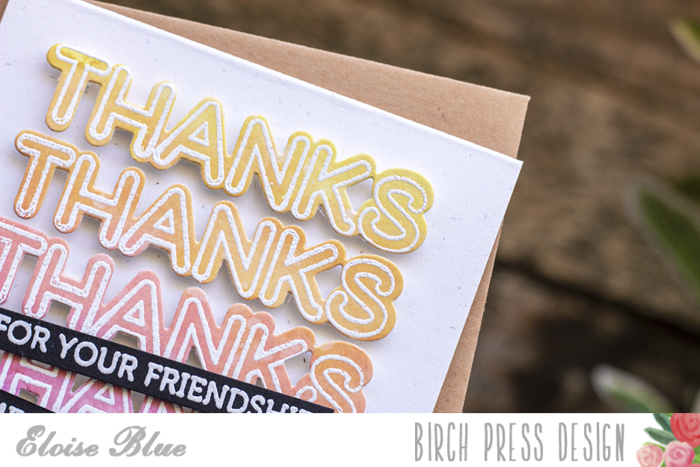
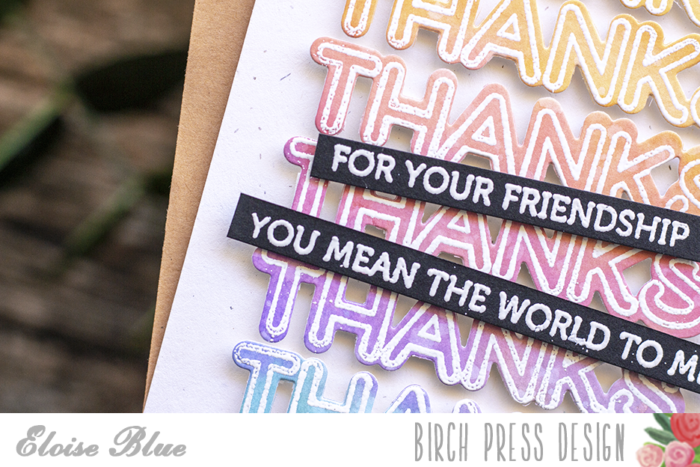
Hello friends, Eloise here and today I have a rainbow watercolour thanks card to share with you all. I used the Lingo Thanks Stamp Set as well as it’s coordinating dies to create this look.
I started off with a piece of watercolour paper and ink blended a ton of Distress Oxide Inks onto the background in rainbow order. I did this very roughly and messy since it doesn’t matter how it looks.
I then took a piece of acetate, sprayed it with water and laid it overtop of the ink blended panel. This blended all the colours together seamlessly. I then die cut the coordinating die of ‘Thanks’ from the Lingo Thanks Set from the panel seven times, die cutting them straight down.
Once all the thanks were die cut, I stamped the coordinating stamp on top and white heat embossed each of them. While I had my supplies out I also white heat embossed a couple of additional sentiments onto black strips.
I added foam tape to the backs of each of them and adhered them into place on top of each other onto a natural white card base. I then added more foam tape to the additional sentiments and adhered them into place as well.
The video is linked down below.
Thanks so much for stopping by today and I’ll see you next time.
Hello everyone! If you love coloring then the Wishing Mandala stamp set is just for you! During the month of February, this stamp set is on sale as our February Item of the Month for $34.99 and includes a set of matching layering stencils!
This is a super fun image to color in with Prismacolor pencils – there are plenty of opportunitues to shade and blend color. I couldn’t stop coloring and adding different shades! Watch the video to get inspired!
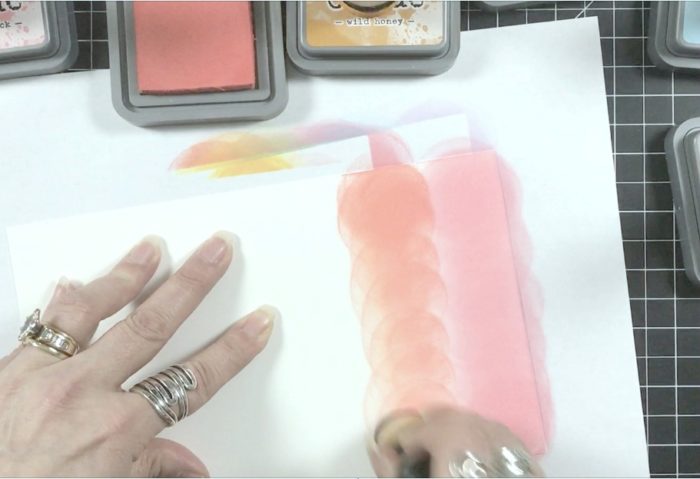
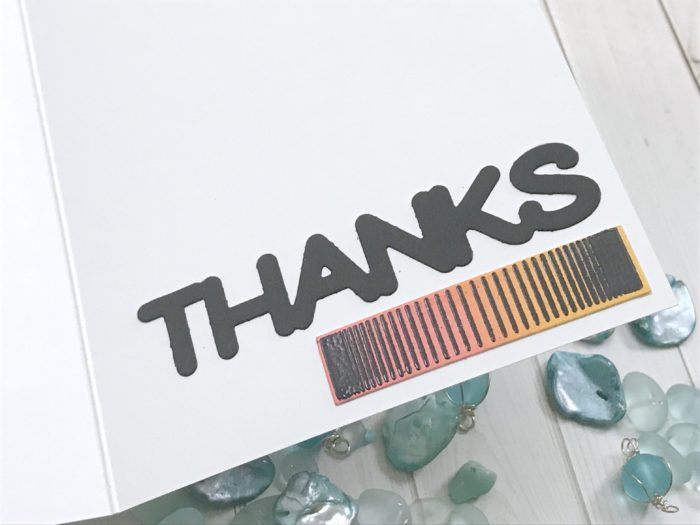
Hi there, it’s Tracey here today and I have a bright and cheery thank you card to share with you using the fabulous Hex Fade stamp set and dies. This co-ordinating stamp and die set is on sale right now in the Birch Press Design store. These unique stamps are designed to give your creations an ombre look even if you only use one colour of ink. To recreate this card start out by stamping the longest of the rectangle stamps on to Bristol Smooth cardstock using VersaFine or other watermark ink. Emboss the images using white embossing powder and then cut the rectangles out with the co-ordinating Hex Fade dies. Using Distress Oxide inks or any other inks that you have, sponge a different colour ink on to the cut out rectangles. For this card colour was added to the images using Distress Oxide inks in Spiced Marmalade, Candied Apple, Mowed Lawn, Mermaid Lagoon and Wilted Violet. The rectangle strips were adhered directly onto a white card base in rainbow order. HINT–start by placing the one strip in the centre of the card front, then add one strip to each outer edge. Finally place the other two strips in between. This is an easy way to get your spacing correct. The bright colours over the white embossed rectangles really highlight the ombre effect of this stamp set. Just imagine what it would look like if you were to blend two shades of the same colour on each rectangle. The ‘Thanks’ sentiment was cut using the Big Lingo Type Thanks die. For this card the background was cut from white and the outline was cut from black. The word ‘sending’ is from the Lingo Thanks Clear Stamp and die set. It was stamped and white embossed from black cardstock, trimmed and then adhered right above the word thanks. The finished card looks so good in the bright colours and the shine from the embossed images adds extra elegance to the overall design. Thank you for stopping by to create with me today. The Hex Fade stamp set has endless possibilities. It can be used for almost any occasion and just by switching up the colour scheme or the method in which you stamp the images you can get totally different looks! See you next time here on the Birch Press Design blog!
The February Item of the Month includes four layering stencils – you won’t believe how quickly you can create gorgeous shading and fill in the mandala image!Check out this video – you’ll see how using each stencil, one at a time to add color upon color, helps you make a masterpiece in no time!
You’ll get a new look every time simply by changing color schemes and varying where color is applied – this is definitely a favorite!
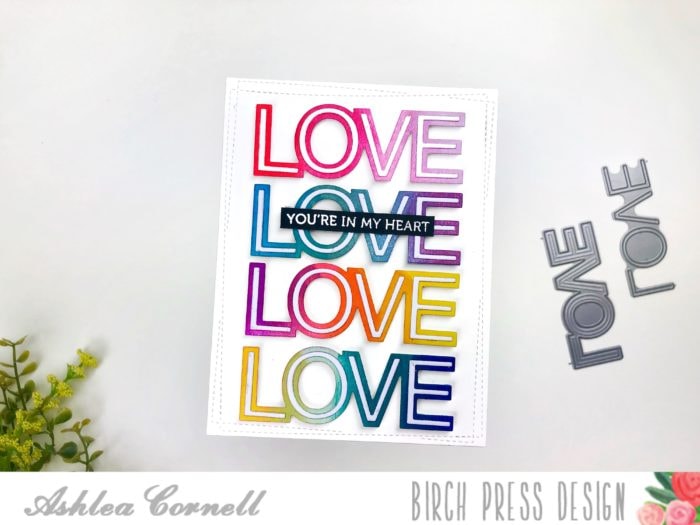
Hello everyone! My name is Ashlea and I am so excited to be on the Birch Press Designs blog for the first time. I have always loved the Birch Press Designs style and quality of product, and I am thrilled to be a part of this team to help inspire and spark ideas! For my first post, I thought I’d focus on a simple but effective technique using shadow dies. Since Birch Press has many word and shadow dies, I wanted to provide ideas of different ways to use them as often as possible! I love the pad to paper technique of rubbing an ink pad onto a piece of card stock in order to transfer a very rich and vibrant color that you just can’t get from the traditional ink blenders. Here’s a video showing a detailed tutorial of how I achieved this look.
I love this technique as it allows me to stretch my uses for these word and shadow dies. It’s super simple!
First, you’ll want to pick 3-4 colors of ink pads that won’t turn “muddy” when the colors meet. Basically, you’ll want to choose colors close to each other on the color wheel. I used Catherine Pooler inks for my pad to paper technique here because I love her pads, especially for pad to paper techniques.
Once I blended all of my colors and cut the shadow die out using the ink blended spaces, I adhered all of the letters to the shadow dies and adhered them to a card front cut with Memory Box Wrapped Stitched Rectangles dies to add a little interest to the border.
Finally, I adhered all of the word dies to the card front with foam tape to add dimension and heat embossed the sentiment “You’re In My Heart” from the Lingo Love stamp set and adhered that over the second word die down.
I hope that you’ve enjoyed learning a bit about how I created this card using the ink pad to paper technique. I hope you’ll try it out on your cards and enjoy it as much as I do! Thanks so much for stopping by and I’ll see you again soon!


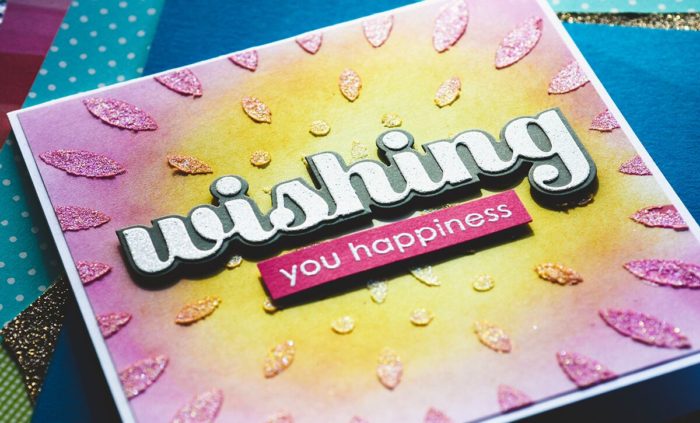 I created a simple background using a single stencil to highlight a word image at the center of the card – some clear glittery embossing paste created a raised textured burst effect that is eye catching!
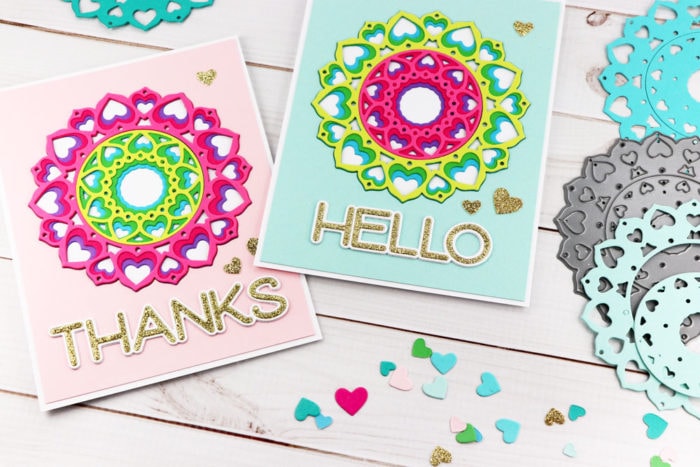 Thanks for stopping by! I hope you’re having a great day! Today I’m playing with the new Adora Layer set! I love the versatility and many different looks you can achieve with this die set.
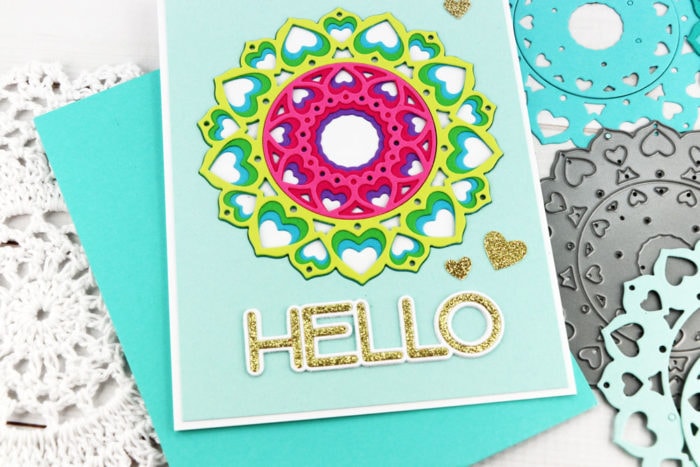 You can change the look by stacking the colors of the layers, but you can also remove the center circle design too!
 I started by cutting a colored card stock panel slightly smaller than my card base. Next I die cut the Adora die from the panel before adhering it to the card base. This creates a clean window to insert the die into.
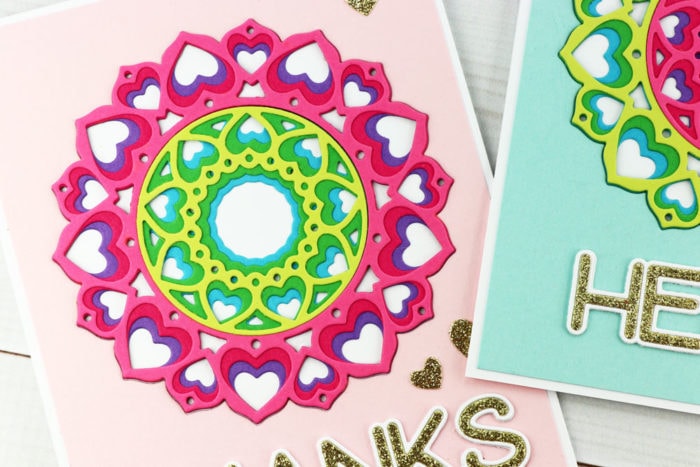 I adhered the layer C die into the open negative space and then adhered the Layers B and A over it creating a neat stack. Make sure you insert the center circle as you go – don’t save them for last. The dies are easier to assemble one layer at a time, vs. inserting the assembled circle stack in the center later.
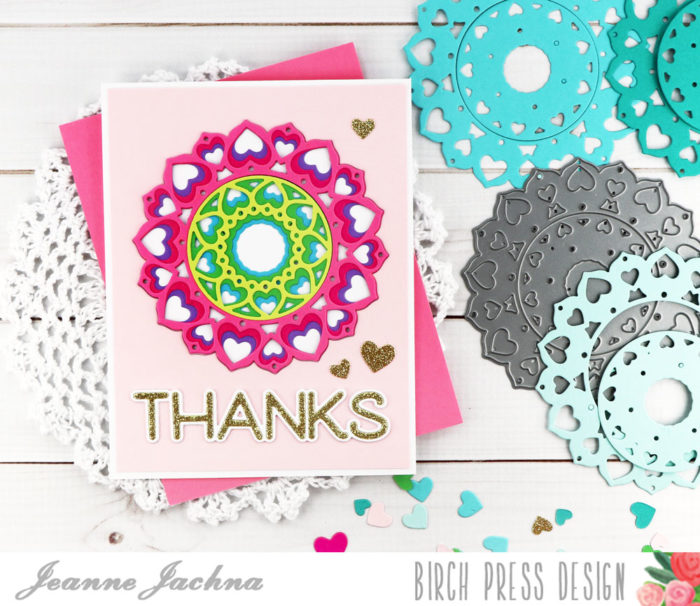 I added a Big Lingo Type Thanks and a few gold glitter hearts as accents. I cut the hearts with the Adora dies.
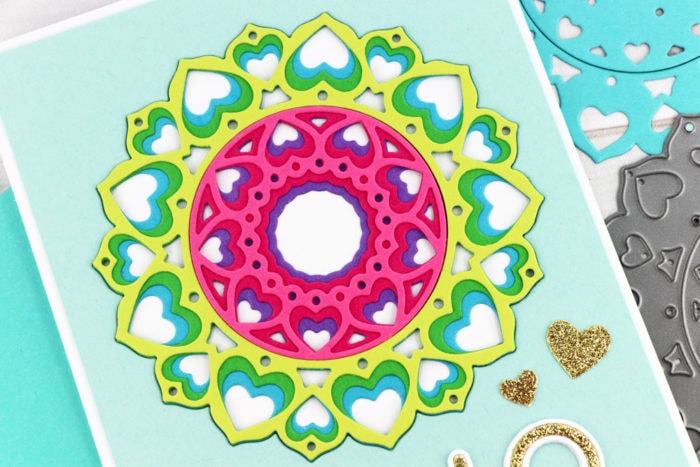 I cut each die layer twice with a total of 6 different colors of card stock and then just swapped the centers to add more interest. Who doesn’t love a rainbow of color?
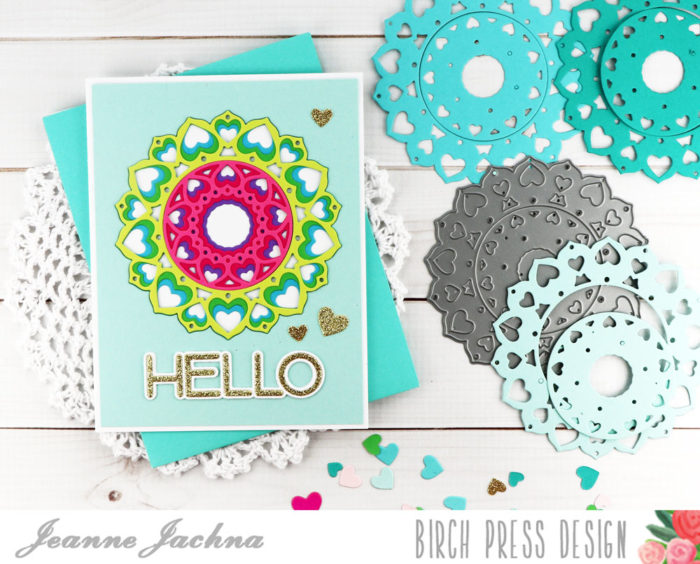 The new Lingo Type word dies are easy to work with.. each set includes a background die as well as an outline word die. The center of the letters on the outline die are removeable so you can use them on other projects or to create personalized messages if you like.
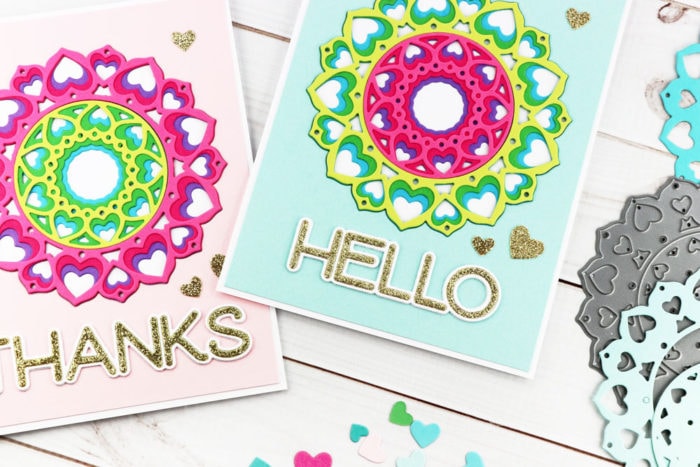 You’re going to love the many ways and fun different looks you’ll achieve with these beautiful stackable dies!
 Finished Size 4.25 x 5.5″


 During the month of February, this stamp set is on sale as our February Item of the Month for $34.99 and includes a set of matching layering stencils!
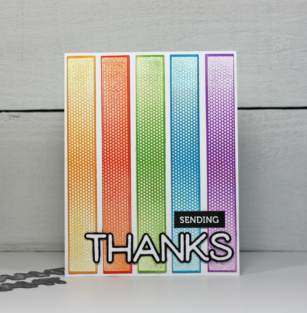
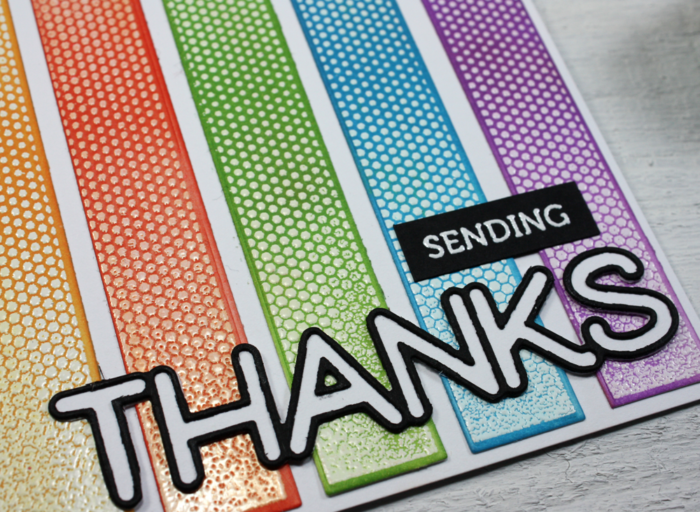 Hi there, it’s Tracey here today and I have a bright and cheery thank you card to share with you using the fabulous
 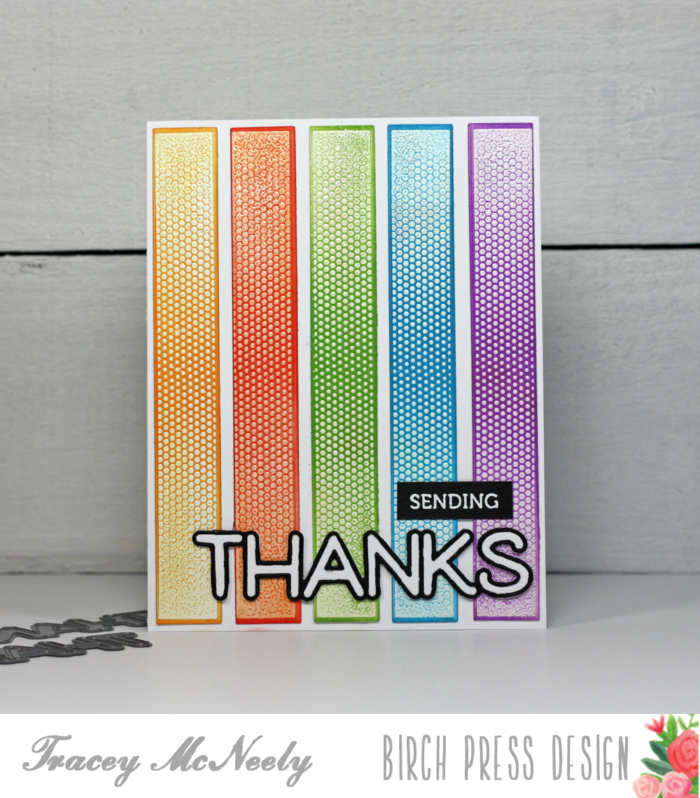 To recreate this card start out by stamping the longest of the rectangle stamps on to Bristol Smooth cardstock using VersaFine or other watermark ink. Emboss the images using white embossing powder and then cut the rectangles out with the co-ordinating Hex Fade dies.
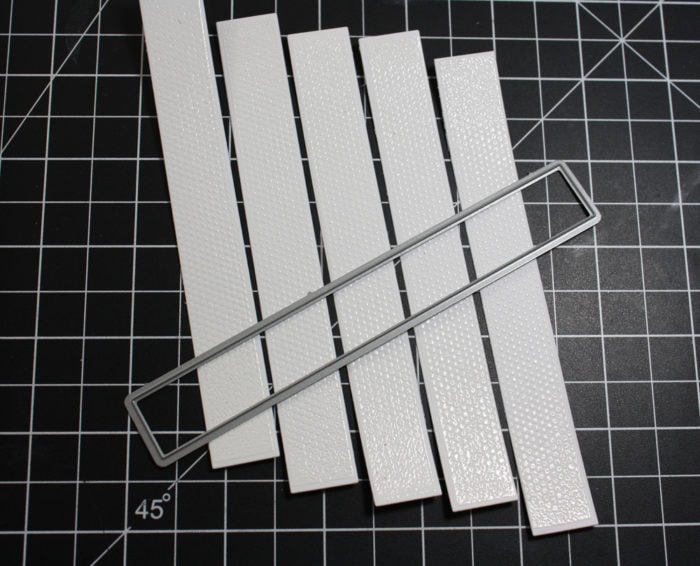 Using Distress Oxide inks or any other inks that you have, sponge a different colour ink on to the cut out rectangles. For this card colour was added to the images using Distress Oxide inks in Spiced Marmalade, Candied Apple, Mowed Lawn, Mermaid Lagoon and Wilted Violet.
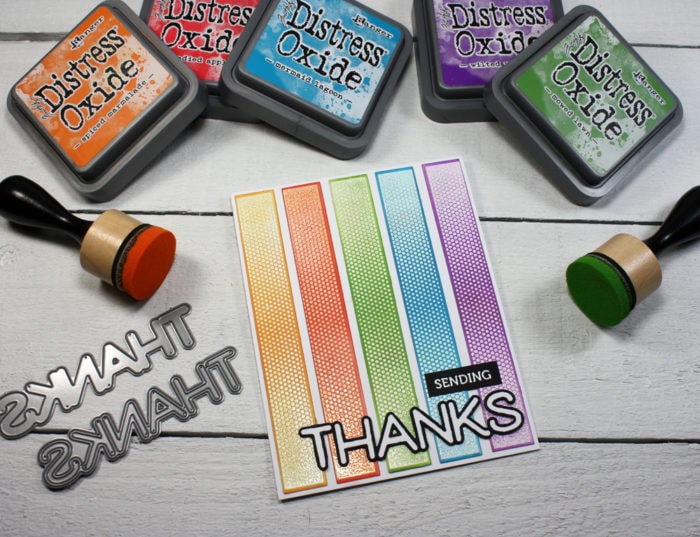 The rectangle strips were adhered directly onto a white card base in rainbow order. HINT–start by placing the one strip in the centre of the card front, then add one strip to each outer edge. Finally place the other two strips in between. This is an easy way to get your spacing correct.
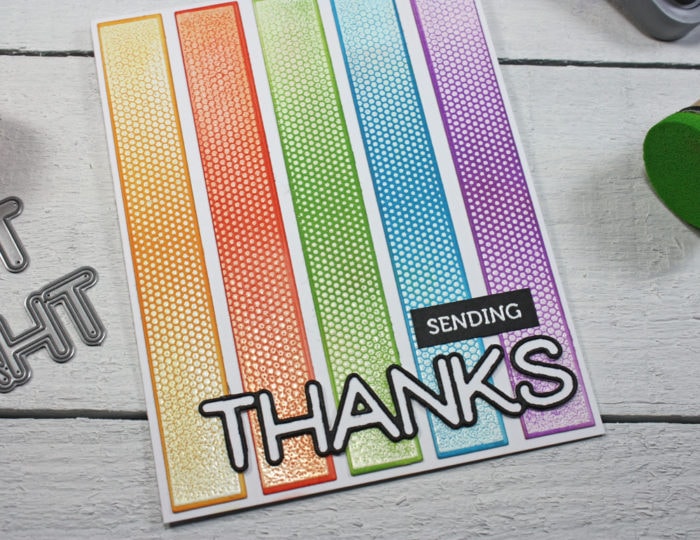 The bright colours over the white embossed rectangles really highlight the ombre effect of this stamp set. Just imagine what it would look like if you were to blend two shades of the same colour on each rectangle.
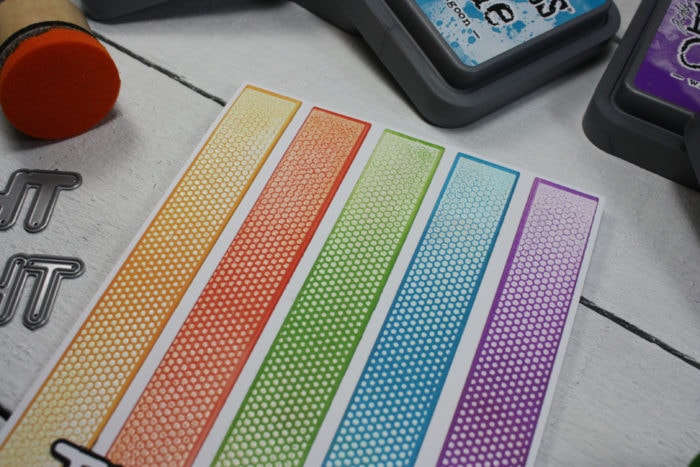 The ‘Thanks’ sentiment was cut using the
  The finished card looks so good in the bright colours and the shine from the embossed images adds extra elegance to the overall design.
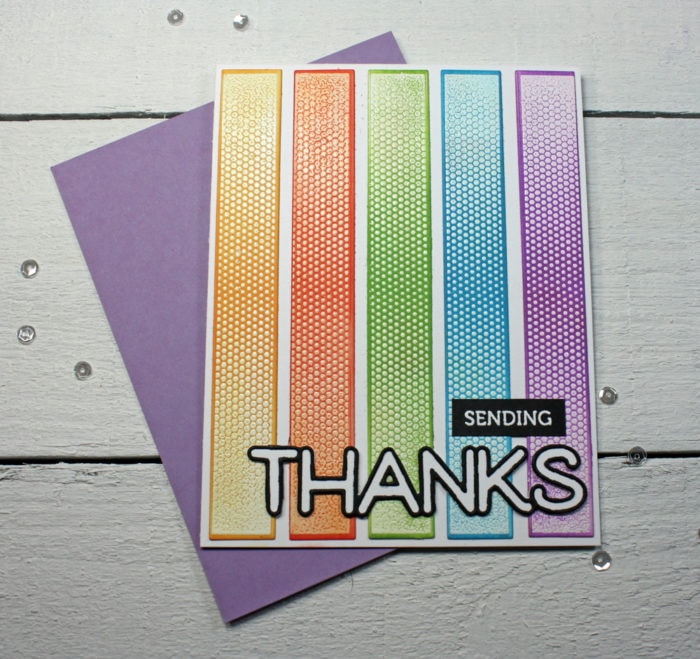 Thank you for stopping by to create with me today. The Hex Fade stamp set has endless possibilities. It can be used for almost any occasion and just by switching up the colour scheme or the method in which you stamp the images you can get totally different looks! See you next time here on the Birch Press Design blog!


 Check out this video – you’ll see how using each stencil, one at a time to add color upon color, helps you make a masterpiece in no time!