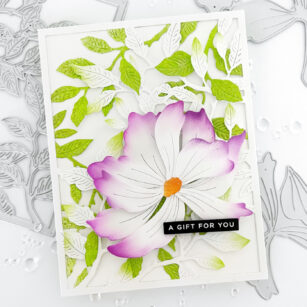
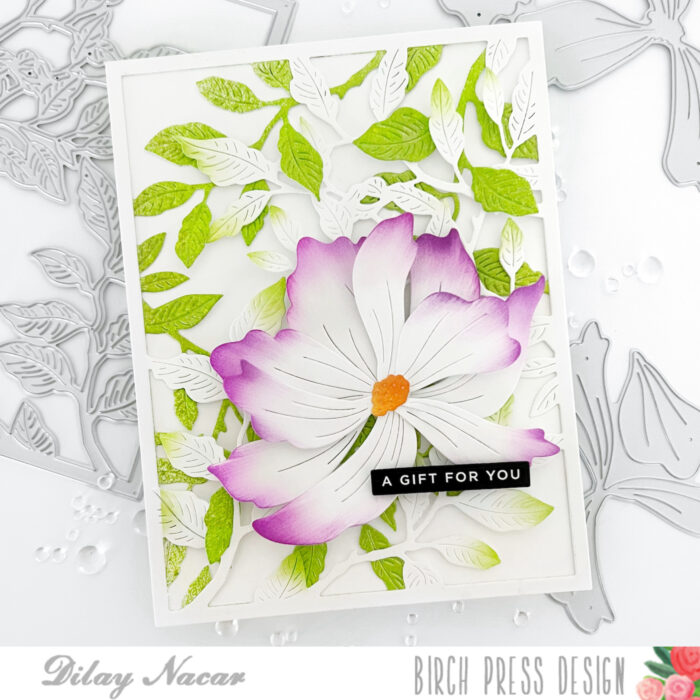
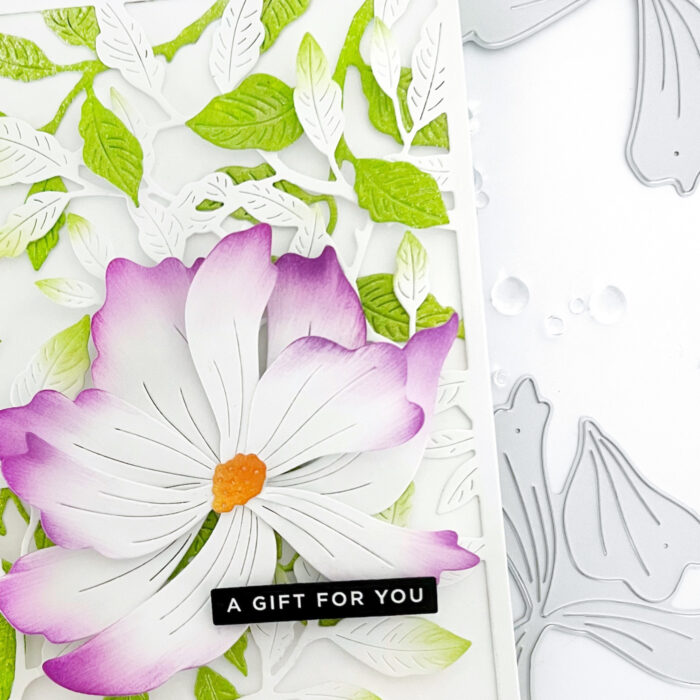
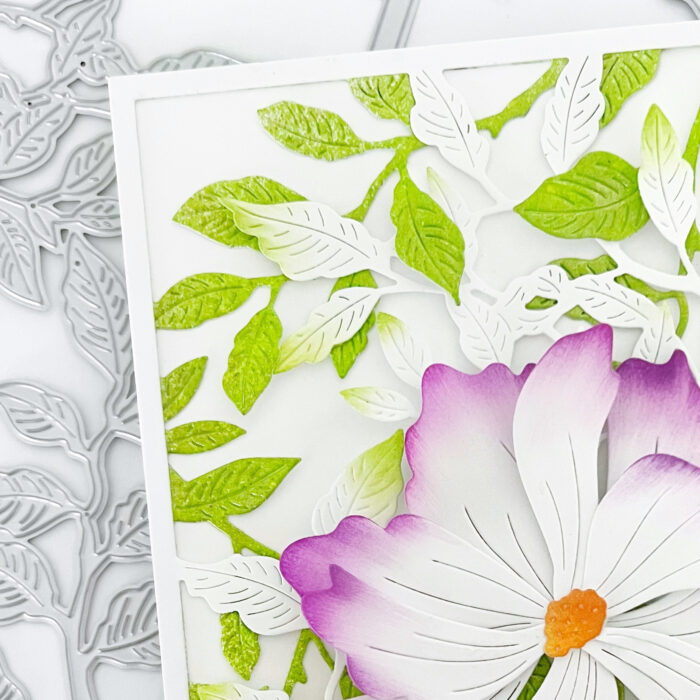
Hello crafty friends! Dee here, excited to share a vibrant floral card featuring the stunning Large Cosmos Contour Layers. I started by cutting two Forest Canopy Layer Dies, one in white and the other from a green ink-blended panel. After rotating the green, I blended parts of the white into it before adhering.
Next, I cut the Large Cosmos Contour Layers and ink-blended the edges with a vibrant purple, centering with yellow and green. I attached it over the leafy panel using foam adhesive squares.
To complete the look, I added a simple sentiment strip from my stash and mounted the finished piece onto a top-folding card base.
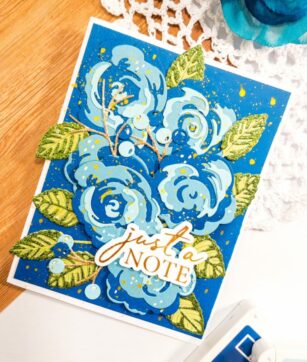
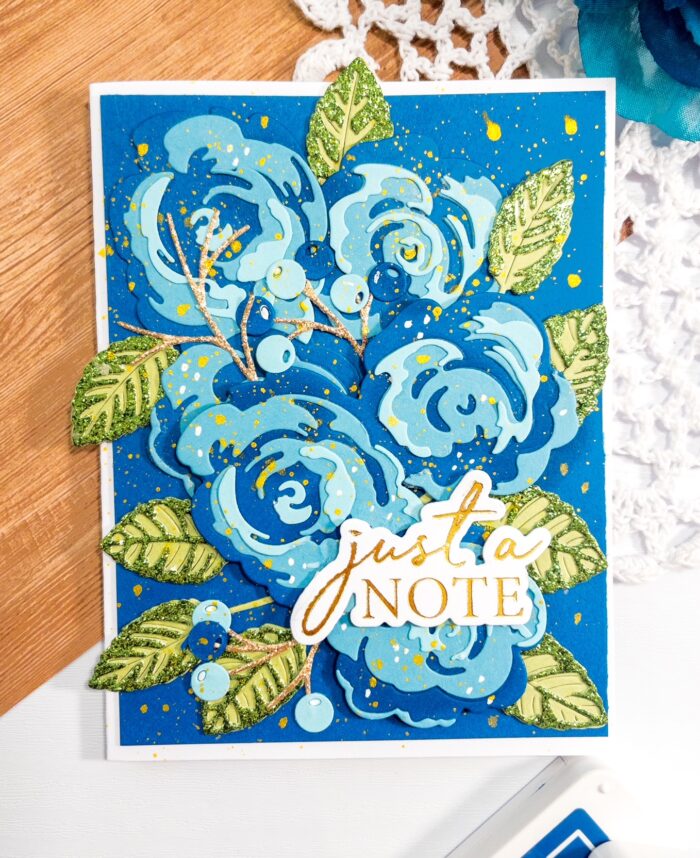
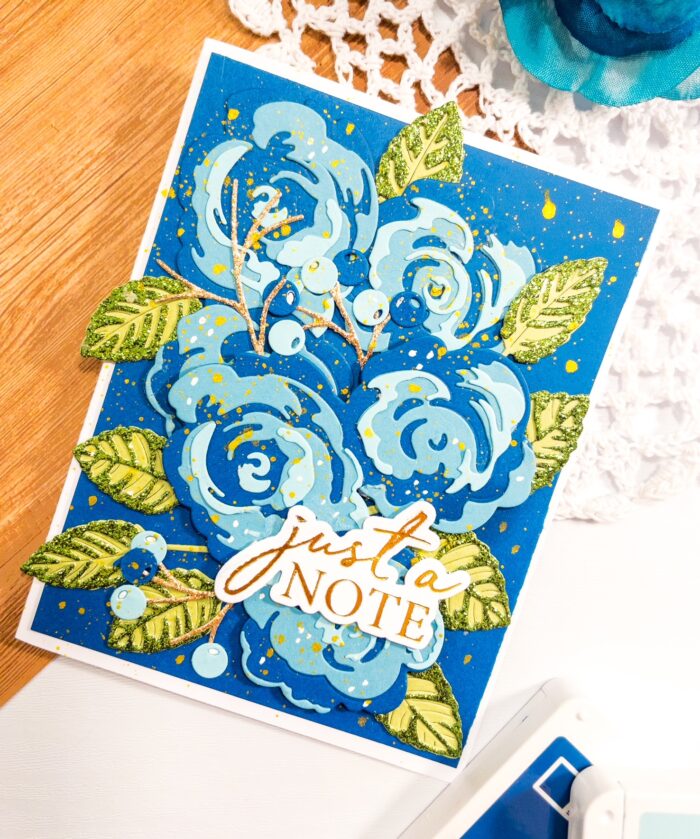
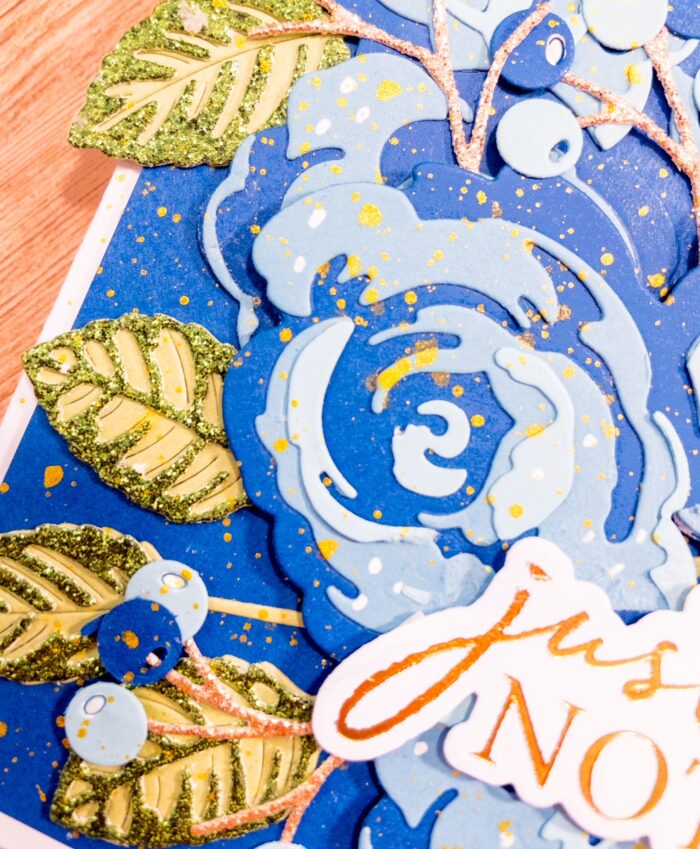
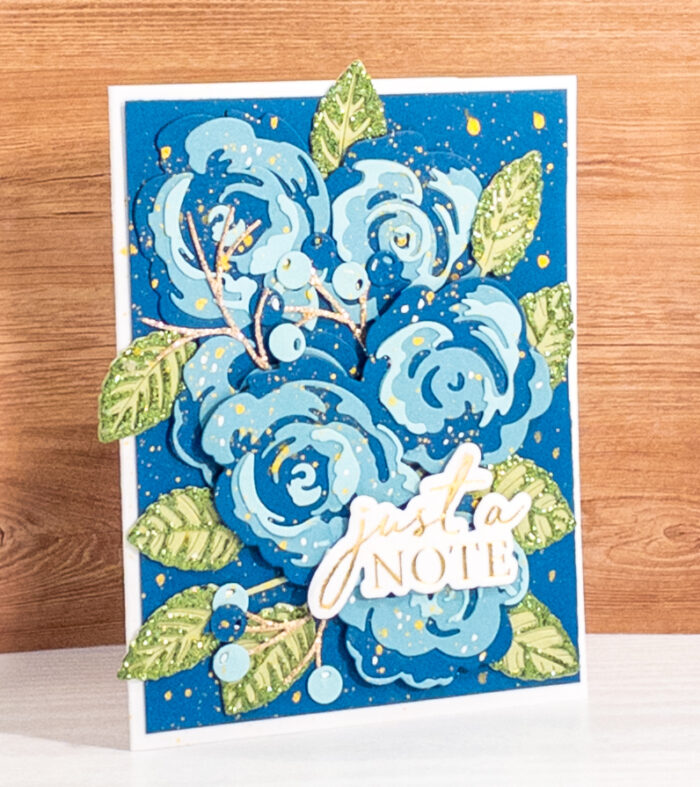
Hello! Happy Friday friends! I hope you have great things planned for the weekend ahead. This is Design Team member Crystal Komara and I’m very excited to share today’s card with you in my favorite color – blue! This card uses lots of beautiful products from Birch Press Design including the Rose Bunch Contour Layering Dies, Mixed Berry Contour dies, Just a Note Noted Script Hot Foil plate and Rose Leaves Contour Layers! Continue reading to learn how I created this very detailed card:
I’m not going to lie, putting the Rose Bunch Contour Layers together is the most cumbersome part of this card and it truly irritated me a little, but the end result – is SO worth it!
Card details:
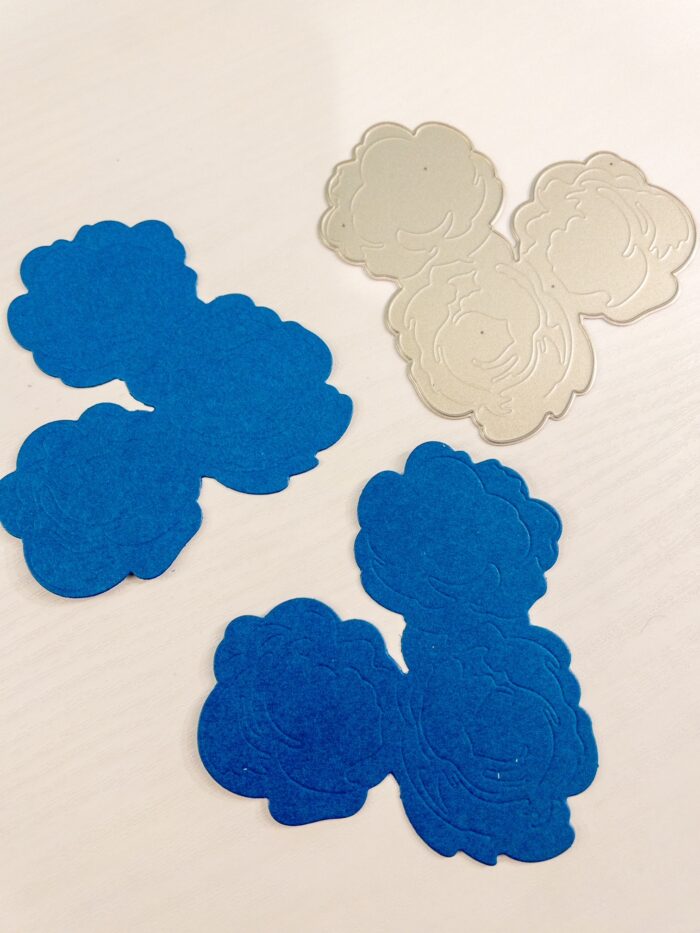
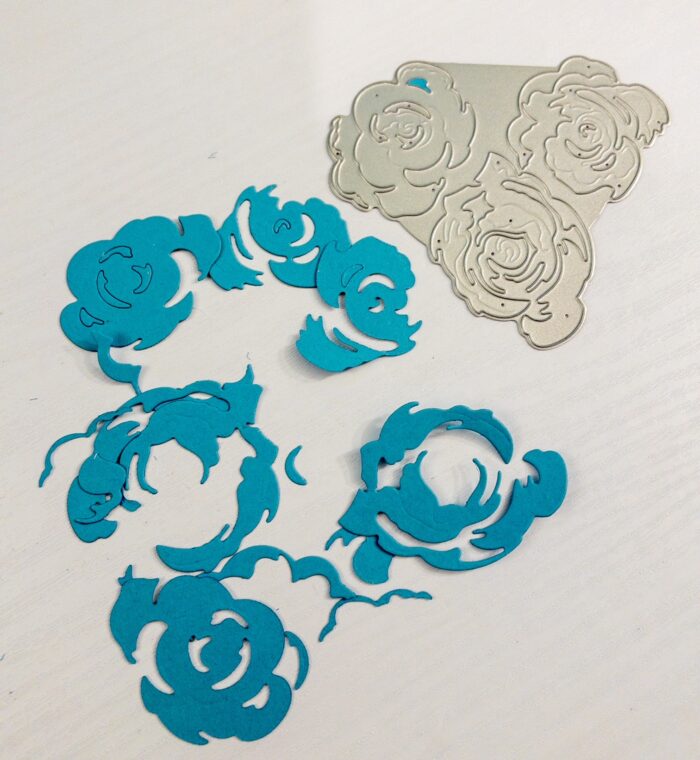
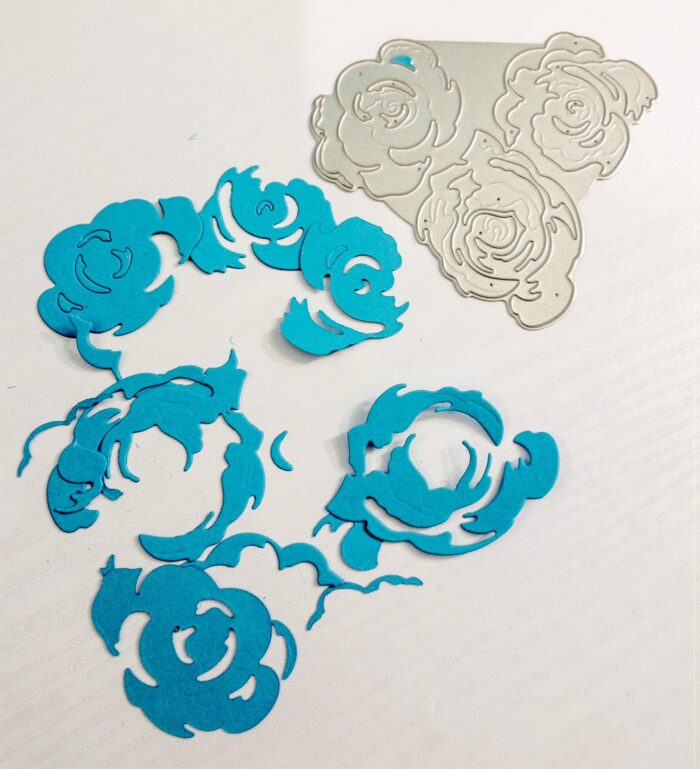
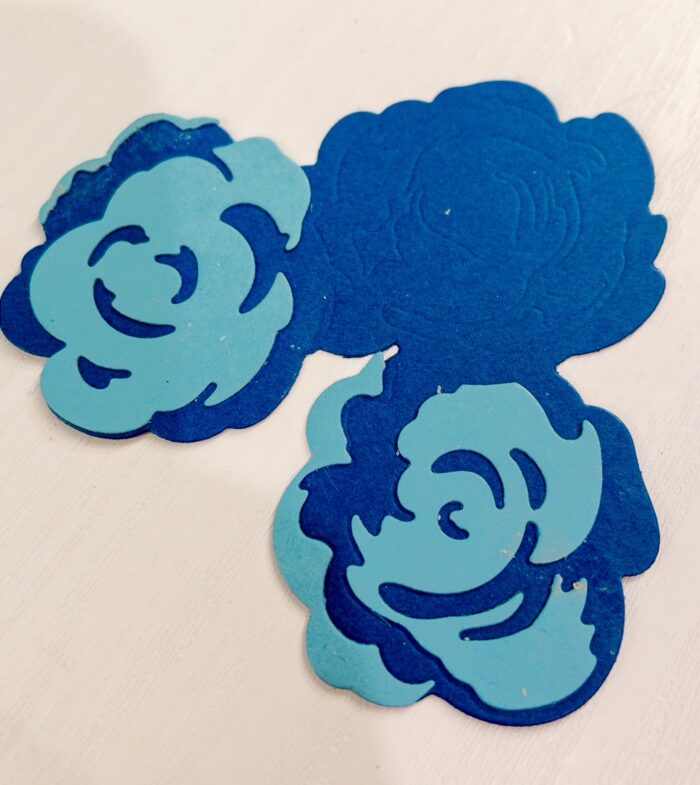
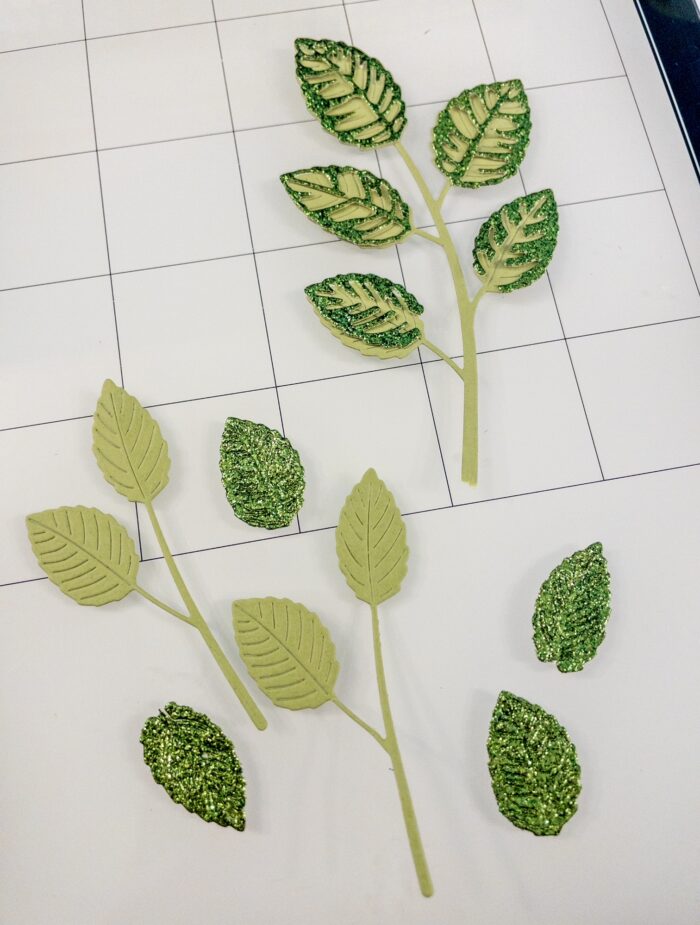
The base of this A2 sized card is made from 80 lb. Neenah Solar White Smooth cardstock. I then adhered a 5 1/4″ x 4″ piece of bold blue cardstock directly to the card base. I then began cutting two sets of the Rose Bunch Contour Layers from three different colored blues cardstocks. (Please see the end of this post where I have pictures of how I die cut these pieces and assembled them). Once the flowers were assembled, I then assembled the leaves using a light green cardstock and a green glitter cardstock. (Again, there are additional photos at the end of this post. )
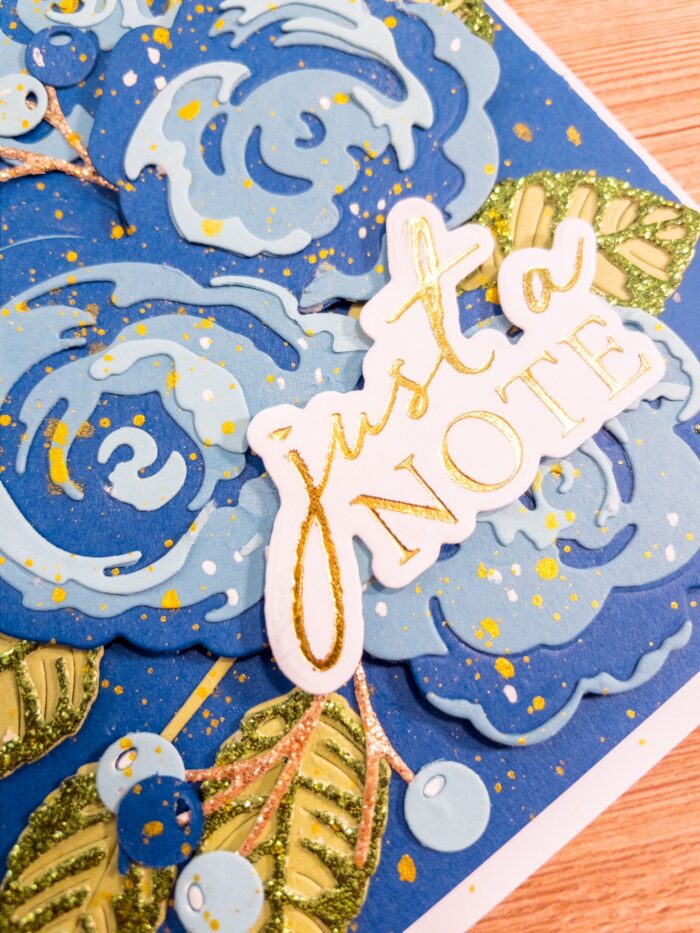
I assembled the Mixed Berry Contour dies using gold glitter stems and two different colors of blue cardstock for the berries. This was just a lot of gluing of little tiny pieces!
I adhered the leaves to the card first and then layered the roses on top. Once everything was situated where I wanted it, I peeled off the backing of the tape and pressed it all firmly into place. I splattered the entire card with a little gold paint. Lastly I heat embossed the sentiment using the Just a Note Noted Script hot foil plate. I used gold foil on white cardstock. I adhered the sentiment to the lower right side of the card using 3M foam adhesive for added dimension.
Here are the closeup photos of how I die cut the roses and then assembled them:
Step 1: Cut base from bold blue cardstock
Step 2: Cut contour layers from another color blue
Step 3: Begin to adhered the contour layers together
Step 4: Assemble the Rose Leaf Contour Layers
When it all comes together, this card is just simply beautiful and worth all the piece work of those contour layering dies! Thanks for visiting and have a wonderfully creative day!
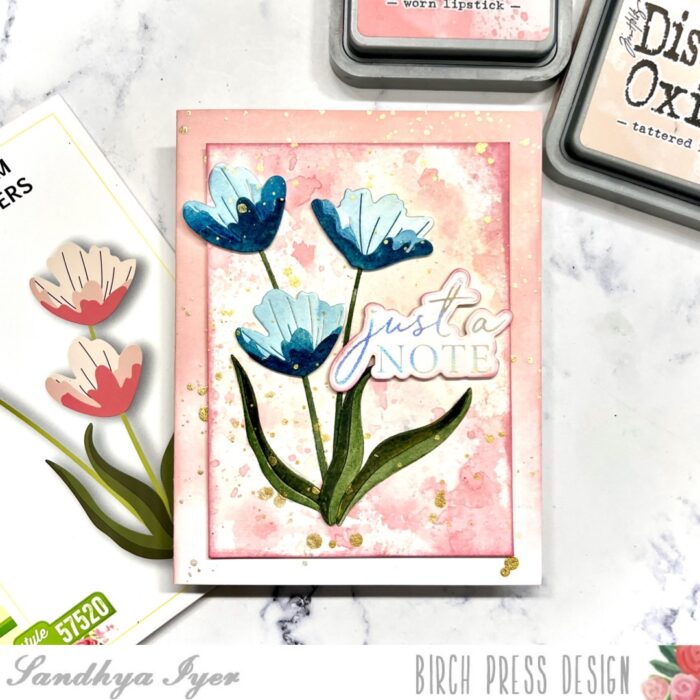
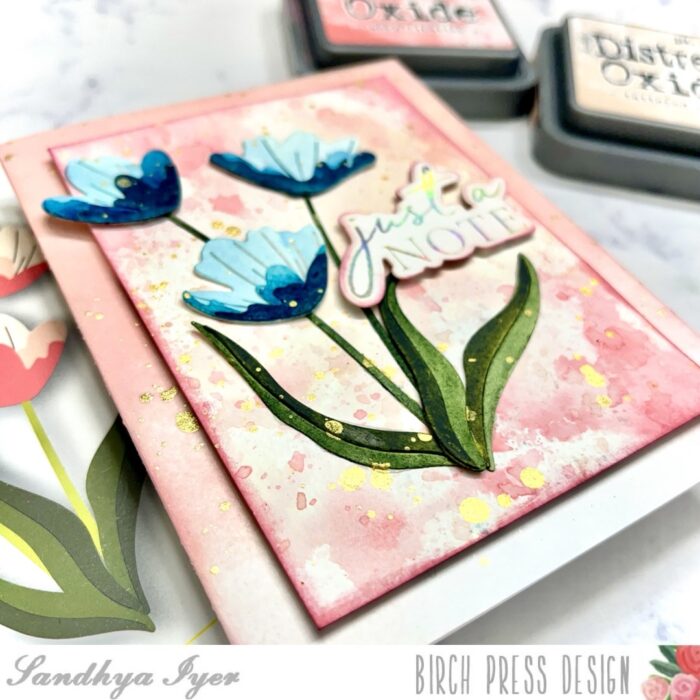
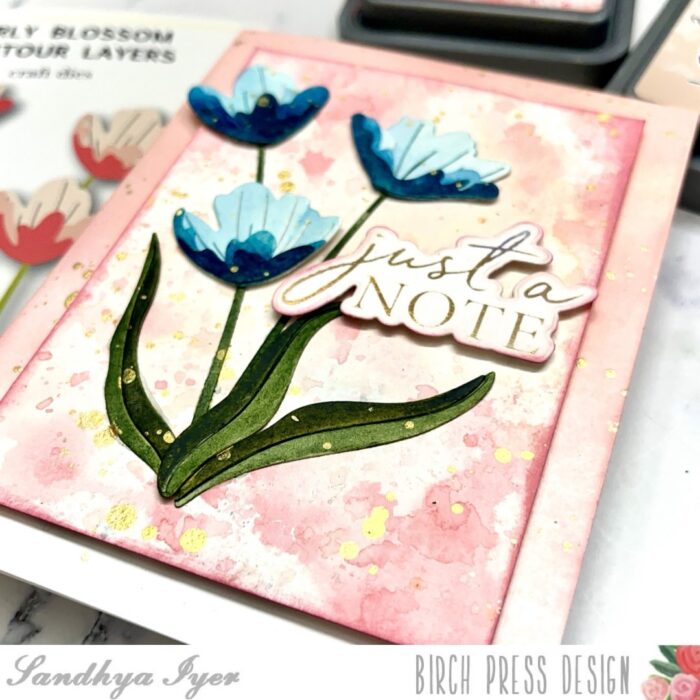
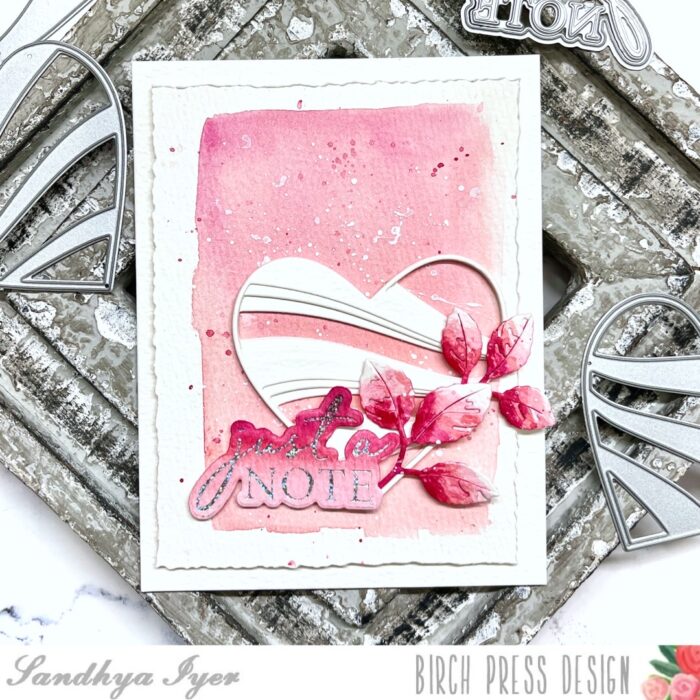
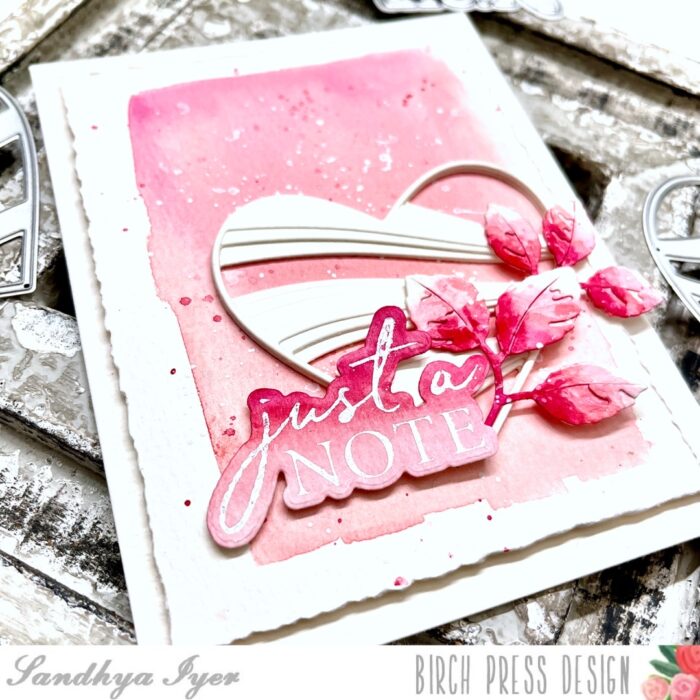
Hello, friends! This is Design Team member Sandhya Iyer here today and I am sharing a floral notecard. I used the Early Blossom Contour Layers die set to create my watercolored florals. The sentiment is a gorgeous scripted hot foil plate and die set called Just a Note.
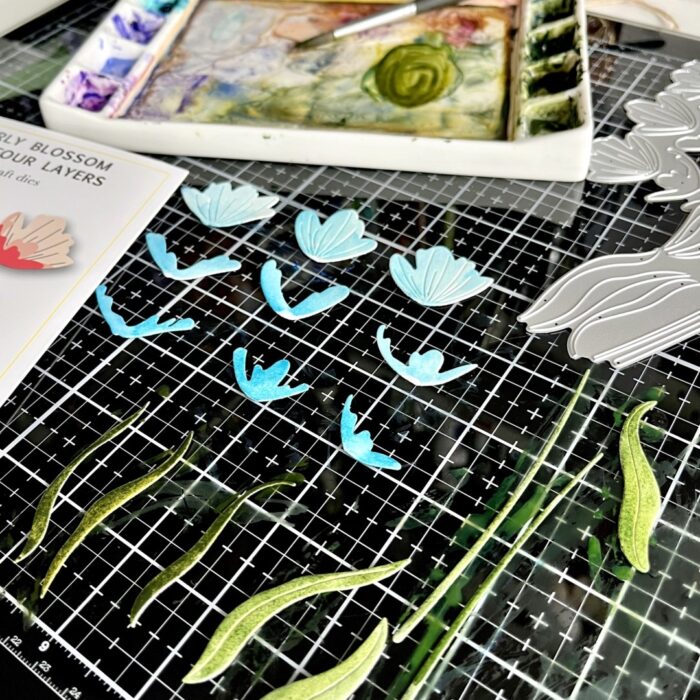
I started by die-cutting the flowers and leaves out of Canson XL watercolor paper. Next, I used Rockwell Magic mineral watercolors to color the die-cut layers.
I assembled the layers to create my flowers and leaves. Then, I created an ink-smooshed background using Worn Lipstick and Tattered Rose Distress Oxide Inks. Next, I used the foil plate to add the sentiment to a piece of Hammermill heavy cardstock and die-cut it out.
Finally, I ink-blended using the same oxide ink combo on my card base and assembled the card. I also added gold splatters to add some glamour.
This brings us to the end of today’s post. Thank you so much for stopping by and I hope you have fun crafting today!
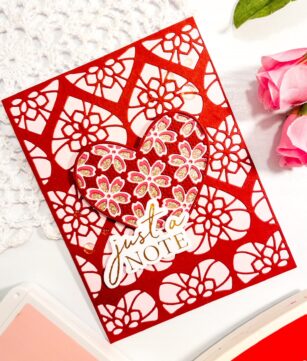
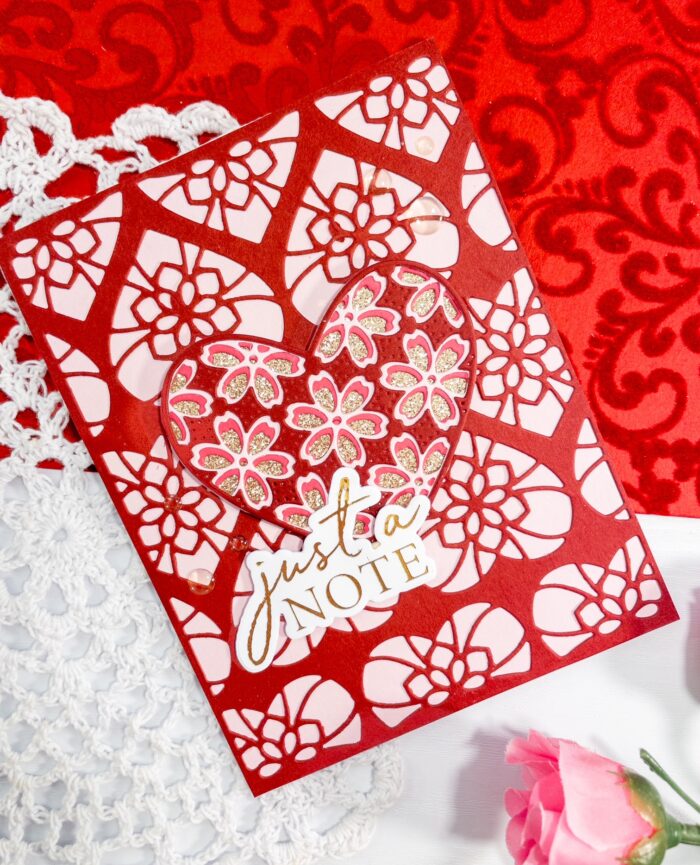
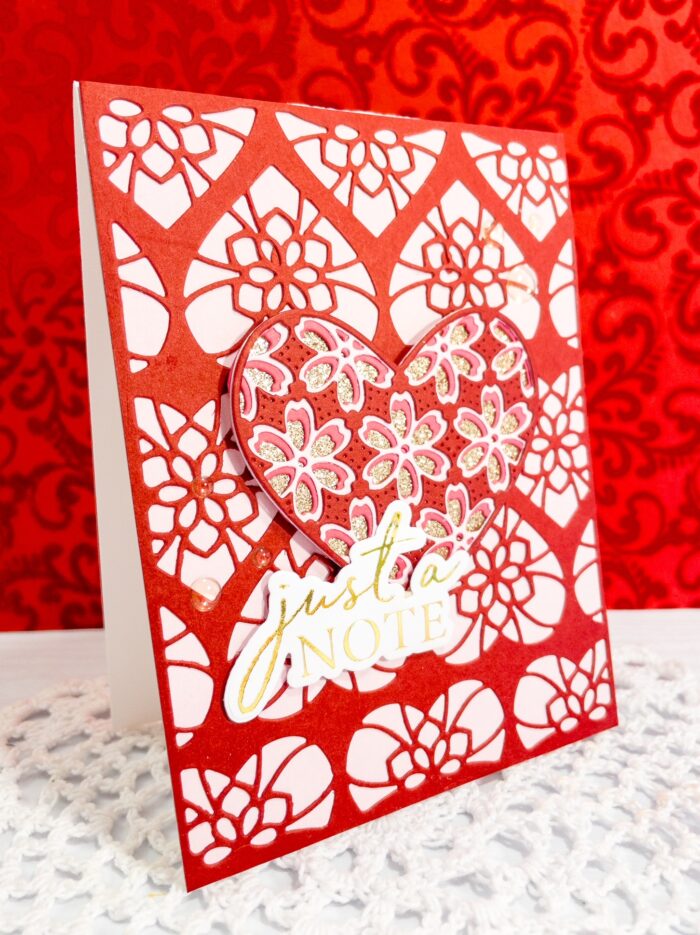
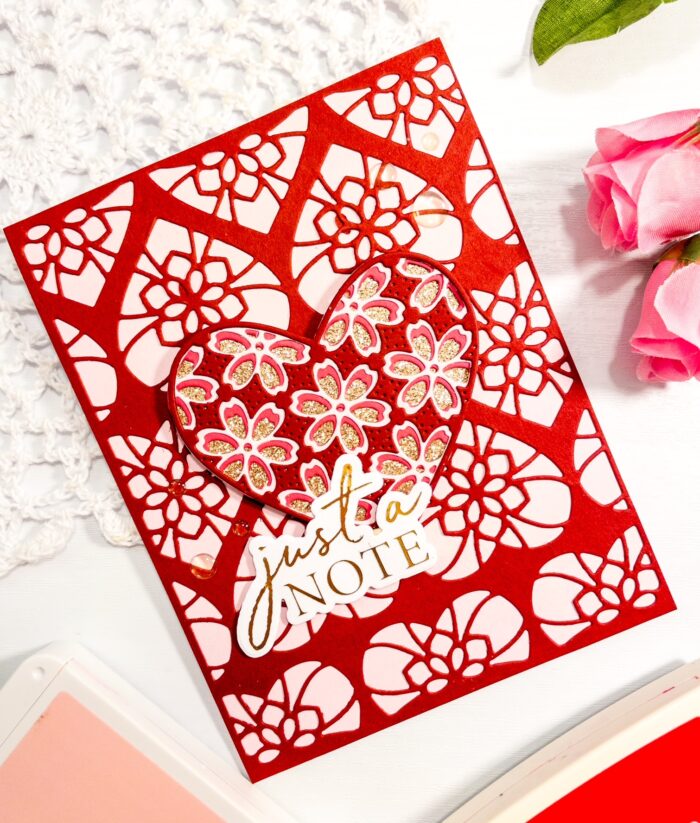
Hello friends and happy week after Valentine’s Day! This is Design Team member Crystal Komara, and, as per my usual, I’m a wee bit late to the game. But, even though Valentine’s Day has passed, every day is a day to celebrate love and today’s card could be shared all throughout the year.
Card details:
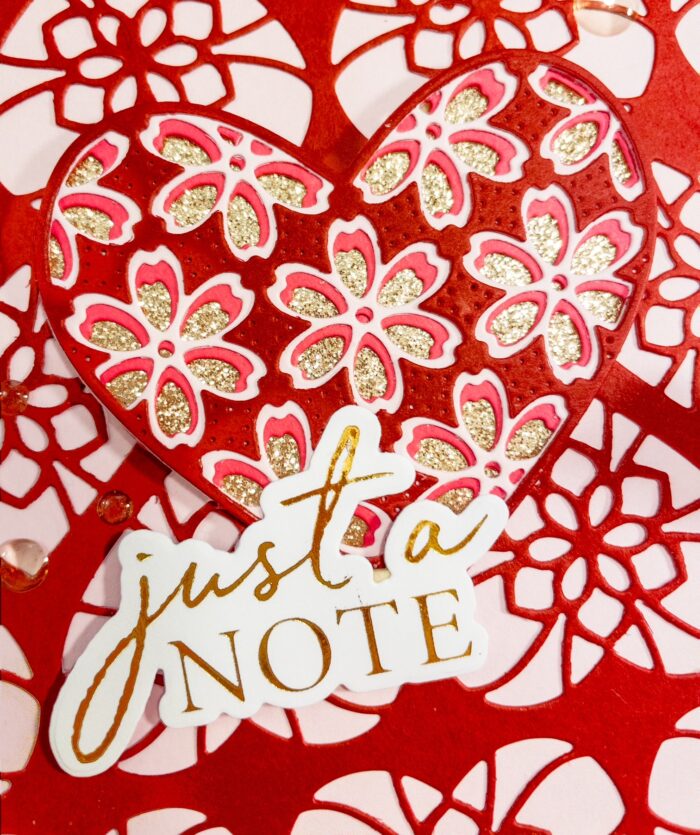
The base of this card is made from 80 lb. Neenah White Solar Smooth cardstock. Using a sheet of red cardstock, I die cut Layer A from the Kinsley Heart Layer Plate set. I adhere this directly to the card base. I heat foiled the sentiment “just a note” using the Just a Note Script Hot Foil Plate. I used gold foil on white cardstock.
To create the heart focal piece I used a layering heart die. Apparently the one I used must have retired, so might I suggest using the Caprice Heart Layering Die instead, which would yield da very similar look! I die cut Layer C from a bold pink cardstock, Layer B from a light pink cardstock and Layer C (the top layer) from red cardstock. I adhered all three layers together with a fine tip liquid glue. Once all three layers were adhered together, I placed the heart over a piece of gold glitter cardstock and trimmed it by hand to fit behind the entire heart.
I adhere the heart to the center of the card and then adhered the gold foiled sentiment just slightly off center using 3M adhesive. Lastly I added a couple clear rhinestone gems for added texture.
I hope you like this beautiful card! Thanks for visiting and have a wonderfully creative day!
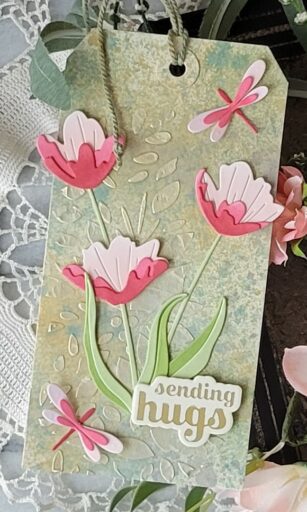
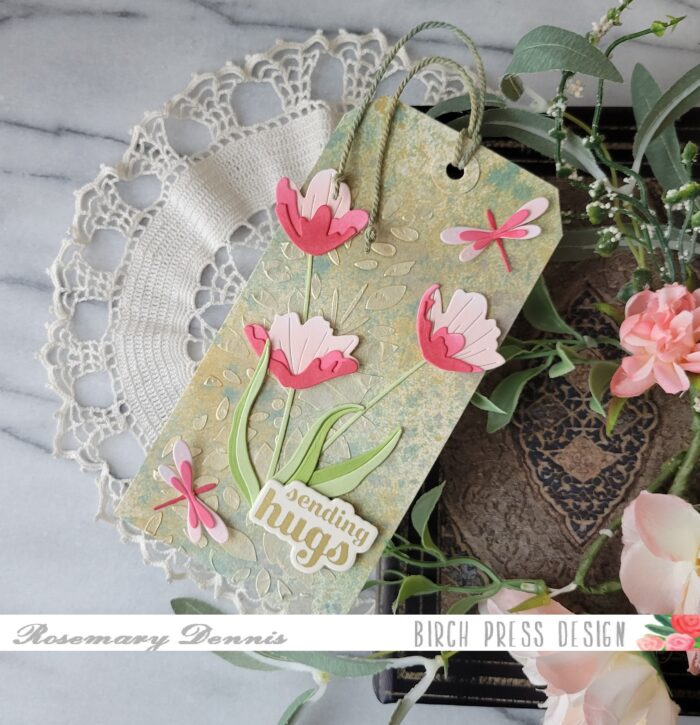
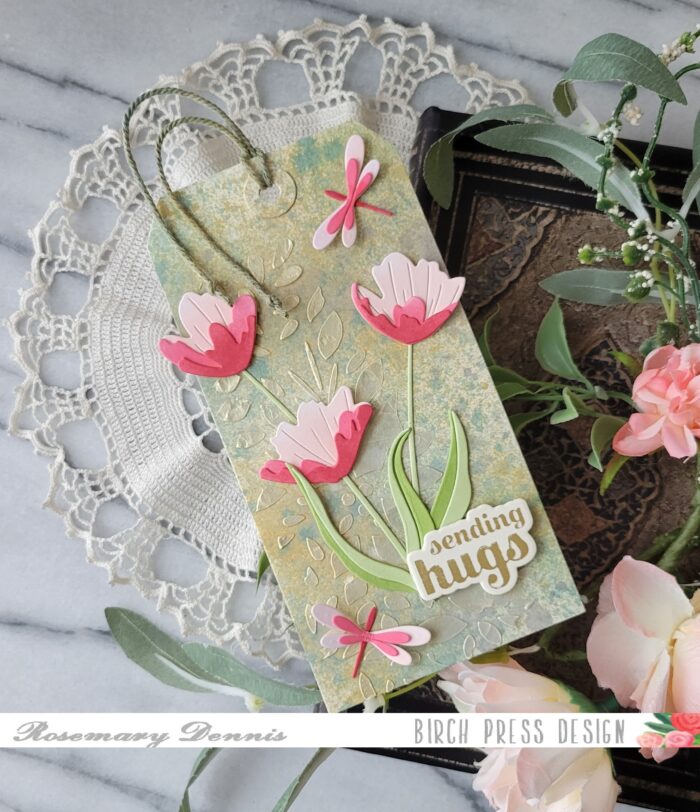
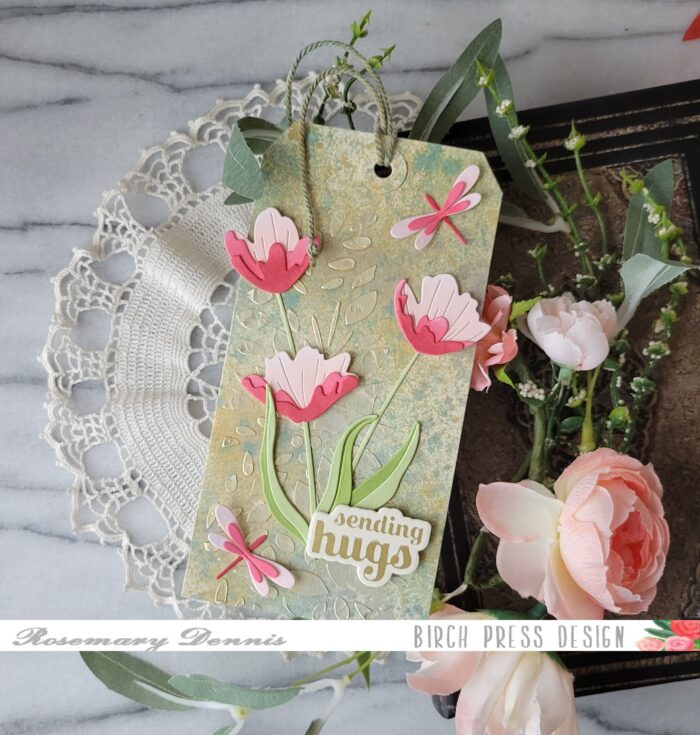
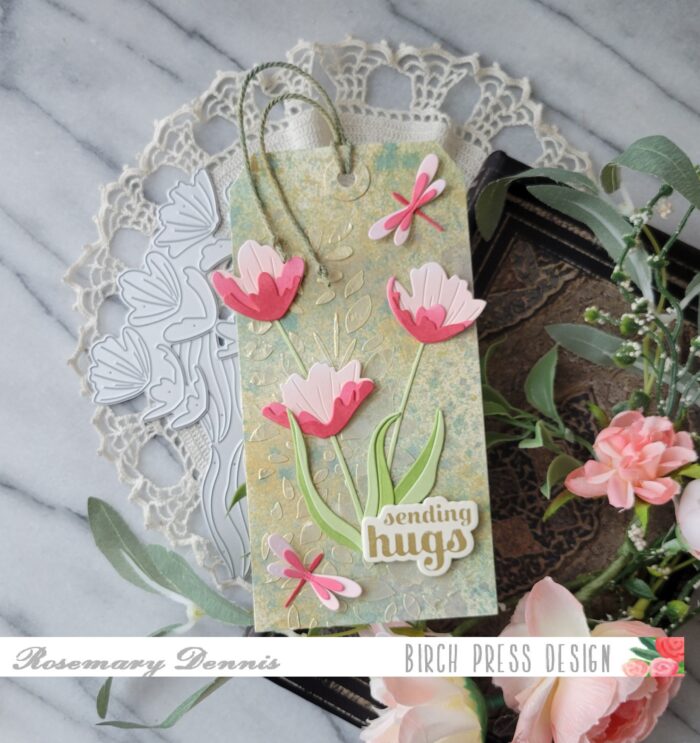
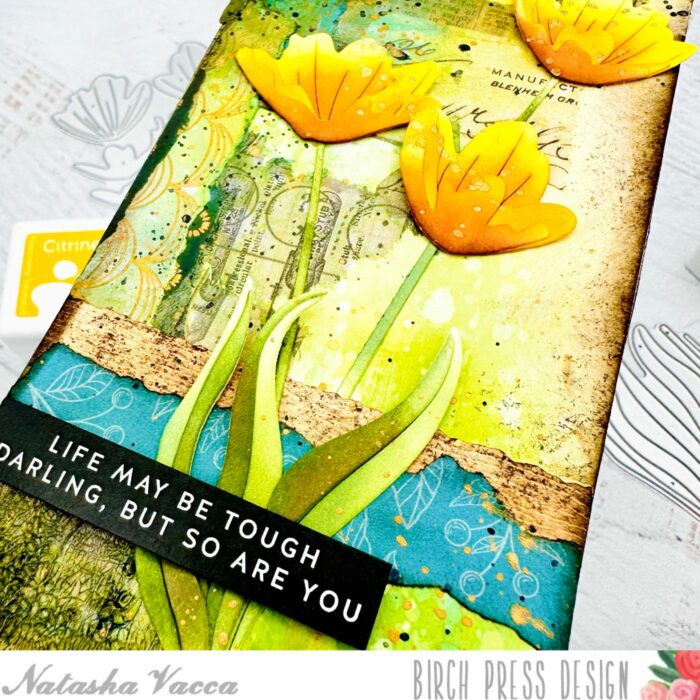
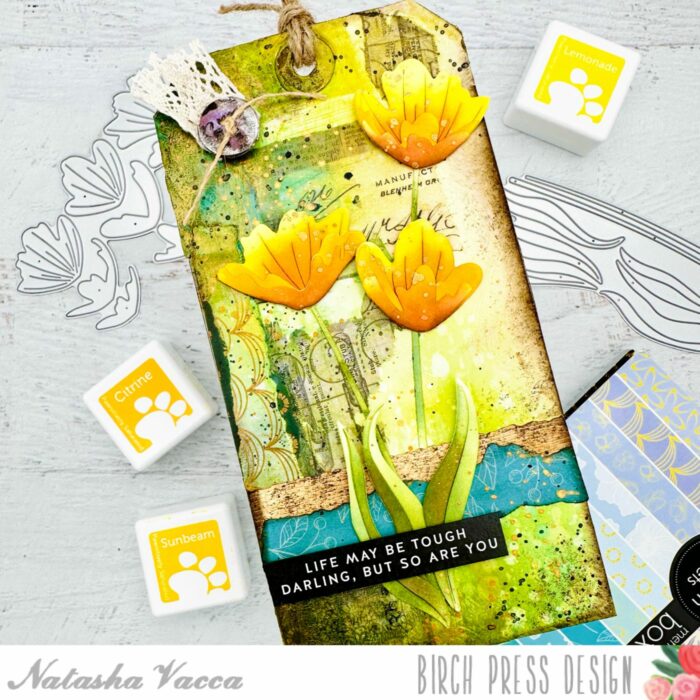
Hello everyone! Rosemary here on the blog today. Hope everyone had a lovely Valentine’s day. I did as I got several things that I love! Today I’m sharing a tag that I created using several different techinques. I used the new Early Blossom Contour Layers dies, as well as the Simple Dragonfly Contour Layers dies and the layer A of the Herbarium layering die set. I had a lot of fun creating this tag!
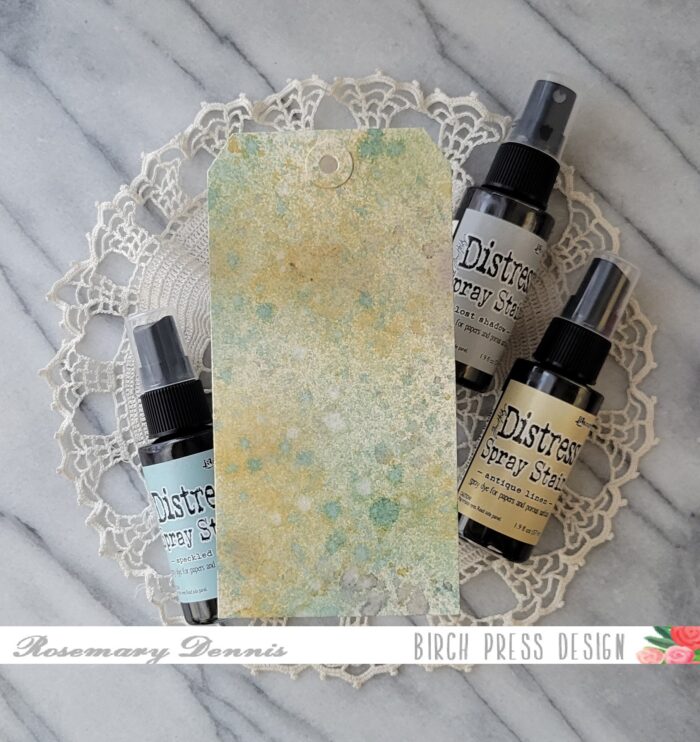
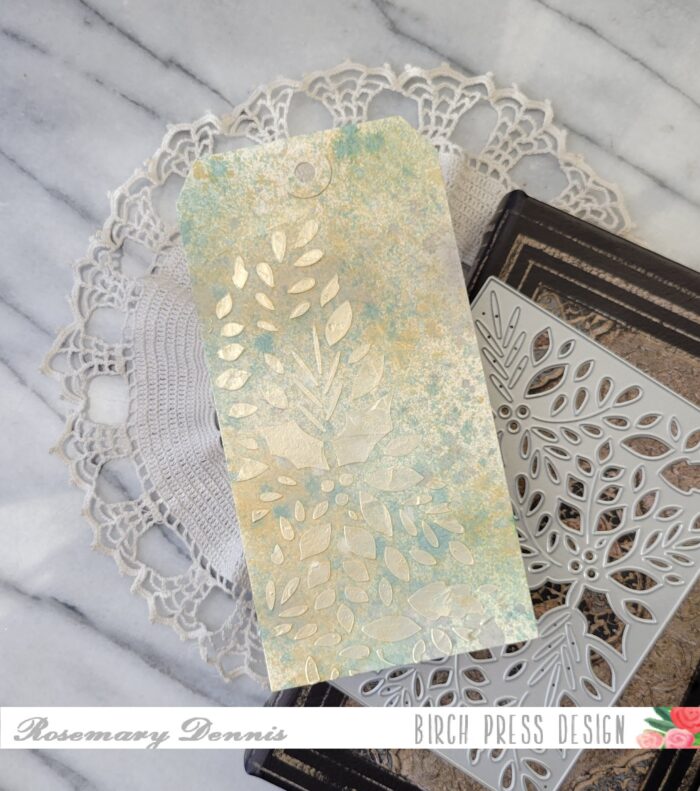
I started off by spraying my premade cream colored tag with the spray stains that you see in the photo: Speckled Egg, Antique Linen and Lost Shadow. I sprayed on each stain individually and then spritzed the tag with a little bit of water. I didn’t want too much movement of the colors. I did dry the tag a bit with my heat tool in between each layer of color. Once I had the background to my liking I set it aside to fully dry.
As the tag dried I got to work on my flowers and dragonflies. I die cut them from white cardstock and used a grip mat to hold all the pieces in place while I blended on the inks in a color family that moves from the light pink to a more reddish color for the flowers and dragonflies. The leaves were inked in two shades of green. I used liquid glue to adhere all the pieces together. While they were drying I moved onto the next layer for the tag.
I have a small jar of Solar Paste in the color Golden Hour and I thought it would look perfect with the background on the tag. I used the A plate from the Herbarium set to create a stencil and then added the embossing paste. I was right that the embossing paste would look nice with the background. I just love how it turned out. As the tag was drying I decided to custom color some chunky white twine I had using two of the spray stains. I used Speckled Egg and Antique Linen for the twine.
Once the paste was dry I began adding all my elements to the tag. I must admit that I was a little worried that the pinks in the flowers wouldn’t play well with the background colors. But as I added the flowers to the tag I realized that the colors worked perfectly! I finished off the tag with the sentiment the Sugar Script Sentiments 1 set and the twine. I had previously hot foiled it on cream woodgrain cardstock and so it worked perfectly with the tag. The tag is large enough that in the future I can turn it into a card!
I hope you enjoyed learning how I made my mixed media tag. Thank you for stopping by and have a wonderful day!
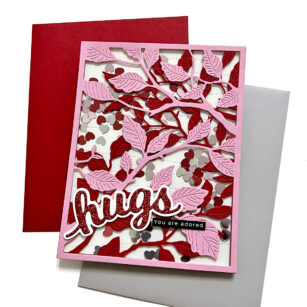
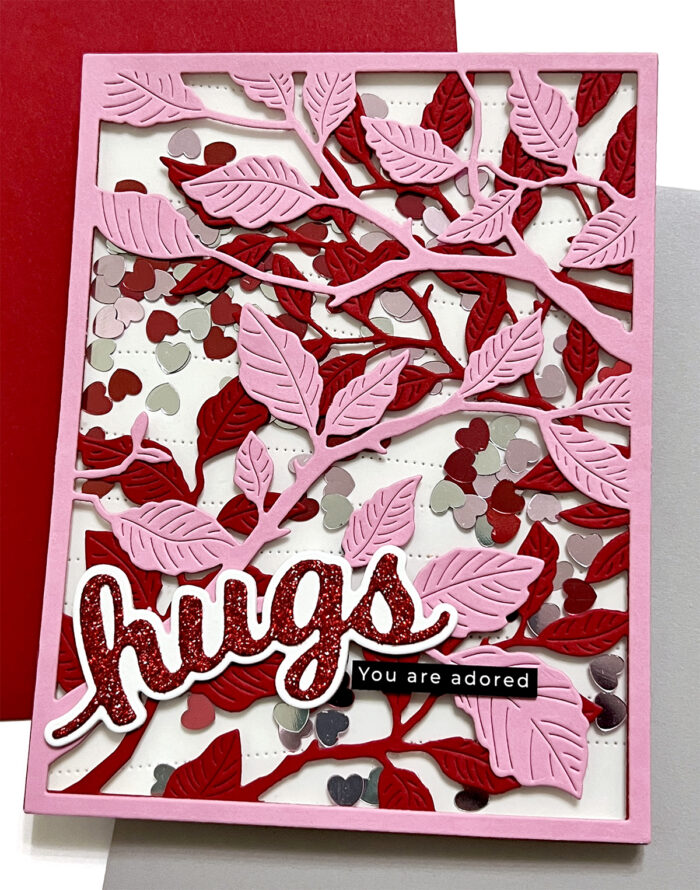
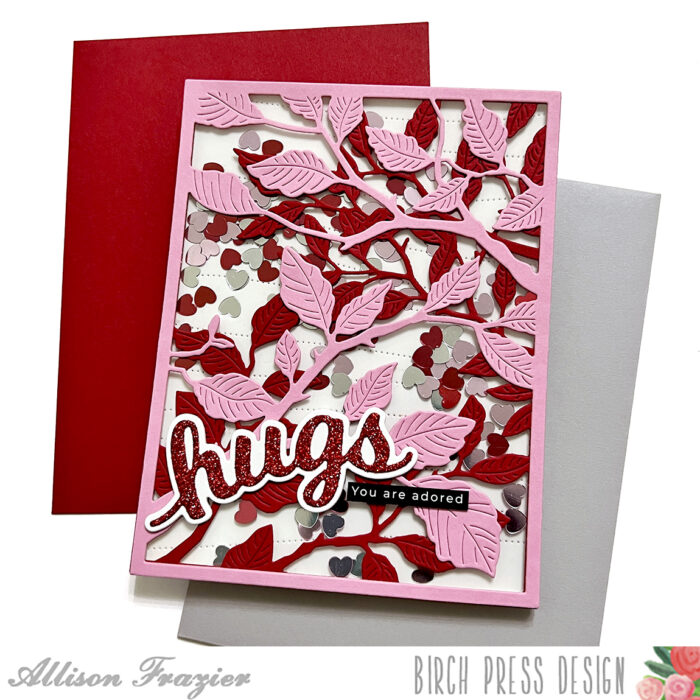
Hello, Birch Press friends. I am excited to be on the blog today sharing this fun shaker card. I have been wanting to make a shaker card with the Forest Canopy Layer Set for awhile. When I ran across this heart-shaped confetti in my stash recently, I knew that it was finally time!
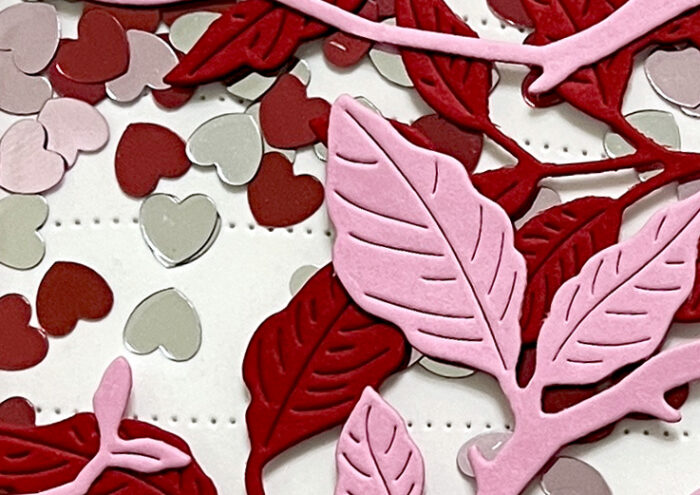
This shaker card was really quite easy to put together. I started by die cutting my back panel with the Pinpoint Contour Plate. I set that aside and proceeded to die cut my two Forest Canopy layers. I cut a piece of pink card stock with Layer B, and I cut a piece of red card stock with Layer C. I did not use Layer A.
I cut a piece of acetate to 4.25″x5.5″ and glued that to the back of the red layer. I trimmed the pieces off of the branches on the pink layer that hold berries, since I did not want to include berries on this card. I then glued the pink layer on top of the red layer.
I trimmed foam tape into thin strips so that I could hide them under the thin frame that is created by the Forest Canopy layers. The one piece of advice that I have for cutting your foam tape into thin strips is to have a good pair of scissors that have a non-stick coating. I placed these foam tape strips directly onto the acetate layer. I then put my heart shaped confetti into the “well” that is created by the foam tape. Since this confetti is completely flat, I did not need to double up my foam tape. Once my confetti was in, I peeled off the release tape and added my white back panel to seal up the shaker. I then glued this onto an A2 card base.
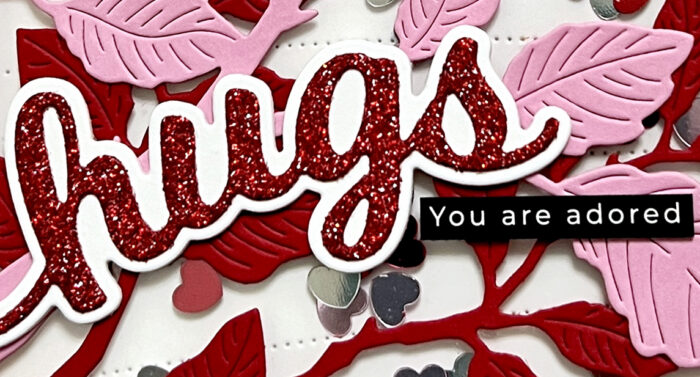
I used the Hugs Honey Script die set for my main sentiment. I cut the detail layer from red glitter card stock. To finish the card, I added a simple sub-sentiment strip from my stash. That’s it for my card today. I hope it brings a smile to your face. Take a look in your stash for dies to make a non-traditional shaker! Thank you so much for joining us today.
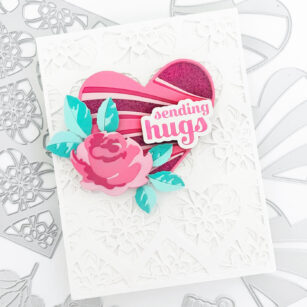
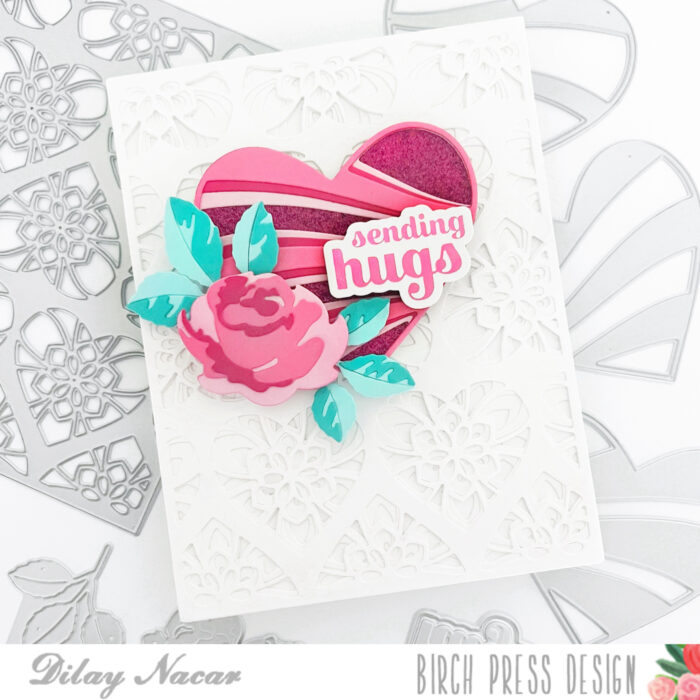
Hello and Happy Valentine’s Day, friends! Dilay here with you today, sharing a clean and simple yet intricate ‘sending hugs’ card. This card showcases the beautiful Banner Heart Layer Set, Kinsley Heart Layer Set, and Rose Bunch Contour Layer dies!
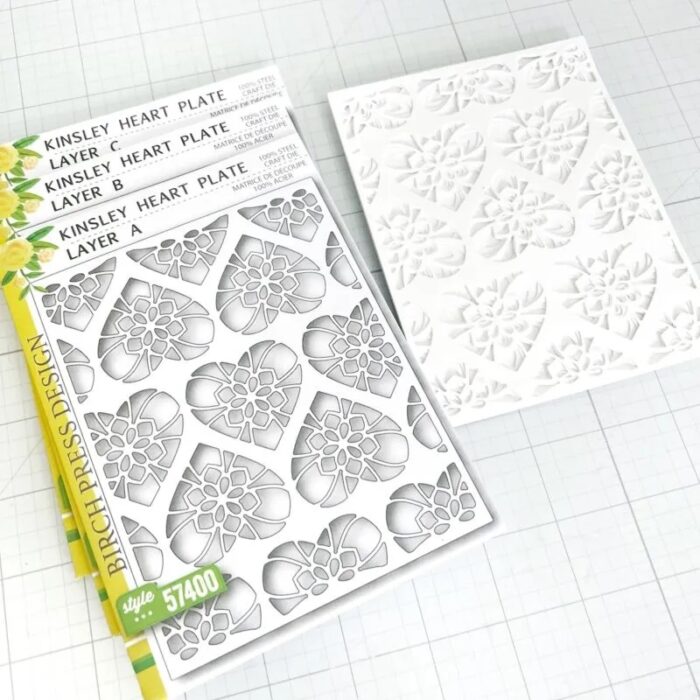
To begin, I created the background by die-cutting each piece of the Kinsley Heart Plate Layer Set (A, B, and C), adhering them together, and then onto a top-folding card base.
Following that, I cut the Banner Heart Layer Set from various shades of pink cardstock and pink glitter cardstock, then adhered the heart on top of the Kinsley Heart Layers.
Afterwards, I fashioned a single rose using the Rose Bunch Contour Layers in various pink and teal cardstock colors. I assembled the layers and placed the rose on top of the heart. To complete the look, I added a pink foiled sentiment from the Sugar Script Sentiments 1 Hot Foil Plate and Die Sets.
Hello Crafty Friends! I hope you had a great weekend! I am excited to be up on the blog today sharing a new release from Birch Press Designs with you – the beautiful Early Blossom Contour Layers die set! I love florals and these dies make it so easy to create with! So let’s get started!
I started by die cutting the florals using Hammermill white card stock. I then ink blended each of the layers using a combination of dye inks. Once all the inking was complete, I adhered each of the layers together using liquid glue.
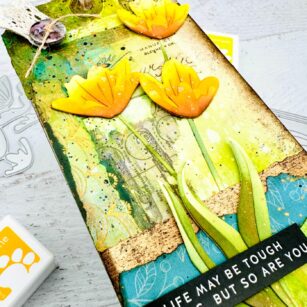
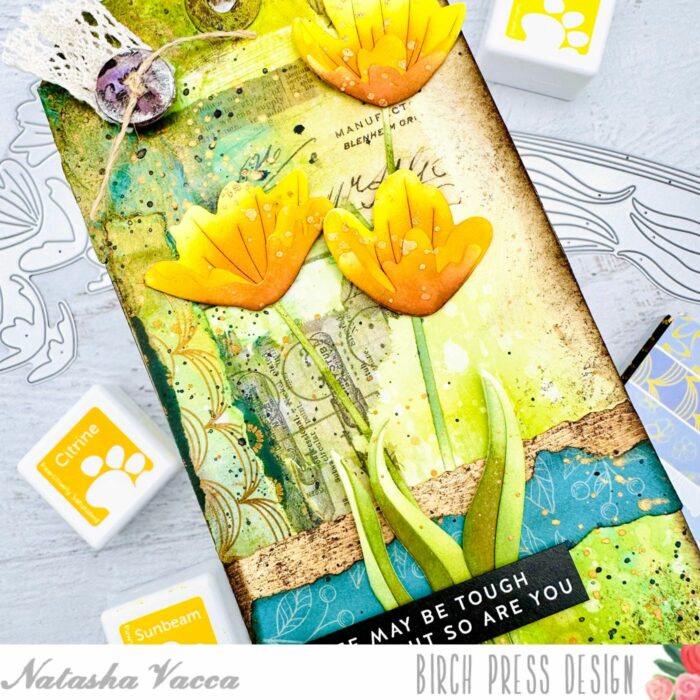
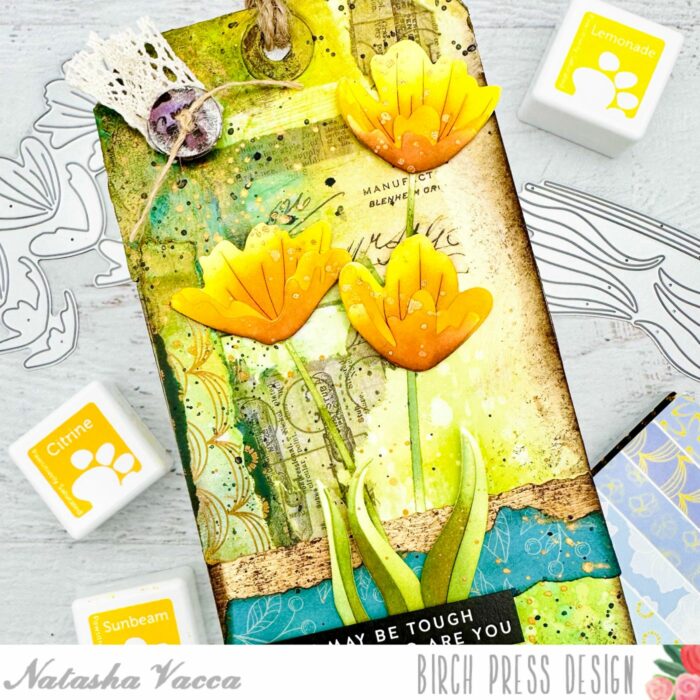
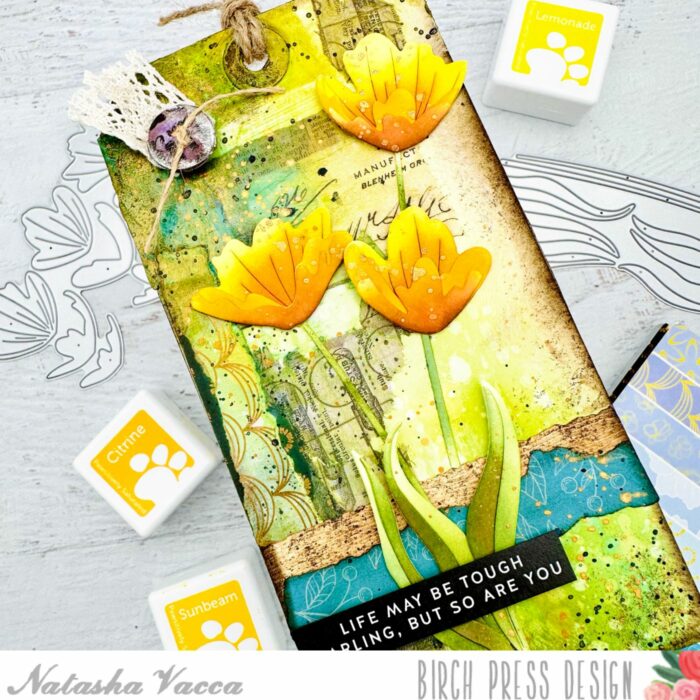
Next I started to work on the background tag for my floral die cuts. I started with a pre-made tag then added papers and collage paper to the tag. I used the Anemone Grove Paper pad, as well as collage paper from my stash. I ripped pieces of paper for a distress look, then adhered them with collage medium. I allowed this to dry, then inked up the background using Distress Oxide Inks. I used: Antique Linen, Pumice Stone, Peacocks Feathers, Vintage Photo, Walnut Stain, and Mustard Seed. I layered these on, as well as splattered with water droplets for added texture.
Next I added Translucent Crackle Paint to sections of the tag, allowed this to dry, then applied Distress Crayons over the top of the crackle paint. I also added some paper glaze to sections for added texture. I then added splatters to the tag using black and gold. I then adhered all the layers together using liquid glue and foam tape. The wood grain paper paper in the center of the tag is from Memory Box and it is in the color cream. I applied ink and sponging to the paper for added texture.
I chose a pre-made sentiment from my stash and adhered this to my tag as well. I darkened the edges of the tag using Distress Ink in Ground Espresso using a blending tool, as well as additional texture using a sea sponge. The tag was completed with twine for the top, as well as lace and a button.
I had a lot of fun putting this together! I encourage you to use your pattern paper in new ways to add texture to your card bases and backgrounds too! Thanks so much for stopping by today! I will be back soon!
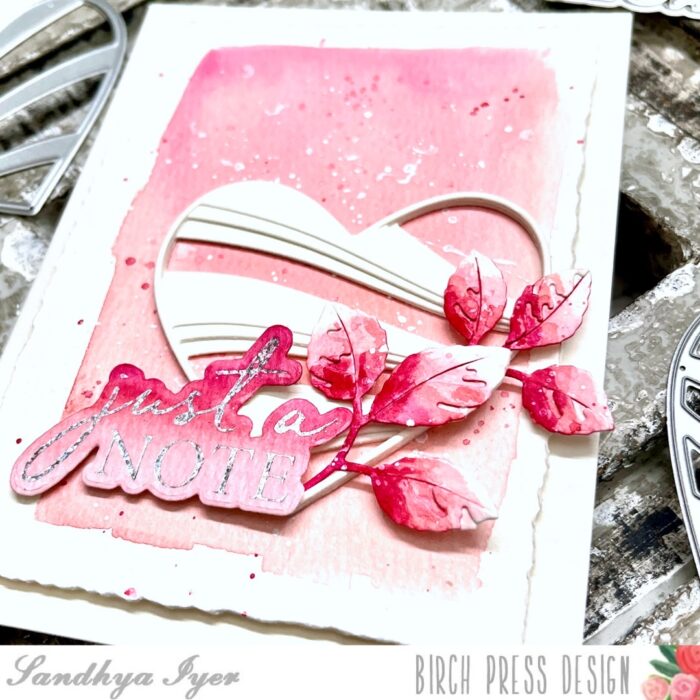
Hello, friends! This is Design Team member Sandhya Iyer here today and I’m excited to share a card along the Valentine’s Day theme. I used the Banner Heart Layering die set to create my focal point and added leaves from the Dainty Rose and Leaves Contour Layers. The sentiment is a gorgeous hot foil plate and die set called Just a Note noted script.
I started by die-cutting multiples of all 3 layers of the Banner Heart Die set out of Arteza watercolor paper. Next, I trimmed a watercolor panel using a deckled edge trimmer and watercolored my background. I let it dry and added pink and white gouache splatters.
Then, I die cut the leaves and assembled the layers. I watercolored the leaves with pinks and also added the same ombre painting to a piece of watercolor paper. Next, I used the foil plate to add the sentiment to the watercolored watercolor paper. I die-cut the foiled sentiment and assembled the card panel with the heart, leaves and the sentiment.
Finally, I added the panel to a watercolor card base to complete my card. This brings us to the end of today’s post. Thank you so much for stopping by and I hope you have fun crafting today!
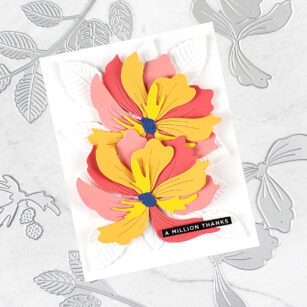
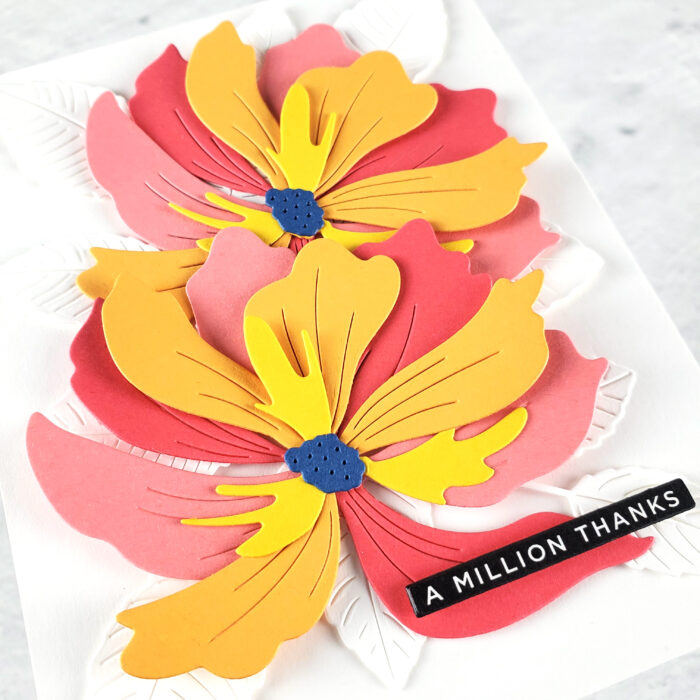
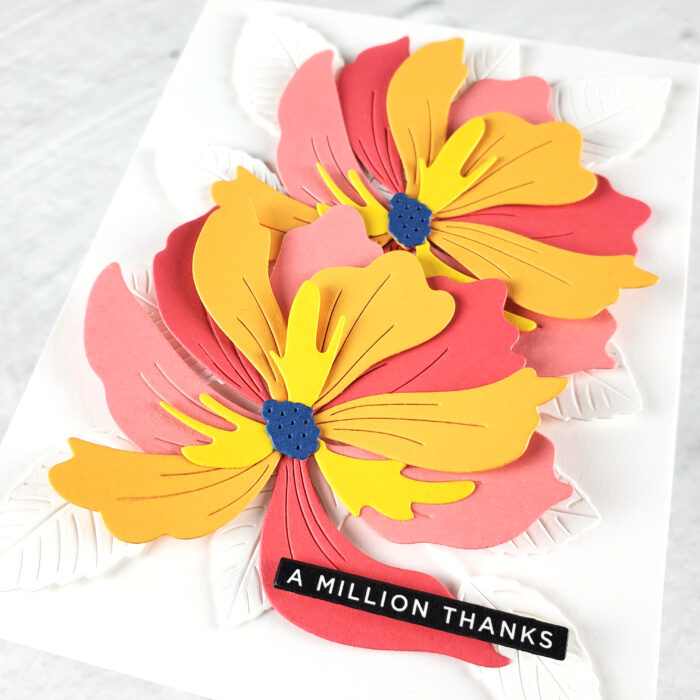
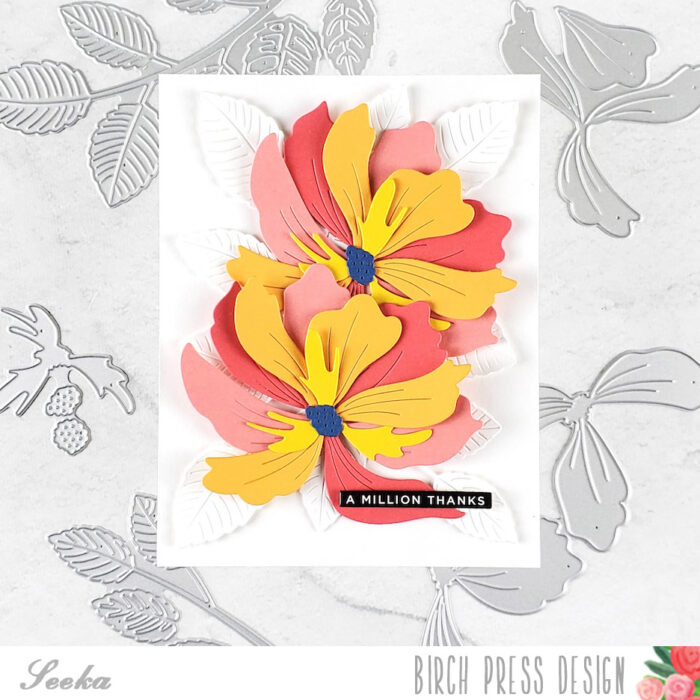
Hello and welcome! Seeka here and today I’m sharing bright and bold card featuring the Large Cosmos Contour Layers die set and the Rose Leaves Contour Layers die set.
I started off by die cutting the four layers of petals from a variety of pink, peach, and yellow cardstocks and the flower center from blue cardstock. I cut each layer twice so I could make two big blooms. I glued the layers together and then I used the Rose Leaves die set to cut several leafy stems from white cardstock.
To assemble the card, I used foam tape to adhere the blooms to a 4.25″ x 5.5″ panel of white cardstock. Next, I tucked the leaves under the blooms and used glue and foam tape to hold them in place. I added a small sentiment from my stash and finished by gluing the card front to a card base.