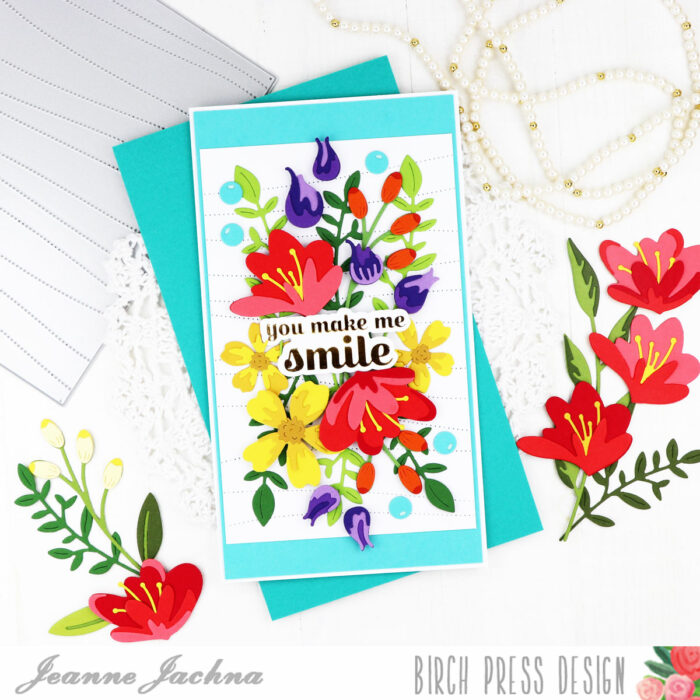
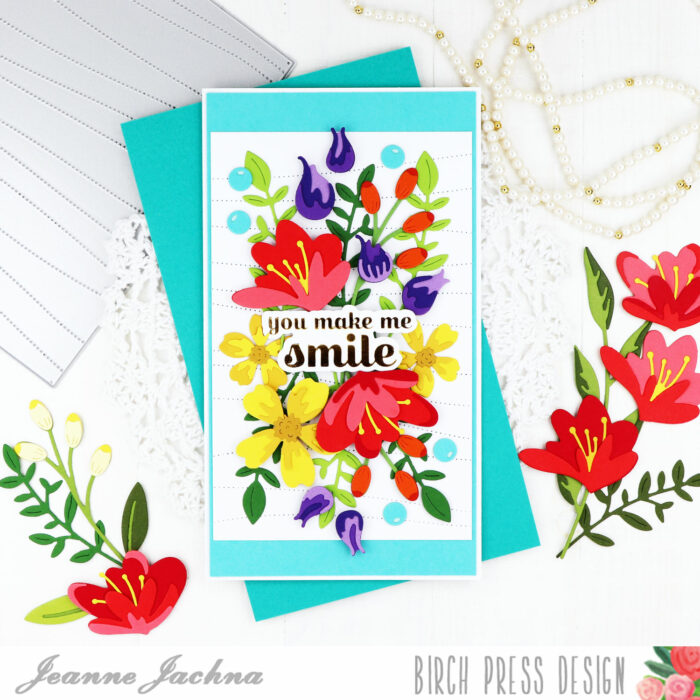
Hi friends! I hope you’re having a great day! Today I’m sharing a slimline card made with beautiful Birch Press Design Florals!
Flowers are my favorite and when they’re bright and bold I just can’t resist – like a little bee and think to myself… MORE PLEASE!!!
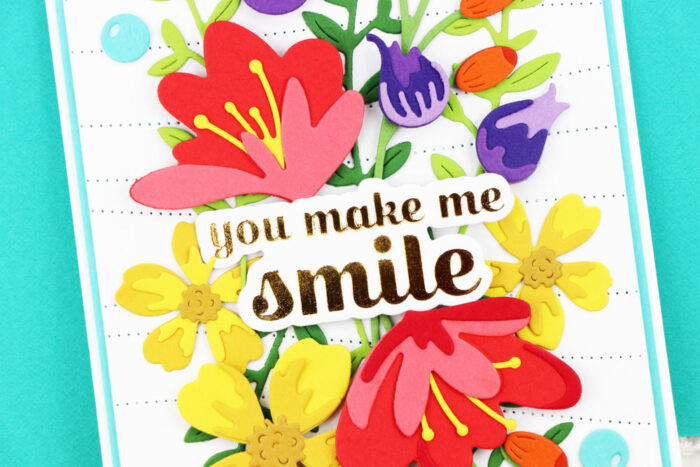
To get more from my panel dies I like to think of different uses for them. One example would be adding a texture pattern to another die cut – perhaps some alphabet letters. Just because the die is made for an A2 card doesn’t mean that you have to stick with that size. I trimmed the Pinpoint Contour Plate die cut panel to 3 1/2″ and layered it over a 3 5/8 X 6 1/2″ aqua panel to make a longer slimline card.
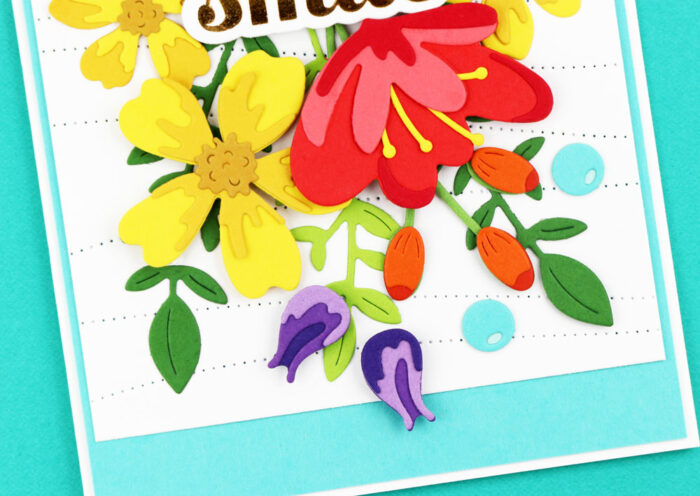
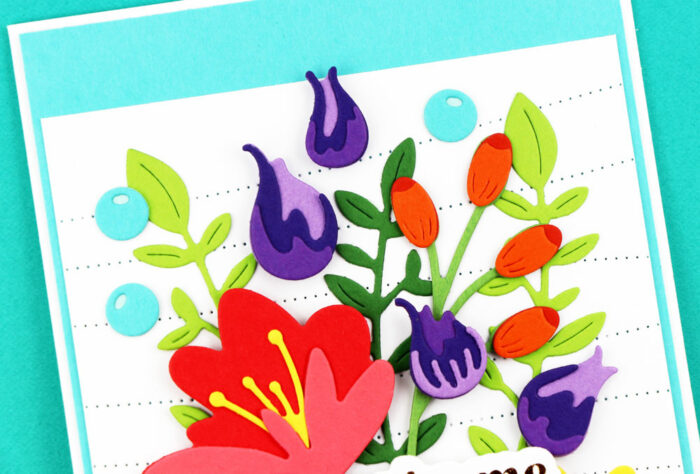
I added the gold foil sentiment to the center of the card with adhesive foam tape so it’s raised. Next I tucked in various shades of green foliage adhered flat to the card. The florals are all adhered with adhesive foam tape. I used berries as accents to coordinate with the blue background panel.
These gorgeous florals look amazing cut from any of your favorite shades – I made a whole bunch so all I have to do is arrange them and add a sentiment. They’re a great addition to your stash!
Finished size: 6 5/8 x 3 3/4″
Supplies
57511 Pinpoint Contour Plate
57507 Phlox Blooms and Leaves Contour Layers
57502 Jovial Blooms and Leaves Contour Layers
57503 Sylvan Berries and Leaves Contour Layers
57492 Delicate Floral Buds Contour Layers
57527 Mixed Berry Contour Layers
bpf503 Sugar Script Sentiments 1 Hot Foil Plate and Die Sets
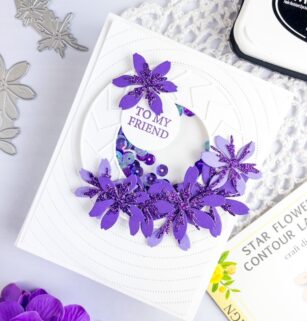
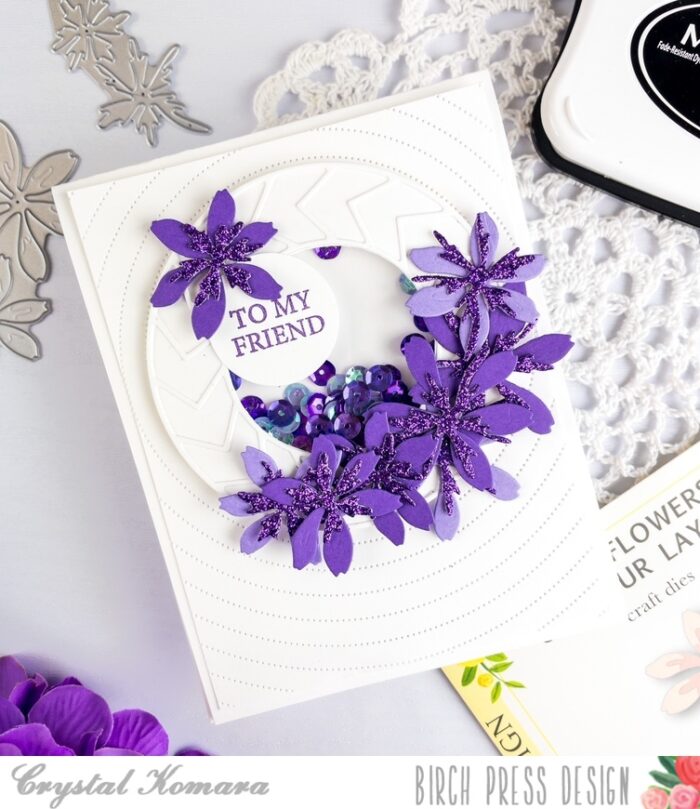
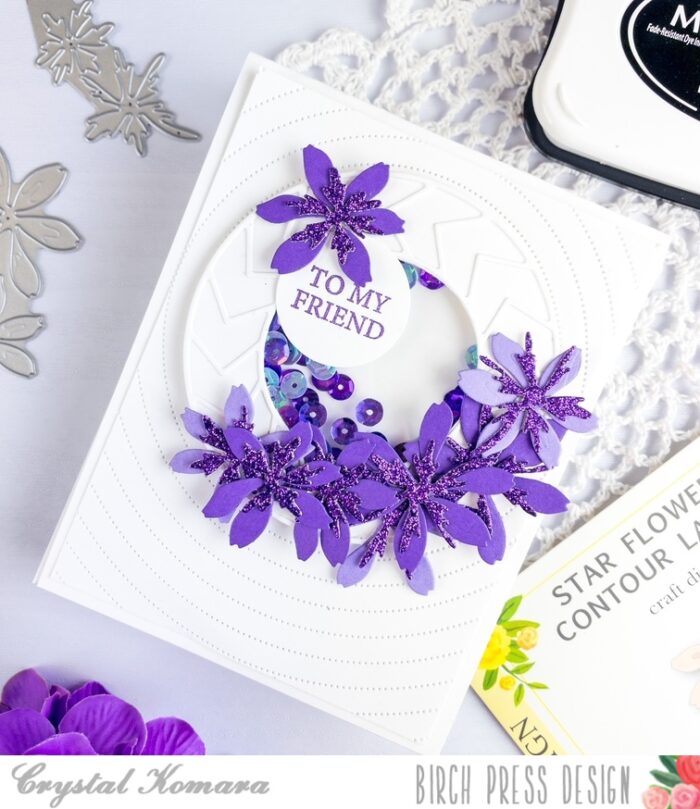
Hello readers and happy Wednesday! This is Design Team member Crystal Komara here today sharing one of my favorite (and seemingly easiest) interactive cards to make – a shaker card! I made this card very monochromatic in purple and white, but if purple really isn’t your color, there are endless possibilities and color combinations you could use instead with these beautiful Star Flowers Contour dies.
Card details:
The base of this A2 sized card is made from 80 lb. Neenah Solar White Smooth cardstock. For the background, I cut a 5 1/4″ x 4″ piece of the same Neenah White cardstock and ran it through my Big Shot using the Pinpoint Radial Plate.
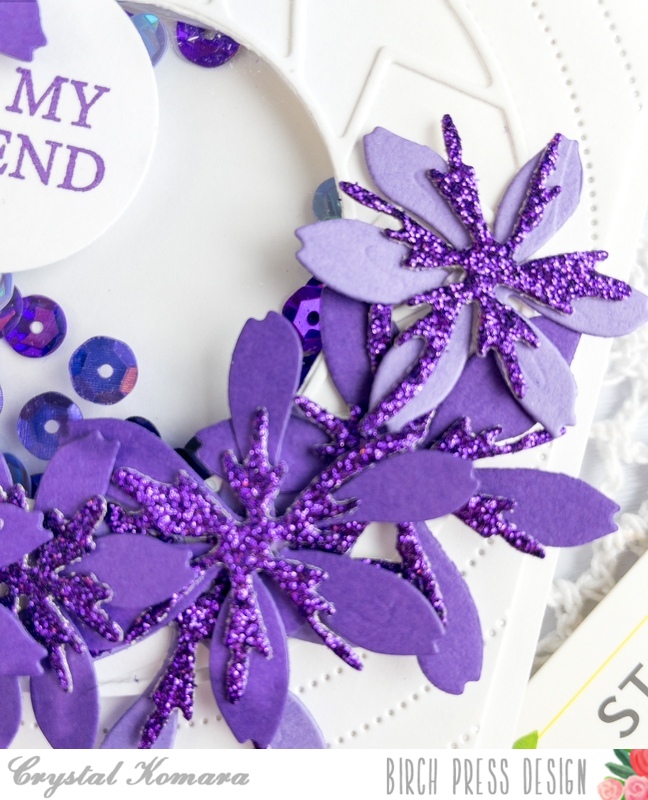
Using the Star Flowers Contour Dies, I cut the flowers from two different colored purple cardstock and one purple glitter cardstock (for the center of the flowers). I adhered the layers of the flowers together with a fine-tip liquid glue.
To create the shaker component, I die cut Layer A of the Roundabout Layer Set from white cardstock. I then fussy cut a solid white background of this same shape to create a white frame. I adhered a piece of clear acetate to the back of this frame. I added about 1 tablespoon of sequins to the card and then layered the shaker frame on top.
I stamped the sentiment “to my friend” in purple ink on white cardstock and used a circle punch to punch it out. This sentiment is from the Kind Hearts clear stamp set.
I love a card that can be made so easy to change simply by alternating the colors or the sentiments. Thanks for visiting and have a wonderfully creative day!
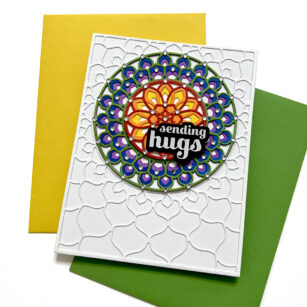
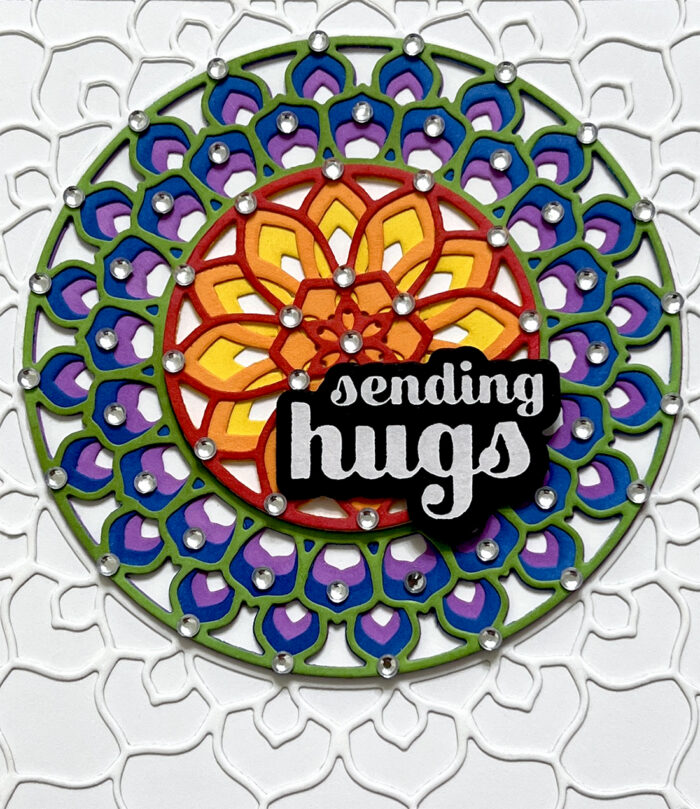
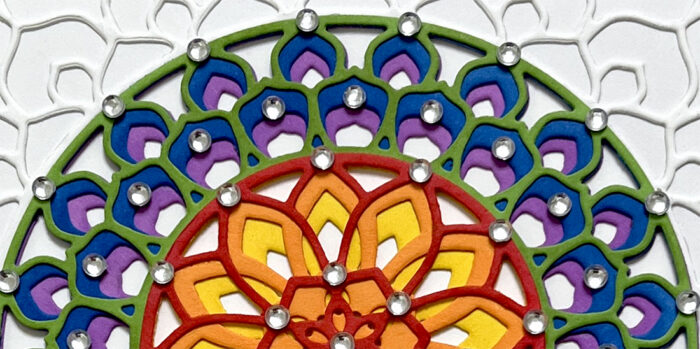
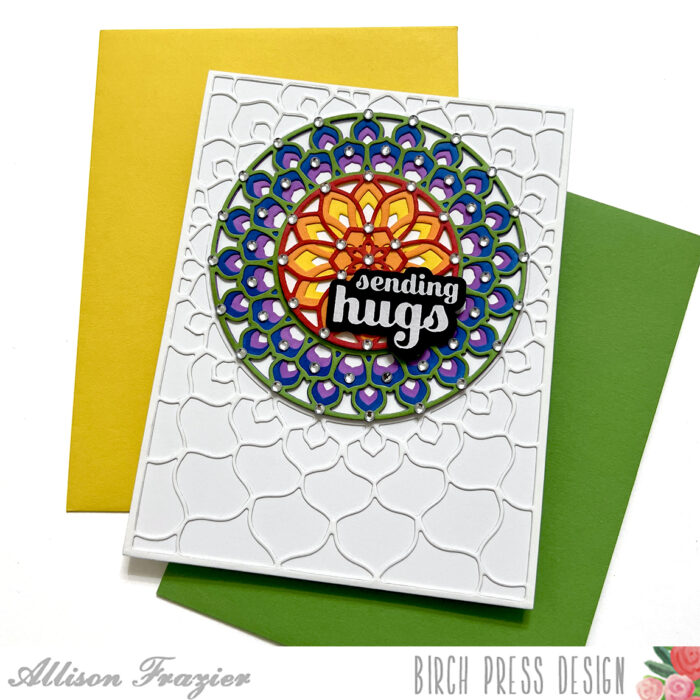
Hello, Birch Press friends! Today, I am sharing this rainbow inspired card featuring the Epiphany Plate Layer Set. This is the second post in a row where I have reached for one of my layering background sets. Layering sets never get old for me because there is an infinite number of color combinations. This especially applies to the Epiphany set, since there are essentially three different elements on the card, each having three layers.
First thing’s first with a layering die set – cut all of the layers! Since there are three plates to the Epiphany set, each cutting out three different elements, I chose to just use each plate once to cut a panel of white card stock. For the large outer layer, I only used the piece that I cut from the A plate. I adhered that to a white A2 card base.
For the outer circle and the inner circle, I ink blended my white die cuts. For the outer circle pieces, I used green for Layer A, blue for Layer B, and purple for Layer C. For the inner circle, I used red for Layer A, orange for Layer B, and yellow for Layer C. I used circle dies to cut a white back for both of these layers. Once I had adhered the three layers together with glue, I adhered each element to its corresponding white circle background. I glued the outer circle to the card. Before adhering the inner circle to the card, I popped it up on foam tape to create some dimension.
For my sentiment, I used the “sending hugs” from the Sugar Script Sentiments 1 Hot Foil Plate and Die Set. I hot foiled the sentiment onto black card stock using white opaque foil. This is my new favorite foil! Before adhering the sentiment to the card, I added clear fairy jewels around the die cuts to highlight the design. I made sure not to place any jewels in spots that would interfere with the sentiment. I had so much fun making this card. There is something very satisfying about adding all those jewels!
Thank you so much for joining us today. I hope this card inspires you and brings a smile to your face!
Hello Birch Press Friends, I am super excited to be back up on the Birch Press Designs blog today! Today’s card features a few floral dies from the latest collection. I had a lot of fun creating today’s card, so let’s get started!
For today’s card I started with 4 die collections and 2 pads of colored card stock from Memory Box. I am using the Phlox Blooms and Leaves Contour Layers, Mixed Berry Contour Layers, Delicate Floral Buds Contour Layers, and the Sylvan Berries and Leaves Contour Layers. I used 2 pads from Memory Box: Berry Red and Lush Green. I love these pads of paper! The colors are amazing and they die cut beautifully and they are super easy to add ink blending on top as well! From each of the die sets listed above I die cut the leaves and stems using 2 shades of green paper from the Lush Green pad. Then for the floral dies (shared above) I used 2 shades of pink from the Berry Red paper pad.
After my leaves and florals were all die cut I laid them out on my ink blending mat. For the green die cuts I used a combination of a light and green dye ink. On the pink layers I used a combination of dark pink and a purple dye ink. Once all the inking was completed I added water droplets to add a bit more texture to each piece. I added the water droplets, then picked up the color with a paper towel.
I set each piece aside and allowed them to dry. Once dry I adhered the leaves and floral layers together with liquid glue. I then added metallic gold splatters to the flowers. I allowed these to dry.
Next I chose a background from my gelli print stash. I trimmed the gelli print panel down, then adhered this to a piece of cream colored cardstock and adhered this to an A2 card base. I then worked on the arrangement for the flowers, stems, and leaves. Once I was happy with the layout I adhered all the layers down using liquid glue and foam tape onto the gelli print background.
To complete my card I chose to use the foiled sentiment Just a Note from the Sugar Scripts Sentiments 1 die set. I foiled the sentiment then adhered this to my card front using foam adhesive. Finally I added a few Fairy Drops to finish my card.
I had a lot of fun creating today’s card! I hope you like it! I will be back soon to share more crafty inspiration!
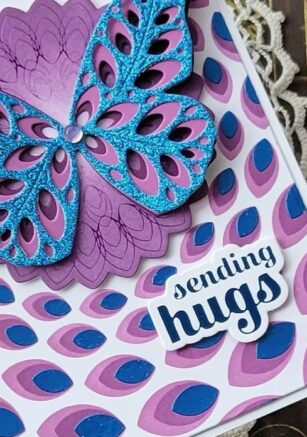
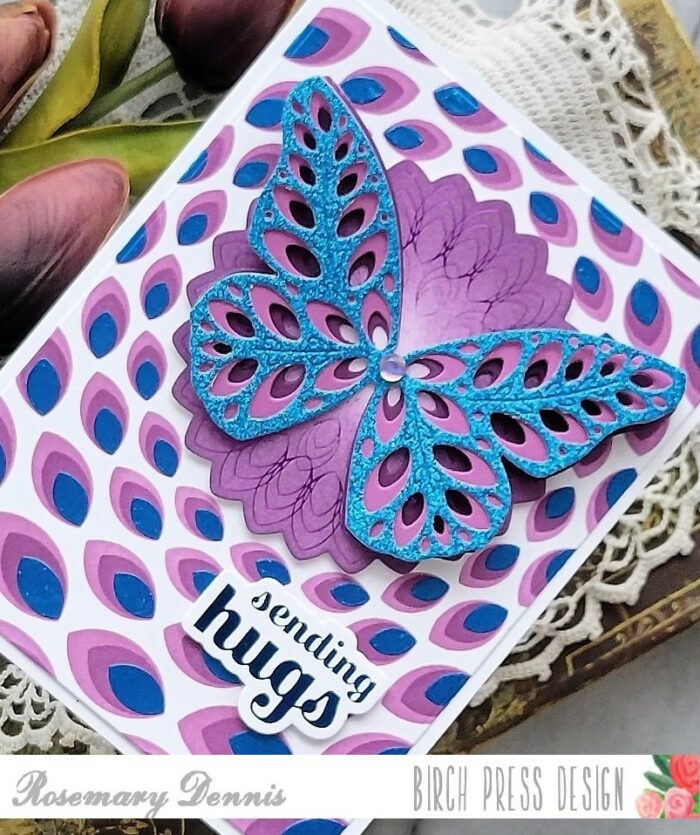
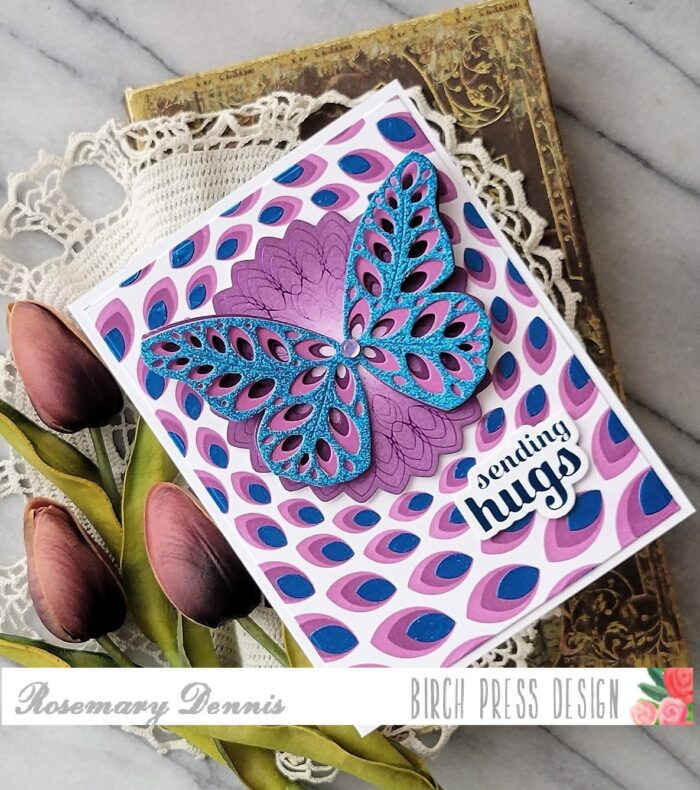
Happy Friday everyone! I have a bold jewel toned card to share with you today. Let’s take a look.
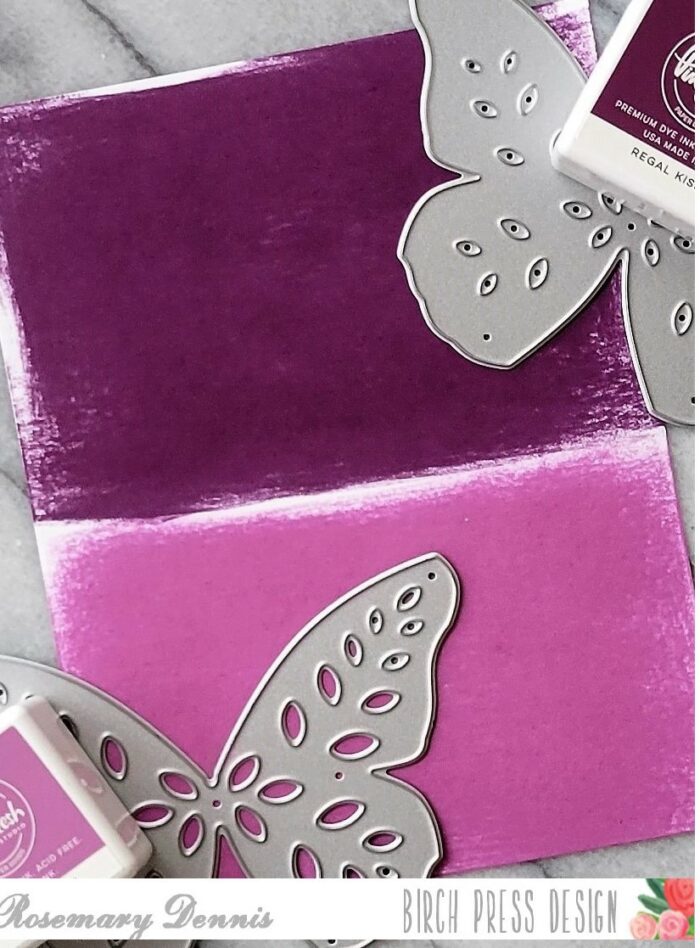
I love the new Gilded Petalpoint stencil set. You can use it in combination with the Gilded Petalpoint hot foil plate or by itself like I did on my card. I decided to go with a bolder color palette for this card and chose shades of purple with a pop of blue.
I don’t often make the decision to use the color purple, but it is so pretty in combination with the blue. I inked up the first stencil with a medium shade of purple and then started to blend on a slightly darker shade, but it wasn’t showing up so I switched to the darkest shade of purple I had. With the third stencil I used a bold blue embossing paste. It has a little bit of shine to it in real life.
Once the stenciling was done I set the piece aside to dry. Thankfully even with the addition of the embossing paste there wasn’t much warping of my cardstock. After the piece dried I trimmed it down to fit my card front. I then moved on to doing a little bit of hot foiling. I used the medallion from the Gilded Pinpoint hot foil plate set and the sending hugs sentiment from the Sugar Script Sentiments 1 hot foil plate for these elements. The medallion was foiled using purple foil and the sentiment using dark blue. I used the darkest purple ink and blended it on the medallion after I die cut it with the matching die.
Now it was time to create my butterfly using the Eloquent Butterfly layering die set. I die cut the top butterfly from a dark blue glitter paper from the Memory Box Glitz Glitter pad. To make sure that everything matched I used the inks that I used for the stencil to ink up some white cardstock. I used the direct to paper method in order to get good saturation of the cardstock. I let the cardstock dry and then die cut the second and third layers. I adhered the layers together with a dot of glue in the center of the butterfly. I then layered the medallion on to the main panel, added the butterfly and the sentiment. I finished off the card with a purple-blue Fairy Jewel to the center of the butterfly.
I hope you enjoyed my project today. Thanks for stopping by and have a lovely day!
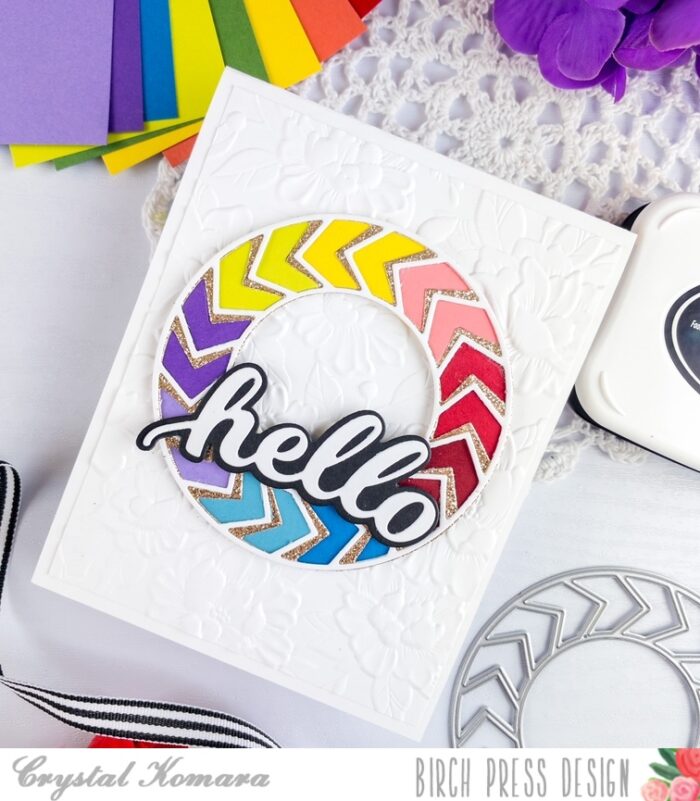
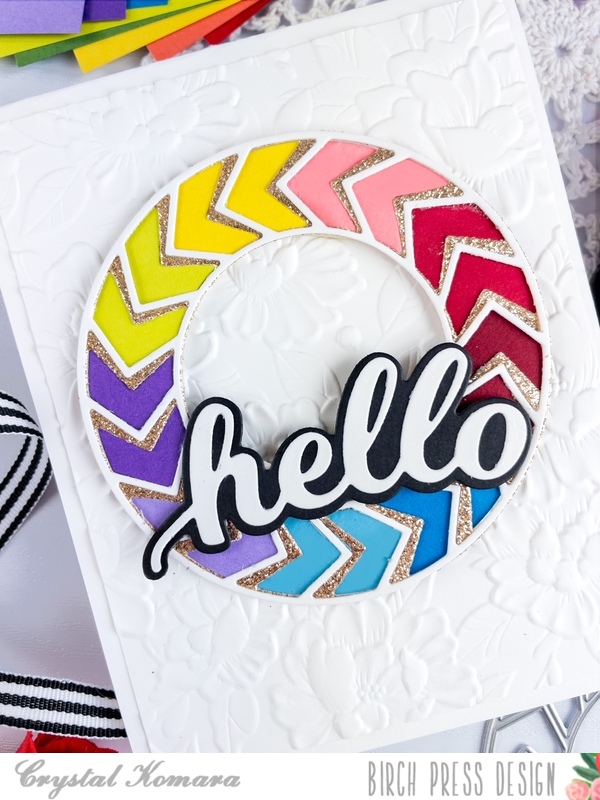
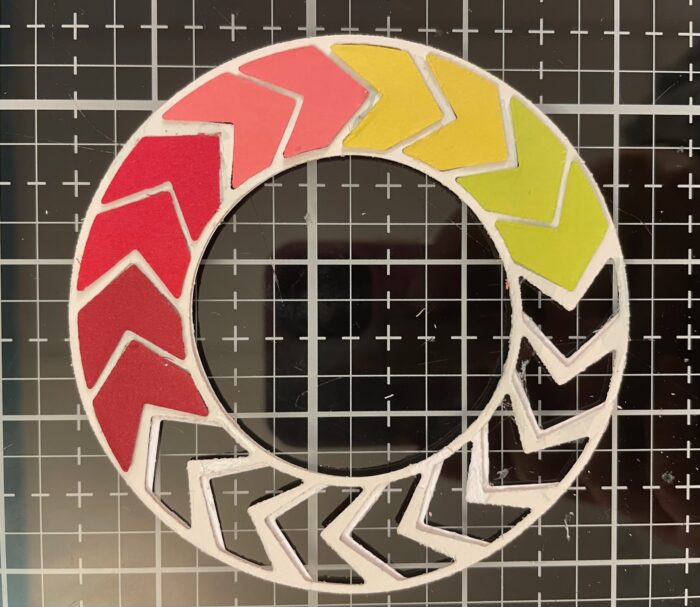
Hello readers! This is Birch Press Design Team member Crystal Komara here with you today sharing some rainbow inspiration using the Roundabout Layer Set. I love creating rainbow colored cards, I just find them so cheerful and uplifting!
Card details:
The base of this A2 sized card is made from 80 lb. Neenah White Solar Smooth cardstock. Using the same Neenah white cardstock, I cut a 5 1/4″ x 4″ piece and ran it through my Big Shot using the Blooming 3D embossing folder from Memory Box Co. (a sister company of Birch Press Design).
Continue reading below to see how I created and assembled the rainbow roundabout itself, it was a little bit tricky!
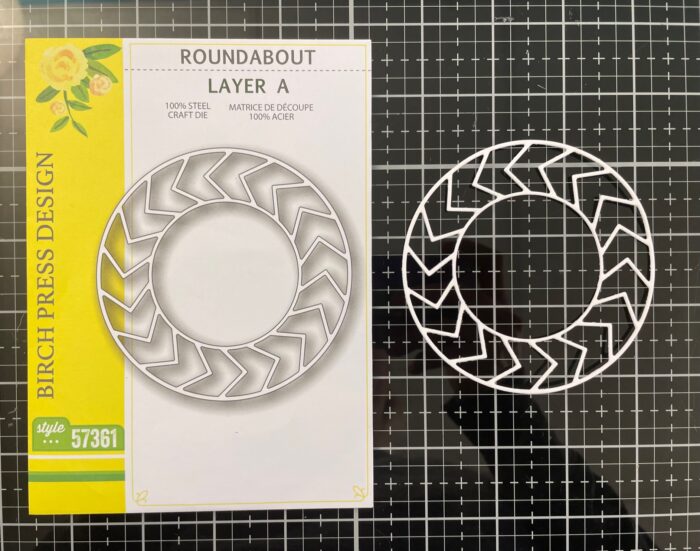
Step 1: Die cut Layer A of the Roundabout Layer Set from white cardstock.
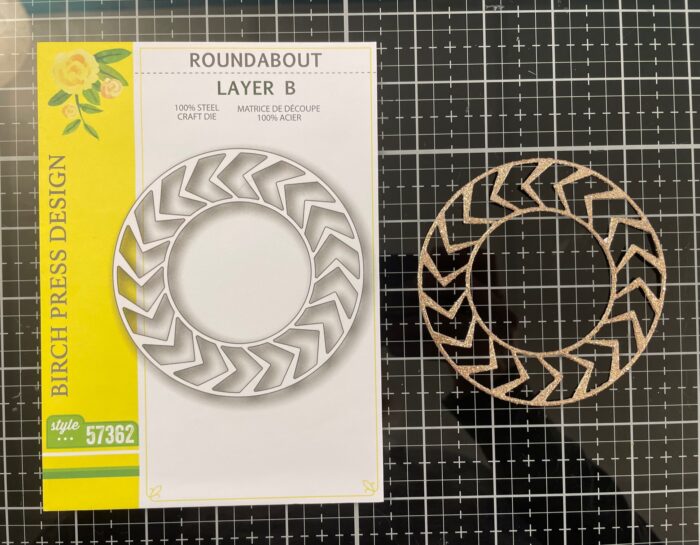
Step 2: Die cut Layer B of the Roundabout Layer Set from gold glitter cardstock.
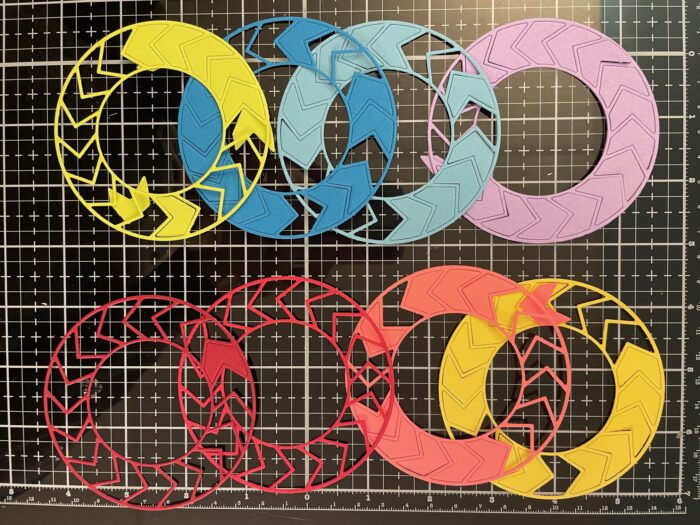
Step 3: Die Cut Layer A from the Roundabout Layer Set from all the colors of the rainbow – ROYGBIV. Red, orange, yellow, green, blue, indigo and violet.
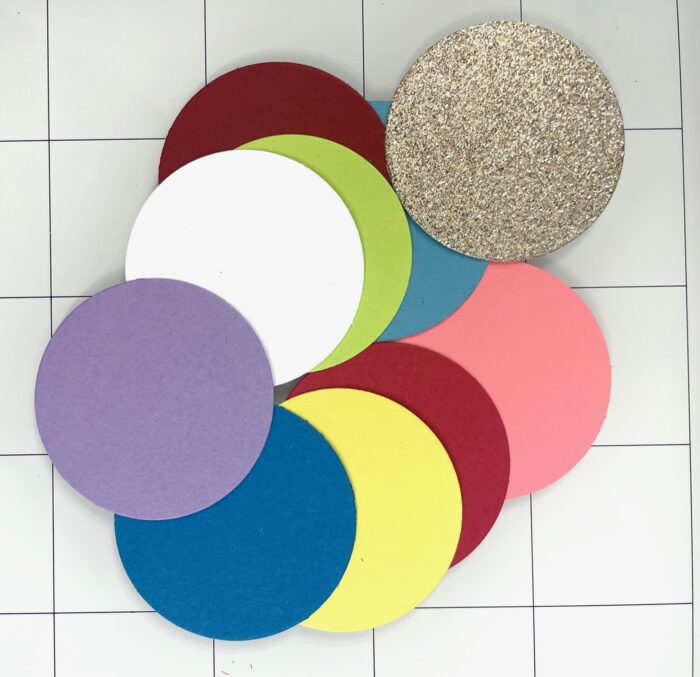
Step 4: Save the large solid circles for another card!
Step 5: Adhere Layer A (white cardstock) over Layer B (gold glitter cardstock) using a fine-tip liquid glue.
Step 6: Piece all the little shapes back into the die in a rainbow array.
I then adhered 3M foam adhesive to the back of the roundabout and adhered it to the center of the card.
Using the Hello Honey Script word die, I die cut the back shadow layer from black cardstock and the thinner top outline from white cardstock. I adhered both layers together with a fine-tip liquid glue and then adhered the entire sentiment to the card using 3M foam adhesive for added dimension.
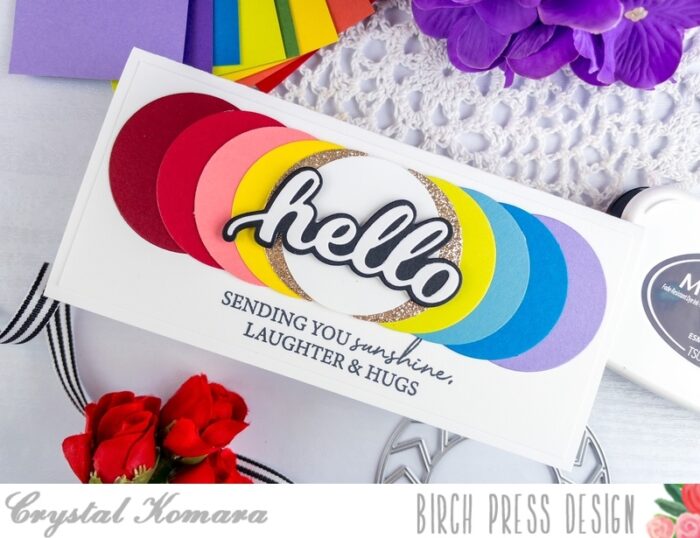
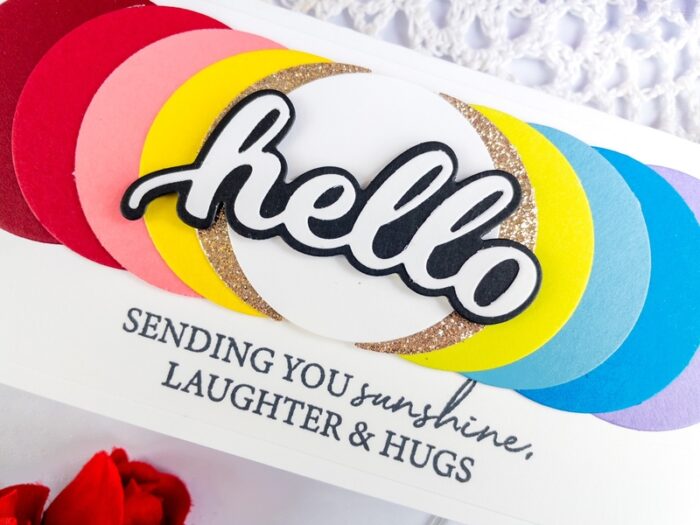
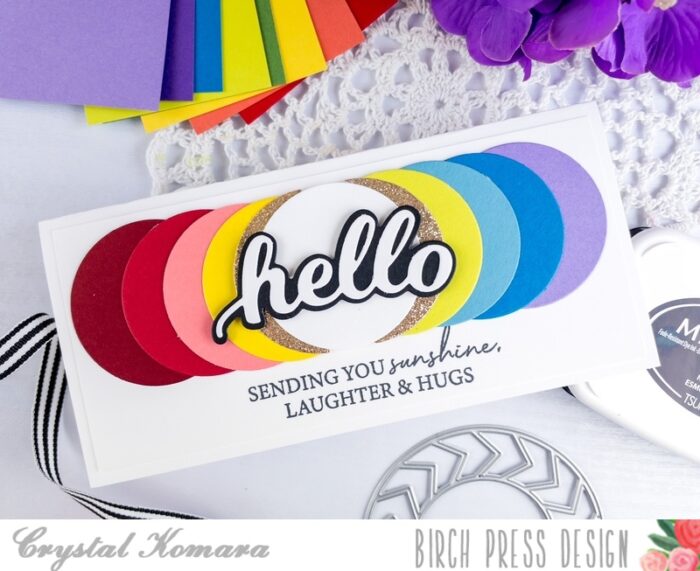
I also created a second card using the leftover solid circles that were die cut from the Roundabout Layer Set.
This mini slimline card measures 6 1’2″ x 3″. Honestly, I made up my own dimensions on this card, so don’t take these measurements as being any sort of a “professional” size! I placed all the die cut circles leftover from the Roundabout Layer Set in a rainbow array horizontally across the card. I stamped the sentiment “sending you sunshine, laughter and hugs” in Memento Tuxedo Black ink. This sentiment is from the Kind Hearts clear stamp set.
Using the same Hello Honey Script word die, I die cut the back shadow layer from black cardstock and the thinner top outline from white cardstock. I adhered both layers together with a fine-tip liquid glue and then adhered the entire sentiment to the card using 3M foam adhesive for added dimension.
I hope you have enjoyed these two very colorful ways to use the Roundabout Layer Set. Thanks for visiting and have a wonderfully creative day!
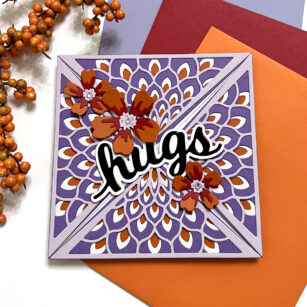
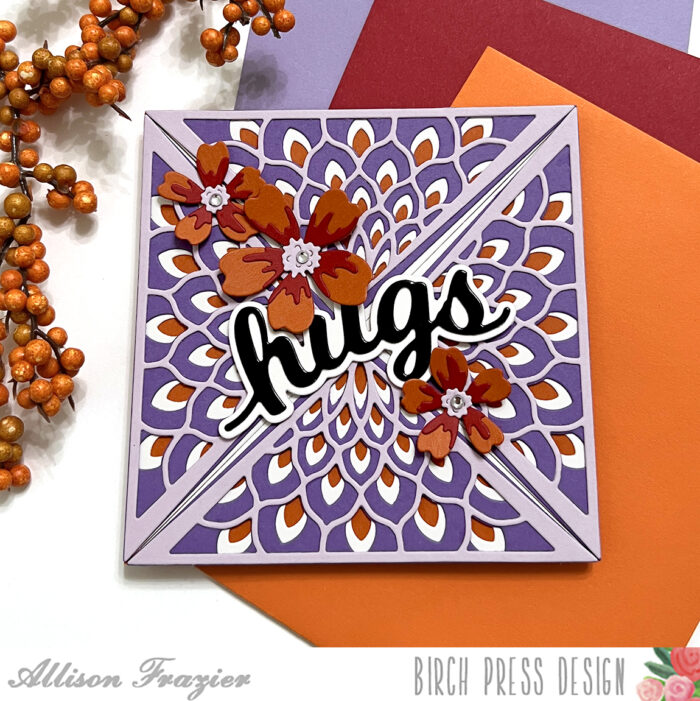
Hello, Birch Press friends! Today, I am sharing this colorful card featuring the Petal Triangle Layer Set. This color palette is something I have been wanting to try for awhile, but I was a bit apprehensive. I decided that a layering die set would be the perfect way to try it out. And, I’m really happy with the results!
The first step was to cut all of the triangles. There are 3 layers and four total triangles, so that is a total of 12 triangles to cut out. I used white card stock for Layer C, purple card stock for Layer B, and lavender card stock for Layer A. I then glued the three layers of each triangle together with liquid glue. I mounted the finished triangles onto a 4.25″ square card base that I had made from a dark orange card stock.
Next, I created three flowers using the Phlox Blooms and Leaves Contour Layers Set. I used the same orange color to create the base of the flower. I cut the detail pieces out of a deep red card stock. The small center pieces were cut from the lavender card stock. I adhered all of those together and set them aside for final assembly.
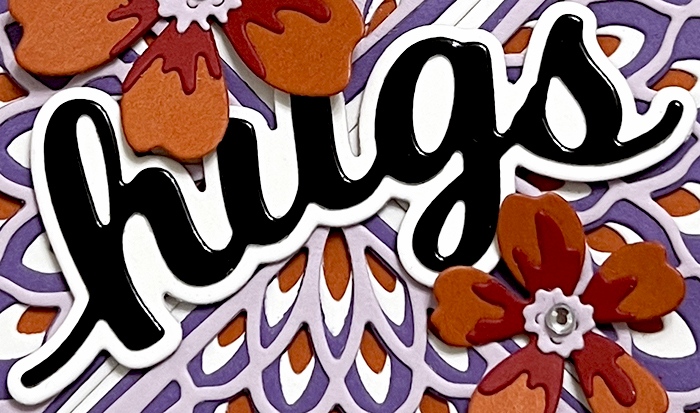
I used the Hugs Honey Script Die for my sentiment. I used two layers of white card stock for my shadow layer. I cut the main layer from black glossy card stock. I adhered the sentiment to the center of my card panel. Finally, I arranged the flowers around the sentiment and added a clear fairy jewel to the center of each flower.
Thank you so much for joining us today. I hope this card inspires you and brings a smile to your face!
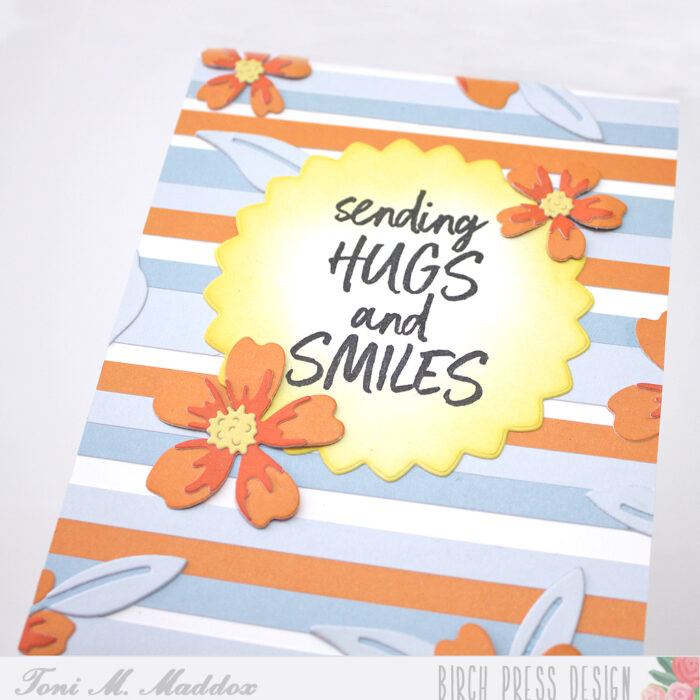
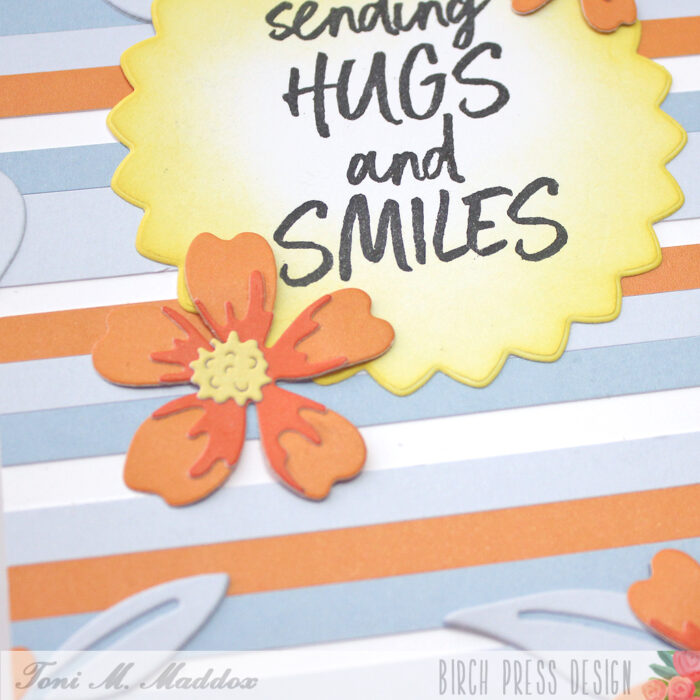
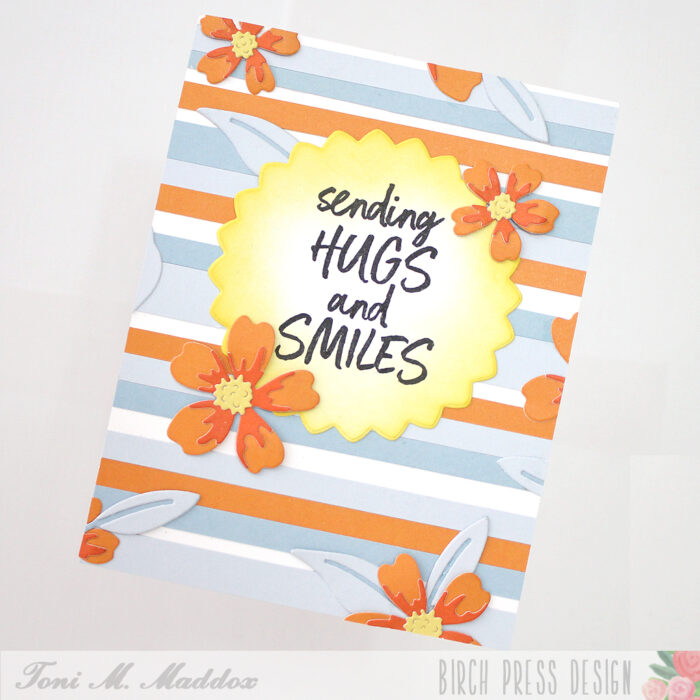
Hello, Birch Press fans! Toni here with you today sharing a card that just makes me happy–I love the colors and the blossoms. So pretty!
I cut out randomly size strips of Memory Box Sunny Orange and Stormy Blue 6×6 cardstock which I adhered to the card base, leaving empty areas so the white base acted as another color strip.
I used the die that comes with the Gilded Petalpoint Hot Foil Plate to cut out a “sun” which I sponged with Distress Oxide Mustard Seed. I stamped one of the Brush Sentiments on top of that in Versafine Clair Nocturne.
I cut out the Phlox Blooms and Leaves Contour Layers using the same cardstock, then adhered them randomly over the card front, nestling them in and around the sun. Easy, peasy!
I hope you enjoyed today’s card and have a great rest of your week!
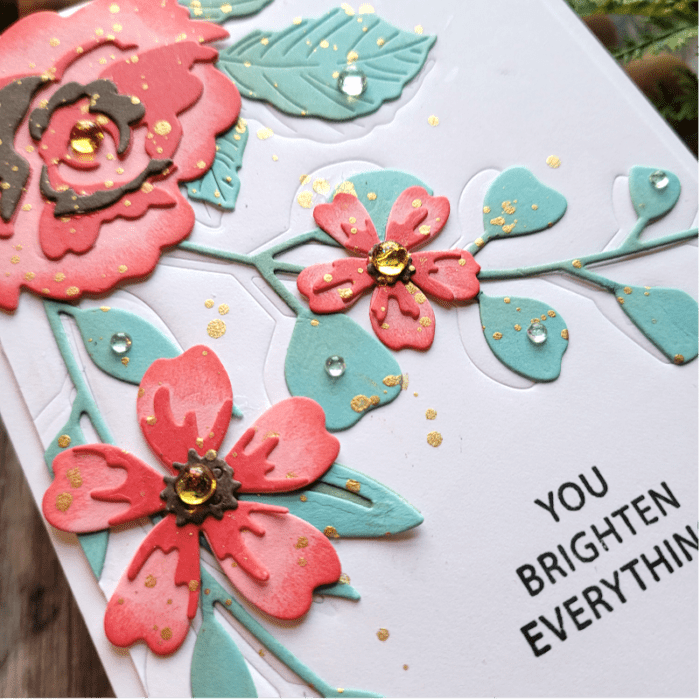
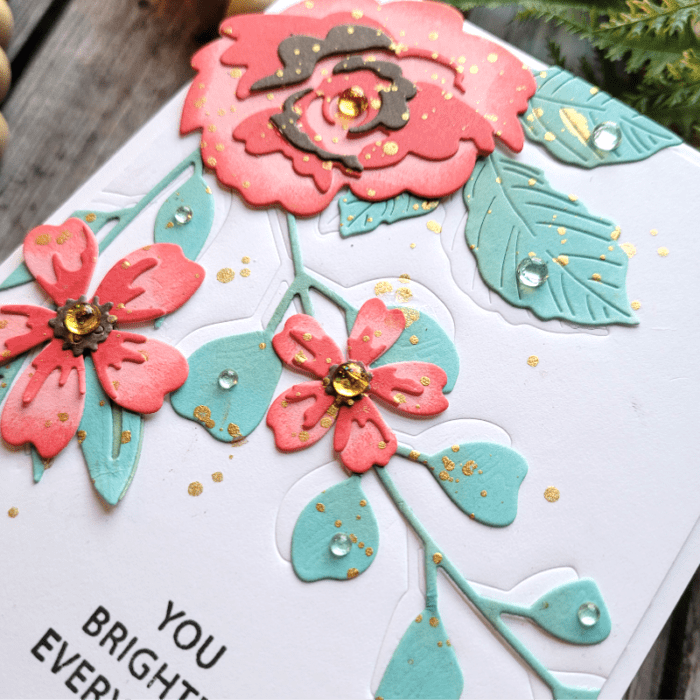
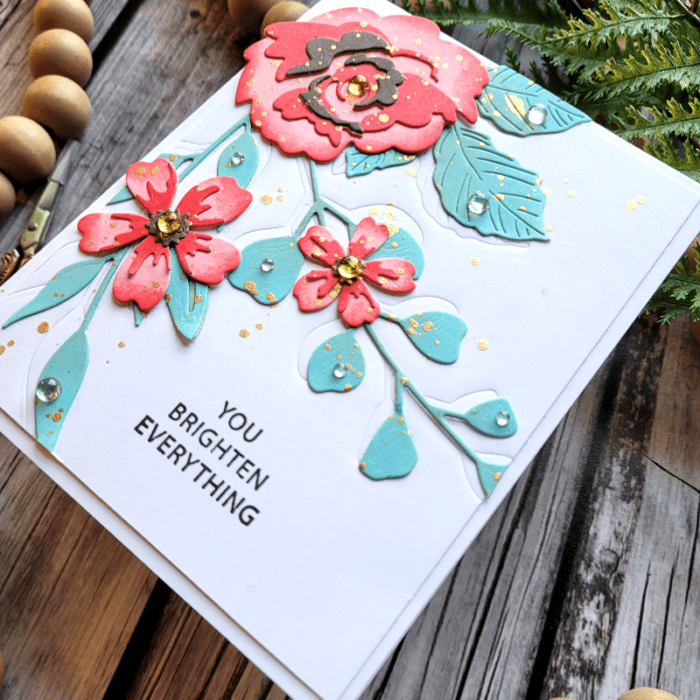
Hi friends! Today I want to share a Clean and Simple Spring Floral card!
A good Clean and Simple card utilizes white space creatively. And it’s hard to add detail and interest without over-doing it!!! I tend to create cards that are filled from top to bottom with details, but I fall in love with designers like Dee Nacar and her expert use of white space, so I’m giving it a try today, and I hope you like it!
Today I’ll be using Morning Rose & Triple Buds die, Eucalyptus Stem & Berries die, Phlox Blooms & Leaves die, Sylvan Berries & Leaves die, and Rainbow Days stamp. All of these items will be linked at the bottom of my post!
First step was to decide on the layout for my card panel. Once that was decided upon, I die cut my floral pieces and ink blended each piece with shades of coral and mint green. While it’s easier to ink blend a card panel first and then die cut second, I like to do the opposite because I can add more depth this way. I create an ombre effect with color that brings my flowers to life. And that’s one of the details you’ll need in a Clean and Simple card! Take a look at the photo above to see what I mean about adding depth.
Next, I added more detail to my white background card panel by using the same die cuts from earlier as an embossing tool. To do this, I placed the die cuts where I wanted them on the card panel, taped them into place so they wouldn’t move, and then ran them through my die cut machine with an embossing pad that comes with my machine (each machine is different, so look for an embossing pad that goes with your die cut machine). The embossing pad allows the image to be embedded into the card panel without cutting all the way through. This is another fun and creative way to use your die cuts! Look at the photo above and below to see the embossed images peeking out from behind the flowers and leaves!
Another option to add detail to a white card panel is embossing with embossing folders. You’re adding detail without losing the white space. It’s a great technique!
The final step was to place the flowers and leaves where I wanted them, along with the sentiment. I wanted to keep the sentiment simple, so I went with a stamped one rather than die cut one. The leaves are placed off-center from the embossed image so that a tiny bit of the embossed image peeks out from behind them. Then I added gold metallic splatters and sequins to add shine! You can see the splatters and sequins in the photo below. Some of the sequins are clear to look like rain drops on the leaves. The splatters and sequins are another subtle way to add detail without busying up the card panel! I was careful only to splatter around the flowers and leaves, leaving a good part of the white card panel alone.
I’m pleased with how this Clean and Simple card turned out! To summarize, here are a few pointers to keep in mind when creating Clean and Simple designs:
Emboss the white card panel with embossing folders or dies
Use splatters sparingly to add interest without overwhelming the card panel
Add detail to the focal point by ink blending to create depth and life to your florals
Keep the sentiment simple and small
Add sequins or a Nuvo Shimmer pen to add shine and shimmer to your focal point
Keep one half to one quarter of the card panel white and untouched
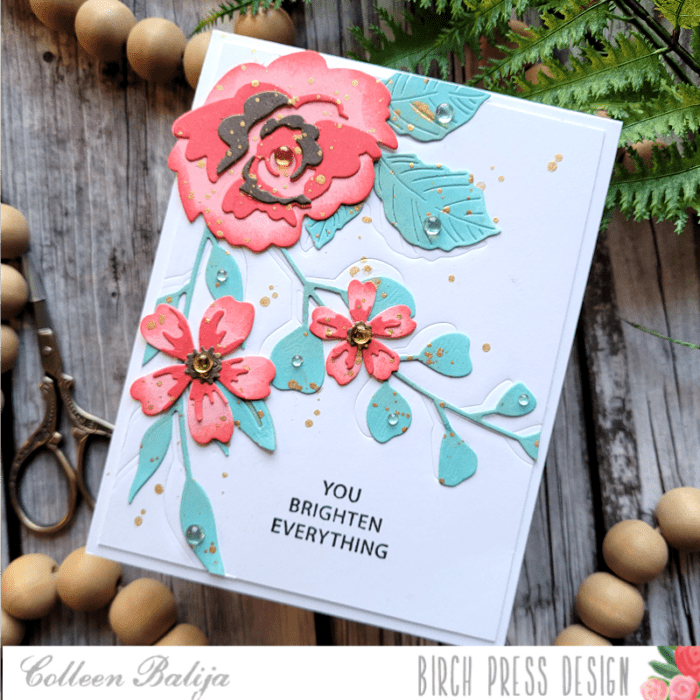
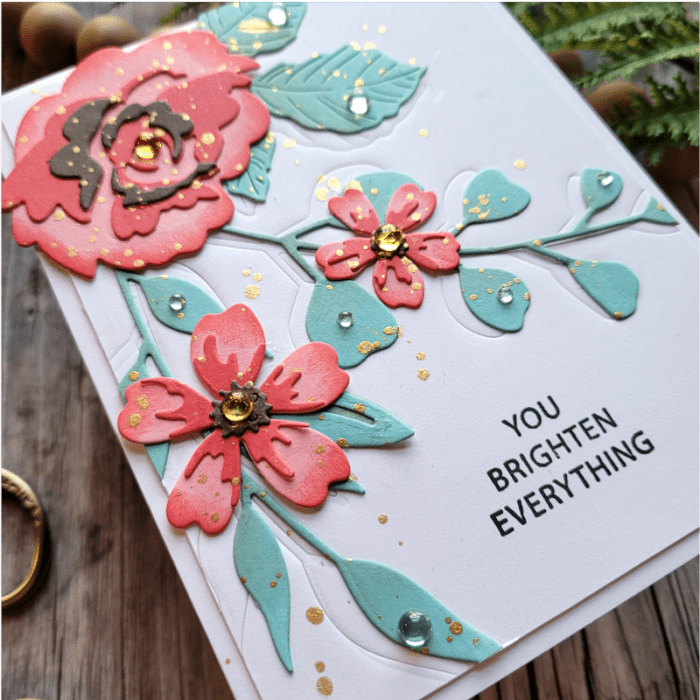
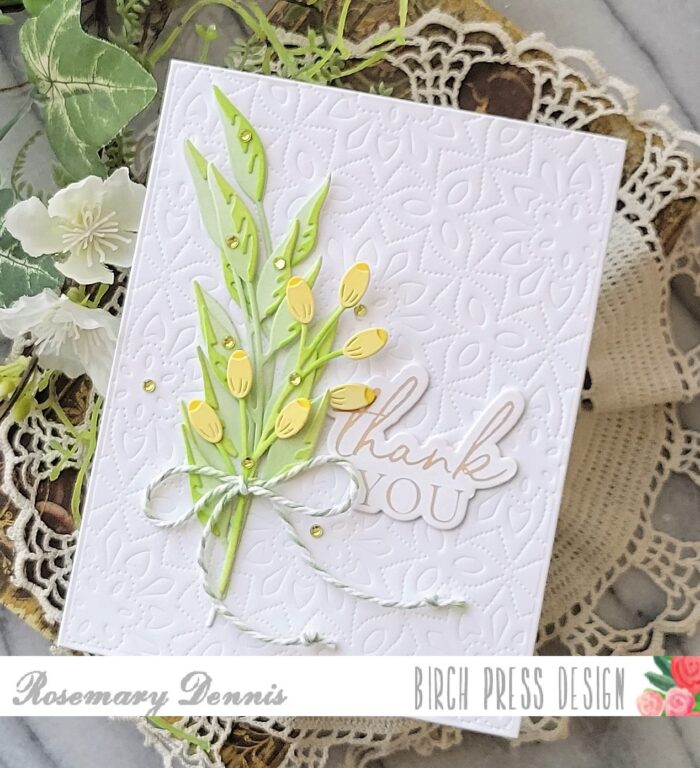
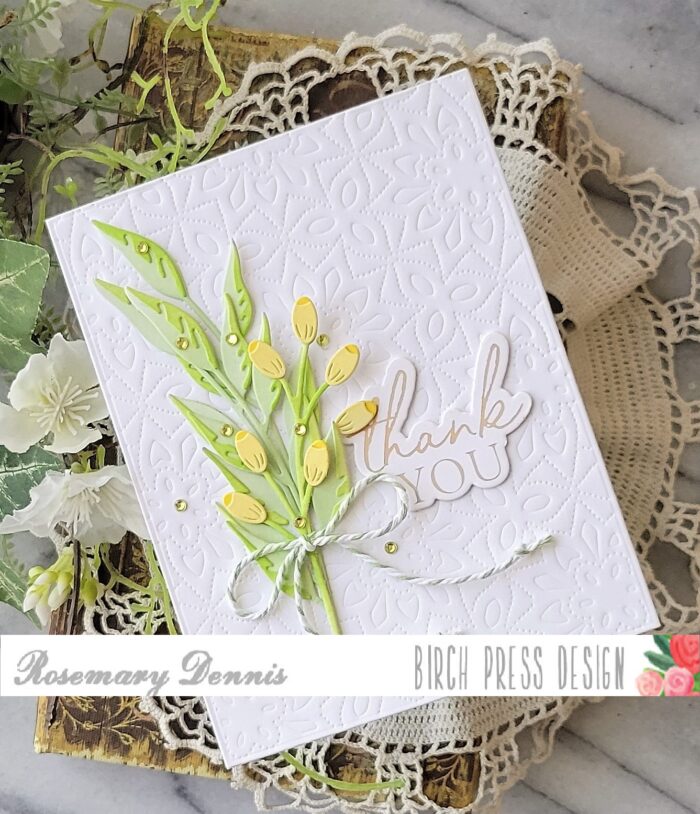
Happy Spring everyone! Today I’m sharing a sweet card showcasing the new Slyvan Berries and Leaves Contour Layers dies and the Thank You Noted Script hot foil plate and die set.
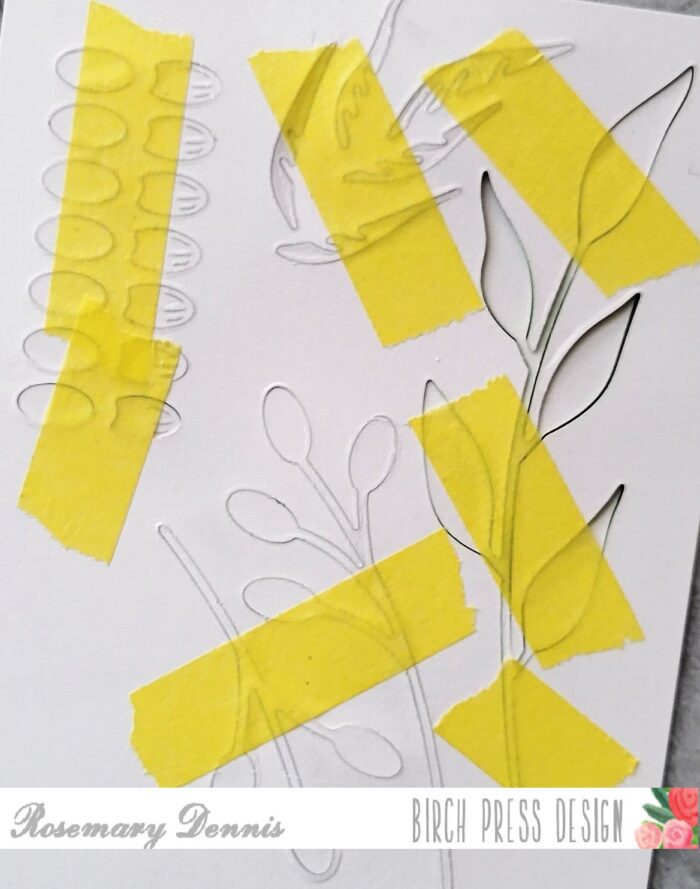
Over my years of crafting I have learned a couple of things that help me when it comes to ink blending on small die cuts. One of those things is that when I die cut the pieces I do not remove them, but flip my cardstock over and add some kind of low tack tape to the back to keep them in place.
As you can see from the above photo it isn’t very pretty looking, but it is so very helpful in allowing you to ink up those small pieces. The next photo shows some of the inking and masking that i did on the die cut cardstock.
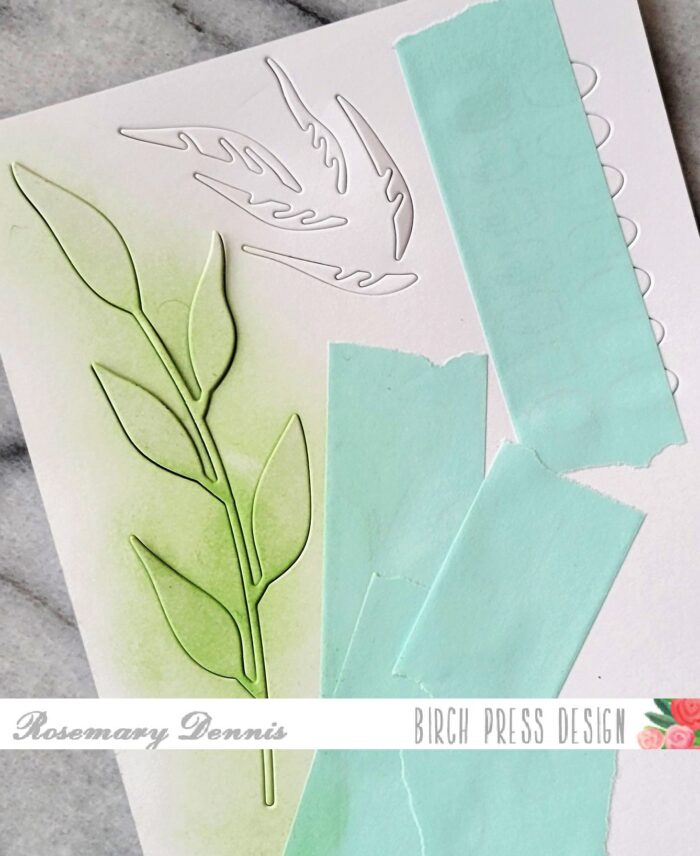
Using this method also allows you to be able to add more ink in some areas and less in others. I wanted the very top leave on the sprig to not have alot of ink and I was able to do that by keeping the die cut in place. I used two shades of light green ink for the leaves and two shades of yellow for the berries. For a bit of contrast I used a brighter green for the stems of the berry sprigs. After I inked up all the pieces to my liking I removed them from the cardstock and got to working out the placement of all of the elements. As I was working this out I decided that I wanted to add some interest to the background. I pulled out the Viola Plate die set and die cut the top layer from white cardstock to use for the background, but didn’t like it. Then I looked at the bottom layer of the die set. Inspiration hit… emboss it! The bottom layer has piercing on it and once embossed created a lovely background. Don’t forget that when you are embossing with dies you need to use a flexible embossing mat and the embossing sandwich that works for your machine.
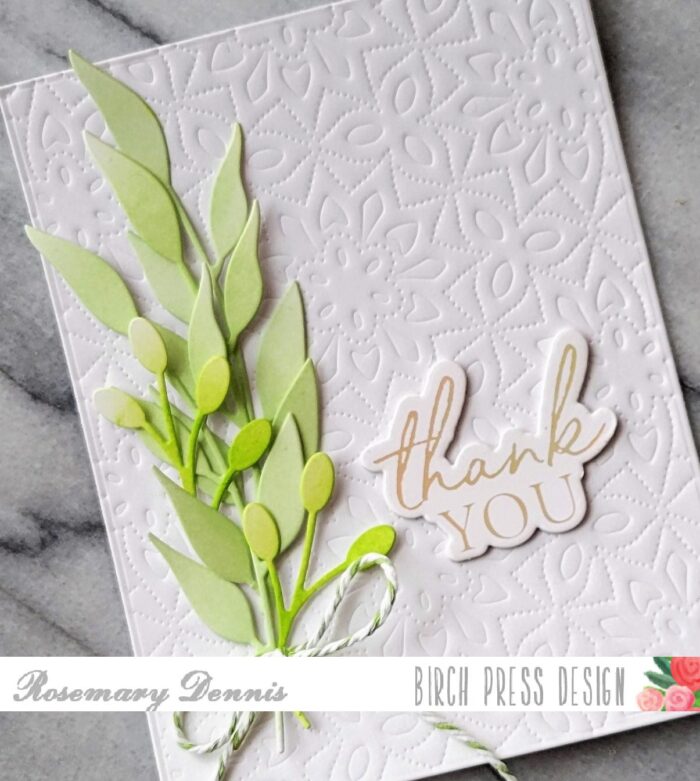
Once the background was set I worked on determining the placement of all the elements. As you can see from the photo above I didn’t have the berries and leaves completed and the sprig arrangement is slightly different from the finished card. Doing the initial arrangement is just a good way to make sure that you are happy with your idea and you can take a photo of it for reference when you complete your card. I assembled the berries and leaves using liquid adhesive.
I adhered all the stems and berries using liquid adhesive. I used the die that comes with the Thank you foil set to die cut two additional layers that I adhered to the foiled one. Liquid adhesive was also used to adhere the sentiment and the little bow tied with some spring green baker’s twine. I finished off the card with some tiny yellow-green Memory Box Fairy Jewels. I must say that I took my inspiration for this card from the cheerful yellow daffodils that are blooming everywhere here in western Washington. I hope I was able to inspire you today!