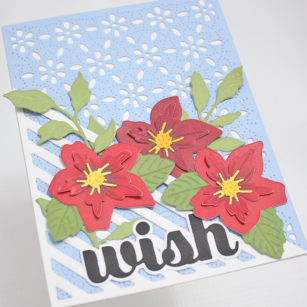
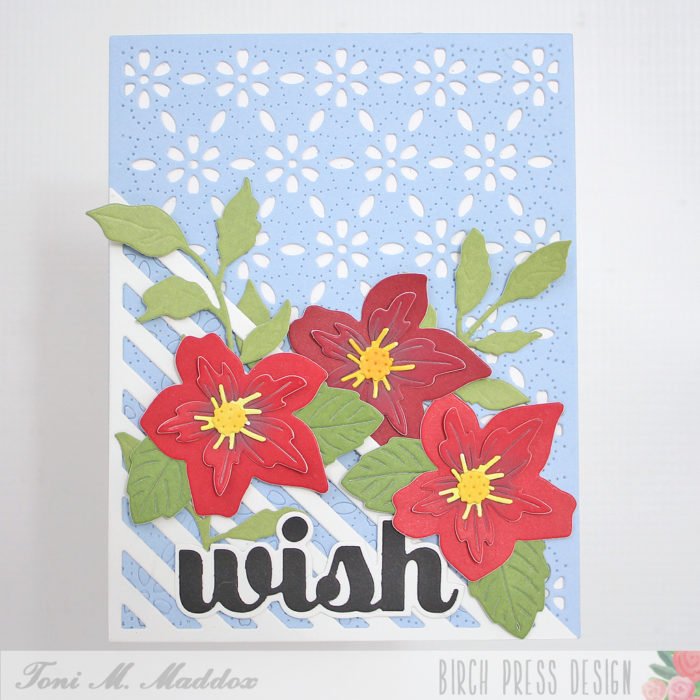
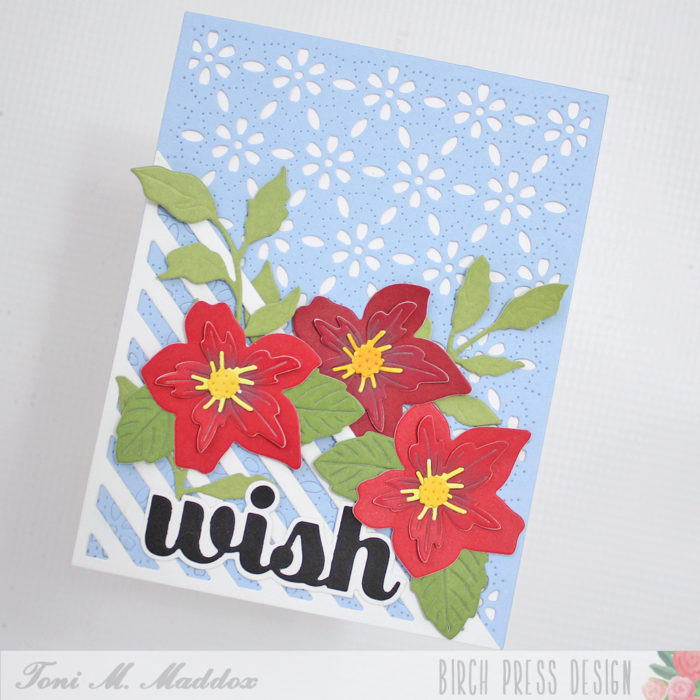
Hello, Birch Press fans! Toni here with you today sharing a rather summery birthday card.
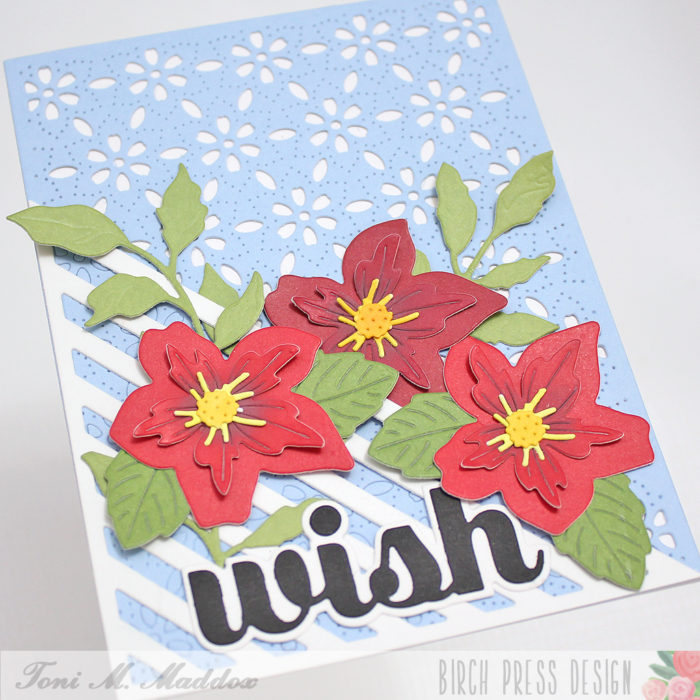
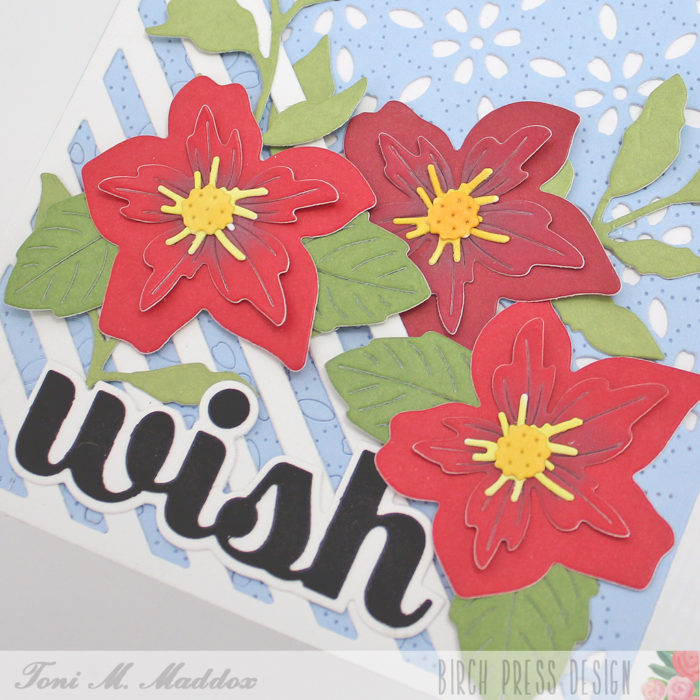
I started the card by cutting the Linear Triangle from a sturdy white cardstock. I then cut out the Flora Plate Layer B out of a piece of Ocean Blue paper.
I adhered the Flora layer onto the card front, having discarded the bits not covered by the Linear Triangle.
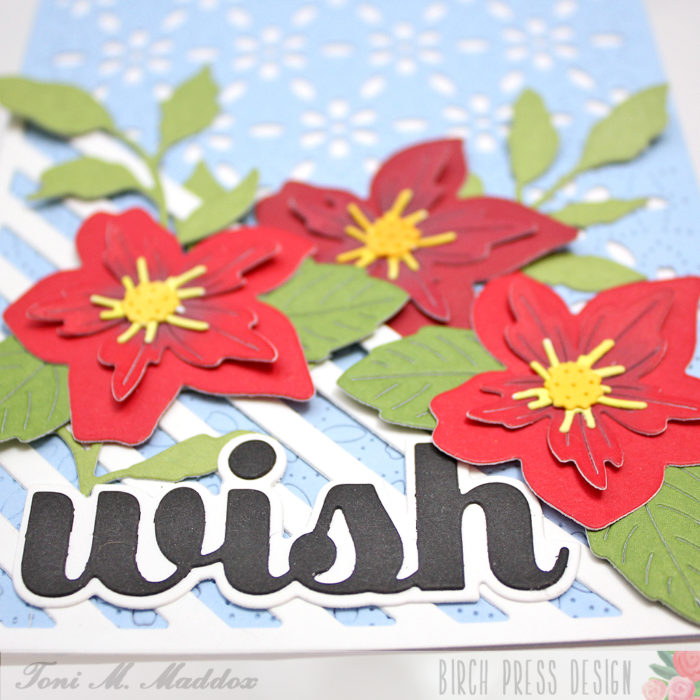
I cut out the the Pimpernel Contour Layers from a piece of Berry Red 6×6 paper. I used Distress Oxide Aged Mahogany to shade the centers.
I cut the stamens out of white then colored them yellow with Copics Y02, Y15 and Y35.
The flowers remind me of clematis so I cut the base layer of the Fuddled Leaf Branches out of Lush Green 6×6 paper, and wove them up and through the Linear Triangle for a climbing effect.
I cut the Make a Wish Sugar Script out of black and white cardstock, nestling it in among the blooms.
I hope you enjoyed today’s card and have a great rest of your week!
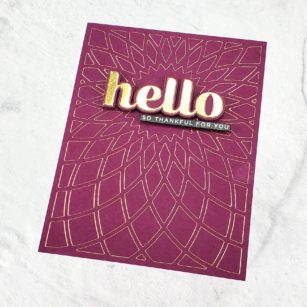
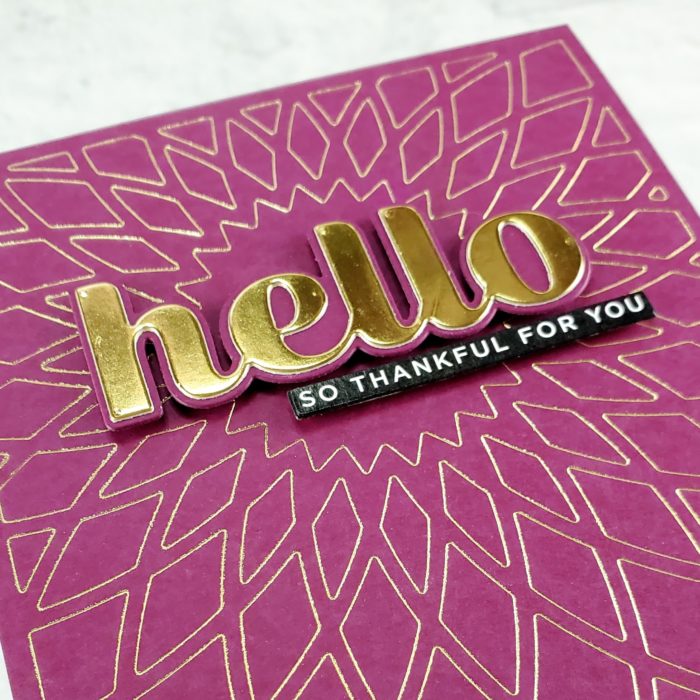
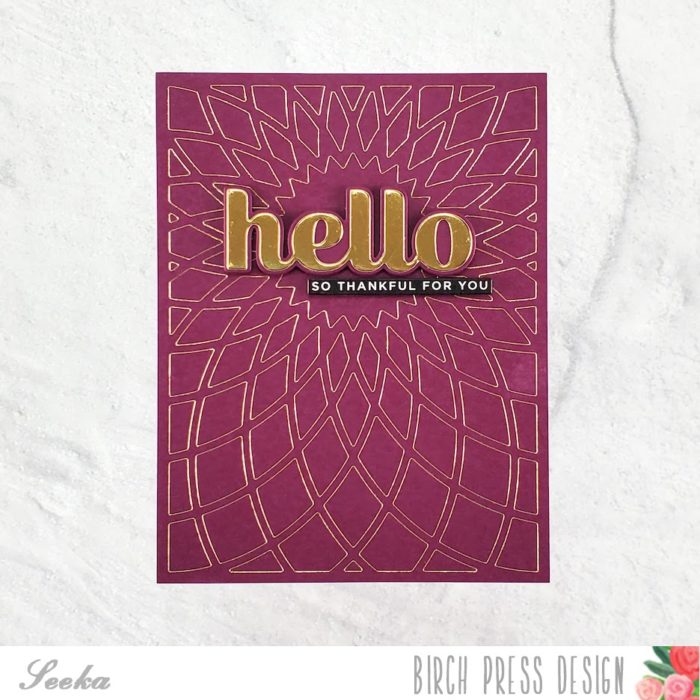
Hi there and welcome! Seeka here and today I’m sharing a card featuring a background made by foiling the Dazzle Layer A cover plate. Foiling with dies is a wonderful way to stretch your supplies!
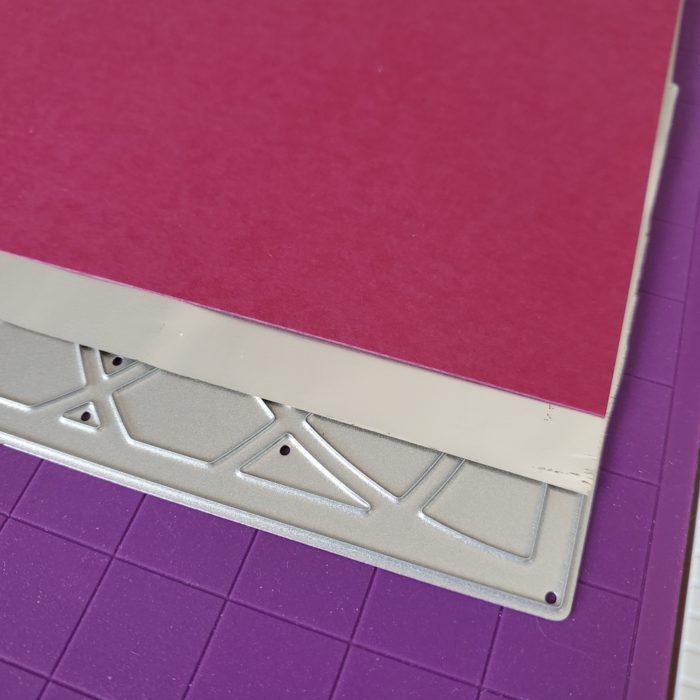
I started by prepping my foiling machine. I centered the Dazzle Layer A die over a 4.25″ x 5.5″ panel of plum cardstock and then flipped the two upside down, together, and placed them onto the heating platform. I used a piece of Post-it Tape to tape the cardstock panel down at one end, creating a hinge, and then I swung the panel up and placed a piece of gold foil over the die, shiny side down. I replaced the plum cardstock panel and then followed the instructions for my foiling machine to foil the panel. Below is an example of the order and orientation of the die, foil, and ink-blended panel on the heating plate (when I went to actually foil, I aligned all these pieces, as described above).
With the foiling done, I started on the sentiment. I die cut the detail layer of the Big Hello Sugar Script die set from gold cardstock and the shadow layer from the same plum cardstock as the background. I glued the two together and then used foam tape to adhere the sentiment to the background. I also added a smaller sentiment from my stash. To finish, I adhered the card front to a card base.
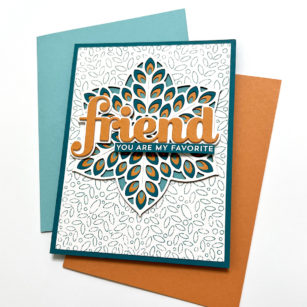
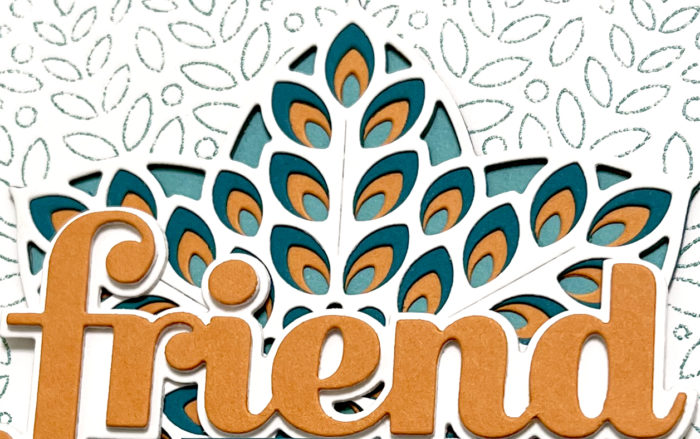
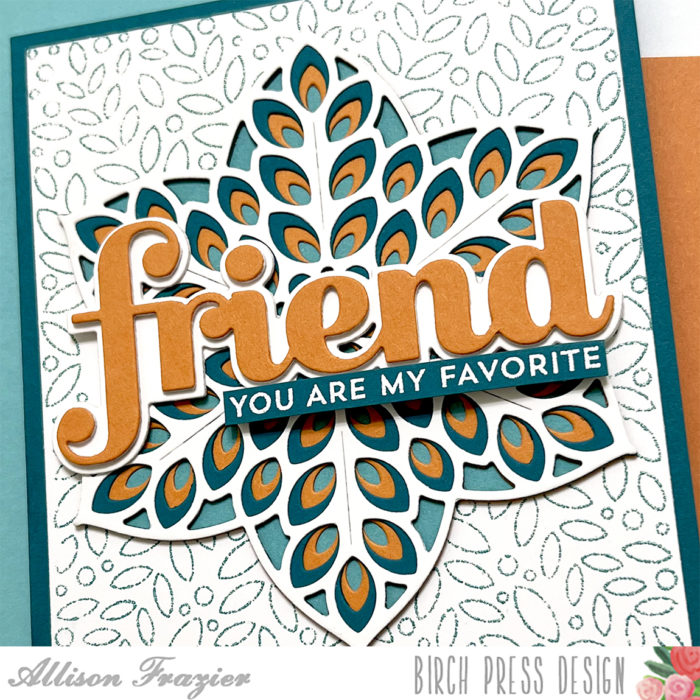
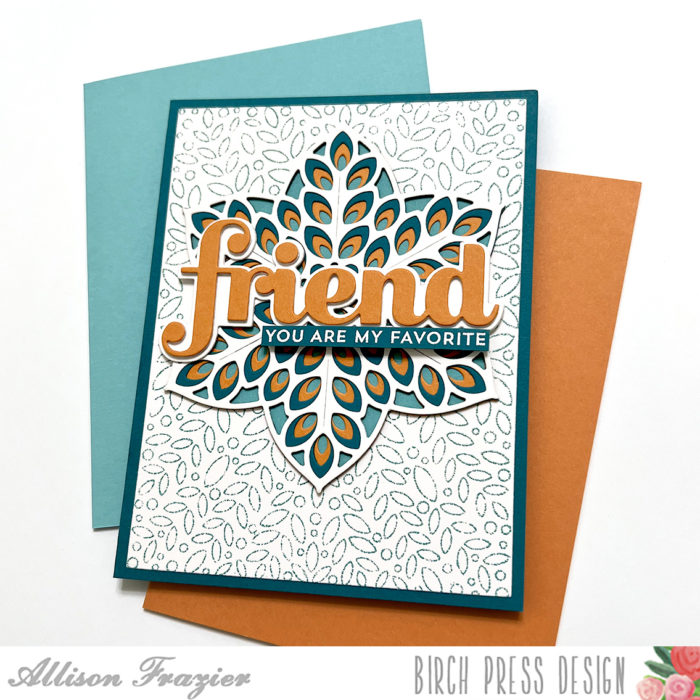
Hello again, Friends! Today I am sharing this gorgeous layered floral star card using one of my favorite color combinations. There is just something about orange and turquoise together, right? It has to be one of the more striking complementary color combos.
I love creating texture in the background of my cards, even if it’s not with dies. For this card, I created texture by stamping and embossing the large stamp from the Christmas Ornament and Labels set. I used a textured turquoise embossing powder – the texture gives it a more muted and imperfect look. I cut the stamped panel down to 4″ x 5.25″ and mounted it to a dark teal A2 card base.
I die cut each of the three layers from the Floral Star Layer Set, using orange paper for Layer C, dark teal for Layer B, and white for Layer A. I then traced one of the negative spaces from those die cuts onto a turquoise piece of paper and cut it with my scissors to form a solid back. I adhered the layers together with liquid glue and then adhered the entire element to the embossed panel, making sure to cover the ornament shape in the stamped image.
Next, I die cut the “friend” shadow twice from white card stock, adhering the layers together. I die cut the friend word twice from white card stock and once from orange card stock, layered those together and adhered to the shadow. Then I placed the finished word into the middle of the floral star. The sub-sentiment is from my stash – I stamped it on the same dark teal card stock and white heat embossed it.
This card is the perfect example of why I fell in love with Birch Press Design when I first started making cards several years ago. The layering dies and the font in their sugar script dies will always stay fresh. Fresh! Maybe that’s the word that comes to mind when I see this color combination.
Thank you so much for joining us today. I hope this card brings a smile to your face.
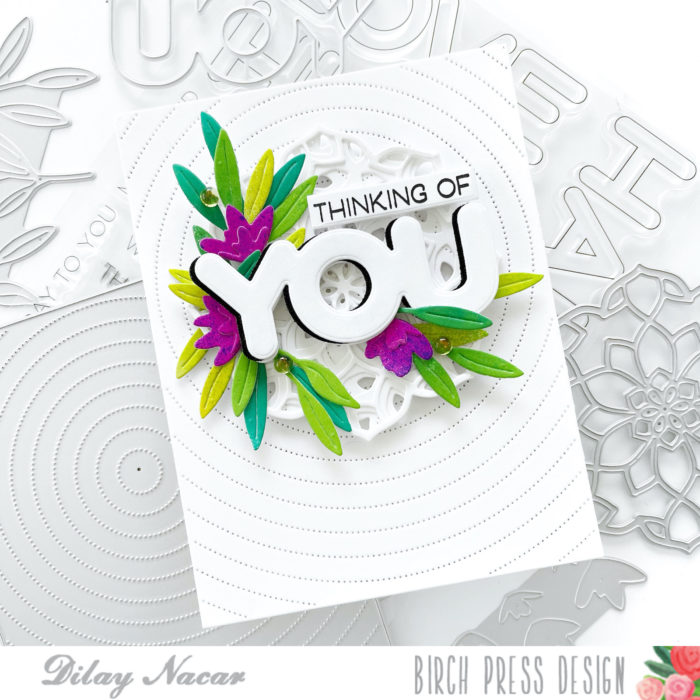
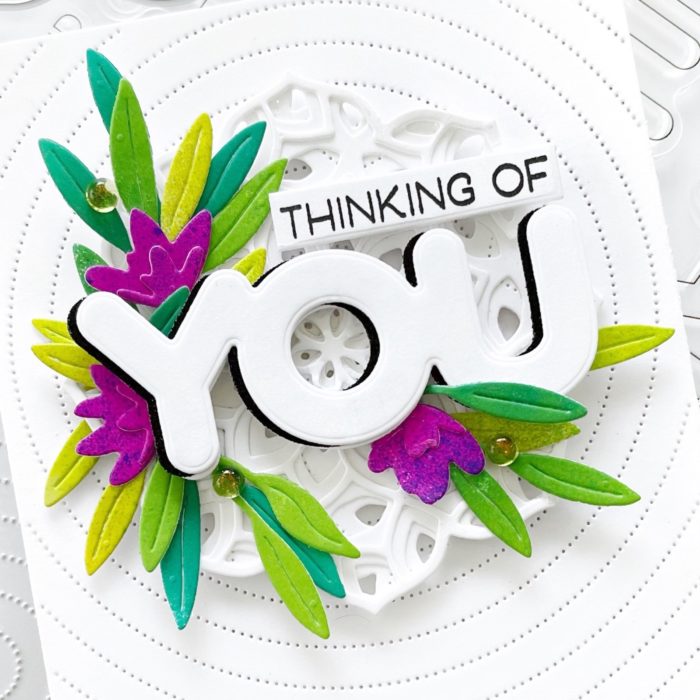
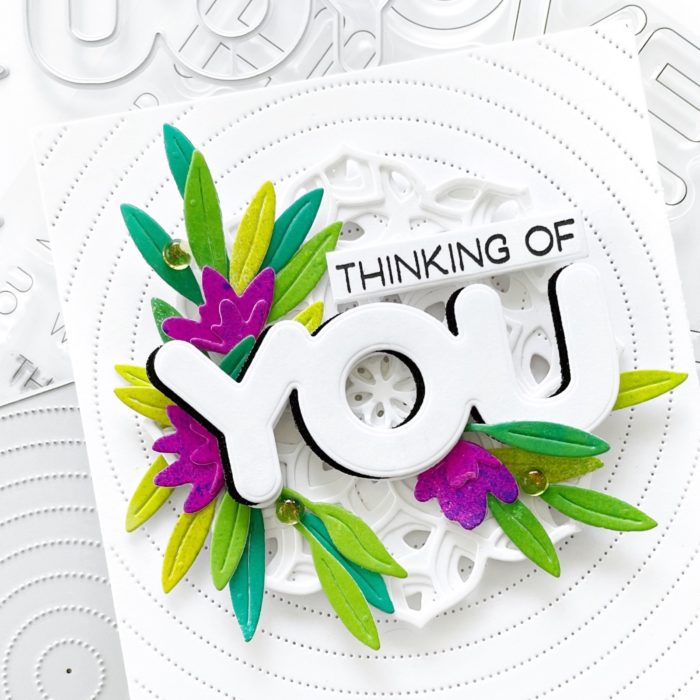
Welcome, crafty friends! Dee here sharing this card created using scraps to make a bold and colorful focal point! To start, I die cut the Pinpoint Radial die in white, then adhered it onto an A2-sized top folding card base. Next, I cut each layer of the Kinsley Layer Set from white cardstock and adhered them together. Once complete, I adhered the Kinsley Layer Set to the center of the Radial Pinpoint background.
As a paper crafter, I tend to have a lot of scraps and look for ways to use them as much as possible! For this card, I used a piece leftover that I had sprayed with acrylic paint that I die cut with the Tiny Tufts and Leaves Contour Layers die set.
Before adhering the Tiny Tufts and Leaves, I stamped ‘Thinking of you & best wishes’ from the Happy Lingo stamp set in black onto white cardstock, trimmed it down (keeping only ‘thinking of’), and set it aside. I then cut the ‘you’ from Happy Lingo coordinating die set in white and black cardstock and adhered them together. I then adhered to both sentiments to the center of the Kinsley Layers.
Once the sentiment was in place, I tucked the Tiny Tuft and Leaves behind the sentiment and secured them with liquid and foam adhesive. To finish, I added clear embellishments l to the leaves.
I hope you enjoyed today’s card and are inspired to create something new! Thank you so much for stopping by!
Hi crafty friends I am excited to be back up on the Birch Press blog today sharing a fun and colorful card with you using the beautiful die set Wispy Blooms. For today’s card I wanted to create a colorful background to highlight these gorgeous blooms! So let’s get started!
I started today’s card by choosing my color palette! When card making I enjoy creating bright and colorful cards. I love the loose look of these flowers and wanted to highlight them with a colorful background! I chose 2 colors as the main colors for today’s card. I selected a gel print from my stash and then chose the second color for my flowers! I love these 2 colors together! It was now time to start die cutting! I started with the Wispy Blooms die set and Memory Box card stock in 2 color pad families: Sunny Orange and Lush Green. These pads are amazing as the colors all coordinate so well together and the mix of colors is just beautiful! I chose 2 colors of orange from the pad and die cut the flowers several times in both shades of orange. I did the same for the leaves using a green from the Lush Green paper pad from Memory Box.
Next I added some ink to each of my die cuts using several shades of orange dye ink. I love the added dimension the ink gives to the completed look. I applied the ink to the layers using a blending brush. I did the same for the floral stem. Once this was complete, I adhered the flowers together using liquid glue.
Next I chose a panel from my stash to die cut the butterflies and the hello script font. The panel I chose had shades of purple and sparkles. This panel was created using a powder pigment. I die cut 2 butterflies using the Simple Butterflies Contour Layers die set. I die cut a second set of butterflies using the Memory Box Vintage Pearl Mirror Pad, I chose a gold color from the pad. I then adhered the butterflies together using liquid glue. I set these aside.
To complete my card I chose the Big Hello Sugar Script die set. I die cut the shadow layer using white card stock one time, then the inner script hello 3 times for added dimension. I die cut this using white card stock and 1 layer using the same purple panel as the butterflies. I then adhered these together using liquid glue. Next I adhered the gel print background to an A2 card base and adhered the flowers, sentiment, and butterflies using both liquid glue and foam adhesive. I added a bit of sparkle using 2 sets of gems. I used the Winter Fantasy Fairy Gemstones and the Bright Jewels collection.
I had so much fun creating today’s card! I hope you enjoyed it and I will be back soon! Happy Crafting!!!!!
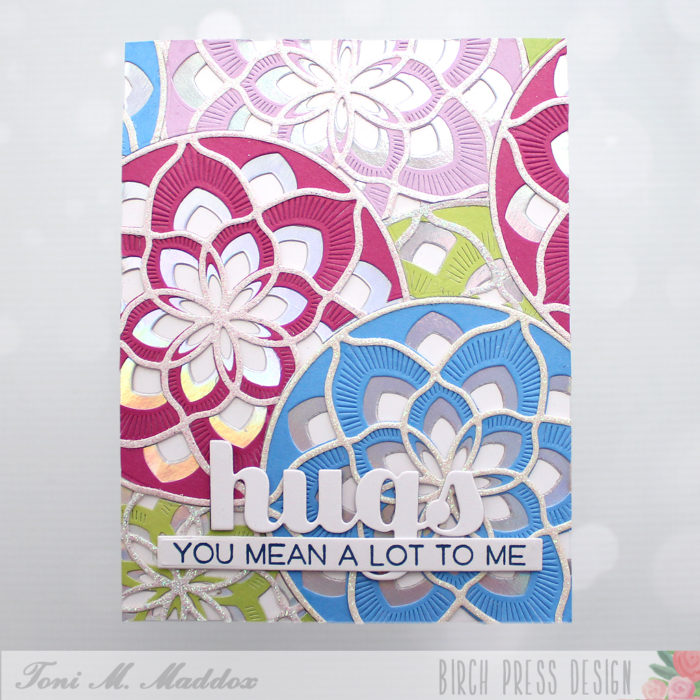
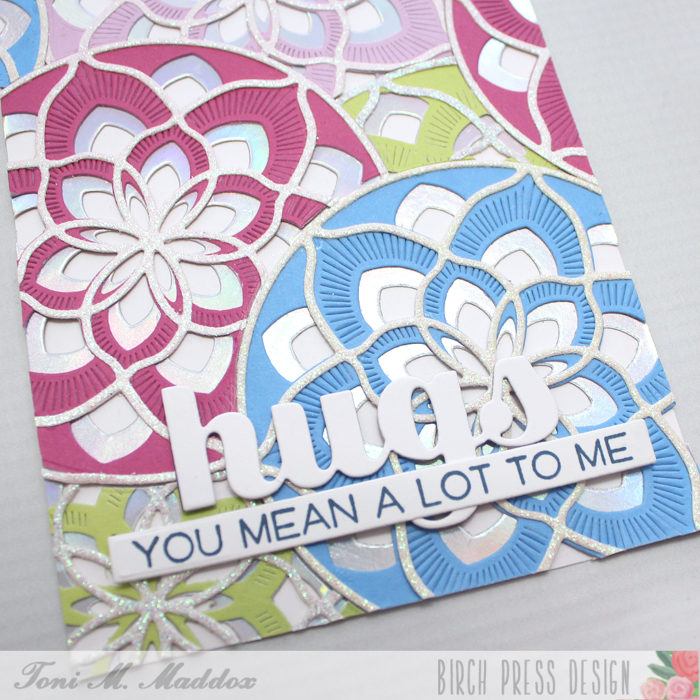
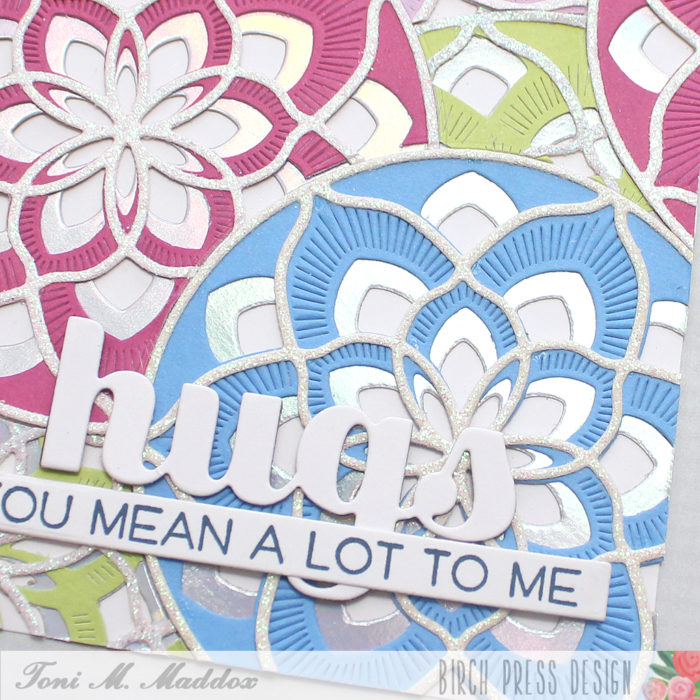
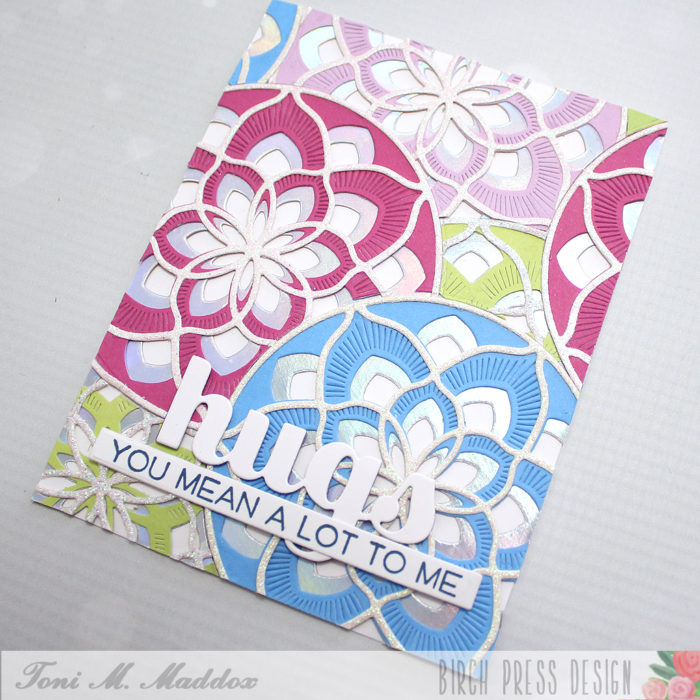
Hello, everyone! Toni here with you today sharing a card that turned out amazing but was a lot more time-consuming than I had anticipated. Of course, it’s after the fact that I think of ways to make it easier!
I wanted to use one of the fabulous BPD mandalas, Arista in this case, over the entire card BUT without adding the bulkiness of layering each mandala on top of the other. This meant I needed to cut the mandalas so they could nest.
I worked up each mandala first using a combination of foil, Memory Box Pastel Glitter Cardstock and Memory Box Lush Green, Vibrant Violet, and Ocean Blue 6×6 Cardstock. Once I had my layout planned-ish, I adhere first the blue one to my card base followed by the others, diecutting with a circle die from my stash and/or fussy cutting them to nest into each other.
I could have made it a lot easier on myself doing this with the first layer (foil) to figure out the nesting cuts then once that was done, I could have adhered the other layers down and trimmed away the excess quite easily. Ah, well, lesson so so learned!
I finished up the card by adding the Sugar Script Big Hugs and the Happy Lingo sentiment stamped in Versafine Clair Twilight. A LOT of work but well worth it!
I hope you enjoyed today’s card and have a great rest of your week!
Happy Tuesday and welcome back to the Birch Press Design blog. On Saturday I shared a card I created using the Adornment Peony die set – post found here. Today, I’m sharing what I did with the pieces I saved after using the outline for the previous card.
First, I cut the Adornment Peony die – both the detailed and the outline die – from heavyweight white cardstock. I did adhere a double sided adhesive sheet to the white cardstock before die cutting it. I then adhered the outline of the peony to the solid outline piece.
Next, I took the black pieces from my previous card and used them to do die cut inlay into the peony outline. I made sure to save all the little pieces so they could be glued into their respective spaces. Next, I took some of the leftover leaves I had and did some light green inking on the edges.
To create my background I cut a piece of red foil cardstock from the Rainbow Reflections Mirror Pad to 4.25″ x 5.5″. I glued this to an A2 card front. On top of this I glued Layer B from the Flora Plate Layer Set because I wanted to make sure the red foil would show through some of the background.
I adhered the assembled peony and leaves using some thin foam tape. I also cut out the ‘thanks’ and shadow using the same Thanks Honey Script I used for the previous card, keeping with the theme of white and the shiny black cardstock.
That is it! This card was easy to put together, and another way to use black, shiny cardstock this Spring.
As always, I hope you’re inspired to create and have a great rest of your week.
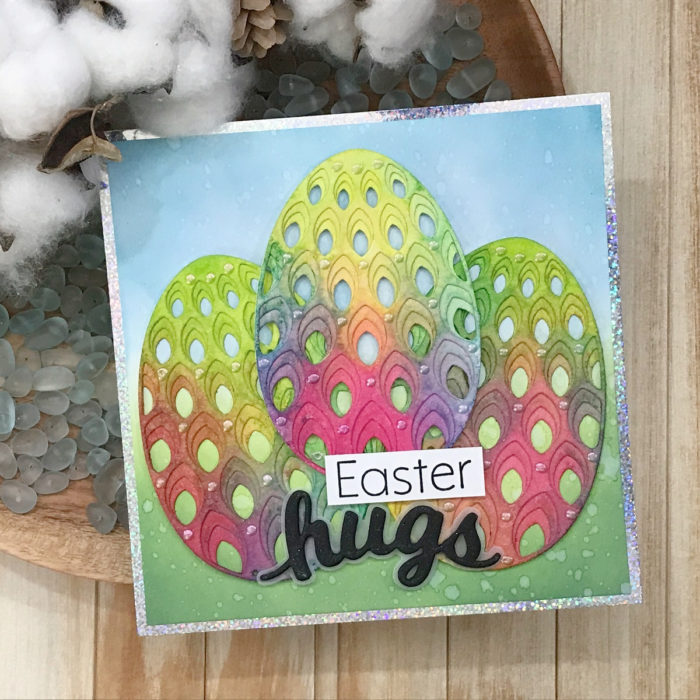
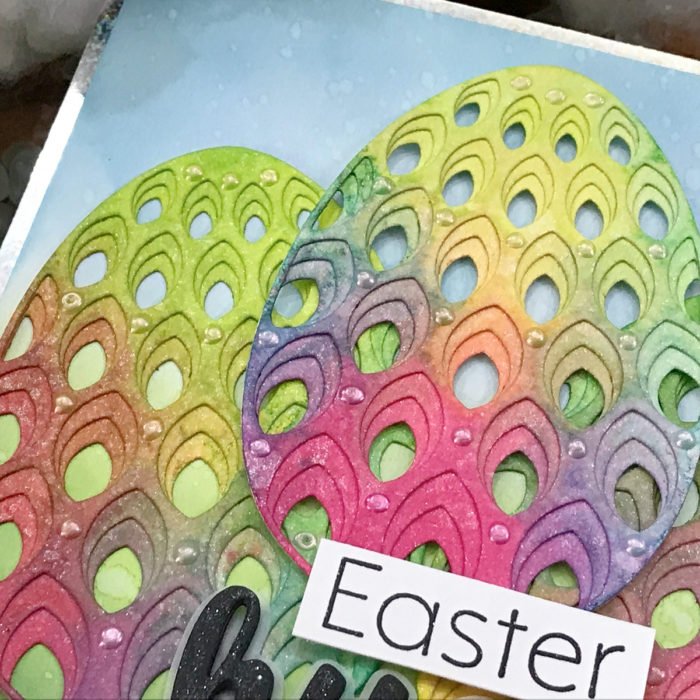
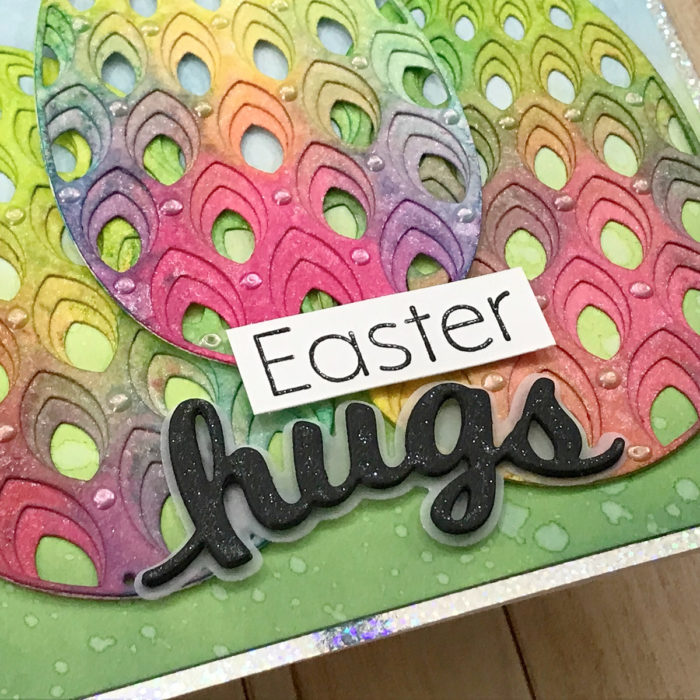
I know Easter has past! However I never get bored dyeing eggs! So, let’s have some fun with the Petal Egg Layering Die set and some dye ink sprays!
For our die cutting you want to use a card stock that can handle a lot of water, so the best choice is either a heavy weight watercolor or Bristol cardstock! I die cut three eggs and used my liquid adhesive to put all my layers together! Set them aside to dry for a while! Before we move on to the next step you want to make sure your layers are perfectly dry!
Grab your spray box and let’s start spraying! I used bright colors and stuck to the primaries, just in case they mixed, we don’t want too much brown on our eggs, right? You can also add a little water from a spra bottle to get those colors moving around.
Once you are done adding your color set these aside to dry, this will take a while…
While they were drying I grab my background panel and used my oxides to create a blended background using a blue and green to give the sense they are outside, ready to be found!
I also got my sentiment ready. I stamped the word Easter and die cut the word hugs.
It’s time to put our card together! I used a 6 in x 6 in card base and arranged my eggs in the center and then added my sentiment on top! To add a little sparkle I used my glitter pen for the hugs sentiment and added drops to the eggs!
Hope you enjoyed today’s project!
Make sure you stay tuned for more wonderful projects coming soon!
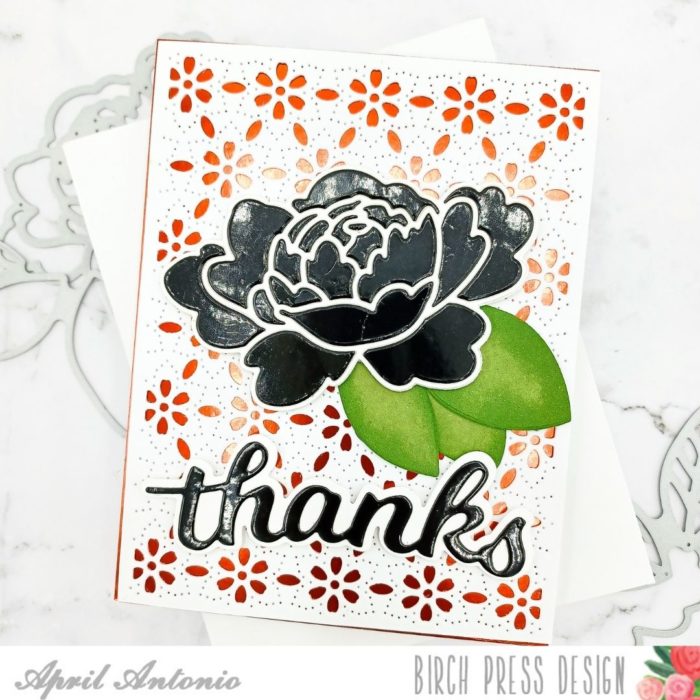
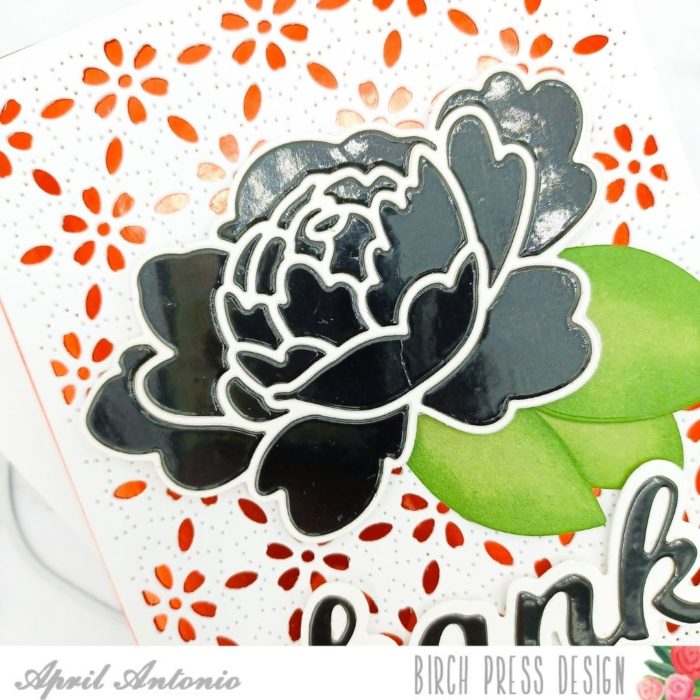
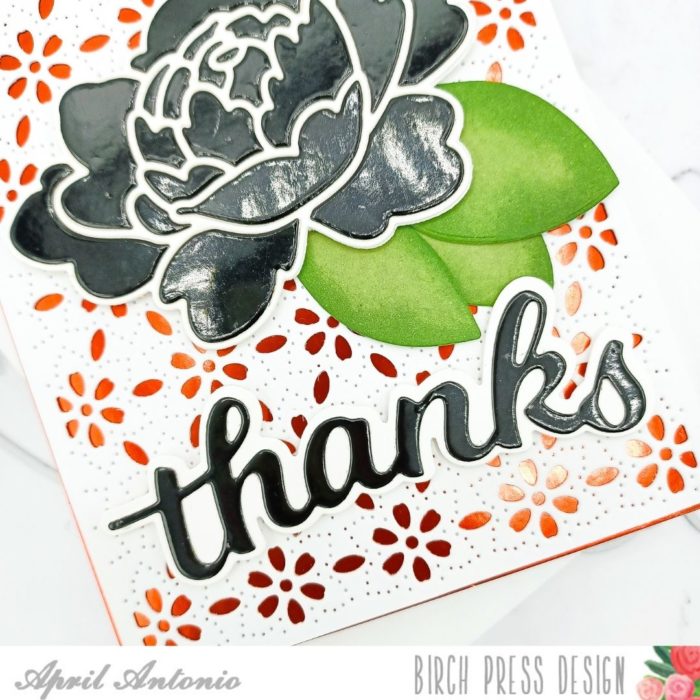
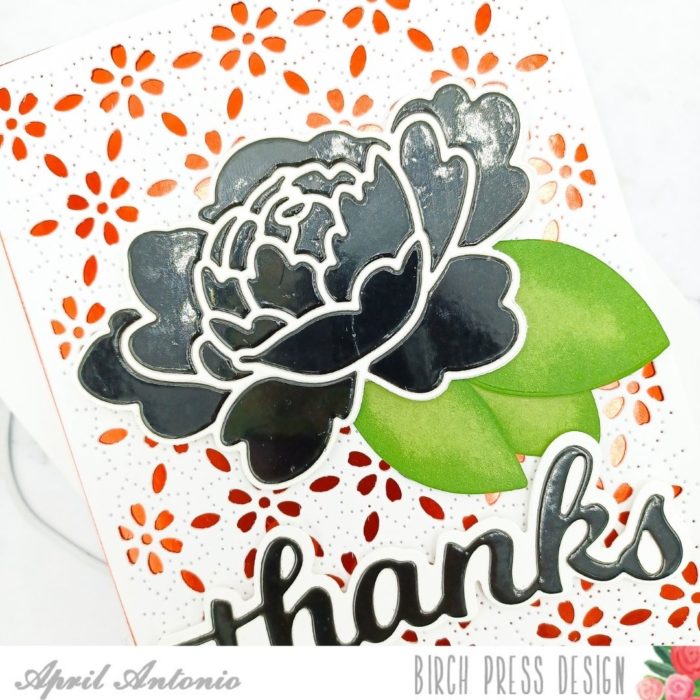
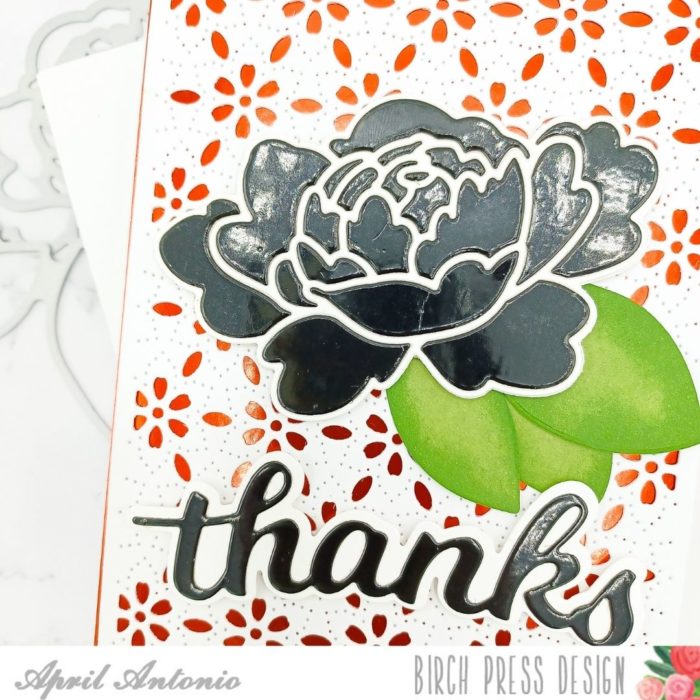
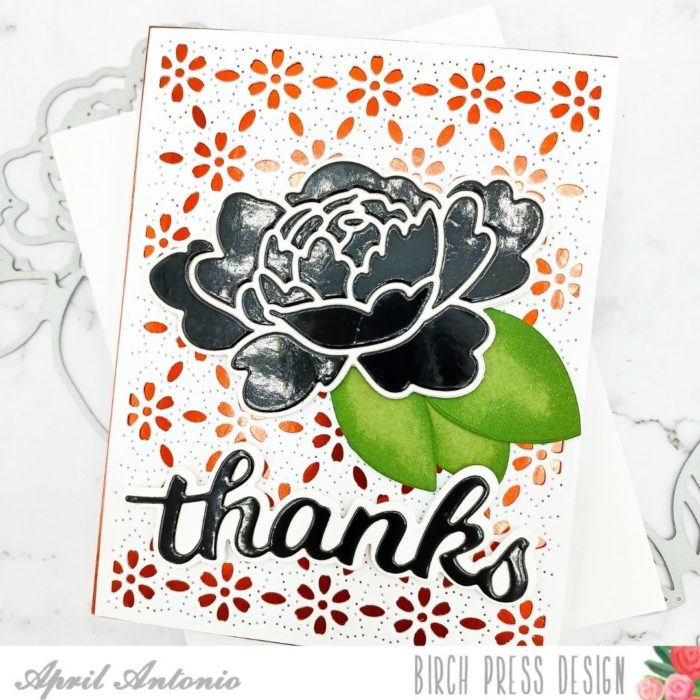
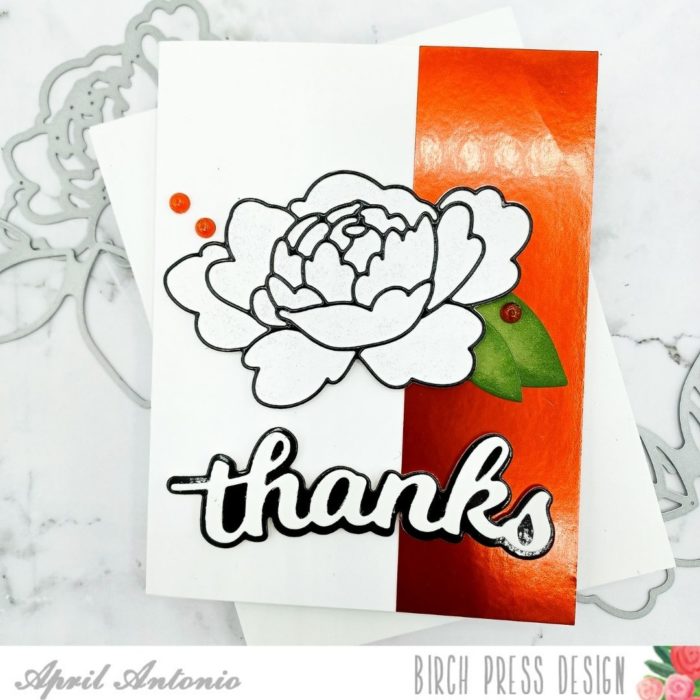
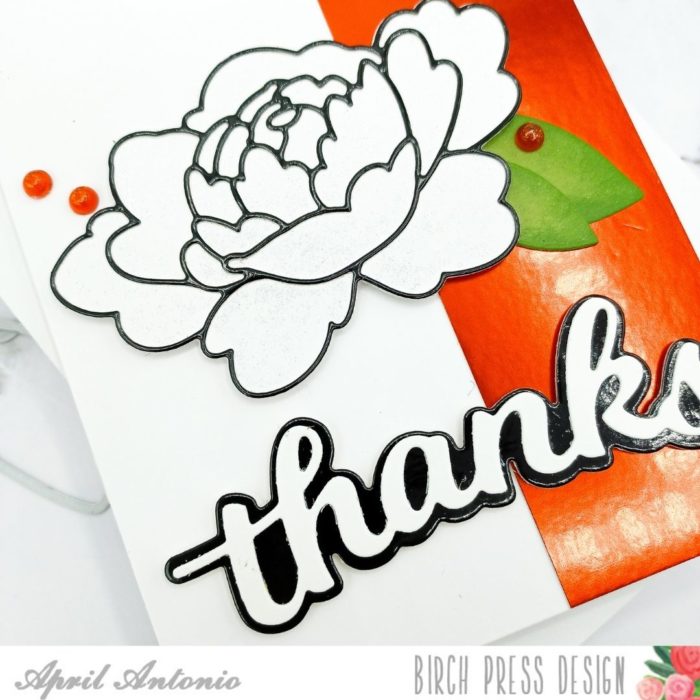
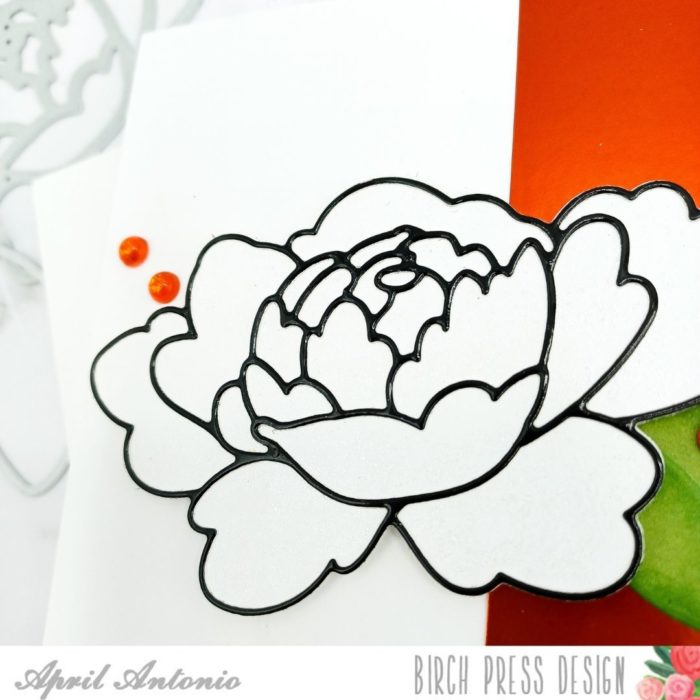
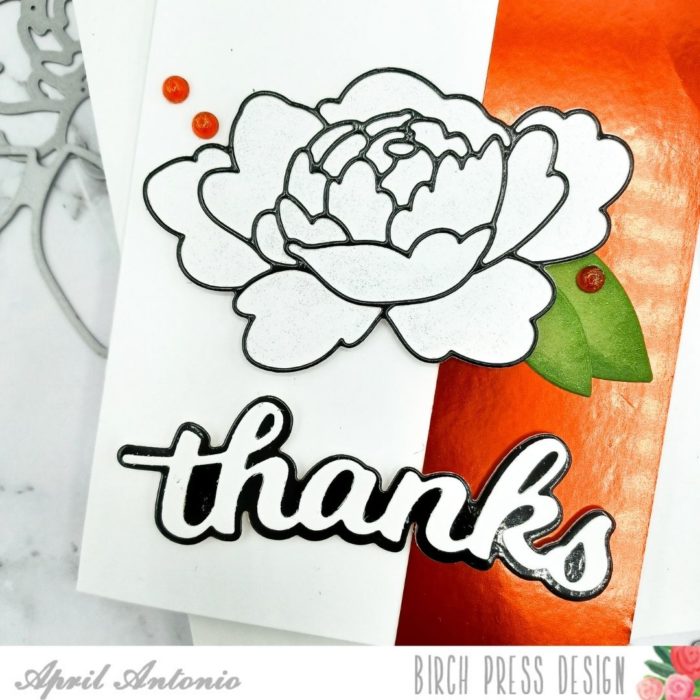
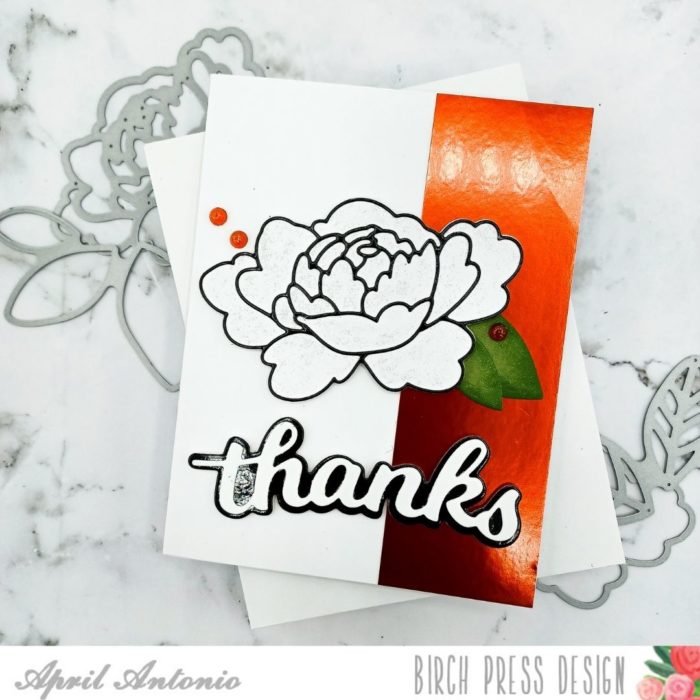
Hola and happy Saturday! April over here on the blog sharing a thank you card featuring the Adornment Peony die set. This set is beautiful and contains four dies: Two peony dies – one detailed, one outline; two leaf dies – one detailed, one outline.
I started this card by deciding that I really wanted to use the Memory Box black glossy cardstock in a way that was celebrated our current Springtime season.
I cut the Adornment Peony outline die out from heavy weight white cardstock so that I would have two solid peony pieces.
2. I took a piece of the glossy black cardstock and put a piece of a double sided adhesive sheet (like Stick It) on the back.
3. I then cut the detailed peony die from this piece of glossy cardstock. Adding the adhesive to the back before cutting made it a lot easier to adhere the delicate pieces later.
4. I peeled the adhesive backing off from the outline piece of the peony, and put it onto the solid peony piece I cut in step #1. I decided to save the other peony pieces to do a diecut inlay on a future card.
5. For the leaves, I used the solid leaf die, and cut it from green cardstock I pulled from the Lush Green 6×6 paper pad. I added a little ink blending to the edges of the leaves with some green ink.
6. One of my favorite paper pads is the Rainbow Reflections Mirror Pad and I used it here to create part of my card background by taking a piece of the red foil paper and cutting about 1.5″ x 5.5″. I glued this to the right edge of the card front.
7. I added the peony and leaves on the front, popped up with some thin foam tape.
8. For the sentiment, I wanted it to match the flower, so I used the same glossy black cardstock with the Thanks Honey Script die set. I cut the background from the glossy cardstock, and the actual sentiment from white cardstock and glued them together, then adhered it to the card with the same thin, foam tape.
9. For final touches I added a few red crystals from the Christmas Fairy Crystals pack. Also, I used my Nuvo shimmer pen to ‘color’ in the white space of the peony.
I really like how the glossy, black cardstock adds just a little extra shine and interest to the card. Also, I encourage everyone to play around with textures and mix glitter, foil, glossy, and any other types together on a card to see how they look.
Thank you for joining me today! I hope you enjoyed the tutorial and will have fun in all your crafting adventures.
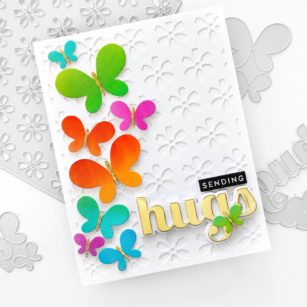
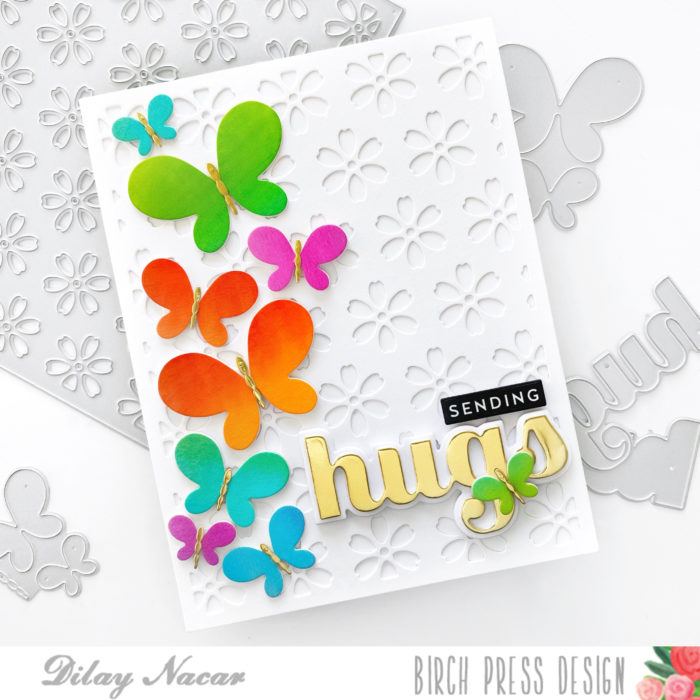
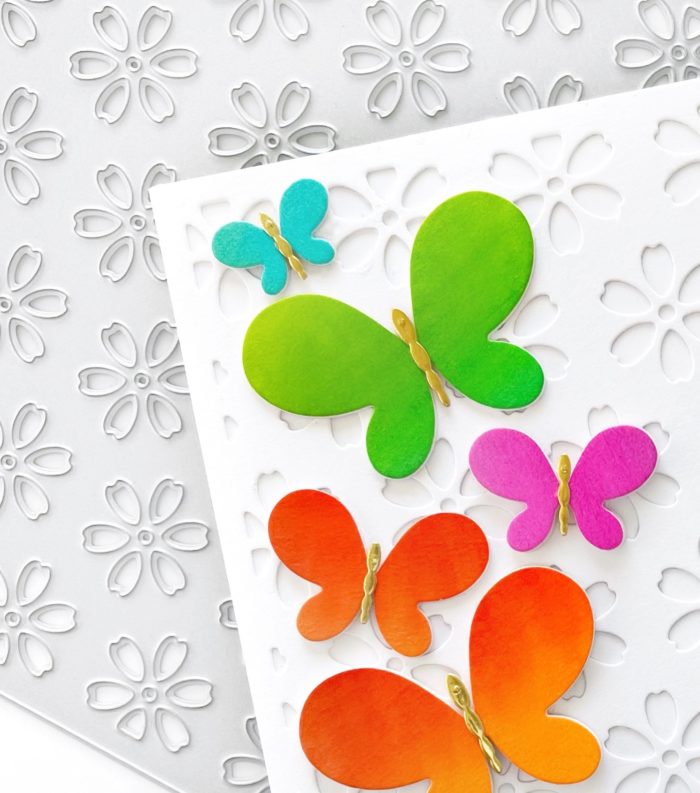
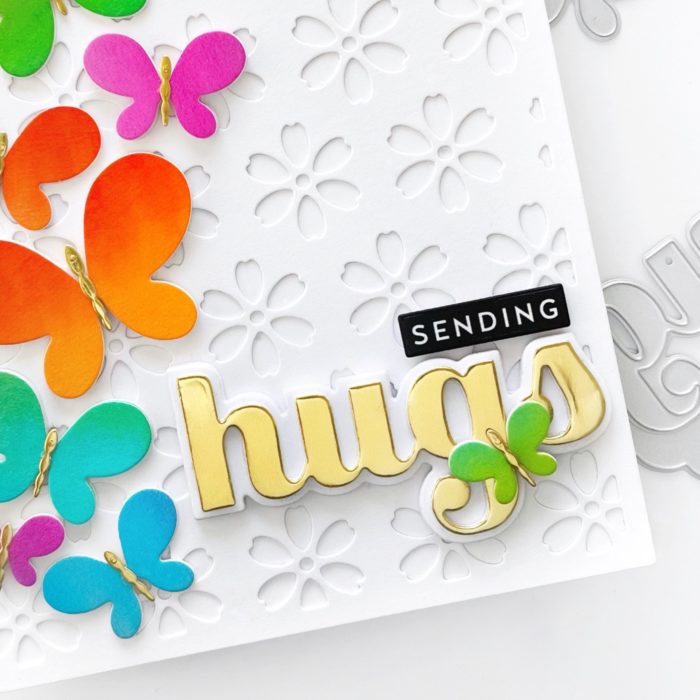
Happy Friday, crafty friends! Dee here today sharing a fun and vibrant card featuring the brand new Simple Butterfly Contour Layers dies!
I began with a piece of watercolor paper and applied a few of my favorite colors using watercolor brush markers. Once dry, I die cut each of the butterflies multiple times (and the antennas in gold) and adhered them together.
Next, I die cut layer B of the Flora Plate Layer Set and adhered it onto an A2-sized white card base, then adhered each of the butterflies onto the card panel.
I cut the Big Sugar Script Hugs die in gold and the shadow in white and adhered it to the bottom corner. I used a sub-sentiment from my stash and adhered it above the ‘hugs’, and since I had one little butterfly left, I decided to add that on top!