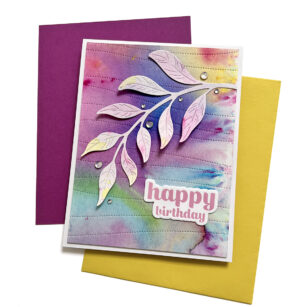
Hello, Birch Press friends! I am excited to be back on the blog today. I have been busy lately making some backgrounds with shimmer powders and decided to use one today. What better way to show off a new hot foil plate, right? This happy birthday sentiment is from the new Sugar Script Sentiments 2 hot foil plate and die set. I have always been such a huge fan of the Sugar Script sentiments, and I love how they’re now available as hot foil plates!
I started with one of the shimmery backgrounds that I made recently. This panel is the result of several colors of shimmer powders and lots of water spritzing! I cut the panel with the Pinpoint Contour Plate and then trimmed it down even more to be 4″ x 5.25″. I put some thin foam tape on the back of the panel and adhered it to an A2 card base.
I used the Curved Leaf Branch die to cut some watercolor paper, and then I used some pink and yellow shimmer powders to lightly color the branch. I adhered this to the panel with liquid glue, making sure not to adhere the actual leaves down. I love the dimension this creates!
I hot foiled the sentiment onto white card stock using pink satin hot foil, and I love how it came out! I love satin/matte hot foil, but don’t be fooled – it still has shimmer to it when the light hits it!
To finish the card, I scattered some fairy crystals and drops around the branch. I hope this card brings a smile to your face! Thank you so much for joining us today.
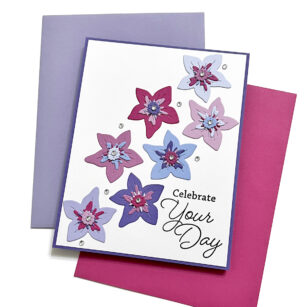
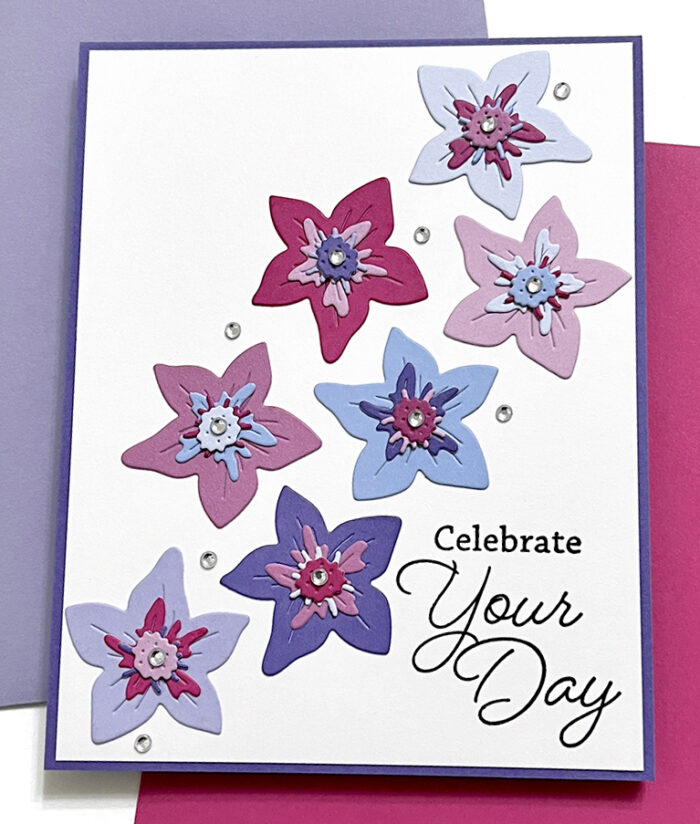
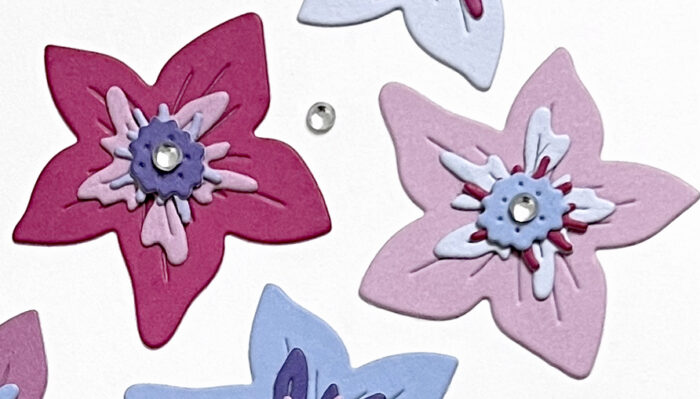
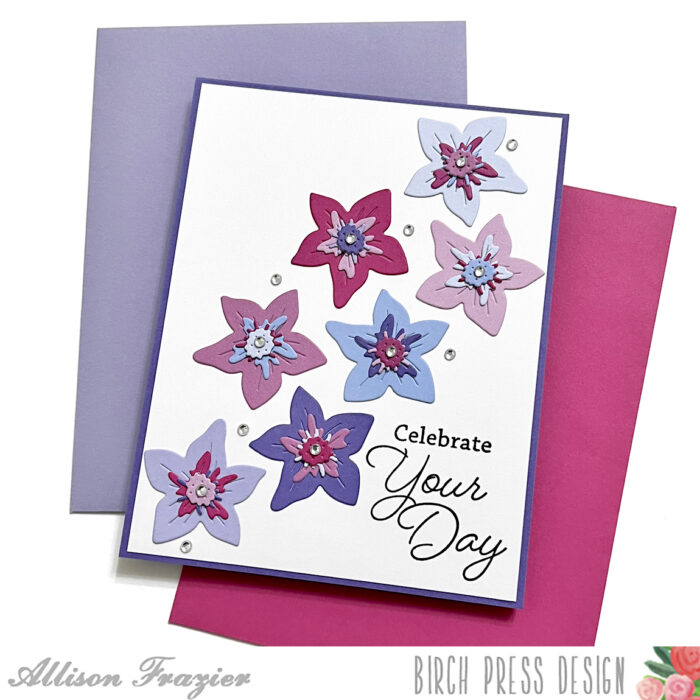
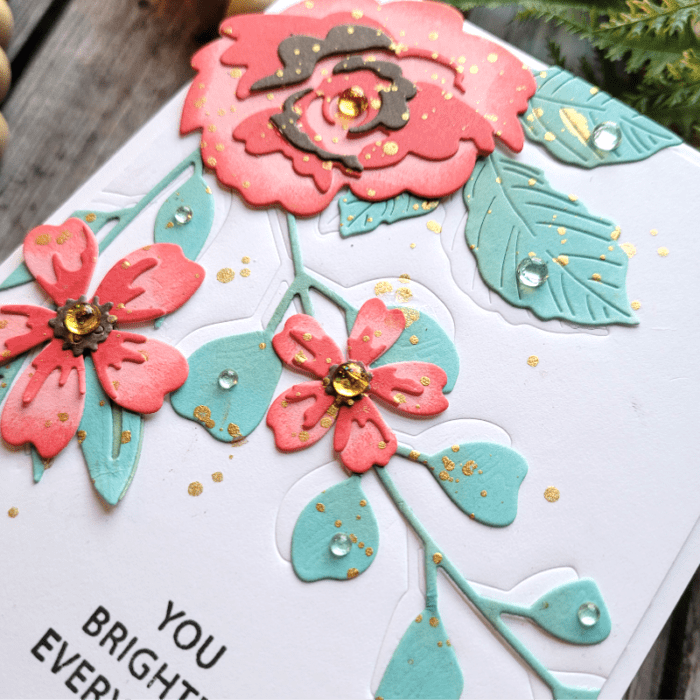
Hello, Birch Press friends. It’s always exciting when there are new products to play with, and that’s exactly what I’m doing today! I am featuring the new Gentle Flower and Leaves Contour Layers set. I love this sweet little flower, and I decided to make it the star of the show.
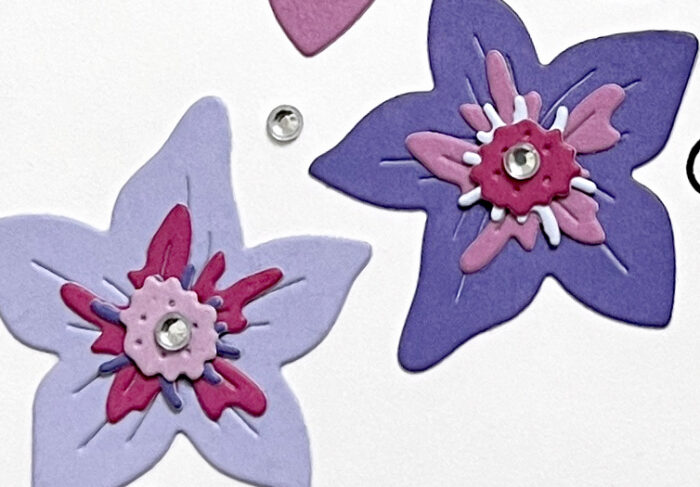
I first cut the flower die out of eight different colors of card stock. The die cuts all of the layers of the flower, so I was able to mix and match all of the layers and colors to come up with the various flowers that you see. I only used seven of the flowers on my card, since odd numbers work better for design.
The fun thing about this flower is that you don’t have to use all of the layers. It even looks sweet with nothing on it at all! I just had fun mixing all the colors up, so I wanted to use all of the layers.
I knew I wanted to arrange my flowers on the diagonal, so I found a sentiment that would tuck perfectly in the lower corner. The sentiment comes from the Friends and Family Stamp Set. I stamped it with black pigment ink onto my white card panel and then glued the panel to a dark purple A2 card base.
After glueing my flowers to the card base, I added some clear fairy jewels, both to the centers of the flowers and around the flowers. And that is it for my card today. I hope it brings a smile to your face. Thank you so much for joining us today.
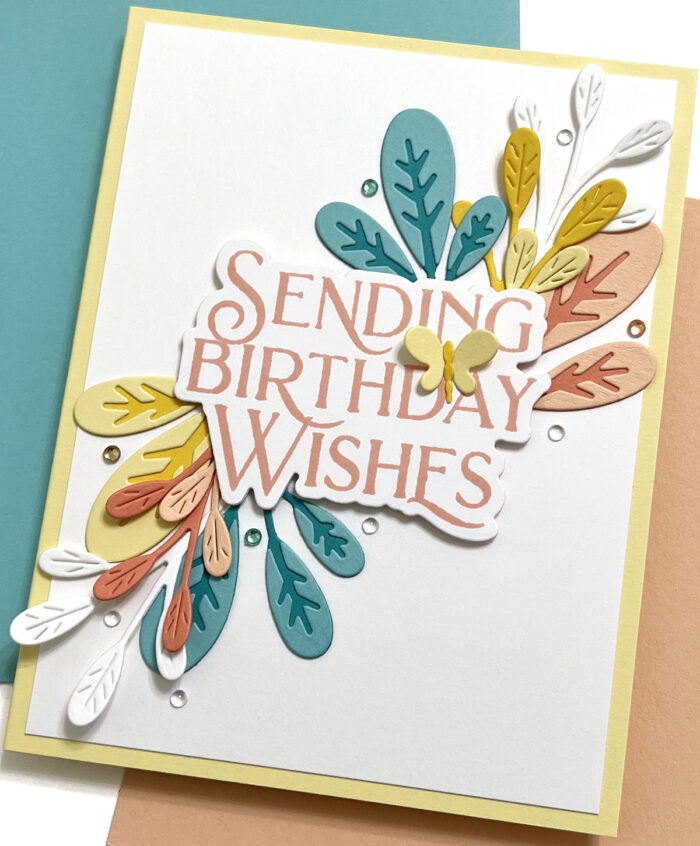
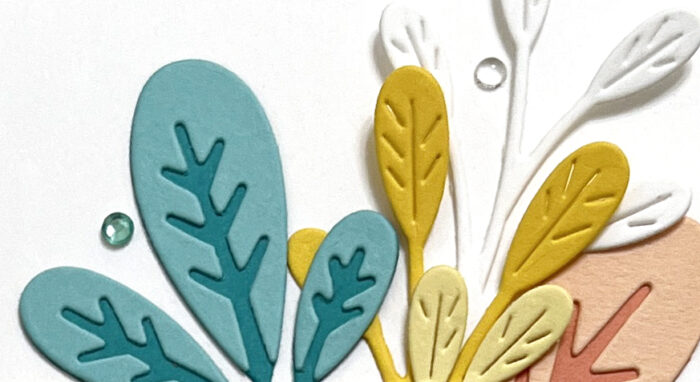
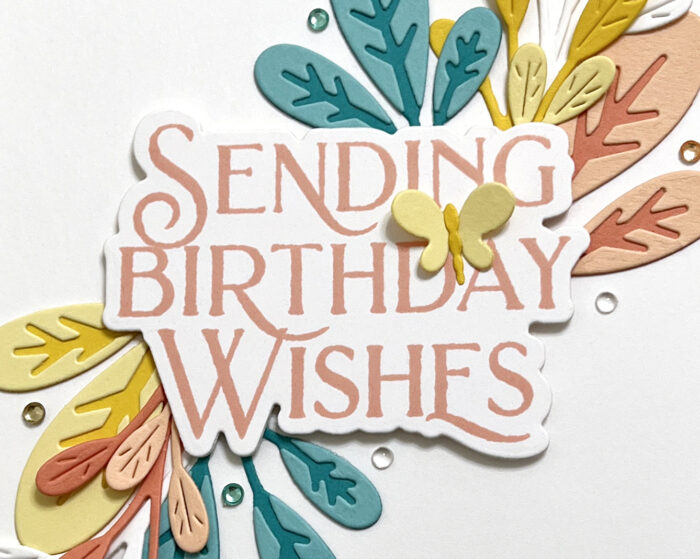
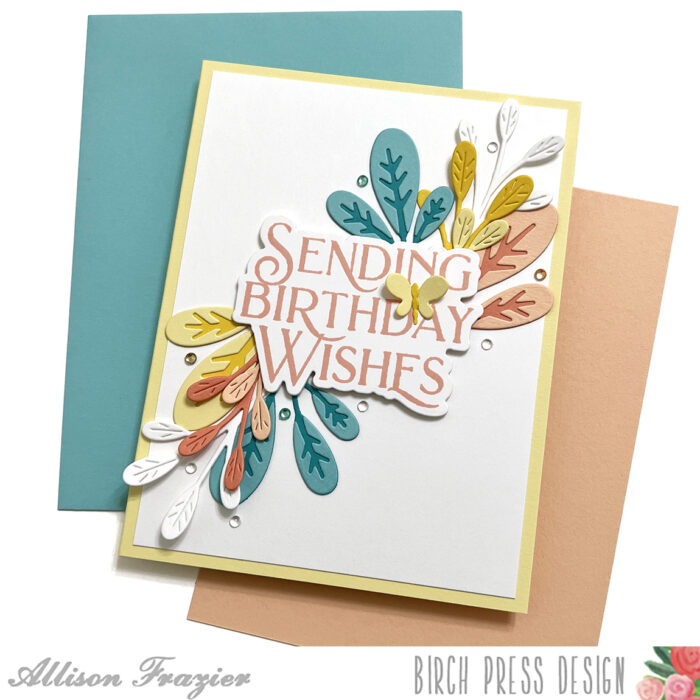
Hello, Birch Press friends! Today, I am sharing a sweet birthday card featuring the new Oval Leaf Branches Contour Layers set. Maybe it’s because we got an early snow this past weekend, but I was in the mood for some spring colors!
I started my card with the sentiment, since it was going to be my focal point. I used the Say It Big stamp set, stamped the sentiment with peach ink, and cut it out with the matching die. I put foam tape on the back of the sentiment and popped it up on a white panel. I had already glued this white panel onto an A2 sized yellow card base.
I cut the leaves out of turquoise, yellow and peach card stock. I cut the bottom layers of the leaves from a darker shade of each color. I glued the lighter detail pieces onto these darker ones. I also cut some small leaves (the ones that don’t have a top layer) out of white, yellow and peach card stock.
Although these leaves are connected to each other, I snipped them all apart so that I could arrange them and tuck them in under the sentiment. Because the sentiment is popped up on foam tape, there is room all the way around to tuck the leaves. Once I had glued all the leaves in place, I added a little butterfly on top of the sentiment. This butterfly comes from the Simple Butterfly Contour Layers set.
I finished up the card by scattering some fairy jewels around the leaves. I hope this card puts a smile on your face and inspires you! Thank you so much for joining us today.
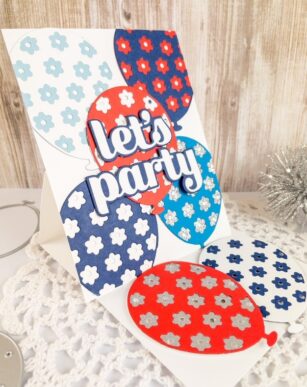
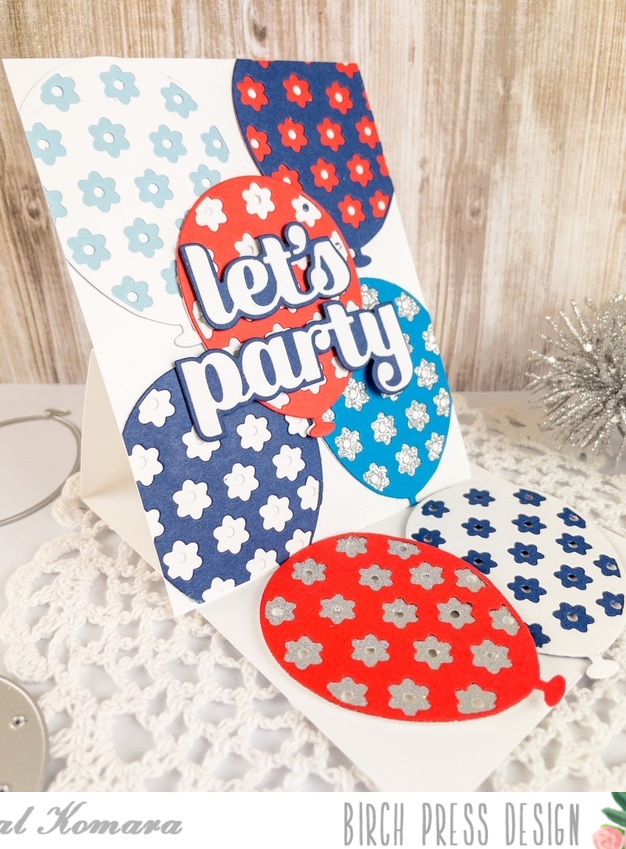
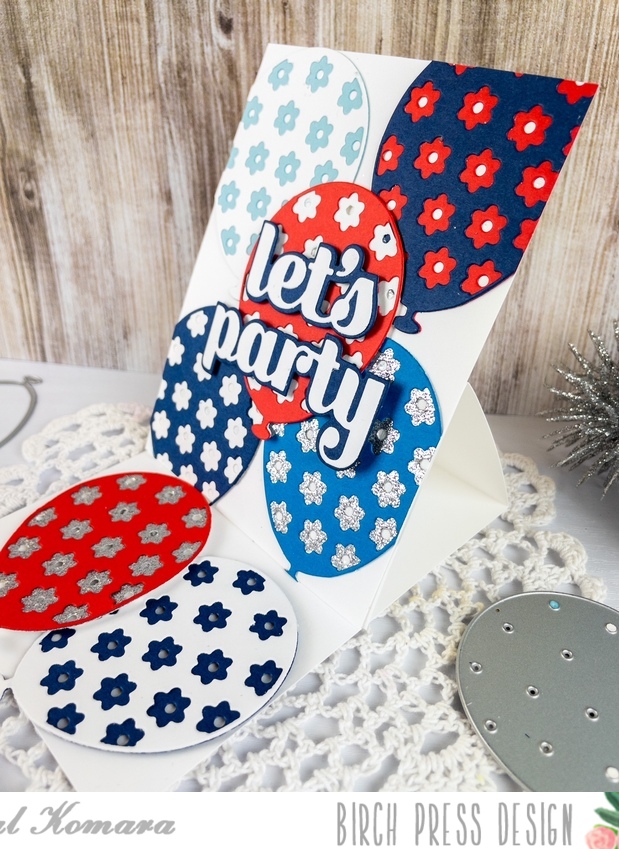
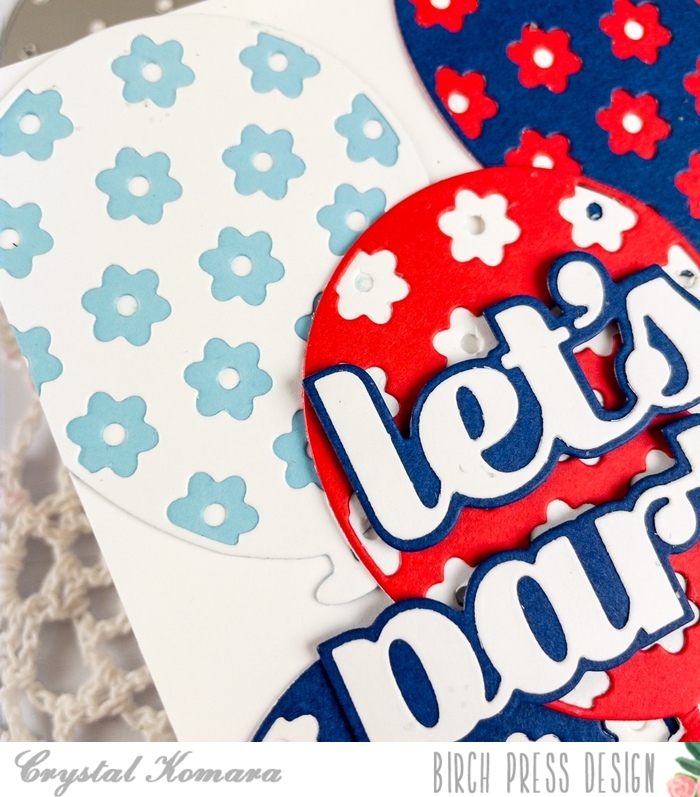
Happy 4th of July friends! This is Design Team member Crystal Komara sharing in the red, white and blue celebration with you today with this patriotic themed balloon easel card.
Card details:
The base of this A2 sized card was made with 80 lb. Neenah Solar White Smooth cardstock.
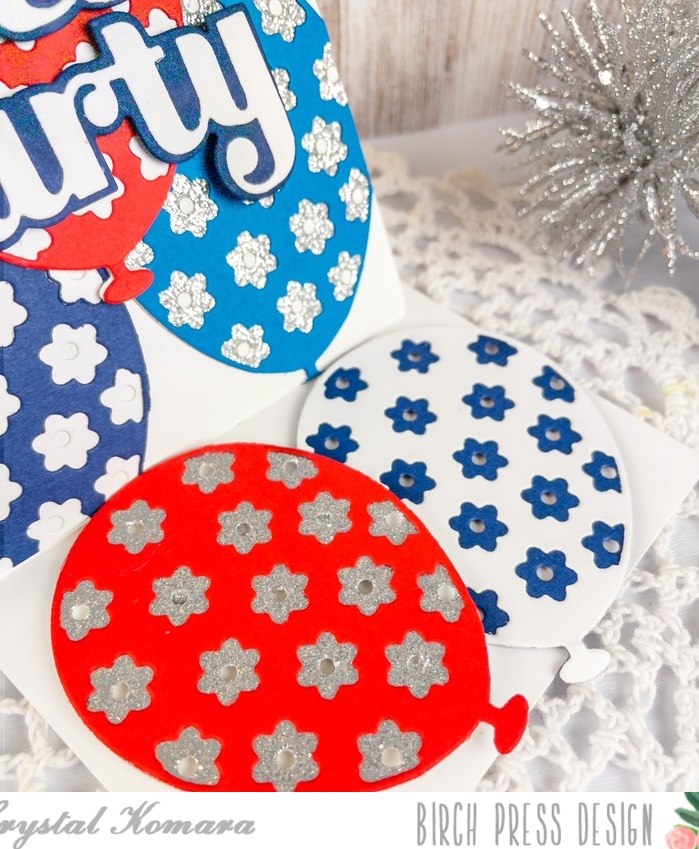
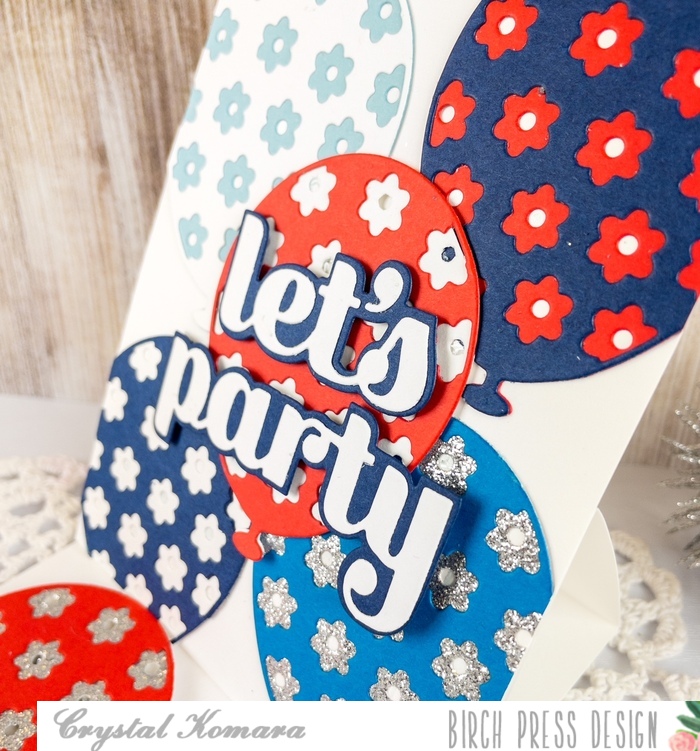
Using all three layers (A, B, and C) of the Floral Balloon Layer Set, I die cut four of every balloon in red, light blue, dark blue, white and silver glitter cardstock. (I really didn’t know how many balloon pieces I would need, so this gave me plenty to mix and match!) I really could have made two cards with all the pieces I had leftover.
I then began playing around with the balloons to see which colors I liked layered over each other, until I found an arrangement that was pleasing to my eye. I saved two balloons for the base of the card, to act as the “stopper” so the easel fold won’t collapse once it is standing.
*To make the easel fold, simply look up a tutorial on YouTube, there are a wide range of ideas, but all you need is the basic cutting instructions which are super easy!
I die cut the Let’s Party sentiment from both navy blue and white cardstock. I layered the two together with a fine-tip liquid glue and then adhered the sentiment to the card with 3M foam adhesive for added dimension.
Have a wonderful, safe and happy 4th of July celebration friends! Thanks for visiting!
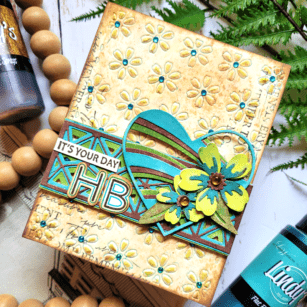
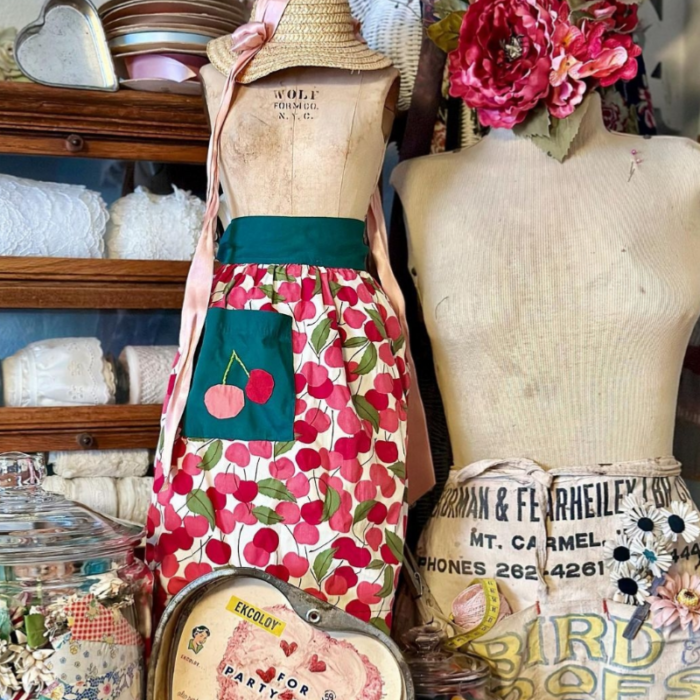
Hi friends! I’m back for Part 2 of How to Use Color Mood Boards for Inspiration! If you haven’t watched my previous post, be sure to visit that one as well for more inspiration! I love to use mood boards for color, texture, and design layout for my cards. Everything is done for you, so all that’s left is for you to choose what inspires you and make your card! Here is the mood board that inspired today’s card:
This mood board seemed old fashioned and rustic to me. I loved the hunter green from the apron, the yellow, brown, and blue from the words (lower right corner), the striking black words right above it, and the distressed shades beige from the manikin. The textures that I loved were from the manikin, the straw hat, and the large heart below the cherry apron. I wanted my card to be rustic and include a heart, flowers, and a mixed media touch with lots and lots of texture!
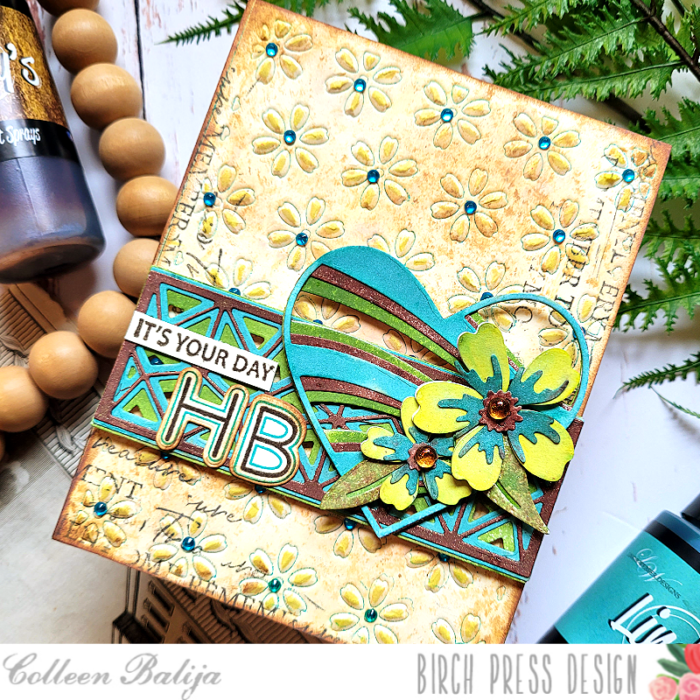
Step one was to create a textured background based on my observations of the mood board. You can see in the photo below all of the subtle, effective detail to my background. Let’s talk about how I achieved this look!
First, I duplicated the various shades of beige on the manikin using 3 shades of brown distress inks and then ink schmooshing onto watercolor cardstock. I placed the inks onto a glass media matt, sprayed with water, and then dipped the watercolor paper onto the ink. I kept repeating this process until I got the desired result. It helps to start with the lightest color of ink and heat each layer before adding the next layer. This creates a distressed look similar to the wood and manikin in the mood board.
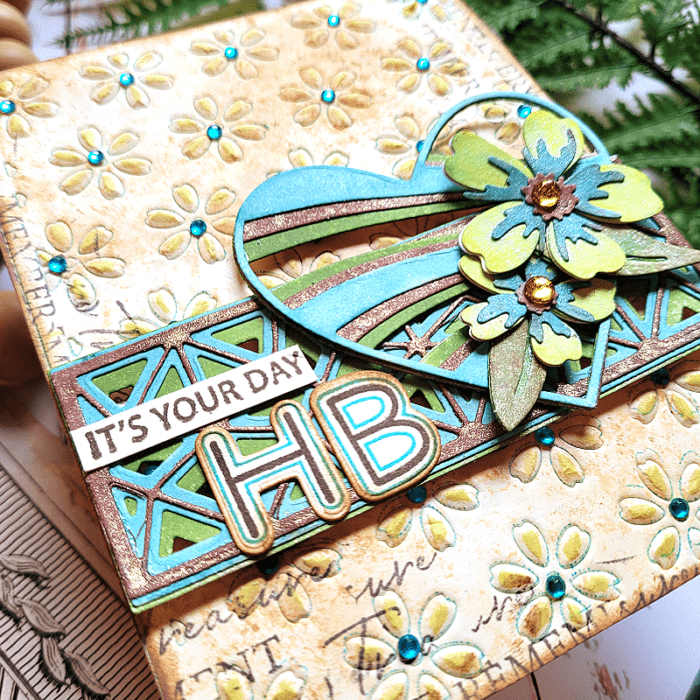
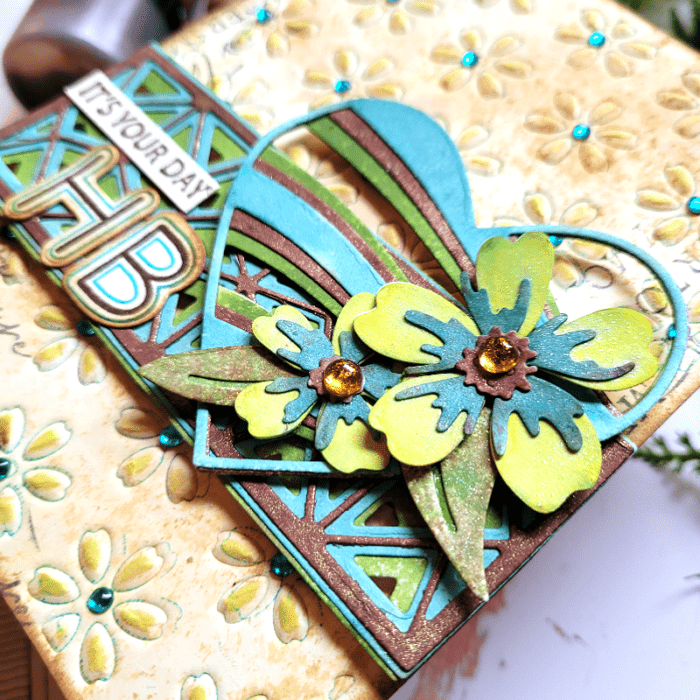
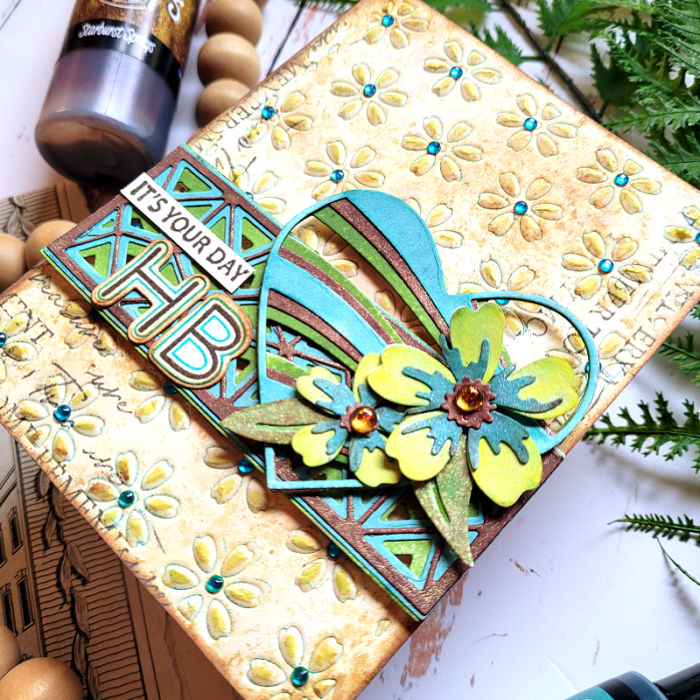
Next, I applied a dark teal shade of ink onto Flora Die Plate Layer B and then placed my inked-up card panel over the die plate and embossed it with my die cut machine (embossing techniques vary by machine – see the instructions for your machine on how to emboss with dies). The emboss technique creates an impression of the die onto your card panel without cutting all the way through it. When I removed the die plate, I was left with an embossed image of flowers edged with the teal ink! Then I went back over the raised image with a bright yellow ink to give the flower petals a pop of color! I adhered the card panel to a white 5.5×4.25 card base and added blue Fairy Jewels over each flower for added interest.
Next step was to work on the flowers and add even more texture! In the photo below, you can see the color and texture with the Banner Hearts die, Mini Splendor Bevel Plates, and Phlox Blooms & Leaves dies.
I die cut all of the above mentioned elements onto white cardstock. Then, I sprayed each of them using my Lindy’s sprays. Lindy’s sprays have subtle color variances and a bit of shine to them, so I knew they would be perfect for this mixed media project! After everything dried, I adhered the layers together. I placed the Mini Splendor Bevel Plates die over the card base about 2/3 of the way down. Then I placed the Banner Hearts die over it and to the right. I placed the 2 Phlox flowers and leaves over the lower part of the heart and finished with a “HB” (Happy Birthday) sentiment from Mod Alphabet stamp and die set. I chose that set because it reminded me of the bold yellow and blue words on the apron! Then I added “It’s Your Day” from Kind Hearts stamp to complete the sentiment.
I love to find unique elements from color mood boards to use on my cards, and I generally get lots of comments about it! I think that’s because the mood boards really inspire me to get playful! See if you can find some unique color mood boards that inspire you to jazz up your cards! You can even use mine! Be sure to let your creative juices flow on the layout and design of your card! Thanks for stopping by today!
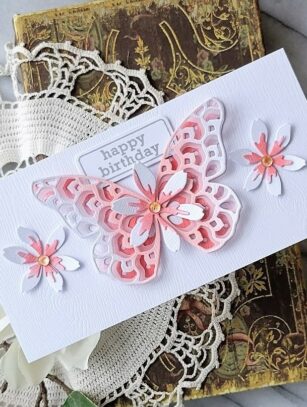
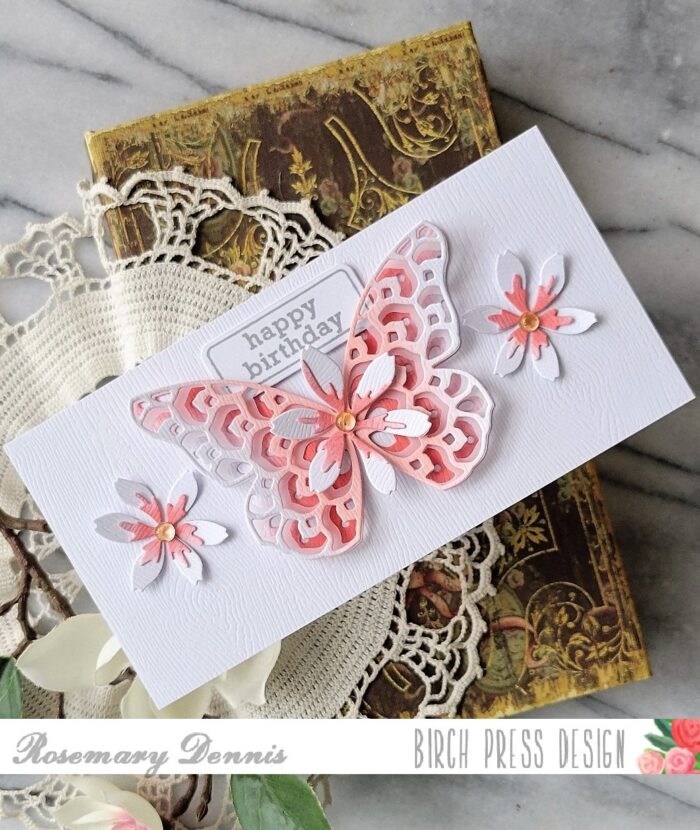
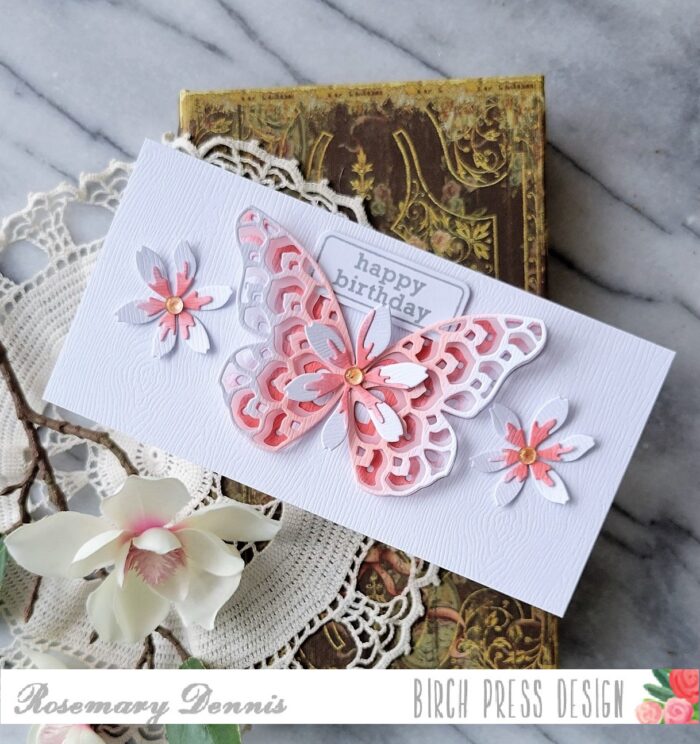
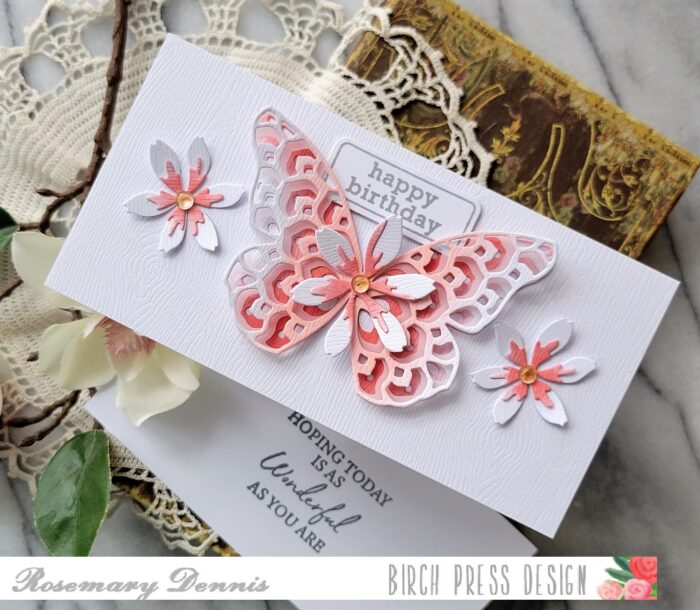
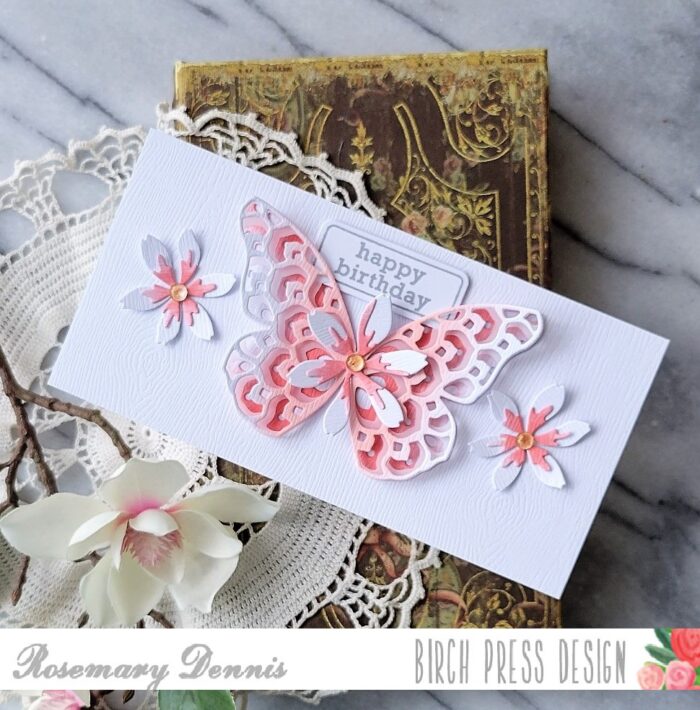
Hello! Today I have a clean and simple mini slimline birthday card to share. I used the Star Flowers Contour Layers dies along with the Glimmer Butterfly layers dies and sentiments from two different stamp sets.
For this card I decided to use the Memory Box white woodgrain cardstock. The only thing I didn’t use it for was the card base! I die cut the the A and C layers of the Glimmer Butterfly from the woodgrain cardstock. The middle (or B) layer was die cut from vellum. I then used to shades of coral ink to ink up the centers of the top and bottom layers. Darker coral on the bottom and light coral on the top. When I had the color to my liking I used liquid adhesive to adhere the butterfly only in the center.
I then created the flowers. All the layers were die cut from the woodgrain cardstock and then I added the darker coral to the second layer. There is a flower center die, but I decided to not use it this time. I layered the flowers and then added a fairy gem to the center of each flower that had a peachy tint to it. To make sure that the gems stayed in place I added a drop of liquid adhesive to the center of each flower.
A piece of the woodgrain cardstock was trimmed to fit the mini slimline cardbase and then adhered with double sided adhesive tape. The large flower was added to the center of the butterfly with a drop of liquid adhesive. Once everything was dry I adhered the elements to my card front using liquid adhesive. Now it was time to determine where to place the sentiment on the card front.
The sentiment on the card front comes from the Contempo Greetings stamp set. I decided to keep it soft my stamping it in a light gray. I then die cut it with the label die from the matching die set. I played around a little with where to place the sentiment and finally settled on the top. I added thin foam squares to the back and then nestled it into the wings of the butterfly. I don’t generally create a sentiment for the inside of the card, but for this card I did.
The reverse side of the woodgrain cardstock is smooth and perfect for stamping on. I trimmed down a piece to fit the inside of the card and then stamped the sentiment from the Kind Hearts stamp set using the light gray ink. This piece was then added with double sided adhesive.
I hope you enjoyed today’s project. Have a wonderful day!
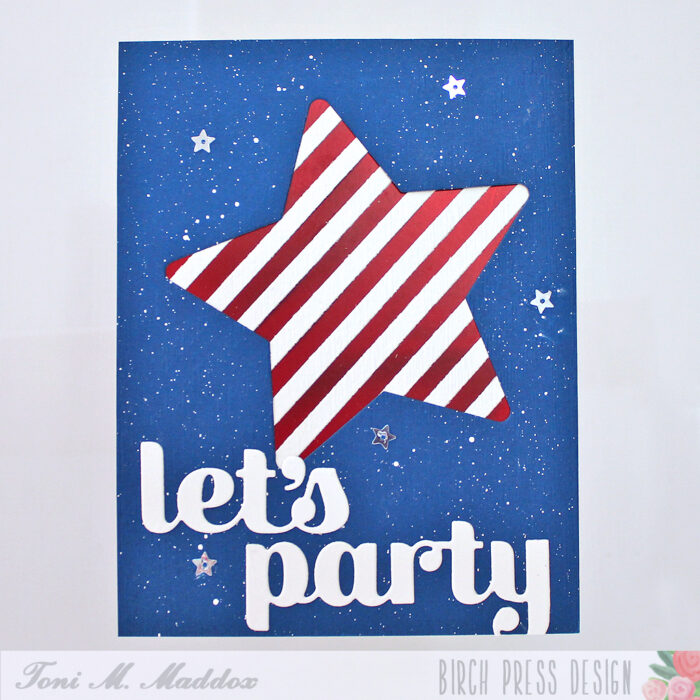
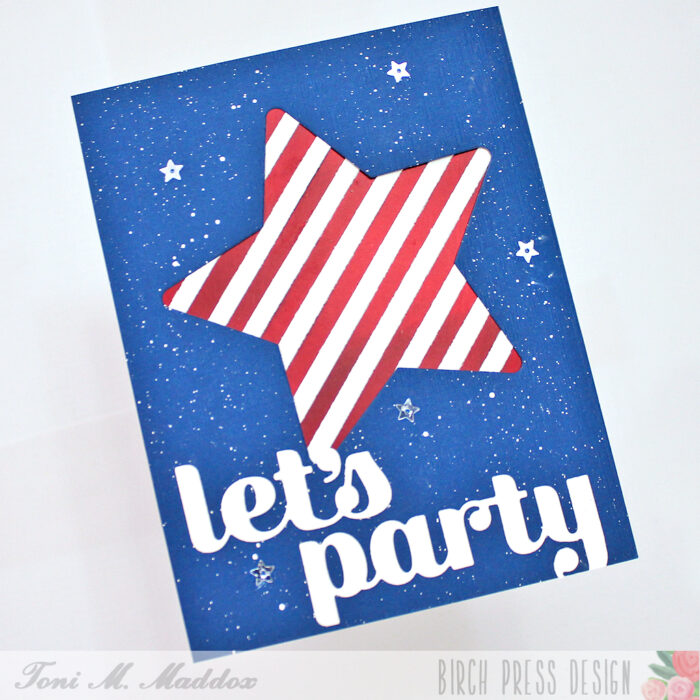
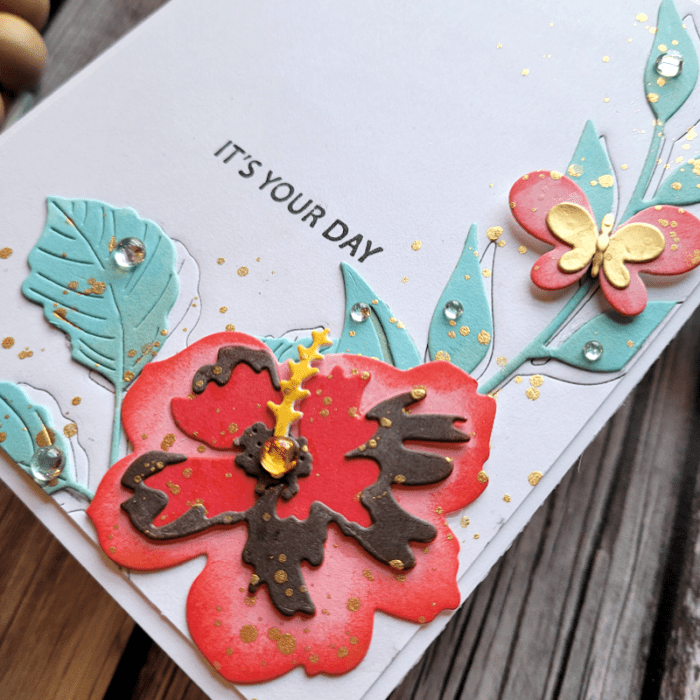
Hello, Birch Press fans! Toni here with you today sharing a card suitable for a patriotic birthday (in the US), congratulations, retirement or even an invitation to a Memorial Day BBQ.
This card was so easy and fun to make. Who doesn’t like spattering and shiny things?
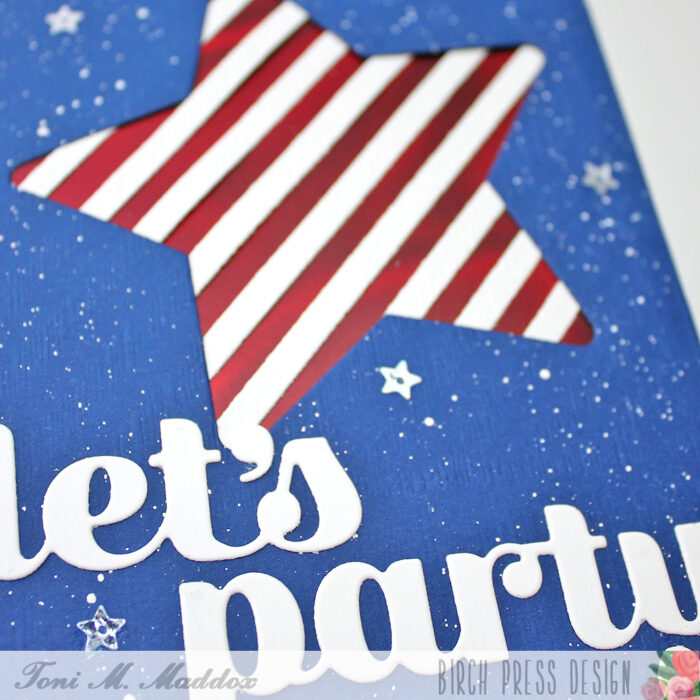
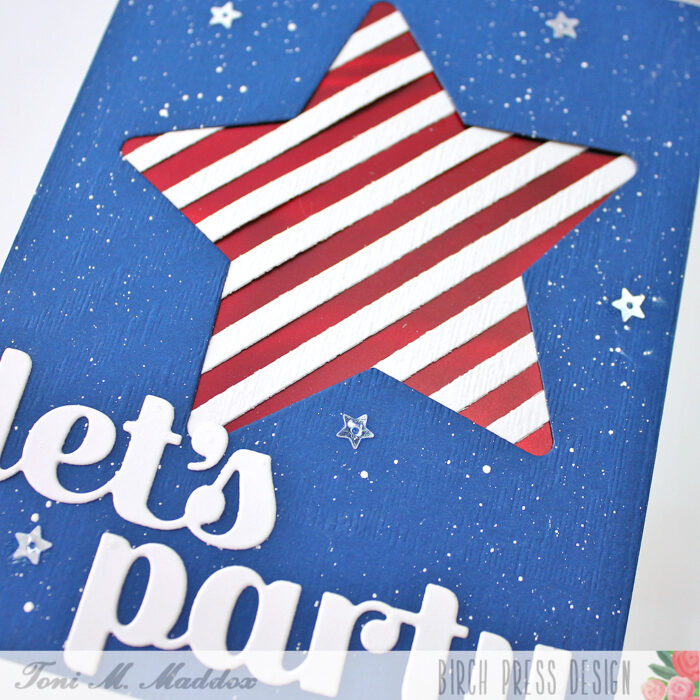
I started the card by cutting out the Piped Icing Star from a blue cardstock which I had embossed with a simple linen-type pattern. I then spattered the surface with Copic Opaque White (for stars or confetti).
Next I cut out a Linear Triangle in white which I positioned so that it created a striped background for the red foil cardstock beneath to peek through.
My final touches included adding the Let’s Party Sugar Script sentiment and a sprinkling of shiny star sequins.
I hope you enjoyed today’s card and have a great rest of your week!
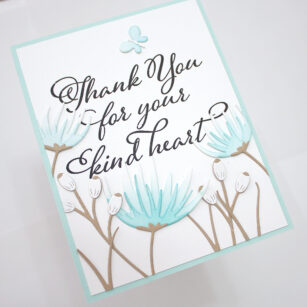
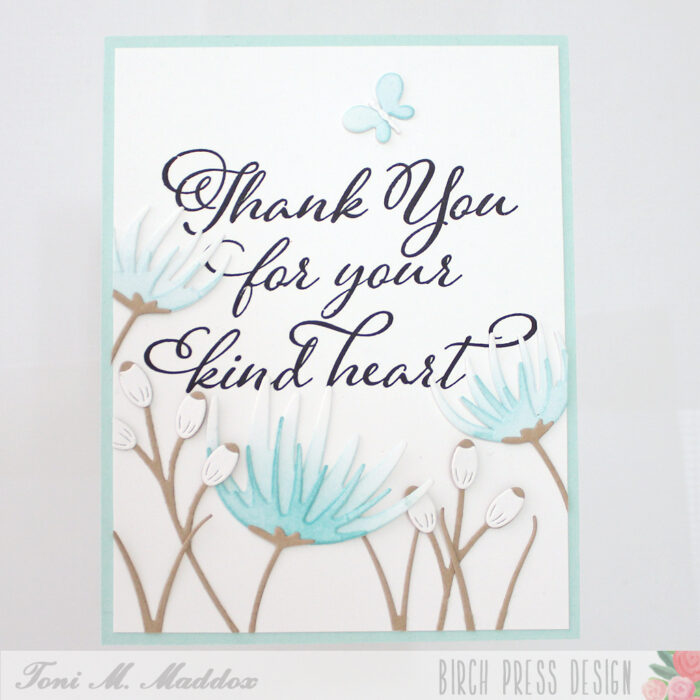
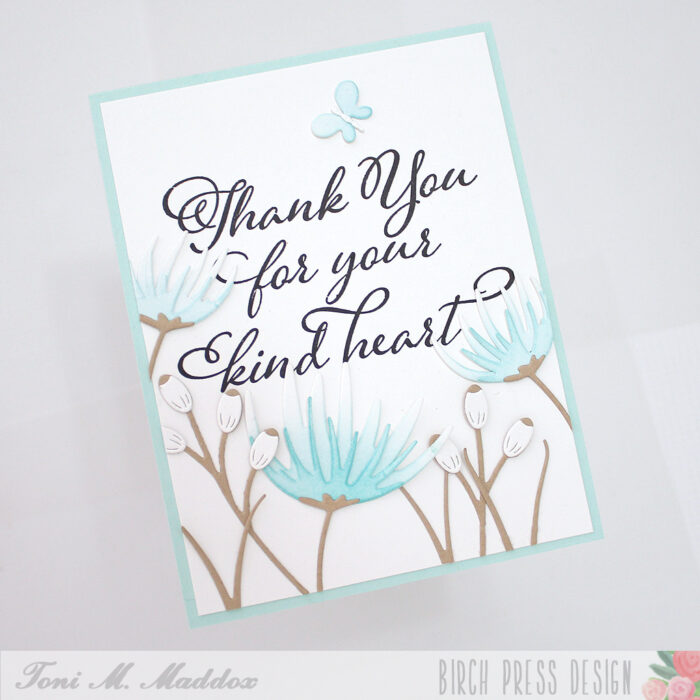
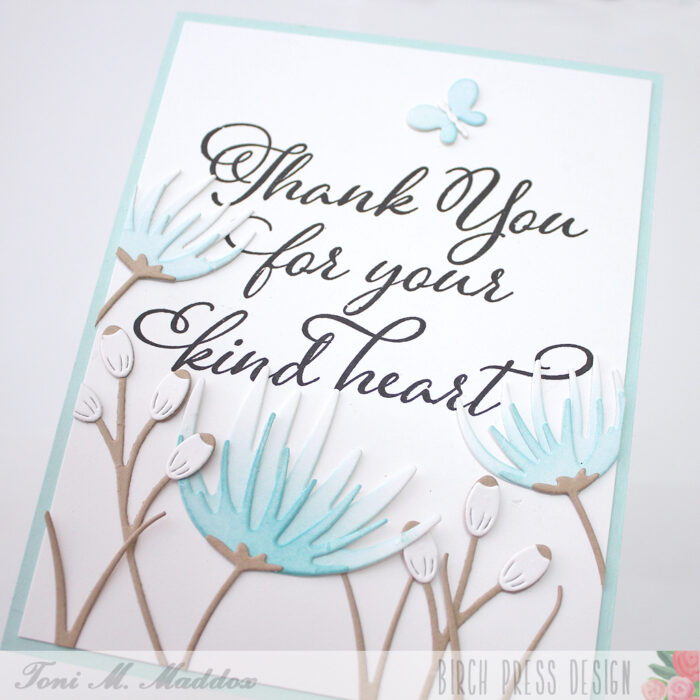
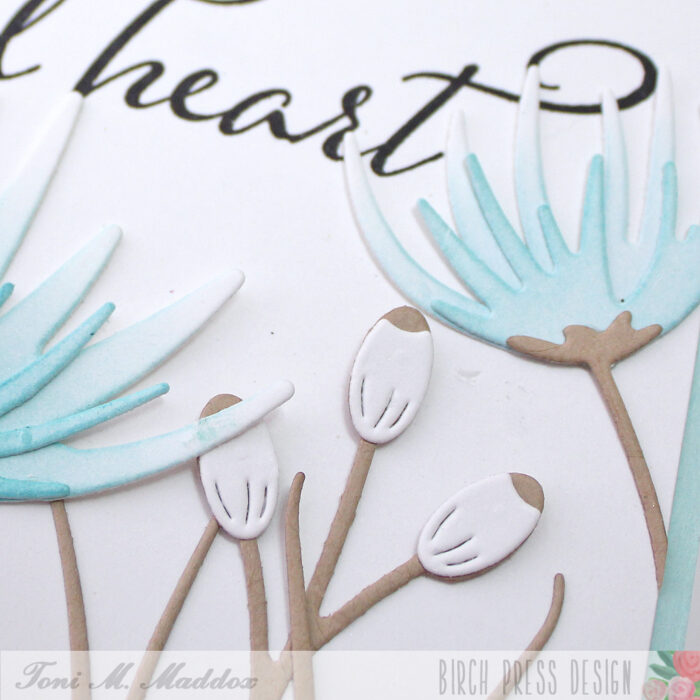
Hello, Birch Press fans! Toni here with you today sharing a simple thank you card using one of my favorite colors combos, aqua blue and kraft.
I cut out the Wispy Blooms as well as the Sylvan Berries and Leaves Contour Layers in white and kraft.
I then sponged the Wispy Blooms and the Simple Butterfly with just a touch of Distress Oxide Peacock Feathers (I think Salvaged Patina is a great substitute).
I stamped the Kind Hearts sentiment in black then framed it with the greenery (blue-ery?).
I added a few stems from the Sprouting Crocus Contour Layers in kraft to fill in a bit.
I hope you enjoyed today’s card and have a great rest of your week!
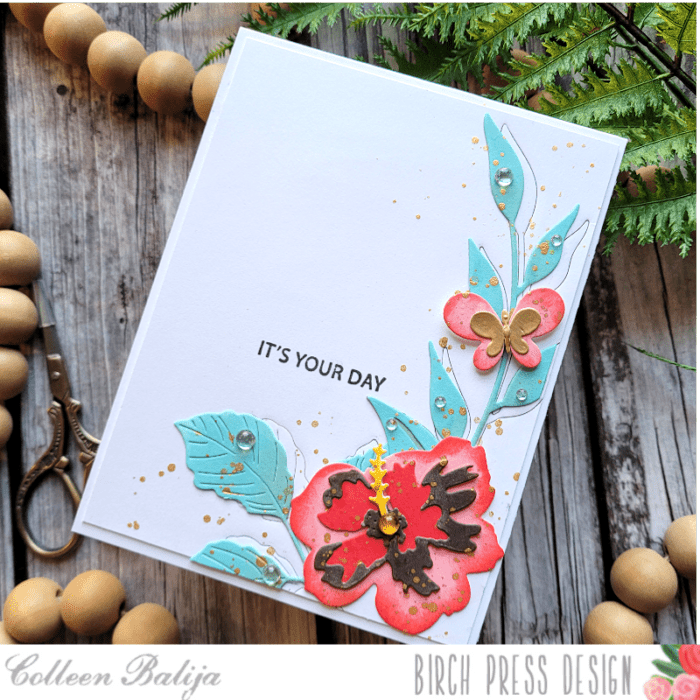
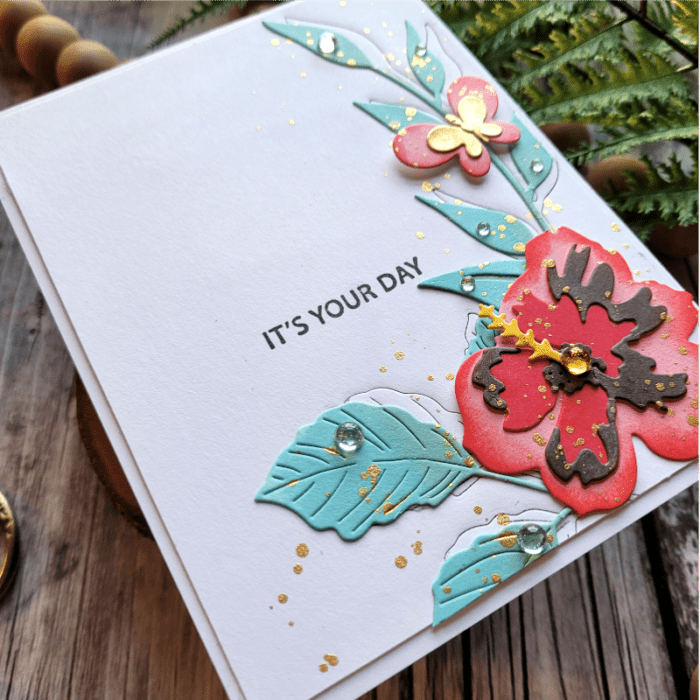
Hi friends! I’m back for this month sharing another Clean and Simple card, similar to my blog post on April 10th! If you haven’t seen that post yet, head over there first to get the deets before reading this post, as this is a continuation!
This month I’ve been focused on Clean and Simple lines in my cards. That’s a challenge for me, but I like a good challenge so decided to give this a try! I hope you like it! Clean and Simple cards can be very effective with just a few simple design ideas to add detail and interest to your card!
The products I’m using for today’s card are Phlox Blooms & Leaves die, Sylvan Berries & Leaves die, Tropical Hibiscus Contour Layers die, Simple Butterfly die, and Rainbow Days stamp. All of these items will be linked at the bottom of my post!
Similar to my other Clean and Simple card of April 10th, the first step was to decide on the arrangement of my flowers on the white card panel. Once that was decided upon, I die cut my flowers and leaves and then ink blended each in shades of coral and mint green. I explained in my first blog post why I die cut first and ink blend second. Basically, it allows me to get more depth of color with the flowers and leaves. You can see that in the photo above!
Next, I wanted to add subtle detail to the white space, so I used a few of the die cuts from earlier as embossing tools. And unlike my first card, this time I inked up the die with black ink! To do this, I inked up just the tips of the dies, placed them carefully where I wanted them (once they are in place, don’t move them or you’ll get black ink all over your nice white card panel), taped them down to the card panel so they wouldn’t move, and ran them through my die cutting machine using an embossing pad. The embossing pad allows the die cut to embed an image without cutting all the way through (Each die cut machine is different in how it works, so refer to your brand of die cut machine for details.) The black ink adds another element of interest! You can see in the photo above and below the level of detail that this technique adds! The black ink is subtle, but effective! You could use any color of ink, too!
Last step was to adhere the flowers and leaves to the card panel, placing the leaves offset from the embossed image so just a bit peeked out from behind! Then I added gold metallic splatters just around the flowers, being careful to leave most of the white card panel untouched. I placed the “It’s your day” sentiment next to the flowers and then finished with sequins over the leaves and flowers.
Clean and Simple cards are really fun, and if you keep these helpful tips in mind, you just can’t go wrong!
Emboss the white card panel with embossing folders or dies
Use splatters sparingly to add interest without overwhelming the card panel
Add detail to the focal point by ink blending to create depth and life to your florals
Keep the sentiment simple and small
Add sequins or a Nuvo Shimmer pen to add shine and shimmer to your focal point
Keep one half to one quarter of the card panel white and untouched
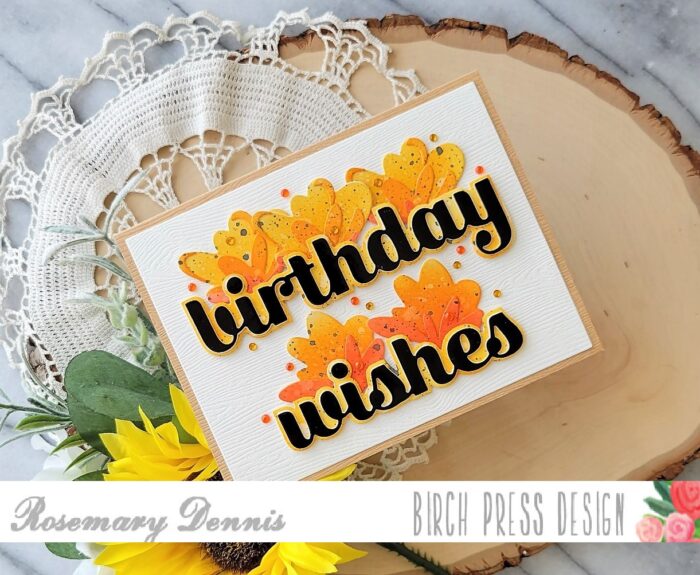
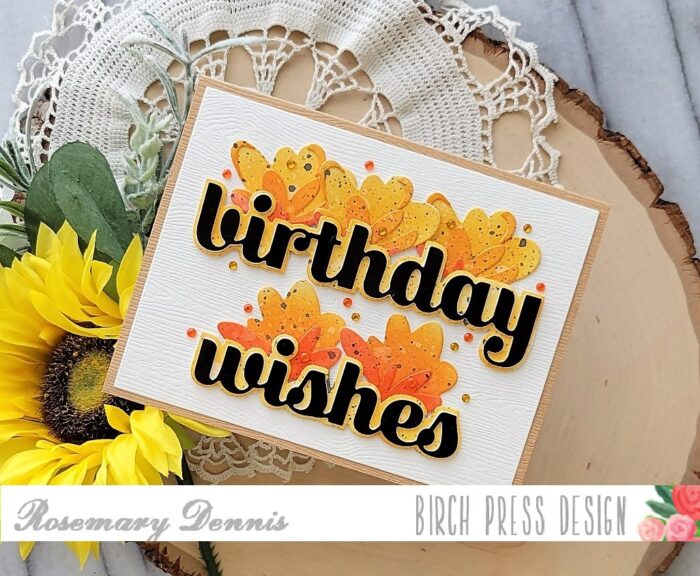
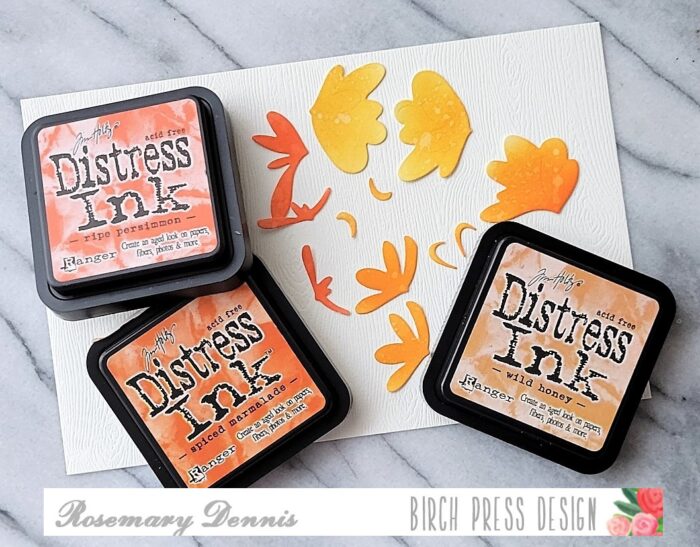
Wow, can you believe it is already the end of April? Where is the time going?! Today I’m sharing a card that was inspired by my other favorite crafting pursuit: cross-stitching. Before I started paper crafting I was an avid cross-stitcher, but I injured my shoulder and stitching became hard to do so I gave it up. Last summer I was inspired to start stitching, again, and discovered that it didn’t bother me as much as it had… yay! And that leads me to the card I’m sharing today. I had started stitching a chart using a warm orange floss and that got me to thinking about the colors I wanted to use for a card I would be making using the new Jovial Blooms and Leaves Contour Layers dies. I know it is spring, but I just love warm autumnal colors and that is where we are going, lol
I started by die cutting all the flowers that I thought I would need for the card. Once I had everything die cut I put washi tape on the back of the panels to keep the pieces in place and did some simple ink blending using distress inks in Spiced Marmalade, Wild Honey and Ripe Persimmon. The flowers with three layers I used all three colors and for the flowers with only two layers I used Ripe Persimmon and Spiced Marmalade. I also splattered on some water to give the pieces a bit of a distressed look. Then I adhered all the layers together. I was so intent on getting my flowers put together that I completely forgot to add the stamens! Oops!
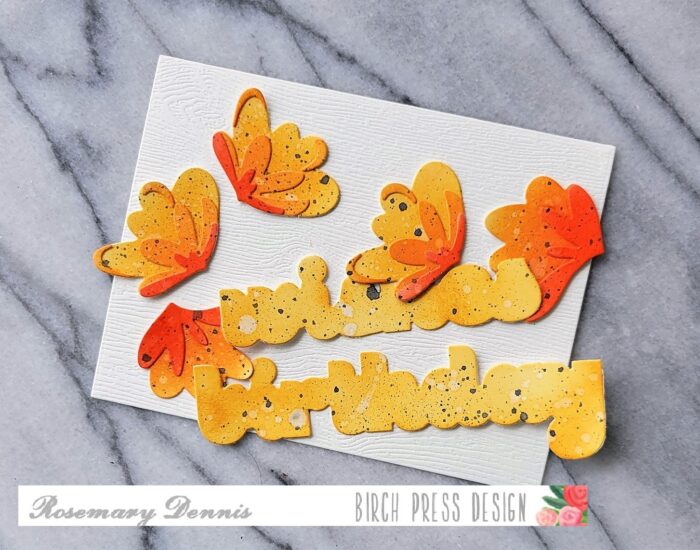
Once I had the flowers assembled I did a little bit more splattering using some black paint. At this point I pulled out the Birthday Wishes Sugar Script die set and die cut the top layer from Memory Box Open Studio glossy black cardstock. That cardstock is amazing! I love how thick and substantial it is. I die cut the shadow layers, inked them up with Wild Honey distress ink, and then splattered on water and black paint. I cut additional words out of scrap cardstock and adhered them to the glossy black words for additional dimension.
Once I had all my elements assembled and ready to go I die cut a piece of Memory Box Open Studio cream woodgrain for the background. I played around with the layout for quite sometime before finally settling on the layout you see.
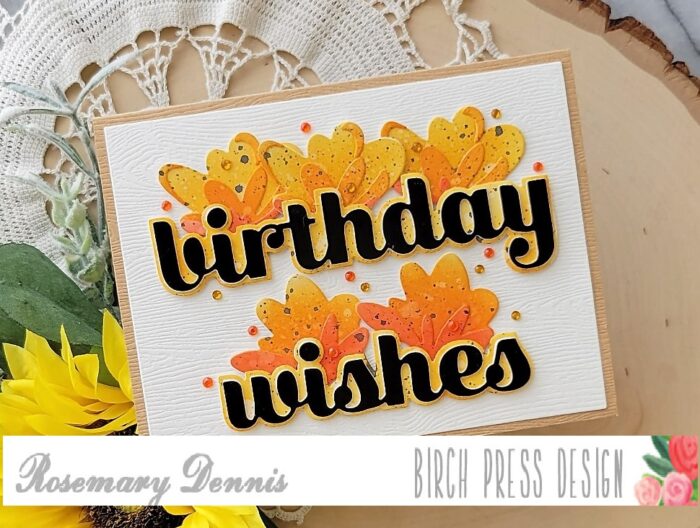
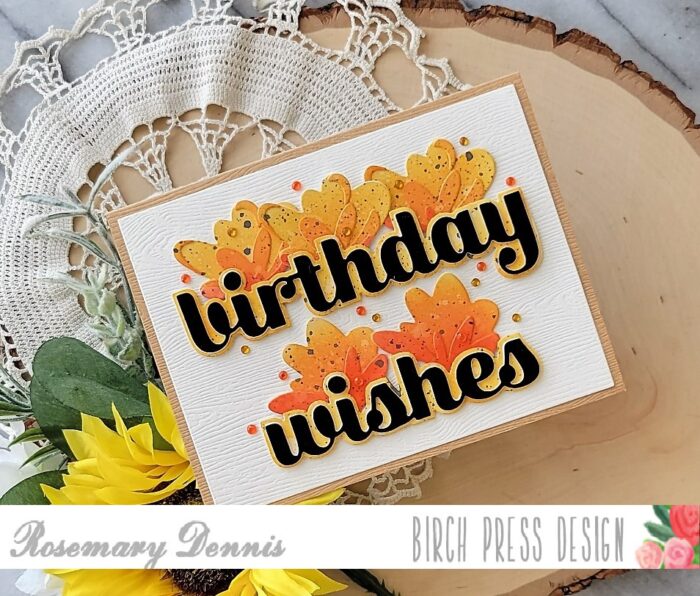
I finished off the card with lots of little warm yellow and orange Open Studio fairy jewels. I did something I don’t normally do and created the card base from woodgrain cardstock. This time I used Memory Box Open Studio kraft woodgrain cardstock and I really like how it looks.
I hope you are inspired by my little trip to autumn. Thanks for stopping by and enjoy your day!