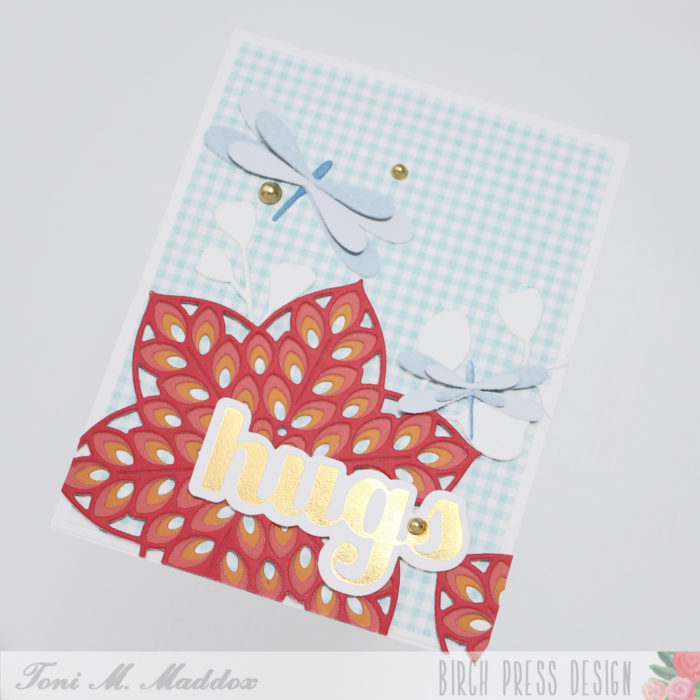
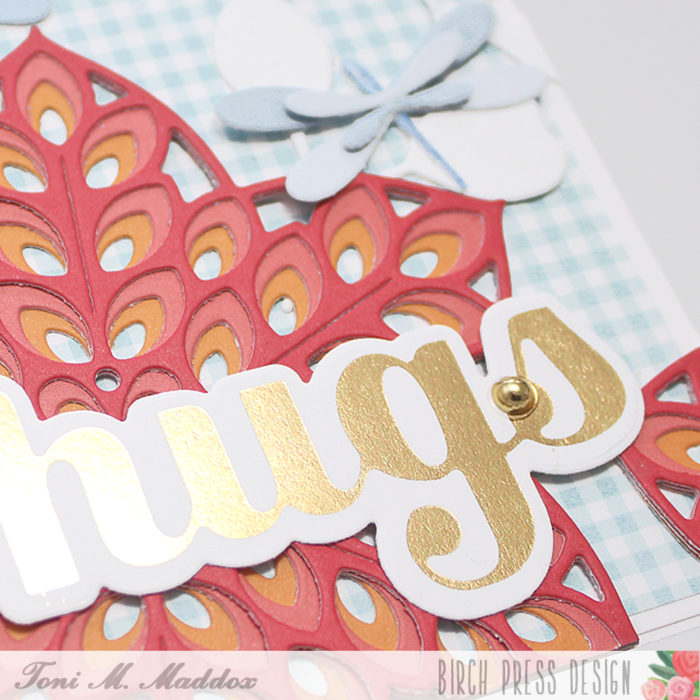
Hello, everyone! Toni here with you today sharing a card using one of my favorite color combo of blues and reds. It’s fab all the time but especially with summer nearly upon us.
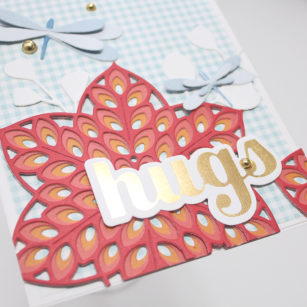
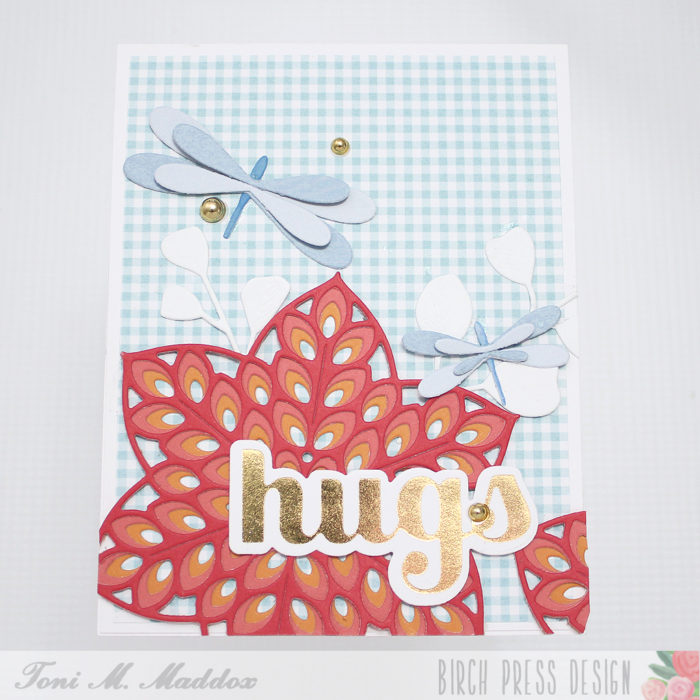
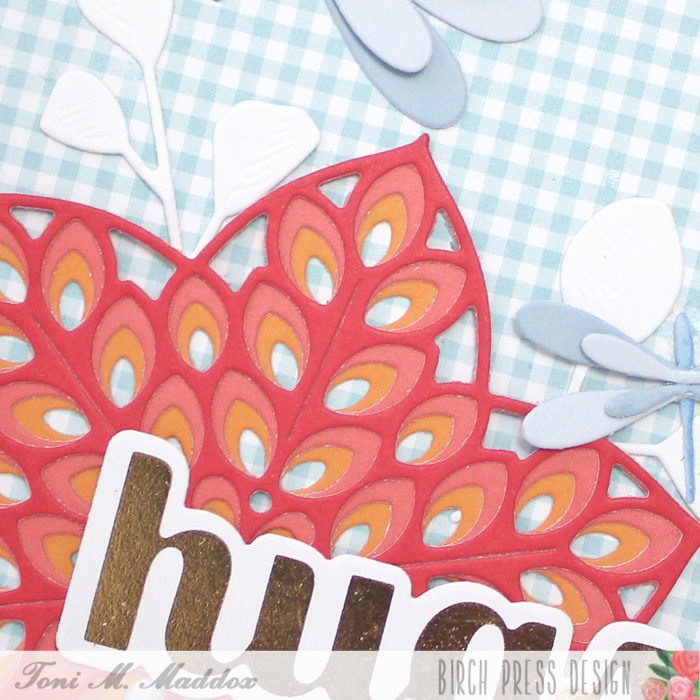
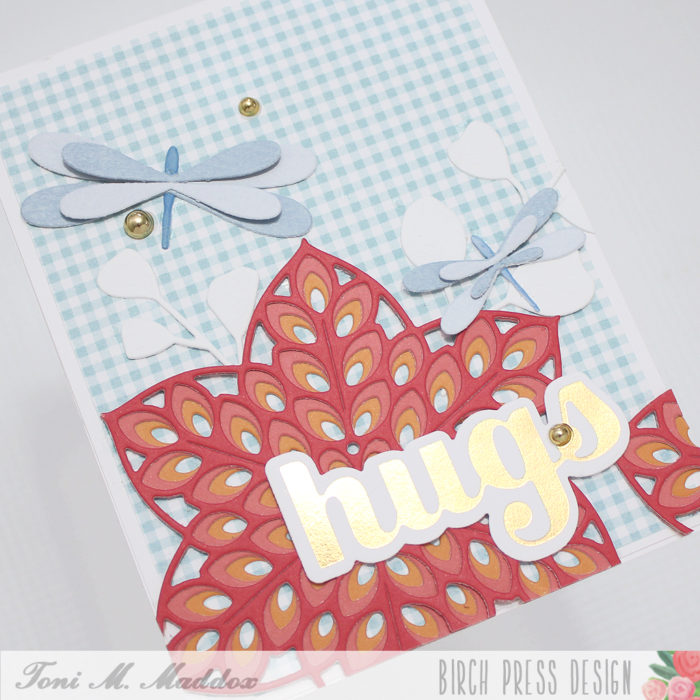
I cut out the Floral Star Layering Dies using MB Sunny Orange & Berry Red 6×6 paper to create a large floral focal point for the card.
Notice how I used a portion of what I had trimmed off to form the tip of another blossom on the card front.
I then foiled and cut out the Hugs Sugar Scripts Hot Foil Plate & Die using a leftover piece of Spellbinders Glimmer Polished Brass Hot Foil. Swoon!
I cut out the Simple Dragonfly Contour Layers using MB Stormy Blue 6×6 Paper to coordinate with the background checks (talk about a summery pattern!).
I was going to sponge the Eucalyptus Stem & Berries Contour Layers but decided I liked them in white.
I hope you enjoyed today’s card and have a great rest of your week!
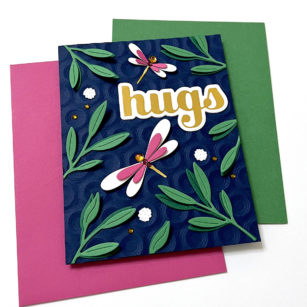
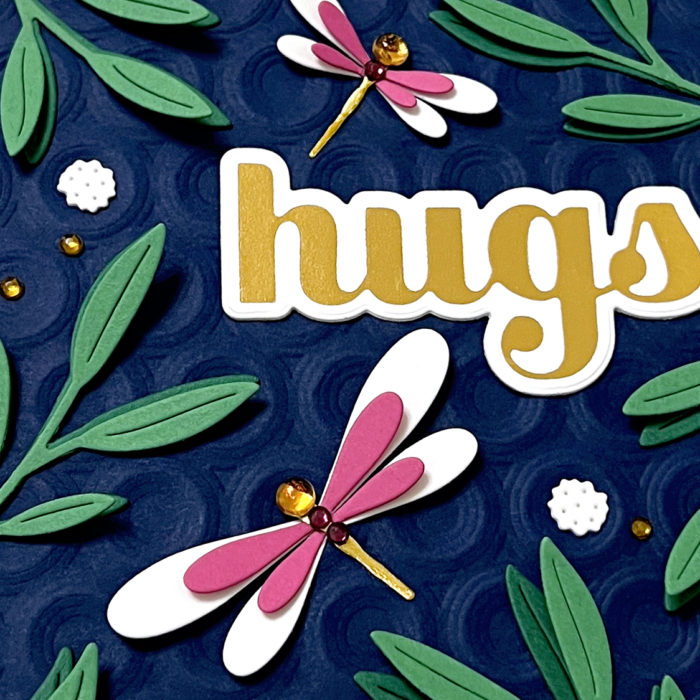
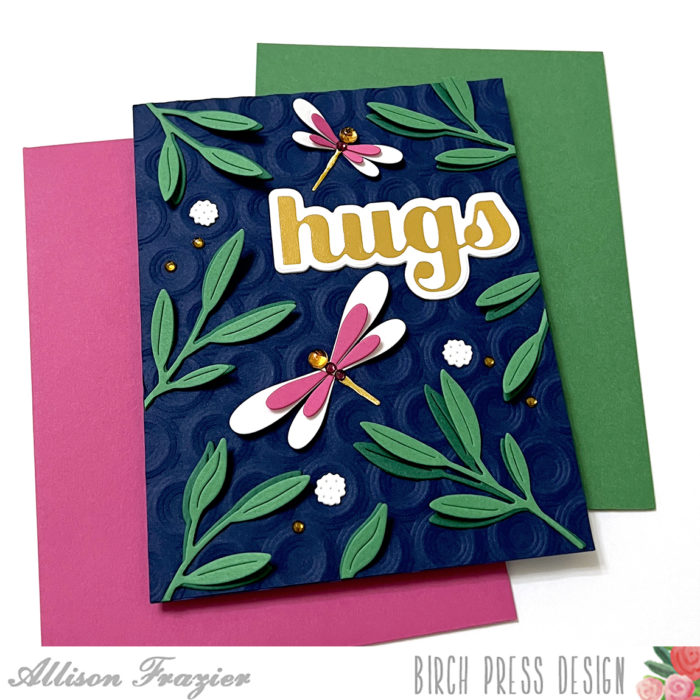
Hello, Birch Press friends! Allison here, and today I’m sharing a card featuring some of my favorite products from the latest release.
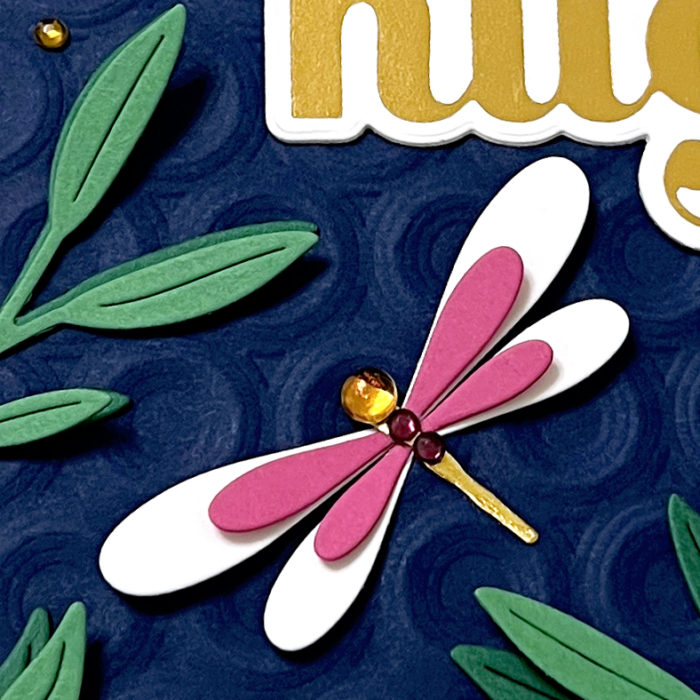
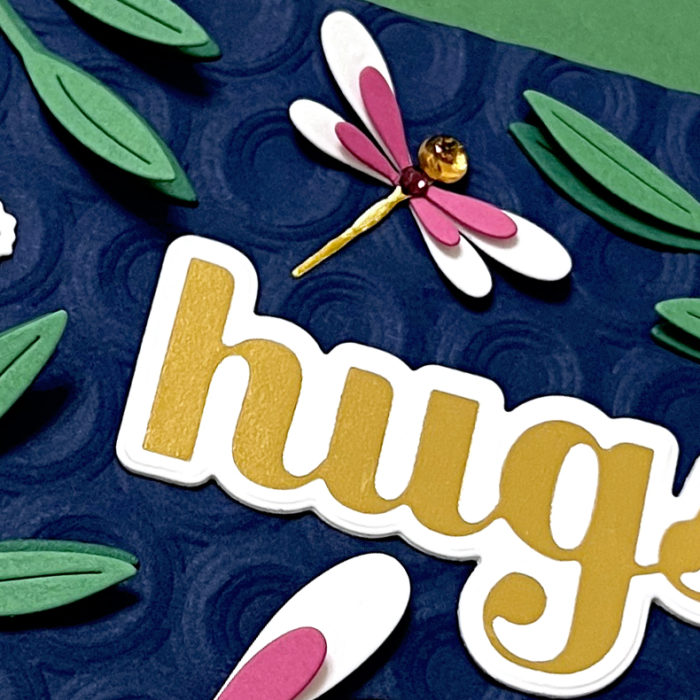
I started by embossing a navy panel of card stock with the Ringadings 3D embossing folder. I love the texture this embossing folder gives! I then die cut a bunch of kelly green leaves from the Tiny Tuft Flowers and Leaves Contour Layers set. I also cut the same leaves from a darker green card stock. I layered those by glueing only the thinnest part of the leaves together, while also slightly offsetting them. I glued the bottom, darker leaf to the card panel. The top layer lifts up off the card and gives great dimension.
Next, I used white and dark pink card stock to cut the wings from the new Simple Dragonfly Contour Layers set. I am in love with these dragonflies! I cut the bodies from gold metallic card stock. I adhered the layers together, only glueing them in the centers. I glued only the body to the card panel. This allows the wings to lift up off of the card, similar to the leaves.
I added some gems to the dragonflies to give them a bit more detail. I also added some gold gems around the panel. The small, white die-cut embellishments are the centers of the flowers from the Pimpernel Contour Layers die set.
The sentiment is the Hugs Sugar Script Hot Foil Plate. I foiled it with a brassy gold color and then cut it out with the matching die.
Thank you so much for joining us today. I hope this card inspires you and brings a smile to your face!
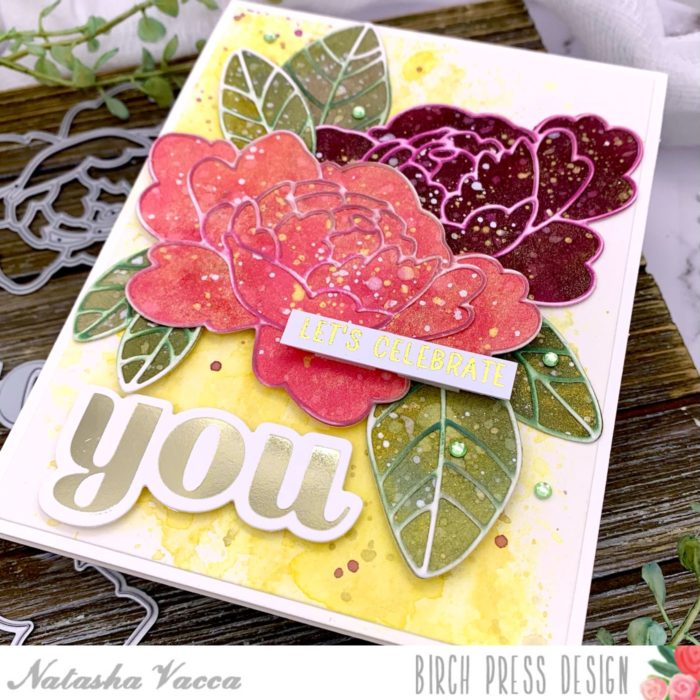
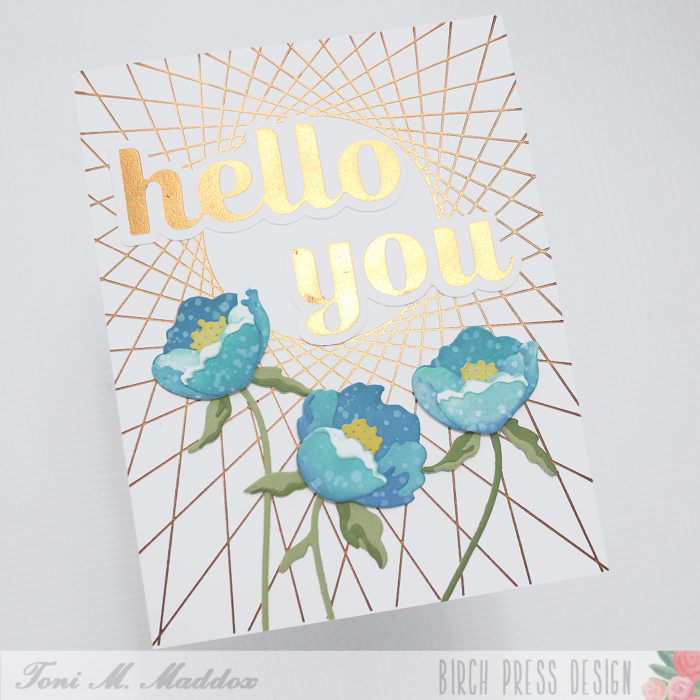
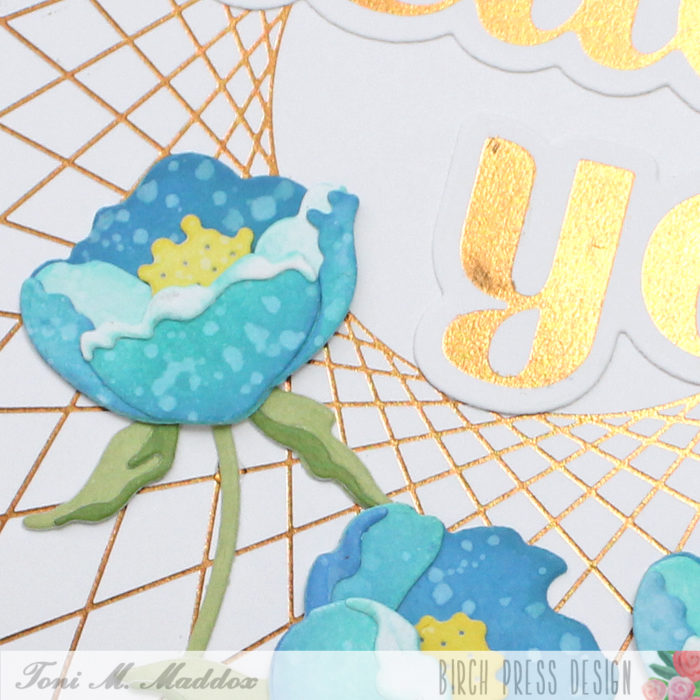
Hi Crafty friends – it is Natasha here and I am excited to be back on the blog today! I had so much fun using the beautiful Adornment Peony die set, paired with the new You Sugar Script Hot Foil Plate and die set! I love all the sugar script dies and the new foil dies are just AMAZING! So let’s get started!
To begin I started by creating a colorful watercolor background using powders. The powders I used today have lots of sparkle and shine! I added these to watercolor card stock and then allowed them to dry. Then I die cut the shadow peony outline layer 2 times (pink and purple) and then die cut the leaves using the outline dies. Next I splattered the peony and the leaves using a combination of white and metallic watercolors. I set these aside to dry.
Next I die cut the detailed layer from the Adornment Peony die set using white card stock. I die cut 2 peony layers and 2 sets of leaves using the white card stock. I then ink blended each peony layer and leaf layer using oxide inks. I did quick ink blending to give the layer a textured look. Once they were dry I adhered these to each of the outline die cuts using liquid glue.
Next I started to work on my background for my blooms. I used several shades of yellow water color and ink smooshed the watercolor onto my panel. Once I was happy with the colors and texture, I added a few splatters to the background. I then trimmed down my panel to fit onto my A2 card base. I adhered my ink smooshed background onto my card base using liquid glue.
Next I foiled the You Sugar Script hot foil plate using a gold foil. I then die cut the (You) using the coordinating die included in the set. To complete my card I arranged my flowers and leaves, then adhered them with liquid glue and foam tape. I also adhered my sentiment using foam tape. I also added a sub sentiment from my stash to complete my greeting.
I added a few Fairy Jewels from the Pastel Jewels collection to complete my card and add a little more sparkle!
Thank you for stopping by today! I had a lot of fun and I am super excited about the new foil die sets! See you soon!
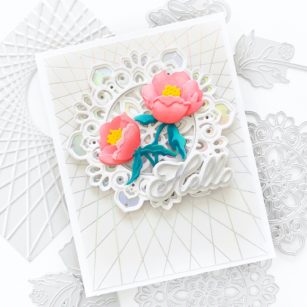
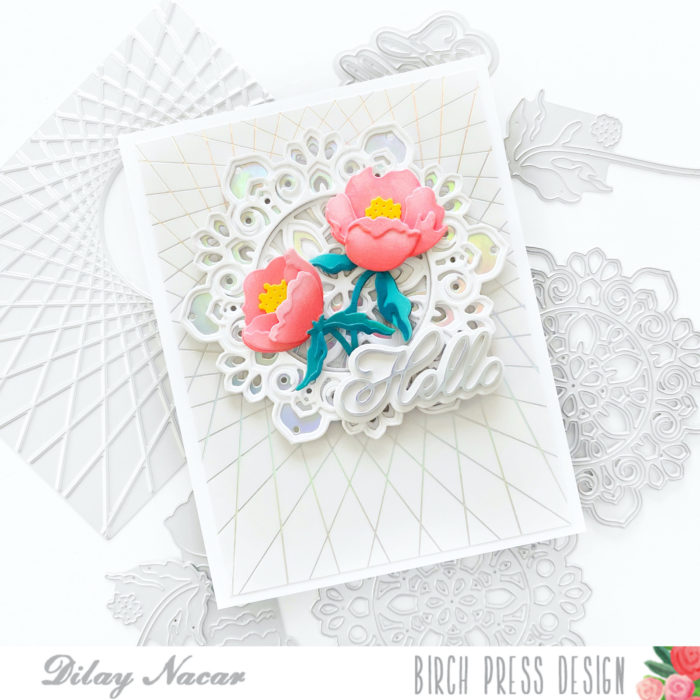
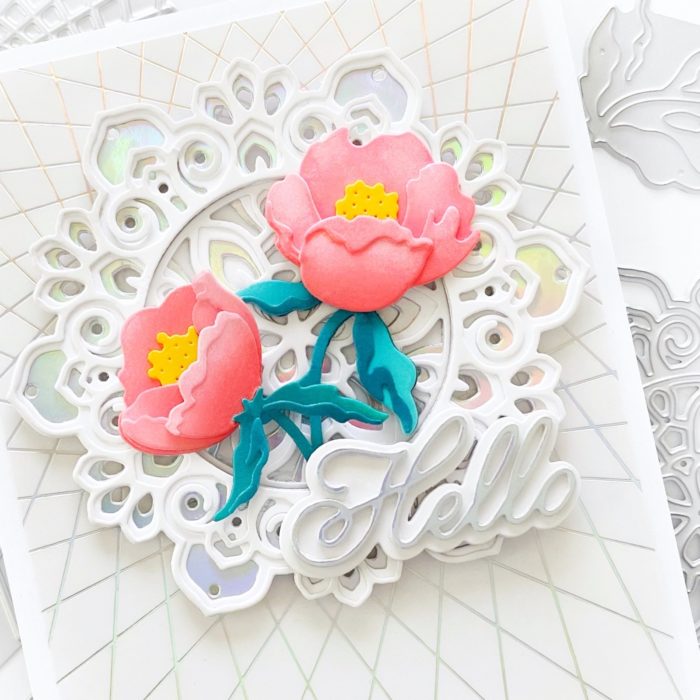
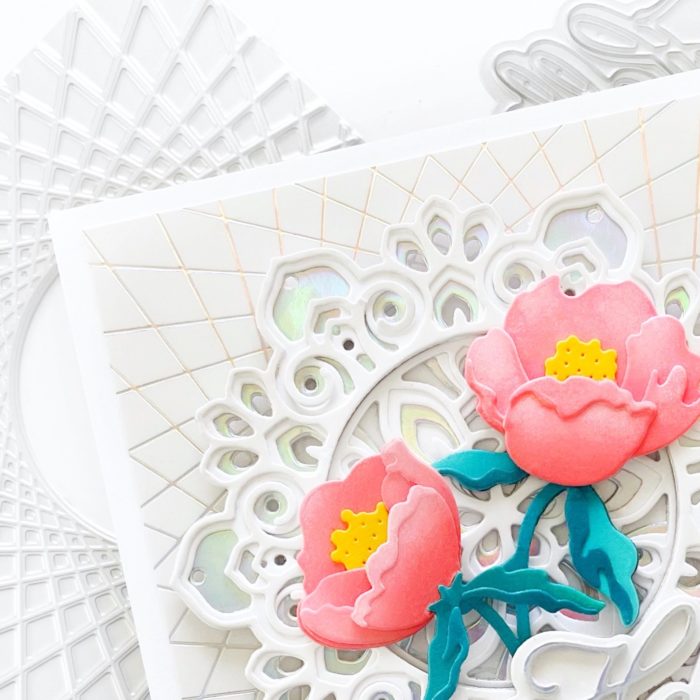
Hello and welcome back, friends! Dee here today sharing a foiled floral card created using beautiful new products from the latest release! This card showcases the String Art Hot Foil Plate and Prime Peony Duo Contour Layers.
To start, I hot foiled a 4” x 5.25” piece of white cardstock with the String Art Frame foil plate. Next, I cut the Tranquility layers A and B in white cardstock and C in Holographic cardstock, then adhered them together. I cut the Prime Peony Duo Contour Layers in colored cardstock from the 6×6 paper packs and ink blended them — using corals for the blooms and teals for the stems and leaves, then adhered them together.
Next, I adhered the Tranquillity layers onto the foiled String Frame, then adhered the Tranquility layers to the center using foam adhesive. I then tucked the peonies into the circle and trimmed the excess stems. I cut the Handwritten Hello in holographic cardstock and the shadow in white and adhered it to the frame. To finish, I mounted the card onto a top-folding card base!
Thanks so much for joining me today! I hope this card inspires you to get creative and try something new!
Hi Crafty friends! I am excited to be back today sharing a colorful thank you card using the beautiful Star Flowers Contour Layers die set!!!!! So let’s get started!
I started today’s card with the beautiful Star Flowers Contour Layers die set! I love these beautiful flowers! I started by die cutting my flowers using 2 shades of blue card stock from the Memory Box Fresh Aqua Collection paper pad. I chose a lighter blue and a darker blue. I love these paper pads as all the colors coordinate so beautifully together! I die cut enough to make 8 flowers. I then chose a yellow shade for the floral center using the Sunny Orange paper pad from Memory Box. Once everything was die cut I added a bit of shading to each floral layer using distress oxide inks. I then adhered the layers together using liquid glue. I then added embossing powder to each flower for added texture and dimension. I pressed the flower into my embossing ink, sprinkled with embossing powder, and then heat set. I then set my flowers aside.
Next I started to work on my background. To create my background I used the Viola Plate layering dies. I used both layer B and C. I die cut each layer on white card stock. Next I wanted to add color to Layer B. I used a yellow shade of dye ink and ink blended on my panel using a blending tool. Next I added 2 colors of sprays for added shine and texture. I allowed this to dry and once dry, I added gold and silver metallic watercolor splatters for added texture. Once everything was dry, I adhered layer B and C of the Viola die cuts together using liquid glue.
Next I used my distress tool to add texture to the edge of the die cut panel. I added texture to various sections. Then I used an archival ink in brown around the outer section of my Viola panel. I then adhered the Viola panel to an A2 card base with liquid glue.
I then adhered my flowers to the front of my card panel. I used a combination of liquid glue and foam adhesive. To complete my card I added the Handwritten Thanks and Outline die. I die cut the shadow using white card stock and the script thanks using the Rainbow Reflections Mirror Pad card stock. I then adhered the sentiment together with liquid glue and added foam tape to the back and added this to my card front.
Thank you for stopping by today! I had a lot of fun today and I will be back soon!
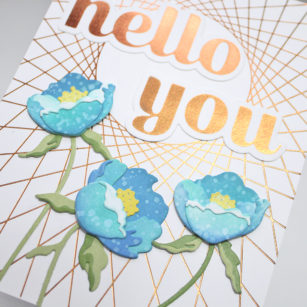
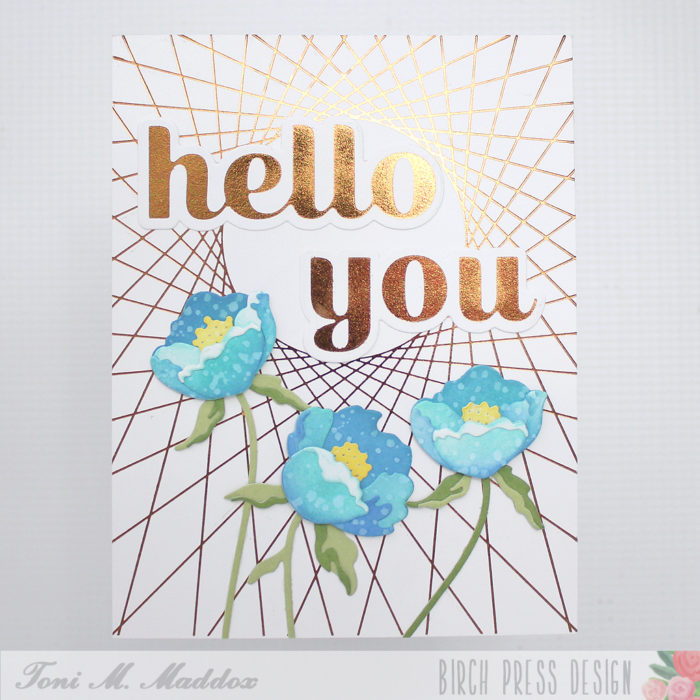
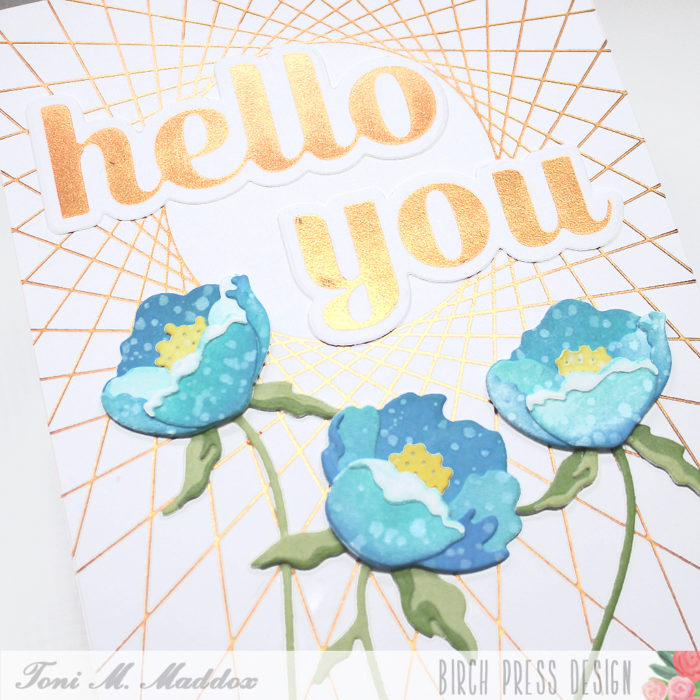
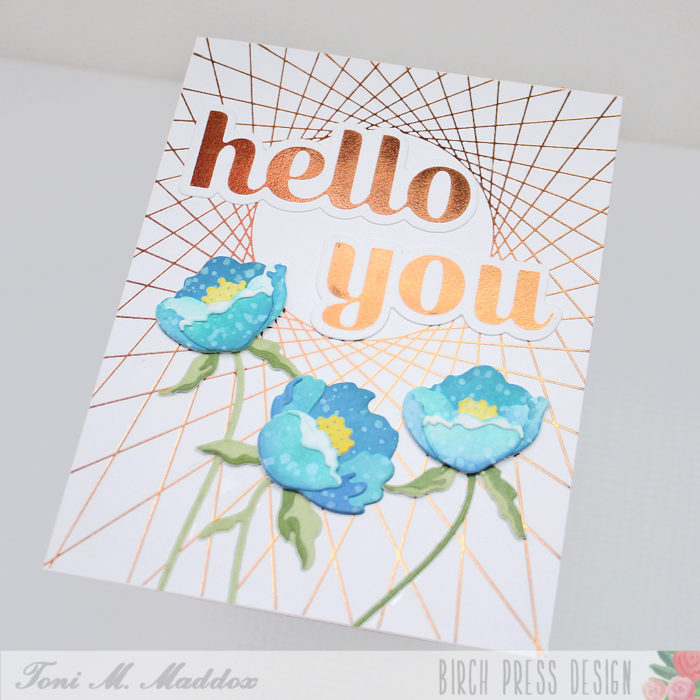
Hello, Birch Press fans! Toni here with you today sharing a card using some of the new hot foil products that Birch Press Design and its parent company, Memory Box, have on offer. How exciting!
I’ve been working with hot foil for a while and definitely have my opinions on which brands/styles I like and which I don’t. I’m happy to say that these are fabulous with good coverage and minimal over-foiling.
This was especially important with the String Art Frame Hot Foil Plate which has a lot of tightly spaced foil lines but I had no problems with the foil appearing where it shouldn’t. Woo hoo!
I also used the Hello and You Sugar Script Hot Foil Plates & Dies, using the same Spellbinders Polished Brass Hot Foil. The outline dies made it so easy to line up so I had even white space all around.
I cut out the Prime Peony Duo Contour Layers blossoms and sponged them with Distress Oxide Peacock Feathers and Prize Ribbon before spattering with water. I cut out the stem portions in Memory Box Lush Green 6×6 cardstock. I love how the colors coordinate with the polished brass foil!
I hope you enjoyed today’s card and have a great rest of your week!
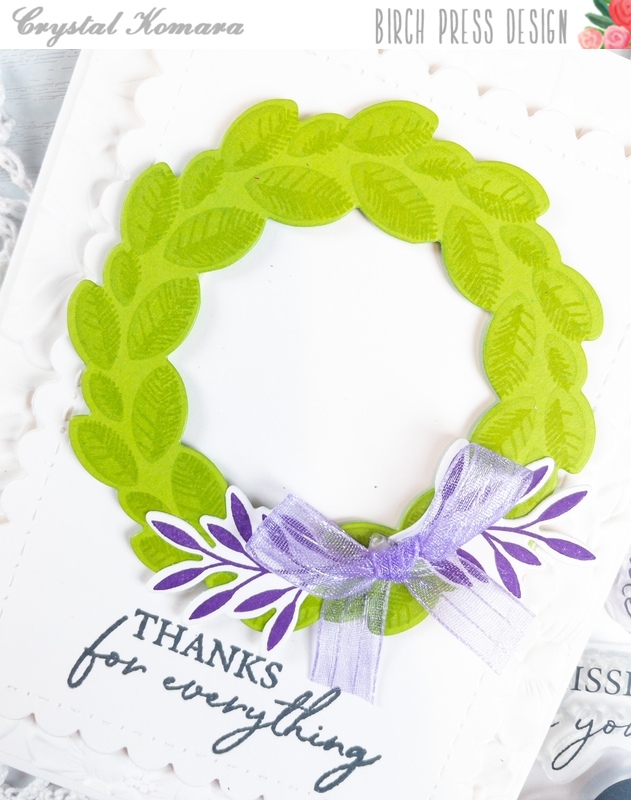
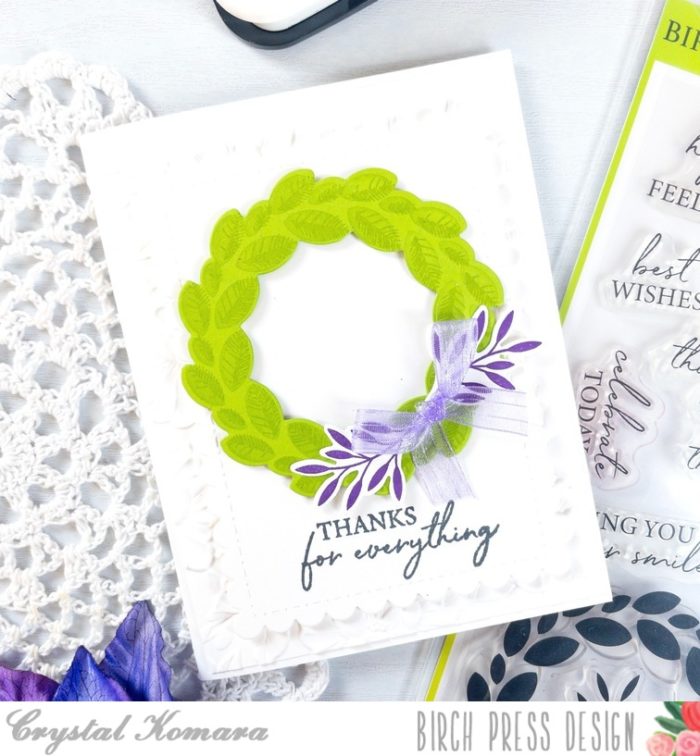
Hello readers! This is Design Team member Crystal Komara here with you today. I know there is a beautiful new release of the hot foils in the shop right now, but I always love to use some of the “oldies but goodies.” Everyone seems to always get caught up in what’s the newest or latest and greatest product, but SOooo many of us haven’t even used what we already own, so that’s what I’ve been working on this month. Today’s card features the beautiful Classic Sentimental Wreath stamp set and coordinating dies.
Card details:
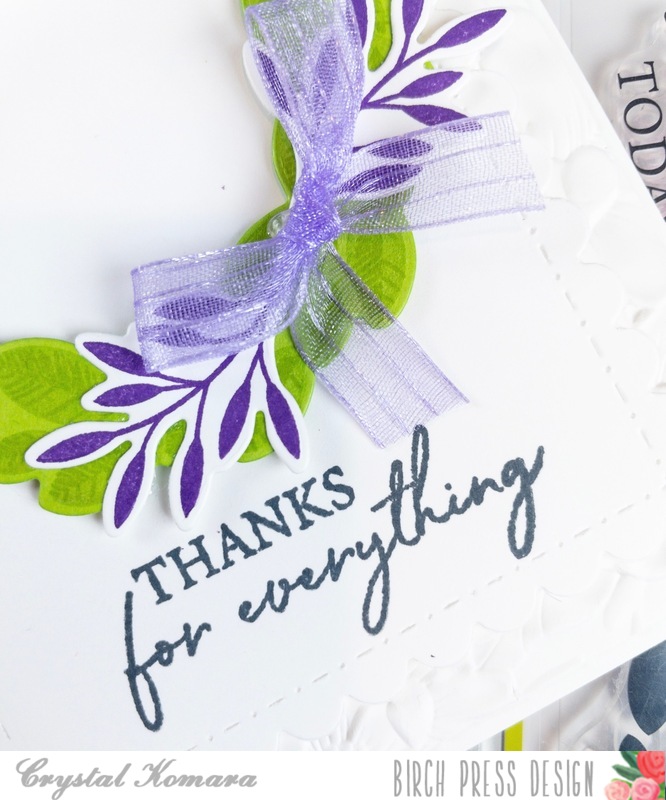
The base of this A2 sized card is made from 80 lb. Neenah Solar White smooth cardstock. This is my go-to white cardstock for e-v-e-r-y-t-h-i-n-g. On a 5 1/4″ x 4″ piece of white cardstock, I embossed it using the Blooming 3D embossing folder from Memory Box (a sister company to BPD). You guys, this folder is absolutely gorgeous! I cut a scalloped rectangle from white cardstock.
On a piece of lush green cardstock, I stamped the wreath first in pale green ink and then the leaf layers in lime green ink. I used the coordinating die to cut the wreath out. I adhered the wreath to the scalloped rectangle using 3M foam adhesive. I stamped two of the flower sprigs in purple ink and used the die to cut them out as well. I adhered the two floral sprigs to the wreath and then I tied a small bow with lilac ribbon and adhered the bow to the card using a glue dot. I stamped the sentiment “thank for everything” in Memento Tuxedo black ink. This sentiment is also part of the Classic Sentiment Wreath stamp set.
This is one of those cards that I say can be used for every type of occasion. I could easily swap out the sentiment for a sympathy, birthday or get well expression and create a variety of quick and elegant cards.
I hope you have enjoyed the simplicity of today’s card. Thanks for visiting and have a wonderfully creative day!
Hello Crafty Friends! It is Natasha here and I am super excited to be back today! Birch Press Design has an amazing new release and I couldn’t wait to create!!! For today’s card I am using 2 dies from the new release – Tropical Hibiscus Contour Layers, as well as the new Hello Sugar Script foiling die! So let’s get started!
I started today’s card with the Tropical Hibiscus Contour Layers die set and 3 paper pads from Memory Box. I love this card stock, as each paper pad has coordinating colors! They truly do all the work for you!! I used the following 3 paper pads: Berry Red, Sunny Orange, and Lush Green. I die cut each layer of the Hibiscus bloom. I chose 3 shades of pink, ranging from light to dark and a yellow for the center. I then chose 2 shades of green. Once everything was die cut, I added ink blending to each layer of the die cuts. I love the added dimension and texture this provides! Once everything was ink blended, I spritzed some water on the layers and once dried adhered them together with liquid glue.
Next I set the flowers and leaves aside and created a fun and colorful background. I wanted to create a background that gave these blooms a summery feel. I created the background on water color card stock using pigment powders. I added several layers of color and once I was happy with the color, I allowed it to dry.
To complete my card I chose the new Hello Sugar Script hot foil plate and die set! I LOVE the sugar script dies and the added foil plate is so much fun and truly beautiful! I foiled the hello using a matte gold foil, then die cut the word using the coordinating die set. I then die cut several more layers on plain white card stock for added dimension. Next I adhered the layers together using liquid glue.
To complete my card I adhered my watercolor background onto an A2 card base. I then chose the arrangement for the flowers and leaves. I adhered these using a combination of liquid glue and foam tape. I adhered the Hello sentiment using foam tape. To complete the card I added a few clear Fairy Drops! I had a lot of fun today and I hope you enjoyed it too!
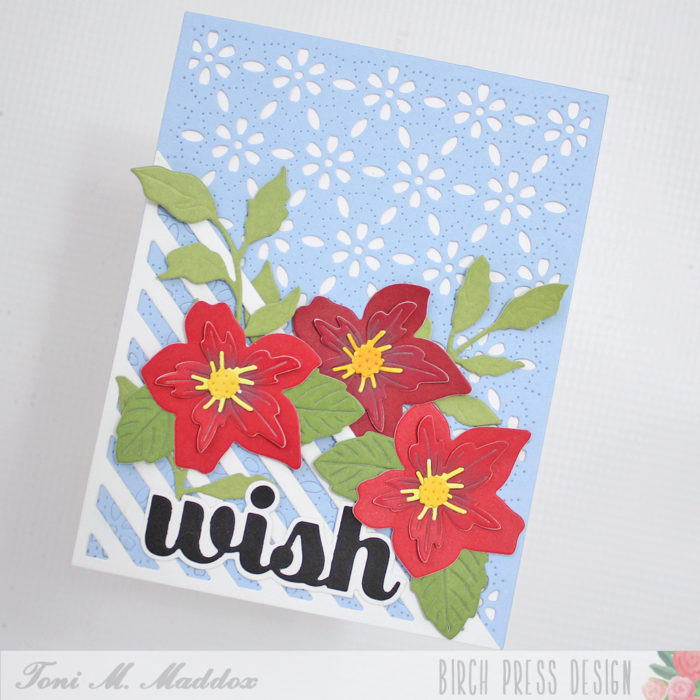
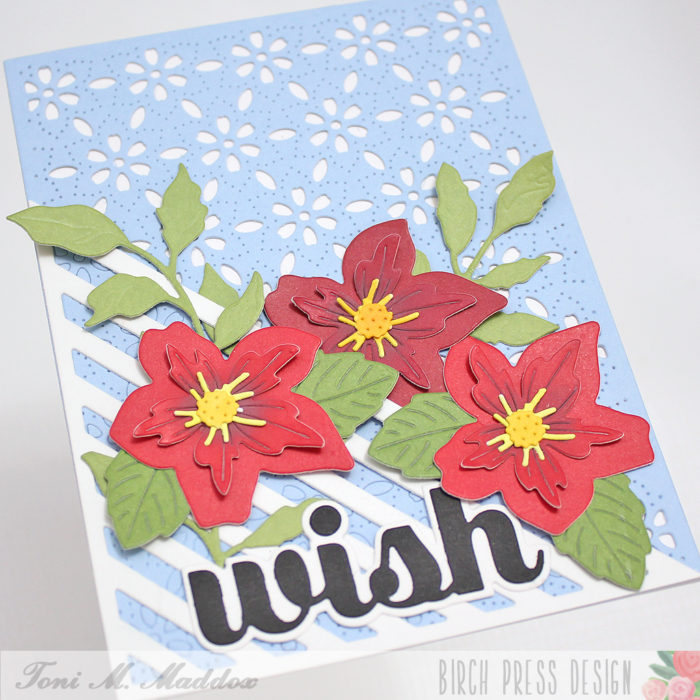
Hello, Birch Press fans! Toni here with you today sharing a rather summery birthday card.
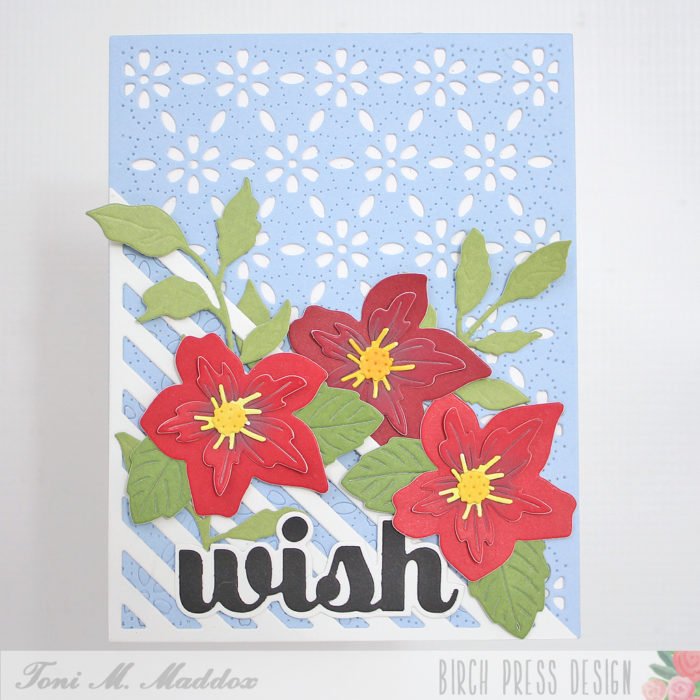
I started the card by cutting the Linear Triangle from a sturdy white cardstock. I then cut out the Flora Plate Layer B out of a piece of Ocean Blue paper.
I adhered the Flora layer onto the card front, having discarded the bits not covered by the Linear Triangle.
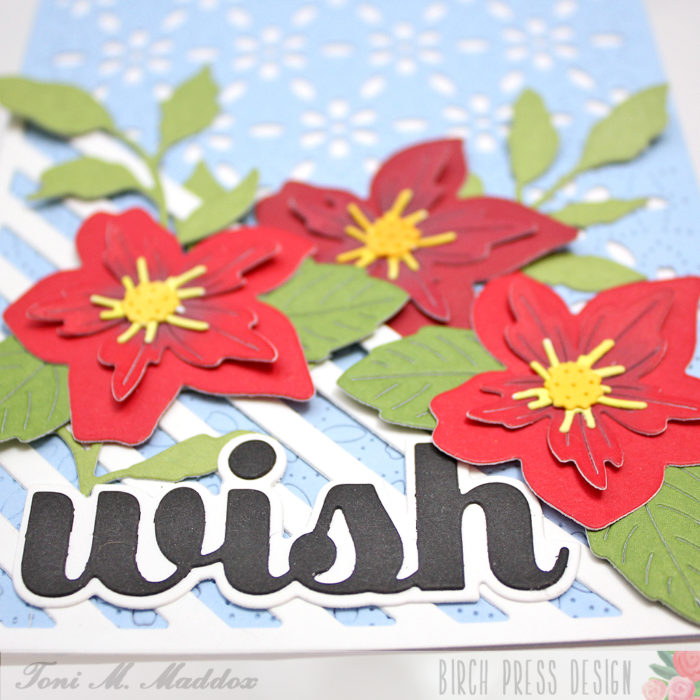
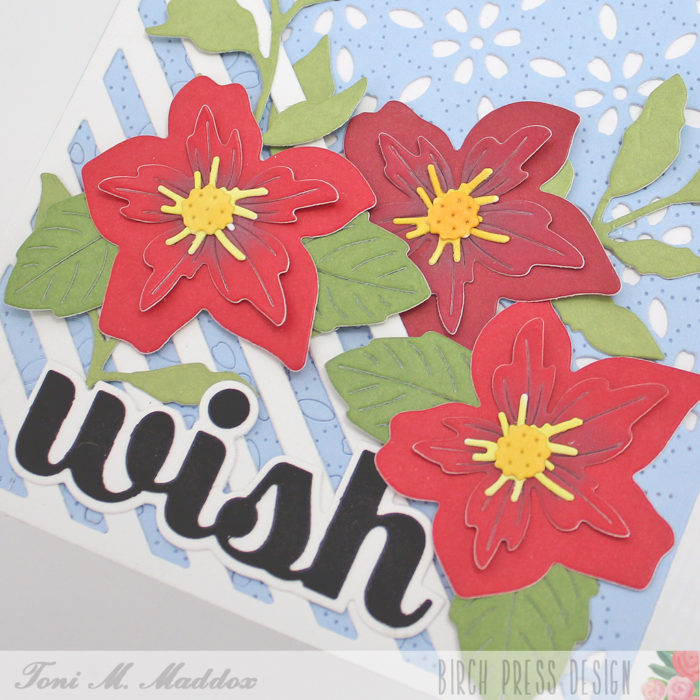
I cut out the the Pimpernel Contour Layers from a piece of Berry Red 6×6 paper. I used Distress Oxide Aged Mahogany to shade the centers.
I cut the stamens out of white then colored them yellow with Copics Y02, Y15 and Y35.
The flowers remind me of clematis so I cut the base layer of the Fuddled Leaf Branches out of Lush Green 6×6 paper, and wove them up and through the Linear Triangle for a climbing effect.
I cut the Make a Wish Sugar Script out of black and white cardstock, nestling it in among the blooms.
I hope you enjoyed today’s card and have a great rest of your week!
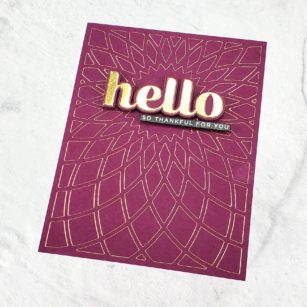
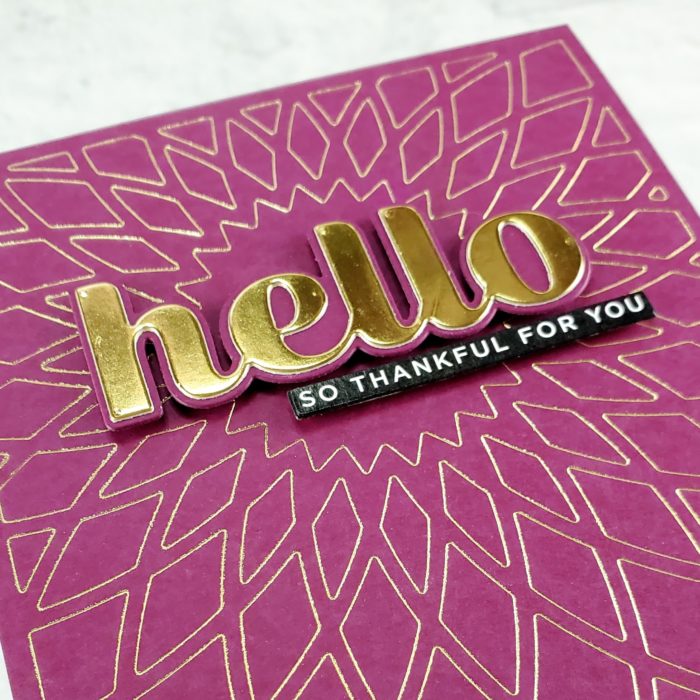
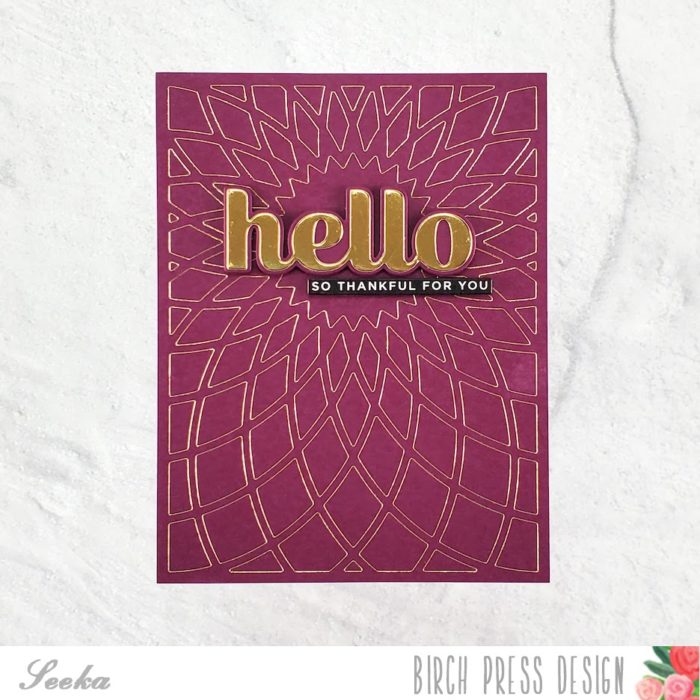
Hi there and welcome! Seeka here and today I’m sharing a card featuring a background made by foiling the Dazzle Layer A cover plate. Foiling with dies is a wonderful way to stretch your supplies!
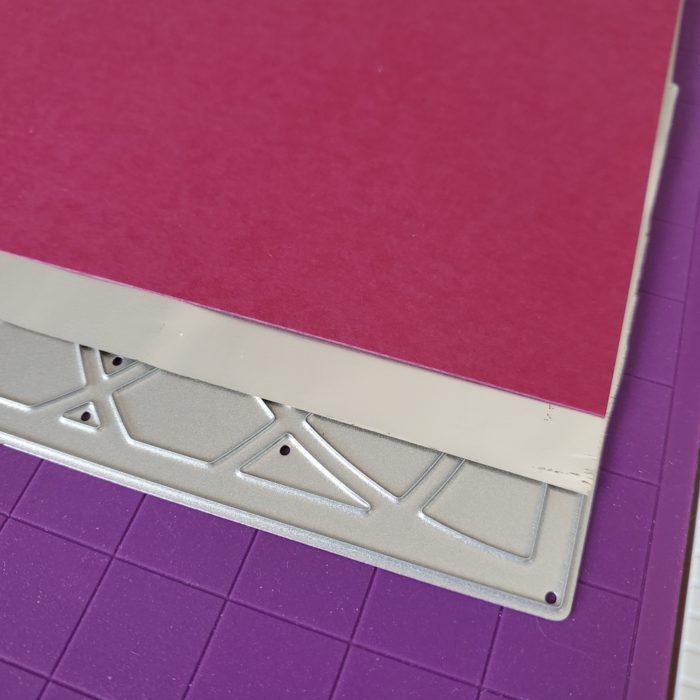
I started by prepping my foiling machine. I centered the Dazzle Layer A die over a 4.25″ x 5.5″ panel of plum cardstock and then flipped the two upside down, together, and placed them onto the heating platform. I used a piece of Post-it Tape to tape the cardstock panel down at one end, creating a hinge, and then I swung the panel up and placed a piece of gold foil over the die, shiny side down. I replaced the plum cardstock panel and then followed the instructions for my foiling machine to foil the panel. Below is an example of the order and orientation of the die, foil, and ink-blended panel on the heating plate (when I went to actually foil, I aligned all these pieces, as described above).
With the foiling done, I started on the sentiment. I die cut the detail layer of the Big Hello Sugar Script die set from gold cardstock and the shadow layer from the same plum cardstock as the background. I glued the two together and then used foam tape to adhere the sentiment to the background. I also added a smaller sentiment from my stash. To finish, I adhered the card front to a card base.