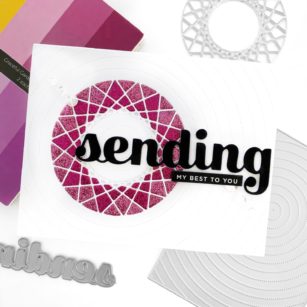
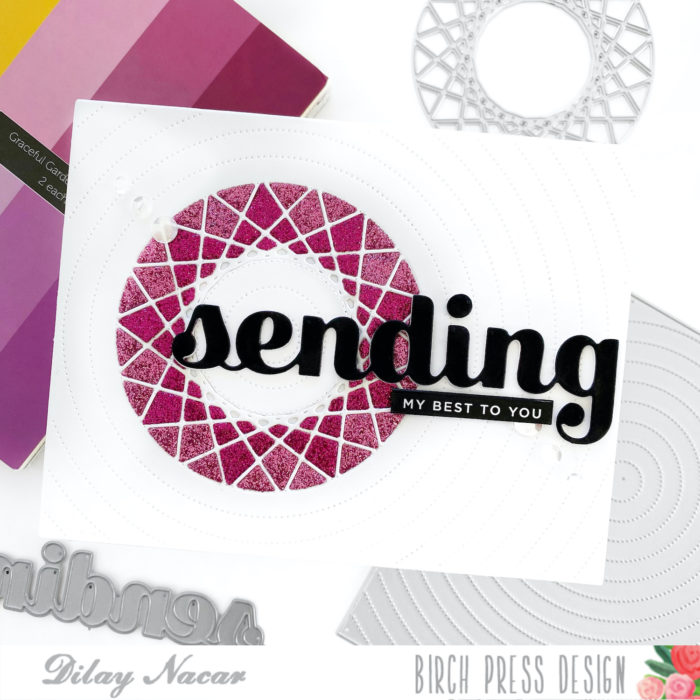
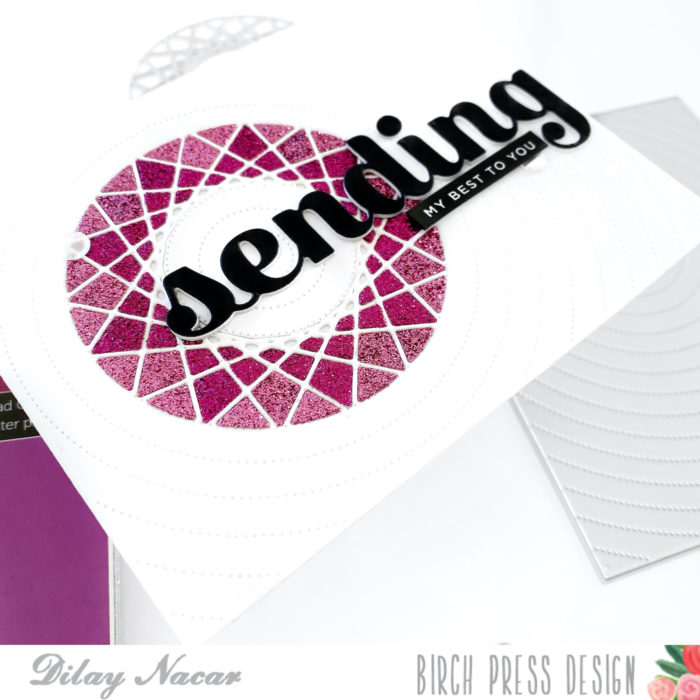
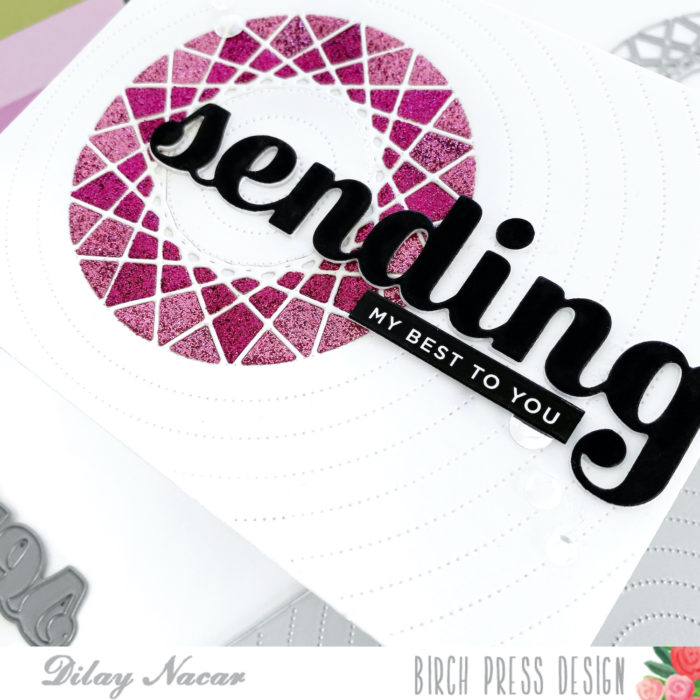
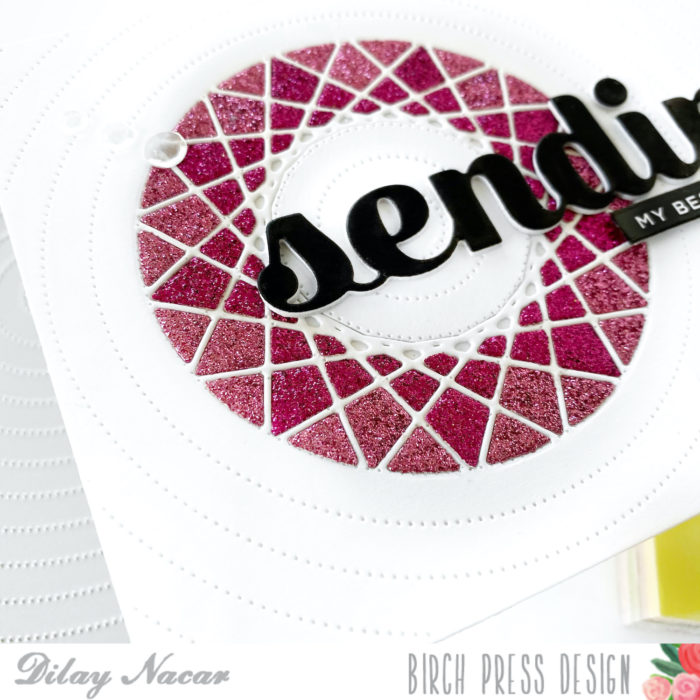
Welcome, Crafters! Dee (@DilayNacar) here and today I am sharing a clean and sparkly encouragement card that features the new String Art Circle Collage die combined with two favorites of mine! Let’s get started and go over how to make this simple yet elegant card!
I began by die cutting the background out of white cardstock using with the Pinpoint Radial die, then die cut directly through the circle using the String Art die. Next, I die cut the String Art die twice more using two different shades from the Memory Box Graceful Garden glitter pad and used the negative pieces to fill in the circle on the background panel.
For the sentiment, I die cut the Big Sending Sugar Script die twice in white and once in black cardstock, stacked them for extra dimension, and adhered it to the card. To finish, I chose a sub sentiment from my stash to add underneath and added some clear sequins as an extra touch!
I hope that you enjoyed my card today! Be sure to check back for more inspiration, and visit us on Instagram @BirchPressDesign and me @DilayNacar for more inspiration. Thanks so much for stopping by today!
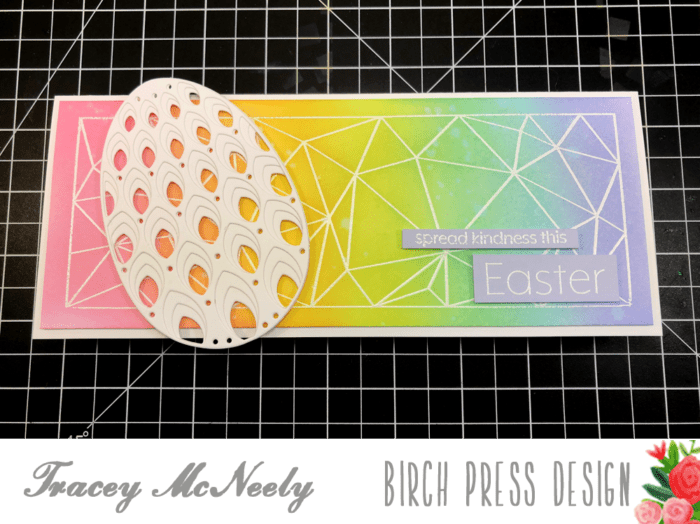
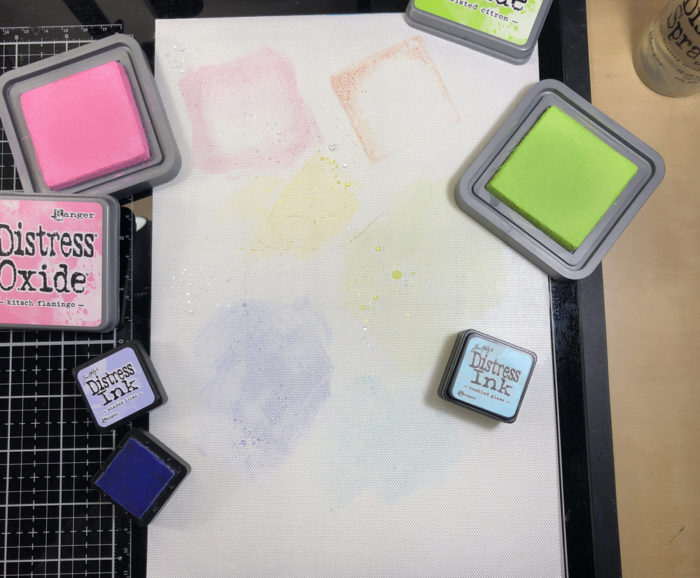
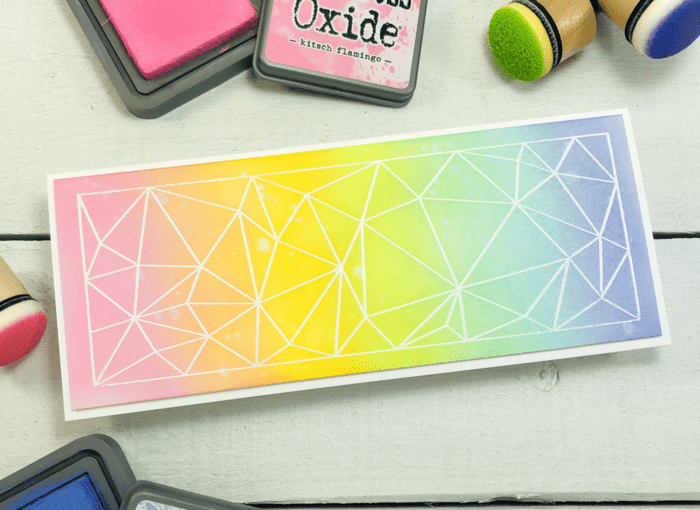
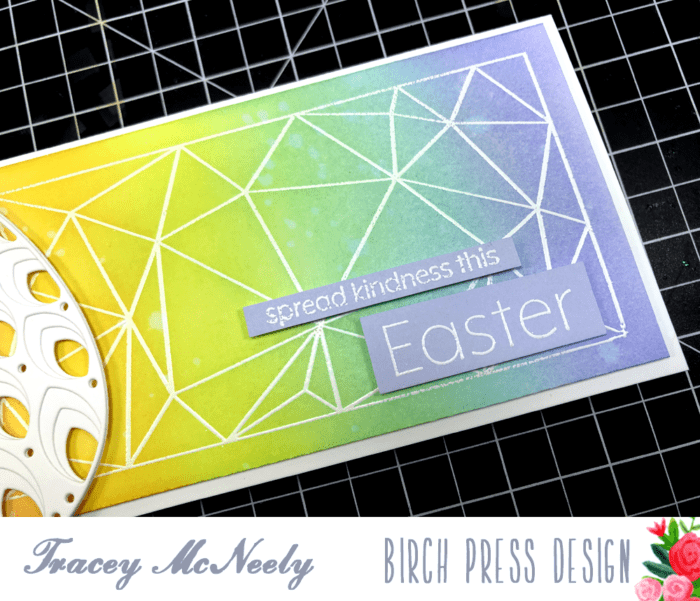
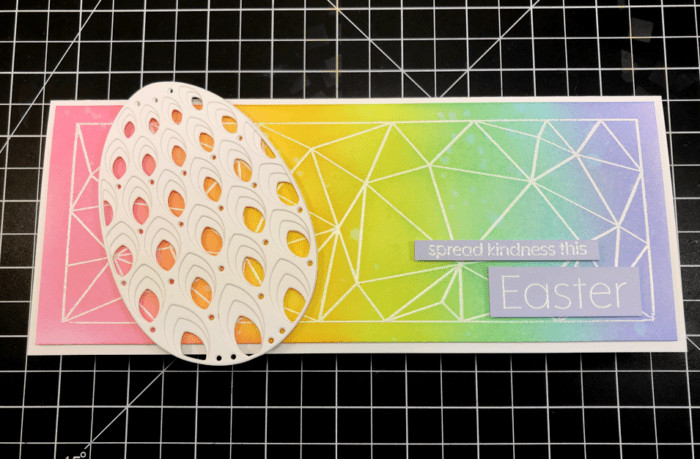
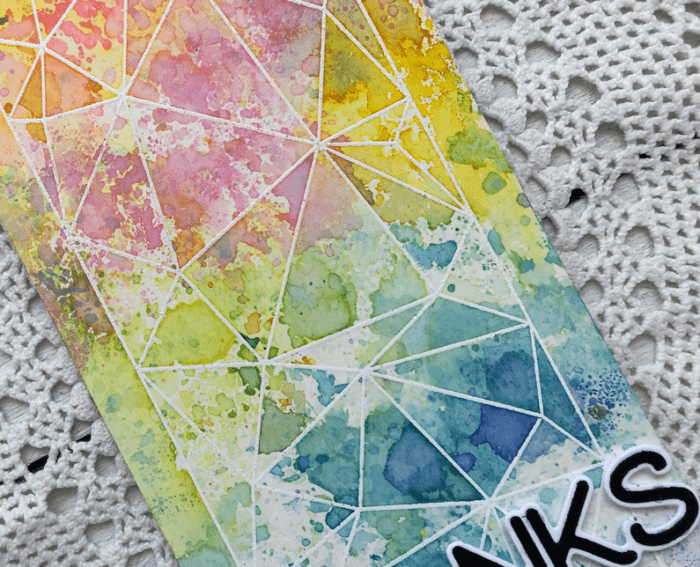
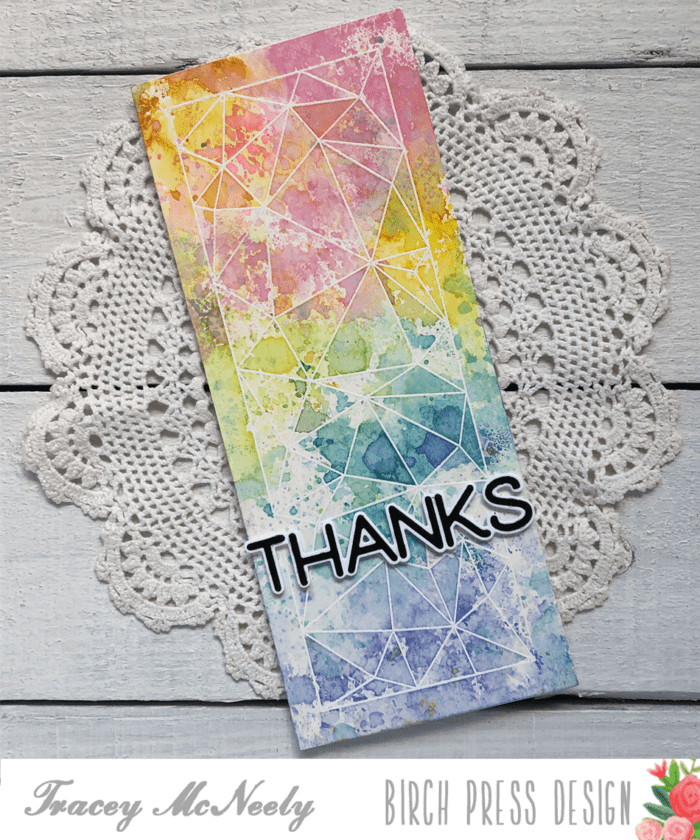
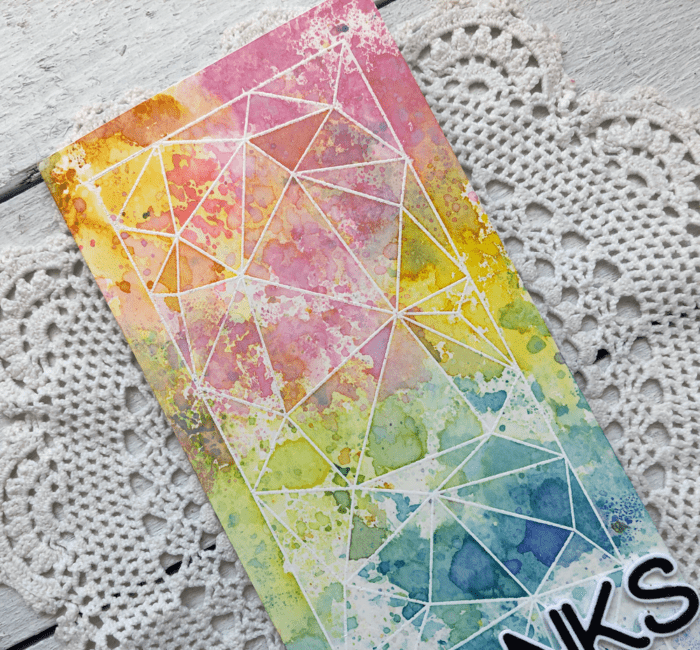
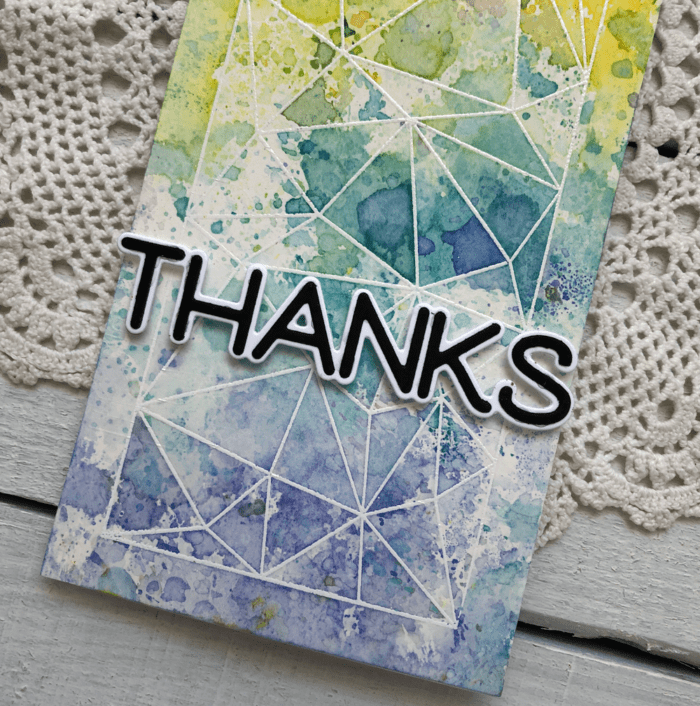
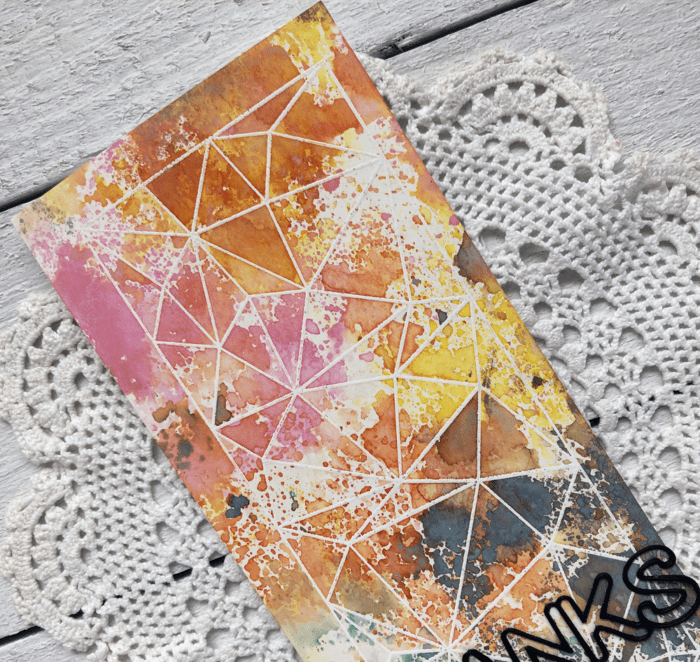
The faceted rectangle from the Crystal Lingo stamp set was white heat embossed on to a 8 1/2″ x 3 1/2″ panel of Bristol Smooth cardstock. I ink blended over the panel in a rainbow using Distress Oxide inks. The colours are Kitsch Flamingo, Carved Pumpkin, and Twisted Citron Distress Oxide inks and Mustard Seed, Tumbled Glass and Shaded Lilac Distress ink.
The panel was trimmed down to 8 1/4″ x 3 1/4″ and it was attached to an 8 1/2″ x 3 1/2″ white card base with foam tape to add a bit of dimension.
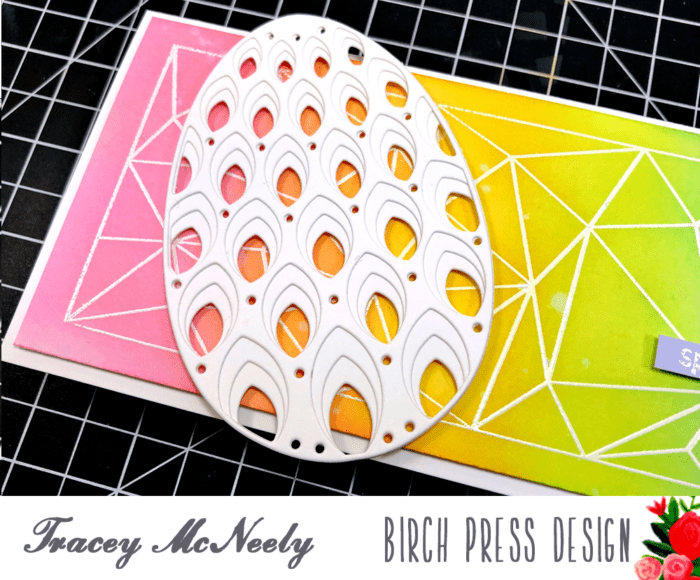
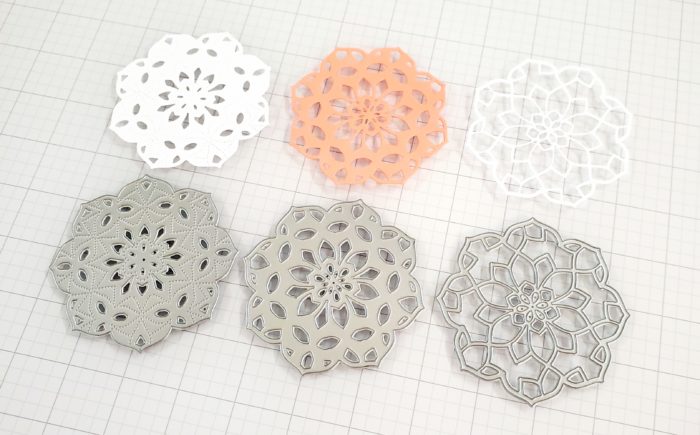
I wanted to use the pretty background along with the Petal Layers die set in a way that one wouldn’t overpower the other. I cut all three layers from heavyweight white cardstock. I adhered the layers together with liquid adhesive and once dry.
I decided to use pinks and oranges as my egg colour from the background. You can place your egg anywhere on the card depending on the colours that appeal to you or your recipient. I chose to place the dimensional egg on a angle. I placed small pieces of foam tape behind the egg to pop it off the background.
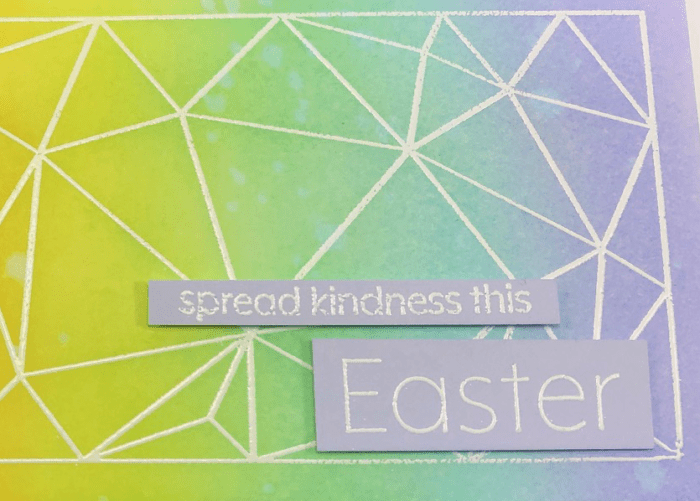
The sentiment from the Blooming Spring clear stamp set was heat embossed and trimmed down and added to he panel with foam tape.
I love the idea of sending someone a landscape, slimline card. So easy to be displayed without tipping over.
Thank you so much for creating with me today. Wishing you a happy and safe Easter.
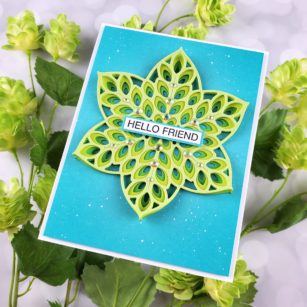
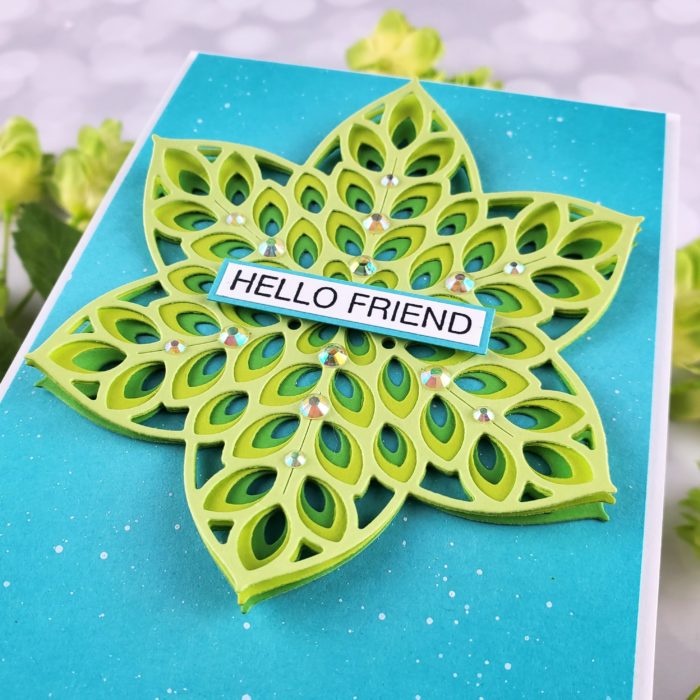
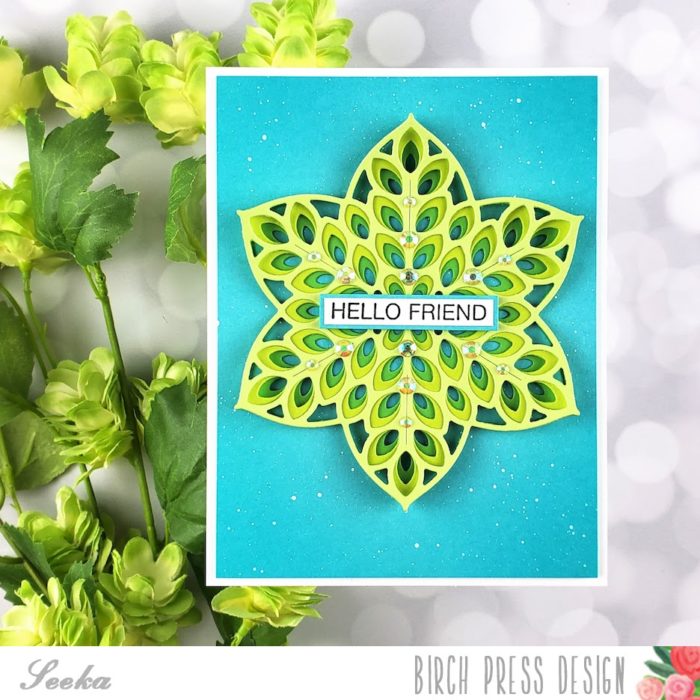
Hello, crafty friends! Seeka here, and today I’m sharing a card featuring the Floral Star Layer die set. In my city, spring is the greenest time of year. The winter rain has refreshed the grasses and everything is bright green ahead of a long and dry summer.
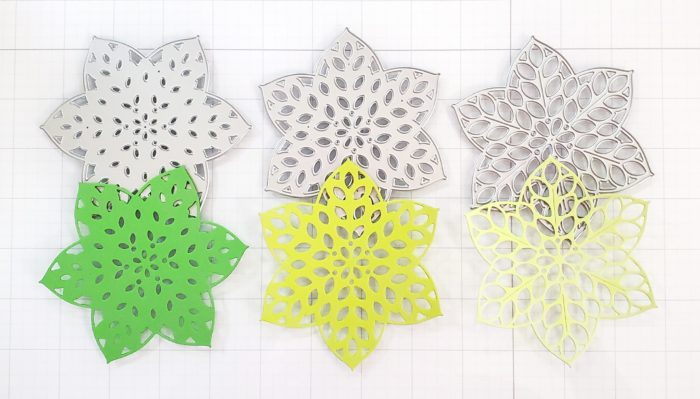
I started my card today by cutting the three layers of the Floral Star in shades of green.
I used small adhesive dots to adhere the layers together, placing the dots towards the center of the star and leaving the edge of the “petals” free.
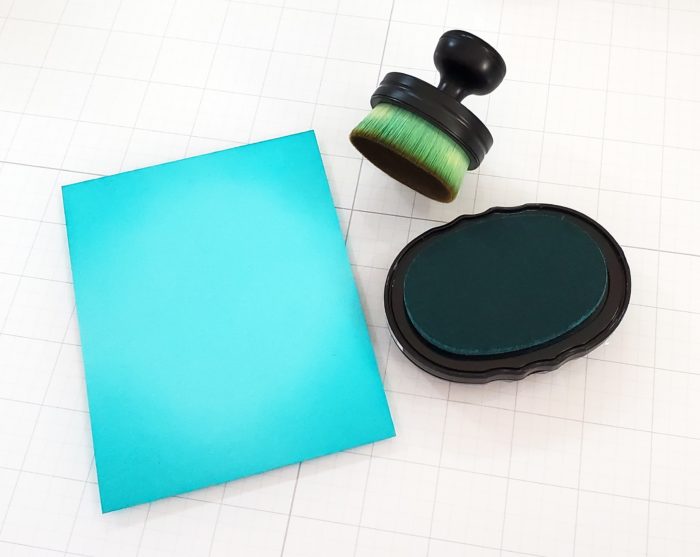
Next, I prepared a background using a 4″ x 5.25″ panel of blue cardstock. To create a bit of depth, I used a blending brush to blend a bit of teal blue ink onto the corners of the panel.
I also used a small paint brush, dipped in white Dina Wakley Media Gloss Spray, to add white splatter to the panel.
Next, I stamped a sentiment from the Awesome Ticker Tape stamp set in black ink onto white cardstock. The stamps in this set include an outline which I trimmed away before adhering the sentiment to a frame of the same blue cardstock.
To assemble the card, I adhered the Floral Star to the blue panel, and then used foam tape to adhere the card front to an A2-sized card base. As a final touch, I adhered jewel embellishments to the star.
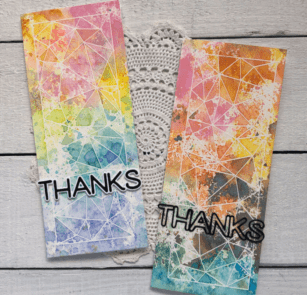
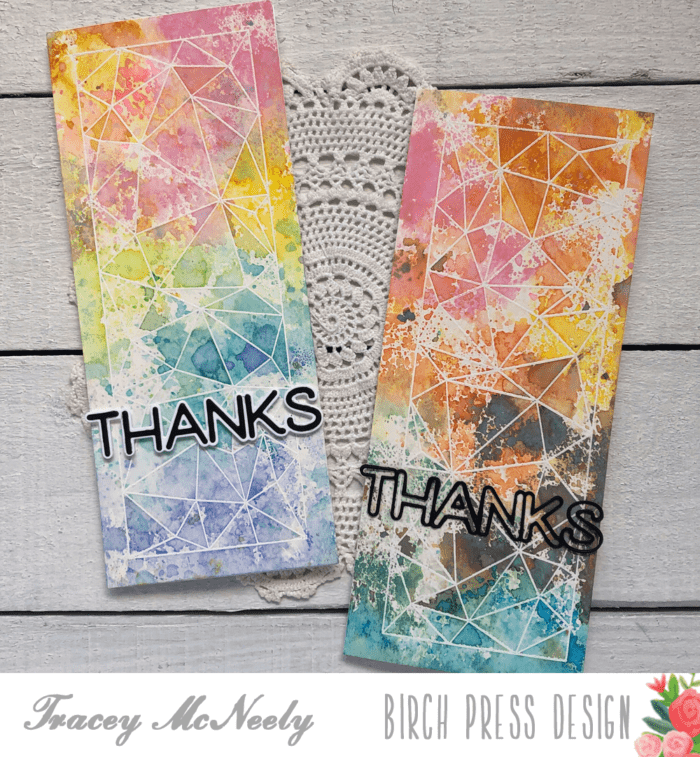
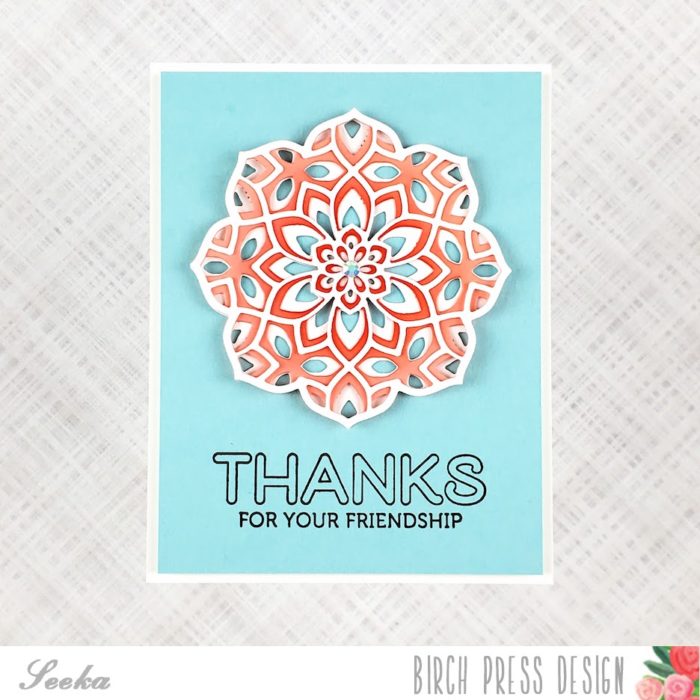
The faceted rectangle stamp in the Crystal Lingo clear stamp set is the perfect size for 8 1/2″ x 3 1/2″ slimline cards.
For both of the my cards today I started off by white heat embossing the faceted rectangle from Crystal Lingo on to two panels of watercolour cardstock cut to 8 1/2″ x 3 1/2″.
TIP: When embossing on watercolour cardstock I always make sure I prep the paper well with my embossing buddy and I always double stamp my embossing ink.
I laid down a combination of Distress Ink and Distress Oxide inks on to my craft mat in a staggered rainbow. I used Kitsch Flamingo, Carved Pumpkin, and Twisted Citron Distress Oxide inks and Mustard Seed, Tumbled Glass and Shaded Lilac Distress ink.
I spritzed some water onto the mat and then put my panel facedown into the ink and picked it up right away. I did not smoosh the ink, just straight on and off. I dried the panel thoroughly and then went back to the mat and tapped the panel around putting on a second layer. I spritzed a bit of water on my panel where the Distress Inks were to disperse them a bit more.
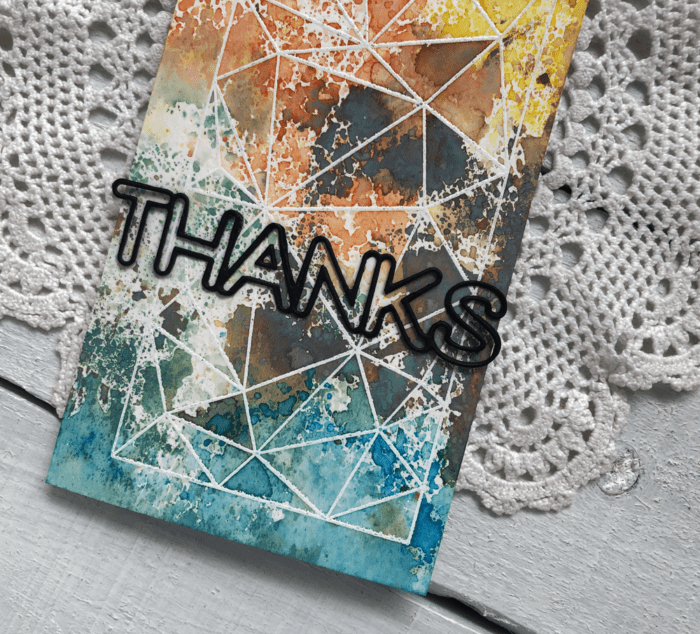
Once again I dried the panel thoroughly and went back to the mat one more time but before tapping down I spritzed the craft mat a bit more to reactivate the ink and did one final layer by tapping the panel on the craft mat. I stamped and die cut the Big Lingo Type Thanks die in white and black and attached it to the card with foam adhesive!
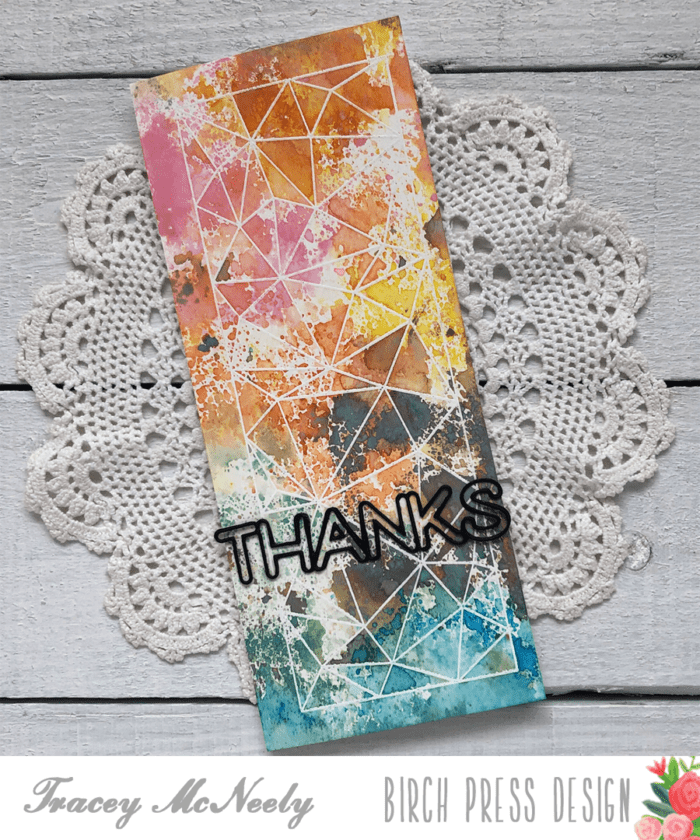
The second panel was actually the first panel but a little bit of Frayed Burlap was all it took to muddy up my rainbow.
Rather than toss it away I kind of liked the masculine vibe that the brown gave to the card. So I did the same as I did for the other card.
I dried it and added more ink until I had three layers! I die cut the Big Lingo Type Thanks using only the detailed die three times for the sentiment. I adhered the three layers together to give the die cut some stability. Trust me this takes some patience–lol! I adhered the die cut directly to the card front.
It’s so much fun to take an image like this, emboss it and then have some fun with your inks. This technique can be done with most inks and of course a little bit of water.
Thanks so much for joining me today and we’ll see you next time!
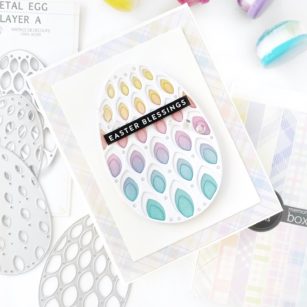
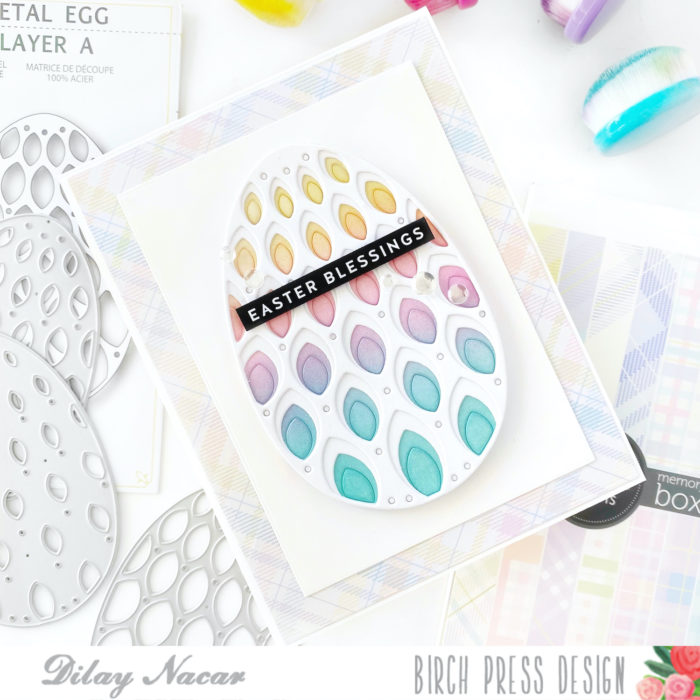
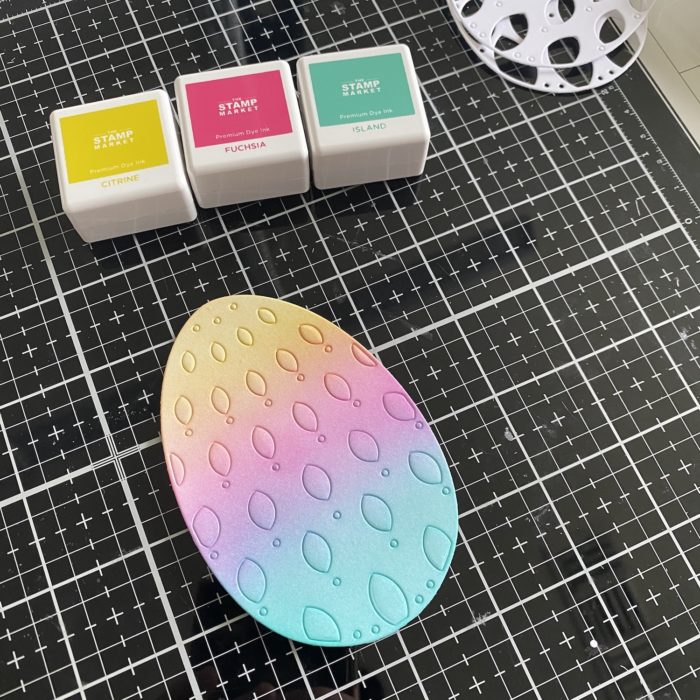
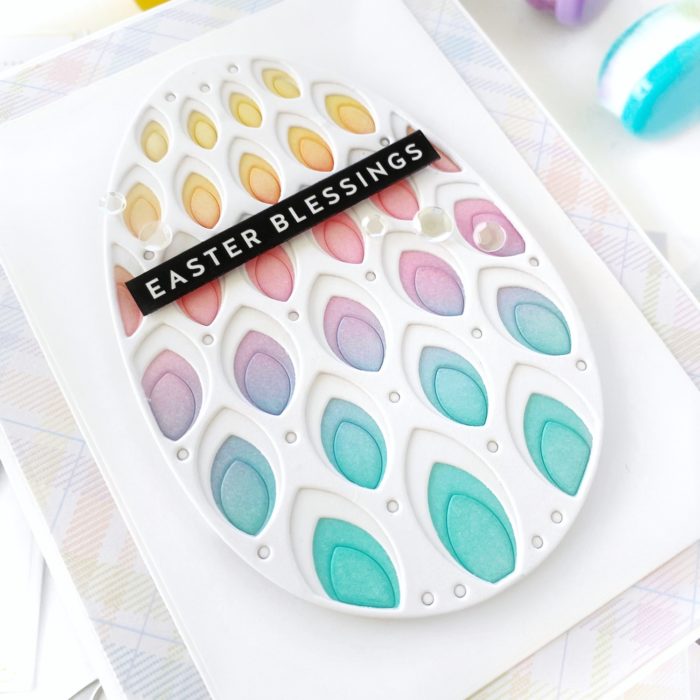
Welcome, friends! Dilay here and today I am sharing a sweet and simple Easter card featuring the brand new Petal Egg layering die combined with the new Memory Box Spring Plaid 6×6 paper pad!
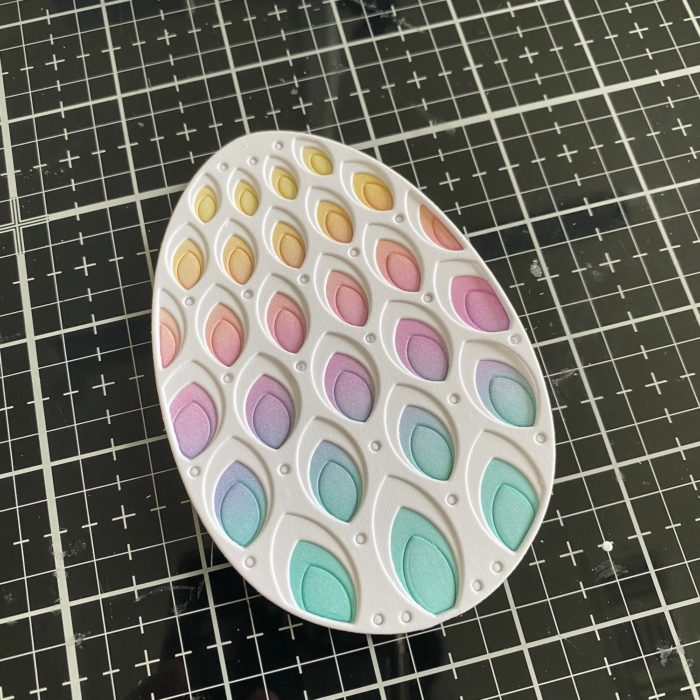
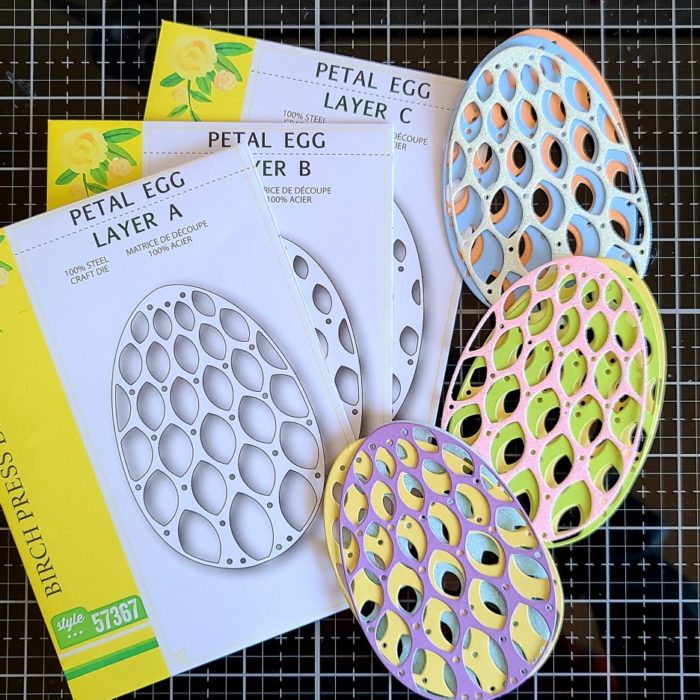
For this card, I began by die cutting each layer (A, B, and C) of the Petal Egg die in white cardstock. For the bottom layer (C), I kept all of the negative pieces together with low tack tape placed on the back of the panel before removing it from the die.
Next, I picked out a selection of pastel inks and ink blended (in rainbow order) layer C then adhered layers B and A on top. I added a simple sentiment strip from my stash to the center of the egg and set it aside to begin working on the background.
For this step, I die cut a piece of patterned paper from the new Memory Box Spring Plaid 6×6 paper pad down to an A2 size and adhered it onto a top-folding white card base. Next, I cut down a piece of white cardstock to 3” x 4.25” and adhered that to the center of the patterned paper. Finally, I added the egg using a thin layer of foam tape and added a few clear sequins for some sparkle!
I hope that you enjoyed this post and found some inspiration! Be sure to tag @birchpressdesign and me @dilaynacar on Instagram so that we can see all of your beautiful creations! Thanks so much for stopping by!
Hello there, crafty friends, I hope you’re having a nice day! Seeka here and today I have a quick and easy card featuring the Kinsley Layer die set.
I started by die cutting the top and bottom layers from white cardstock, and the middle layer from peach cardstock.
Next, I used a blending brush to blend a peach-colored ink onto the center of the middle layer in order to create a bit of color variation and depth.
Then I adhered the three die cut layers together using adhesive dots placed towards the center of the floral shape. I left the outer edges un-adhered, so they could lift away from each other like flower petals.
Next, I stamped sentiments from the Lingo Thanks stamp set near the bottom of a 4″ x 5.25″ inch panel of light blue cardstock.
To assemble the card, I adhered the die cut to the center of the blue panel, and then used foam tape to adhere the panel to white 4.25″ x 5.5″ card base. As a final touch, I glued a little blue gem to the center of the die cut.
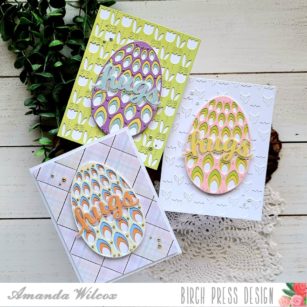
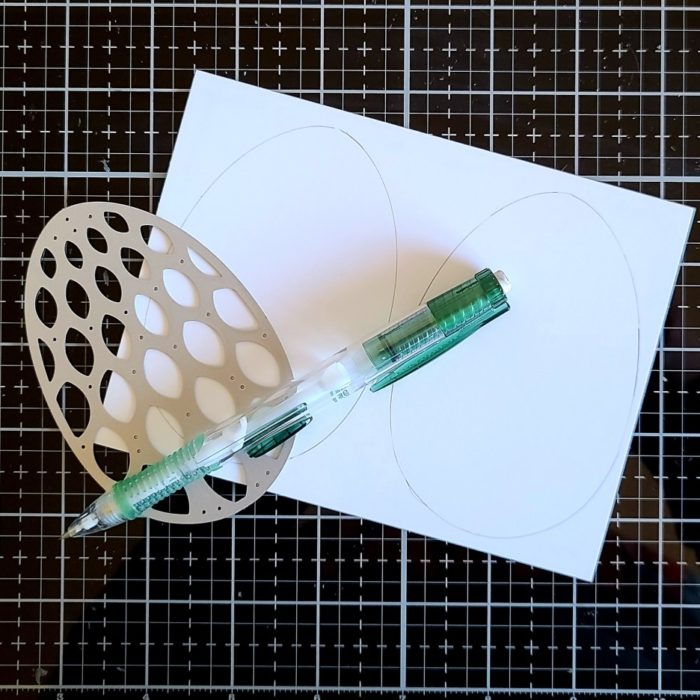
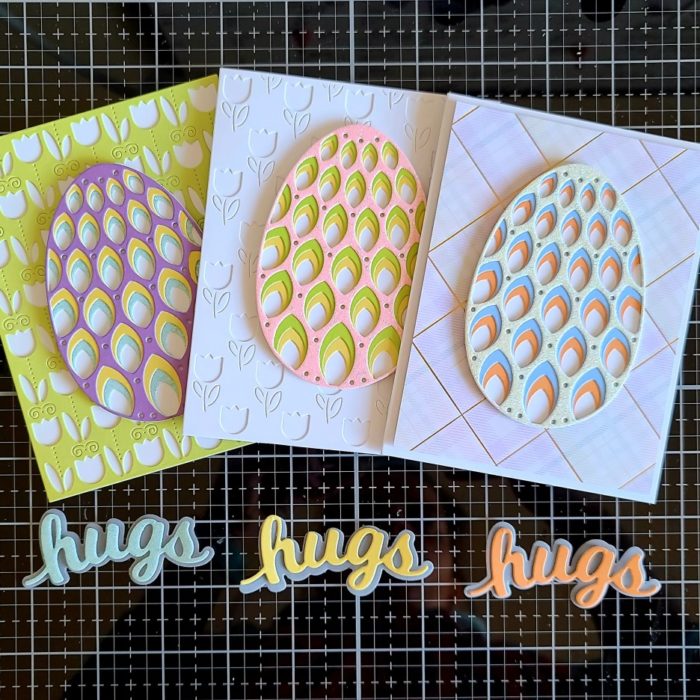
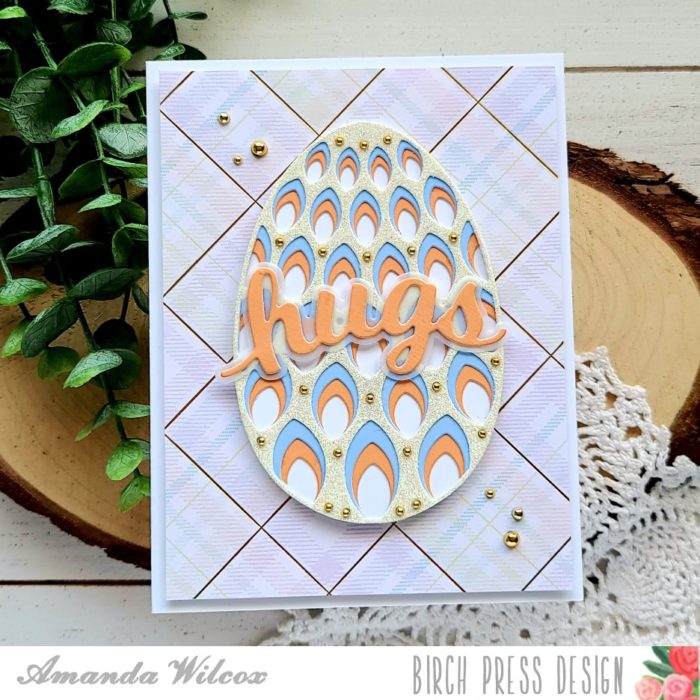
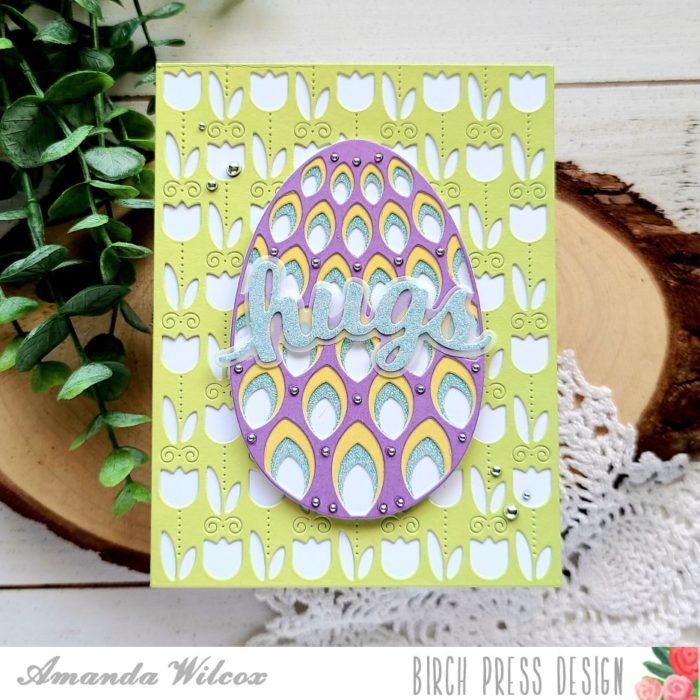
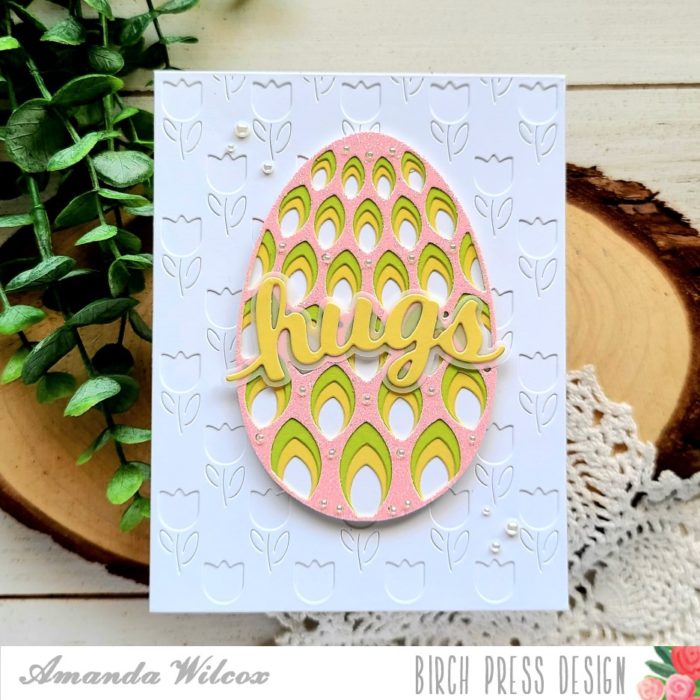
Hello everyone! It’s Amanda from Twiddler’s Nook today and I have a trio of cards to share featuring the petal egg layering set and a few different backgrounds to pair it with.
To start off today’s cards, I just pulled out a variety of cardstock colors – glitter and not – and started cutting the layers of the petal egg. It was so fun to mix and match, and just play, with all of them once they were cut out.
After I decided on the layers that I wanted to use together, I ended up with three complete eggs and thought it would be fun to make three cards to share with you today.
For my backgrounds, I used layer A and C of the Field of Blooms set. Then for my third card I pulled out the Memory Box spring plaid paper pad and chose one of the beautifully foiled pieces to use.
I used liquid glue to adhere all of my egg layers together and decided I wanted the backs to be solid so the background panels didn’t show through. Since there isn’t a solid egg shape I traced one of the dies three times and cut inside the tracing line and glued it to the back of my layers. If anything hung over, I just used my scissors to trim off the excess. Super easy and forgiving if you don’t fussy cut well.
I used liquid glue to adhere the Field of Blooms backgrounds to white card bases and then used foam tape to add the plaid paper, which I had trimmed down to 4×5.25 inches. Then for my sentiment, I went with the hugs honey script dies. I cut the shadow from vellum and then the words from the same paper as the bottom layer of the egg it was coordinating with.
I adhered the sentiments with liquid glue and the popped the eggs up on each background with foam tape. For finishing touches I added baubles to each one. This first one has gold to play off the gold foiling in the patterned paper.
Then I used silver baubles for this one because I thought the bright colors worked well with the bright silver.
And for this final card, I chose pearls because it’s got a bit softer colors and I just loved how they worked with the pink glitter paper on the top layer of the egg.
I appreciate you sharing your time with me. Have a fabulous day!
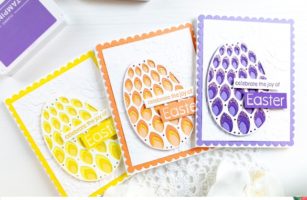
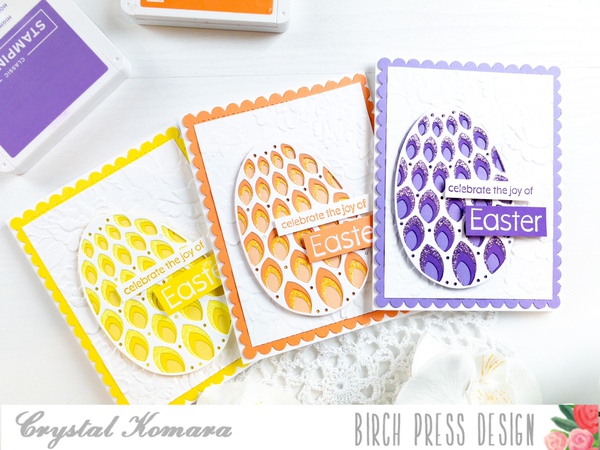
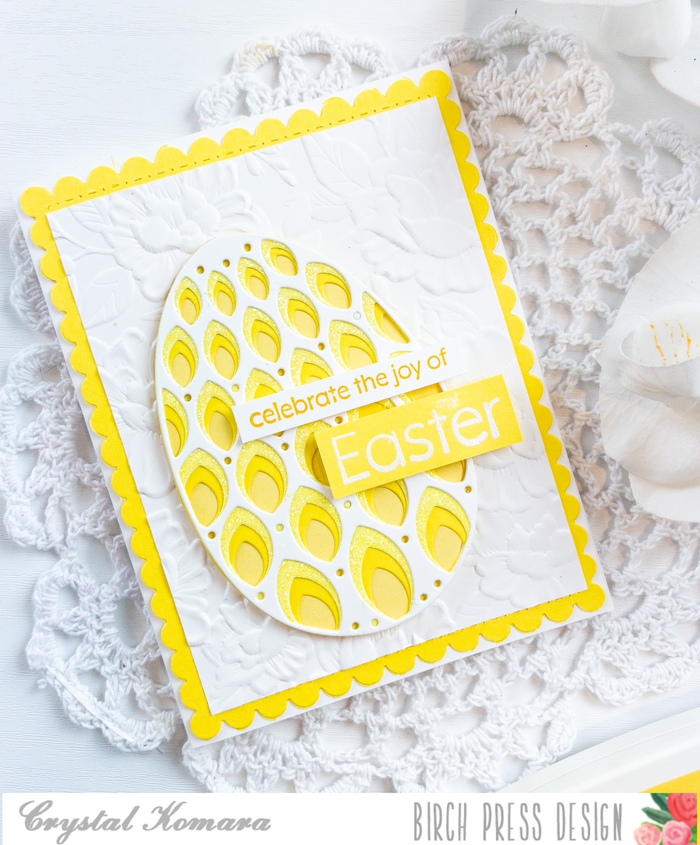
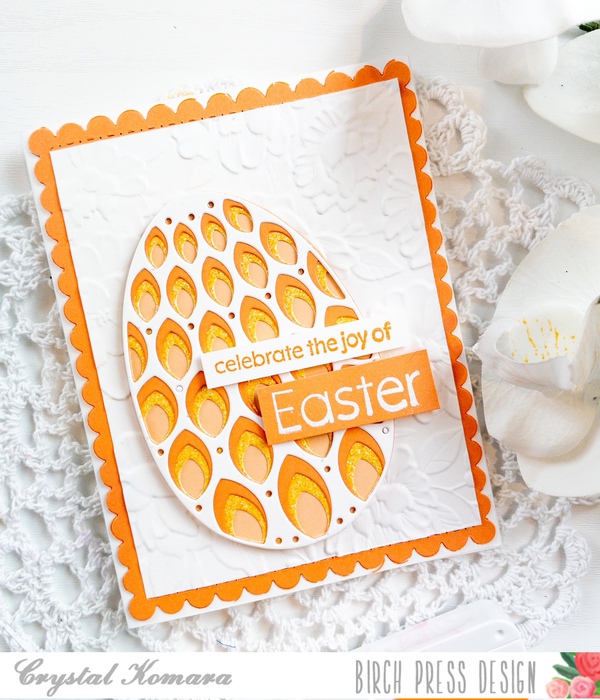
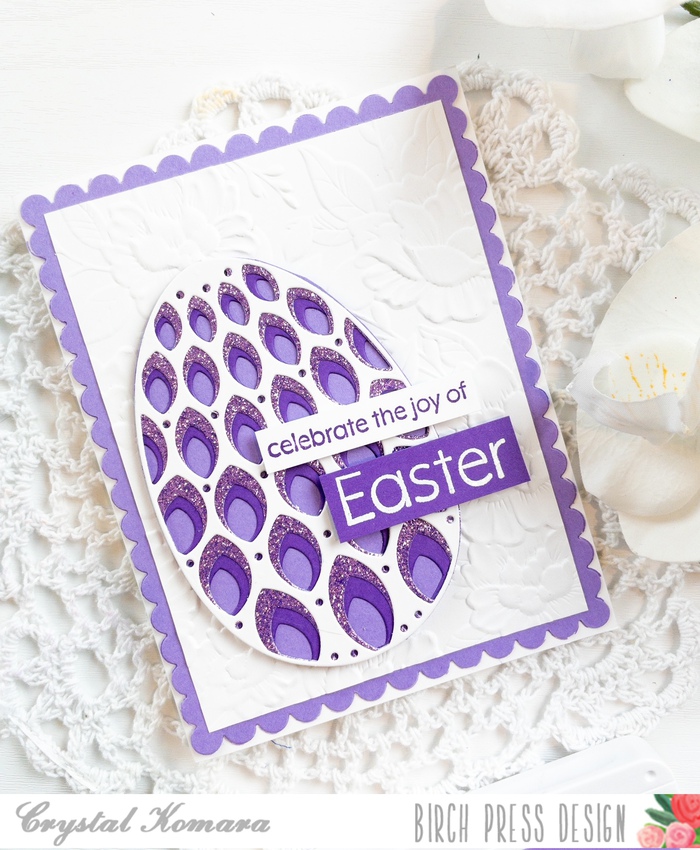
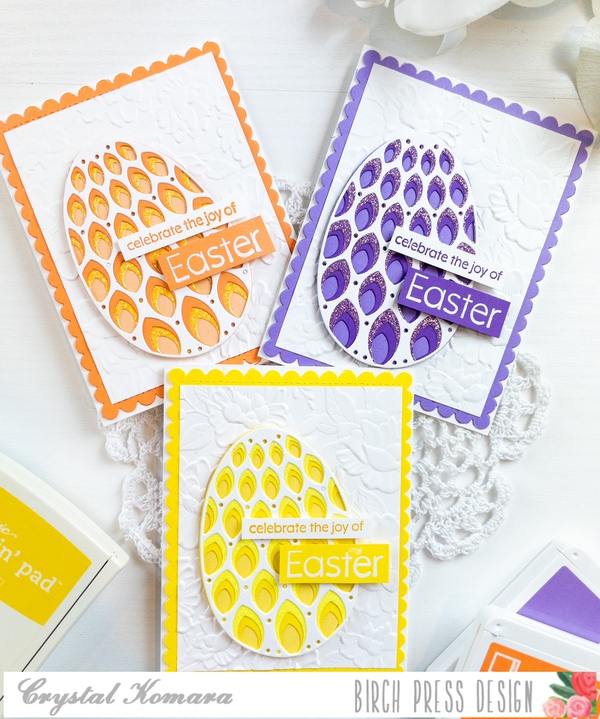
Hello friends and welcome back from the weekend! This is Crystal here with you today and I’m sharing three cards made using the beautiful Petal Egg Layering Dies for this trio of Easter inspired cards.
Please continue reading to see how I made these cards:
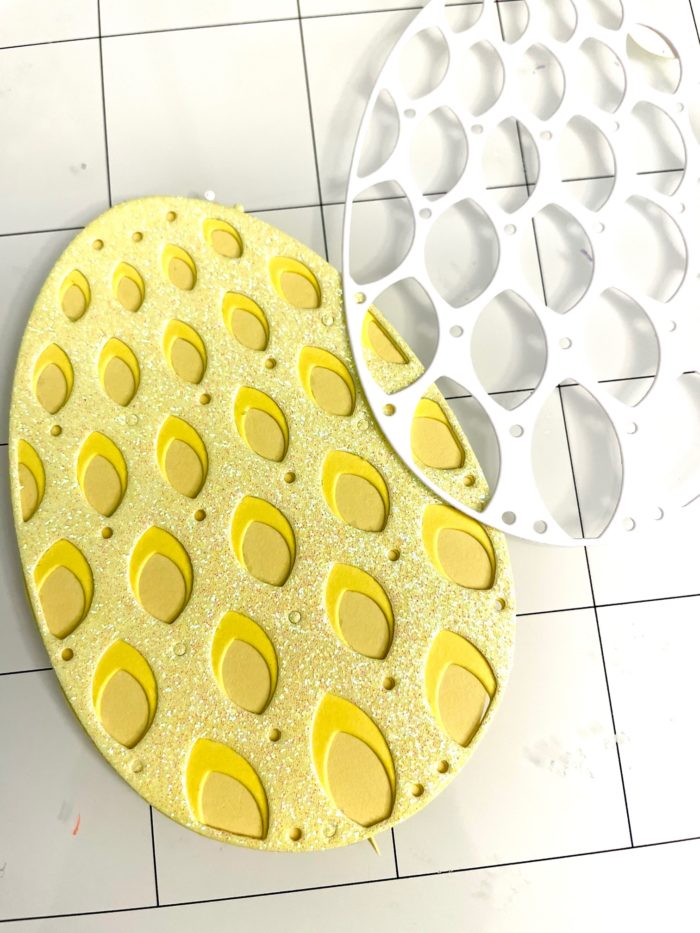
First, I die cut the three layers of the Petal Egg die. For the orange colored card, I die cut Layer A (the top layer) from white cardstock, Layer B (the middle layer) from a peach colored cardstock and Layer C (the bottom layer) from orange glitter cardstock.
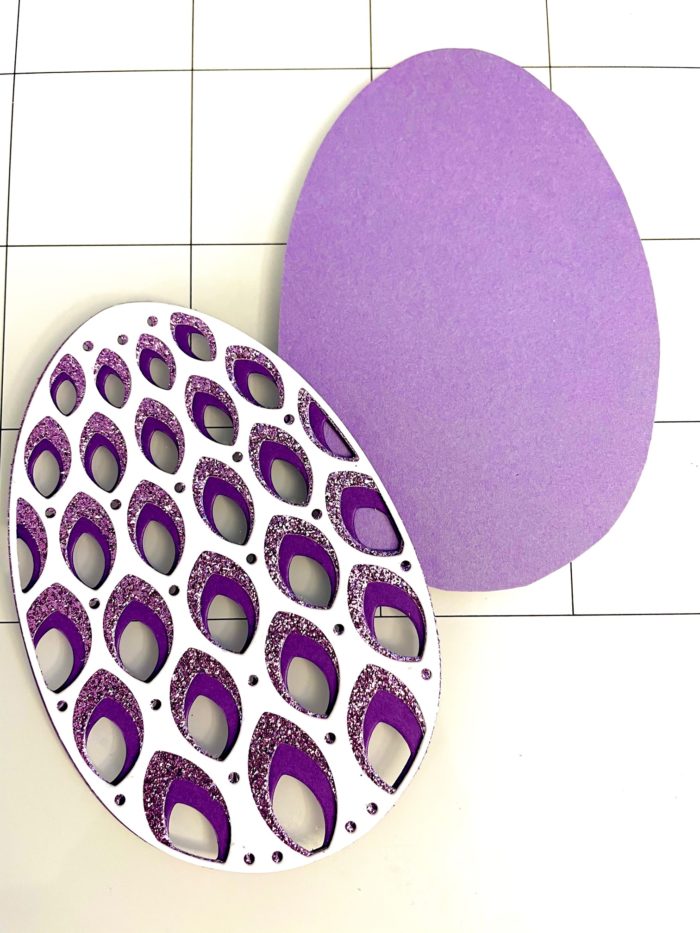
I did the same thing for the both the purple and yellow Easter eggs too. For the purple colored card, I die cut Layer A (the top layer) from white cardstock, Layer B (the middle layer) from a purple glittery cardstock and Layer C (the bottom layer) from lavender purple cardstock.
Using a liquid adhesive (LineCo ph bookbinding glue) is my go to!) I began to adhere all the layers of each egg together and set them aside.
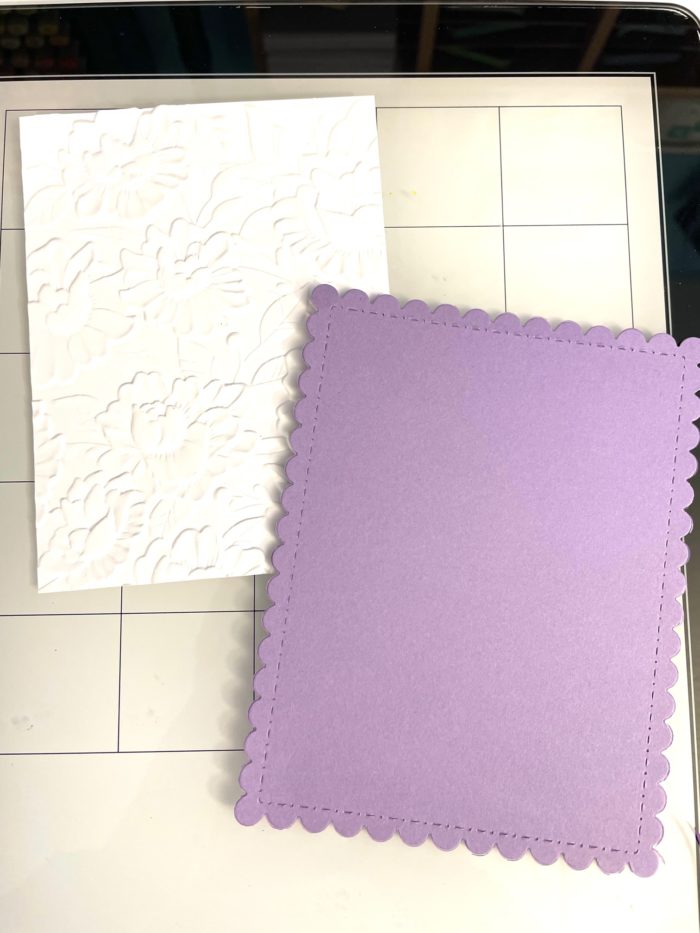
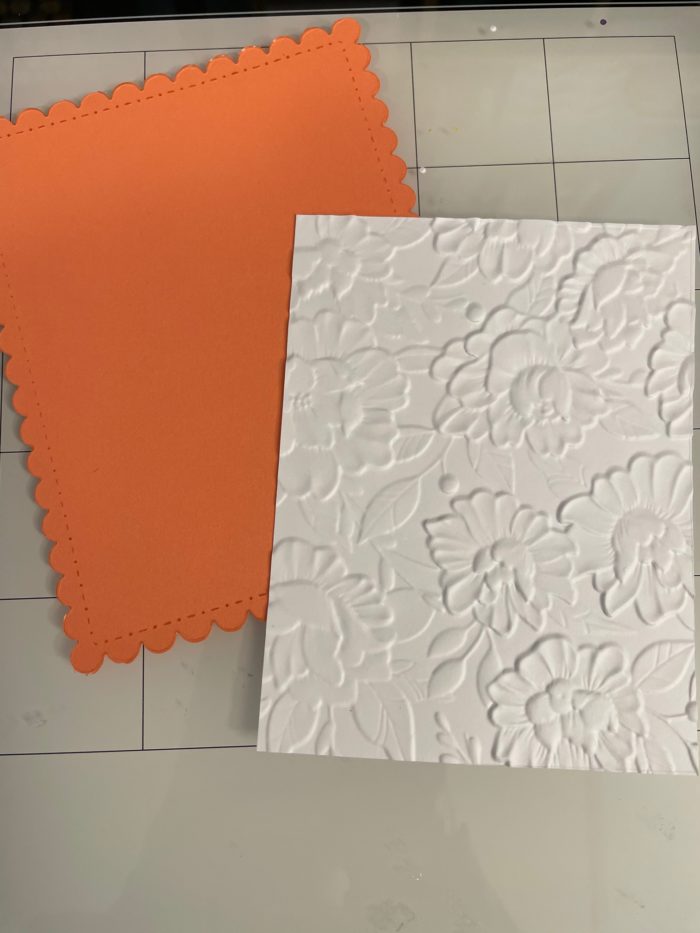
Next I worked on the card base itself. The base of each card is made from 80 lb. Neenah White Solar Smooth cardstock and then I used a scalloped rectangle die to die cut purple, peach and yellow cardstock for a strong background. I dry embossed three pieces of 5″ x 3 3/4″ sheets of Neenah white cardstock to add more dimension to the background.
I stamped a sentiment on thin strips of white cardstock and then I heat embossed the word “Easter” on coordinating sheets of peach, purple and yellow cardstock. I adhered the sentiments to the card using 3M foam adhesive for added dimension.
I love how these cards turned out and even though I chose to make them in these three colors, you could use whatever monochromatic color scheme you would like for equally beautiful results!
Thank you for visiting and have a wonderfully creative day!
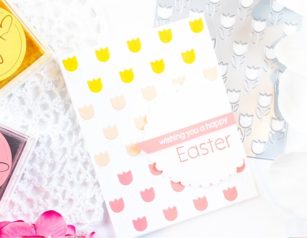
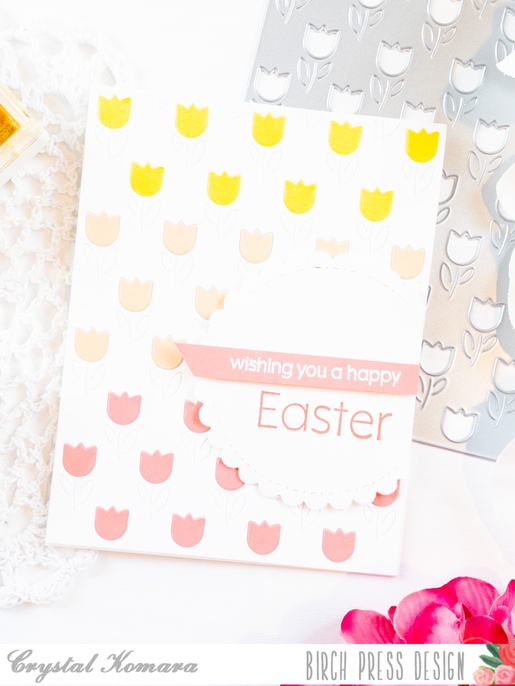
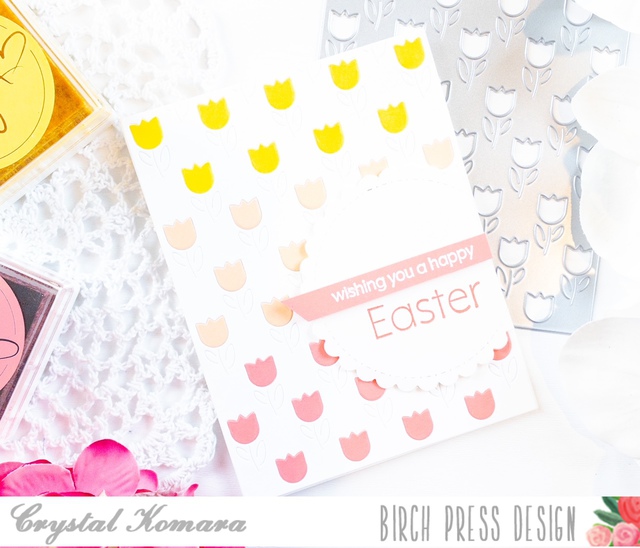
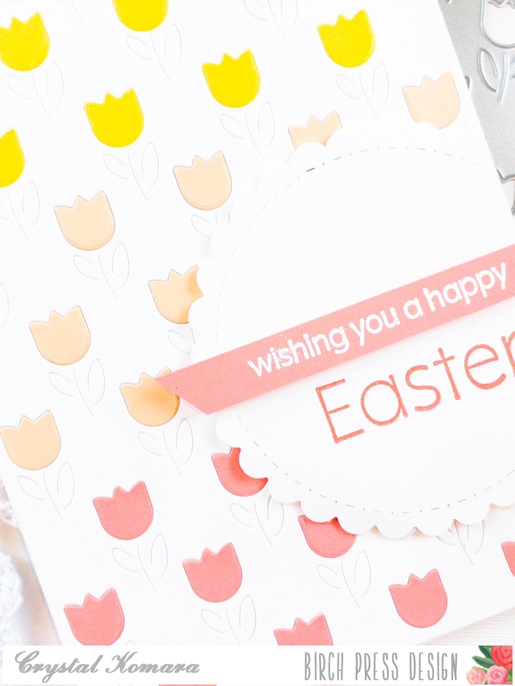
Hello crafty readers and happy Monday! I hope you all had a lovely weekend. Today I am sharing my first spring inspired card using the beautiful new Tulip Fields Layering Plate.
For this A2 sized card, I only used Layer C (or the bottom layer) of the Tulip Layering Plate dies. I love being able to use these dies together as a group of three, or as stand alone dies, so you get more for your money!
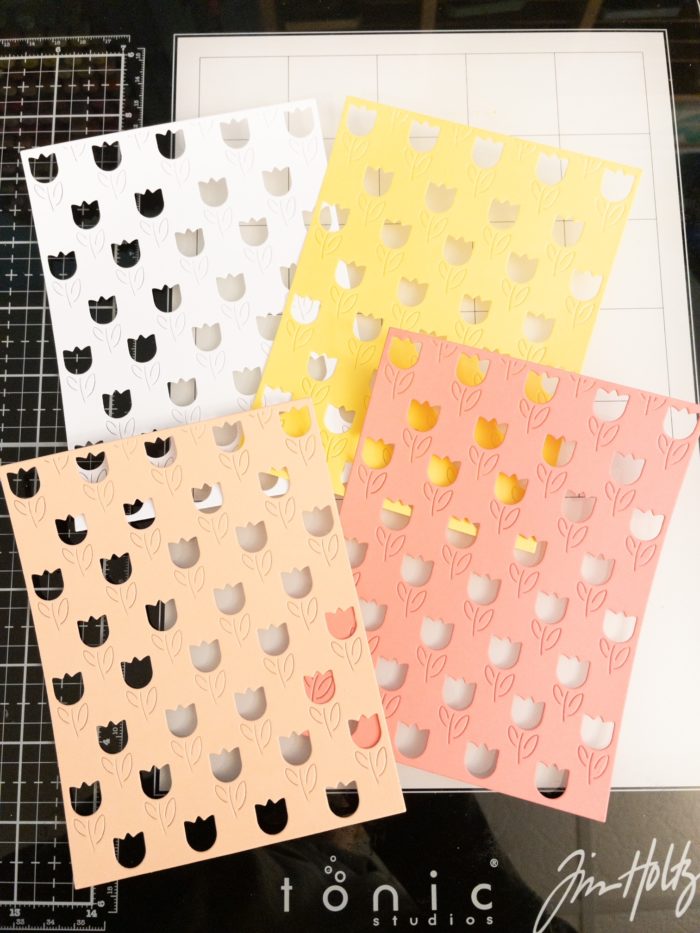
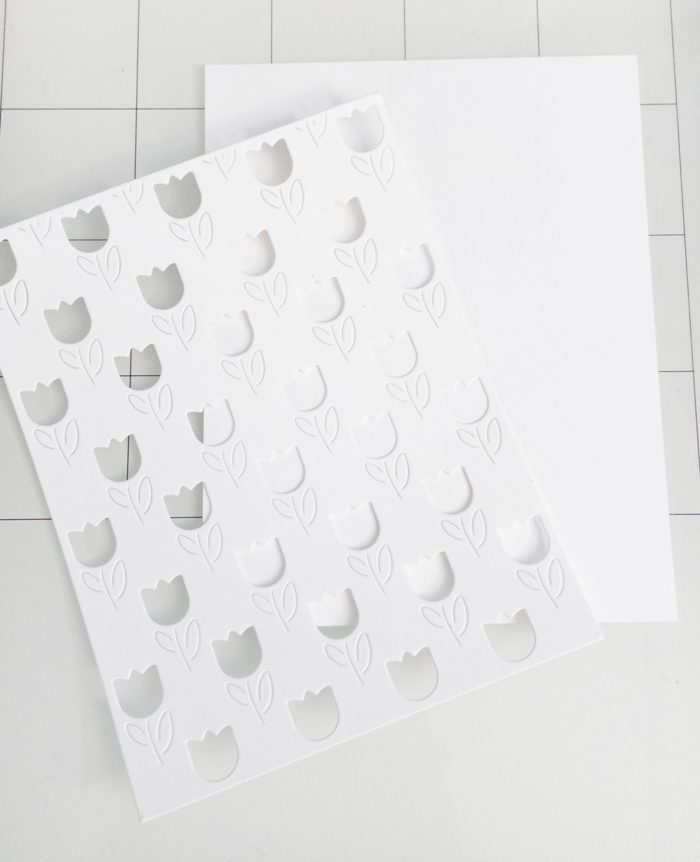
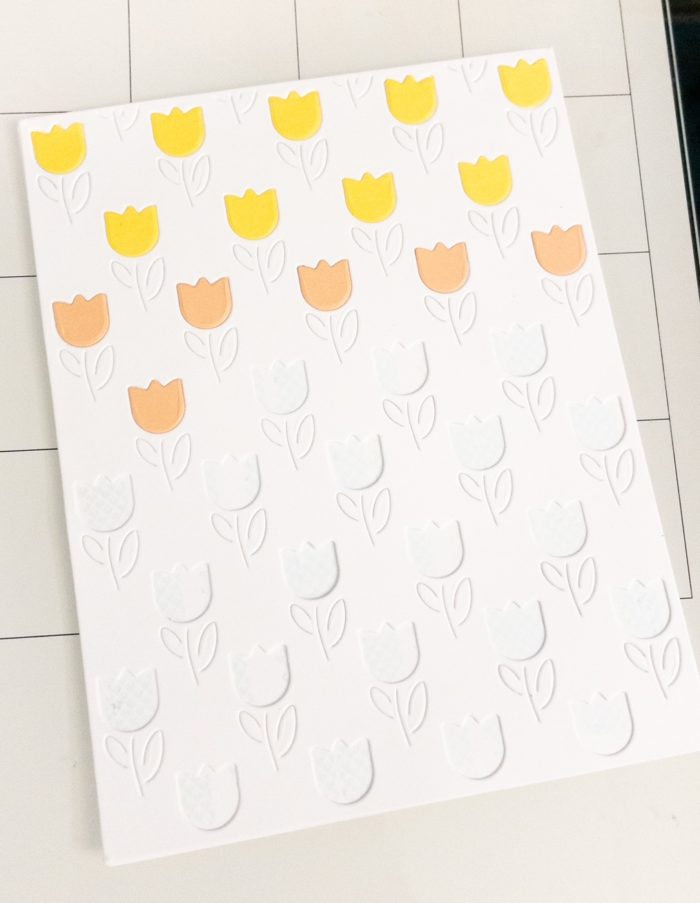
To create this card, first I die cut Layer C from four different color of cardstock – white, peach, yellow and pink.
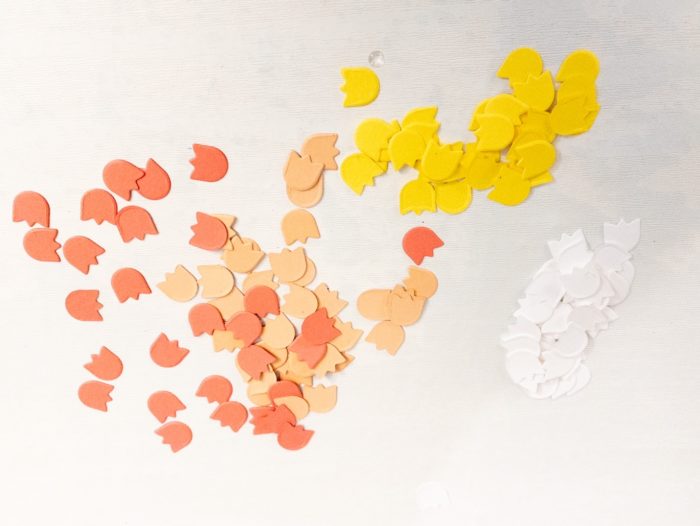
I separated all the little tulip heads by color after running each color cardstock through my Big Shot machine.
I placed a 5 1/4″ x 4″ piece of white cardstock behind the white Layer C tulip cut cardstock. I lined this paper with Tombow dot adhesive, so that when the tulip paper was placed on top, there were still sticky holes left for me to place each tulip head.
I placed the tulip heads in yellow, peach and pink rows. Yes, I had to place them into position one-by-one, then I added a scalloped circle with a sentiment and voila, all done!
I hope you enjoyed today’s card. Thank you for visiting and have a wonderfully creative day!
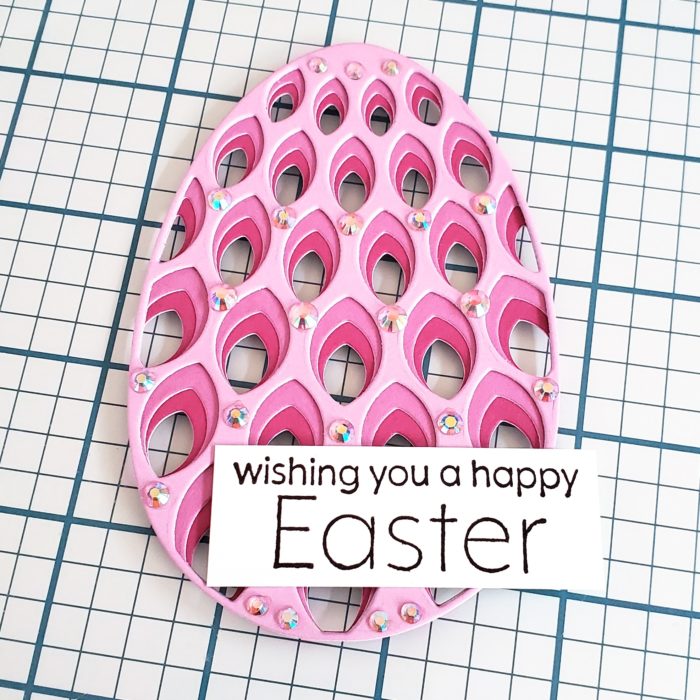
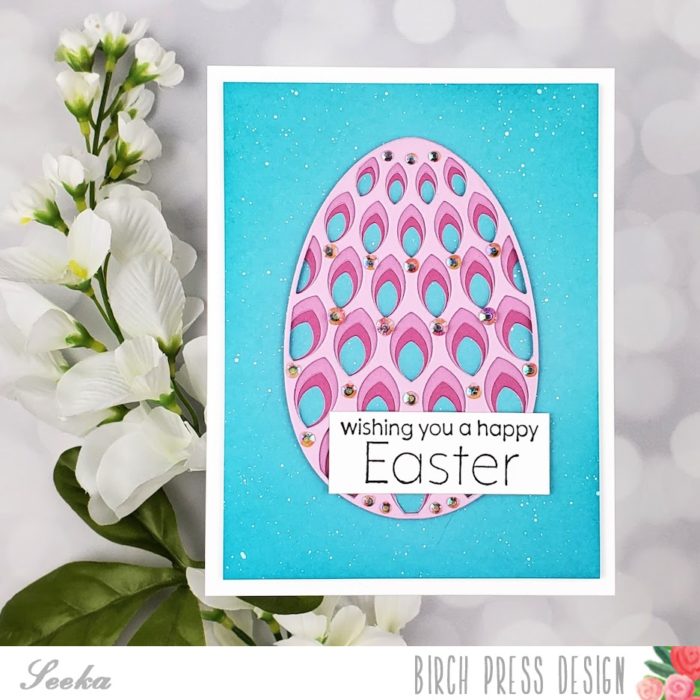
Hello! It’s Seeka here and today I’m sharing an Easter card featuring the Petal Egg Layer Die set.
I started off by cutting the three layers of the egg in shades of violet cardstock from the Memory Box Vibrant Violet 6×6 paper pack.
Next, I adhered the layers together and then adhered jewel embellishments over the pattern of small dots in the die-cut pattern. I also stamped sentiments from the Blooming Spring stamp set onto a strip of white cardstock and adhered it over the bottom right of the egg.
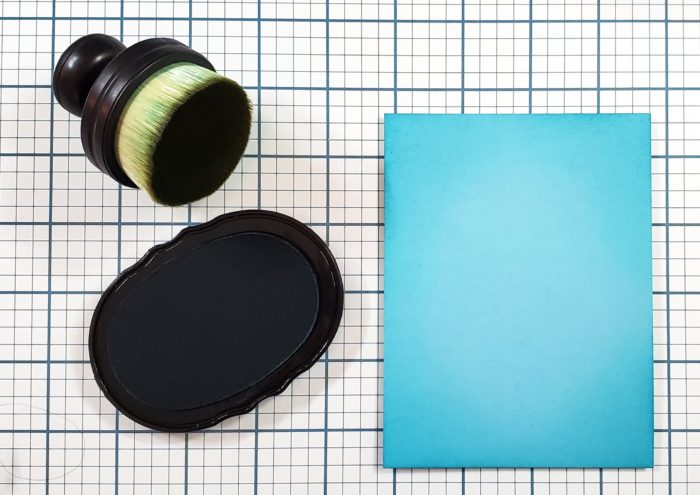
For the background, I trimmed a piece of teal cardstock from the Memory Box Fresh Aqua paper pack to about 4″ x 5.25″ inch. To add a bit of interest, I used a blending brush to blend on a bit of teal dye ink at the corners of the panel.
Next, I used a small round paint brush to splatter a bit of white Dina Wakley Media Gloss Spray over the panel.
To assemble the card, I adhered the egg and sentiment to the teal panel and then used foam tape to adhere the card front to an 4.25″ x 5.5″ card base.