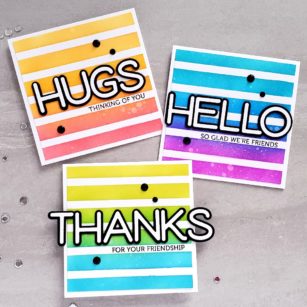
Good morning! It’s Ardyth here this morning with 3 bright happy cards that focus on some new sentiment dies.
This simple 4.25″ square design starts with the Bold Stripes stencil and two colours of ink, blended to create an ombre effect.
Then I added the die cut Hugs sentiment, and stamped a sentiment from the Lingo Thanks stamp set.
Then I did it again, with the Hello die cut and different colours on my background.
And when it came time to do the third card with the Thanks die cut, it didn’t fit. It’s designed to fit on a full A2 card base. But because my square cards fit in an A2 envelope, it’s fine (and really fun!) to have the thanks hanging over the edge of this card!
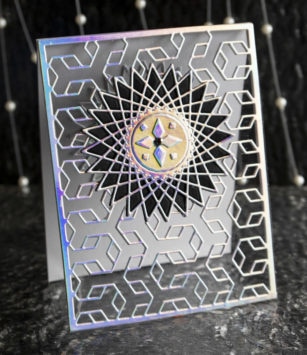
Hello! Watching Jennifer McGuire make see-through cards this morning inspired me to make a mad dash to the Interlocking Frame and String Art Circle. I was so excited to make this card, it felt a bit like morning aerobics, except way more fun!
Jennifer’s video is the original and I highly suggest watching that for overall instructions; however, I wanted to offer some additional tips and tricks specific to the Interlocking Frame. This frame has a lot of intricate detail, which may offer some challenges to a card design such as this, but it’s totally doable, easy, and the results are stunning! Make sure to check out the short video below for some tips in using this particular die for this card design.
The mixture of the dies, holographic paper, and see-through design makes this an absolutely stunning card. As it sits on display, different colors appear just depending on the angle of light that is catching it. It’s almost like glass etching. In the photos above, blue turns to a gold, and even pastel as seen below:
The details of the String Art Circle are so stunning, with so many options. In the photo above, I’ve die cut one out of black. All the pieces were left intact to create a background for the holographic outline. Left over negative pieces were used to embellish the center, along with an iridescent black pearl. Wow! This has to be one of my all-time favorite cards.
For the interior, I added another String Art Circle cut out of the holographic paper to match the exterior. A light gray paper creates the background, with a white center for an embellishment. It’s a great card to have on hand because it’s so versatile. Depending on colors used, this could be very masculine or very feminine, and is great for any occasion from wedding, anniversary, birthday… even a holiday greeting would be beautiful. The inside font could be casual or formal, so it’s great for any style, too! Room for writing a note or even a larger sentiment is on the back.
No matter how hard I try, photos simply do not do this card justice. Check out the video below for some tips, tricks, and to see this card in action!
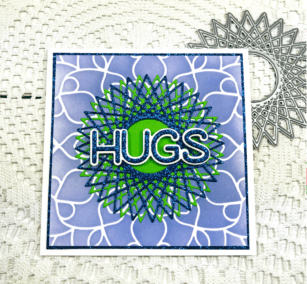
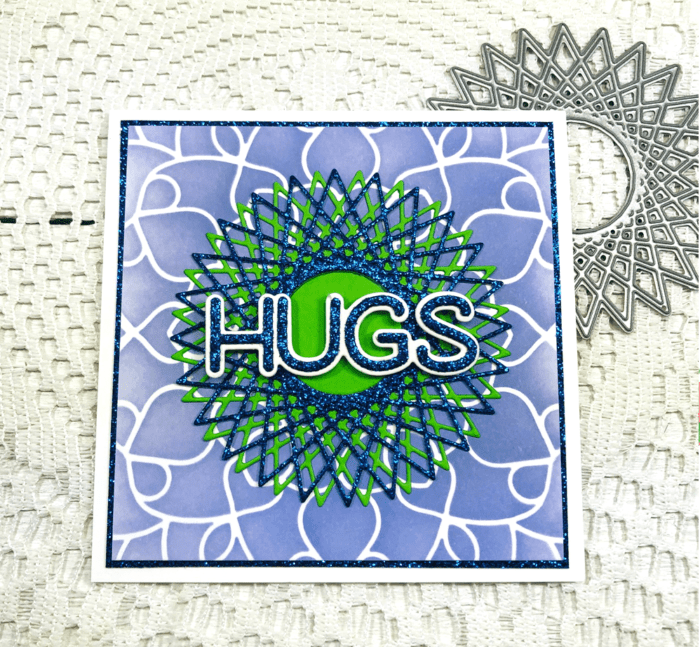
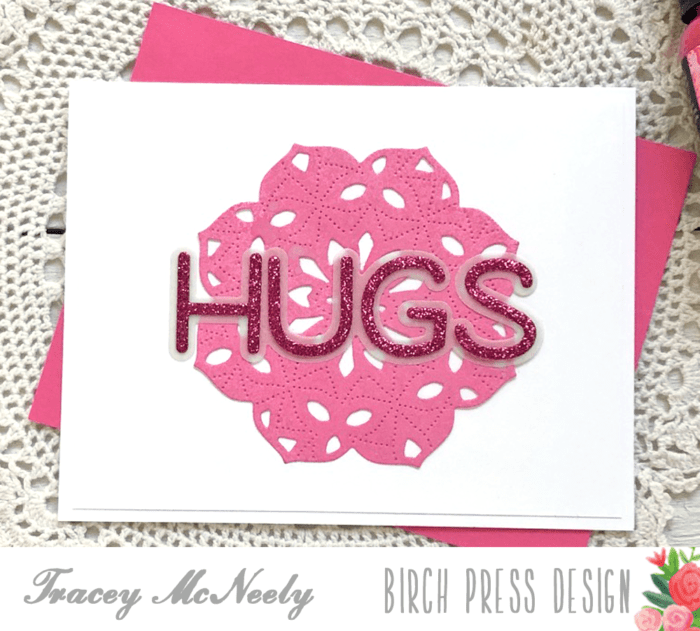
Hi there, it’s Tracey here with you this morning. Today I might be using the wrong design principles to create a sparkly card that looks right in my eyes.
I started by ink blending the Midnight Mandala Stencil with Shaded Lilac Distress Oxide Ink over a panel of Bristol Smooth cardstock. I cut the panel down to a 3 7/8″ x 3 7/8″ square making sure the flower in the centre of the stencil was right in the centre of my ink blended panel. I had to do a little math and use my T-square to move out 1 15/16″ from the centre point of the flower.
I cut of piece of royal blue cardstock from the Twinkling Jewel Glitter Pad to a 4″ square. I adhered this panel to a a 4 1/4″ card base. Next I adhered the ink blended panel over the glitter panel. This leaves a tiny 1/16″ border around the ink blended panel.
The String Art Circle was cut twice, once with a bright green cardstock and once with the same royal blue glitter cardstock. I adhered the green string art circle to the centre of the ink blended panel and then I inlay the green centre. Next I adhered the royal blue string art circle over top slightly offset.
The sentiment is from the Big Lingo Type Hugs die set. I cut the shadow using white cardstock and the inner letters from the royal blue glitter cardstock. I glued the letters over the shadow. Before adding it to the card I added tiny pieces of foam tape to the back of the word hugs and then placed it over the centre of the string art circle.
So much glitter and sparkle! The best is that the glitter on the Twinkling Jewel Glitter papers stays put, no getting all over your hands and workspace or recipient!
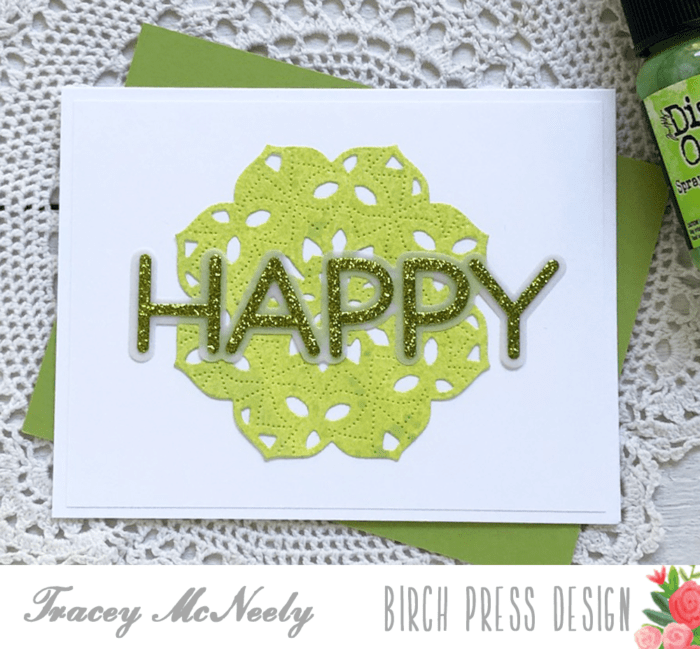
You could use any of the Birch Press Design stencils to create magnificent backgrounds to use along with any of the stand alone die cuts. Add in some of the beautiful glitter paper and you have a gorgeous card whether you used sound design principles or not! Thank you so much for creating with me today and have a great weekend!
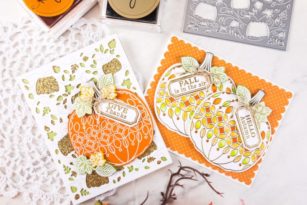
Hello readers! This is Crystal Komara here with you today sharing two cards using the beautiful new “Autumn Breeze” layering plates and “Pumpkin Lacework” stamp set and coordinating dies. Fall is my absolute favorite time of the year and I couldn’t be more excited about these new products!
I stuck with a traditional fall color palette of white, orange, olive green and gold for these A2 sized cards.
Just look at that beautiful stitching from the Autumn Breeze Layer Plate A!
Here is the second card I created using the “Pumpkin Lacework” stamp set and coordinating dies:
I have created a step-by-step YouTube video tutorial showing how both of today’s cards were made. I hope you will enjoy it!
I still look forward to creating even more cards using these beautiful new fall products! Thank you for visiting and have a wonderfully creative day!
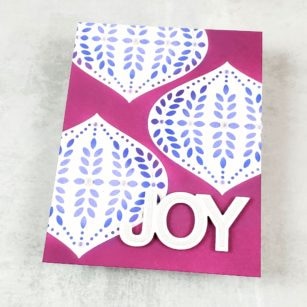
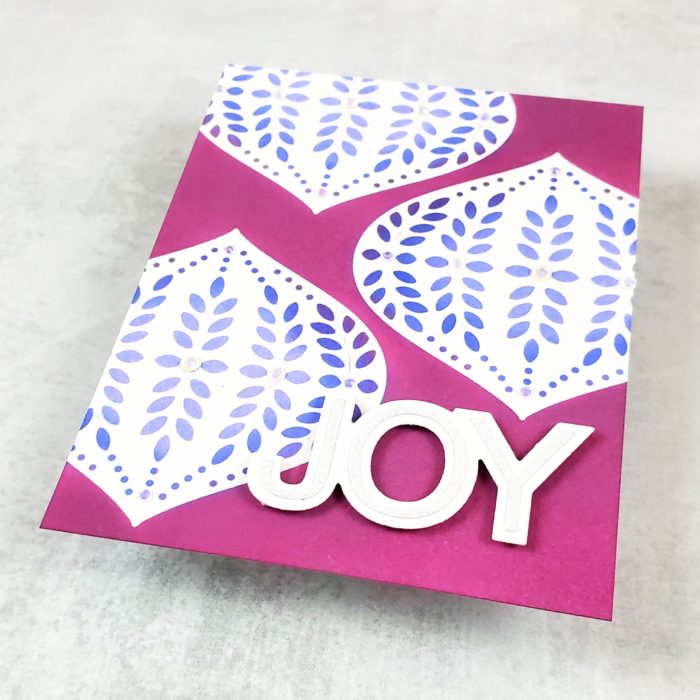
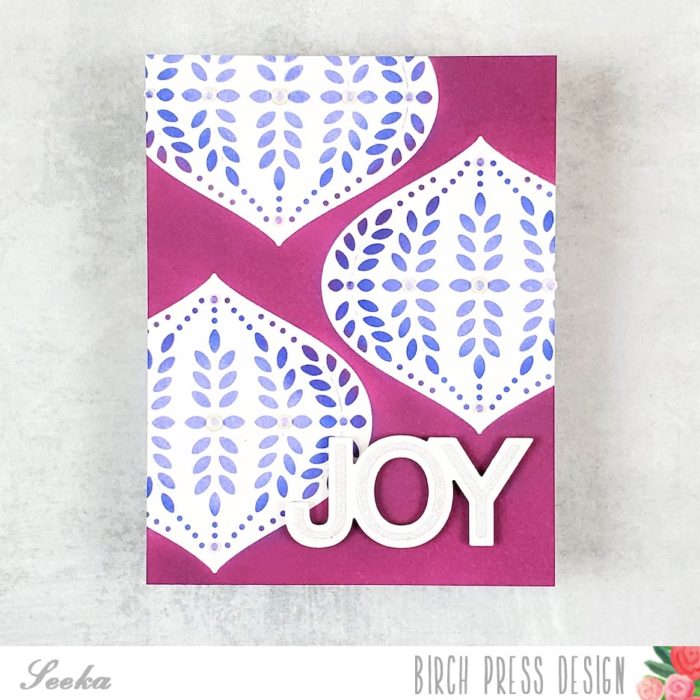
Hello! It’s Seeka here, and today I have another example of stretching your supplies!
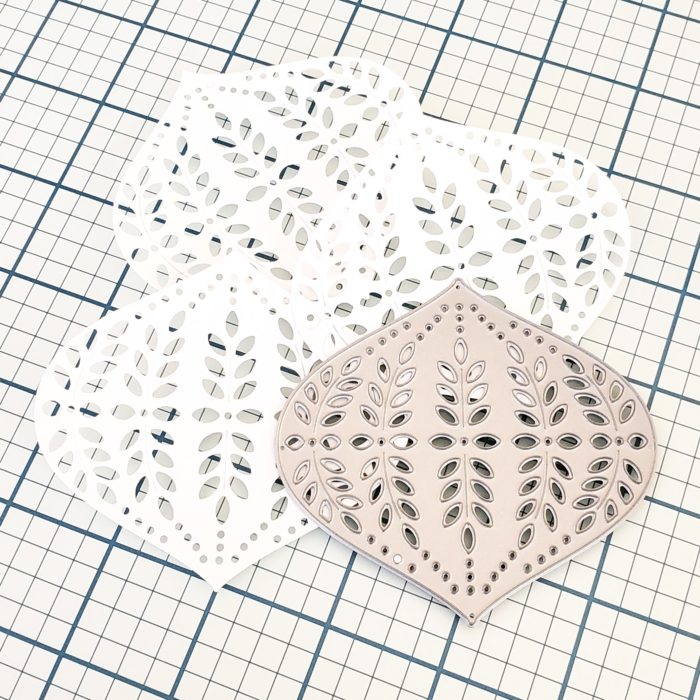
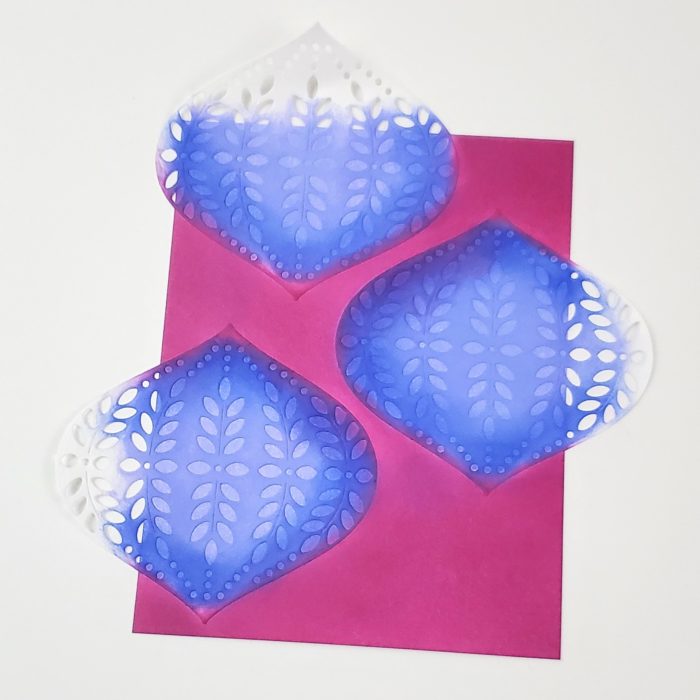
I began by using the Marisol Ornament Layer B die to cut three masks out of masking paper (I happened to use Avery Removable ID Labels).
Next, I remove the release paper and stuck the three masks onto an A2-sized piece of bristol smooth cardstock. Using foam daubers, I applied Shaded Lilac Distress Oxide ink over the masks, making sure to ink all the little openings.
Then I used a foam blending tool to add Seedless Preserves between the masks. This color acts as the background. Since the foam blending tool doesn’t allow for precise color application, a bit of Seedless Preserves colored the edges of the ornaments. To use this to my advantage, I used another dauber to blend Blueprint Sketch ink over the areas where Seedless Preserves and Shaded Lilac met, to soften the transition from wine to purple.
Next, I removed the masks and adhered some small clear jewel embellishments to the ornaments.
For the sentiment, I used the Simple Joy die and cut the shadow layer out of white cardstock, and the detail layer out of silver glitter paper. I adhered the detail layer to the shadow layer and then used foam tape to adhere the sentiment to the background.
To finish, I adhered the card front to an A2-sized card base.
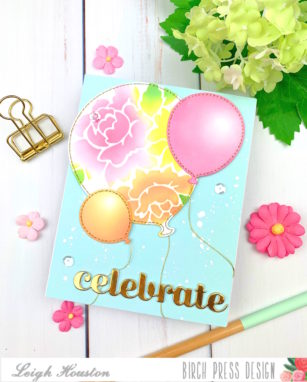
Hello, friends! I am so happy you stopped by today. I’m here sharing how I made this stenciled and stitched balloon card using Birch Press Design’s Party Balloon dies.
These Party Balloon dies are truly a must-have for creating birthday or celebratory cards. I love their stitched details! To start my card, I die cut my largest balloon and added stenciled details using Poppystamps’s Romantic Blooms stencil and Distress Oxide Inks. I then die cut two smaller balloons and added color with the same shades of Distress Oxide inks, being sure to keep a highlight area for some realism.
To add some more interest to the balloons, I stitched through the stitch holes using gold metallic thread and a simple backstitch. I then adhered some of the same thread to the back of the balloons to create their strings.
To finish the card, I splattered a sky-colored background panel with some white paint. I then cut my “celebrate” sentiment from gold mirror cardstock. I popped up my largest balloon with foam tape and adhered my balloons to the cards, wrapping their strings somewhat loosely around the back of the panel to add to the floating effect. A few sparkly sequins and this card was finished!
I hope you like this simple but pretty celebration card! Links to the products I used are below. Thanks again for stopping by and I’ll see you again soon with another card project!
Hello there, it’s Seeka here and today I have a sunny card featuring the Cora Layer die set.
I started by cutting three Layer As out of light green cardstock, and three Layer Bs out of light blue cardstock.
Next I adhered the green layers to the blue layers.
I created a yellow frame by cutting a rectangle out an A2-sized piece of yellow cardstock. I adhered the frame to a panel of white cardstock and then adhered the three Cora blooms across the panel.
I trimmed the Cora die cuts where they hung off the panel.
Using the Big Hugs Sugar Script die, I die cut the sentiment from teal cardstock and then adhered it to the shadow layer, which I die cut from vellum. I used foam tape to adhere this to the card front along with a stamped sentiment from the Blooming Spring stamp set.
To finish, I adhered the card front to an A2-sized card base.
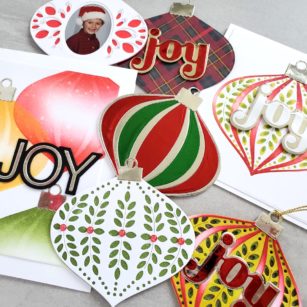
Good morning! Ardyth here with loads of ideas for using three of the new ornament die sets: Ornament Basics, Marisol Ornament and Twinkle Ornament.
First, I made some cards. For the one on the left, I used the outline of the Marisol ornament as a negative stencil and blended ink through. Then I put the top layer of the Marisol set over and blended more ink to create tone-on-tone stripes.
I used the Marisol ornament die cuts as layered stencils to create the one on the right, along with the Big Sugar Script Joy sentiment.
The new Memory Box Polished Foil paper pad has 12 different colours of foils and I used them for my ornament toppers and sentiments.
Next, I used them to make some tags. The top and bottom tags used the top layer of the Marisol set, along with foil papers from the Polished Foil paper pad.
I used one of the Christmas Plaid patterned papers to make the Joy tag (left).
I also used one leafy layer from the Marisol set along with a solid background from the Ornament Basics set (right).
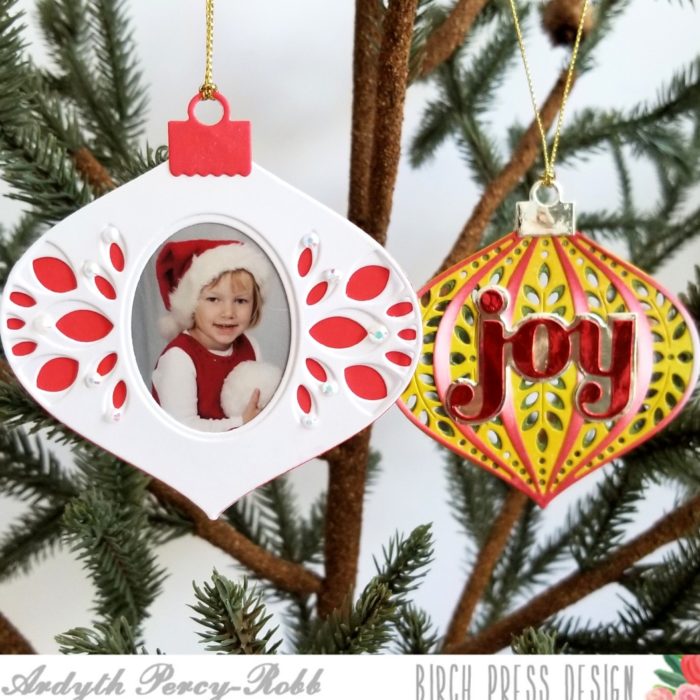
Finally, I made two ornaments. The one on the left uses the top two layers of the Twinkle set – that oval is the perfect frame for photos. And I added the same two layers to the back, with a photo of my son, so that this ornament has 2 ‘pretty’ sides!
The one on the right uses the die cuts I used as stencils for one of my cards, also doubled-up so that the back is pretty.
There are so many ways for these die sets to be used and combined to create fun and meaningful projects for the holidays!
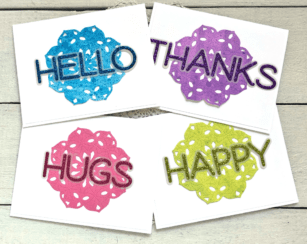
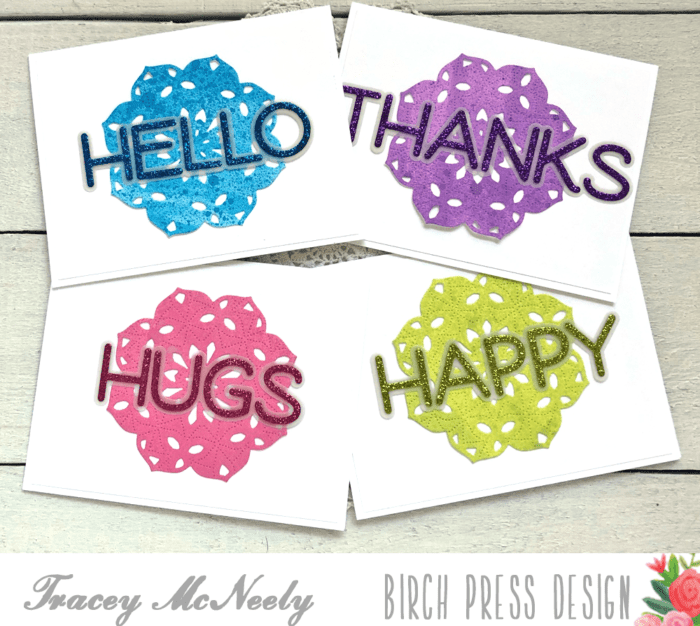
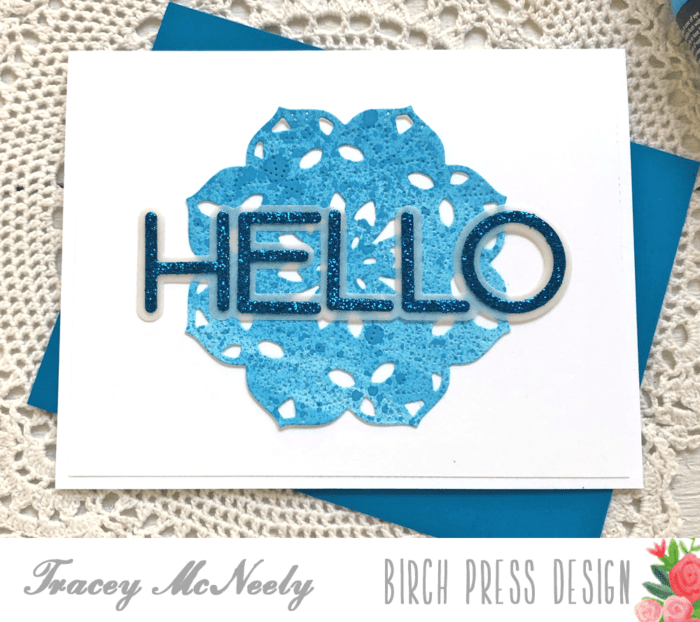
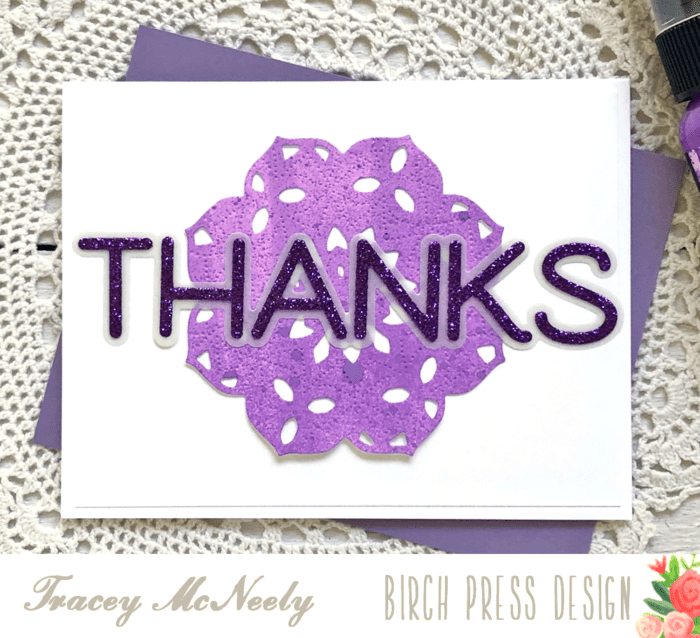
Hi there it’s Tracey. Today I am going to show you how easy it is to use one basic card design and by changing just one element you can make multiple cards each with a different theme.
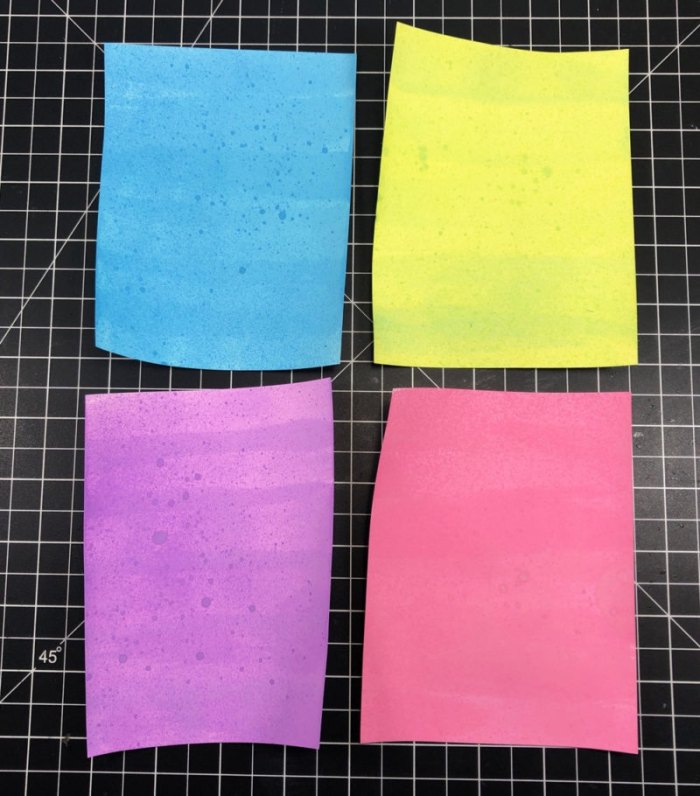
Each one of my four cards uses the newly released Kinsley Layer Set. The background paper for each of the die cuts was custom made using Distress Oxide Spray Inks. I sprayed some ink on my glass media mat and then sprayed some water onto the ink. I picked up the water with a foam blending tool and ran it back and forth across a panel of white cardstock until the whole panel was covered. I left some time so the first coat dry and then gave each of the panels a spritz of the same colour Distress Oxide Spray Ink direct to paper to add some subtle interest. I let the panels dry completely and then I cut four of the Kinsley Layer Dies Layer C from each panel. I chose to use only Layer C because on its own it creates a beautiful stitched pattern.
Each white A2 sized card has a 5 1/4″ x 4″ mat that I adhered the Kinsley Layer die directly to and the sentiments added to the top with liquid glue. The mat was then adhered to the card base directly making the card nice and flat for mailing.
Thanks so much for stopping in today. Give it a try, choose a simple background and change up your sentiments to make a collection of cards to have at the ready. You never know…
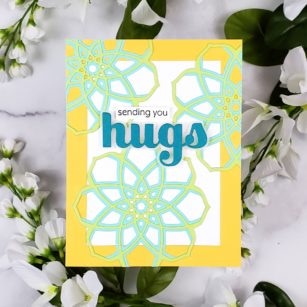
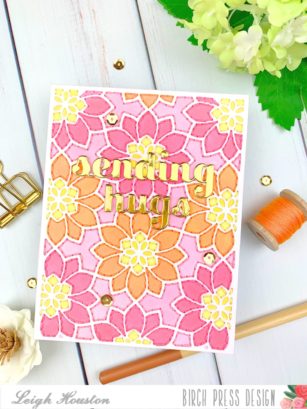
Hello, friends! I’m so thrilled you’ve joined me today for this cheery, summery card. I added some texture and dimension to the gorgeous Birch Press Designs Viola die set and I’m excited to share the process with you!
I started my card by die cutting Layer A from the Viola Layering Die Set twice: once from inexpensive cardstock, and once from Neenah Classic Crest Solar White #110 cardstock. I used my inexpensive die cut panel as a stencil, using alcohol markers to color in the negative spaces. When I was finished, I discarded the stencil and adhered the clean 110# layer on top of my colored card base using a strong liquid adhesive.
After the adhesive had dried, it was time for the stitching. I used a paper piercer to poke holes inside the die cut lines. I then used coordinating embroidery floss (I used 4 strands) and a simple backstitch to stitch inside these spaces. This went surprisingly quickly… a couple of episodes of bad TV and I was finished!
To finish my card, I die cut my sentiments from the Sending and Hugs Sugar Script dies from gold mirror cardstock. A few sparkly gold sequins and this card was finished!
I hope you enjoyed this project! Links to the products I used are below. Thanks again for stopping by today, and I’ll see you again soon with another card project!