
Hi there, it’s Tracey here with you this morning. Today I might be using the wrong design principles to create a sparkly card that looks right in my eyes.

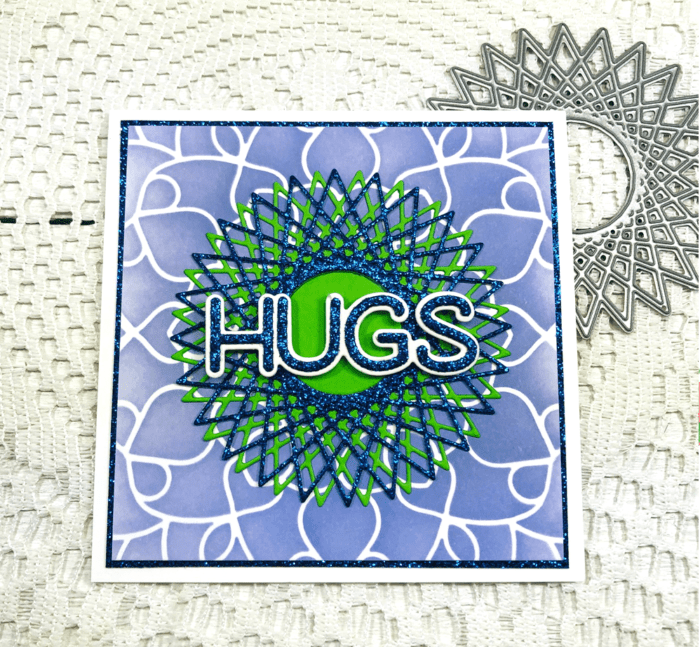
I started by ink blending the Midnight Mandala Stencil with Shaded Lilac Distress Oxide Ink over a panel of Bristol Smooth cardstock. I cut the panel down to a 3 7/8″ x 3 7/8″ square making sure the flower in the centre of the stencil was right in the centre of my ink blended panel. I had to do a little math and use my T-square to move out 1 15/16″ from the centre point of the flower.

I cut of piece of royal blue cardstock from the Twinkling Jewel Glitter Pad to a 4″ square. I adhered this panel to a a 4 1/4″ card base. Next I adhered the ink blended panel over the glitter panel. This leaves a tiny 1/16″ border around the ink blended panel.

The String Art Circle was cut twice, once with a bright green cardstock and once with the same royal blue glitter cardstock. I adhered the green string art circle to the centre of the ink blended panel and then I inlay the green centre. Next I adhered the royal blue string art circle over top slightly offset.

The sentiment is from the Big Lingo Type Hugs die set. I cut the shadow using white cardstock and the inner letters from the royal blue glitter cardstock. I glued the letters over the shadow. Before adding it to the card I added tiny pieces of foam tape to the back of the word hugs and then placed it over the centre of the string art circle.

So much glitter and sparkle! The best is that the glitter on the Twinkling Jewel Glitter papers stays put, no getting all over your hands and workspace or recipient!
You could use any of the Birch Press Design stencils to create magnificent backgrounds to use along with any of the stand alone die cuts. Add in some of the beautiful glitter paper and you have a gorgeous card whether you used sound design principles or not! Thank you so much for creating with me today and have a great weekend!

Supplies


Comments
One response to “String Art Hugs | by Tracey McNeely”
This is fun Tracey, love the sparkle and your colors!