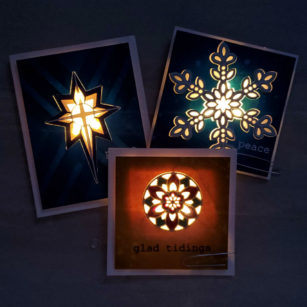
Good morning! Ardyth here with some Christmas-in-July cards with a special light-up feature!
All 3 cards follow the same steps:
create the layered die cut
ink blend a background panel (you can use solid cardstock if you wish)
cut the hole from the background panel and back it with vellum
glue the layered die cut in the hole
add the lights to the back of the panel
adhere to cardbase
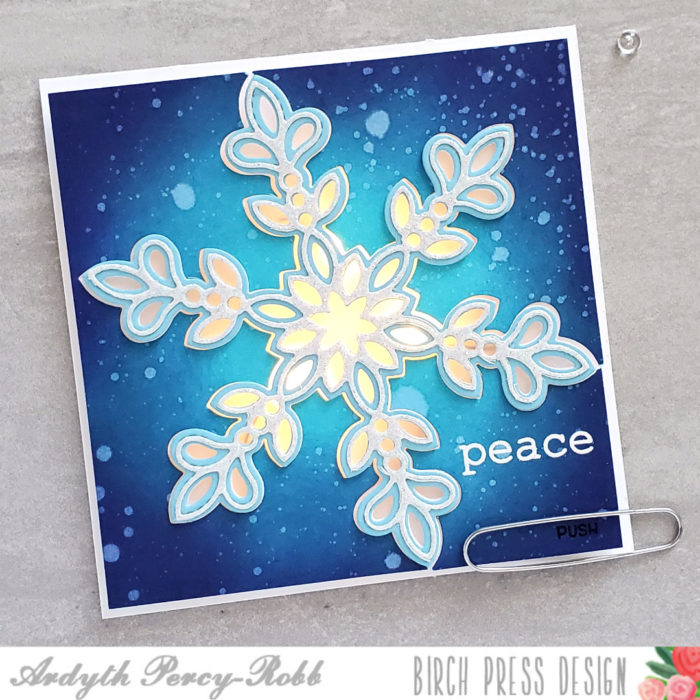
For my first card, I used 2 layers of the Glitz Snowflake dies, A & B. I stacked up 4 of the B layer and added one Layer A on top, that had been cut with one of the glitter cardstocks from the Delicate Pastels paper pack.
The sentiment is from the Memory Box Tidings Wreath set, embossed with white powder.
(The paper clip is just to hold the lights on by putting pressure on the switch).
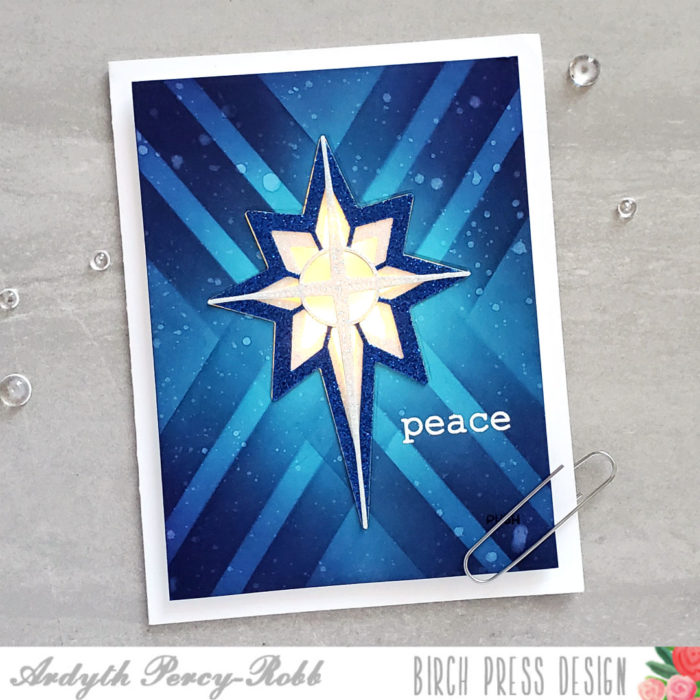
My second card uses the Bold Stripe stencil on the background, and 3 of the layers from the Nativity Star set, cut from glitter cardstock from both the Delicate Pastels and Twinkling Jewels paper packs.
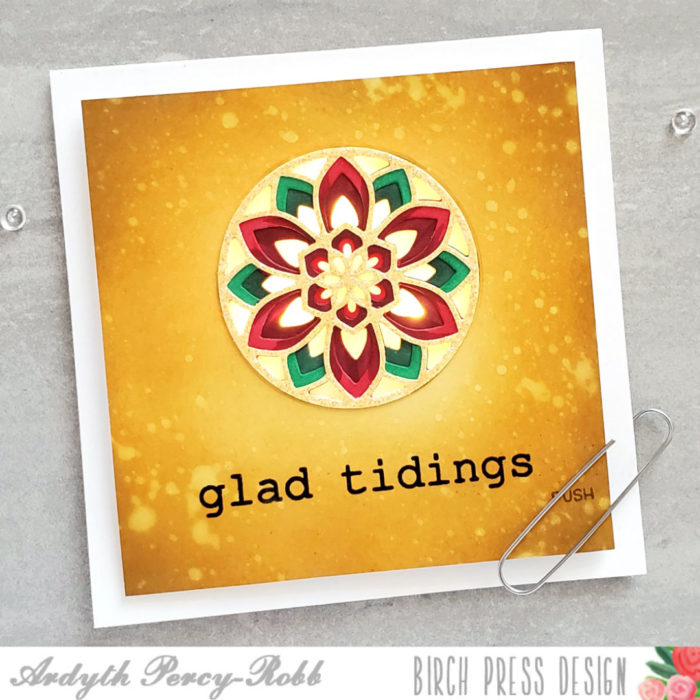
My third card uses the centre, floral portion of the Epiphany layering set, to create a poinsettia.
Here’s a video showing how I made these 3 very special cards:
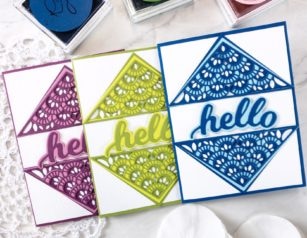
Hello friends! This is Crystal here with you today and I have made a few cards to share using the Frilly Triangle Layering dies. I love to make my cards in multiple colors, because every card truly does look different, yet perhaps one color is more appealing to your eye than another.
The first A2 sized card was made using a rich blueberry blue and a light baby blue cardstock. To keep things simple, I stayed with a monochromatic color palette for each of these cards. And, surprisingly for me, I did not use any glitter cardstock when creating any of these cards. That’s a first for me. I’m a glitter girl!
The second card uses an earthy moss green cardstock paired with a lime green cardstock. I’ll be the first to admit, I don’t love this color combo, but I bet someone else will!
For the last card today, my color palette is a rich raspberry cardstock and a sweet sugarplum (pinkish) cardstock. This one is my favorite!
I hope you have enjoyed seeing a variety of ways to use the Layering Triangle dies. Thanks for visiting and have a wonderfully creative day!
Hello! It’s Seeka here and today I have a card featuring ink blending and the pretty Fiori Plate Layer dies.
I confess that I forgot to take in-progress photos so I sincerely apologize! That said, this card was very simple to put together so I think it will be easy for you to follow along.
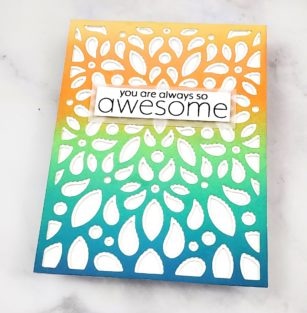
I started by blending six colors of Distress Oxide inks onto an A2-sized panel of Strathmore Bristol Smooth cardstock. I didn’t set out to use six colors, but as I played around, I added more colors. From top to bottom they are: Scattered Straw, Carved Pumpkin, Twisted Citron, Cracked Pistachio, Peacock Feathers, and Faded Jeans.
When the panel was dry, I used the Fiori Plate Layer A die to die cut it. Then I used the Fiori Plate Layer B to die cut three pieces of heavyweight white cardstock. I stacked and andhered these three Layer B die cuts together and then adhered the ink-blended Layer A on top.
For the sentiment, I stamped a couple of sentiments from the You Are Awesome stamp set onto a strip of white cardstock. Then I used foam tape to adhere the sentiment strip to a slightly larger piece of vellum.
To assemble the card, I adhered the sentiment to the die cut background and then adhered that, in turn, to an A2-sized card base.
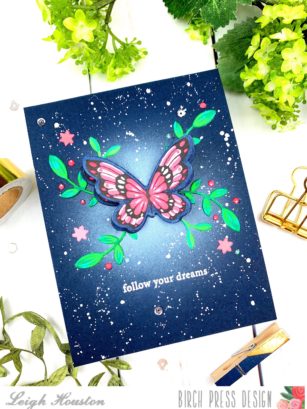
Hello, friends! I’m so happy to be here today to share this dimensional butterfly card I made with Birch Press Designs’s Lovely Butterflies stamp set. This set is perfect if you’re a butterfly lover like me!
I started this card with a panel of dark blue cardstock. I used white pigment ink to blend a halo in the center of the card where my butterfly would be. I then embossed my sentiment from the Lovely Butterflies set with white embossing powder and added white splatters to give the card a night sky look.
I always keep my leftover negative die cuts from my Birch Press dies, so I chose some foliage and stars from the Avalon Layer A die. I colored the pieces with alcohol markers and accented them with layers of gouache on top.
For my butterfly, I stamped the image on white 110# cardstock. I then used gouache paint to paint the butterfly’s wings. I decided I wanted to make the butterfly look like it is flying, so I stamped the image once again and colored it with markers matching the gouache paints I had selected (this was a time-saver over painting a second butterfly).
To assemble my card, I adhered the marker-colored butterfly and my foliage onto my card base. I then folded my painted butterfly up the middle and adhered it to the bottom butterfly along the crease. This creates such a beautiful effect of the butterfly’s wings rising up from the card.
I hope you enjoyed this project! Links to the products I used are below. Thank you for stopping by today, and I’ll see you again soon with another card project!
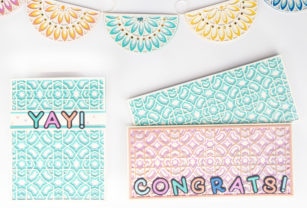
Hello! Today I am celebrating the birth of my beautiful niece, Ava Rose! In honor of her, I have made some festive cards using the Grandiose Bevel Plate Set and a banner using the Lumina Set. I love being able to come up with whatever word fits the occasion, and I used the dies from the Mod Alphabet Stamp and die set. Each letter in this set has two dies; one for the top layer, and one for the base. I used black for the base, with a color for the top.
Notice in the above photo, there are two sizes of cards shown. The one on the left is a standard A2 size using the die set as it is. The cards on the right utilize the repeating pattern of the same die to make a larger card than the die! These cards are not quite as large as slimline cards, but very close and would fit in the slimline envelopes.
To accomplish this, I needed to do some partial die cutting. I know that when I first heard of this technique, I was intimidated and it seemed complicated. Please try this! It’s easy, fast, and opens up so many possibilities to die cutting. Here are some photos of the process.
Notice the top cutting plate does not cover the bottom of the die. To extend this die cut pattern, we don’t want the end to be cut out. Anything under the top cutting plate will cut, anything not under the top cutting plate will not cut. Here’s what we get below:
Next, we need to just line up die. This is done by overlapping the pattern a little with the die, so the die can “click” into the cut piece, thus lining everything up perfectly for extending. If you don’t feel it “lock” into place, sometimes it is helpful to line it up from the back, as shown below.
Next, place the top cutting plate over the die, but remember we don’t want the end of the die to cut our pattern so we partially cut once again, as shown below on the cutting plates.
Here is the result:
The finished piece measures 3.25 inches by 7.5 inches. To leave a small border around the design, I cut the card base slightly larger. Note: the dies, when stacked, have a bevel effect on one edge as shown in the “Yay!” card. I cut that bevel off with my trimmer (after gluing the layers together) so it did not have a bevel, as shown below:
The banner was so much fun to make, and super easy! I used the Lumina Layer Set in various colors. Even though the die cuts a full 4.25 x 5.5 design, I simply used scraps over the part I wanted to cut, as shown below:
Once the layers were cut and glued together, I glued that piece to a circle that closely matched the size of the design.
The circle creates a base to be folded over twine or ribbon. This is a one-sided banner, but to make the pattern visible from both front and back, simply glue another design onto the back… or use a different full circle design from Birch Press Design and fold in half. I love dies that have so much versatility!
I embellished each center with some Fairy Sugar glitter glue in matching colors, along with some heart-shaped sequins.
Thanks for stopping by today, and I hope these projects inspire your next celebration!
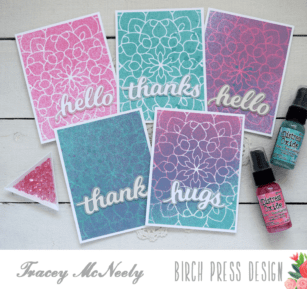
Hi there, it’s Tracey back again today. You’re getting a double dose of me this week. I am a big fan of adding colour to my projects with Distress Oxide Inks and today I have a special treat for you. I have five cards that were created with the Birch Press Design Midnight Mandala Stencil and Distress Oxide Spray Inks!
I used only two colours and one stencil and no two cards are the same. The process can be a bit messy so I use a homemade spray box. It is a 12 x 12 x 5 1/2″ priority mail box that I use whenever I splatter, flick or spray ink or watercolours inside the house. NOTE: I NEVER spray anything toxic inside the house such as spray paints or adhesive
The first two cards are very simple, I put a piece of white cardstock inside the box and laid the Midnight Mandala Stencil over top. The first card uses Picked Raspberry Distress Oxide Spray. The bottle was primed and just sprayed a few times over the stencil. Then I lifted the stencil to reveal to design on the white cardstock panel. The stencil got a quick wipe off with a baby wipe and then the process was repeated with Peacock Feather Distress Oxide Spray. I set the two panels aside to dry.
For the next two cards I sprayed the entire background of the white cardstock panels with each colour of Distress Oxide Ink. One card was sprayed pink first and the other blue first. Once they were dry I laid the stencil over top of the coloured panel and then sprayed the other colour over top.
The last card was a combination of both colours of Distress Oxide Spray Ink. The difference with this card is that I did not wait for the first colour to dry before spraying the second colour. I sprayed the pink at the top of the card front and the blue at the bottom. What ended up happening as they met in the middle was a beautiful shade of purple. TIP: Do a bit of trial and error with the colours you choose when wet colour mixing. You don’t want to end up with a muddied panel.
All the panels were trimmed down to 5 1/4″ x 4″ and adhered to a white card base. The Honey Script Hello, Honey Script Thanks and Honey Script Hugs dies were used for the sentiments. All the shadows were cut from vellum and all the words were cut from white cardstock and glued together. They were attached to the card fronts with foam tape.
This was a fun project to put together, really easy and I ended up with five unique cards.
Thank you so much for stopping in today and I hope you are staying well. See you next time here at Birch Press Design.
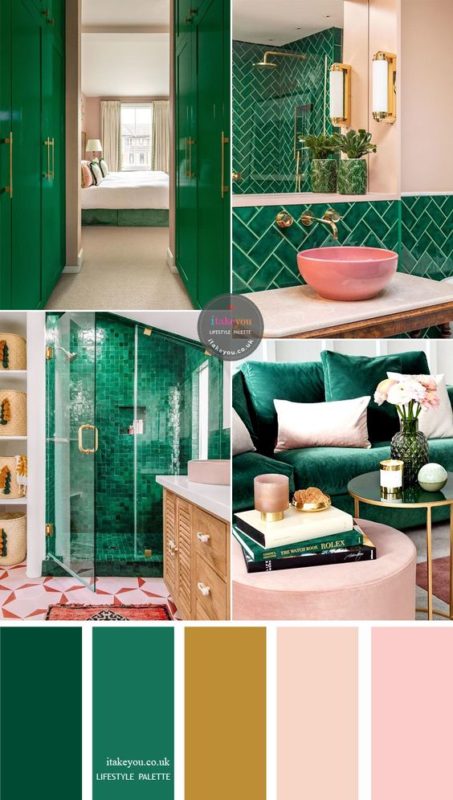
Hello readers! This is Crystal here with you today and before we get to today’s cards, I’m going to share with you the Pinterest photo I found that became my source of inspiration! Never in a million years would I have paired these colors together, yet when I saw this image, I was captivated by how stunning these colors were. Now, granted, I would not choose these colors for any room in my house, but I was determined to bring these colors to life on paper, and I couldn’t be more in love with the results!
I have created a step-by-step YouTube video tutorial showing how both of these cards were made. I hope you will find this helpful!
We can find inspiration in so many places. Thank you for visiting and have a wonderfully creative day!
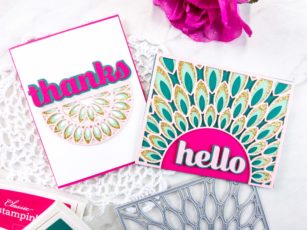
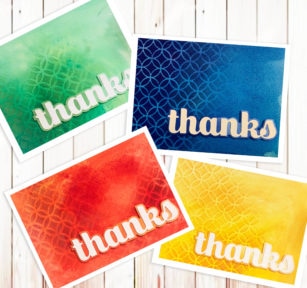
Hello Birch Press Design fans! Today I am featuring the same design in variations of color. This is a great design to make multiple cards.
On watercolor paper I created several water colored backgrounds using two shades of Brusho color crystals. Once I created several backgrounds, I cut them down to 4 x 5.25. In coordinating colored inks, I chose a medium shade as well as a dark shade of ink to use for the Ring Tile Stencil layer. Ink was brushed onto the stencil from light to dark in an ombre effect, and only onto the card in certain areas creating a lovely fading effect.
The sentiments I chose are the Big Thanks Sugar Script. I adore this font! The outline layer of the word dies was also ink blended in a light to dark and faded effect that really makes the inner die layer stand out quite nicely.
The inner die was adhered with glue and the outline layer was affixed to the base with double sided foam mount tape and the entire card front panel was added to a standard A2 (4.25 x 5.5) card base.
I had a lot of fun creating a total of four cards in striking blue, red, green, and yellow.
I just love the washed out and faded effect that the water color layer gives the to the stencil layer.
I sure hope that you are encouraged and inspired to create some wonderful backgrounds of your own and experiment with stencils!
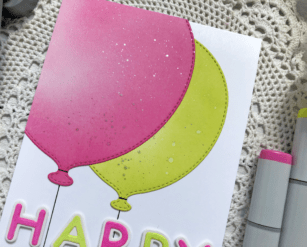
Hi there it’s Tracey here today and I have a card and video for a bright and fun birthday card using the Party Balloon die set along with the Modern Alphabet die set.
I used the two largest balloons from the Party Balloon die set and I cut them with Bristol Smooth cardstock. I ink blended Distress Oxide inks on to each balloon. Once done I flicked some watered down Perfect Pearls on to the balloons for some extra interest and shine. I added the balloons to my card front with tape runner and the large pink balloon intentionally hangs over the edge of the card front. I drew the balloon strings on to the card front with a ruler and fine tip black marker.
The Mod Alphabet die set was used to cut the word ‘happy’. I cut both the shadow and the smaller letters with white cardstock. I coloured the smaller letters with Copic markers to match the colours of the balloons. I glued the alphas together, added foam tape to the back of each letter and set them aside. The word ‘birthday’ from the Best Friend stamp set was stamped in the bottom right of the card. Then I trimmed where the balloon was overhanging the card with scissors.
I lined up the word ‘happy’ and finished the card off by drawing a line across the neck of the balloons.
Thank you so much for joining me today and I hope I I’ve inspired you to make something pretty today. Enjoy the rest of your weekend and we’ll see you next time!
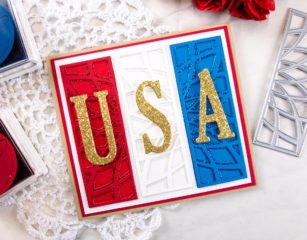
Hello readers! This is Crystal here with you today sharing a patriotic inspired card. I don’t know if anyone actually sends 4th of July cards or not, but this idea would also work well for members of the military or law enforcement. The first time I saw the Mini Dazzle Bevel Layering Plates, I knew immediately that I wanted to create a flag in strips of red, white and blue.
In order to fit all three strips of the Mini Dazzle Bevel Layering Plates on this card, I had to size the card’s dimensions to 5 1/2″ x 5 1/2″ square.
Here is a step-by-step YouTube video tutorial showing how I created this card:
I hope you have enjoyed seeing a patriotic spin on this card! Thank you for visiting and have a wonderfully creative day.