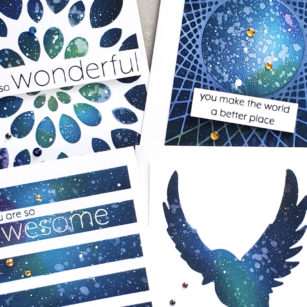

Good morning! Ardyth here with 4 cards using the same, fun technique: creating a galaxy sky through a stencil!
I started by adhering the most open layer of the Mandala Stencil set on a white card panel with temporary spray adhesive.

I blended random areas of bright colours – lemon yellow, lime green and bright fuschia through the stencil, leaving most of the panel white.
I blended a mid-blue ink over the whole panel, darker around the edges and lightening up toward the centre.

Then I blended navy blue ink over the whole panel, again, dark around the edges and lightening up toward the centre.
A little note about creating galaxy skies – they all look very ugly through the whole process, until the very, very end. Don’t worry if you’re not happy with it at this stage, just keep going!

I blended black ink through the stencil, this time just at the very edge of the panel. Then, leaving the stencil on, I spritzed water and lifted up some of the colour with a paper towel.
Then, I mixed some white acrylic paint with water and tapped it over the panel to create stars (this is the point where it starts to look good!)
As you can see, I couldn’t stop. And I didn’t just use stencils either!

As well as the Mandala Stencil set, I used Bold Stripes Stencil, a home-made stencil created from a String Art Frame die cut, and the negative from the PoppyStamps Peaceful Dove die.
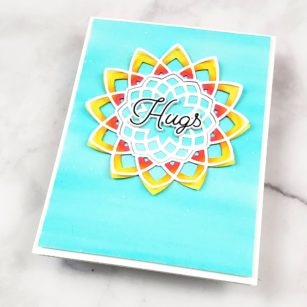
All my sentiments came from the You Are Awesome stamp set.
I hope you like these cards – there is a 1 minute video on our Instagram feed today showing the process in detail.
Supplies