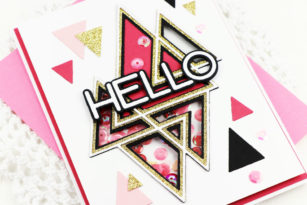
Hello! Today I am featuring several new products from Birch Press Design. First, I stamped white card stock using the new Line Fade stamp set and die cut them out with the coordinating dies.
I did some die cutting, cutting out the second to largest triangle from the Tall Triangle die set and my sentiment, Joy, from the Simple Joy die.
I popped up the triangle and the Joy sentiment to create this quick and simple Christmas card. You could use any color scheme to make the card for any occasion. The Line Fade stamp set is so versatile and the die set as well. You can find the process video below. Enjoy!
Welcome back for another day of Birch Press Inspiration. As the countdown to Christmas has already begun I still have a few cards to make. The Tall Triangle Set craft dies are just perfect to make a simple Christmas tree and so easy to mass produce. I simply chose three shades of green cardstock and cut them with the Tall Tree dies. I think I spent more time choosing which layer would be which colour than it took to actually create the tree! I created a red front for my card base and then added a white panel over it for my tree. The base was the largest die cut triangle, I adhered that to the card front directly. Then I adhered the remaining three layers using foam tape to give the completed tree dimension. The numbers were from the new Sugar Script Numbers craft dies from red cardstock to make the letters pop!A really simple design and in no time you can make multiple cards! With the layers you can make multiple cards in no time. I stamped two sentiments from the Joy and Peace Clear Stamp Set on the inside of the card. One of the things about the sentiment sets from Birch Press Design is that you have the ability to mix and match the phrases and say exactly what you want to say. Just two craft die sets I as able to create today’s card. You can get creative with so many colours. Thanks for stopping by today and I hope that I have inspired you to make some cards using just a couple set of craft dies! Have a wonderful day getting creative.
Have you checked out the new releases in the store? You’re going to love all the new products including dies, stamps and STENCILS! Today I’m sharing a card made with the new Stargazer die! When I saw it for the first time I kept seeing a color wheel! I couldn’t wait to start playing with it so add lots of beautiful colors! I started by cutting the Stargazer Layer A from white card stock and adhering it to the Stargazer Layer C die cut. Next I flipped it over and added double sided adhesive foam tape to the back. Next I inserted colorful die cut card stock pieces inside the openings. The adhesive foam tape provides some hold but you will still need to add glue over the white card stock to hold the cuts in place. The tape gives you a steady surface to adhere to and allows you to stick the finished Stargazer to your card base. I embellished my card with enamel dots so you can see the added dimension from the foam. The dots are slid under the raised Stargazer die cut. The center star cuts are in rainbow order with the outer circle filled with variations (lighter and darker shades) of the center colors. The Simple Peace word die comes with an outline (cut from gold here) and a detailed (cut from white) word die cut. I love that I can stack the die cuts or just use the letters if I like. Would you like a chance to win the Stargazer Layer A die cut? Click here to jump to our Instagram account where you’ll find details on how to enter to win. All you need to do is follow us and tag a friend.
We’ll be having more Instagram prizes throughout the month so check back often! Finished Size 4.25 x 5.5″
Supplies
Are you a Coffee Lover? Then you need to check out Amy Tsuruta’s Coffee Lovers Blog Hop! She’s arranged an amazing week long event with loads of sponsors and opportunities for you to see and share Fall/Winter coffee themed projects and win prizes along the way. Birch Press Design is a proud sponsor of the event because what’s better than friends, coffee and crafting?! You can get all the details here on Amy’s Blog! I’m playing along with this pretty card! And of course there is a prize on this blog post too! Birch Press Design makes the most beautiful, innovative dies on the market. They’re layering dies make elegance easy. The focal point of my design – that gorgeous wreath – is actually five layers of colorful card stock. I cut the Layers A through D with ombre shades of green card stock. The base that the wreath sits on – the Mandala Circle Base – is cut from red card stock adding a pop of red to the green layers. The Morning Cup die from Poppystamps is cut from gold foil and layered over ivory card stock. I decorated the cup with leaves left behind from cutting the wreaths. It reminds me of the Lenox Holiday Collection china. Don’ you just love that big dollop of whipped cream over the coffee/cocoa? I love the different shades of green revealed through each layer of the die cut openings. The background is a panel of aqua card stock topped with the largest Tall Triangle die cut from a lighter shade of aqua card stock. The Simple Joy word die includes a background die (cut from white) and the clean outline letters (cut from red). The background die is embossed so placing the skinny detailed letters is easy. Want a chance to win a $20 gift certificate for the store? All you need to do is leave a comment by midnight US EST on December 7. The winner will be announced on December 11 here on the blog!
December 11-2018 addendum… And the winner is… Lisa has been contacted by email! Thanks for joining us and for all your lovely comments!
Gorgeous! Just love the Birch Press dies… so beautiful! So many on my wish list for sure! Thanks so much to Birch Press for being a Super Sponsor again!
Hi there, it’s Tracey and welcome back for another inspiration post. Today I have the pleasure of introducing the brand new Birch Press Design Wreath layering set along with the new Simple Joy craft die. By creating just one wreath I was able to create two festive projects. I created the beautiful wreath mandala using three shades of green cardstock and one sheet of sparkle cardstock. Once I die cut all the pieces I separated the inside from the wreath to use to make a second project. These are the supplies that I used… The wreath craft die set comes with four Layers (Layer A, Layer B, Layer C and Layer D). I cut Layers A using my darkest shade of green because that is the layer I wanted to be the top layer of my wreath. Layer B was cur from the lightest shade of green and Layer C from my darkest shade of green. Finally I cut Layer D from the sparkle cardstock. I glued all the layers together using liquid adhesive so that I had a bit of time to wiggle the layers into place if I needed too. I used for red sparkle Stickles to fill each of the holes of the wreath that were meant for the berries. Once assembled I adhered the wreath to a top folding cardbase. I die cut the joy sentiment from the new Simple Joy craft die set using red cardstock. Classic Christmas colours that really pop off the clean white cardbase. I set the assembled card aside and I glued the centers from layers A through D together, once again with liquid adhesive. I die cut a tag from the Poppystamps Stitched Main Street Tags and I adhered the tiny wreath on to the tag. Then I stamped Joy from the Joy and Peace clear stamp set in red at the bottom of the red. I finished the tag off with a couple of tiny silver jingle bells tied on with same silver cord. It is always fun to stretch your supplies and it was easy to create two projects at the same time. This would be a lovely duo for a Christmas present. A tag for the package and a card inside. Thank you so much for joining me today! I am excited to share with you that I have a PRIZE for one lucky person on the Birch Press Design Instagram. Come over to see what it is…
Hello Everyone!
I am back with another project using the ISSA Snowflake, but this time only Layer A! I had to make an ornament as my focal point on my card.
What I love about these dies is you can either use all to layer your image or you can chose just one layer to create your card. What is even better with this set is there are multiple areas within this die design to chose from to show on your design!
During the Holiday season I always chose strong bold colors for my card making. This time is no different! Gold mirror, Silver mirror and Black, I think that is pretty bold, right? But you can choose any colors that will fit your look!
I die cut my pieces, one in the gold and another in the silver, but I also cut the center portion one more time. This way the center of my ornament would have more dimension and set higher than the rest! Once all my pieces were die cut, I glued them all together using my liquid adhesive. I set it aside so it can dry, placing acrylic blocks on top for added weight!
Once all set, I placed it onto my card base using double sided foam tape, because we can never have too much dimension!
My sentiment, Merry Christmas, is from the ‘Joy & Peace Clear Stamp Set. I used gold embossing powder and heat set just above the ornament directly onto my standard A2size card base (4 1/4 inches x 5 1/2 inches).
I grabbed my black embossing pen and drew a string with a bow for my hanging ornament and heat set it with clear embossing powder!
If you want to see more details just click on the video below and see our project come together step by step!
I hope you enjoyed today’s project… Make sure you stay tuned for more wonderful projects coming soon! Have a great day and always remember… Be Creative!
Hello everyone, Alicia here. I hope everyone had a lovely Thanksgiving for those that celebrate. Next up is Christmas, and I’m so ready for the flood of Christmas card inspiration.
Today I made a card featuring the gorgeous Nativity Star Layering Die Set. I used white card stock with a touch of some glitter card stock in purple and silver to cut out each layer. My goal was to do a night sky, but incorporate more purples. I used Distress Oxide Inks in Wilted Violet, Blueprint Sketch, Faded Jeans and Black Soot.
I used the Joy and Peace stamp and die set for my sentiment and heat embossed it in white on black card stock. I then popped everything up with dimensionals and added some sequins for extra sparkle. I have included a video below, so you can check out the process of how I put this card together. Enjoy!
Justine Hovey is back today with a layered embossed look for her clean and simple Christmas card. The Issa die is a stunning die for the holidays and it actually has three different parts that can be layered up – the inner snowflake, snowflake frame and the outer circular frame.
I used two colours of embossing powder – pink champagne and silver to create this look. I die cut all the layers out of white cardstock and then inked up each layer using Versamark ink. I added the embossing powder and melted it with a heat tool. If you would like a less granular appearance, repeat the embossing a few times to get a smooth look.
I then rearranged my layers in the order I thought would look best. I wanted the white to be in the middle so that it didn’t get lost too much in the background. I finished the card using the Joy and Peace clear stamp and coordinating die. I stamped first and then die cut – I found this the easiest way to get an even cut.
Hello friends, Eloise here and today I thought I would lay off the Christmas cards and just make an everyday friend themed card using the Calen Layering Set along with the Best Friend stamp set.
To start off my project today I die cut all the layers from some coloured cardstock. I used the image below as inspiration.
I made sure to cut all three layers from each colour to create different combinations. Once they were all die cut I adhered them together using liquid glue.
I then cut down a card base from some natural cardstock and adhered my layered pieces in the centre and then cut off the over hanging edges.
Lastly I stamped out the sentiments from the Best Friend stamp set. I stamped the ‘Friend’ word on white with black and die cut it out, then used the ‘You Amaze Me’ and white heat embossed that on a black strip. I popped them up on foam tape and adhered them into place.
Thanks so much for stopping by today, I hope you feel inspired. See you next time!
Today I am featuring a card using brand new products from the new release. I was so excited to work with this Prismatic Triangle Layering Die and the new Big Hello Sugar Script Die.
I decided I wanted to create a pretty clean and simple card with just a pop of color. I brought in a variety of Distress Oxide Inks and blended some color onto some Bristol Smooth card stock. I then cut out each layer with white card stock and placed the color pieces back into the triangles.
I added my sentiment and some clear sparkling sequins and that is all there is to it! I love this layering die because each of the layers can be used alone, but layering them up sure gives it a dramatic look.
LisaBzibziak
November 30, 2018 — 9:12 pm