Hello readers! This is Crystal here with you today sharing a patriotic inspired card. I don’t know if anyone actually sends 4th of July cards or not, but this idea would also work well for members of the military or law enforcement. The first time I saw the Mini Dazzle Bevel Layering Plates, I knew immediately that I wanted to create a flag in strips of red, white and blue.
In order to fit all three strips of the Mini Dazzle Bevel Layering Plates on this card, I had to size the card’s dimensions to 5 1/2″ x 5 1/2″ square.
Here is a step-by-step YouTube video tutorial showing how I created this card:
I hope you have enjoyed seeing a patriotic spin on this card! Thank you for visiting and have a wonderfully creative day.
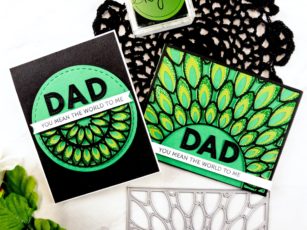
Hello readers! Who else struggles with making masculine cards? I know that I sure do! Cutesy pink dancing pigs and glittery pop-up mermaids just aren’t going to cut it for my dad! With Father’s Day soon approaching I know that we are all looking for some inspiration to create cards for the special men in our lives. I have found that simply by using certain colors, it is easier to achieve a more masculine look. For today’s two cards, I used the Lumina Layering Plates (A, B & C) and a darker color palette of black, gold and green. I think this same card in navy blues and golds would also be an excellent masculine inspired combination.
Here is the first card I created using the “leftover” cutout circle pieces from the Lumina Layering Plate. I could have added this cut-out back in to the original card design, but I like the idea of creating two cards from one die!
Here is the second card I created using the Lumina Layering Plates:
I have created a step-by-step YouTube video tutorial sharing how I made both of these cards. I like to keep my videos short and sweet, so it under 7 minutes long!
Thank you for visiting and I hope you have a wonderfully creative day!
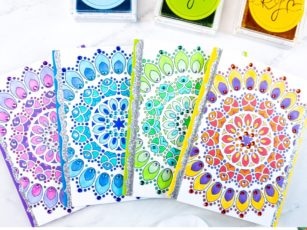
Hello crafty readers! This is Crystal here with you and today’s post is all about coloring the beautiful Thankful Mandala stamp set. If you love to color, then these cards will be perfect for you to try. And, well, if you don’t love to color so much then you can simply admire the beauty of someone else’s coloring!
I will be the first to admit that I have a love/hate relationship with coloring. There are times when I find it peaceful and soothing, yet there are also days when I find it can be simply dreadful! So, listen to how YOU feel. If you feel like coloring today, then go for it! If you’d rather sit back and eat a hot fudge sundae, you certainly won’t find me judging you! : )
For this yellow mandala I used Copic marker numbers V17, R27, Y02 and YR68.
For the green mandala I used Copic markers numbers YG06, G21, G05 and BG13.
For the purple mandala I used Copic markers number RV19, RV55, RV66, V9 and BV02.
Each of these cards begins the same way. I stamped the large Thankful Mandala on a 5 1/2″ x 3 1/4″ piece of Neenah Solar White Smooth cardstock in Memento Tuxedo black ink. Then I selected 3-4 colors of Copic markers in complimentary hues and color away. There is no rhyme or reason to my madness! In all honesty, each mandala took me about half an hour to color and then I adhered various colored rhinestones for added sparkle.
I found a complimentary colored cardstock base for each color and added two strips of die cut glitter paper down each side of the mandala.
For the blue mandala I used Copic marker numbers B02, B24, B52 and B12.
I hope you have enjoyed these cards and will maybe try coloring some too! Thanks for visiting and have a wonderfully creative day.
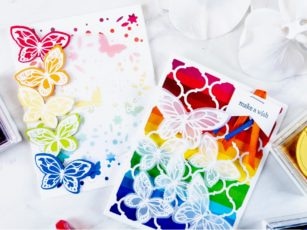
Hello readers! This is Crystal here with you today sharing some rainbow cards featuring the Lovely Butterflies stamp set. I’ve been creating a lot of rainbow themed cards lately, because I find them very cheerful and uplifting and I think we could all use more sunshine (and rainbows) in our lives right now!
The base of this first card was made using 80 lb. Neenah Solar White smooth cardstock. Using the Delfina Layering Plate A, I die cut the lattice background from white cardstock. I adhered a piece of rainbow paper behind the lattice using a Tombow dot runner before adhering both layers to the card base. I stamped the sentiment “Make a wish” in Memento Tuxedo black ink on a piece of scrap paper and notched the bottom end. I adhered thin pieces of orange, red and blue ribbon behind the sentiment and stapled it together. Yes, stapled! Why not?! It’s art!
I stamped a variety of butterflies from the Lovely Butterflies stamp set on vellum cardstock in Versamark ink and heat embossed them with white embossing powder. I die cut the butterflies using the coordinating Lovely Butterflies dies and adhered them to the card small pieces of 3M foam adhesive for added dimension.
To create the second card, I die cut the Butterfly Garden Layer Plate C from white cardstock. I adhered this over a piece of rainbow patterned paper. I stamped one butterfly on each of five different colored cardstocks (red, orange, yellow, green and blue) and heat embossed the butterflies with white embossing powder. I used the coordinating Lovely Butterflies dies to die cut the butterflies out.
I die cut a circle of vellum cardstock and stamped the sentiment in the middle of the circle in Versamark ink. I heat embossed the sentiment with white embossing powder and adhered it to the center of the card. I adhered the die cut butterflies down the left side of the card in a rainbow pattern. I adhered the butterflies to the card using small pieces of 3M foam adhesive.
I have created a YouTube video tutorial for you to watch and learn how both cards were created!
Thanks for visiting and have a wonderfully creative day!
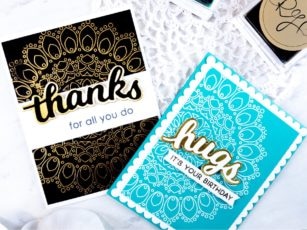
Hello crafty friends! This is Crystal here today sharing two cards made using the beautiful Thankful Mandala background stamp. I chose to work with this stamp set because it was something very different for me, and I am so happy that I decided to challenge myself because I love how these cards turned out! In fact, I had so much fun experimenting with this stamp set that I’ll be sharing even more cards using it at the end of the month!
The very first thing I did after receiving the stamp was to actually cut down the Mandala! Yes, this was equally as scary as it might sound! I knew this could go wonderfully right, or horribly wrong really quick and that I was taking a chance at potentially ruining a $25 stamp set! I didn’t particularly like the large square shape of the mandala, so I trimmed off the outermost layer to give it more of that peacock edge shape. Fortunately, it worked out just fine! Phew!
Card details:
The base of this A2 sized card is made from 80 lb. Neenah Solar White Smooth cardstock. I stamped the large mandala in Versamark ink on black cardstock and then heat embossed it with gold embossing powder. I cut the mandala in half in order to separate it on the card. I adhered each half to the top and bottom of the card base. I die cut the larger outline word “thanks” from gold foil paper and the smaller word outline from black cardstock. I mounted the two together using a Tombow tape runner and adhered both to the center of the card using 3M foam adhesive. Lastly, I stamped the sentiment “for all you do” in the middle of the card in Memento Tuxedo black ink.
For the second card, my card base is a sheet of turquoise cardstock. I stamped the mandala in Versamark ink on another sheet of turqoise cardstock and heat embossed it with white embossing powder. I trimmed the image down to 5″ x 3 3/4″ and mounted this stamped mandala onto a scalloped sheet of white cardstock. I adhered both sheets to the card base. I die cut the word “hugs” from both gold foil paper and white cardstock, layering the two together using a Tombow tape runner. I stamped the words “it’s your birthday” in Versamark ink on a thin strip of white cardstock and heat embossed it with gold embossing powder. I notched both ends before adhering it to the card below the word “hugs” using 3M foam adhesive.
I hope you have enjoyed these cards featuring the Thankful Mandala stamp set. Thank you for visiting and have a wonderfully creative day!
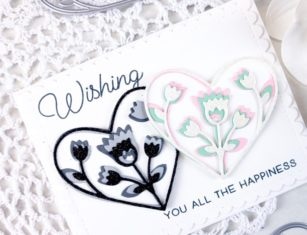
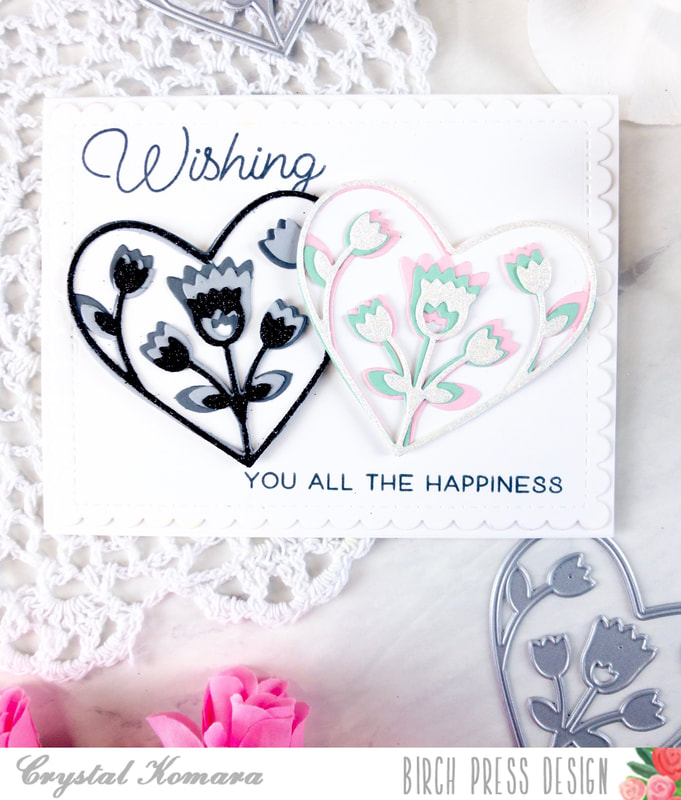
Hello readers and happy Thursday! This is Crystal here with you today and I am sharing a wedding themed card created using the Folk Art Heart Layering dies. And yes, that is a mouthful to say! My husband and I actually had a wedding that we were supposed to attend two weeks ago in Orange County, California, that was canceled due to coronavirus. There were over 300 people anticipated to attend and travel in from across the country. Ugh, I can’t even imagine what that poor bride (and groom too, of course!) have been going through. . .
*You can see full details on how to make this card in the video at the end of this post.
The base of this A2 sized card is made from Neenah Solar White smooth cardstock. I also created a white scalloped frame from the same cardstock. Using Memento Tuxedo black ink, I stamped the sentiment at the top and bottom of the card, so that there would be room for the two hearts in the middle. I tried to create each heart to resemble more traditional bride and grooms colors, though you could easily make the hearts to match the wedding colors, or create two pink and white hearts if there were two brides to be celebrated!
Here is a video tutorial that I created showing how to create this card:
Thank you for visiting and I hope you have a wonderfully creative day!
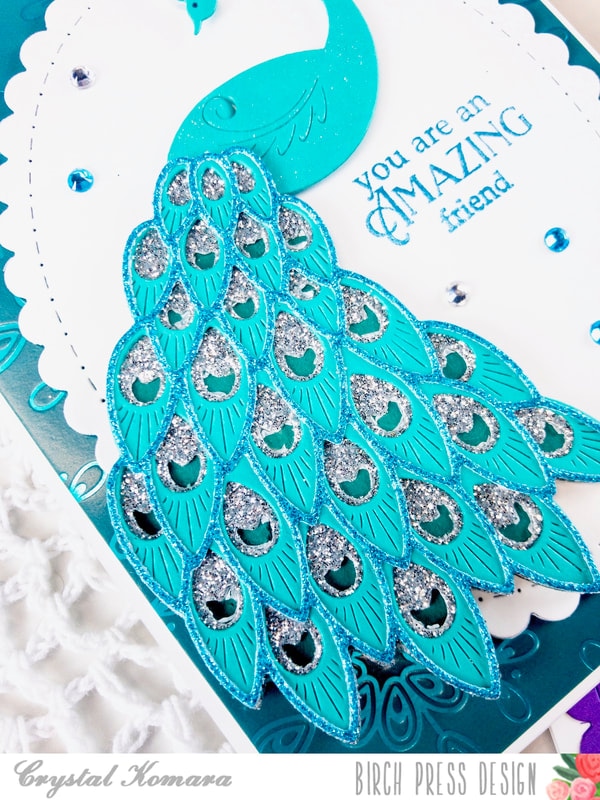
Hello readers and happy Saturday to you! This is Crystal here with you today, and I hope that you are all enjoying your weekend thus far, and, more importantly, I hope that you are all happy, safe and healthy. We are fortunate to all share a common hobby that can be done from the comfort and sanctity of our homes. So keep on creating, but, don’t forget to also SEND those cards out to help brighten someone’s day! We could all use a little extra love right now.
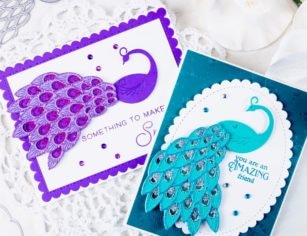
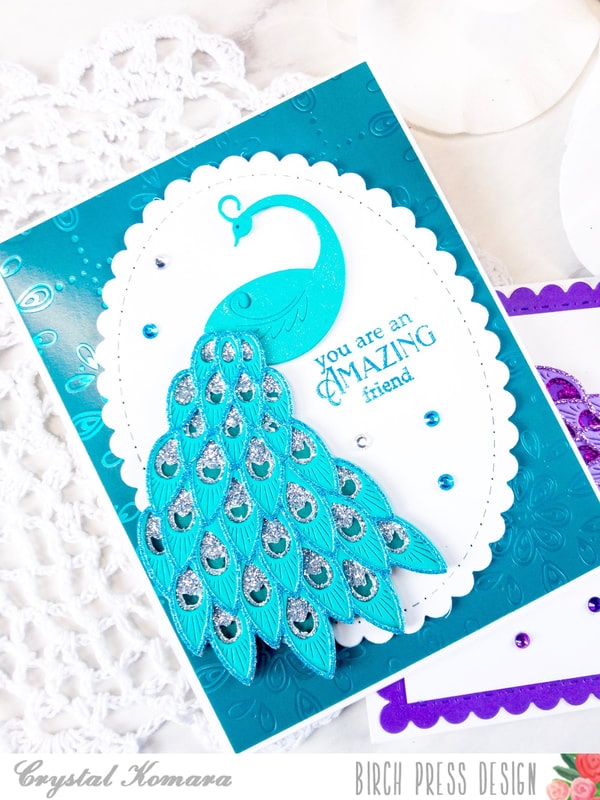
Today I am sharing two different cards that I created using the beautiful Regal Peacock Layering Dies. These dies were the very first layering dies that I actually purchased from Birch Press Design and I have to say, now that I’ve actually assembled them into cards, they are every bit as beautiful, elegant and regal, as I thought they would be.
I created the “traditional” teal colored peacock card first (seen below), but I was very curious to see if a non-traditional colored peacock (purple) would have the same WOW factor, and yes, as it turns out peacock’s are beautiful creatures in any color!
I have created a step-by-step tutorial video for you showing how each of these cards was created. I hope you will find it helpful!
Thanks for visiting and have a wonderfully crafty day!
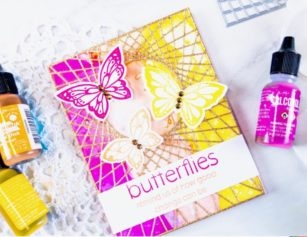
Hello crafty readers! Thank you for visiting during our exciting Blog Blitz celebration! All week long the Creative Team is inspiring you with their amazing designs, but also giving YOU a chance to win some of these fun NEW products!
This is Crystal here today sharing two vividly detailed cards using the new String Art Frame. Read all the way to the end of today’s post to see how you can win this die!
For this first A2 sized card, I used a base of Neenah Solar White Smooth 80 lb. cardstock. I created a background from alcohol inks in the colors of Raspberry, Salmon and Valencia. I die cut the new String Art frame from gold glitter cardstock and adhered it directly over the alcohol ink background.
Using the Lovely Butterflies stamp set, I stamped three of the smaller butterflies in similar ink colors (Raspberry, Salmon and Yellow). I die cut the butterflies and adhered them to the card using 3M foam adhesive for added dimension. I also added a couple gold rhinestones to the bodies of each butterfly for added sparkle.
Using the Garden Bloom stamp set, I stamped the “butterflies” sentiment in Raspberry ink on Neenah Solar White Smooth cardstock and the “remind us of how good change can be” in salmon ink just below it. I trimmed the sentiment strip to 4 1/4″ x 1 3/4″ to fit the card just below the butterflies.
I have created a video for you showing how I made each of today’s cards. I hope you will enjoy it seeing the step-by-step process.
For this second card, I used an alcohol ink background filled with blues and greens that resembled the ocean. When I die cut the String Art frame in silver, I realized it kind of looked like a fishing net! So, I went with it and created an “Ocean Fantasy” scene.
I stamped many of the images from the Ocean Fantasy stamp set in Versamark ink on a variety of blue and green colored cardstocks. I heat embossed the images with white embossing powder and then fussy cut each image (there is no coordinating die set). I adhered the images to the card with 3M foam adhesive for added dimension. I even added a coat of clear Wink of Stella to the images for even more sparkle!
We’ll be having giveaways on our Instagram account March 21-29, 2020. We’ll use a random number generator to select a winner from the comments on each of the Instagram posts during the blog blitz. Only one prize per person, per giveaway. You have until midnight US EST on April 1 to leave a comment on each and every Instagram post that you want to enter. Winners will be announced on the Instagram posts on April 3.
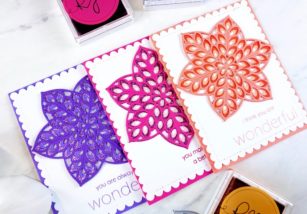
Hello crafty readers! This is Crystal here with you today sharing three cards featuring the beautiful new “Floral Star” Layering Dies. These dies, like all of the Birch Press Design products, are simply gorgeous and after initially making the purple card, I wanted to show you how these dies look in other colors too! This basic flower/star design would well for a variety of occasions.
I have created a video for you to watch and learn how these cards were made. Each A2 sized card was made in a similar monochromatic color tone. Each color was carried throughout the card both in the cardstock base and coordinating ink.
I hope you have enjoyed today’s cards. Thank you for visiting and have a wonderfully creative day!
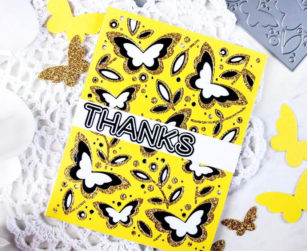
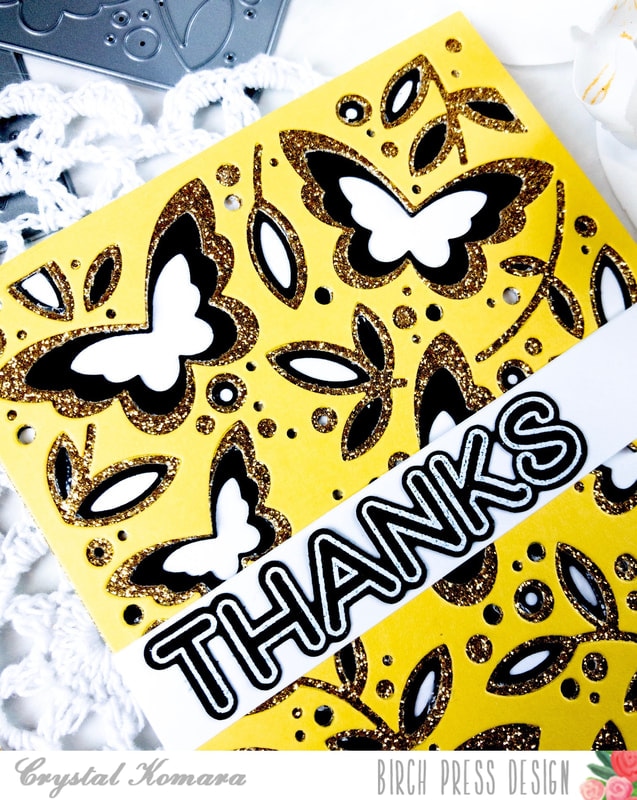
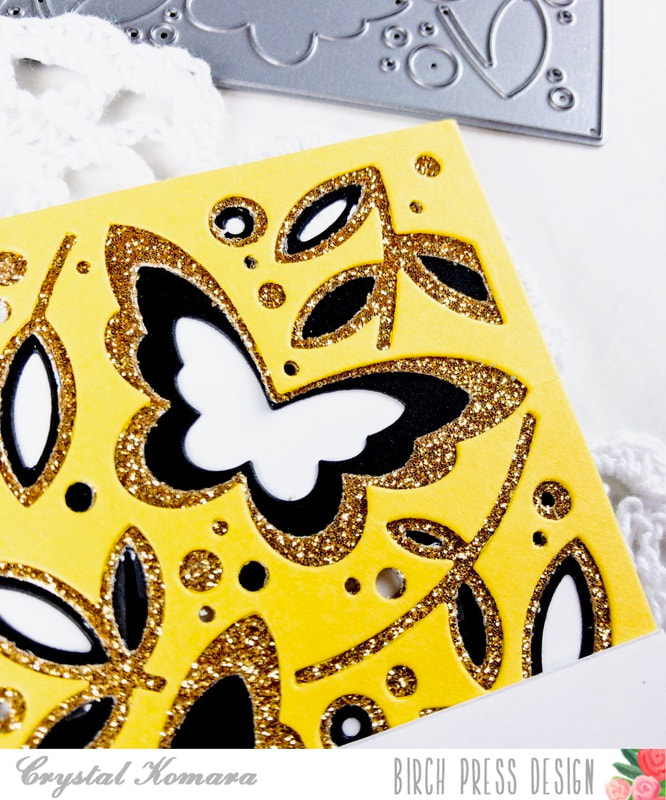
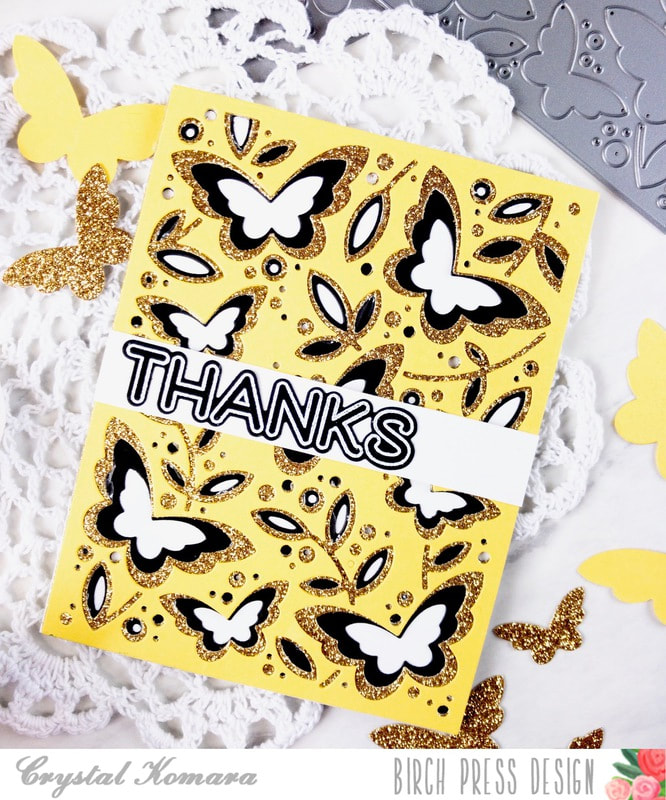
Hello readers! This is Crystal here today sharing another way to use the beautiful Butterfly Garden Layering dies. If you recall, just last week I shared these two cards created using these same exact layering dies, yet they look vastly different when they are done in a completely different color scheme! I can’t decide which one I like better, can you?!
I have created this fairly short video for you to watch to see how I put this A2 sized card together. This will guide you though step-by-step each process of this card – and it’s all under five minutes long! I’m a fan of keeping things short and sweet!
There is also a list of supplies used (with clickable links) conveniently located at the end of this post.
I hope you have enjoyed this card and video tutorial. Thanks for visiting and have a wonderfully creative weekend!