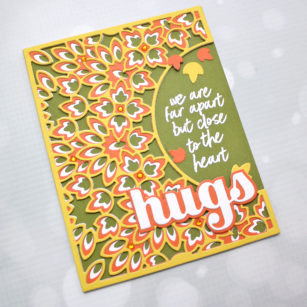
Hello, crafty friends! Toni here with you today to celebrate fall, my favorite season.
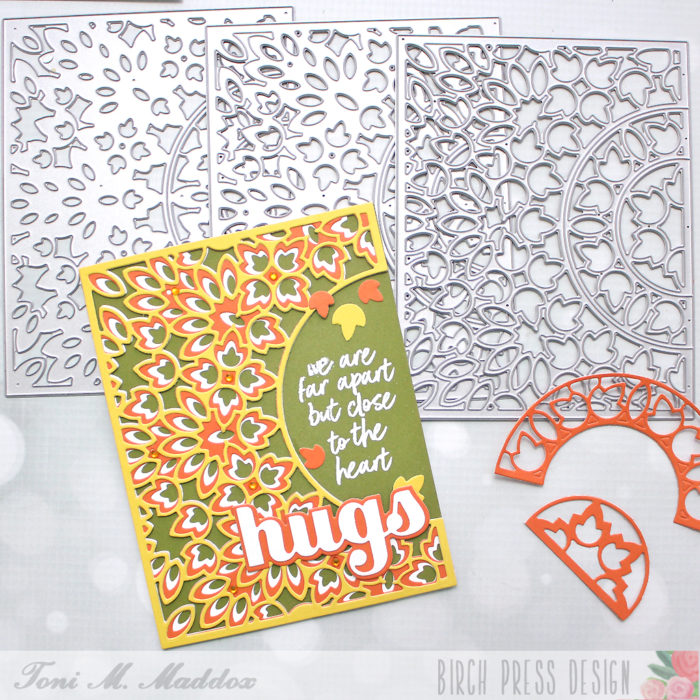
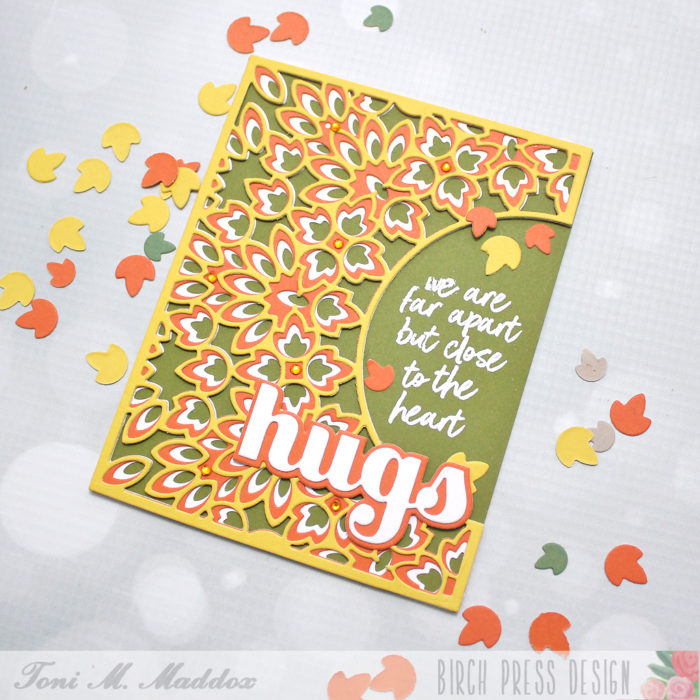
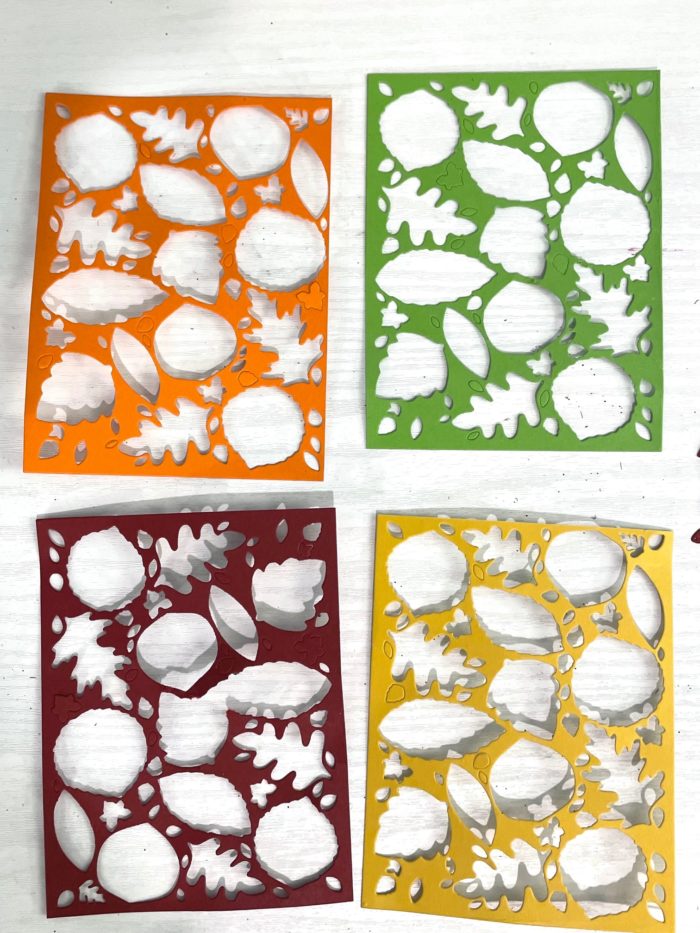
I’ve used the Enchantment Layering Dies to form the leafy design on the card. I used papers from the Sunny Orange pad: layer A = yellow, layer B = orange, layer C = off white. The green is from my stash. I love these rather retro colors!
I left off the interior arch of the Enchantment Layering Dies which created the perfect spot to emboss the Brush Sentiment in white. I also used the Big Hugs Sugar Script dies to supplement the Brush Sentiment.
To finish off the card I used a few Bright Jewels as well as a few of the leaves leftover from cutting the Enchantment Layering dies. I’ll be saving the other leaves for more fall cards for sure. What an easy way to create a pile of leaves!
Thanks for visiting today and have a wonderful rest of your week!
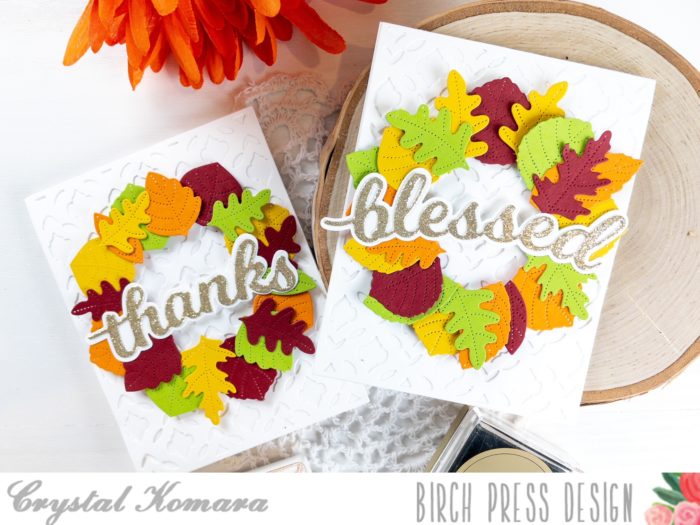
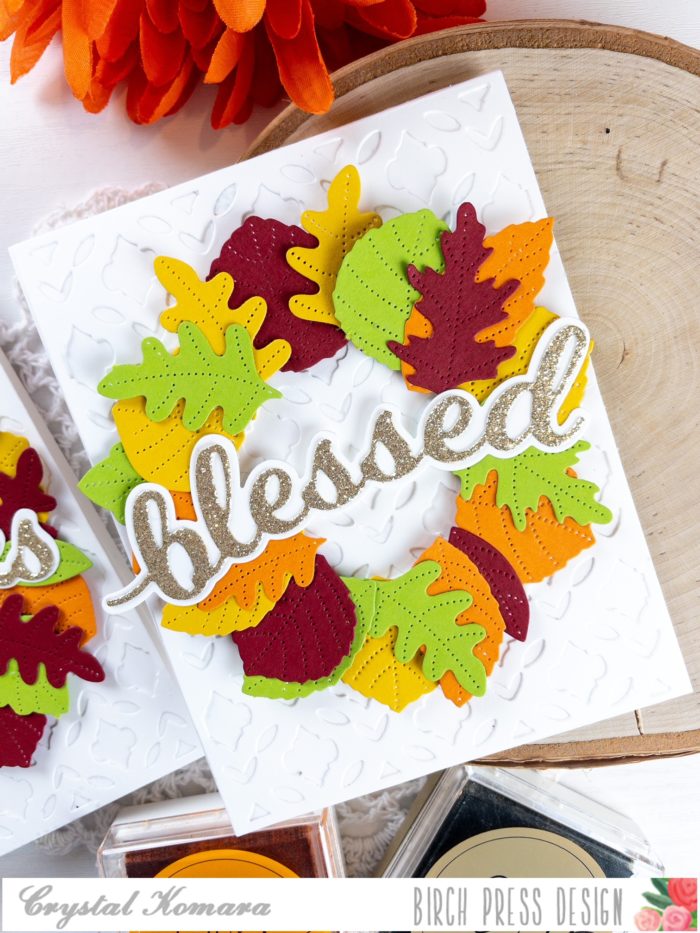
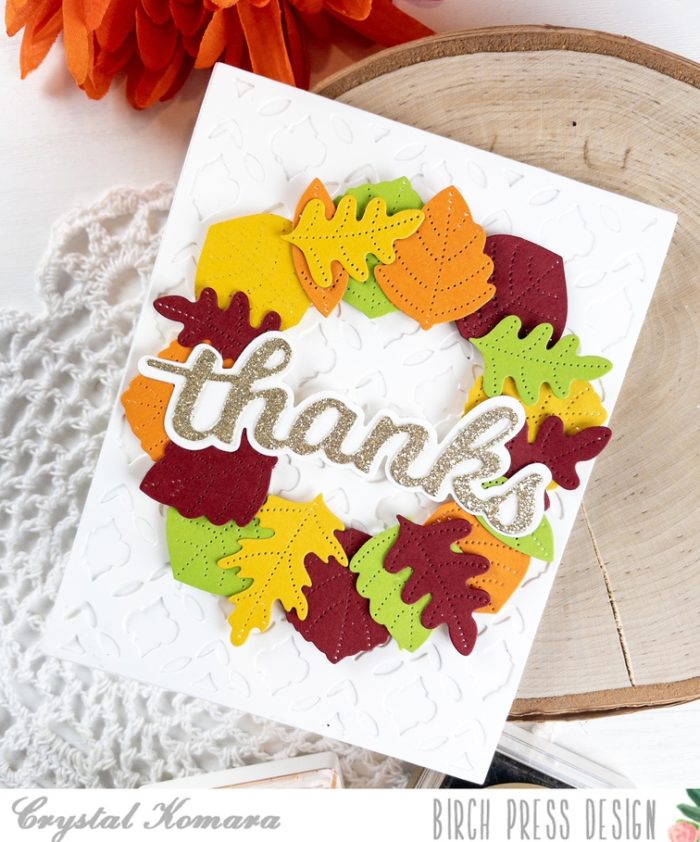
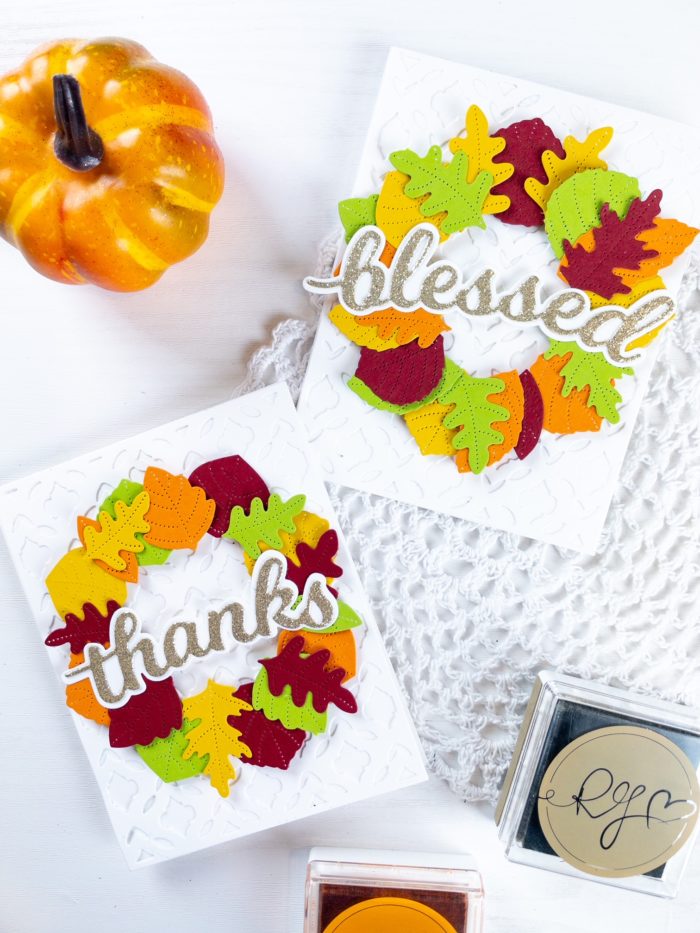
Hello friends! Happy Wednesday, I hope your week is going good so far. Friday is coming! This is Design Team member Crystal Komara here with you today sharing a fun way to use Layering Plate B of the Autumn Breeze Layering Plates.
Card details:
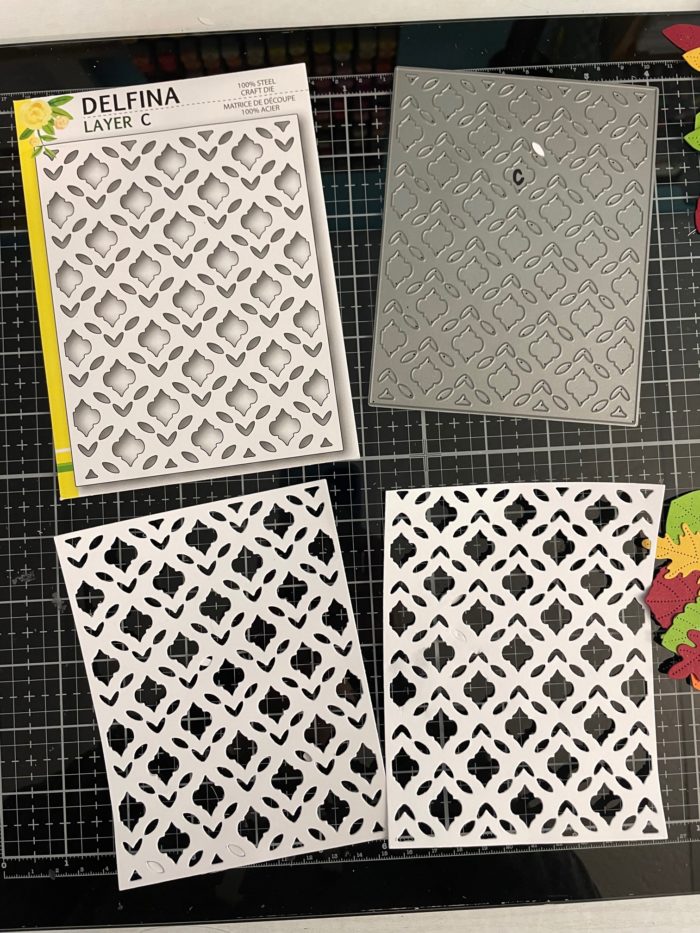
The base of this A2 sized card is made from 80 lb. Neenah Solar White Smooth cardstock. Using a separate sheet of this same white cardstock I die cut Layer Plate C of the Delfina Layering Plates (retired) which became the background. I cut this twice (because I was making two cards):
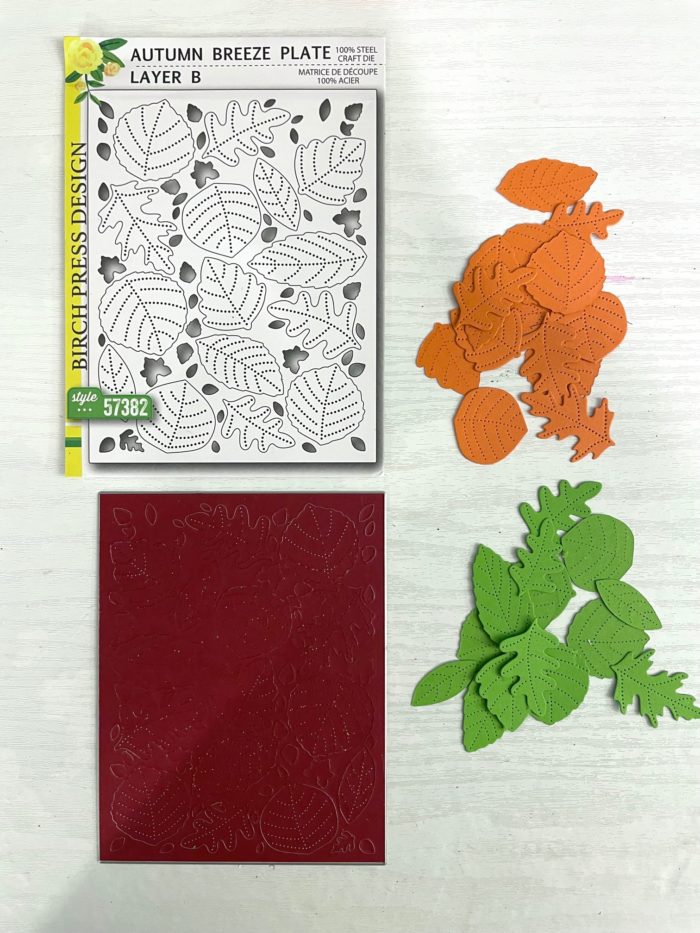
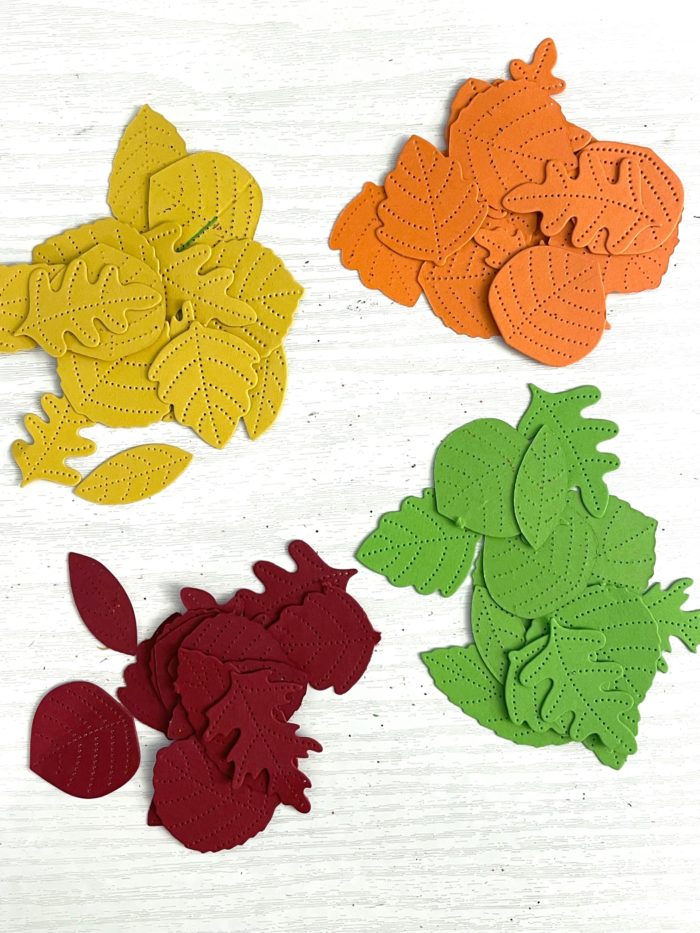
Next I die cut Layer B of the Autumn Breeze Layering Plate four times, one each in red, orange, yellow and green cardstock. This would give me all the leaves I needed to complete these two cards. (*Note, I actually had enough leaves to create a third card).
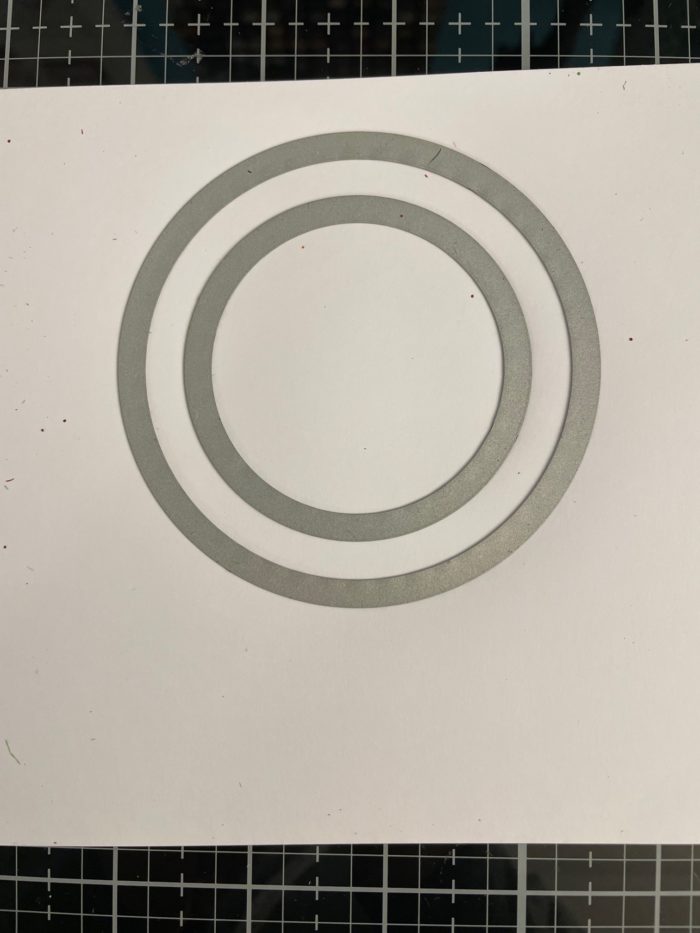
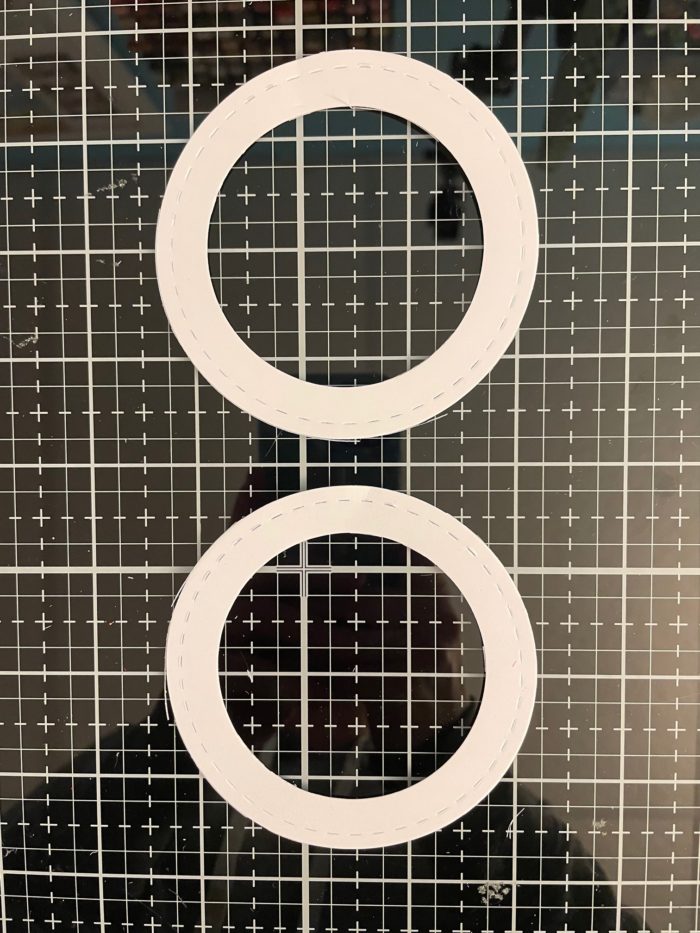
I created a circular frame to act as a guide to adhere all the leaves to. I did this by placing a smaller circle die inside of a larger one:
Then I began to adhere the leaves to the frame in a circular pattern using a Tombow adhesive runner:
Using the Thanks Honey Script dies and the Blessed Honey Script dies, I die cut the larger shadow sentiment from white cardstock and the thinner sentiment from gold glitter cardstock using the 6″ x 6″ Holiday Glitter pad.
I hope you have enjoyed this different way to use the Birch Press Design layering plates. Thanks for visiting and have a wonderfully creative day!
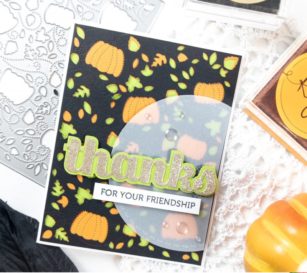
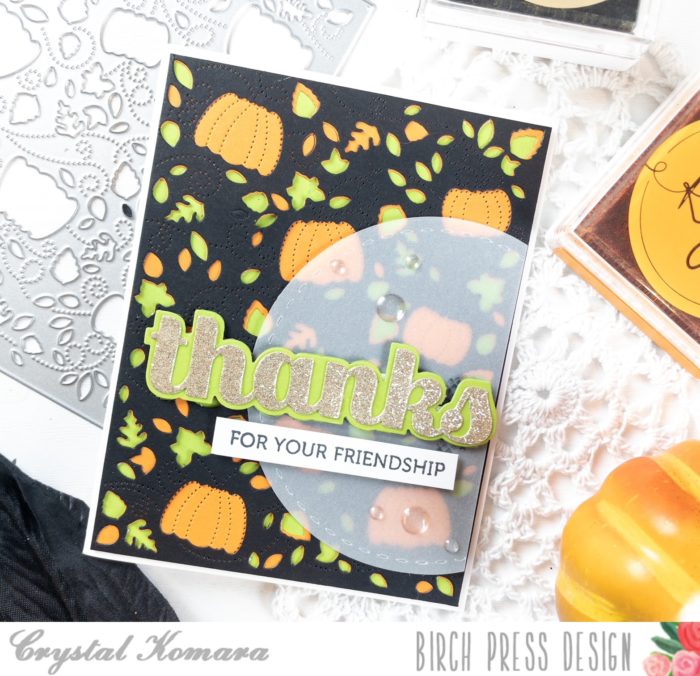
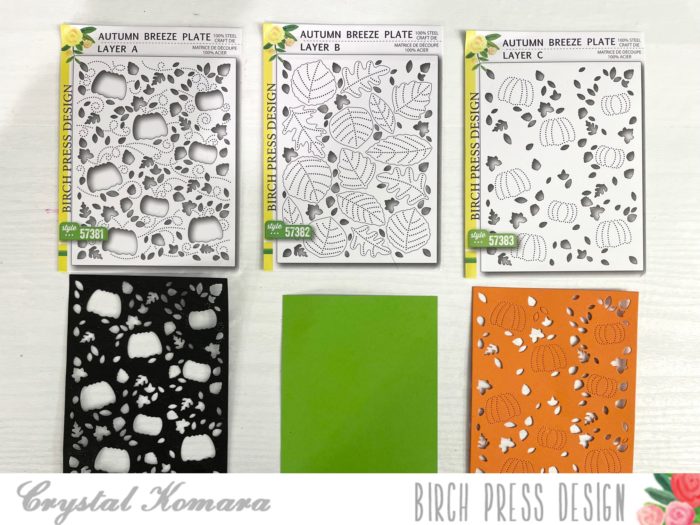
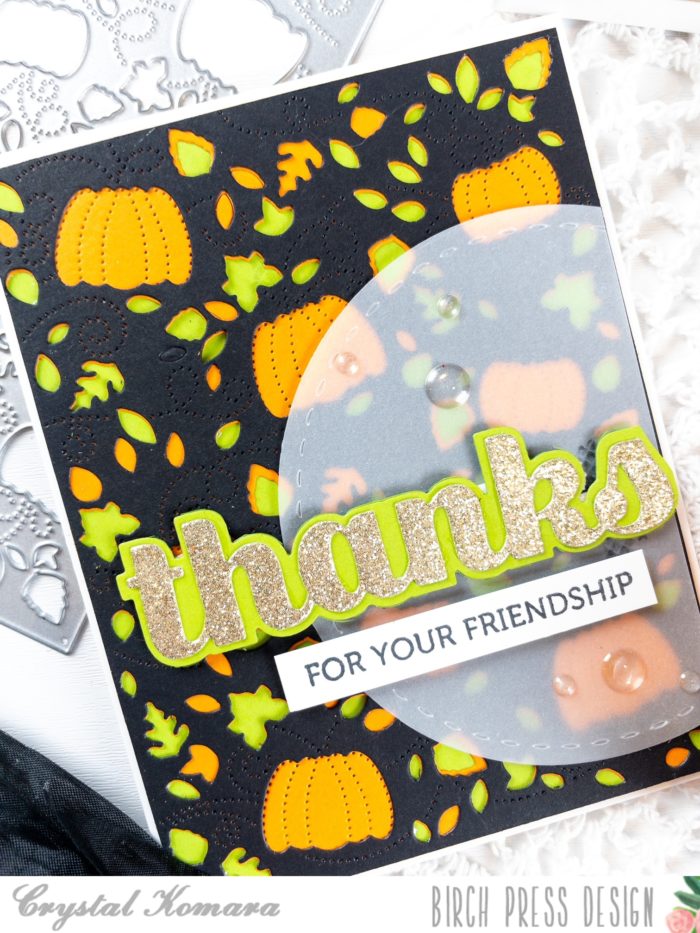
Hello crafty readers and happy 1st of September! For those of us who love fall (ME ME ME!) then let the pumpkin spice season begin! If you’re still sippin’ on your summer ‘ritas, no shade here, you do you! But, I’m full speed ahead to apple pies, sweater weather and all things fall. This is Design Team member Crystal Komara here with you today sharing a fun (and mildly Halloween inspired) card using the Autumn Breeze Layering plates:
Card details:
The base of this A2 sized card was made from 80 lb. Neenah Solar White Smooth cardstock. Using two out of three layers of the Autumn Breeze Layering Plates, I used a piece of garden green cardstock as the bottom layer (in lieu of Layer B). For Layer C I die cut the plate using pumpkin orange cardstock. Layer A was cut from basic black cardstock. You can see my photo below for all three layers:
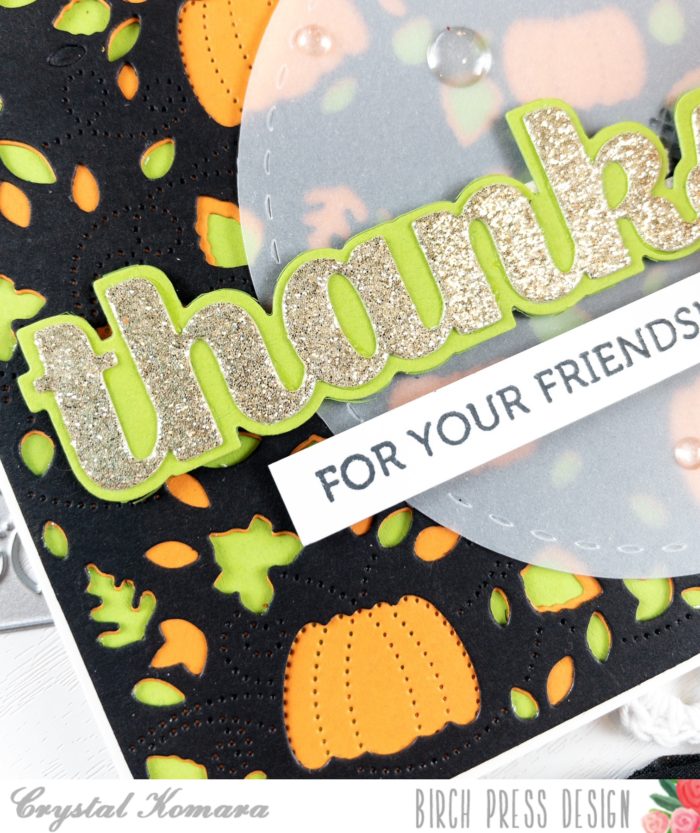
I adhered all three layers together using a Tombow adhesive tape runner before gluing the three layers down to the card base. I cut a 3″ circle from vellum cardstock, cutting of the right side just a bit before adhering it to the card. Using the Big Thanks Sugar Script dies, I die cut the large shadow sentiment from garden green cardstock and the thinner sentiment from gold glitter cardstock from the 6″ x 6″ Holiday Glitter Pad. I adhered the two layers together with Tombow adhesive before adhering the enticement sentiment strip to the card using 3M foam adhesive for added dimension.
On a thin strip of white cardstock I stamped the sentiment “for your friendship” in Memento Tuxedo black ink. This sentiment is from the Lingo Thanks stamp set. I adhered this sentiment strip below the large “thanks” using 3M foam adhesive for added dimension.
I hope you have enjoyed this card! Thank you for visiting and have a wonderfully creative day.
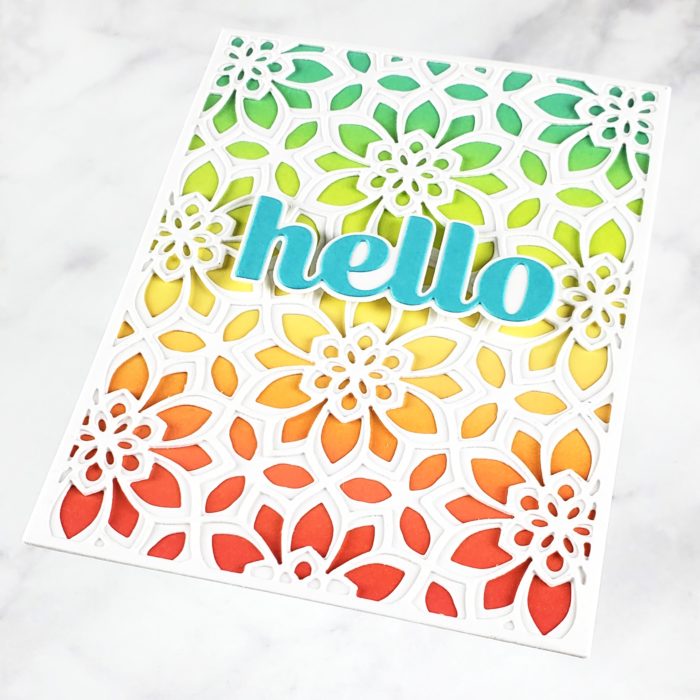
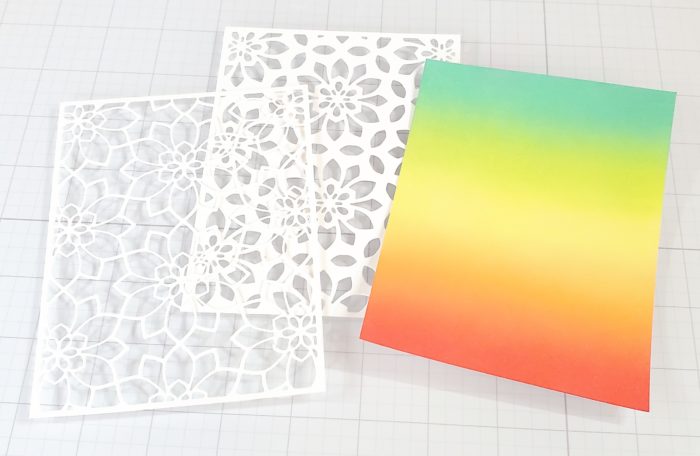
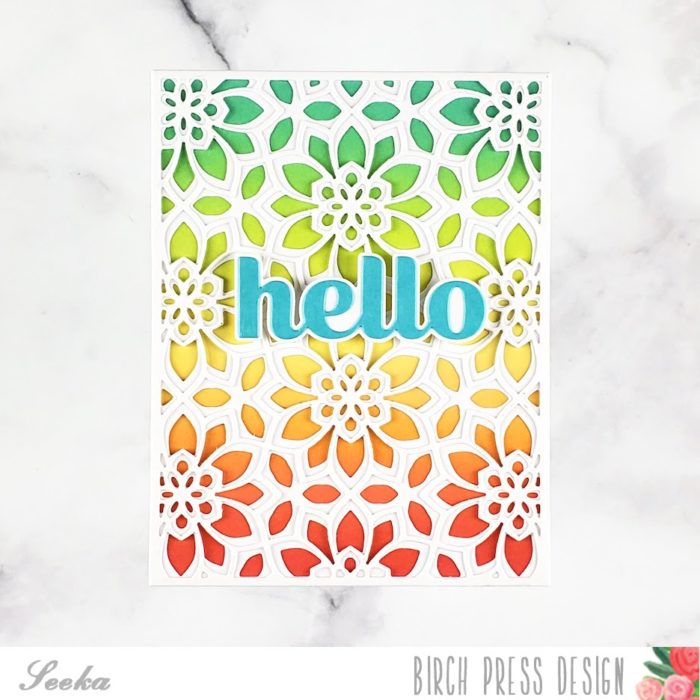
Hello and welcome! It’s Seeka here today sharing a card featuring the Viola Plate Layer die set. These intricate layers are standouts on their own, or they can be a great way to finish off a ink-blended panel, as I’ve done here.
I started off by using foam blending tools to blend a rainbow (minus a couple of colors) onto a 4.25″ x 5.5″ panel of Bristol Smooth cardstock. For this background, I used Distress Oxide inks: Cracked Pistachio, Twisted Citron, Squeezed Lemonade, Wild Honey, and Abandoned Coral.
Next, I used Viola Plate Layers A and B to die cut white cardstock.
Next, I adhered the layers together.
Using the Big Hello Sugar Script die set, I die cut the sentiment from blue cardstock and its shadow layer from white cardstock. I adhered the two pieces together and then used foam tape to adhere the sentiment to the background. To finish, I adhered the card front to a card base.
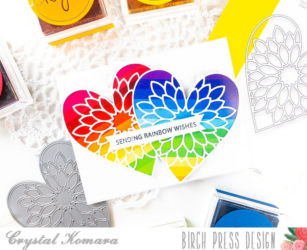
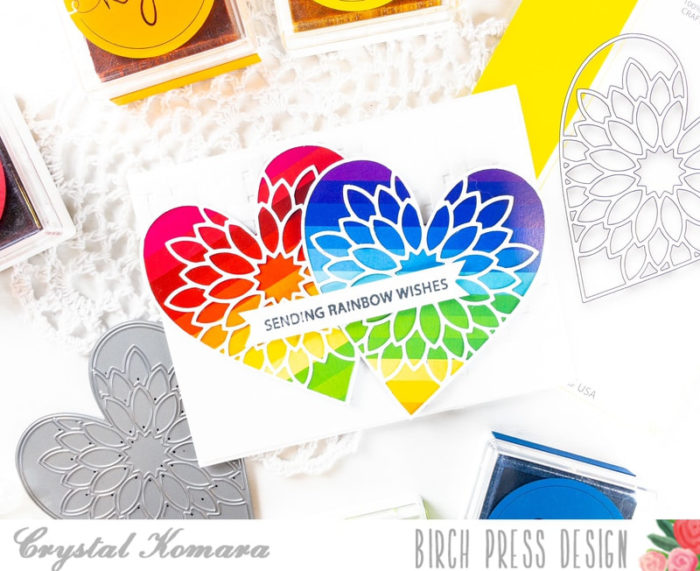
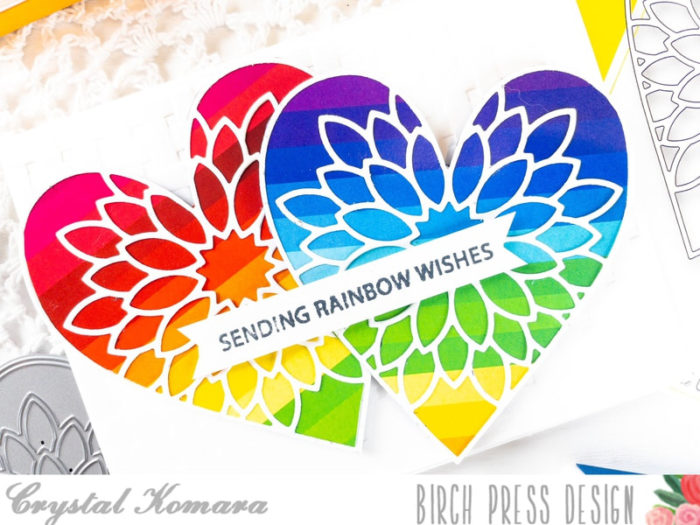
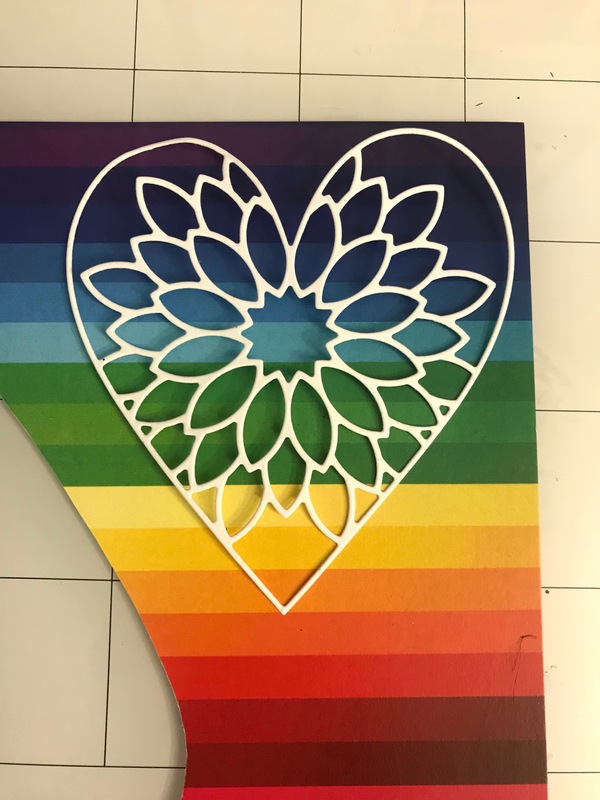
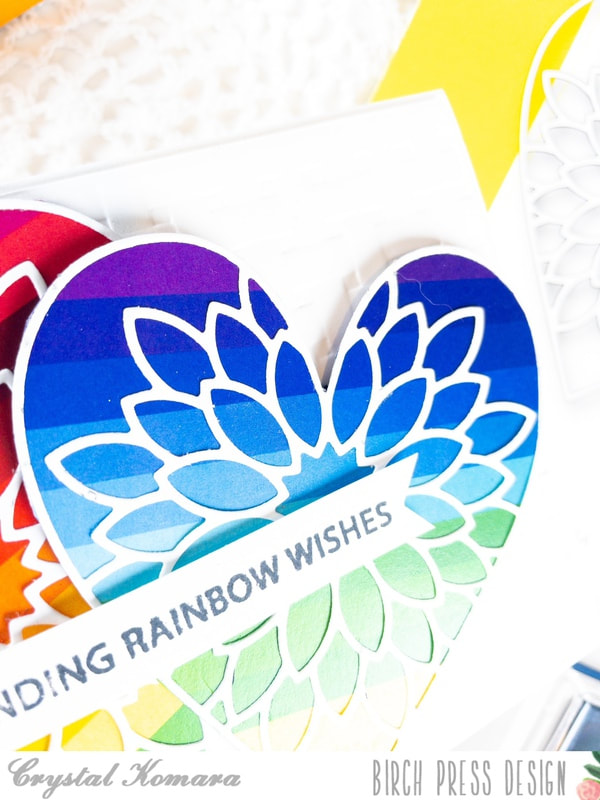
Hello crafty readers! This is Crystal here with you today sharing a colorful card using the Dahlia Heart Layering Dies and some fun rainbow colored paper.
Card details:
The base of this A2 sized card is made from 80 lb. Neenah Solar White Smooth cardstock. For the first 5 1/4″ x 4″ paper, I dry embossed a piece of white cardstock using a basket weave embossing folder. I adhered this embossed paper directly to the card base.
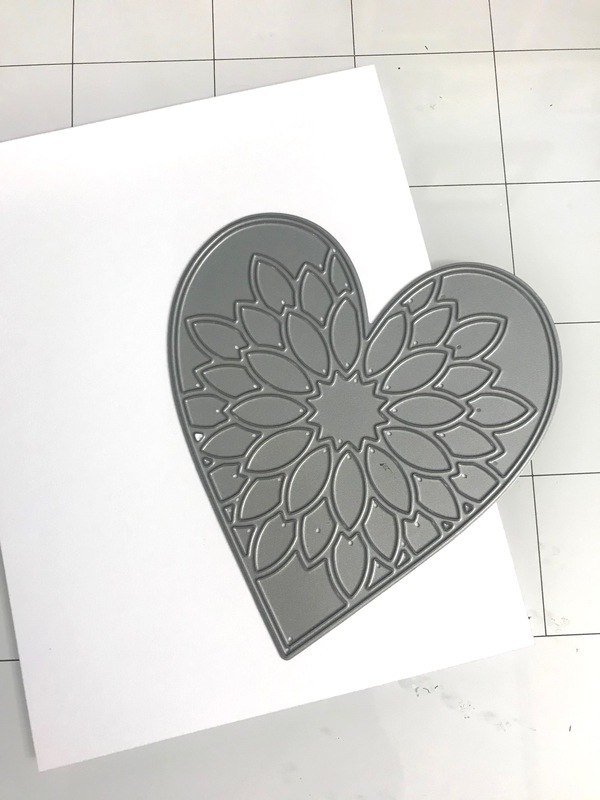
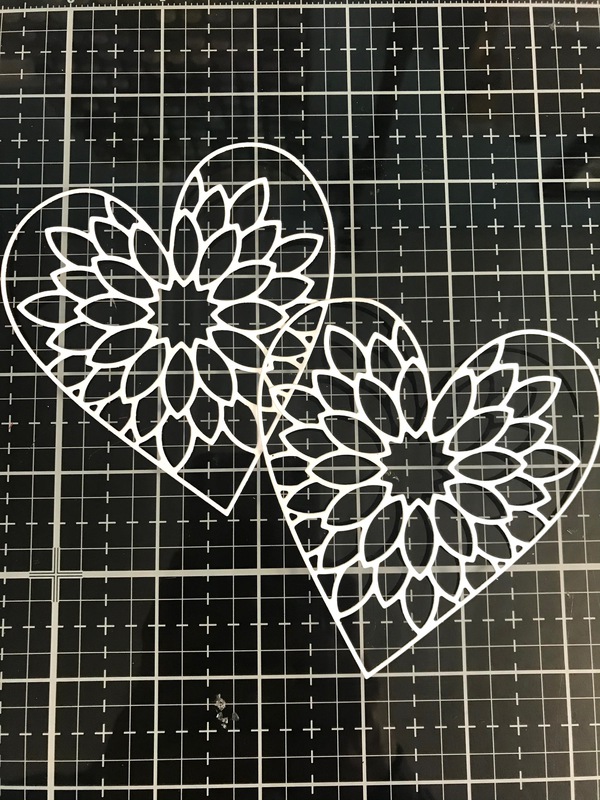
To create the two hearts, I die cut Layer A (the top layer) of the Dahlia Heart Layering Dies from white cardstock. I die cut two of these pieces as I have two hearts. I layered the Dahlia Heart outline over some scrap pieces of rainbow paper and fussy cut around the hearts:
I adhered the two hearts to the card using 3M foam adhesive for added dimension. Lastly, I stamped the sentiment “sending rainbow wishes” in Tuxedo Memento Black ink. This sentiment is from the Rainbow Days Lingo stamp set. I adhered the sentiment to the front of both heart using a Tombow adhesive runner.
I hope you have enjoyed this cheerful card. Thanks for visiting and have a wonderfully creative day!
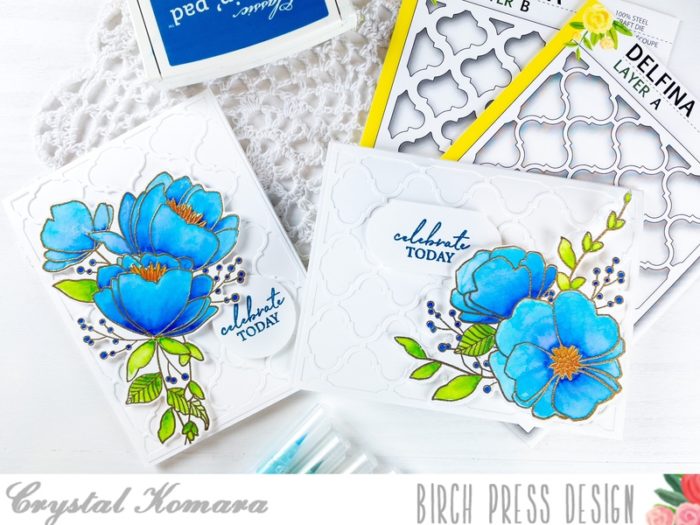
Hello friends and happy Monday! Welcome back from the weekend. This is Crystal here with you and I’m excited to be sharing STAMPED projects with you today and not the usual beautiful layering dies that Birch Press Design is known for. Do you even know that Birch Press Design also sells stamps?! Surprise, they do!
Card details:
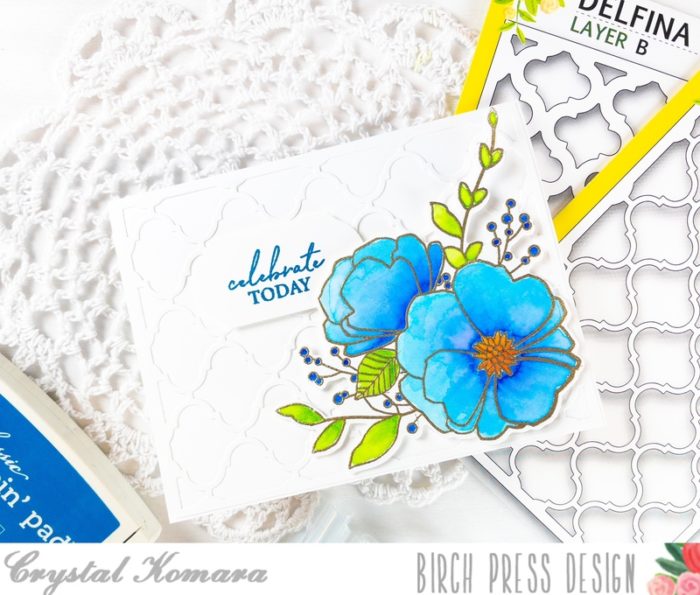
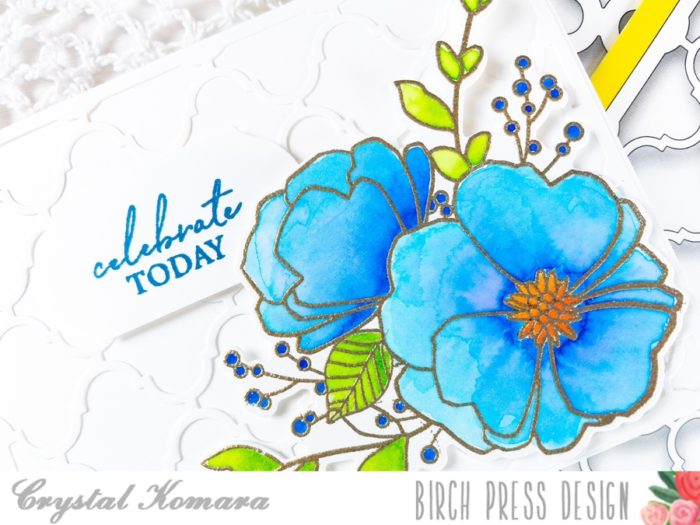
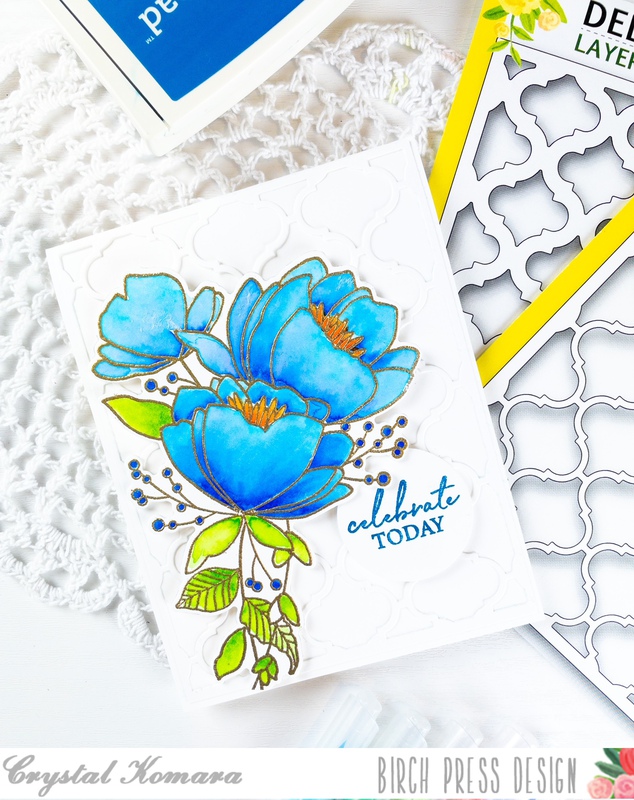
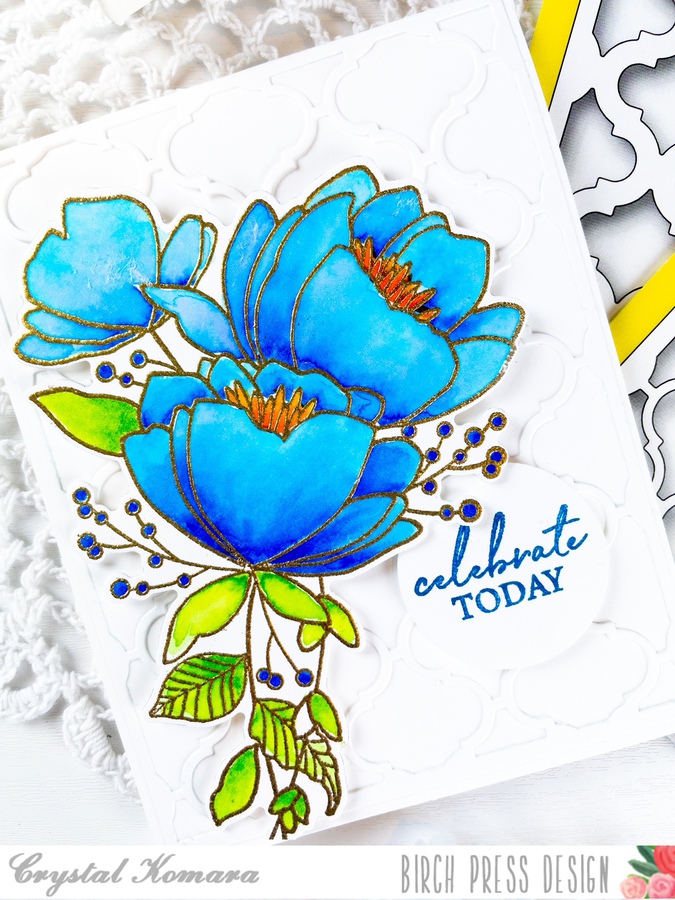
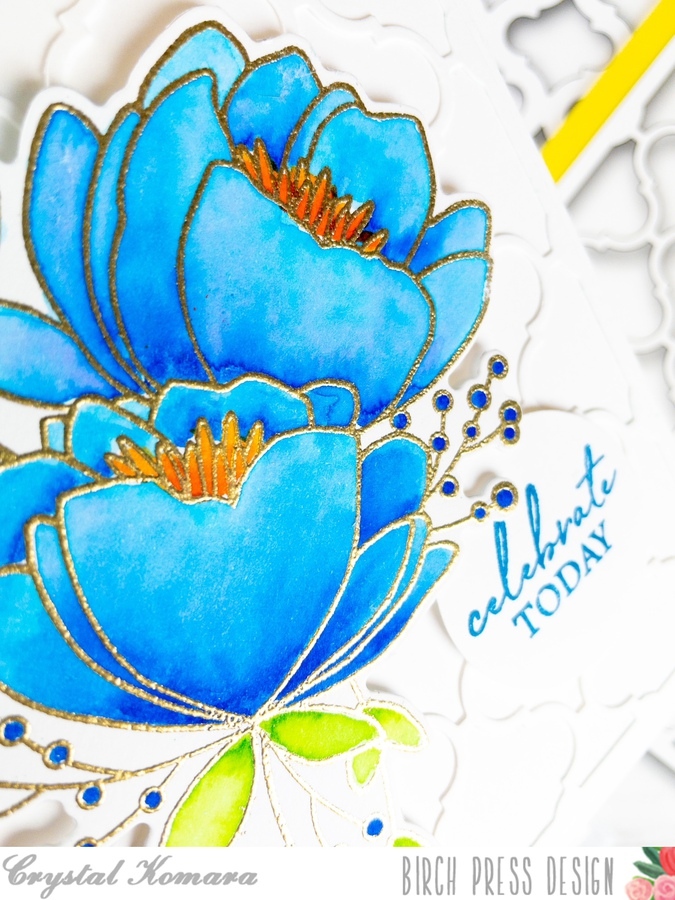
The base of this A2 sized card is made from 80 lb. Neenah Solar White Smooth cardstock. This is my go-to white cardstock for everything. Using the Delfina Layer A die, I die cut the lattice background from white cardstock. I adhered this directly to the card base. I stamped the flowers from the All the Happiness stamp set in Versamark ink on Distress Watercolor cardstock and heat embossed the image with gold embossing powder. I then watercolored the flowers using Zig Clean Color Real Brush markers in Scarlett Red, Bright Yellow, Persian Blue, Pale Green and Light Green.
Once the watercolor was dry, I die cut the image using the coordinating All the Happiness dies. I adhered the flowers in the lower right corner of the card using 3M foam adhesive. I stamped the sentiment “celebrate today” from the Classic Sentimental Wreath stamp set. I punched the sentiment out using a label punch and adhered it to the card with 3M foam adhesive.
I also created a second card using the same stamp set and watercolor colors:
The base of this A2 sized card is made from 80 lb. Neenah Solar White Smooth cardstock. Using Layer A from the Delfina Layering Dies, I die cut the lattice background from white cardstock. I adhered the lattice background directly to the card. I stamped the flowers from the All the Happiness stamp set in Versamark ink on Distress Watercolor cardstock. I heat embossed the image with gold embossing powder and then I watercolored the image using Zig Clean Color Real Brush markers (the same colors are listed above).
I die cut the flowers using the coordinating die and adhered the flowers to the card using 3M foam adhesive. I stamped the sentiment “celebrate today” from the Classic Sentimental Wreath stamp set in blue ink on white cardstock. I punched the sentiment out with a 2″ circle punch. I also adhered the punch to the card using 3M foam adhesive.
I hope you have enjoyed seeing products OTHER than dies that Birch Press Design has to offer. Thanks for visiting and have a wonderfully creative day!
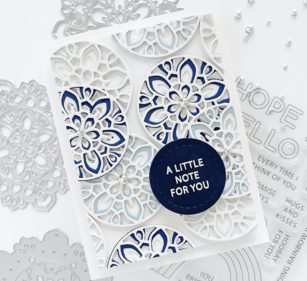
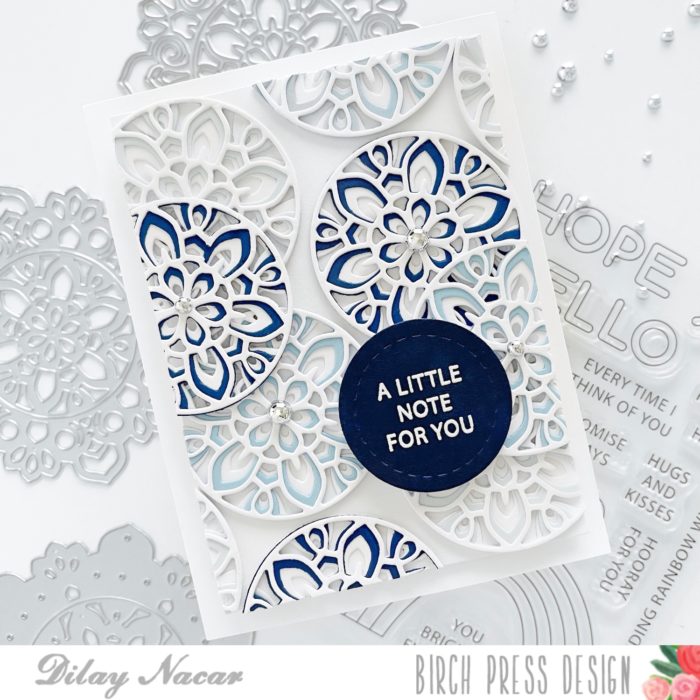
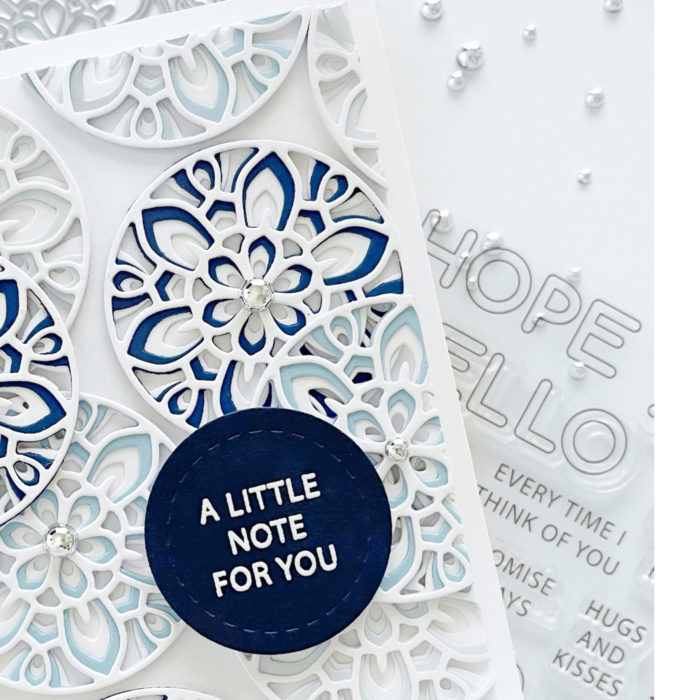
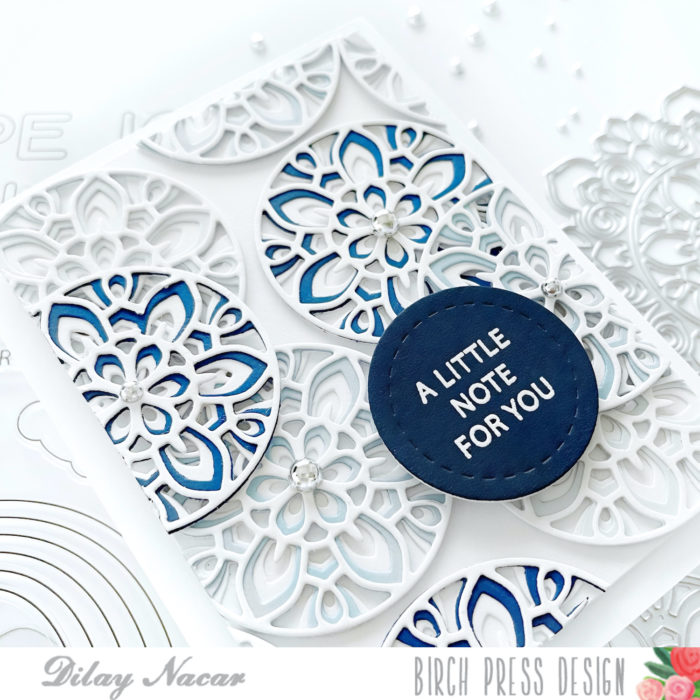
Hello friends, and welcome back! Dee here and today, I am sharing this intricate card that I created with the Tranquility layer die set! For this card, I decided to use a single color in three different shades for an elegant and sophisticated feel. I hope that you like what I came up with! Let’s begin!
First, I die cut the center circle of the Tranquility die (saving the outer layers for a future project), cutting layers A and C in white and layer B in all three shades of blue. I then adhered the layers together with each combination containing a blue middle layer.
Next, I cut a piece of white cardstock down to 3.75” x 4” and adhered the circles to it in a random pattern, and trimmed off the excess, using those pieces to fill in any gaps. I heat embossed a sentiment from the Rainbow Days stamp set and die cut it with a circle die (from my stash), and adhered it to the card with foam tape.
To finish, I added silver metallic pearls to the center of each of the circles for some extra shine and mounted the card onto an A2-sized top-folding base.
Thank you so much for stopping by, crafty friends!
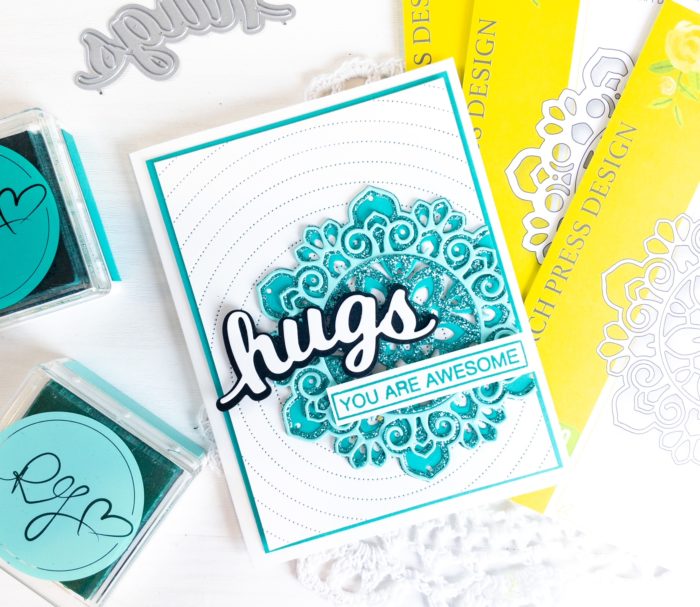
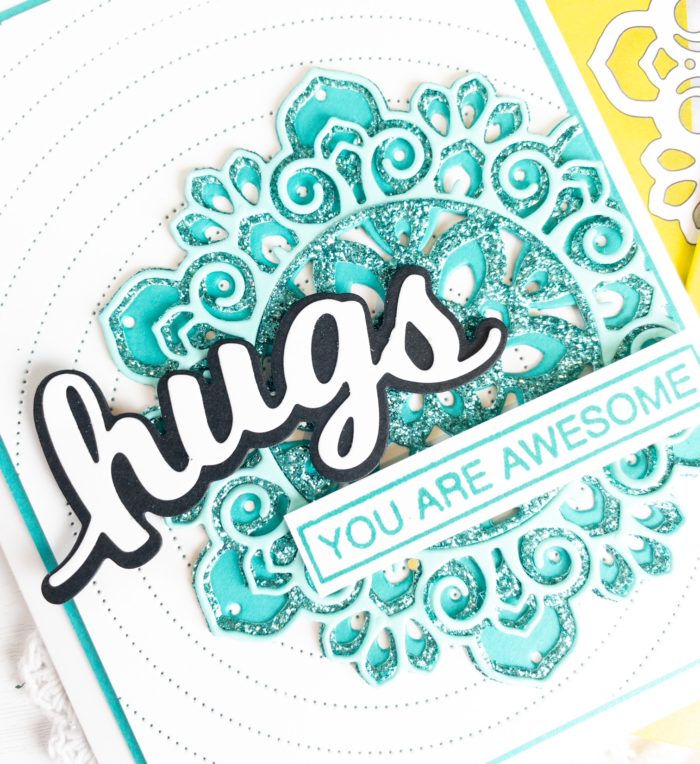
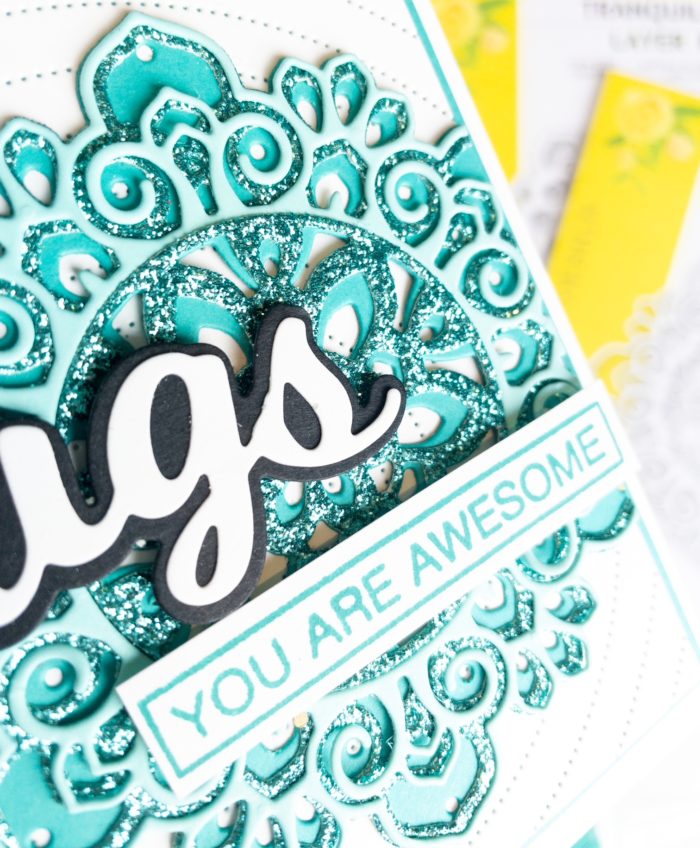
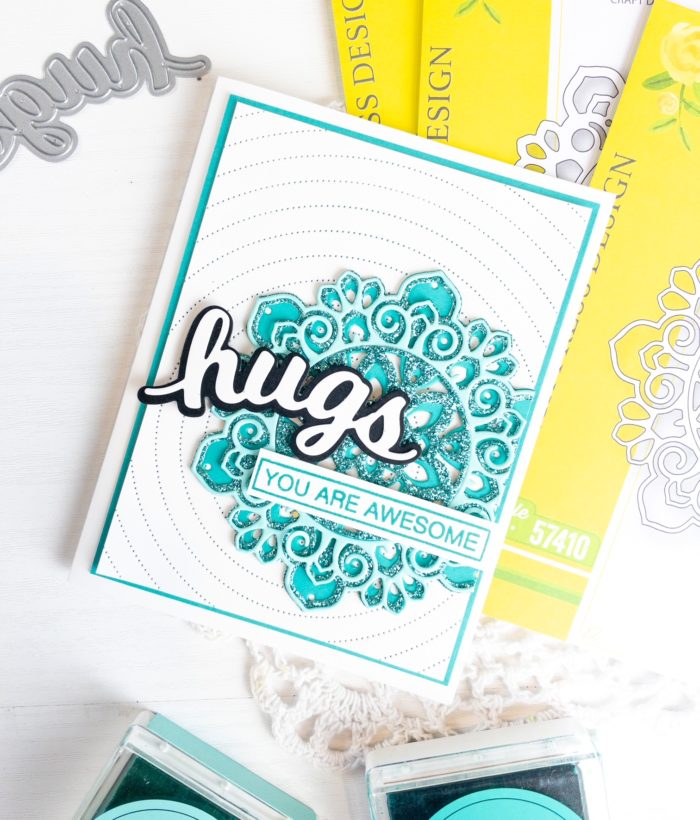
Hello friends and happy Monday! I hope you all had a pleasant weekend. This is Crystal Komara here with you today sharing a fun design featuring the Tranquility Layering Set.
Card details:
The base of this A2 sized card is made from 80 lb. Neenah Solar White Smooth cardstock. I cut a 5 1/4″ x 4″ piece of Bermuda Bay cardstock as the first mat. I used the Pinpoint Radial Plate to die cut a piece of white cardstock that I adhered directly to that Bermuda Bay cardstock. I die cut the three layers of the beautiful Tranquility Layering Set using the Fresh Aqua 6 x 6″ paper pack. The top layer, Layer A was die cut from a light blue-green color. Layer B, the middle layer, was cut from a turquoise piece of cardstock from the Twinkling Jewel Glitter Pad. Layer C, the bottom layer, was also cut from the Fresh Aqua paper pack.
I adhered the three layers of the die together using Lineco Neutral ph bookbinding glue ,my go-to liquid adhesive. I adhered the three layers to the card using 3M foam adhesive for added dimension. I die cut the word “hugs” using the Hugs Honey Script dies. I die cut the bottom shadow layer from black cardstock and the top layer from white cardstock. I adhered both layers together before adhering them to the card. Lastly I stamped the sentiment “you are awesome” in Bermuda Bay ink from the Ticker Tape stamp set. I cut out the sentiment and adhered it just below the word “hugs.”
I hope you have enjoyed today’s card. I simply love using the layering dies from Birch Press Design because they are so unique! Thank you for visiting and have a wonderfully creative day.
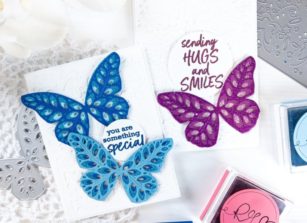
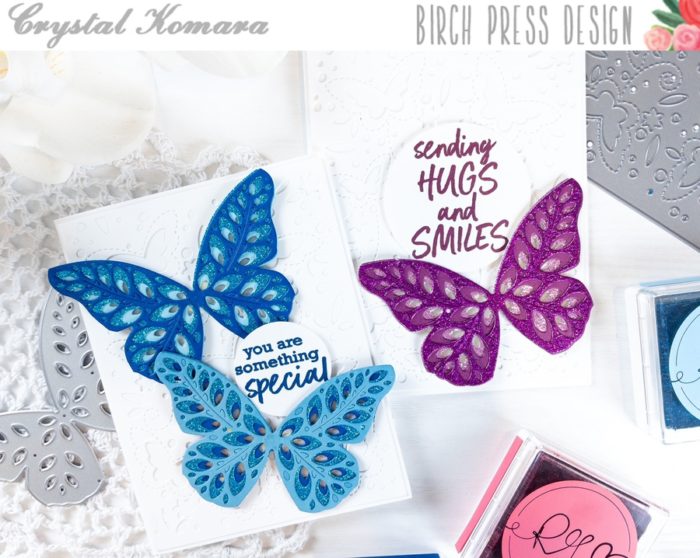
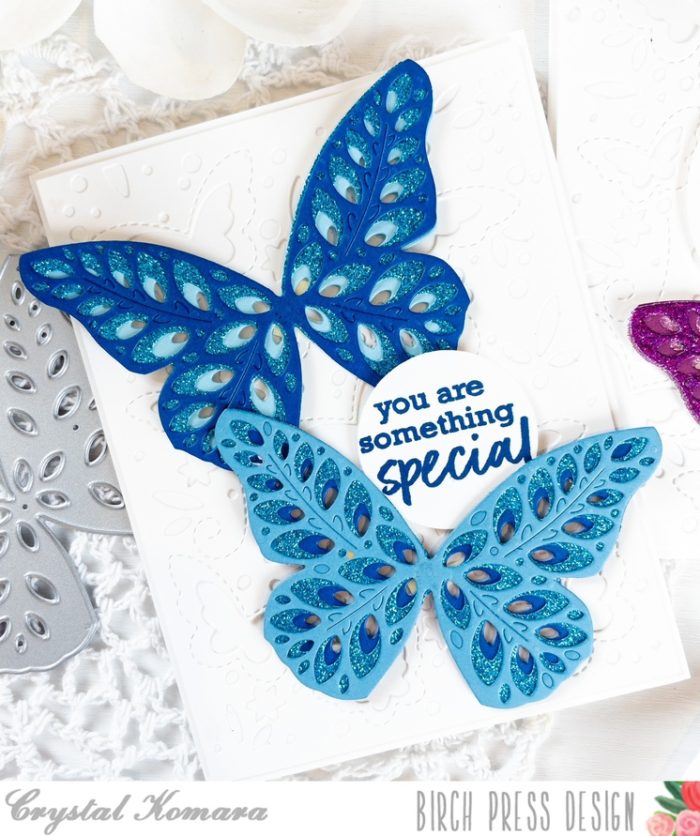
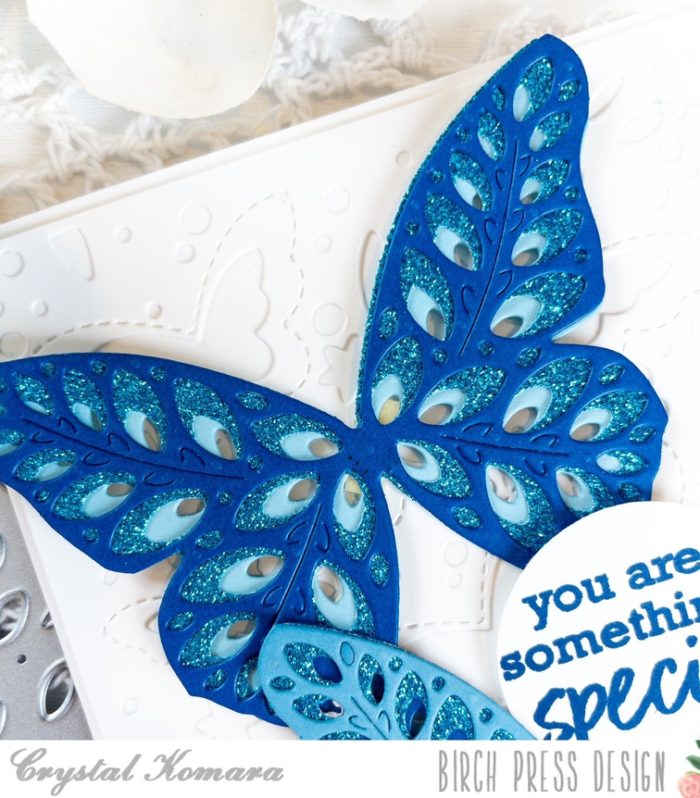
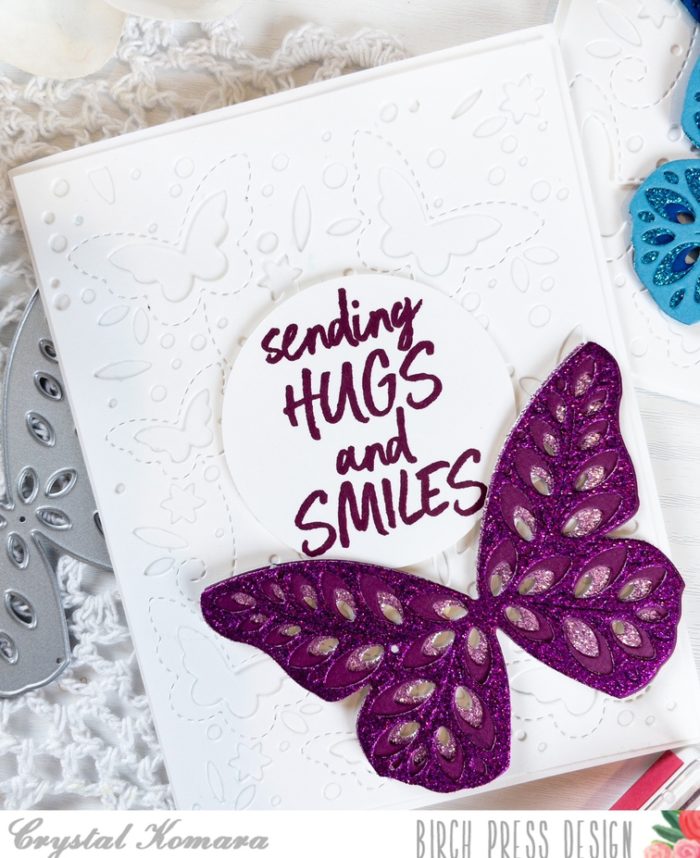
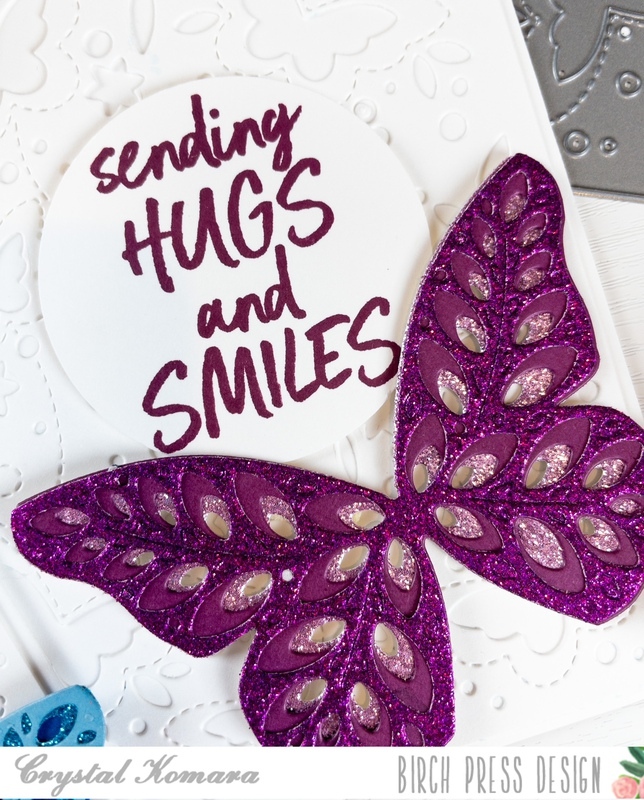
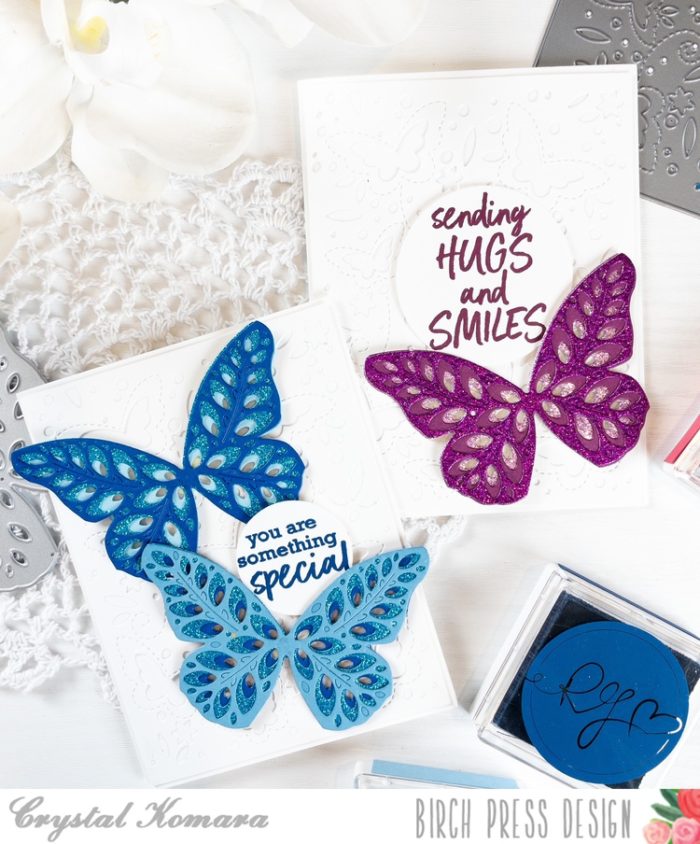
Hello friends! This is Crystal Komara here with you today sharing another way to use the beautiful Eloquent Butterfly dies. I am SOOOoo in love with this latest release from Birch Press Design featuring a variety of unique layering butterflies because the options are truly endless when you combine layers and colors. Today I chose to use a monochromatic blue and a monochromatic purple color scheme for my cards, but you could choose yellows, reds, oranges or the list goes on for an entirely different look.
For this first A2 sized card, I used 80 lb. Neenah Solar White Smooth cardstock as my card base. This is my go-to white cardstock for e-v-e-r-y-t-h-i-n-g! I use it for my card bases, distress oxide inks, Copic coloring and die cutting. It is one of the only white cardstocks you will need. For the first layer, I die cut the Butterfly Garden Layer C from white cardstock and adhered it directly to the card base. I used the Eloquent Butterfly dies and die cut Layer C, Layer B and Layer A using cardstock from the Ocean Blue 6″ x 6″ paper pack and the Frosted Glitter Twinkling 6″ x 6″ pad.
I layered the butterflies together using LineCo ph neutral bookbinding glue, which is my favorite liquid adhesive. Once the layers of the butterflies were adhered together I used 3M foam adhesive to add the butterflies to the card. Using blue ink, I stamped the sentiment from the Brush Sentiments stamp set on white cardstock and punched it out with a 2″ circle punch. I adhered the sentiment circle to the card using 3M foam adhesive.
For this second A2 sized card, I used the same 80 lb. Neenah Solar White Smooth cardstock for my base. I also die cut the Butterfly Garden Layering Plate C from white cardstock and adhered that directly to the base of the card. I die cut the Layer A, Layer B and Layer C of the Eloquent Butterfly dies using the Berry Red 6″ x 6″ paper pack and the Twinkling Jewel Glitter pad.
I stamped the sentiment from the Brushed Sentiments stamp set in raspberry ink on white cardstock and punched it out with a 3″ circle. I adhered the sentiment and butterfly to the card using 3M foam adhesive for added dimension.
The Design Team has been WOW’ing you with amazing samples from this butterfly themed release and I hope today’s cards continue to inspire you. Thank you for visiting and have a wonderfully creative day!
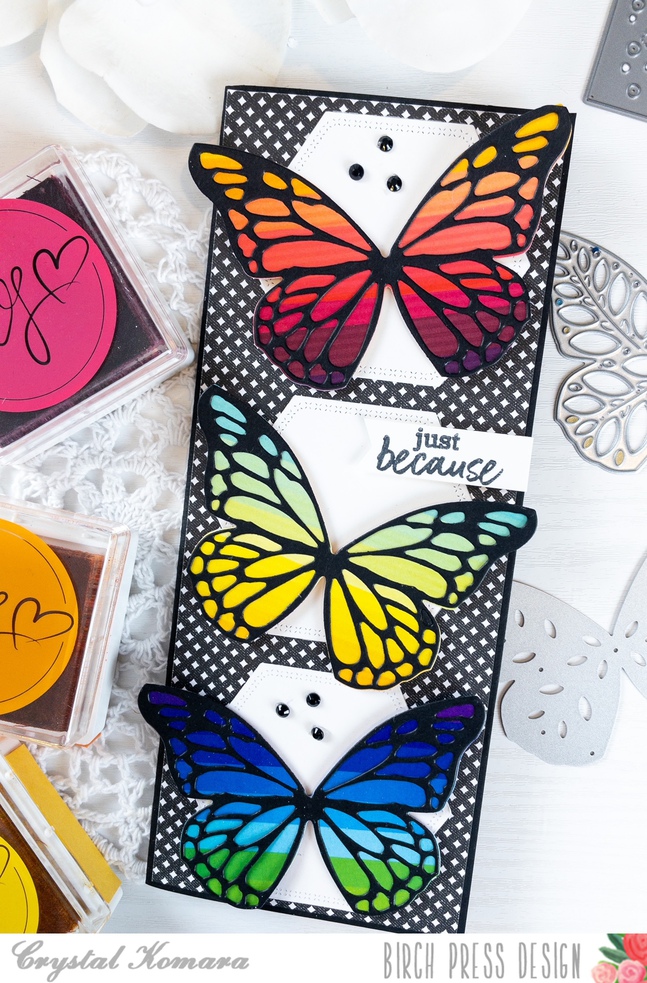
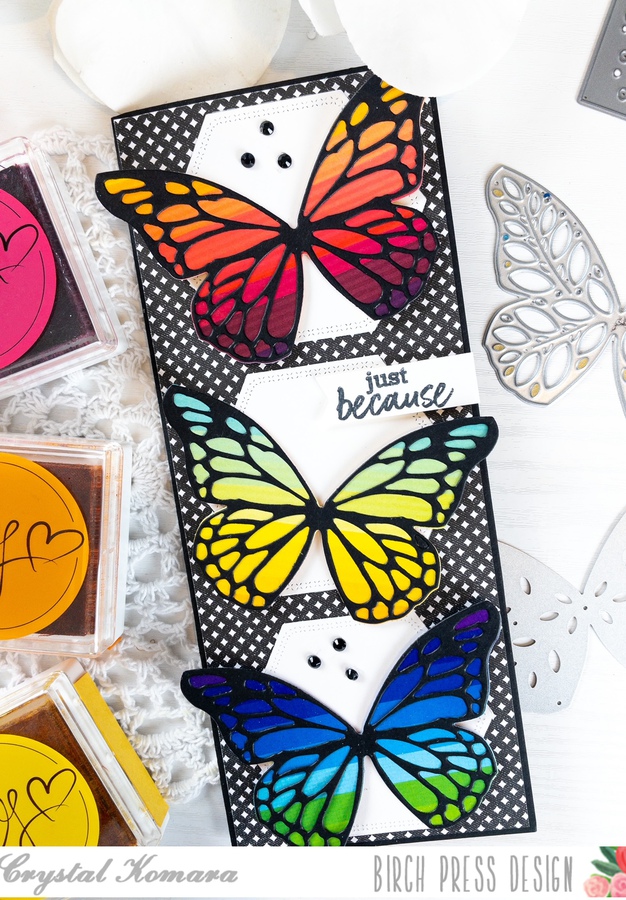
Hello readers and happy Monday! I hope you all had a nice weekend. This is Crystal Komara here with you today sharing a slimline card using the beautiful new Butterfly Basics dies. I am absolutely in love with this latest release from Birch Press Design featuring a variety of layering butterflies like the Eloquent Butterfly and the Glimmer Butterfly, so I envision lots of butterfly themed cards in my future!
Today’s slimline card measures 8 1/2″ x 3 1/2″. Slimline cards are designed to fit inside a regular #10 business sized envelope and require no additional postage. The base of this slimline card is made from 80 lb. black cardstock. I cut an 8 1/4″ x 3 1/4′” miscellaneous piece of black and white diamond printed paper for the first layer. Using a hexagon shaped die, I die cut three 2 1/2″ hexagons from white cardstock. I adhered the hexagons directly down the center of the card using a Tombow tape runner.
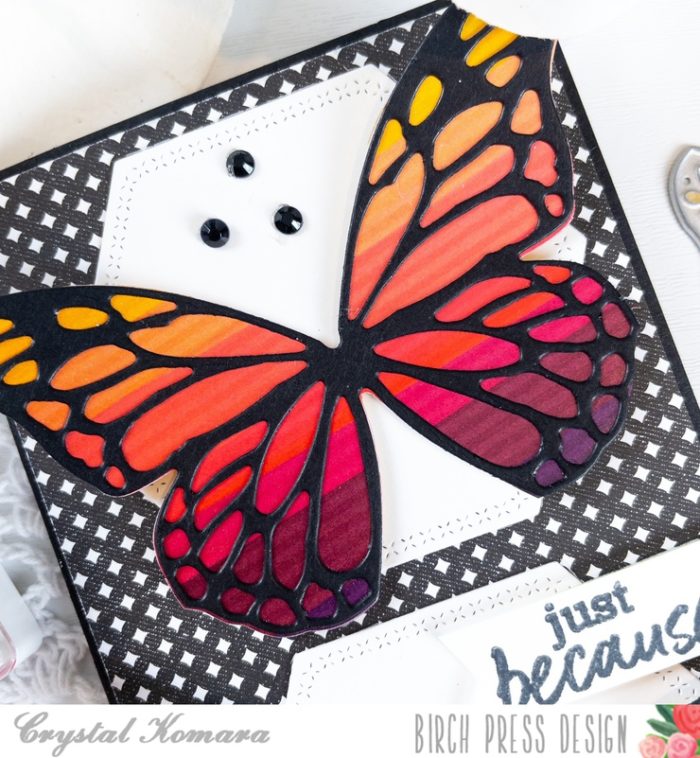
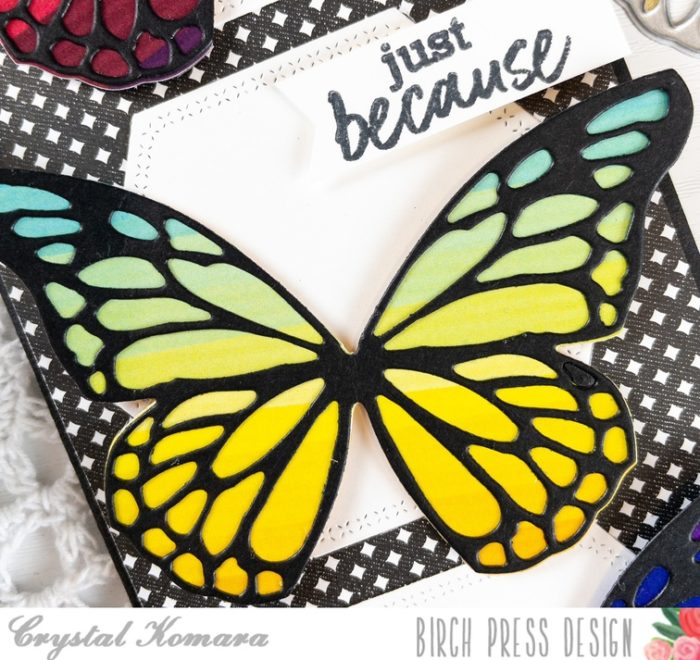
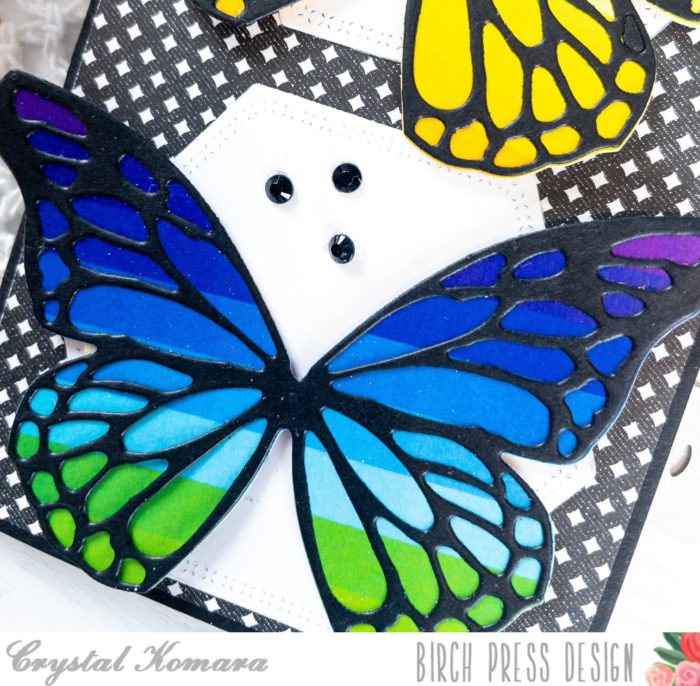
From a piece of rainbow cardstock, I die cut the body of the butterfly from a section of the paper that included more red and oranges, then a section of yellows and greens and a third section from blues and purples, to mimic the colors of the rainbows. I die cut the butterfly outline from black cardstock. I adhered the black outline over the rainbow bodies and adhered the three butterflies to the card using 3M foam adhesive for added dimension. I stamped the sentiment “just because” from the Brush Sentiments stamp set in Memento Tuxedo black ink on a thin strip of white cardstock and adhered it to the card also using 3M foam adhesive. Lastly, I added a couple black rhinestones to the card for added texture.
I hope you have enjoyed today’s card featuring the beautiful new Butterfly Basics dies. Thank you for reading and have a wonderfully creative day!