Hello Birch Press friends, I am excited to be back on the blog today. I love creating with dies and today I am going to share some mixed media ATC’s (Artist Trading Cards) with you! For the focal image I will be using the Curved Leaf Branch Contour Layers die set. So let’s get started!

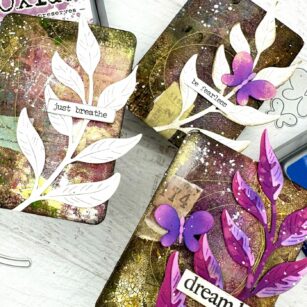
I started by die cutting 3 of the Curved Leaf Branch layers using white card stock, as well as a set using the Vibrant Violet paper pad. Once the leaves were die cut, I set the white leaf branches aside. I wanted to keep these one layer. On the violet leaf branch, I added oxide ink to the leaves, as well as to the top layer on the leaves. I used several shades of ink to add contrast to the leaves. I adhered on the 2nd layer of the leaves using liquid glue and then set these aside.

Once my leaves were die cut, I trimmed 3 different gelli prints into ATC size (2.5 x 3.5). On each of the ATC’s I added a variety of texture using texture paste and crackle paste. I added the paste using a spatula to the edges, as well as used the Gilded Grace Inside Stencil Set. I chose one of the stencils from the set and added the stencil to my backgrounds and applied texture paste through the stencil. I allowed the paste to dry completely before moving onto the next step.

Once the paste was dry, I added a bit more texture by applying distress crayons and gold glitz to the paste areas. I continued to work on the areas until I was happy with the texture of my backgrounds. Once everything was dry, I added a strip of washi tape to each ATC, with a bit of white gesso for added distressing. I also added white splatters to a couple of the ATC’s as well.
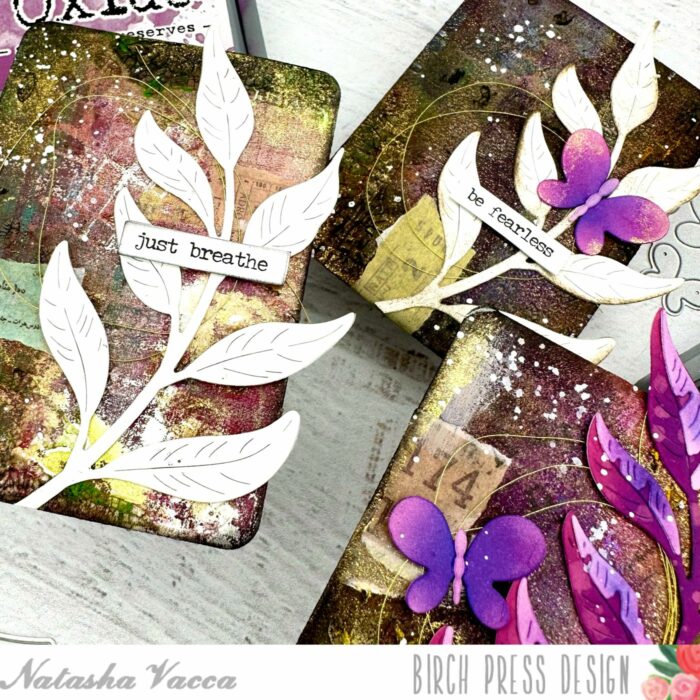
Next it was time to adhere the leaves onto the ATC panels. Under each leaf I used gold thread and adhered this to the panel with a glue dot. I then adhered the leaves onto each ATC on top of the gold thread. I added sentiments from my stash, as well as a stamped sentiment from the Gracious Floral Stamp and die set. I trimmed the sentiments and adhered them to my ATC’s.

I added a butterfly die cut to two of the ATC panels. I die cut the Simple Butterfly Contour Layers die set using the Vibrant Violet paper pad. I added Distress Oxide ink to each layer of the butterfly and then adhered it together. I thought this was a sweet and simple addition!
I hope you enjoyed stopping by today and learning how to create ATC’s, as well as how to use your layering stencils to add texture!

Have a great day and I will be back soon!

Supplies

Supplies


Supplies