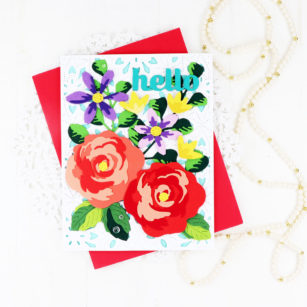
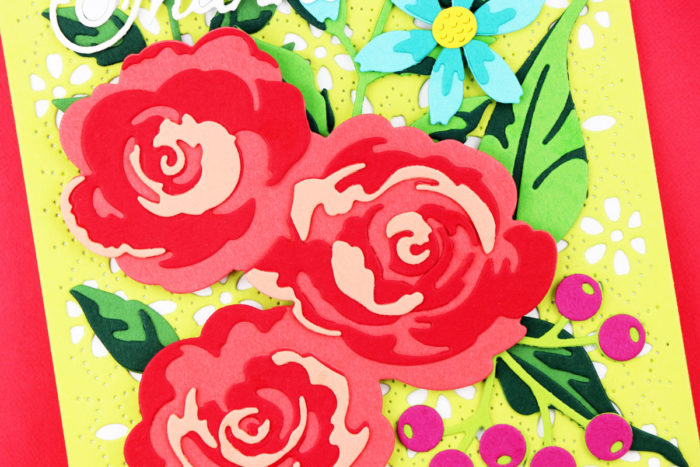
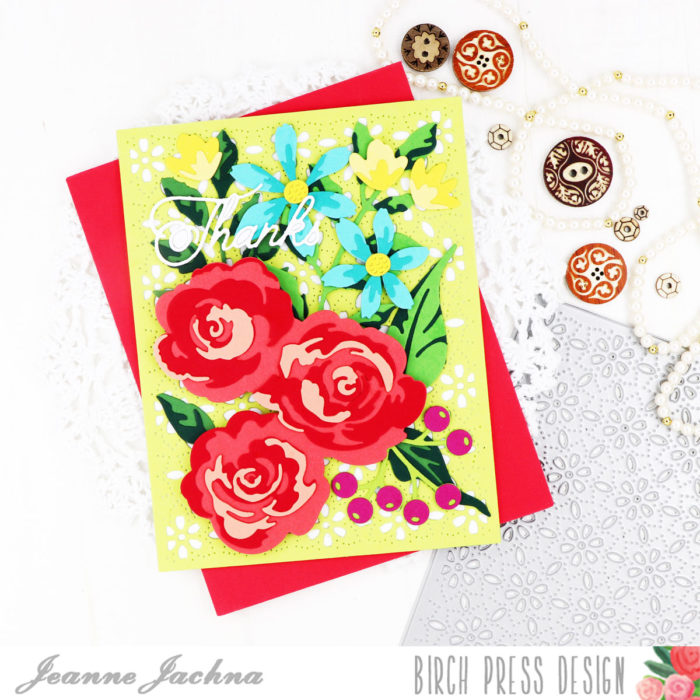
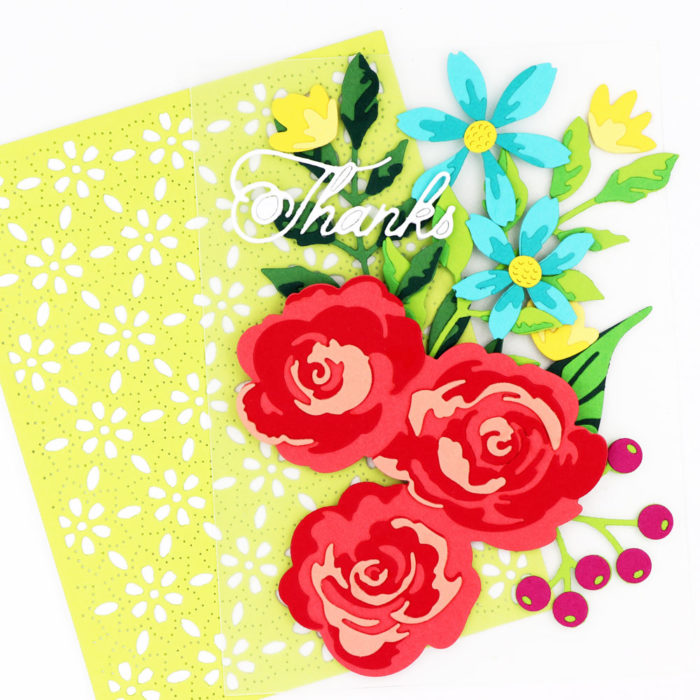
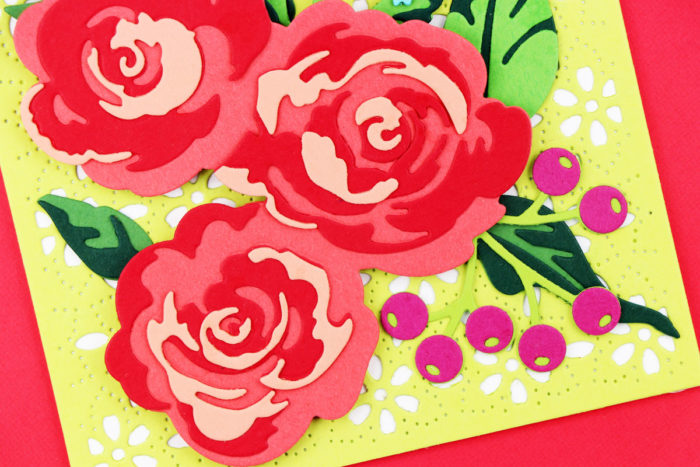
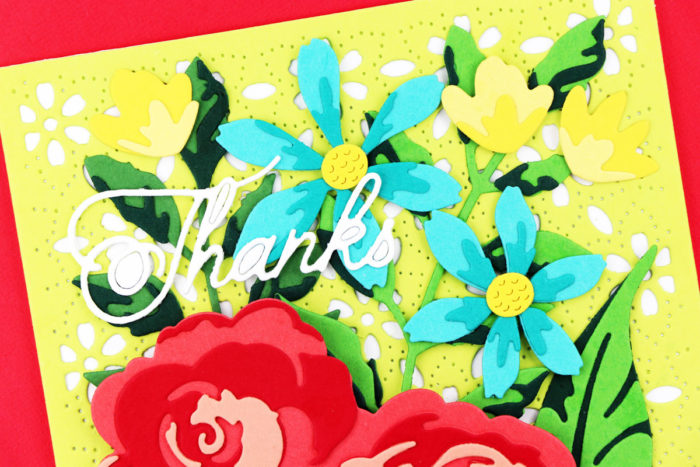
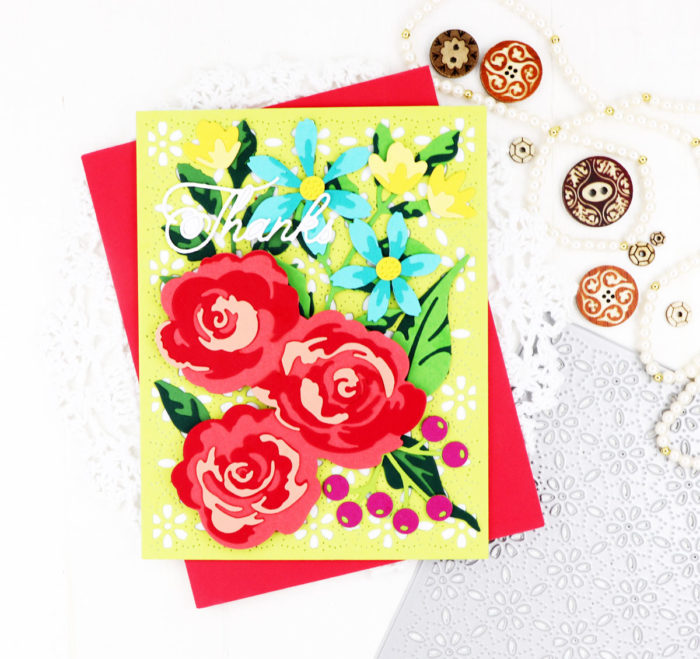
I’m smitten with flowers so I adore the last floral release from Birch Press Design. The flowers are generally all three layer and look great in any color combination. Each layer has embossed lines to help guide you in assembling them.
To get started I always cut and arrange several flowers in different shades so that later when I decide to make I have lots of assembled flowers to choose from.
I like to assemble the images on a piece of plastic the size of my card front. The clear plastic makes it easy to pick up the entire arrangement and layer it over different backgrounds to help me decide which one I like best.
Because I cut the flowers ahead of time, before I make my cards, I find that I choose colors I might not have originally selected. Just as an example.. I wouldn’t normally think the plum colored berries would compliment the red roses, but they do, and I think they’re perfect!
If you look close you’ll notice I changed one of the Fuddled Leaf branches in the background. The color was too similar to the lime Flora cover plate so I selected a different shade for more contrast.
Enjoy creating your own floral bouquets with beautiful layered blooms from Birch Press Design!
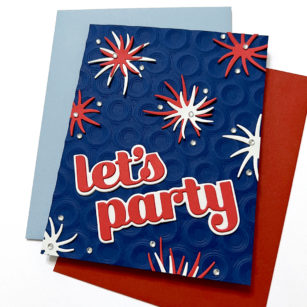
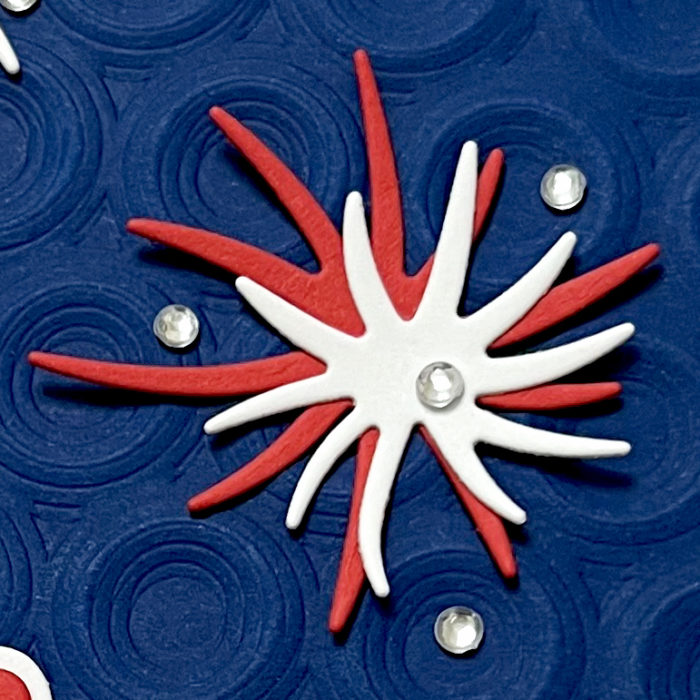
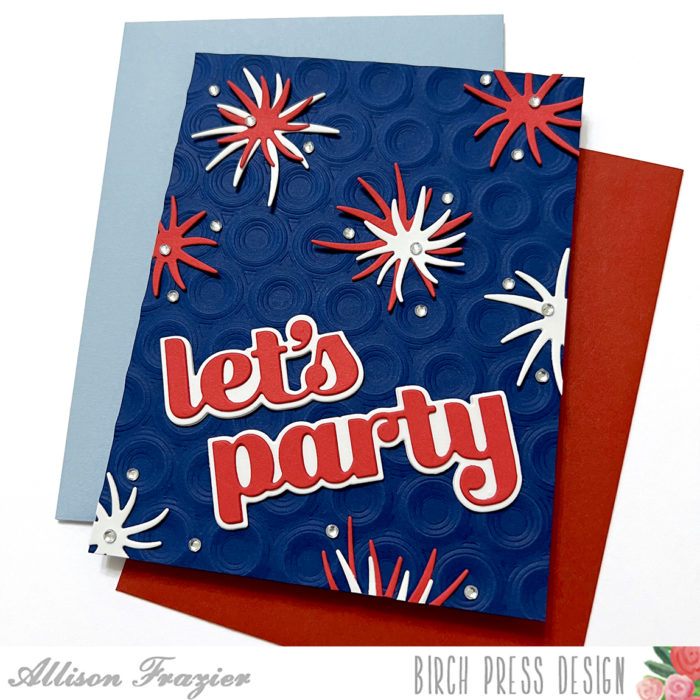
Hello, Birch Press Friends, and Happy 4th of July! Allison here, and today I’m sharing this festive card featuring the Wispy Blooms Contour Layers die set. I love finding new ways to use my supplies, so why not make fireworks out of flowers?
I started my card with an A2 panel of blue card stock, which I embossed with the Ringadings 3D embossing folder. I then adhered that to a blue A2 card base.
I cut the two wispy shapes from the die set out of white and red card stock. These extra wispy shapes are not part of the layering flowers, but they might be my favorite part of the die set. I have used them before as background texture, and I think it was back then that I got this idea to make them into fireworks. I adhered these shapes around the card panel. For some of the fireworks, I layered one of the smaller pieces onto the larger one.
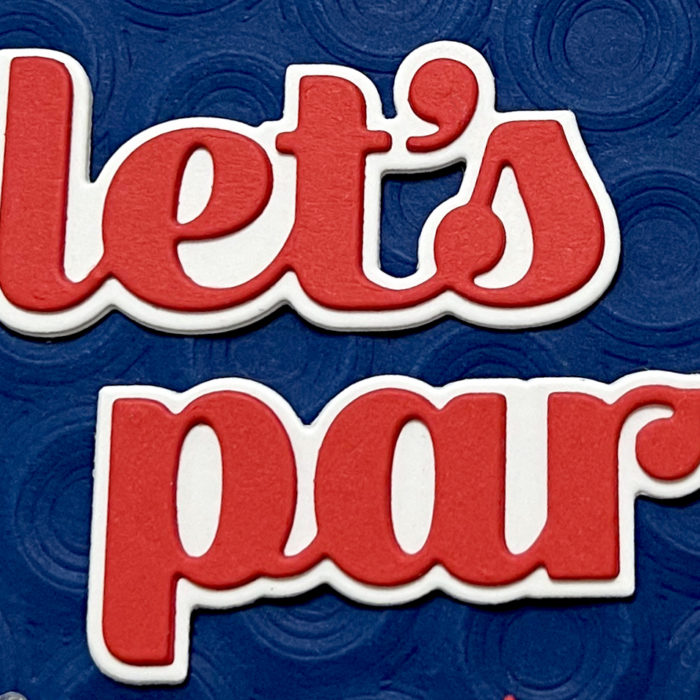
For the sentiment, I used the Let’s Party Sugar Script die. I cut the shadow out of white card stock, and the words out of red card stock. I doubled up both the shadow and the word for dimension and then glued these onto the panel at an angle.
To finish up the card, I scattered some clear fairy jewels all around the design.
Thank you so much for joining us today. I hope this card inspires you and brings a smile to your face!
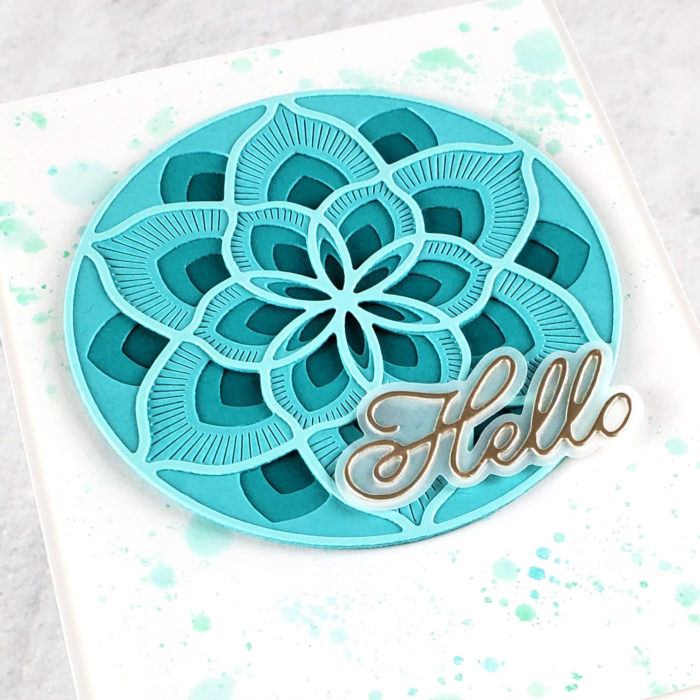
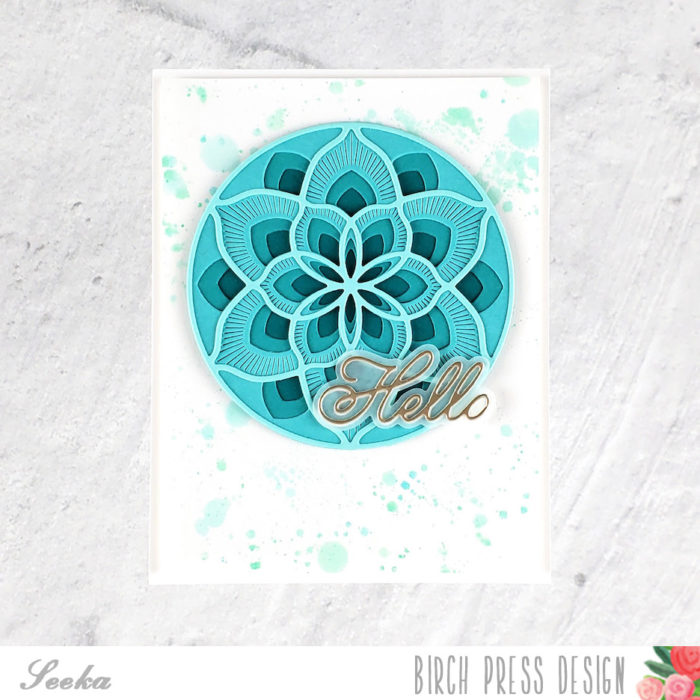
Hello and welcome! Seeka here and today I have a card featuring the Arista Layers die set. I consistently come back to this set, it’s one of my favorites from Birch Press Design!
I started off by selecting four shades of teal cardstock (the colors in the Fresh Aqua 6×6 cardstock pad are a good option). I cut each of the three Arista layers from the three lightest shades of teal and then cut a solid circle from the darkest shade of teal. I layered and glued the three die cut pieces together and then glued the solid circle to the bottom.
Next, I created the sentiment by cutting the detail layer of the Handwritten Hello and Outline die set from mirror cardstock (check out the Vintage Pastel Mirror 6×6 cardstock pad for good options). Then, I adhered it to the shadow layer which I cut from vellum. I glued the two layers together and then glued the sentiment to the Arista medallion.
For the background, I dropped a few drops of several shades of teal acrylic paint onto a craft mat. I spritzed the paint with clean water and then dragged several 4.25″ x 5.5″ panels of white cardstock through the paint. By the third panel, only a few drops of paint remained on the craft mat and instead of dragging the panel through the paint, I used it to blot up the drops which created this splattered look. I used this panel for the card, saving the other two for future projects.
To assemble the card, I trimmed a quarter inch off each end of the background and then used foam tape to adhere it to a cardbase. Last, I adhered the medallion and sentiment.
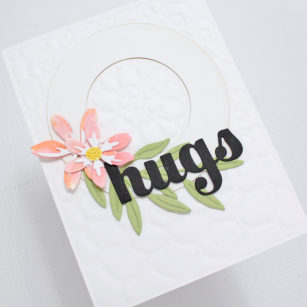
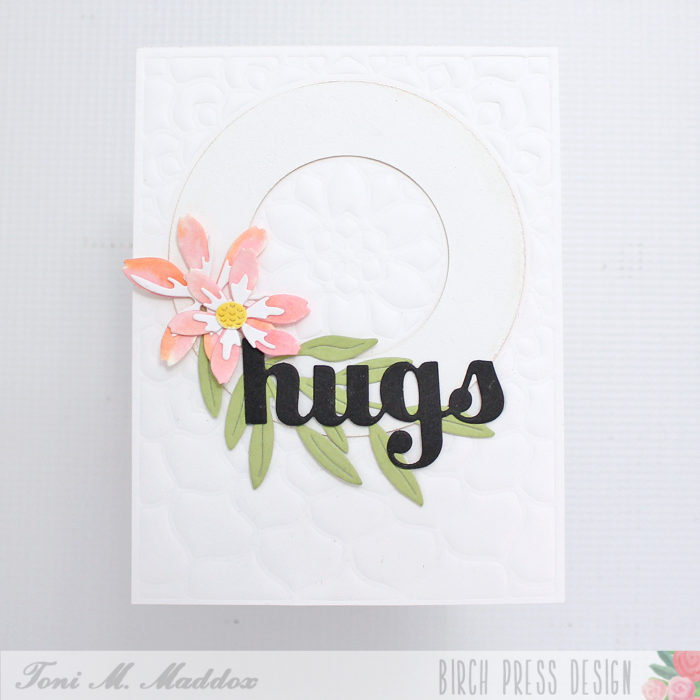
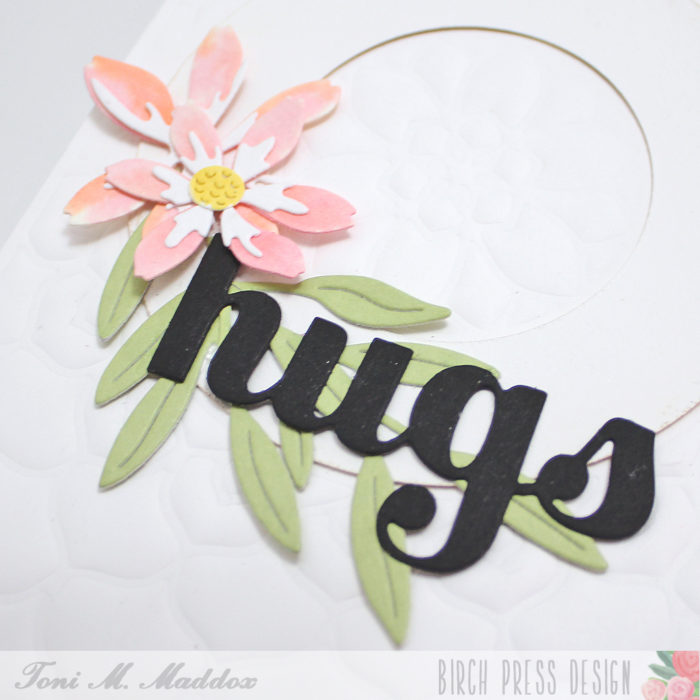
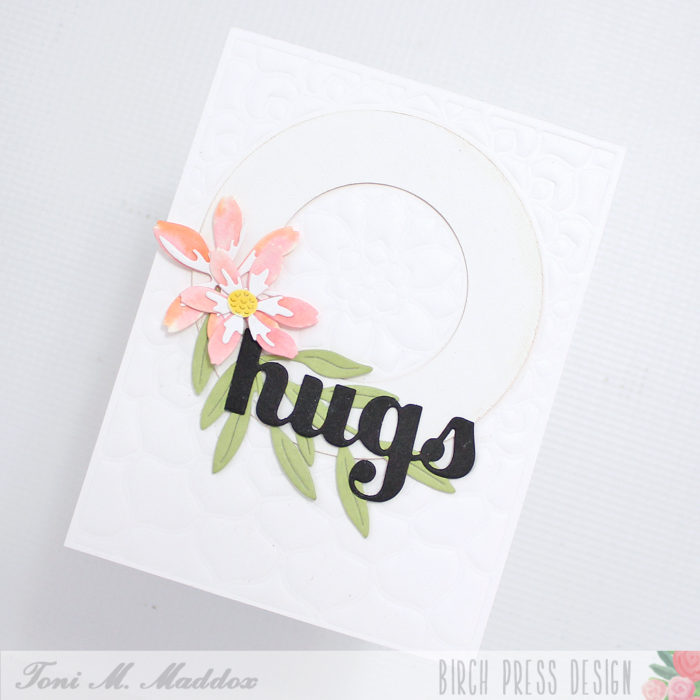
Hello, Birch Press fans! Toni here with you today sharing a card that I would call any occasion. Honestly this is among my favorite type of card to make as I can use it for about anything: sympathy, friendship, encouragement, you name it.
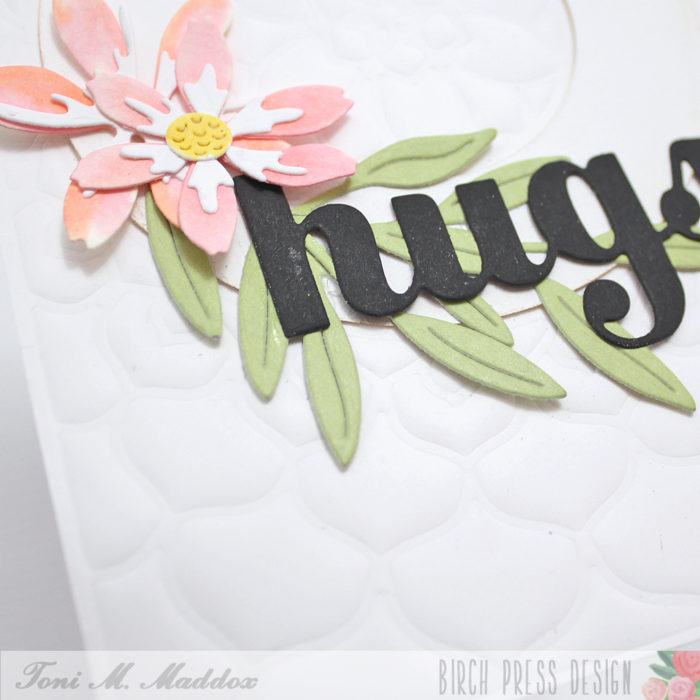
I started the card by using the Epiphany Plate Layer A with a rubber mat to emboss/impress the card front. The texture is amazing but really hard to capture in a photo.
Next I cut out the Mandala Card Frame, using the circle as a wreath. I sponged it lightly with Distress Oxide Vintage Photo for a tiny bit of contrast against that white base. Notice now the circle fits perfectly in the Epiphany Plate center?!
To decorate the wreath, I watercolored the Star Flowers Contour Layers blossoms with Zigs and adhered them along with a few Tiny Tuft Flowers and Leaves Contour Layers cut from Memory Box Lush Green 6×6 cardstock.
I nestled the Big Hugs Sugar Script diecut amongst the foliage. So pretty!
I hope you enjoyed today’s card and have a great rest of your week.
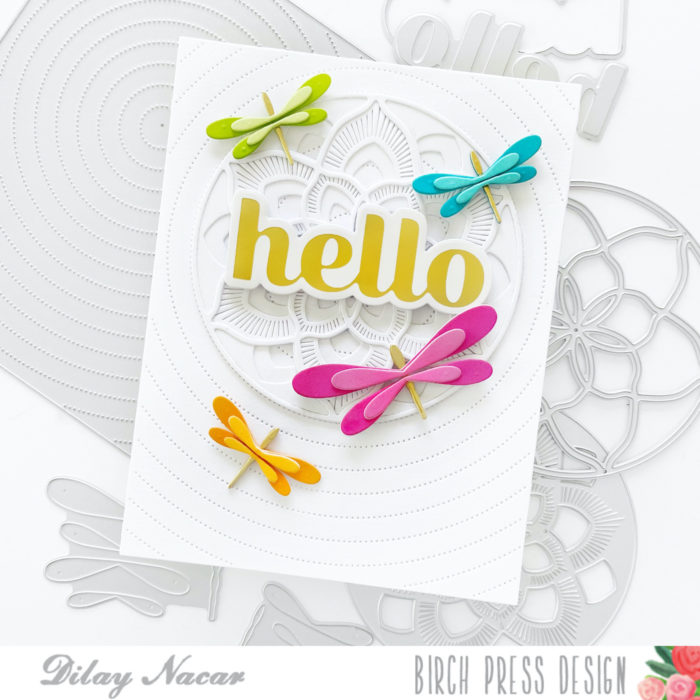
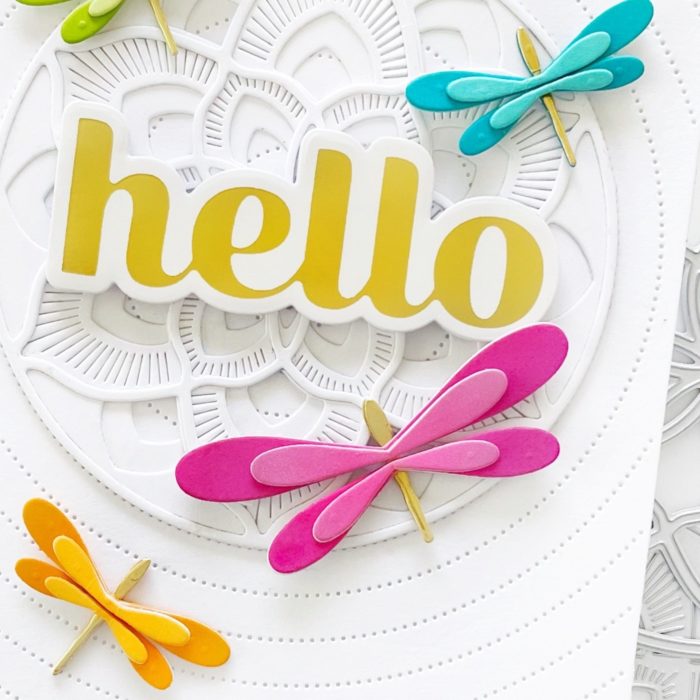
Hello Crafty friends – it is Natasha here and I am excited to be back up on the Birch Press Blog today! Today I am sharing a fun and easy way to use your layering dies, as well as the Simple Dragonfly Contour dies to create a colorful mixed media card! So let’s get started!
For today’s card I started with the Grace Layering die set and a gelli print background from my stash. I chose layer A and followed the directions on my die cutting machine for creating an impression on paper using your dies. This was super easy to do and created a beautiful impression on my gel print background!
Next I used several oxide inks from my stash and ink blended around the edges of the print. The Grace layering set created a beautiful impression on my print and I used the inks to add a bit more texture to the raised sections of the background panel.
Once my ink blending was complete I added some distressed edges to my panel. I then added a bit more texture using embossing glaze and a crayon. Once my panel was complete, I set it aside.
I love using die cuts and embossing powder together and the Simple Dragonfly Contour Layering dies are perfect for a colorful mixed media vibe! I die cut 3 dragonflies on white cardstock. I then adhered the dragonfly wings together using liquid glue. Then I chose 3 colors of embossing powder and heat set each of the wings and antennae. I then adhered these together with liquid glue and added foam tape behind the wings. I then adhered the background panel to an A2 card base and adhered my dragonflies to the card panel. To complete my card I added a Handwritten Thanks and Outline sentiment die. I die cut the shadow layer in white and the inner script thanks using the Rainbow Reflections Mirror Pad. I adhered these together and added foam tape to the back for added dimension. I added a sub sentiment from my stash to complete my card.
Thank you so much for stopping by today! I hope this card inspires you to use your layering dies to dry emboss a panel and to create a mixed media card using your dies! I will be back soon!
Hello and welcome, crafty friends! Dee here today with another clean and simple card that I created using scraps and a few dies! To begin, I cut the Arista Layer die, A, B, and C and adhered them onto the center of a base made by cutting a piece of white cardstock with the Pinpoint Radial Plate die.
Next, I hot foiled the Big Sugar Script Hello foil plate in matte gold and cut it with the coordinating die, then cut it twice more in white to stack and add dimension. I then adhered it to the center of the Arista layers.
To finish, I cut the Simple Dragonfly Contour Layers in gold, pink, orange, green, and teal, then assembled and adhered them to the card.
I hope you enjoyed today’s card and are inspired to create something new! Thank you so much for stopping by, friends!
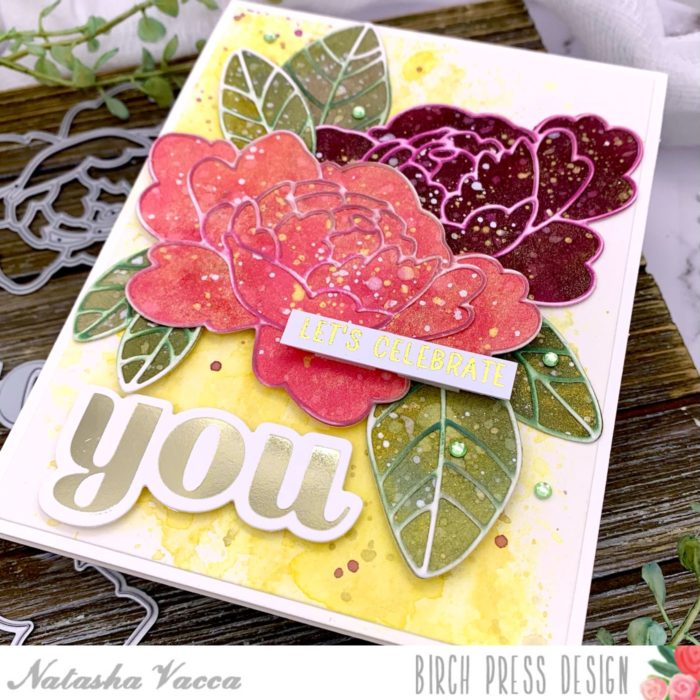
Hi Crafty friends – it is Natasha here and I am excited to be back on the blog today! I had so much fun using the beautiful Adornment Peony die set, paired with the new You Sugar Script Hot Foil Plate and die set! I love all the sugar script dies and the new foil dies are just AMAZING! So let’s get started!
To begin I started by creating a colorful watercolor background using powders. The powders I used today have lots of sparkle and shine! I added these to watercolor card stock and then allowed them to dry. Then I die cut the shadow peony outline layer 2 times (pink and purple) and then die cut the leaves using the outline dies. Next I splattered the peony and the leaves using a combination of white and metallic watercolors. I set these aside to dry.
Next I die cut the detailed layer from the Adornment Peony die set using white card stock. I die cut 2 peony layers and 2 sets of leaves using the white card stock. I then ink blended each peony layer and leaf layer using oxide inks. I did quick ink blending to give the layer a textured look. Once they were dry I adhered these to each of the outline die cuts using liquid glue.
Next I started to work on my background for my blooms. I used several shades of yellow water color and ink smooshed the watercolor onto my panel. Once I was happy with the colors and texture, I added a few splatters to the background. I then trimmed down my panel to fit onto my A2 card base. I adhered my ink smooshed background onto my card base using liquid glue.
Next I foiled the You Sugar Script hot foil plate using a gold foil. I then die cut the (You) using the coordinating die included in the set. To complete my card I arranged my flowers and leaves, then adhered them with liquid glue and foam tape. I also adhered my sentiment using foam tape. I also added a sub sentiment from my stash to complete my greeting.
I added a few Fairy Jewels from the Pastel Jewels collection to complete my card and add a little more sparkle!
Thank you for stopping by today! I had a lot of fun and I am super excited about the new foil die sets! See you soon!
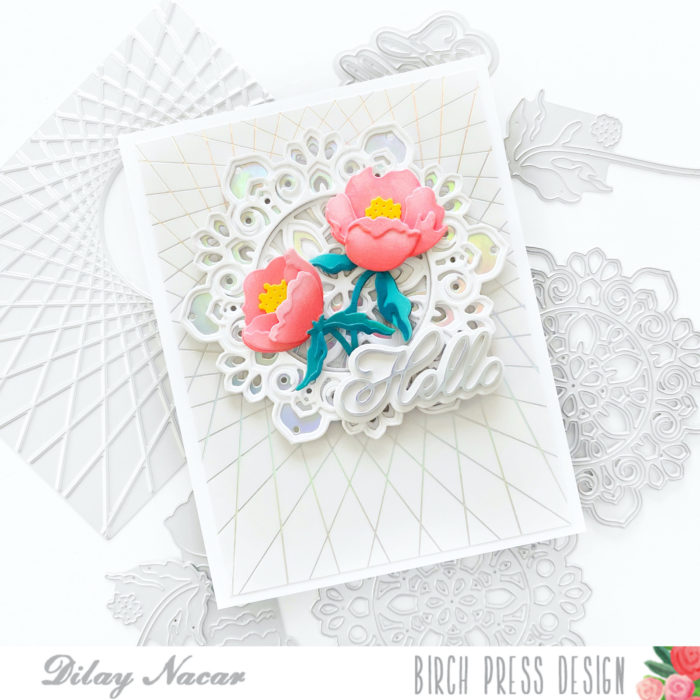
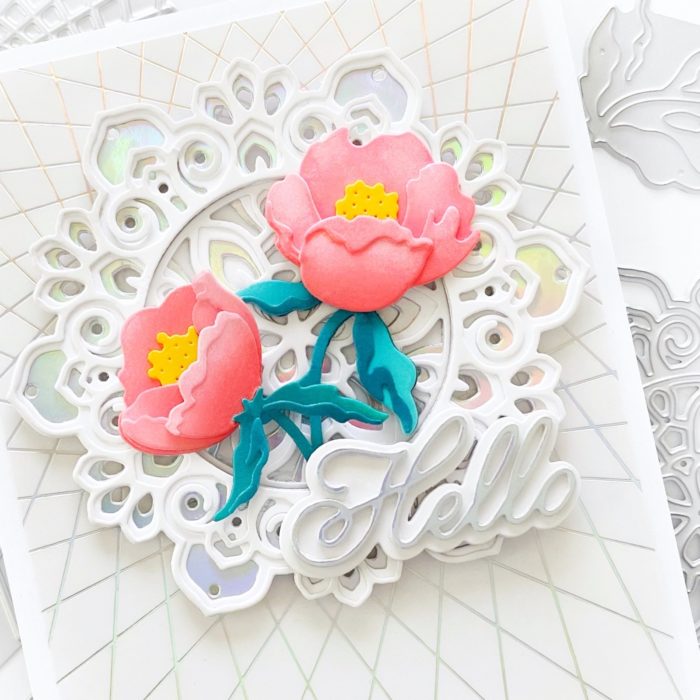
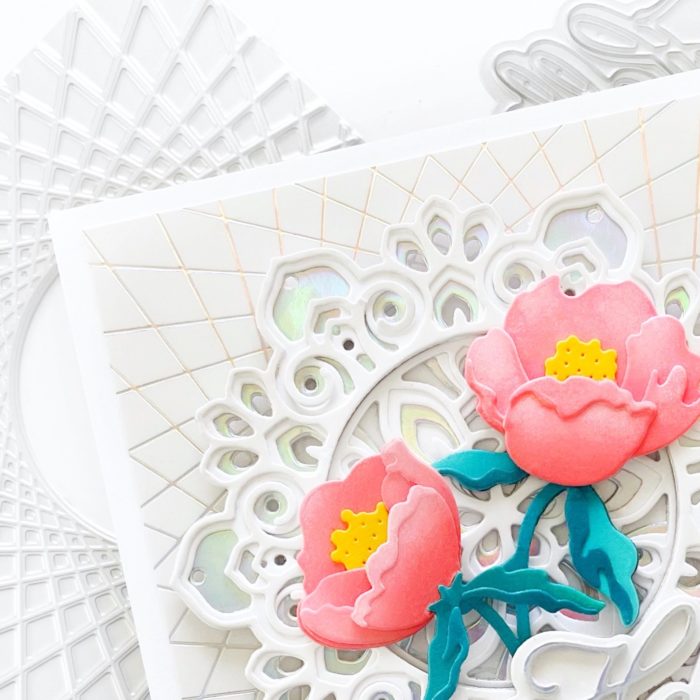
Hello and welcome back, friends! Dee here today sharing a foiled floral card created using beautiful new products from the latest release! This card showcases the String Art Hot Foil Plate and Prime Peony Duo Contour Layers.
To start, I hot foiled a 4” x 5.25” piece of white cardstock with the String Art Frame foil plate. Next, I cut the Tranquility layers A and B in white cardstock and C in Holographic cardstock, then adhered them together. I cut the Prime Peony Duo Contour Layers in colored cardstock from the 6×6 paper packs and ink blended them — using corals for the blooms and teals for the stems and leaves, then adhered them together.
Next, I adhered the Tranquillity layers onto the foiled String Frame, then adhered the Tranquility layers to the center using foam adhesive. I then tucked the peonies into the circle and trimmed the excess stems. I cut the Handwritten Hello in holographic cardstock and the shadow in white and adhered it to the frame. To finish, I mounted the card onto a top-folding card base!
Thanks so much for joining me today! I hope this card inspires you to get creative and try something new!
Hi Crafty friends! I am excited to be back today sharing a colorful thank you card using the beautiful Star Flowers Contour Layers die set!!!!! So let’s get started!
I started today’s card with the beautiful Star Flowers Contour Layers die set! I love these beautiful flowers! I started by die cutting my flowers using 2 shades of blue card stock from the Memory Box Fresh Aqua Collection paper pad. I chose a lighter blue and a darker blue. I love these paper pads as all the colors coordinate so beautifully together! I die cut enough to make 8 flowers. I then chose a yellow shade for the floral center using the Sunny Orange paper pad from Memory Box. Once everything was die cut I added a bit of shading to each floral layer using distress oxide inks. I then adhered the layers together using liquid glue. I then added embossing powder to each flower for added texture and dimension. I pressed the flower into my embossing ink, sprinkled with embossing powder, and then heat set. I then set my flowers aside.
Next I started to work on my background. To create my background I used the Viola Plate layering dies. I used both layer B and C. I die cut each layer on white card stock. Next I wanted to add color to Layer B. I used a yellow shade of dye ink and ink blended on my panel using a blending tool. Next I added 2 colors of sprays for added shine and texture. I allowed this to dry and once dry, I added gold and silver metallic watercolor splatters for added texture. Once everything was dry, I adhered layer B and C of the Viola die cuts together using liquid glue.
Next I used my distress tool to add texture to the edge of the die cut panel. I added texture to various sections. Then I used an archival ink in brown around the outer section of my Viola panel. I then adhered the Viola panel to an A2 card base with liquid glue.
I then adhered my flowers to the front of my card panel. I used a combination of liquid glue and foam adhesive. To complete my card I added the Handwritten Thanks and Outline die. I die cut the shadow using white card stock and the script thanks using the Rainbow Reflections Mirror Pad card stock. I then adhered the sentiment together with liquid glue and added foam tape to the back and added this to my card front.
Thank you for stopping by today! I had a lot of fun today and I will be back soon!
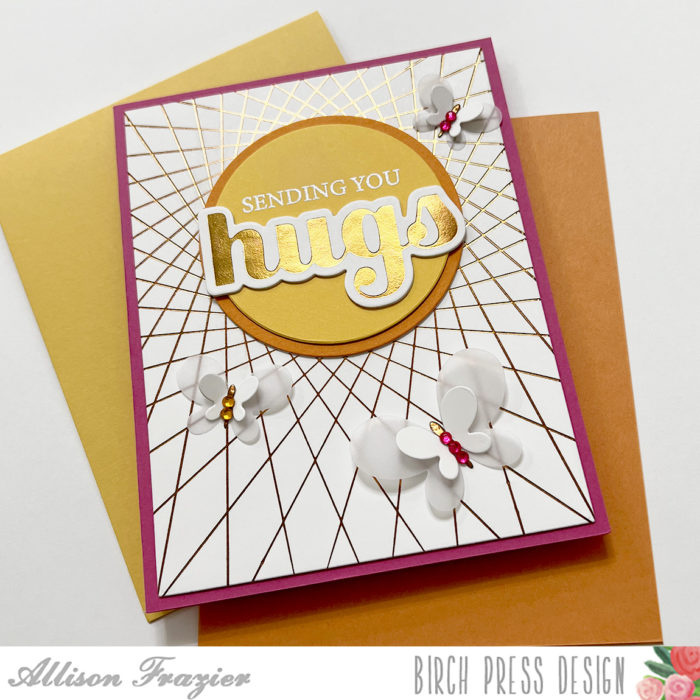
Hello, Everyone! Look who has hot foil plates now! We are very excited to be able to show off these gorgeous plates and how hot foiling can complement the rest of the beautiful Birch Press Design products.
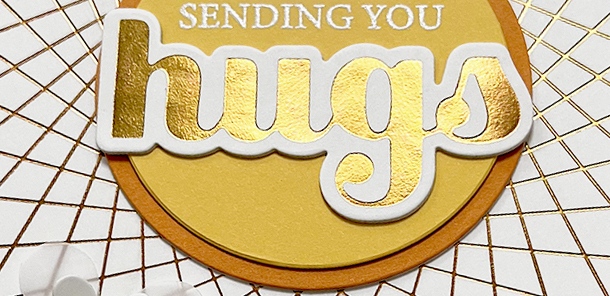
Not only are there sugar script hot plates, but one of my favorite background dies is now available as a hot foil plate, too. And that is what I started this card with. I took a piece of smooth white card stock and hot foiled the String Art Frame plate with copper foil. This foil looks gold in the pictures, but that’s the wonderful thing about foil – it changes color and luminosity as the light hits it. The hot foiled image came out crisp and beautiful on the first try, so I set that aside.
Next, I foiled the hugs hot foil plate with the same copper foil onto the same white card stock. I cut it out with the matching die that comes with the plate. It came out gorgeous! The hugs sugar script die has always been one of the most used sentiments in my stash, and I know that this hugs hot foil plate will get just as much use.
To ground my sentiment in the center of the string art frame, I cut two circles from yellow and orange card stock. On the smaller yellow circle, I stamped a partial sentiment from the Kind Hearts stamp set. The full sentiment is “Sending you sunshine, laughter & hugs.” In order to stamp just the “Sending you,” I masked off the rest of the stamp with washi tape, inked the stamp with VersaMark ink, removed the washi tape, and then stamped it onto the yellow circle. I then heat embossed it with white embossing powder. I assembled the two circles together, glued the hugs sentiment below the stamped sentiment, and adhered it onto my foiled panel. I then adhered the panel onto a hot pink A2 card base.
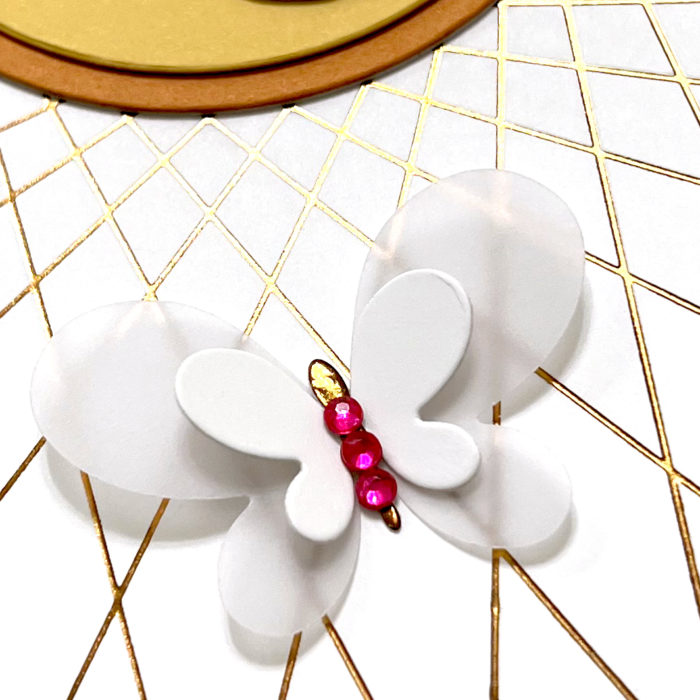
To embellish the card, I die cut three butterflies using the Simple Butterfly Contour Layers die set. I cut the larger layers from vellum and the top layers from white card stock. The bodies of the butterflies were actually cut from the same copper hot foil that I used on the rest of the card. If you have a solid hot foil plate in your stash, you can easily create solid foiled pieces of card stock. As a final embellishment, I added colorful fairy jewels to the butterfly bodies.
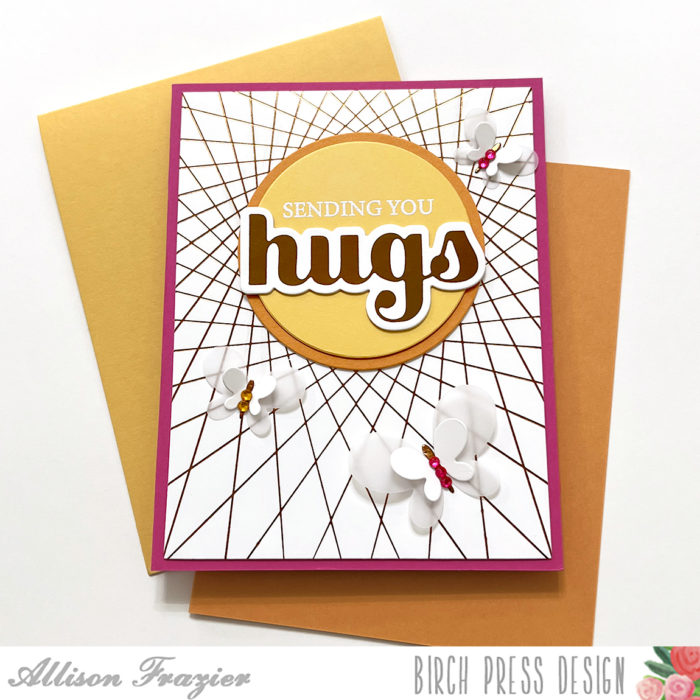
In this last photo, you can see the copper color of that foil. Again, it just depends on the lighting – the foil gives the card such a dynamic feel. I hope you’re all as excited as we are about these new hot foil plates. Thank you so much for joining us today. I hope this card brings a smile to your face!