Tag: contour layers

  • Sending Love | By Natasha Vacca

    Sending Love | By Natasha Vacca

    Hello Birch Press friends, I am excited to be back up on the blog today sharing a fun and easy card using the Banner Heart Layering die set! So let’s get started!

    For today’s card I started with the Banner Heart Layering die set. I die cut layer A and C using white card stock. I then die cut layer B using the Festive Glitter paper pad. For the glitter layer I chose a dark blue shade from the paper pad. I then ink blended layer A and C using Distress Oxides. I used a combination of Distress Oxides: Saltwater Taffy, Picked Raspberry, Seedless Preserves, Shaded Lilac, and Villainous Potion. Once the layers were ink blended I set these aside to dry.

    Next on layer B, I wanted to add a bit more texture to the glitter paper pad. I used a combination of paper glaze, as well as embossing powder! I love the texture this provides. Once the other heart layers were completely dry, I added Gilded Foundry wax to sections of the heart. I then adhered all the heart layers together using liquid glue.

    Next I chose a gelli print from my background stash and dry embossed the background using the Ringadings embossing folder from Memory Box. I then applied white pigment ink to sections of the folder and ran it through one more time. I like this effect and the random texture this provides the dry embossed background. I allowed the ink to dry, then trimmed the panel using my paper trimmer for my card base.

    I completed my card by stamping a sentiment from the Contempo Greetings stamp and die set. I stamped the sentiment in purple, trimmed using the coordinating die, then applied foundry wax and ink on the edges as well. I then adhered the card panel, heart, and sentiment to my card base.

    Thank you so much for stopping by today! I will be back soon!


    Supplies


    Supplies


  • Early Blossoms | By Seeka

    Early Blossoms | By Seeka

    Hello and welcome! Seeka here and today I’m sharing a clean and simple card featuring the new Early Blossom Contour Layers die set. These sweet blooms come together so easily!

    I started by cutting the three layers of the blooms from three different shades of pink cardstock. Then I cut the two layers of the leaves and the stems from two shades of blue cardstock. I layered and glued the pieces together and then set them aside.

    For the background, I used the Arista Layer B die from the Arista Layer die set to cut a piece of white cardstock. I cut the resulting medallion into quarters and glued each quarter to the corner of a rectangular piece of cardstock.

    To assemble the card, I used foam tape and glue to adhere the blooms, stems, and leaves to the Arista panel, and then I used foam tape to adhere the card from to a 4.25″ x 5.5″ card base. To finish, I added a small sentiment from my stash.

    Thank you so much for visiting!


    Supplies


  • Eloquent Butterfly Layered tag | By Natasha Vacca

    Eloquent Butterfly Layered tag | By Natasha Vacca

    Hello crafty friends, It is Natasha and I am excited to be up on the blog with you today! Today’s project combines the beautiful Eloquent Butterfly layered set, paired with beautiful papers from Memory Box! So let’s get started!

    I started by die cutting each layer (A and C) from the Eloquent Butterfly onto white cardstock. Once it was die cut, I added Distress Oxide Ink (Brushed Corduroy and Walnut Stain) to layer A and C. For layer B I die cut the butterfly using the Memory Box Glitzy Glitter pad using a piece of blue glitter paper. Then on layer B I added a couple colors of embossing powder. I do one color at a time, adding layers and not fully covering the butterfly with one color of powder. I also added a bit of embossing powder to layer A to add more interest and texture. I then adhered the butterfly together using liquid glue and set it aside.

    Next I started to work on my tag background using a pre-made tag from my stash. I then chose a few pieces of beautiful pattern paper from the Memory Box Magnolia Grove paper pad. I love these papers, they are so beautiful! I adhered the layers onto my tag, then dry embossed one of the papers using the Memory Box Ringadings embossing folder. Once this was dry embossed I tore the pattern paper to give a distressed look. I then added the same distress oxide inks to the paper. I added a bit more texture by applying an iridescent embossing powder to sections of the dry embossed paper. I then adhred the layer onto my tag,

    Next I added splatters to the tag panel using a brown spray from my stash. I allowed the panel to dry, then distressed the edges using my distress ink pad. I chose a sentiment from my stash and adhered this with foam tape, then adhered the butterfly to the tag using liquid glue.

    I completed the project with a twine at the top of the tag and a few gems from the Christmas Fairy Drops collection!

    Thank you so much for stopping by today! I will be back soon!


    Supplies


    Supplies


  • Merry Christmas Poinsettia | By Sandhya Iyer

    Merry Christmas Poinsettia | By Sandhya Iyer

    Hello, BP friends! Sandhya here and today I am sharing my Christmas Poinsettia card. I used the Splendid Poinsettia Contour Layers die set for my focal point. I used a sentiment from the Glad Tidings stamp set for my sentiment. So let’s get started!

    I started by spraying a few pieces of watercolor paper with Distress Spray Stain and Distress Mica Sprays in shades of red and green. To keep the layers distinct, I tried to keep one sheet a few shades darker than the other. Then, I die-cut the base layer out of the darker piece and the detailed layer out of the lighter piece.

    Next, I assembled the layers and built my layered poinsettia. I used all the layers interchangeably to get a more dense layered look. For the center, I added iridescent flatback drops in a tiny cluster. Next, I added gold details using gold foundry wax.

    Finally, I trimmed some textured watercolor cardstock with a deckled trimmer to create my panel. I stamped my sentiment in black and adhered the layered poinsettia to it. Then, I inked around a kraft card base and adhered the panel down to it in a slanting manner.

    This brings us to the end of today’s post. Thank you so much for stopping by and I will be back soon with one more card before we end the year!

    Supplies:

  • Thanks Oval Leaves | by Crystal   Komara

    Thanks Oval Leaves | by Crystal Komara

    Hello friends! This is DT member Crystal Komara here with you today with what just might be my new favorite card ever that I’ve designed for Birch Press Design. Now, I’ll admit, I was initially hesitant to use the contour dies, becuase oh-so-much die cutting, but I promise, the end result is always SOOooo worth the work!!

    Card details:

    The base of this A2 sized card is made from 80 lb. Neenah Solar White Smooth cardstock. I cu ta 5 1/4″ x 4″ piece of black cardstock and dry embossed it using the Blooming 3D Embossing Folder from Memory Box Co, a sister company of Birch Press Design. This is my go-to floral embossing folder, it’s so elegant.

    Then I just began die cutting lots and lots of the Oval Leaves contour dies in yellow, orange and gold cardstock. I mismatched up the layers, so that I layered yellow with orange and rust with gold. There was no method to this matching up madness.

    Lastly, I flicked some gold acrylic paint onto the entire image and I love how this effect came out! It added a bit of grunge, but also a bit of sparkle!

    I love this card so much that I want to try re-creating it in other color palettes too, so be sure to check back in regularly to see what myself and the rest of the Design Team are creating to inspire you!

    Supplies

  • Warm Wishes | by Sandhya Iyer

    Warm Wishes | by Sandhya Iyer

    Hello Birch Press friends! This is Sandhya here with a fresh card to send warm wishes. It is kind of festive, more winter-like. I used the Forest Leaf and Berries Contour Layers and The Forest Canopy Layer C die sets for this card. For the sentiment, I grabbed the Warm Wishes Vintage Sentiment die.

    I started by die-cutting all the pieces from the Forest Leaf And Berries Die set out of watercolor paper. Next, I used Distress Spray Stains and Distress Mica stains to color the pieces. For the smaller pieces like the berries, it is easier to use tweezers and dip them into a buddle of color and then lay them out on a craft mat to dry.

    For the delicate branch, I used an ink blending tool and dabbed over it with Ground Expresso Distress Ink. Once all the colored pieces were dry, I assembled the berries and leaves per the instruction leaflet.

    Next I die-cut the Forect Canopy Laver C out of Watercolor cardstock 2 times. I adhered the 2 layers together to create more dimension and then adhered it down on a white A2 card base. Then, I die-cut my sentiment and placed it towards the entre of the background.

    Finally, I arranged the berry clusters and leaves around the sentiment and adhered them down with liquid adhesive. I also added a few flatback pearl embellishments to tie it all together. While it is hard to see the shimmer in the pictures, this card is a lot more shiny and attractive in real life.

    This brings us to the end of today’s post. Thank you so much for stopping by and I hope to be back soon with more new card ideas.

    Supplies:

  • Christmas in July with Forest Canopy and Large Cosmos | by Colleen Balija

    Christmas in July with Forest Canopy and Large Cosmos | by Colleen Balija

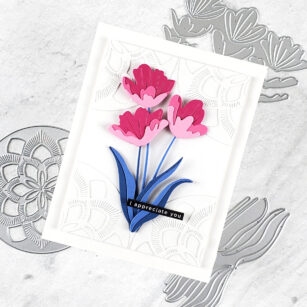
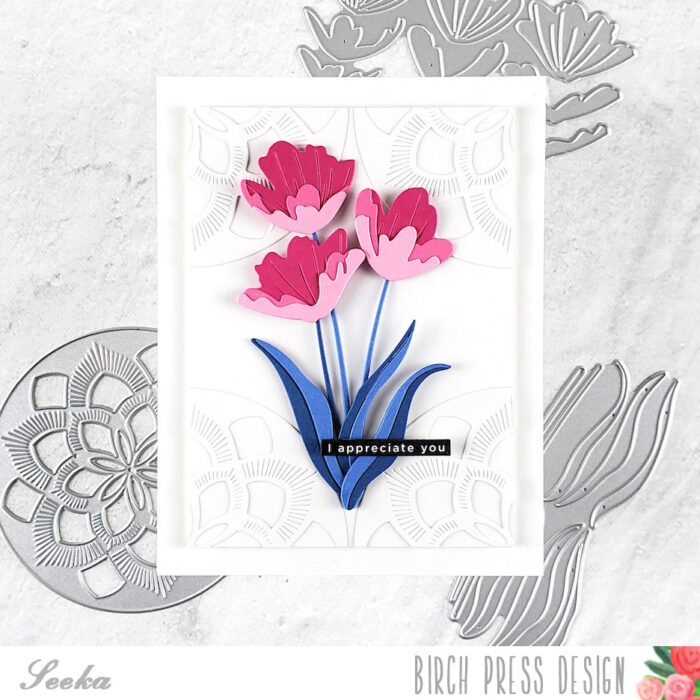
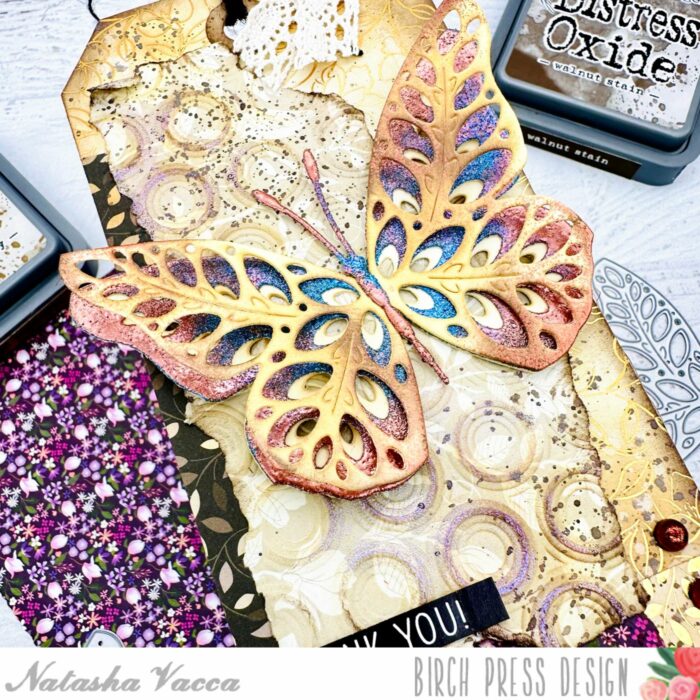
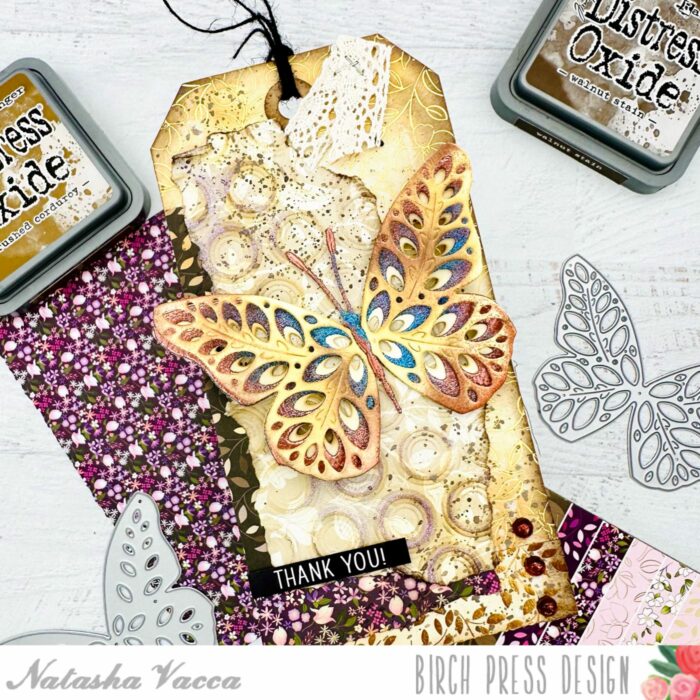
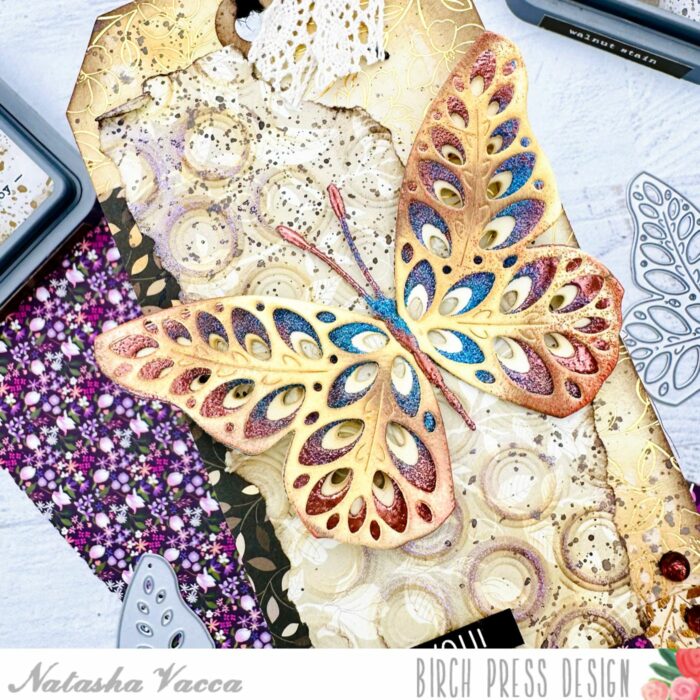
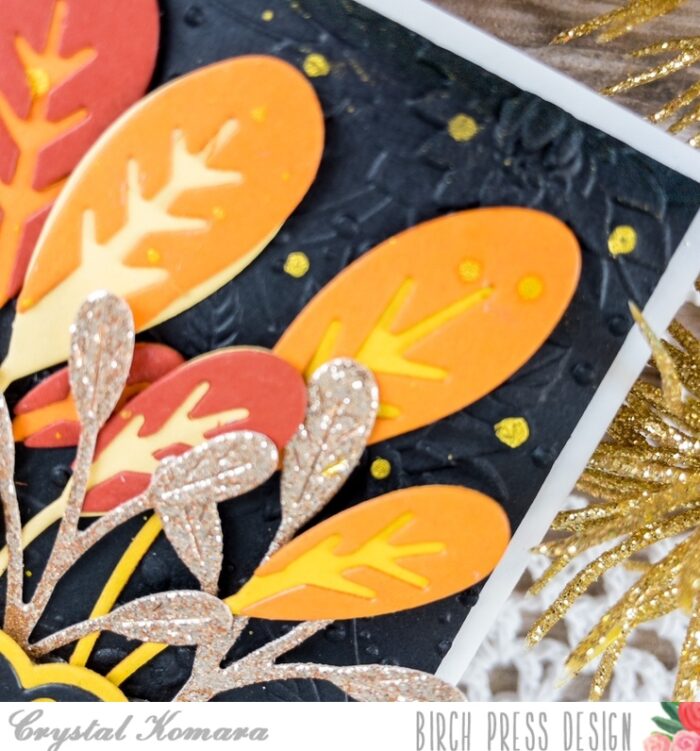
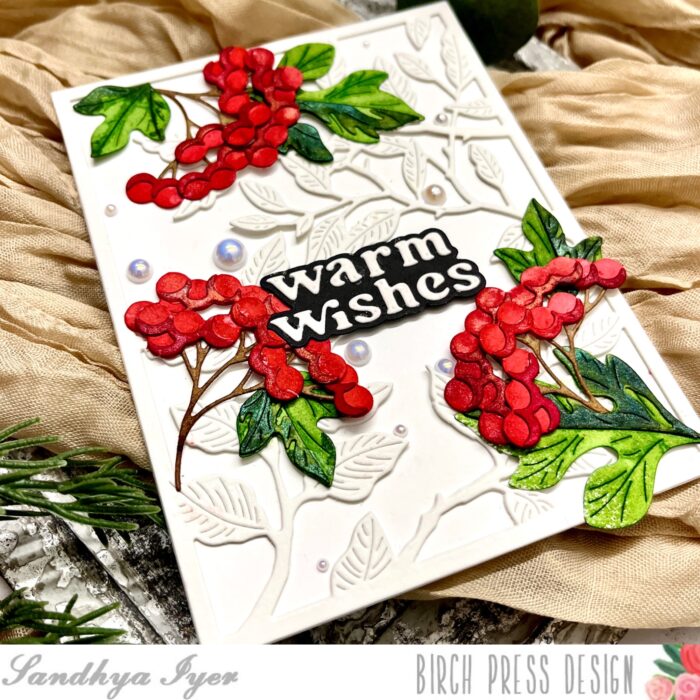
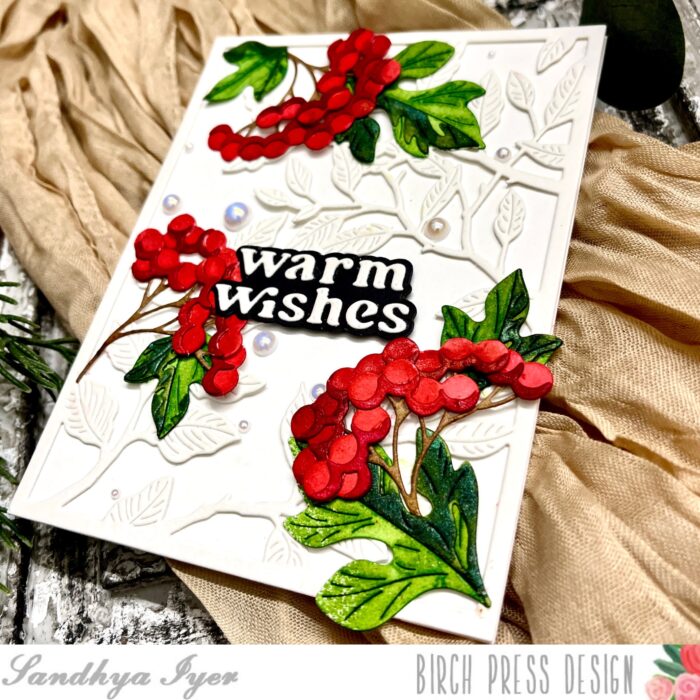
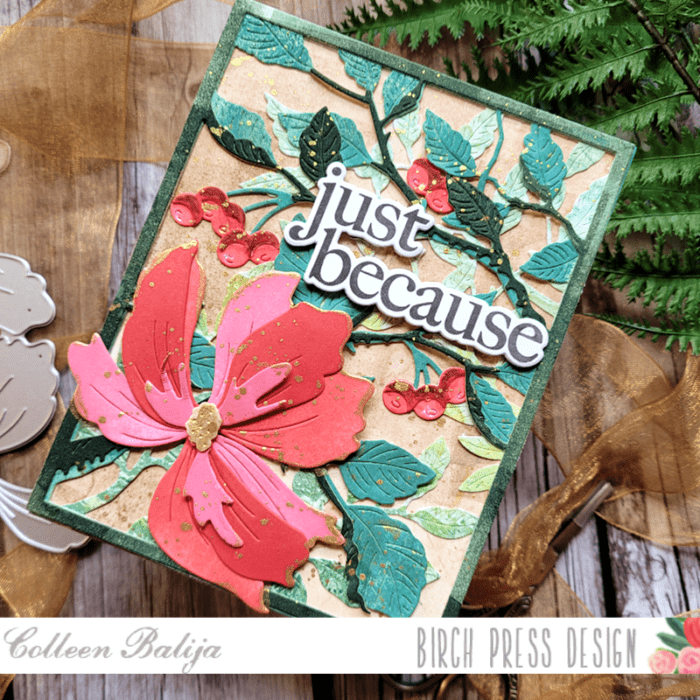
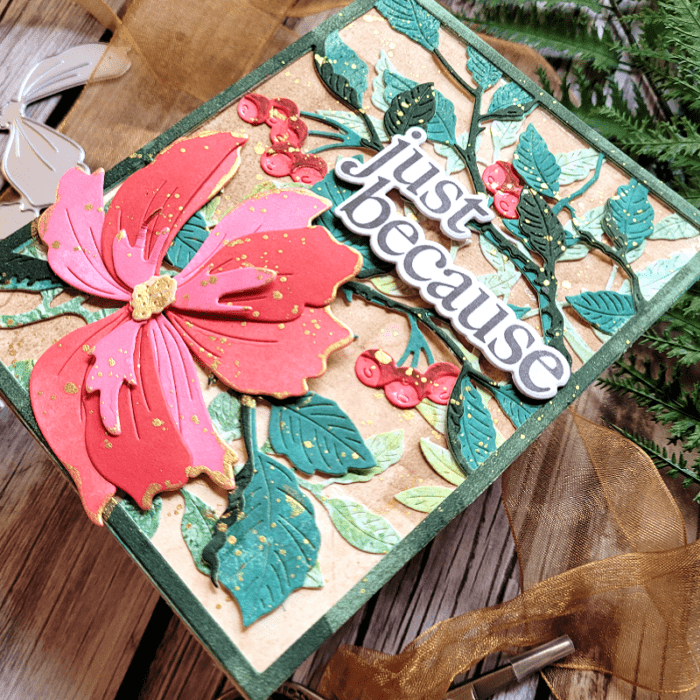
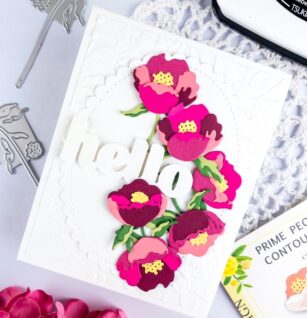
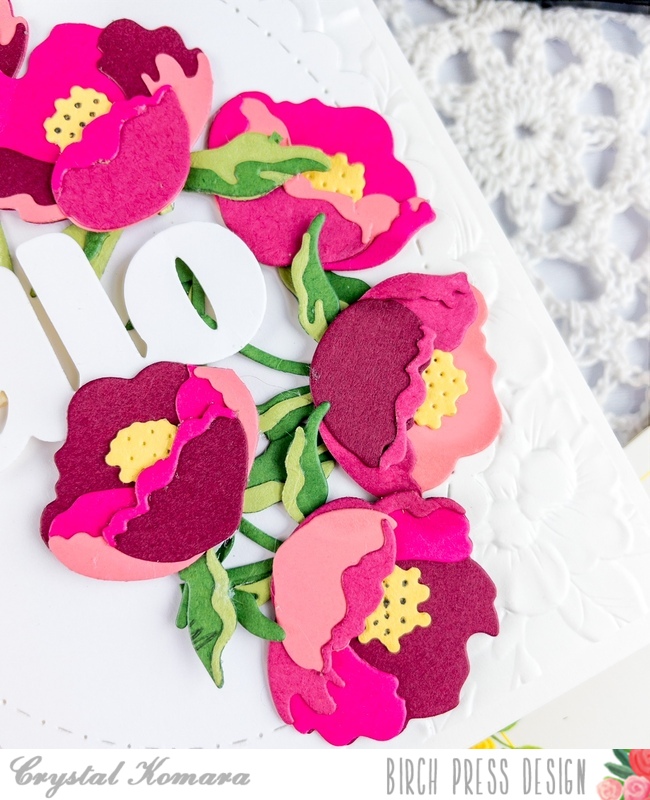
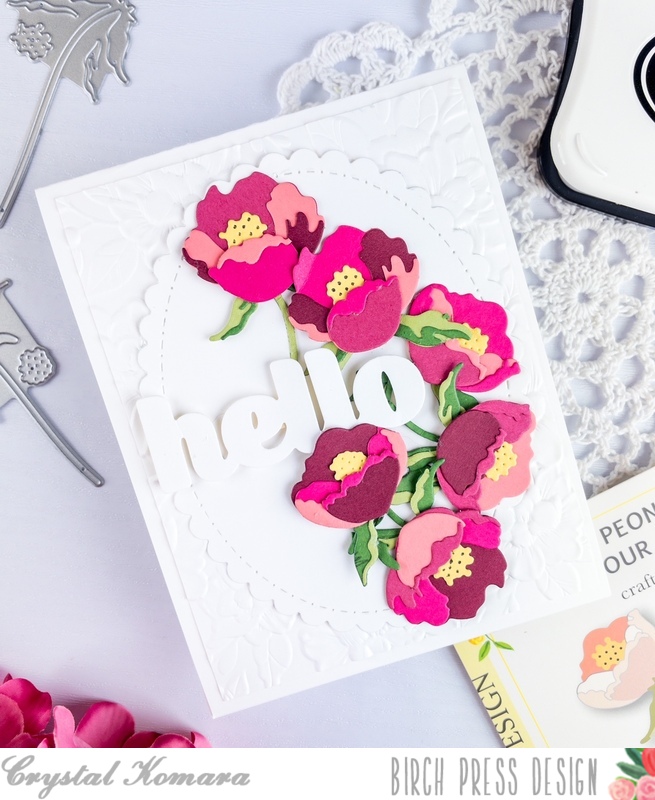
    Hi there! Today I’ve got a card for you that reminds me of Christmas -only in July! This wasn’t intended to be a Christmas card, but after seeing the finished product, I will definitely be creating similar cards for the holidays using these new products! I’ll be using the new Large Cosmos Contour Layers die and Forest Canopy Layering dies. As usual, I will share the product links at the end of my post!

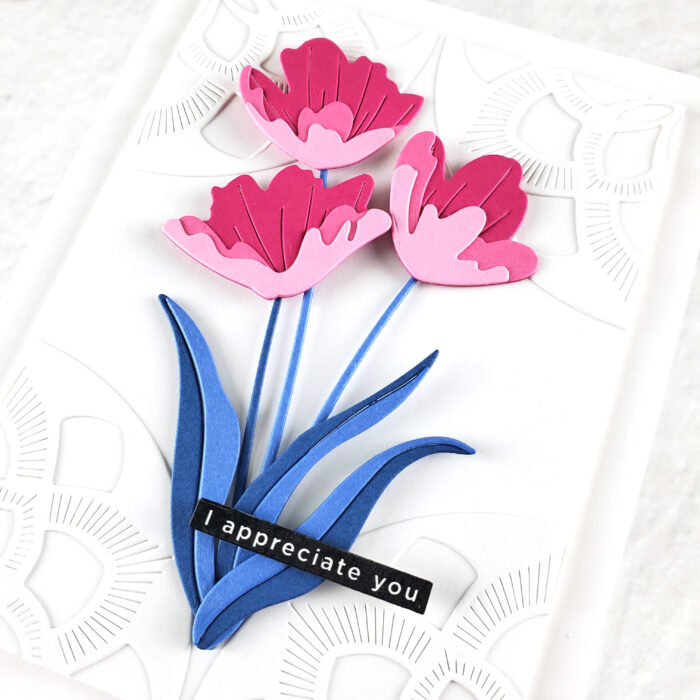
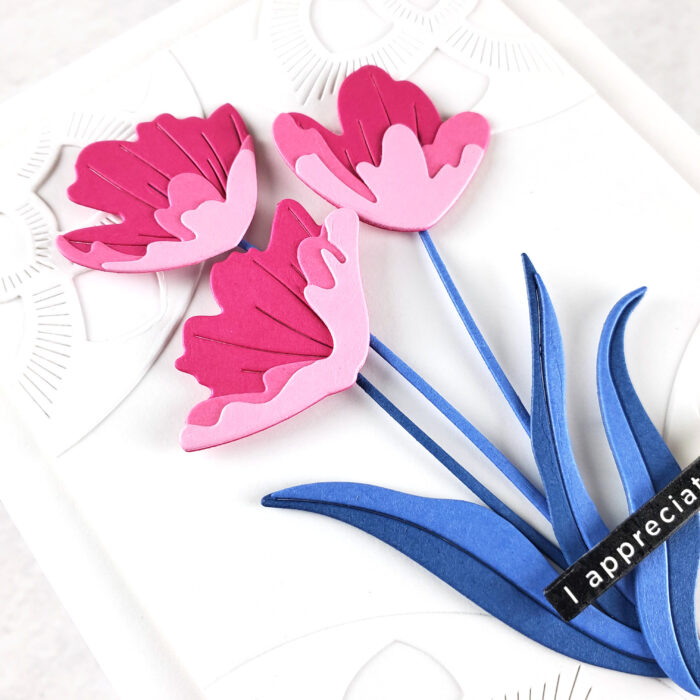
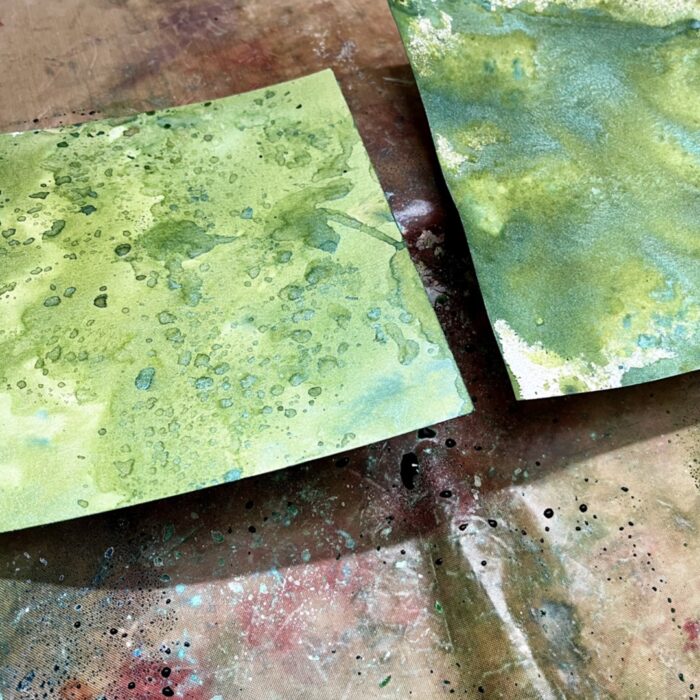
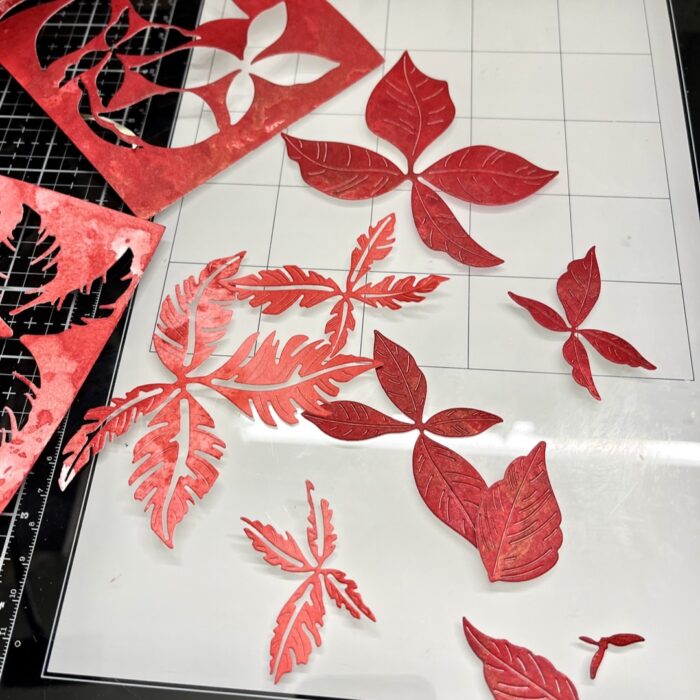
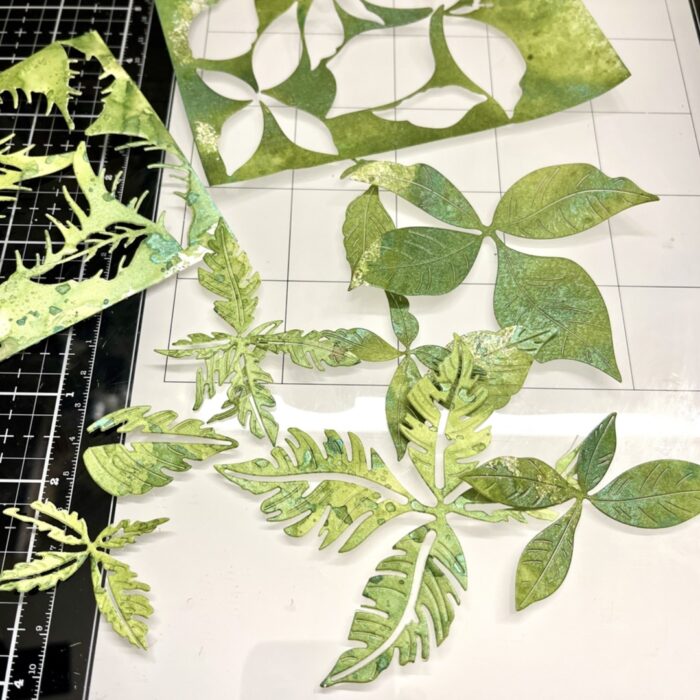
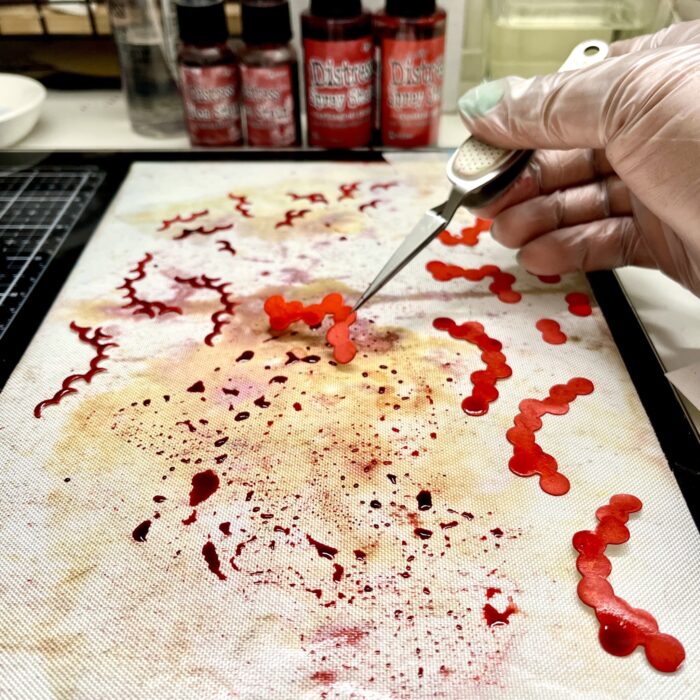
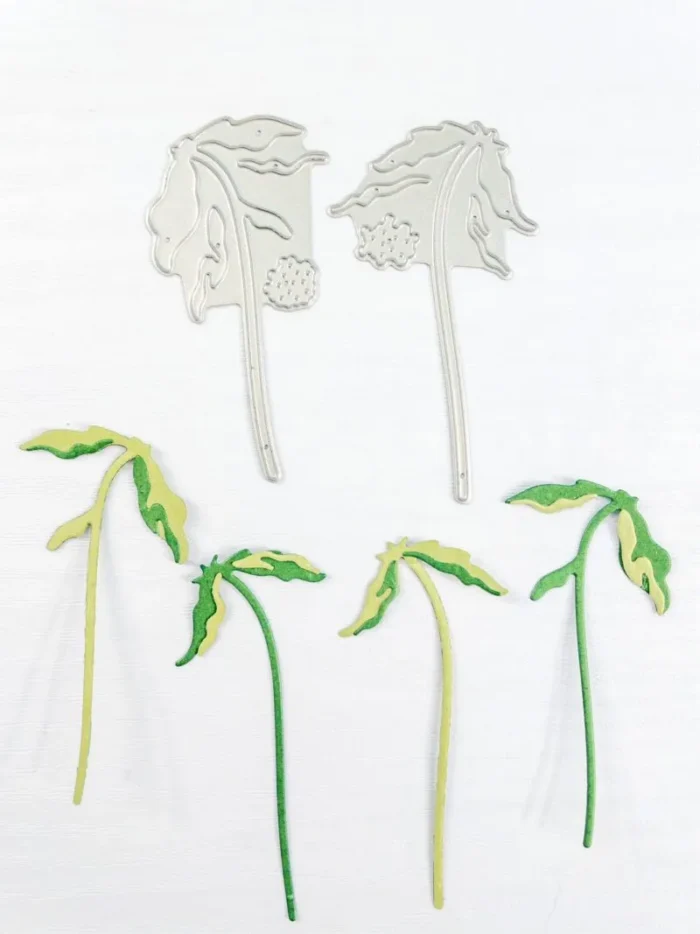
    I chose to use shades of brown, green, and coral for this card (very similar to the card I shared in my post a couple weeks ago). Step one was to create the background. The Forest Canopy is a layering die set, which Birch Press Designs is known for creating in great detail! I die cut each of the layers using heavy white cardstock. Then I applied shades of green color, going from light to dark, by ink schmooshing to create a variegated, natural look to the leaves. This set comes with berries as well, and I inked those up in shades of coral.

    TIP: To ink schmoosh, apply the ink onto a glass media matt, spray with a bit of water, and then place the card panel directly onto the ink and “schmoosh” around over the ink to apply color to the card panel. Repeat this step until you’ve achieved the desired look that you want. If you notice in the photo below, this technique achieves more depth as opposed to basic ink blending.

    Once the inking was complete, I adhered the layers together and applied them over a card panel that was inked in shades of brown. I am in love with how earthy and beautiful the colors are coming along!

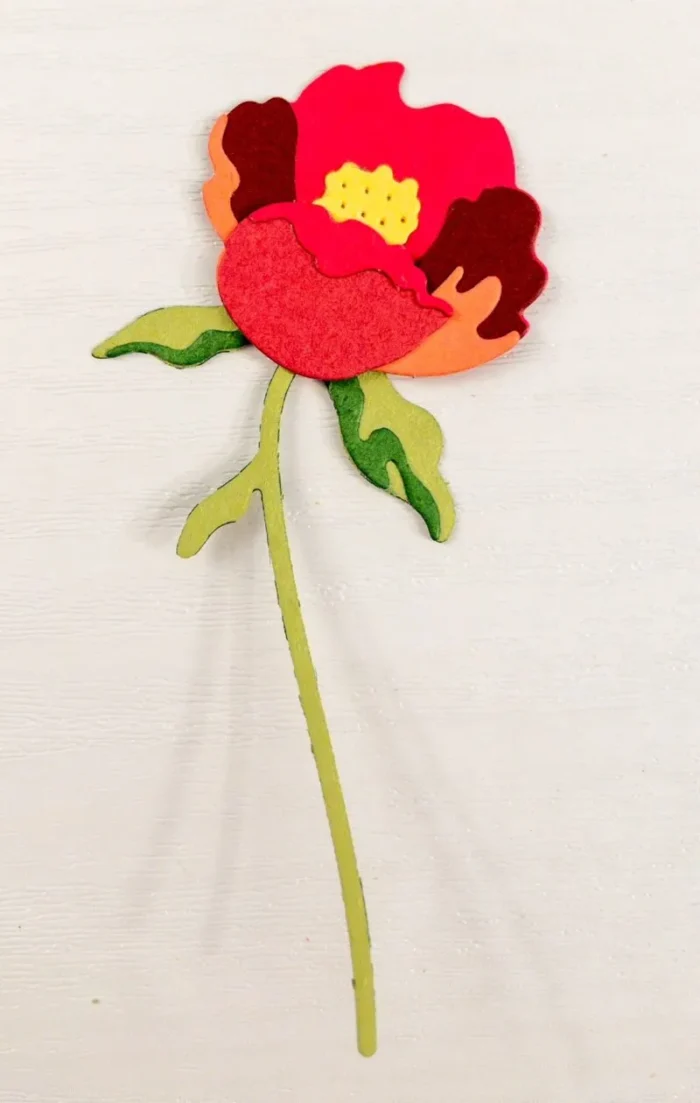
    Next I focused on the Large Cosmos Flower die. Did you know that Birch Press Designs embosses the layers on the flower so that you know exactly where to place each layer? I think that’s genius! They also emboss highlighted areas that add interest and depth to the flowers!

    I die cut each layer of the flower onto white cardstock and then ink blended the layers in shades of coral. Then I went around the edges of the flower and the stamin with gold embossing powder for added shine and interest. I adhered my layeres and placed the Cosmos Flower onto the lower left corner over the Forest Canopy leaves, and then added gold metallic splatters over the entire panel. I finished with a sentiment from the Memory Box Gracious Florals stamp and die set!

    Next time I may change up the color scheme and create a few holiday cards using these new dies! I’ll be sure to share them with you! Thanks for stopping by today!


    Supplies


  • Prime Peony Hello | by Crystal Komara

    Prime Peony Hello | by Crystal Komara

    Hello readers! Now that spring is officially here (oh but wait, is it??) Oh well, I declare spring IS here! Let’s celebrate with all things floral. This is Design Team member Crystal Komara here with you today sharing this hello card made using the Prime Peony Duo Contour Layers.

    Card details:

    The base of this A2 sized card is made from 80 lb. Neenah Solar White Smooth cardstock. I cut a 5 1/4″ x 4″ piece of the same Neenah White cardstock and ran it through my Big Shot using the Blooming 3D embossing folder from Memory Box Co. (a sister company of Birch Press Design). I adhered this embossed background directly to the card base. Next, I die cut a large oval from white cardstock.

    To create all the peonies, I die cut the various layers of the Prime Peony from different colored pink cardstocks and then using the image provided, I was able to assemble them (with only limited curse words!) Trust me, I’m not proud of my less-than patience.

    After adhering all the peony pieces together I adhered them to the card using 3M foam adhesive for added dimension. Lastly, for the sentiment, I used the Big Hello Sugar Script die. I die cut just the top layer (not the shadow layer) from white cardstock. I cut this layer three times and them on top of each other before adding them to the card.

    I hope you have enjoyed this card! Thanks for visiting and have a wonderfully creative day!

    Supplies

  • Shaker Star Flowers | by Crystal Komara

    Shaker Star Flowers | by Crystal Komara

    Hello readers and happy Wednesday! This is Design Team member Crystal Komara here today sharing one of my favorite (and seemingly easiest) interactive cards to make – a shaker card! I made this card very monochromatic in purple and white, but if purple really isn’t your color, there are endless possibilities and color combinations you could use instead with these beautiful Star Flowers Contour dies.

    Card details:

    The base of this A2 sized card is made from 80 lb. Neenah Solar White Smooth cardstock. For the background, I cut a 5 1/4″ x 4″ piece of the same Neenah White cardstock and ran it through my Big Shot using the Pinpoint Radial Plate.

    Using the Star Flowers Contour Dies, I cut the flowers from two different colored purple cardstock and one purple glitter cardstock (for the center of the flowers). I adhered the layers of the flowers together with a fine-tip liquid glue.

    To create the shaker component, I die cut Layer A of the Roundabout Layer Set from white cardstock. I then fussy cut a solid white background of this same shape to create a white frame. I adhered a piece of clear acetate to the back of this frame. I added about 1 tablespoon of sequins to the card and then layered the shaker frame on top.

    I stamped the sentiment “to my friend” in purple ink on white cardstock and used a circle punch to punch it out. This sentiment is from the Kind Hearts clear stamp set.

    I love a card that can be made so easy to change simply by alternating the colors or the sentiments. Thanks for visiting and have a wonderfully creative day!

    Supplies

  • Golden Sylvan Berries | By Seeka

    Golden Sylvan Berries | By Seeka

    Hello and welcome! Seeka here again with you today, this time sharing a card featuring the Sylvan Berries And Leaves Contour Layers die set.

    I started off by cutting the berries and leaves layers from green, yellow and orange cardstocks. I glued the layers together and then set them aside.

    Next, I die cut the Arista Layer B plate three times from white cardstock, then I glued the layers together and then glued the resulting piece to a panel cut with the Pinpoint Contour Plate.

    I arranged and glued the leaves and berries onto the background, trimming the stems where needed. Then I added a sentiment from my stash before gluing the card front to a top-folding card base.

    Thank you very much for visiting!


    Supplies