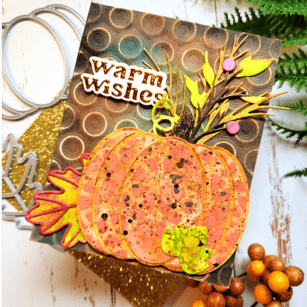
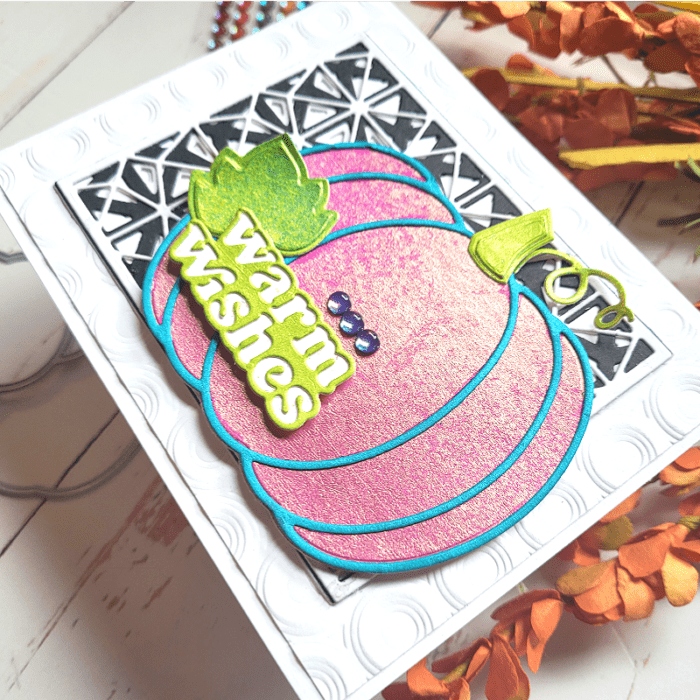
Tag: Ink Blending

  • Autumn Foliage Delight | by Colleen Balija

    Autumn Foliage Delight | by Colleen Balija

    Hi friends!

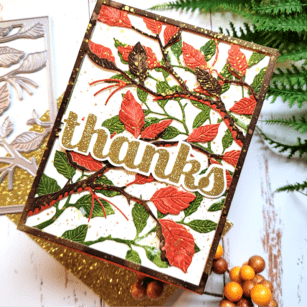
    I’m back this month with another fall card, because well….I just can’t get enough of fall! Next month will be holiday cards, but this month I just want to embrace the beauty that is fall! I live in the Midwest of the United States, and we get some breathtaking colors and scents of fall! So, here is my fall card using Forest Canopy Layering dies and Thanks Sugar Script and Memory Box Cream Woodgrain paper! I will list the links to products used on my card at the end of this post!

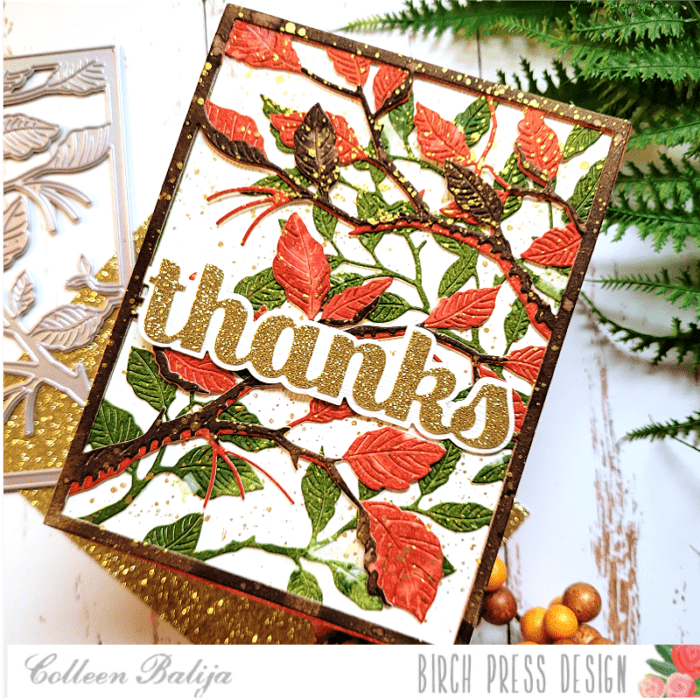
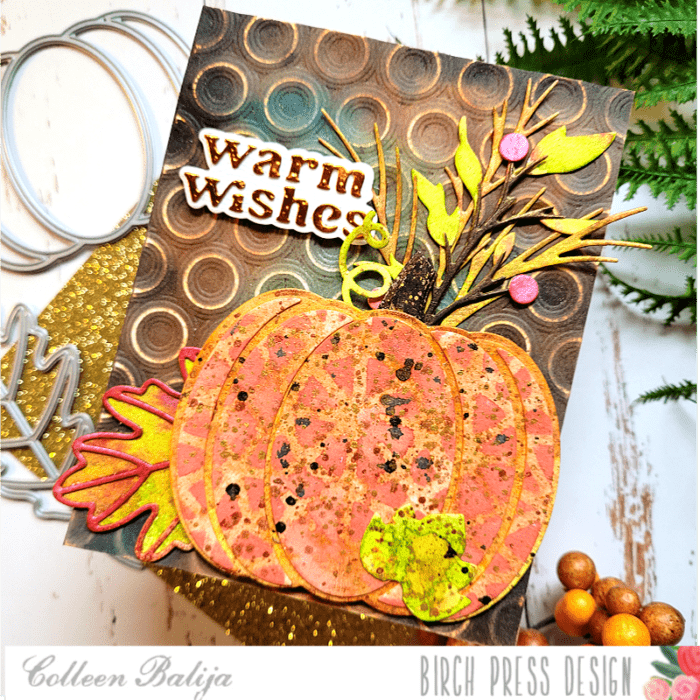
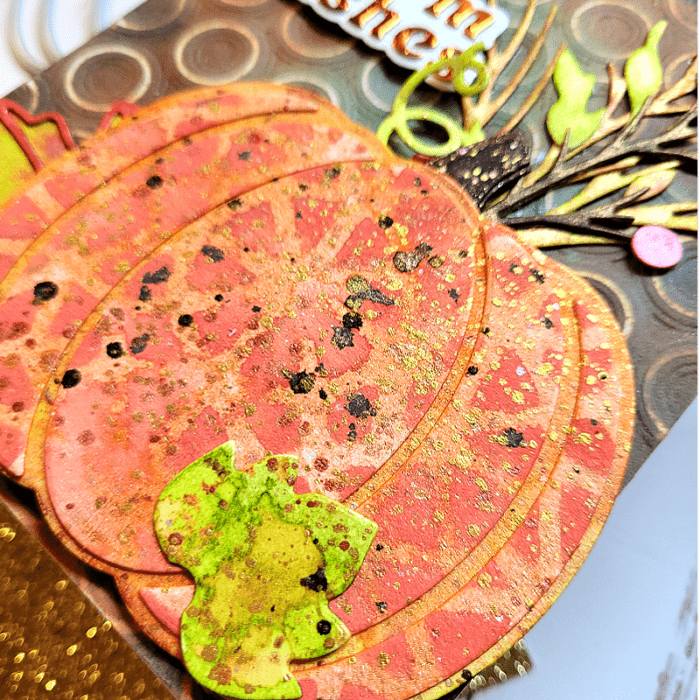
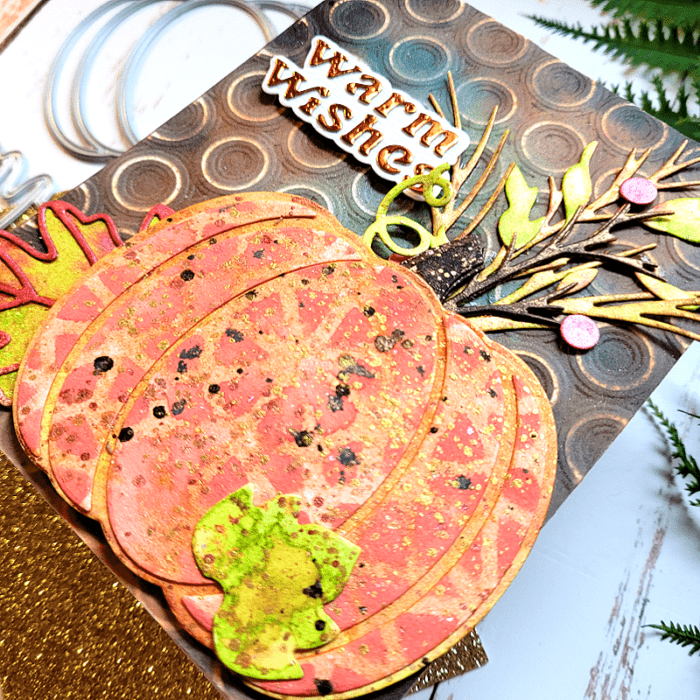
    This card may look detailed, but it was quite easy! I started by inking up 3 watercolor card panels in my favorite fall colors using reactive inks, and then die cut the 3 layers from Forest Canopy Layering die over each of the colors. I LOVE this die set because it is just so detailed with embossed images over each of the leaves! I adhered the layered leaves together and placed them over Memory Box’s Cream Woodgrain cardstock. Then I sprayed a bit of water over the leaves to get the ink to react. I love the result! You get this really cool, distressed look that adds another level of detail to your card! You can find reactive inks just about anywhere. My favorites are Catherine Pooler and Hero Arts! I added gold splatter over the entire panel. Look closely in the photo below to see all the detail in the leaves and how the ink reacts to water!

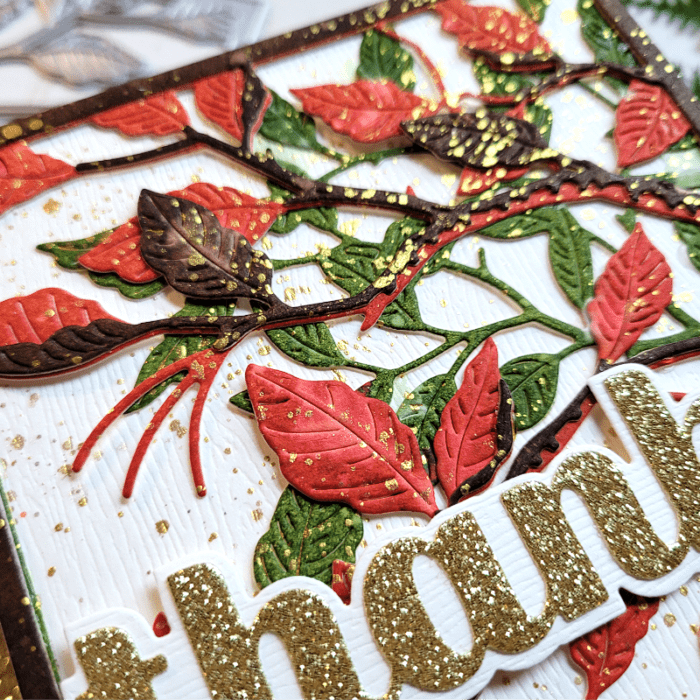
    I originally planned to add a pumpkin over the leaves, but after seeing how beautiful the leaves turned out, I decided not to cover it up! So, now I just needed a bold sentiment that would stand out from all that glorious detail, and Thanks Sugar die was up for the challenge! Below is a good photo of that sentiment! It’s large and bold and the PERFECT touch if all you want to add over your design is a sentiment!

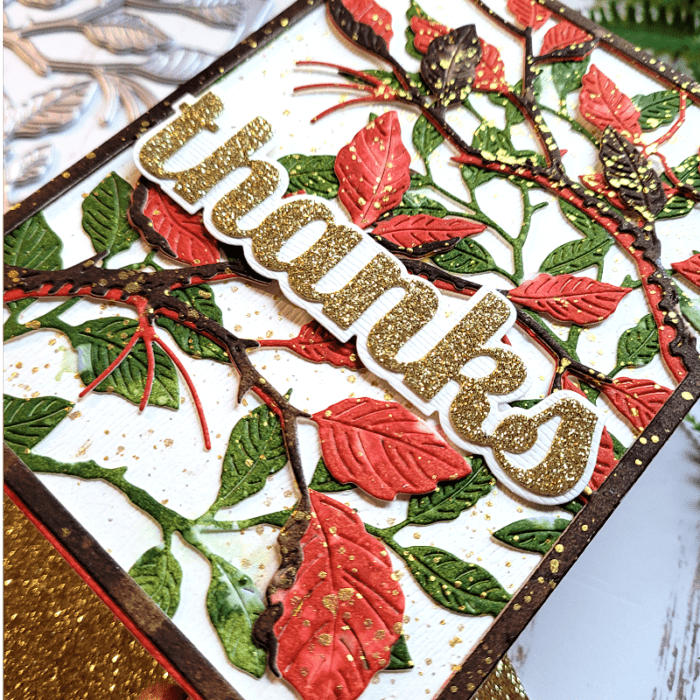
    For the Thanks sentiment, I die cut the bottom layer in Cream Woodgrain paper and the top layer in Festive Glitter in gold, adhered them together, and placed it over the background with foam tape. The entire panel rests on a white 5.5×4.25 card base. I love how the gold from the sentiment makes the gold splatter pop a bit more!

    Birch Press dies are so detailed that you really don’t need to add much to have a beautifully detailed card! Just a little ink, splatter, and a large bold sentiment and you’re done! Keep in mind that the Forest Canopy Layering dies can also be used for your holiday colors – just change up the color scheme! Thanks for stopping by!

    Supplies


  • Warm Autumn Wishes with Adornment Pumpkin Die | by Colleen Balija

    Warm Autumn Wishes with Adornment Pumpkin Die | by Colleen Balija

    Hi friends!

    With fall upon us in full swing, I wanted to make a festive autumn card using Adornment Pumpkin die set! I’ll also be using Warm Wishes layering die, Hillside Branch & Contour Layers, Adornment Oak Leaf die, Splendor Bevel Plate (Layer A only), Memory Box Cream Woodgrain paper, Memory Box Vintage Pastel Mirror paper, and Memory Box Ringadings embossing folder! All of the product links will be listed at the end of my post!

    I’ve been seeing pumpkin cards where the pumpkins have been stamped with a design, so I decided to do that with the Adornment Pumpkin! I die cut the layers on watercolor paper and sprayed them with Hero Arts Orange and Bright Yellow shimmer sprays. These sprays add a really cool shimmer that I wanted to get with my pumpkin! Next, I grabbed Splendor Bevel Plate Layer A and used it as a stencil, applying color through the die onto the top layer of the pumpkin using a darker orange ink. I applied green spray over the leaf and brown over the stem. Then I adhered the layers together and splattered gold and dark brown inks over the top. Then I set my festively decorated pumpkin aside for later! Below is a close up of the details on my pumpkin, I love it!!!!!

    Next step was to work on the foliage that I wanted to place around the pumpkin. I die cut Hillside Branch & Contour Layers and Adornment Leaf die on watercolor paper and then sprayed those the same way I sprayed my pumpkin. Then I adhered the layers together.

    Now for the background! I grabbed a colored card panel that I had in my stash (I occasionally create several background panels to be used when needed – it’s really handy!). Then I embossed the panel with Ringadings embossing folder. This folder is AWESOME! Next, I used a sanding tool to remove a layer of ink from the raised areas of the embossed image. You can see how the circles are almost white! This is an easy technique that adds another element of detail and is amazing for mixed media! I adhered the panel to a white 5.5×4.25 card base. Also, I die cut the layers of Warm Wishes using Memory Box Cream Woodgrain paper and a bronze shade from the Vintage Pastel Mirror paper. I adhered the pumpkin and tucked the foliage in behind it, and then finished with the sentiment.

    TIP: To place the letters of your sentiment in the exact position, I place the outer portion (negative) of the die over the base layer (which was the Woodgrain Cream color) but don’t adhere it! Then I add glue to the letters and tuck them inside the positive part of the die. I gently pull the negative portion off using a pick to ensure the letters stay in place and don’t lift with the outer die! Easy peasy!

    I love how the background is quite dark compared to the colorful pumpkin and foliage. That really helps the focal point to pop! Thanks for stopping by today!

    Supplies


  • Colorful Adornment Pumpkin | by Colleen Balija

    Colorful Adornment Pumpkin | by Colleen Balija

    Hi friends! As we near the end of summer and welcome fall into (most of) our lives, I wanted to share a card using the NEW Adornment Pumpkin. But…I am adding a playful twist by experimenting with color! So today I will share my version of the ideal pumpkin using Adornment Pumpkin die set, Splendor Bevel Plates, Memory Box Ringadings embossing folder, and Warm Wishes sentiment die!

    The first step was to decide on the color of my pumpkin. Using my Hero Arts shimmer sprays as inspiration, I created a fuchsia and aqua pumpkin with shimmery green foliage! To achieve that fun pop of color, I die cut the pumpkin layers onto white watercolor paper, placed them in a box that I use solely for my sprays (keeps the mess down!), and sprayed the pumpkin layers with the fuchsia and aqua sprays. When they dried, I adhered the layers together. Also, to give the pumpkin more depth and support, I die cut the base layer 2 more times and adhered them all together. Here is a closer look at the shimmer and shine of that pumpkin!!!

    Isn’t she a beauty? Next, I created the sentiment using the new Warm Wishes layered die. The base layer of the sentiment is white, and the 2nd layer is done with the green spray. I used only the negative part of “Warm Wishes”. But you could also pop the in the positive portion as well and use a different color!

    Now I was ready to work on a complimentary background!

    The background needed to be neutral since the pumpkin was so bright that you need sunglasses to look at it, ha ha! I dry embossed a piece of white cardstock with Memory Box Ringadings embossing folder, trimmed the panel to 5.25×4, and placed it over a 5.5×4.25 white card base. Then I created a geometric frame over the embossed image using Splendor Bevel Plates on black and white cardstock. I love the geometric look and the texture that both the embossing folder and dies added!!!

    The last step was to place the pumpkin and sentiment over the background that I had just created. I offset the pumpkin to the right of the Splendor Bevel Plates just for interest, and added the green stem with foam tape so it was in alignment with the pumpkin. I placed the sentiment and the leaf together at the bottom left of the pumpkin and finished with Memory Box Treasury Chest Fairy Gemstones over the sentiment.

    Next time I make a card using this pumpkin, I may play with color once again! Who says a pumpkin has to be limited to orange, right? Thanks so much for stopping by today!

    Supplies


  • Pad To Paper Ink Blending for Shadow Dies By Ashlea Cornell

    Pad To Paper Ink Blending for Shadow Dies
    By Ashlea Cornell

    Hello everyone! My name is Ashlea and I am so excited to be on the Birch Press Designs blog for the first time. I have always loved the Birch Press Designs style and quality of product, and I am thrilled to be a part of this team to help inspire and spark ideas! For my first post, I thought I’d focus on a simple but effective technique using shadow dies. Since Birch Press has many word and shadow dies, I wanted to provide ideas of different ways to use them as often as possible! I love the pad to paper technique of rubbing an ink pad onto a piece of card stock in order to transfer a very rich and vibrant color that you just can’t get from the traditional ink blenders. Here’s a video showing a detailed tutorial of how I achieved this look.

    I love this technique as it allows me to stretch my uses for these word and shadow dies. It’s super simple!

    First, you’ll want to pick 3-4 colors of ink pads that won’t turn “muddy” when the colors meet. Basically, you’ll want to choose colors close to each other on the color wheel. I used Catherine Pooler inks for my pad to paper technique here because I love her pads, especially for pad to paper techniques.

    Once I blended all of my colors and cut the shadow die out using the ink blended spaces, I adhered all of the letters to the shadow dies and adhered them to a card front cut with Memory Box Wrapped Stitched Rectangles dies to add a little interest to the border.

    Finally, I adhered all of the word dies to the card front with foam tape to add dimension and heat embossed the sentiment “You’re In My Heart” from the Lingo Love stamp set and adhered that over the second word die down.

    I hope that you’ve enjoyed learning a bit about how I created this card using the ink pad to paper technique. I hope you’ll try it out on your cards and enjoy it as much as I do! Thanks so much for stopping by and I’ll see you again soon!


    Supplies