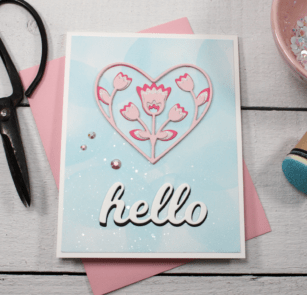
Hi there, it’s Tracey back today with a little more inspiration using the Folk Art Heart Layer dies set. When I was planning my card I was thinking spring, but as I finished up my card a big snow storm was blowing in.

To create my custom background I used the Circle Burst stencil to ink blend over a panel of Bristol Smooth cardstock using only one colour of Distress Oxide ink (Tumbled Glass). Using a geometric shaped stencil allow you to customize your results. I randomly moved the stencil over the panel and ink blended until the entire panel was covered. I flicked some watered down Perfect Pearls with a paintbrush to the panel to add a little bit more interest. Some areas ended up darker and some areas more white but the result was a pretty backdrop for the layered tulips.

I cut the Folk Art Heart Layers from dark pink (Layer C), light pink (Layer A) and the light pink from the Delicate Pastel Glitter Pad. I glued the layers together with liquid glue.
The hello is from the Hello Topper die and it was cut once from black and once from white. The two pieces were glued together slightly offset to create a shadow so it would stand out on the card front.

The stenciled panel was trimmed down to 4″ x 5 1/4″ and adhered to a top folding white card base. To finish the card off I attached the layered tulips and the sentiment to the card front.

Thank so much for stopping in today to create with me and I hope you try using your stencils in a different way to create a custom background. Stop by tomorrow for some more inspiration here on the blog.

Supplies


