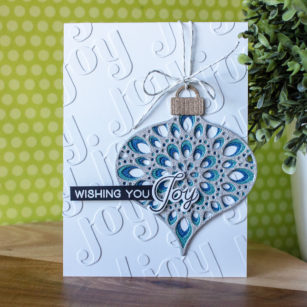
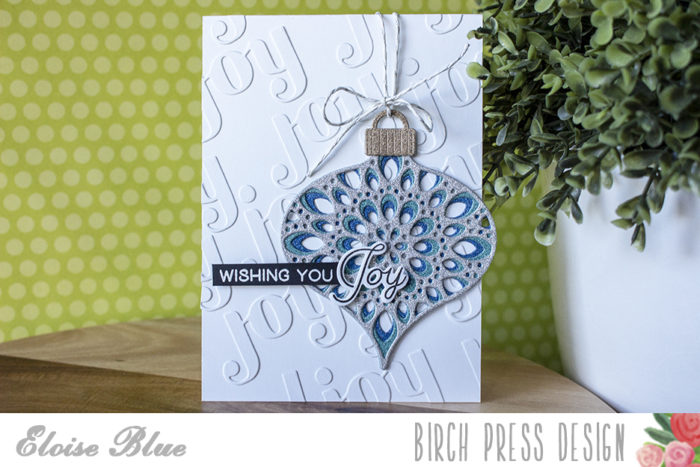
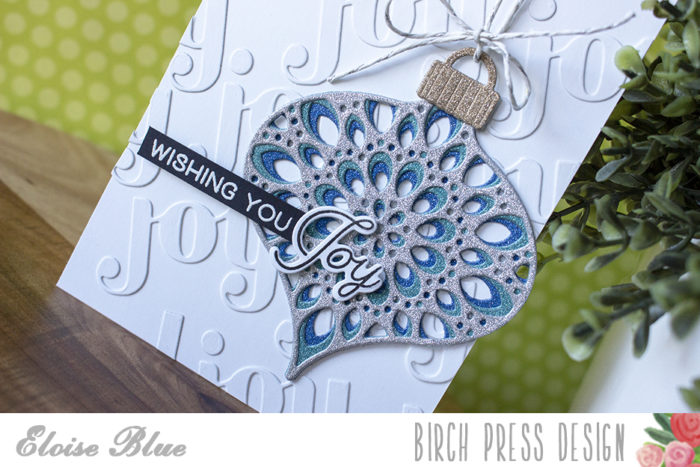
I started off with cutting out my Radiant Ornament Dies out of some glitter cardstock. I used a silver, teal and darker blue colour. While I had my die cutting machine out, I also die cut a ton of ‘Joy‘ words as well.
I cut down a card base and adhered all the Joy words to the background using liquid glue. I also adhered all my ornament layers together as well.
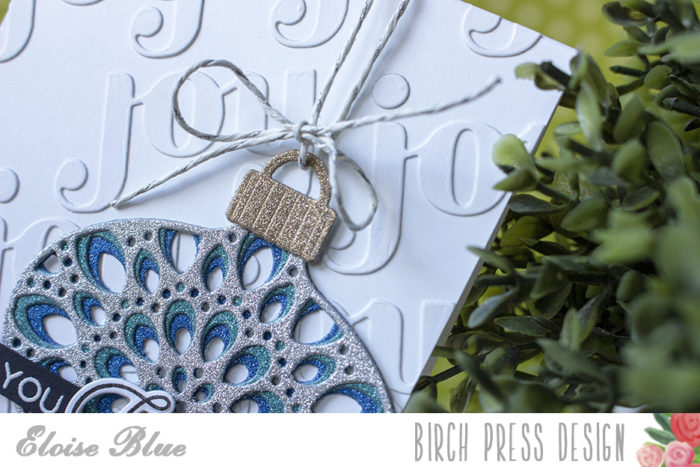
I adhered my ornament to the card base with more liquid glue and tied a bow at the top using some silver twine.
Lastly, I white heat embossed my sentiment from Joy and Peace onto a strip of black cardstock and also die cut the stamped Joy word as well. I adhered them both to my card with foam tape.
Thanks so much for stopping by today, I hope you enjoyed my project. The video is linked down below if you would like to watch.
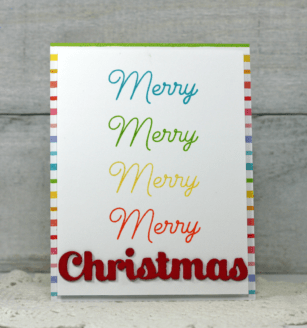
Hi I have a fun video for you today using the Joy and Peace clear stamp set as the main product for my card! It is time to get into high gear with my Christmas cards and this card is a perfect example of a card that you can easily mass produce. Here are the products that I used for my card, you can use any inks that you have as well as any patterned paper you have in your collection. The stamp platform tools that are available today make stamping almost foolproof. For my design I used one sentiment from the set and stamped it in a rainbow of colors to fit on the front of the card. I started with a 5 1/4″ x 4″ piece of white cardstock that I place in the top left of my MISTI stamping platform. I did this so that once I decided where my sentiment stamp was going to go I just needed to keep moving my paper down by an inch and then stamping in the next colour in the exact alignment to the left of the card front. The following video shows you the process I used, enjoy!
The Christmas Sugar Script die was cut three times with red cardstock and then glued together to create a thick sentiment for the bottom of my rainbow! Tthe rainbow patterned paper is the perfect base to make the rainbow of Merry’s pop! One more look at the card. Thanks so much for popping in today and I hope that maybe I have inspired you to get going on those Christmas cards and use this technique for mass producing. Have a great day and we will see you next time!
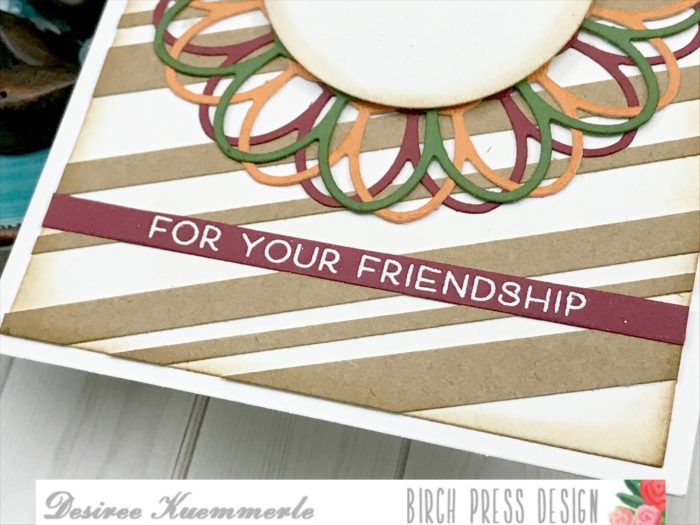
Now let’s see what we can create when we only use one of the layering dies! Today I wanted to have some fun with the Aurora Die Set, but I only wanted to use one of the layers, not all of them.
Since Fall is coming faster than ever, I wanted to chose colors that were warm and earthy (I am not sure if this is word, but it is what I see when I look at this card…LOL). I decided on a maroon, deep green, orange and kraft for my card stocks. I also had a navy blue but later changed my mind and did not have it part of the design.
I started die cutting my card stock with the Layer A of the Aurora Die set, once completed set them aside. I grabbed by paper trimmer and the kraft card stock and started cutting strips in the following sizes – 1/8 in – 1/4 in – 3/8 in. These are going to be used to create our own pattern paper for our card background!
I placed my strips on my design base at an angle using the various sizes we created earlier. To adhere them to my panel my liquid adhesive was perfect to ensure a good bond. Once they were all attached I used my shears to trim around the edge. I used my vintage photo distress ink around the edges to provide some shading.
I placed my die cuts on my design panel using my liquid adhesive and instead of stacking them on top of each other evenly I chose to stagger the layers. Now remember we are using only one die form the set! By staggering each of the colors it forms the shape of a flower! I set this panel aside so it can dry.
I grabbed a scrap piece of the maroon and wanted to use this for my sentiments. The sentiments I chose come from the ‘Just Because’ Stamp and Die set. After treating my card stock with my anti-static tool, I stamped my sentiments using my versamark ink and then heat emboss with fine detail white embossing powder. Trimmed my one sentiment and used the die associated for the other. I set my sentiments in place and set my panel onto my standard A2 size top folding card base.
If you want to see more details just click on the video below and see our project come together step by step!
I hope you enjoyed today’s project… Make sure you stay tuned for more wonderful projects coming soon! Have a great day and always remember… Be Creative!
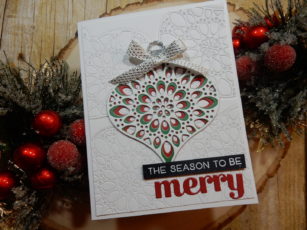
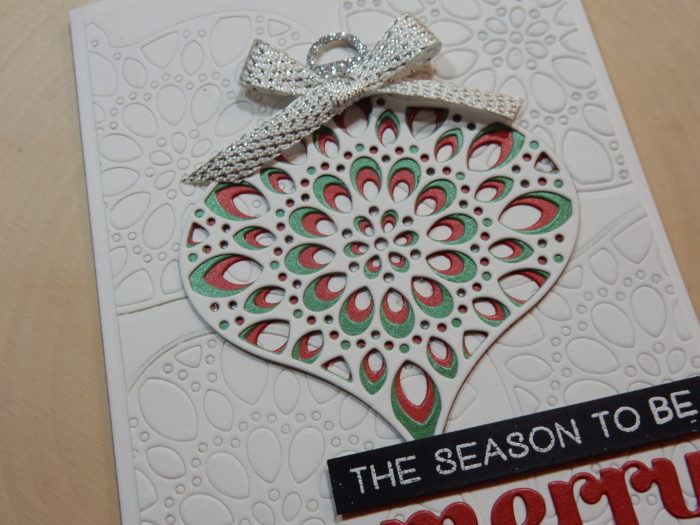
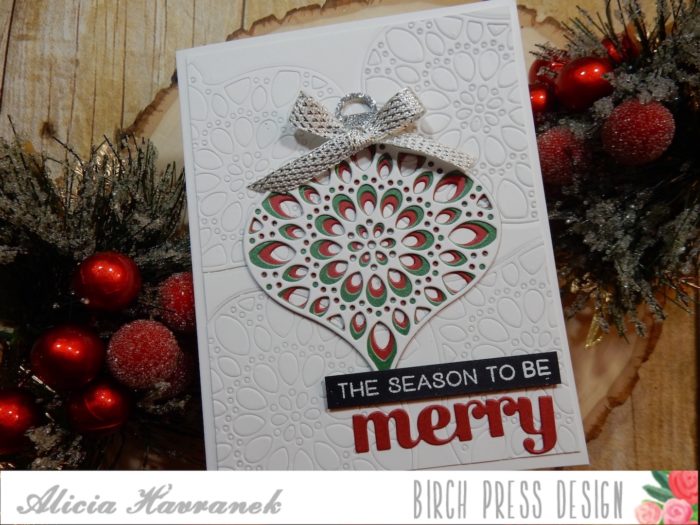
Hello! For today’s card I used the gorgeous Radiant Ornament Layering Dies to create a classic Christmas card. For the sentiment I brought in the Merry Sugar Script Die and the Joy and Peace stamp set.
For my card panel I first took Layer A and embossed it on some white card stock. Refer to your die cutting machine directions to find out how to emboss with a die. I then took all three layers and cut them out with red, green, and white card stock. I used some glitter card stock from my stash to die cut the ornament topper.
For the sentiment I love to add a touch of black to have the sentiment pop. I heat embossed the sentiment in white embossing powder and used red card stock to die cut out “merry.”
I just love these layering dies. They add so much to a card with very little work!
Hi Crafters,
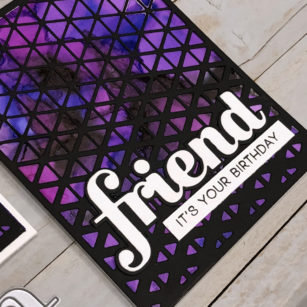
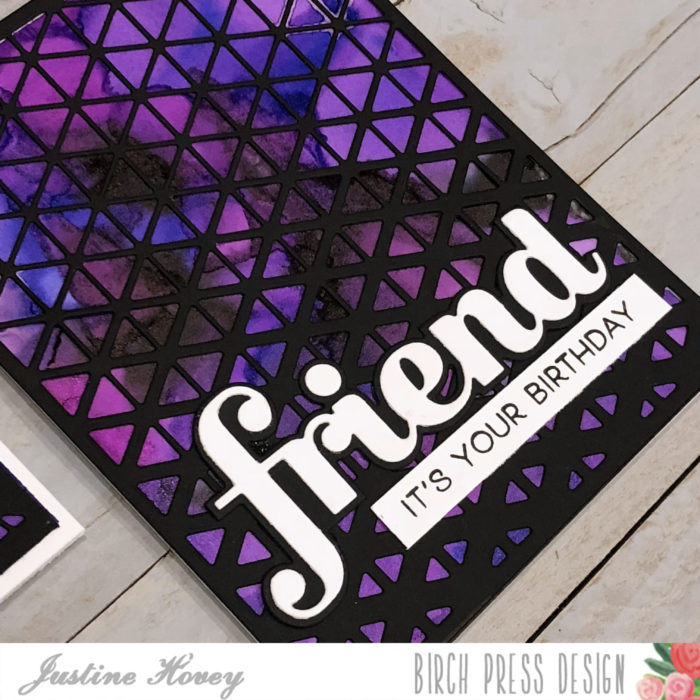
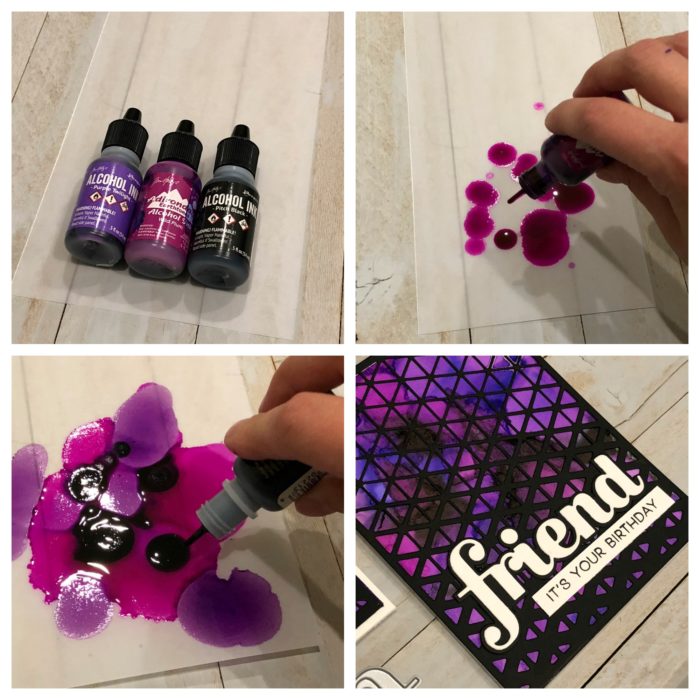
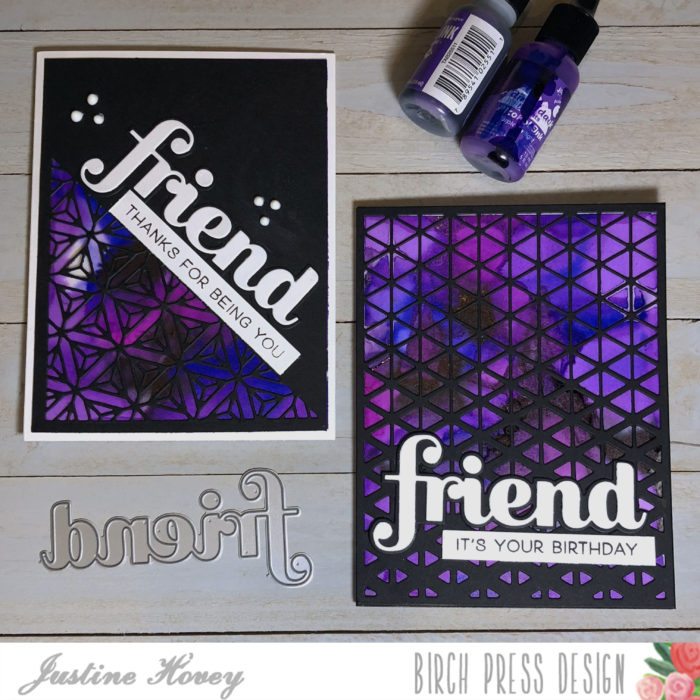
It’s Justine back again here on the Birch Press Blog! Today I am creating a stained glass effect on my card using Alcohol Inks. Using Vellum paper helped me achieve that slightly muted but vibrant colour. I used a fairly thick vellum for this piece. Vellum is a non-porous surface that is super elegant when used alone, but it is perfect for any alcohol techniques as well.
Step 1: Choose your ink colours. I used Purple Twilight, Wild Plum and Black
Step 2: Shake your inks onto the vellum and cover the surface without pooling the colour much.
Step 3: Blow the inks around using a straw or an empty pen tube works too!
Step 4: Let dry – these dry super quick!
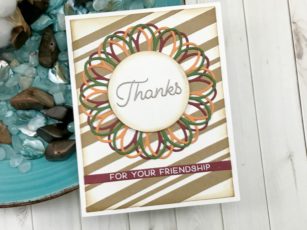
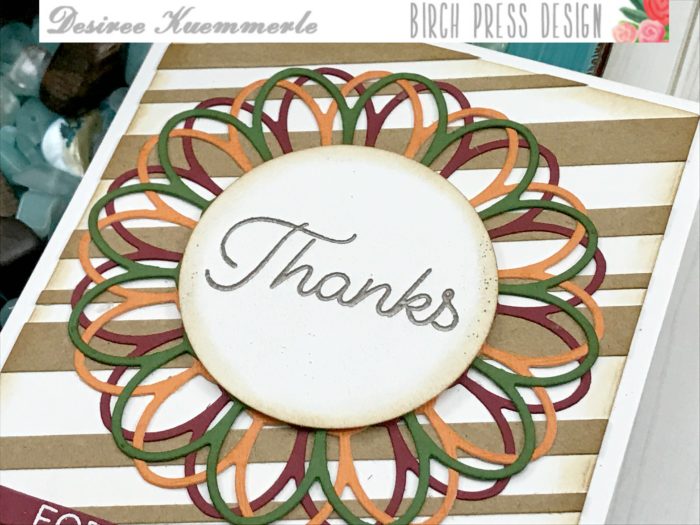
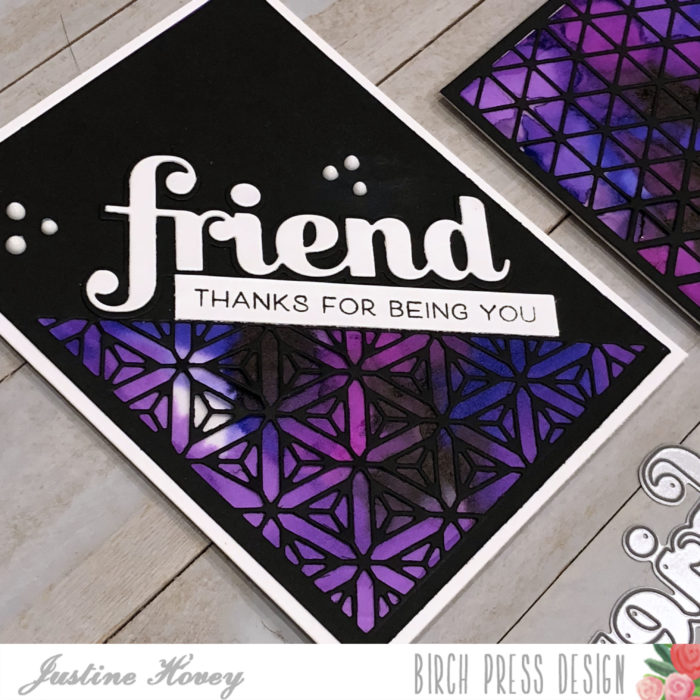
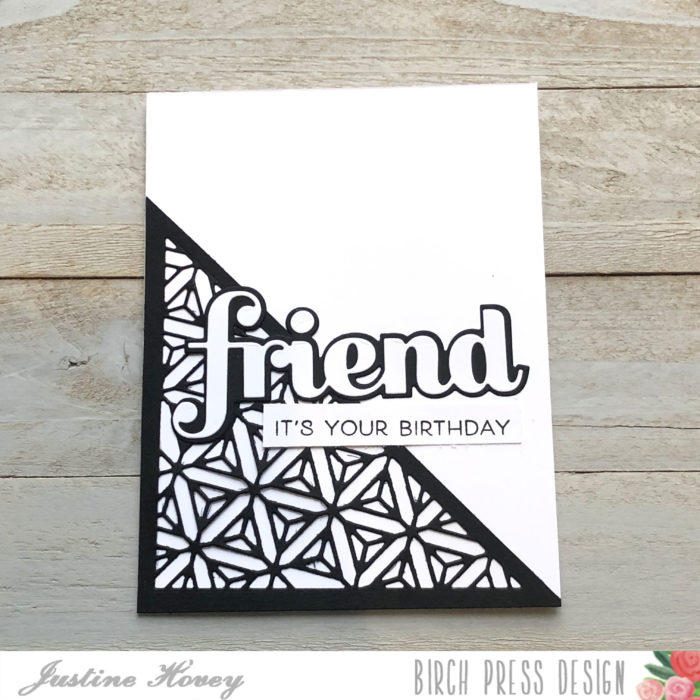
Pairing various die cuts over colourful backgrounds is one of my favourite things to do while cardmaking. I used the Triangle Fade Frame and the Prism Triangle Collage to die cut the panels out of black cardstock. I layered them overtop and then embellished with the sentiment Friend Sugar Script and the Best Friend Stamp set.
Both cards have a very deep and regal look. I added some white accents to each of the cards to ensure they wouldn’t get too dark. I hope you enjoyed today’s inspiration!
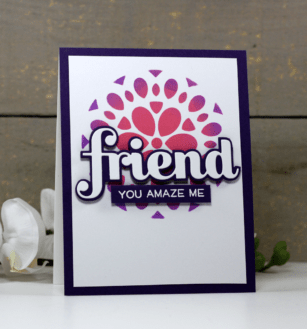
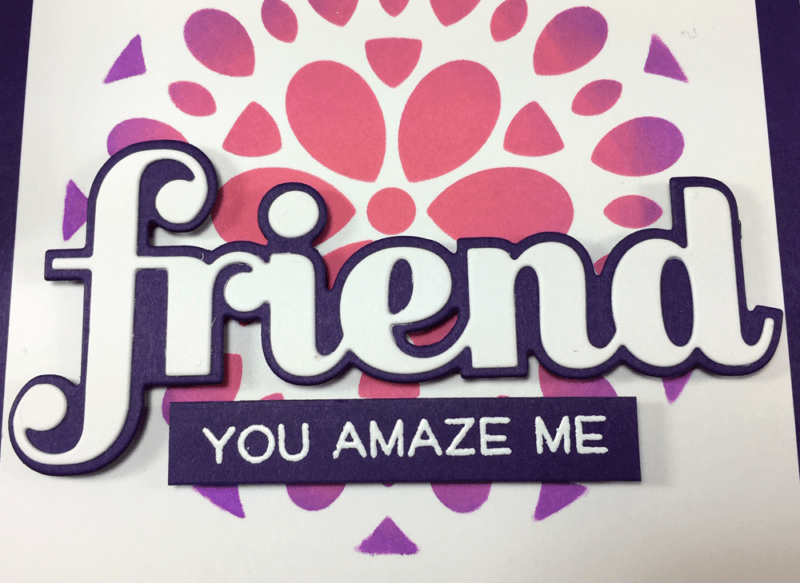
Welcome back for another inspiration post at Birch Press Design. Today I have a fun card to share with you using the Viva Stencil set. The set comes as three separate stencils that work together, but for today’s card I only used Layer A so that I could do some ink blending right on the stencil. I gathered my supplies together and made a short video to show you how I used the Mandala Card Frame along with the stencil to ensure that my ink blending only went through the stencil and not all over my white card base. Armed with my Frog Tape I taped the Mandala Card Frame, that was cut with very thin white cardstock, over my 5 1/4″ x 4″ panel of Bristol Smooth cardstock. Once I secured the top and both sides down I lay the stencil over the circle and then taped the stencil down on the top bottom and both sides so that it would not move when I was blending ink over it. It might seem a bit much but there is nothing worse than a stencil shifting when blending ink on it. Lets have a look at how I created this card…
The stenciling is so vibrant. I used Abandoned Coral, Picked Raspberry and Wilted Violet Distress Oxide Inks. My ink pads were very juicy so I barely had to pick up any ink because my blenders were still a bit wet from the first run. Yes I did have to start over since I didn’t have my stencil secured enough with the Frog Tape the first time. I used a sentiment from the Best Friends clear stamp set which I embossed in white on the same purple cardstock, that I used for the shadow on the Big Friend Sugar Script die and for mat behind the main panel. The purple really picks up the purple in the design. A closer look at the blended colours from the stencil. Thanks for stopping in today to create a card with me. All of the stencil sets at Birch Press Design open up so many options for colours and design. Have a wonderful day and we’ll see you next time.
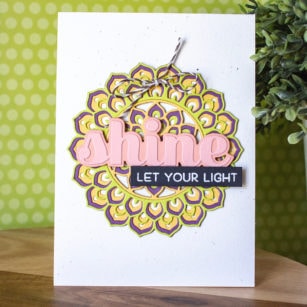
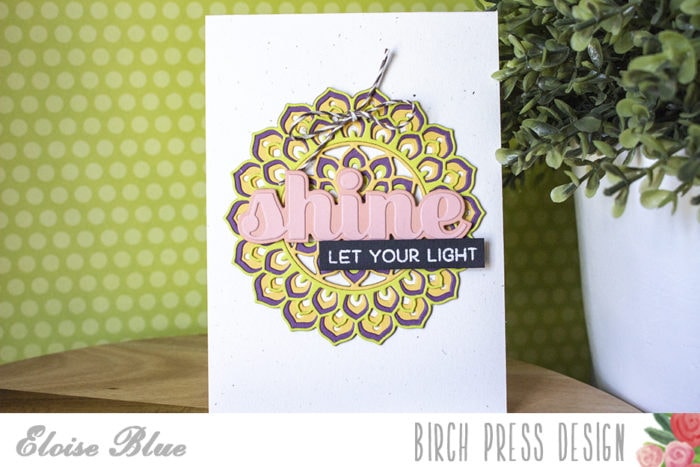
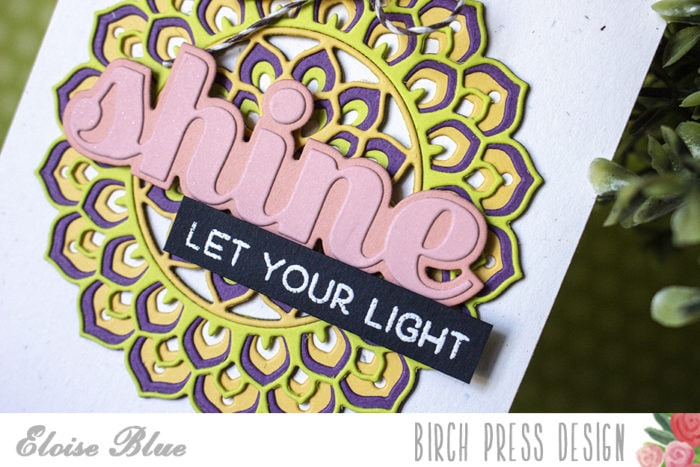
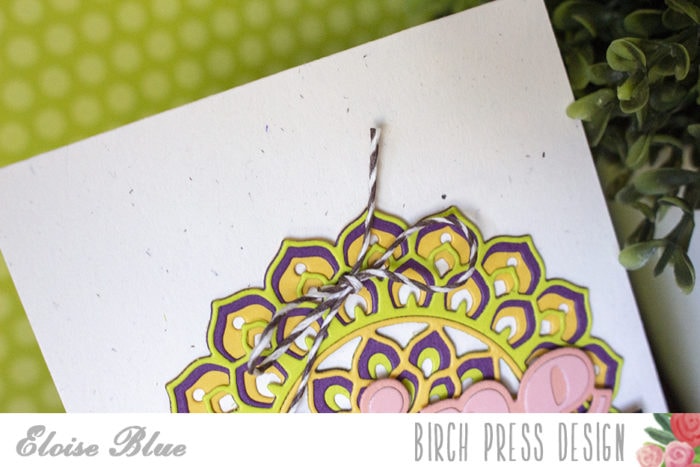
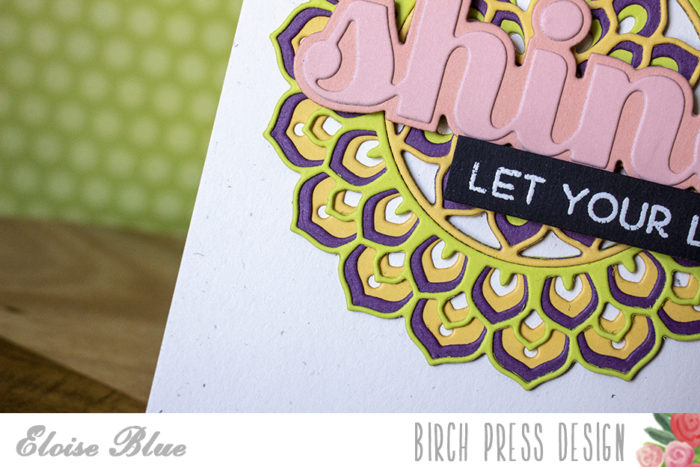
To begin my card today, I started off with cutting out the Calen layers from their respective colours of cardstock. Below is the image for reference.
So I pulled some green, purple and mustard coloured cardstock for the layers and then two shades of pink for the sentiment. I die cut them all out and then set them off to the side.
I then took some liquid glue and adhered all my layers together. I used Layer A for the green, Layer B for the purple and Layer C for the yellow. I also reversed that for the centre panel, so the yellow would be on top.
Once they were all layered together, I adhered the sentiment together as well. I added a little Wink of Stella onto the top layer. I then made a card base out of some natural white cardstock, it has little specks in it so I thought it would be nicer than plain white.
I adhered my layered piece into the centre and tied a little bow at the top. I added foam tape onto the back of the Shine sentiment and also white heat embossed the ‘Let Your Light’ sentiment from Joy and Peace onto a strip of black cardstock and adhered that too.
That finished up my card for today, I hope you enjoyed. The video is linked down below.
Thanks for stopping by and I’ll see you all next time.
Hello Everyone!
Let’s layer some cardstock together! I am just amazed at how this looks on a card… It is coming out of the card or going in, it does not matter, it is just beautiful, RIGHT?
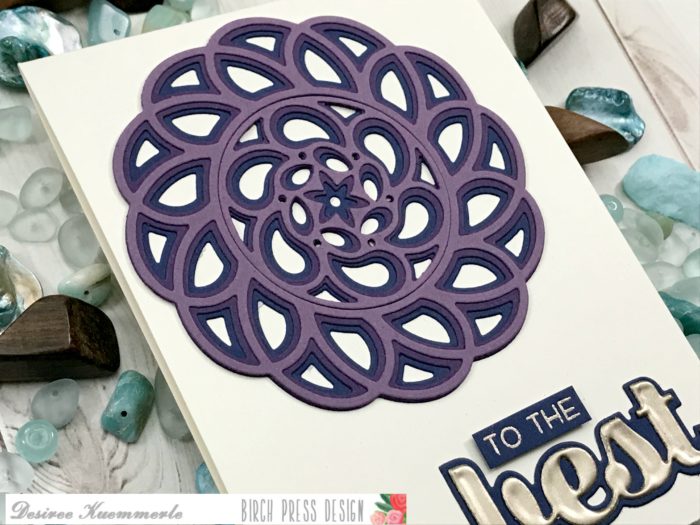
So let’s make one together! You want to first chose your cardstock so you can see just how the colors will look together. I chose to stay in a cool tone and chose a dark blue and then two shades of purple. I made my card base ivory, so the colors would not be so bright. Ivory will help to tone them down.
Next let’s get out our die cutting machine and let’s go to town! You want to make sure you have matched up the card stock with the proper die! And while we are there let’s cut out our sentiment to get it ready as well! With this die you will have a total of 6 pieces, 2 for each color. You will have the outer ring and then the center circle… What is great is you can decide which piece you want to use for your card! Of course, I chose EVERYTHING! LOL
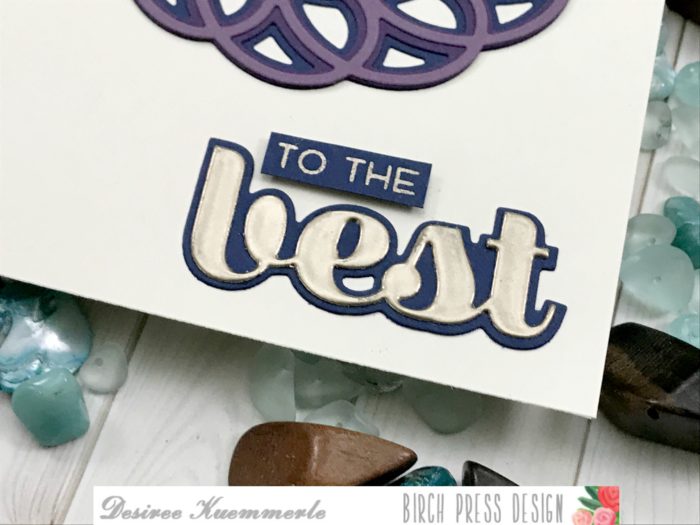
I used a liquid glue to adhere all my focal pieces together and set it aside under an acrylic block to make sure they adhered together! While that is drying let’s work on our sentiment. I chose the Best Friend Clear Stamp Set along with the Big Best Sugar Script Die Set.
I die cut my background of my sentiment our of the same dark blue card stock used previously and an ivory for ‘best’. Now it really does not matter which color you make this since we will be using our embossing powder to completely cover it! Yup that’s right, pull out your clear embossing ink and over that die cut! Cover it with your embossing powder of choice. I chose Liquid Platinum. Heat set and repeat! I actually did this process twice so I could get the look of metal for my sentiment. I stamped my top portion of my sentiment on a piece of scrap dark blue card stock and heat embossed that as well in Liquid Platinum.
Once everything is dry its time to put our card together! I pulled out a Standard A2 size card base and placed my Splash Die cut in the upper left-hand corner again placing an acrylic block to make sure it stays secured to my card. I then grabbed my sentiments and positioned them down in the bottom-right hand corner. I placed the larger sentiment first and then layered the smaller just above.
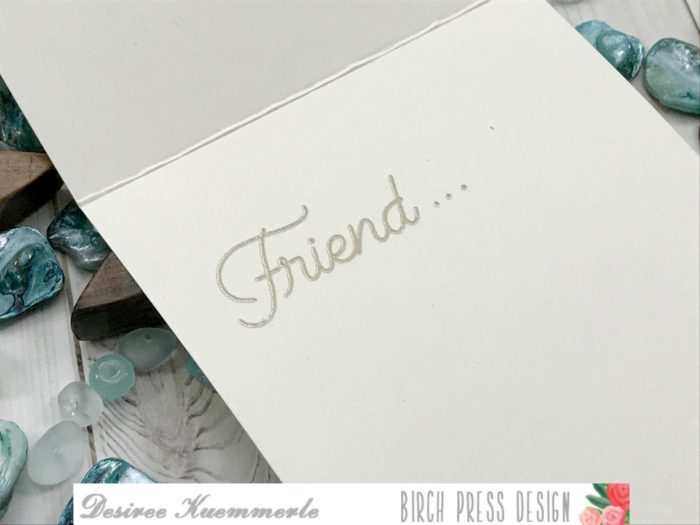
But I also wanted to add a sentiment on the inside. I chose “Friend”. I thought it kinda completed the thought of the card.
If you want to see more details just click on the video below and see our project come together step by step! Along with a few laughs of course!
I hope you enjoyed today’s project… Make sure you stay tuned for more wonderful projects coming soon! Have a great day and always remember… Be Creative!
Hi Birch Press Fans!
It’s Justine with my second set of cards this month! I’ve been having so much fun creating with Birch Press Dies and experimenting that I thought I would create a few simple designs. These cards can be found in my new video, My Top 7 Favourite Background Dies.
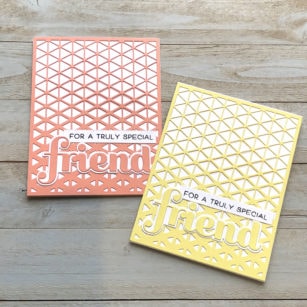
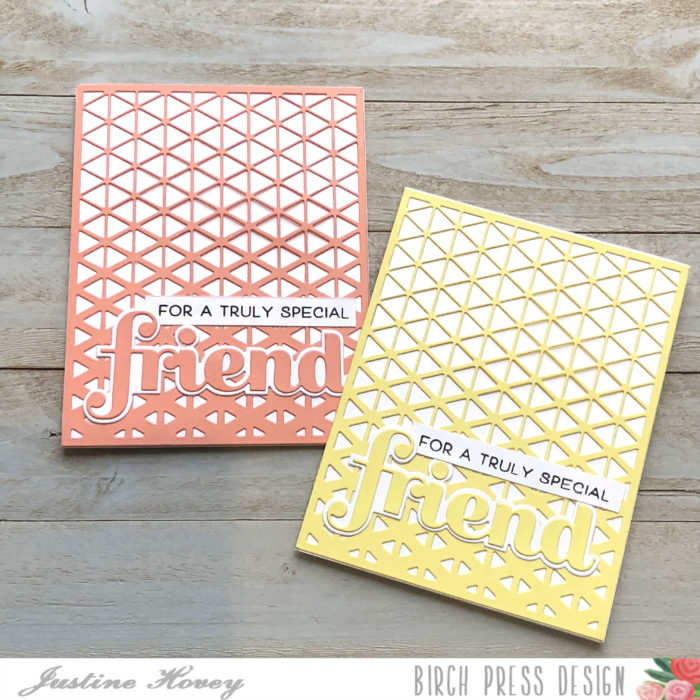
For my first two cards, I used the Triangle Fade Frame Die to create my backgrounds. I wanted to go with some softer tones in Lemon Drop and Peach Bellini. These are both relatively monochromatic cards since I chose the same colours for the sentiment die Big Friend Sugar Script Die.
These cards are literally just die cut and glue. I think the intricacy of Birch Press Designs truly make the cards pop without much effort. I can’t wait to begin to explore ways to spice up these dies, but I must say that I’m still just loving their simple look of being die cut and glued onto my cards. When I’m back next month, I’ll be showing off some super awesome techniques using them!
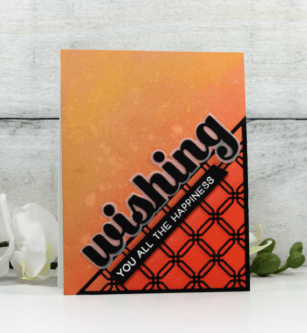
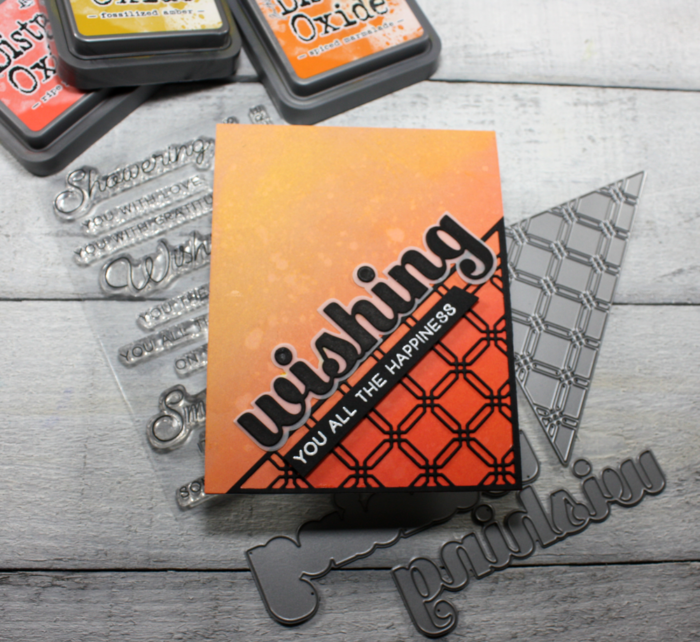
Welcome back for another inspiration post at Birch Press Design. Today I will be creating a card using the new Ludlow Triangle Collage craft die along with some fall inspired colours to create an ombre background! I created a short video tutorial for you so that you can see the steps I took to make this card and so you can recreate this card for yourself if you like.
I started by ink blended some Distress Oxide inks onto a panel of Bristol Smooth cardstock, I used Ripe Persimmon, Spiced Marmalade and Fossilized Amber. I also used the Ludlow Triangle Collage and the Big Wishing Sugar Script craft dies. The Ludlow Triangle craft die cuts all the detail of the die but does not does not cut the outer edges of the die. For my card today I wanted to cut the die so that all the lovely detail would sit in the corner of my ombre ink blended panel. I did this by cutting the die in the bottom corner of a piece of black cardstock and then trimming it off with my cutter. Let’s have a look…
The Big Wishing Sugar Script die set will cut both a sentiment and a shadow for when you want to add extra depth to the design. The sentiment from Wishing You the Best clear stamps set was embossed with white on black cardstock and was added to the card front with foam tape. The ombre background really showcases the elegance of the Ludlow Triangle’s design. Thanks so much for coming by today and I hope I’ve inspired you to do something creative today. See you again next week and have a wonderful weekend.


 Hi I have a fun video for you today using the
 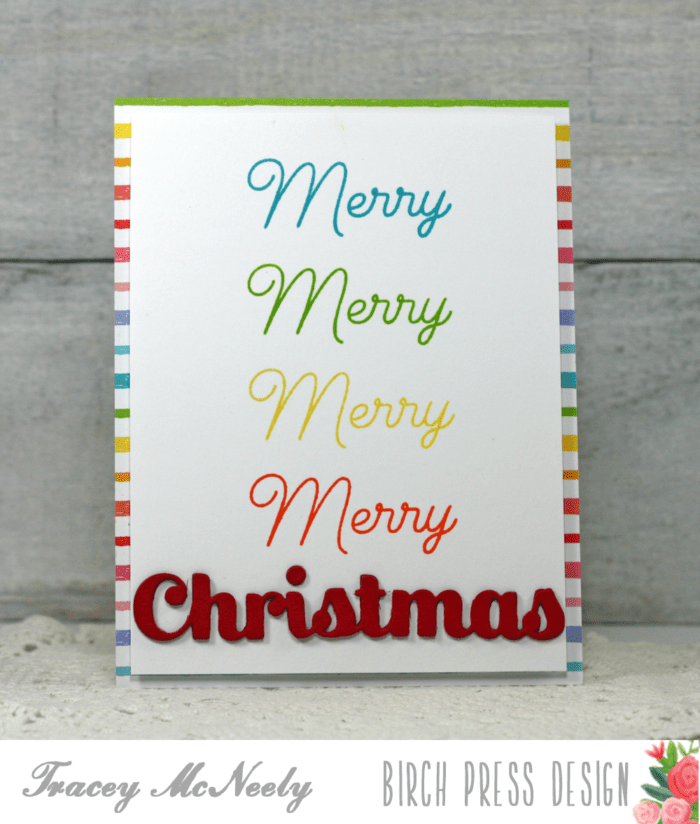 Here are the products that I used for my card, you can use any inks that you have as well as any patterned paper you have in your collection.
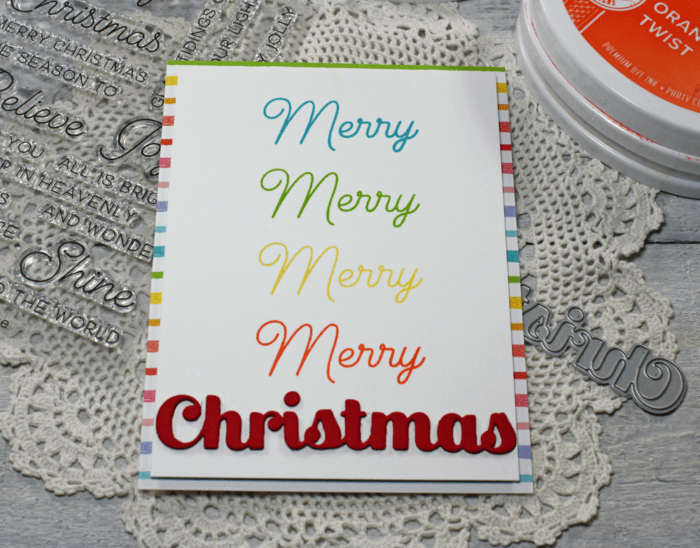 The stamp platform tools that are available today make stamping almost foolproof. For my design I used one sentiment from the set and stamped it in a rainbow of colors to fit on the front of the card. I started with a 5 1/4″ x 4″ piece of white cardstock that I place in the top left of my MISTI stamping platform. I did this so that once I decided where my sentiment stamp was going to go I just needed to keep moving my paper down by an inch and then stamping in the next colour in the exact alignment to the left of the card front. The following video shows you the process I used, enjoy!
 Tthe rainbow patterned paper is the perfect base to make the rainbow of Merry’s pop!
 One more look at the card.
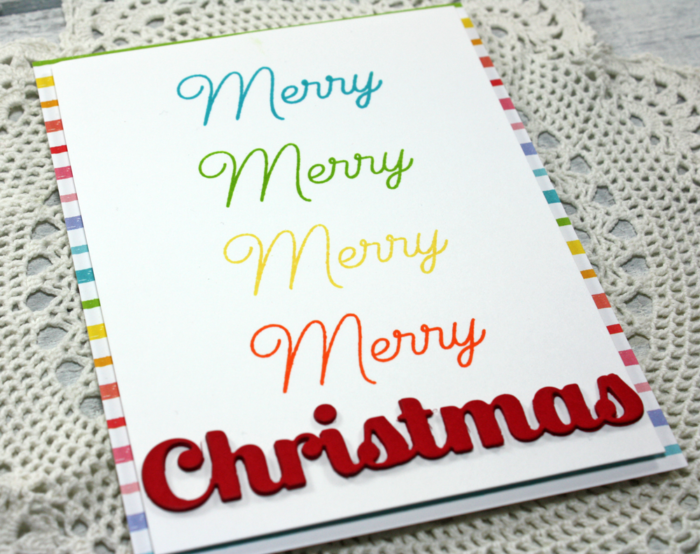 Thanks so much for popping in today and I hope that maybe I have inspired you to get going on those Christmas cards and use this technique for mass producing. Have a great day and we will see you next time!


 Welcome back for another inspiration post at Birch Press Design. Today I have a fun card to share with you using the
 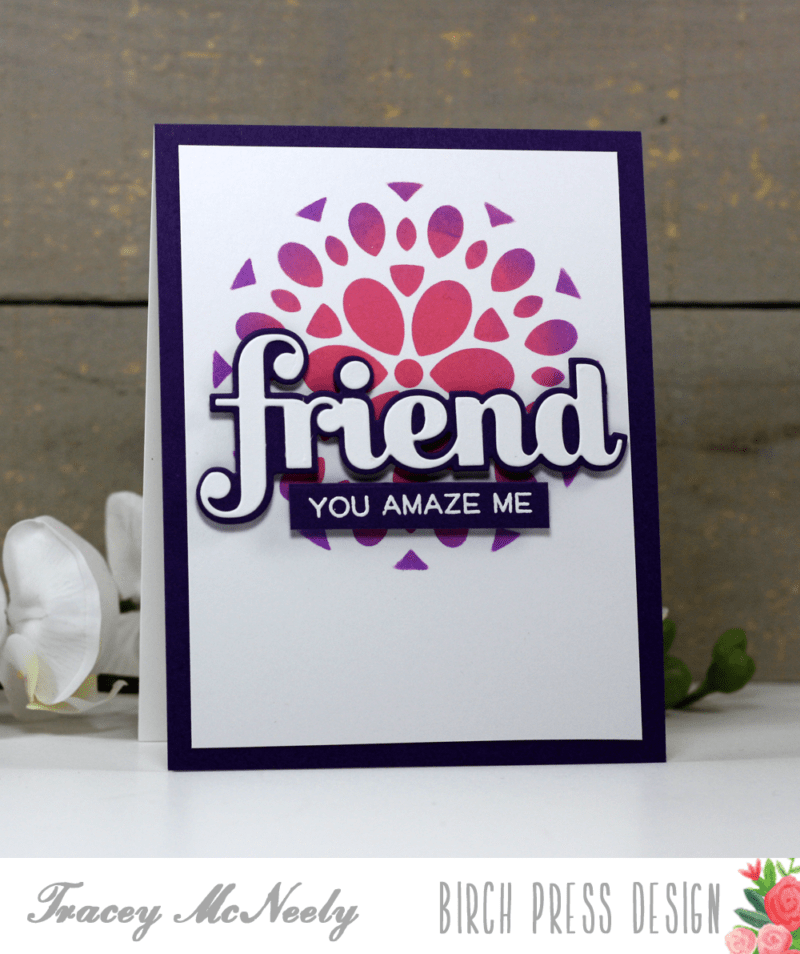 I gathered my supplies together and made a short video to show you how I used the
 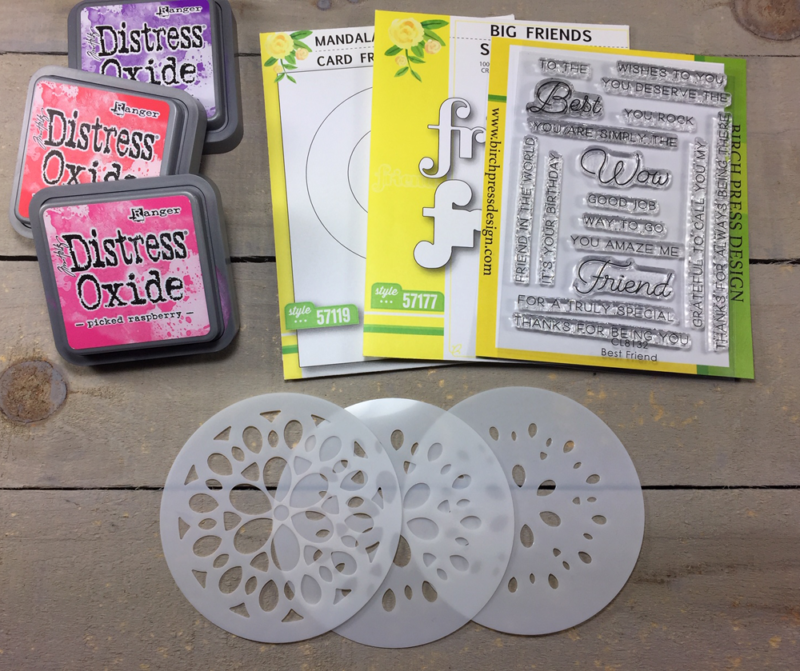 Armed with my Frog Tape I taped the Mandala Card Frame, that was cut with very thin white cardstock, over my 5 1/4″ x 4″ panel of Bristol Smooth cardstock. Once I secured the top and both sides down I lay the stencil over the circle and then taped the stencil down on the top bottom and both sides so that it would not move when I was blending ink over it. It might seem a bit much but there is nothing worse than a stencil shifting when blending ink on it. Lets have a look at how I created this card…
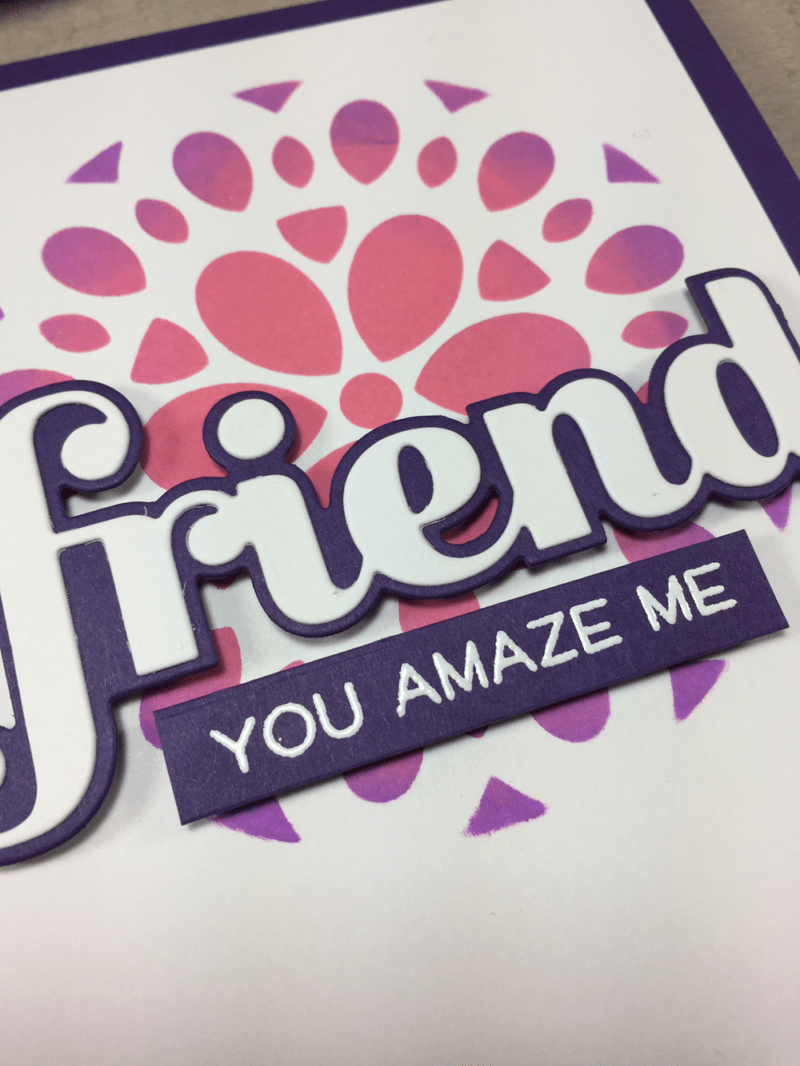 I used a sentiment from the Best Friends clear stamp set which I embossed in white on the same purple cardstock, that I used for the shadow on the Big Friend Sugar Script die and for mat behind the main panel. The purple really picks up the purple in the design.
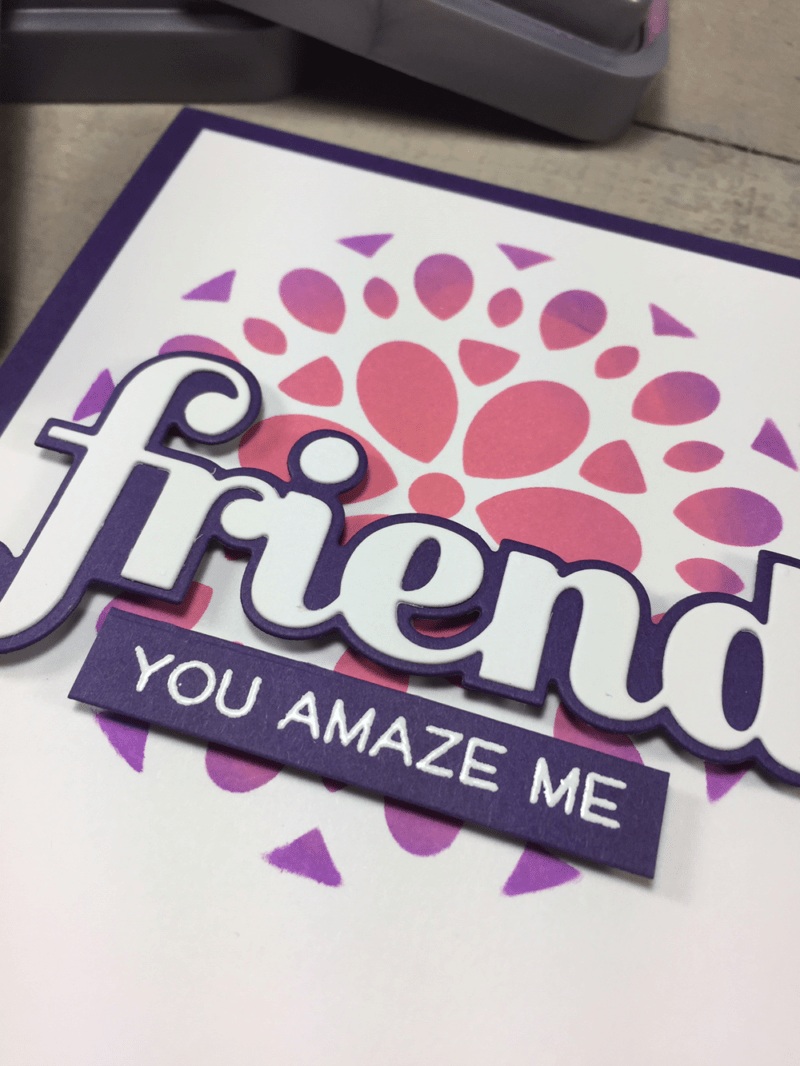 A closer look at the blended colours from the stencil.
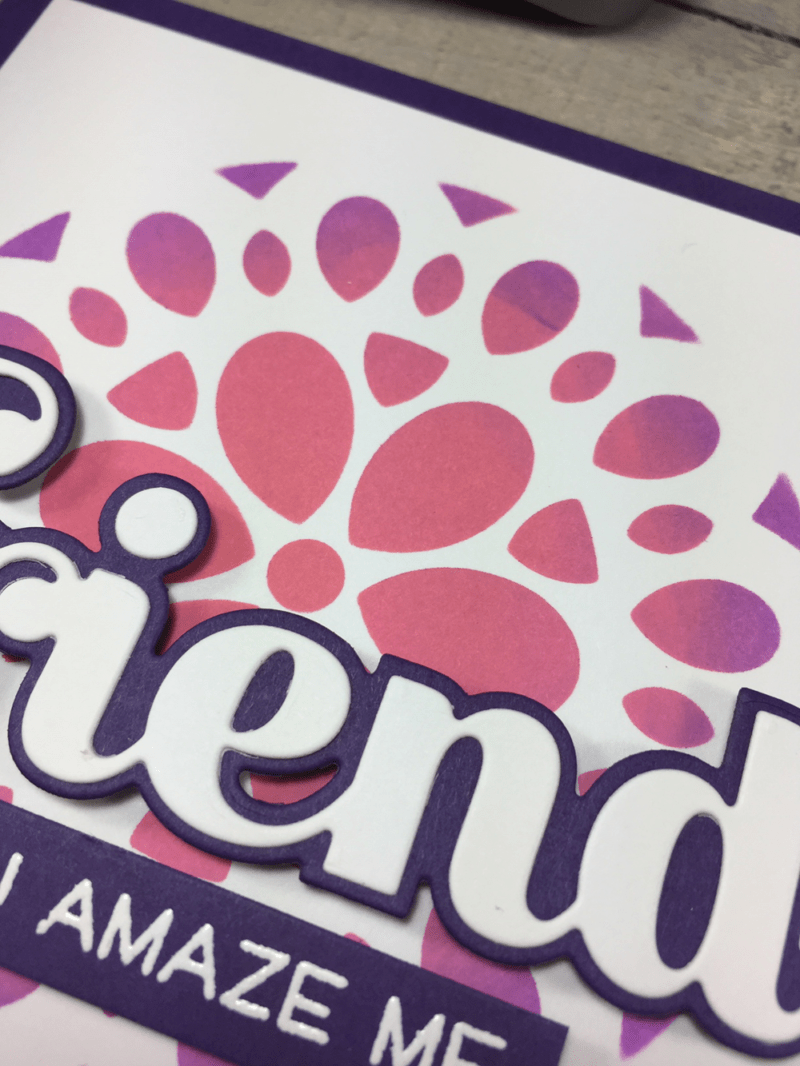 Thanks for stopping in today to create a card with me. All of the stencil sets at Birch Press Design open up so many options for colours and design. Have a wonderful day and we’ll see you next time.


 Welcome back for another inspiration post at Birch Press Design. Today I will be creating a card using the new
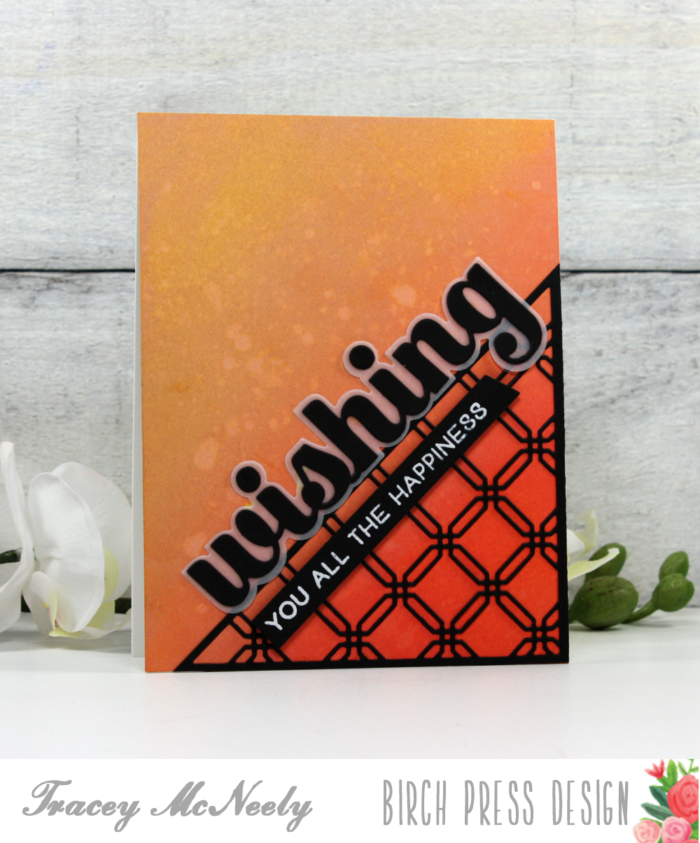
 The Ludlow Triangle craft die cuts all the detail of the die but does not does not cut the outer edges of the die. For my card today I wanted to cut the die so that all the lovely detail would sit in the corner of my ombre ink blended panel. I did this by cutting the die in the bottom corner of a piece of black cardstock and then trimming it off with my cutter. Let’s have a look…
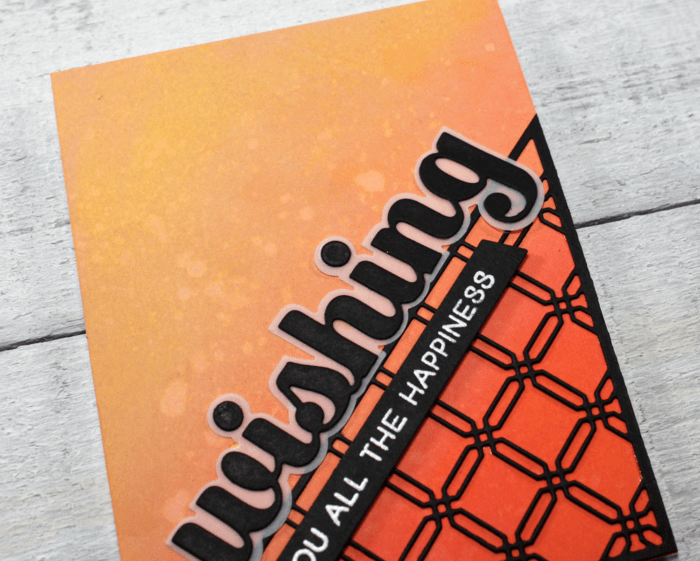 The Big Wishing Sugar Script die set will cut both a sentiment and a shadow for when you want to add extra depth to the design. The sentiment from
 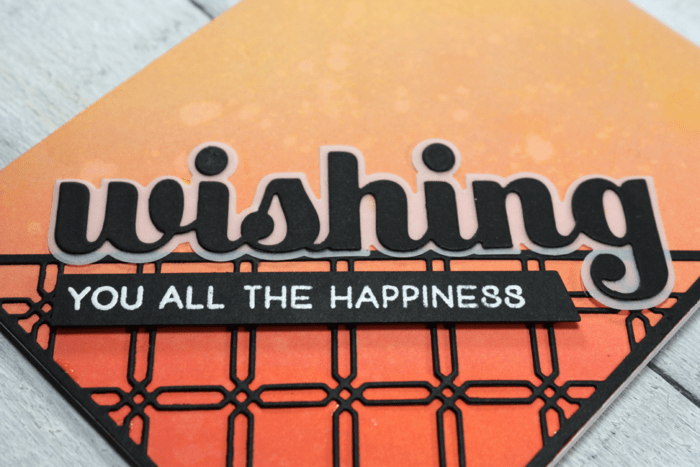 The ombre background really showcases the elegance of the Ludlow Triangle’s design.
 Thanks so much for coming by today and I hope I’ve inspired you to do something creative today. See you again next week and have a wonderful weekend.


