
Hello Everyone and Welcome Back!
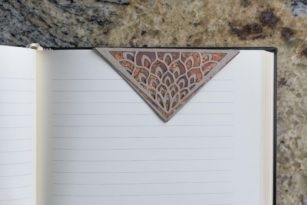
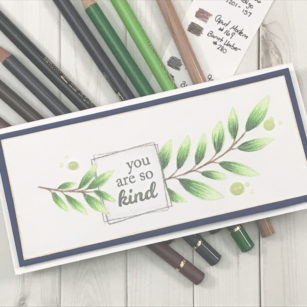
For today’s project, I just had to revisit the Grateful Leaf Frames Stamp Set! I thought one of the images was perfect for a Slim Line Card and I just had to use my colored pencils.
Let’s gather our cardstock and ink we will need to get our project started! First let’s cut a piece of Bristol cardstock to 2 ½ in x 6 in and a mat cut to 2 ¾ in x 6 1/4in and set them aside. Now since we are making a slim line card, we need a special size for our card base. I cut mine to 6 in x 6 ¼ in and scored this panel at 3 in along the 6 in length.

I went back to my piece of Bristol Card stock and stamped my imaged using a very pale ink so I could use the no-line coloring technique with my colored pencils. Also at this time I stamped my sentiment using a pale grey ink.

After all my coloring was completed and layered my card stocks together using my liquid adhesive!
Added a few drops for embellishment and there we have it, a simple slim card design!

As always, I hope you enjoyed today’s project… and if you want to see more details just click on the video below and see how these projects come together step by step!
Make sure you stay tuned for more wonderful projects coming soon! Have a great day and always remember… Be Creative!

Supplies