Hi friends! It’s Jeanne here today and I’m sharing two cards made with the Dazzle Bevel Layer Set.
I think the hardest part working with layered dies is what colors to use on which layers. I’ve found that alternating darks and lights works best for high contrast and big impact.
I made one card in ombre shades of pink and a second card in peacock colors.
If you look close you’ll see I alternated light and dark card stock so each layer is clearly defined.
I always like to add a touch of bling because who doesn’t love a little shiny right? Instead of adding sequins to this card I decided to add a bit of gold glitter inlay along the top.
The Sugar Cut Word dies are cut from coordinating card stock colors. I added sentiment strips stamped with phrases from the Just Because stamp set.
These cards have a finished size of 4 5/8 x 3 3/4″. The layers give them a thick rich feel and expensive look.
No matter what colors you decide on I know they’ll be absolutely beautiful and your recipients will be delighted!
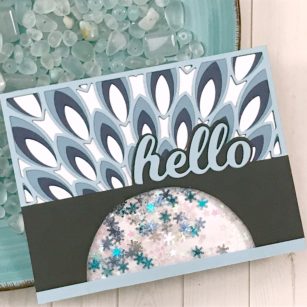
For today’s project we will be using the Lumina Layering Die Set to create a shaker card! I will also be adding the Hello Topper Sentiment Die to help with the shaker element!
Let’s start by cutting our die cuts out and getting them ready our assembly…
I then will adhere the main panel to my card base which I chose a mat silver card stock and then using my craft knife cut out the half circle (I will use that section of another card!).
Now I can build my shaker by adding my acetate and my double layers foam tape and strips on my card panel…
I found some adorable shaker bits of snowflakes and iridescent stars to fill with, removed my release paper carefully and then placed my panel on the back and made sure everything was secured in place!
I then traced my cut out on my sentiment topper and then used me craft knife again to cut this section out – but of course I did not measure and did not leave enough to cover the bottom piece of strip adhesive! So, we get creative and I cut a ¼ inch strip from another piece of card stock to cover that completely!
Layered my sentiment three times and placed onto the background!
Set my panel onto my standard A2 size card base which is 4 ¼ inch x 5 ½ inch top folding…
As always, I hope you enjoyed today’s project… and if you want to see more details just click on the video below and see how this project comes together step by step!
Make sure you stay tuned for more wonderful projects coming soon! Have a great day and always remember… Be Creative!
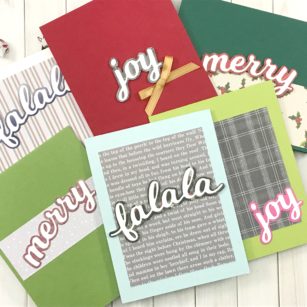
For today’s project, let’s use our sentiment dies and make them our focal point! Clean and simple is the theme for today…
For my sentiments I will be using the Memory Box 6×6 paper pad called Dashing Holiday along with creating our own sentiment backgrounds just by using our inks.
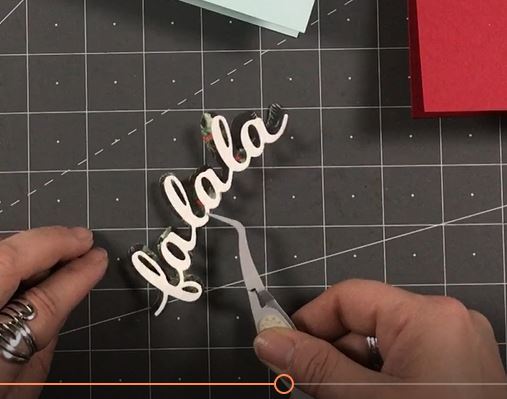
To get everything prepared I started by die cutting all the elements that I can, when I was using my pattern paper.
I set my die cuts aside and pulled out my inks, for today I will be using my Distress Oxides, but you can use any inks you have in your stash. We will be creation different effects and they can be completed with any inks we have! Once the panels are completed and dry, I will use my background die to cut them out!
Variegated Effect…
Solid Effect….
Solid with water added…
When adhering my sentiment to the background I like to use my liquid adhesive to make sure my die cuts are secured.
Once my sentiments were ready, I started cutting my panels in different sizes and shapes for my sentiment to be set on… any size will do here. They are them placed directly onto a standard A2 size card base…
In no time at all you have clean and simple cards, perfect for those last-minute invites or drop ins during this holiday season!
As always, I hope you enjoyed today’s project… and if you want to see more details just click on the video below and see how these projects come together step by step!
Make sure you stay tuned for more wonderful projects coming soon! Have a great day and always remember… Be Creative!
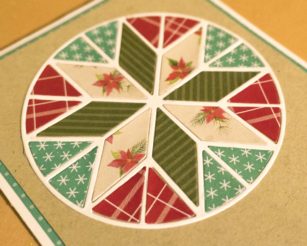
Hello! Today I’ll share a really fun idea to create simple greeting cards using patterned holiday papers along with the Stargazer Layer A die.
I started out by cutting the Stargazer die a few times out of holiday papers from the Memory Box Dashing Holiday 6 x 6 paper pad. I loved using paper pads for projects like this, because the colors and patterns share the same feel and coordinate beautifully together. Makes it so easy!
Several unique cards can be made with just a few simple die cuts, because it’s all about piecing the cuts together… quilting with paper! These are holiday themed, but any theme would work with this inlaying technique.
The pieces cut from the die are simply glued into frame or outline the die creates, which is called inlaying or paper piecing. So many dies would work well with this, but I absolutely love the Stargazer’s versatility with the different looks the colors and patterns can create. I especially love the frames cut out of patterned paper, as shown below in a striped pattern.
Simply glue the frame onto a card base, and start inlaying the negative pieces and shapes from other cuts! It’s truly simple, relaxing, and fun. I matted kraft card stock against another piece of patterned paper to make a colorful frame and was done!
These would make a great set of cards to give as a gift, too… Thanks so much for stopping by today ~ I hope you have a wonderful day!
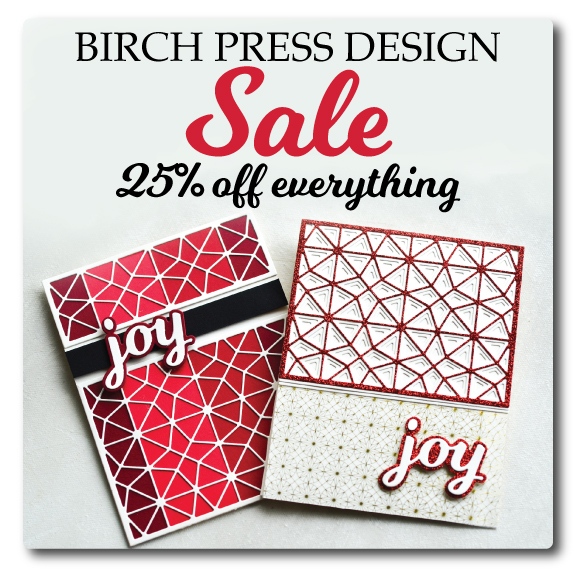
We’re thankful for YOU! Enjoy 25% off the entire store site as well as free gift with every order. Free Shipping is also included for Continental USA customers! November 28 – December 2. No Code Required!
For today’s project we will be using the Nobilia Layering Die Set! The die set is very deceiving! So many die cuts that you can chose to put back together or not to get many looks from one die! Let’s get started and you will see what I mean!
I will be using a paper pad from Memory Box called Dashing Stripes and Dots. These colors are not your typical color pallet and that is what really attracted me to it! They are deeper color values.
After choosing my colors I started my die cutting, here is where I realized all the different cut outs that you will get and was pleasantly pleased… LOL When I made my first cut I saw the possibility of making a frame for all the panels that you get!, so not only will you get your layering pieces but also a frame that can be a different color all together to make them pop!
I used different color palette for my outer frame and panels and used another color palette for my focal point! Grabbed my liquid adhesive to adhere all my die cut pieces together, and yes I even had a few extras!
Grabbed my Standard A2 size card base (4 ¼ in x 5 ½ in) and started by placing my frame down first and then my panel inserts onto my card.
Added some pearl embellishments and our card is complete! But there is something else here that we can build, and that is a beautiful ornament for you tree or even a gift! Because I changed the color of my center point on my card, I had those die cuts left, let’s not let them go to waste! These are symmetrical dies so you can put a backing on them as well!
As always, I hope you enjoyed today’s project… and if you want to see more details just click on the video below and see how these projects come together step by step!
Make sure you stay tuned for more wonderful projects coming soon! Have a great day and always remember… Be Creative!
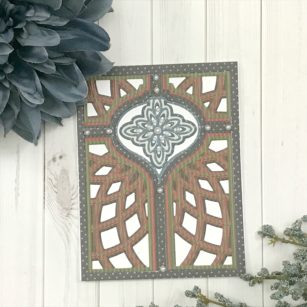
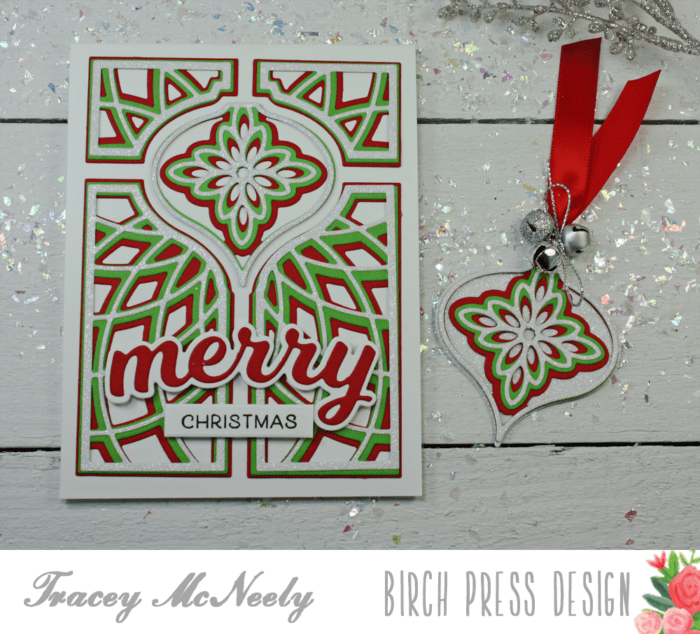
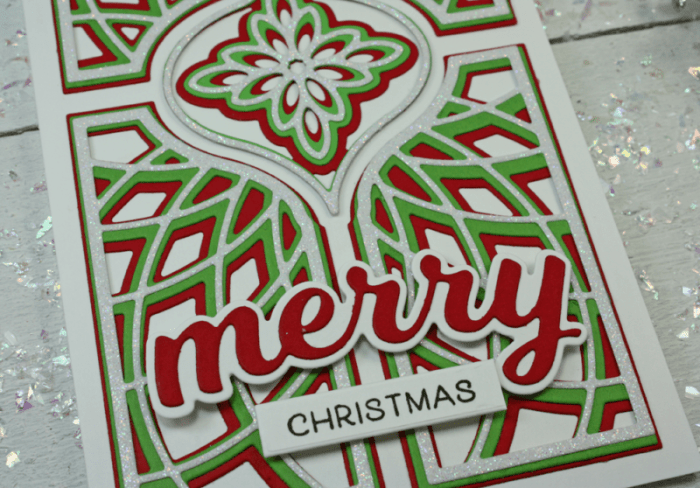
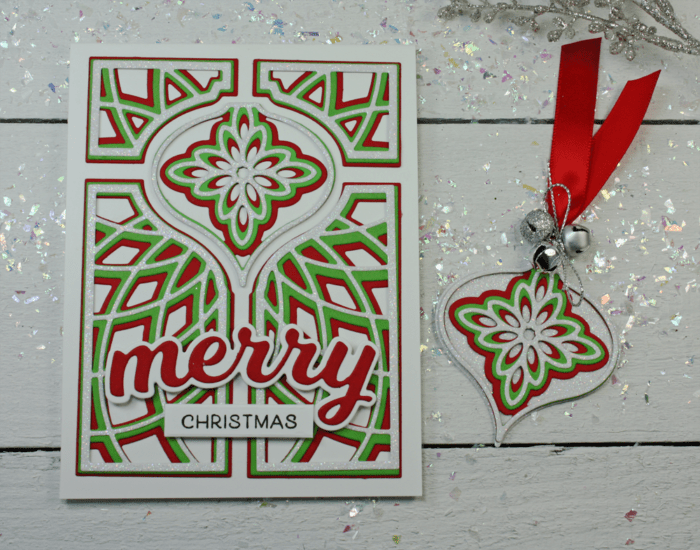
Hello, it’s Tracey here this morning! I am excited to share a card and a tag using the brand new Nobila Layering craft dies.
The Nobila Layering die set has three layers and cuts 5 different sections that layered together create a gorgeous ornament, card front.
I cut Layer A from white sparkle cardstock, Layer B from green cardstock and Layer C from red cardstock. The die panel is 4″ x 5 1/4″ and to easily centre my card front I used a little trick. I took the outer panel that I cut the bottom layer, Layer C from and temporarily adhered it to my card base. I did this so I could inlay the bottom pieces using the panel as a grid.
Once the pieces were glued into place I removed the outter panel leaving the design perfectly centred.
Once that was set I glued on the remaining layers. The dimension is just stunning. To finish the card off I die cut the Merry Honey Script die in red and the shadow in white. Then I stamped the word Christmas from the Joy and Peace stamp set. Both sentiments were added with foam tape.
I cut another set of the three colours from the Nobila Layering set but just for the ornament in the centre that I used today to make a tag. I also cut the largest ornament from the Classic Ornament craft die set for the background out of the white sparkle cardstock. The layers were glued together and adorned with ribbon and jingle bells!
GIVEAWAY ALERT!! We are all celebrating the new release at Birch Press Design, and they are giving away a layer from the Nobilia Ornament Layering Die Set that I am using today.
Here is how you can get your chance to win! Just comment on this blog post and on December 1st the winner will be announced!
Now of course there is a second chance for you and even your friend to win!
Just follow Birch Press Design on Instagram @birchpressdesign make sure you like this Instagram post and make sure you tag a friend!. Only one comment will be selected and you and your friend will both receive on these dies.
You must comment by 12 midnight US standard eastern time November 30! Good Luck!
I am also excited to let you know that Birch Press Design is a sponsor today for the 25 Days of Christmas tags over on my blog In My Creative Opinion. Head over there for you chance to win another prize being offered by Birch Press Design.
I’ve been playing along in (and thoroughly enjoying) the 25 Days of Christmas Tags event, and I am SMITTEN today with Birch Press Design as the sponsor. Your beautiful layered dies were showcased so magnificently today by everyone (your Design Team and Tracey’s) and I am over the moon in love with your amazing, unique (dies) products. I just became your newest Follower on Instagram and I tagged a talented crafty friend. Blessings to you all at Birch Press Design for your generous support of the crafting community and for sponsoring this FUN event. Karen Letchworth www.karen-mycuprunnethover.blogspotl.com
Hello! Today’s card is one of those cards that looks like it took a ton of time, but the secret is letting the Grandiose dies do all the work! Festive and bright, with some shimmer in the background, this is a great card for any occasion during the holidays… including thank you’s!
I’ve used negative pieces from die cuts to create a very simple design in the background band. The base of the embellishments were cut from Layer B, and the tops cut from Layer C. Because I wanted these specific colors and shapes, I die cut the layers rather than using leftovers from making the card base. Because these die cuts are so versatile, nothing ever goes to waste and can be used on other card layers. (I keep extra cut pieces in the same envelope as the dies for simplicity!)
I hope you have fun experimenting with different color layers, and even the negative pieces! Because these background die layers are in two parts, colorful scraps can be used. I love to just cut a bunch in different colors and see how they look together. This can result in many unique combinations that wouldn’t have been planned!
Have a wonderful day! Thanks so much for stopping by.
Hello! Today I’m so excited to share an idea for using the Grandiose Bevel Plate Layer Set to create an easy gift box, and the Mini Grandiose Bevel Plate Layer Set to create an easy band. These layers are so beautiful – they are a gift in themselves – but so easy, and I’ve done all the measuring for you near the end of this post.
The boxes include measurements for festive liners. The above liner can be found in Memory Box’s Dashing Holiday 6×6 pad. The red box (with chocolates in mind) has Birch Press Design’s Vanilla Bean dotted paper.
So many different looks and options with the layering sets, mixed with patterned papers on the inside!
Now, for the GIVEAWAY info! The die set for commenting on this post will be the large Grandoise Bevel Layer!! This is the die set used to create the base of these boxes (belly band die set is the mini set, not included). Keep checking back for more giveaway chances all throughout November!
Here are the details:
We are all celebrating this recent and new release at Birch Press Design, and they are giving away a layer from the Mini Dazzle Bevel Plate Layering Die Set!
Here is how you can get your chance to win! It’s simple – just comment on this blog post and the winner will be announced on December 1st!
There’s also a second chance for you and even your friend to win!
Just follow Birch Press Design on Instagram @birchpressdesign make sure you like this Instagram post and make sure you tag a friend!. Only one comment will be selected and you and your friend will both receive on these dies.
Jennifer this is just beautiful. I have a couple of birch press layering dies and I can’t wait to try this technique on the next box I make. Thank you for sharing your talents.
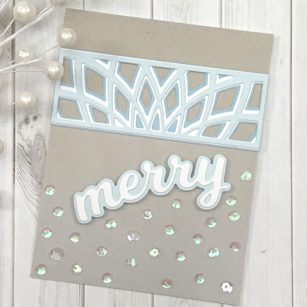
For today’s project I will be using the Mini Dazzle Bevel Plate Layering Die Set! This set is part of the new release and I am loving them! The size of these dies are perfect for any card size and occasion!
For this I chose soft shades of blue for this card. The dies reminded me of a snowflake in a way.
Once my pieces were cut I layered them together using my liquid adhesive and set that aside to dry under an acrylic block.
I then die cut the Merry Honey Script sentiment and layered those pieces together as well.
I cut a panel 4 ¼ inches x 5 ½ to place my die cuts on. I grabbed a mini blender and used my white pigment ink to add shading to the bottom on my card.
I set the layered die panel towards the top of my card and the sentiment below!
Let the sequins begins! I love iridescent sequins and for this card I made sure I had lots of them underneath the sentiment!
GIVEAWAY ALERT!!
Yup here are the details!
We are all celebrating this recent and new release at Birch Press Design, and they are giving away a layer from the Mini Dazzle Bevel Plate Layering Die Set!
Here is how you can get your chance to win! It’s simple just comment on this blog post and wait patiently until December 1st when the winner will be announced!
Now of course there is a second chance for you and even your friend to win!
Just follow Birch Press Design on Instagram @birchpressdesign make sure you like this Instagram post and make sure you tag a friend!. Only one comment will be selected and you and your friend will both receive on these dies.
You must comment by 12 midnight US standard eastern time November 30! FINGERS CROSSED!
As always, I hope you enjoyed today’s project… and if you want to see more details just click on the video below and see how these projects come together step by step!
Make sure you stay tuned for more wonderful projects coming soon! Have a great day and always remember… Be Creative!