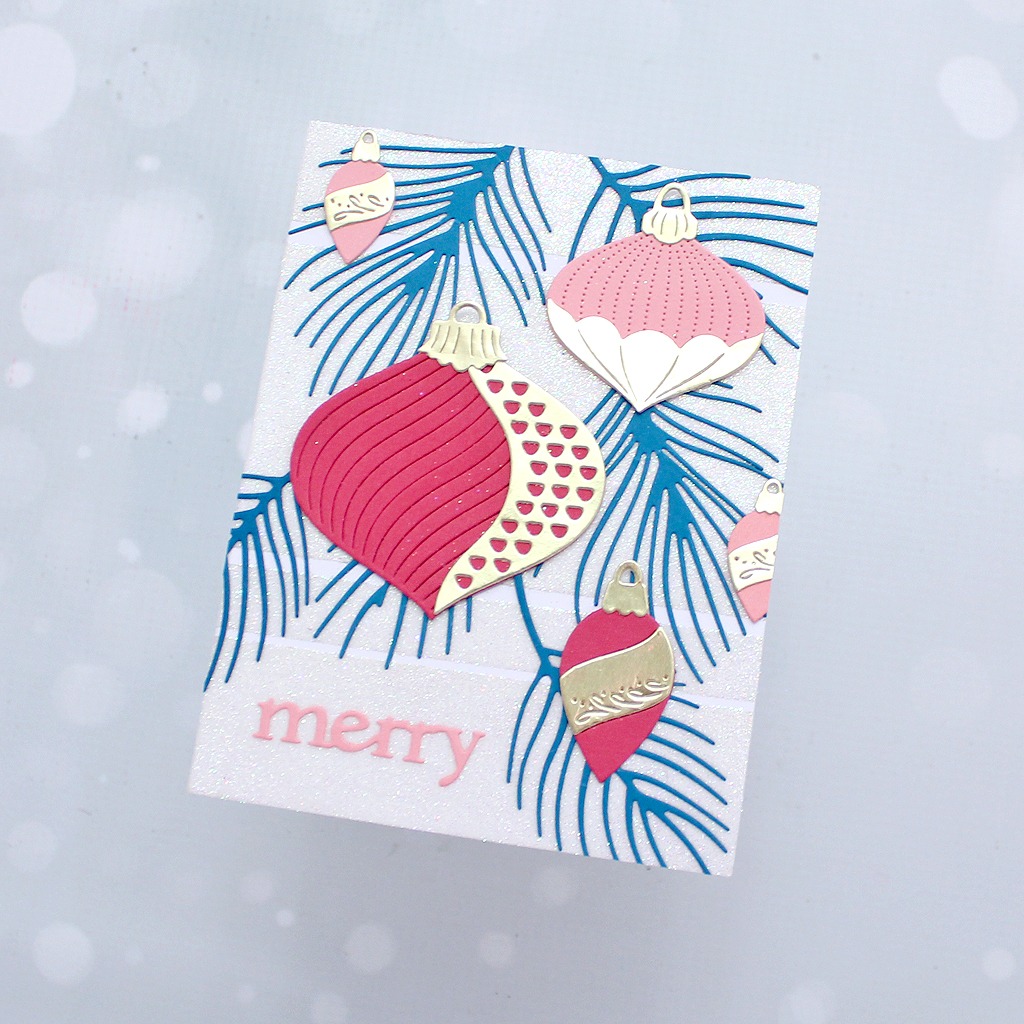
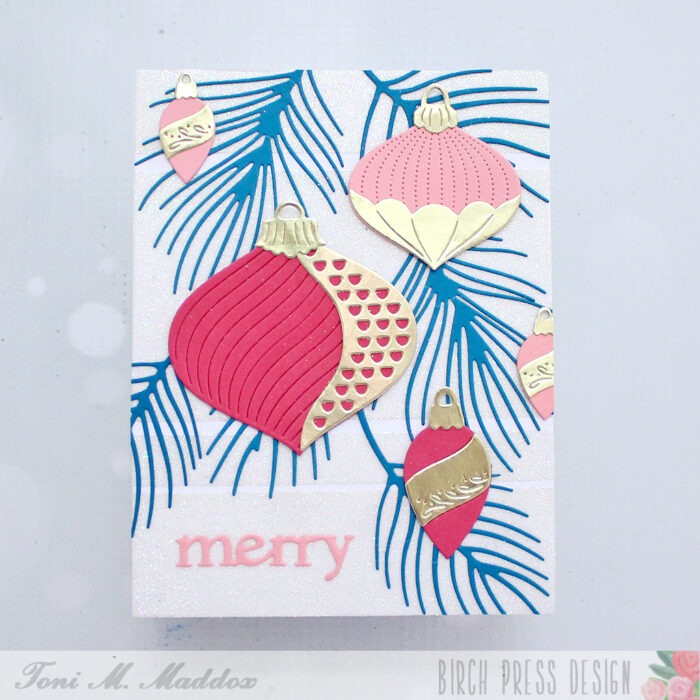
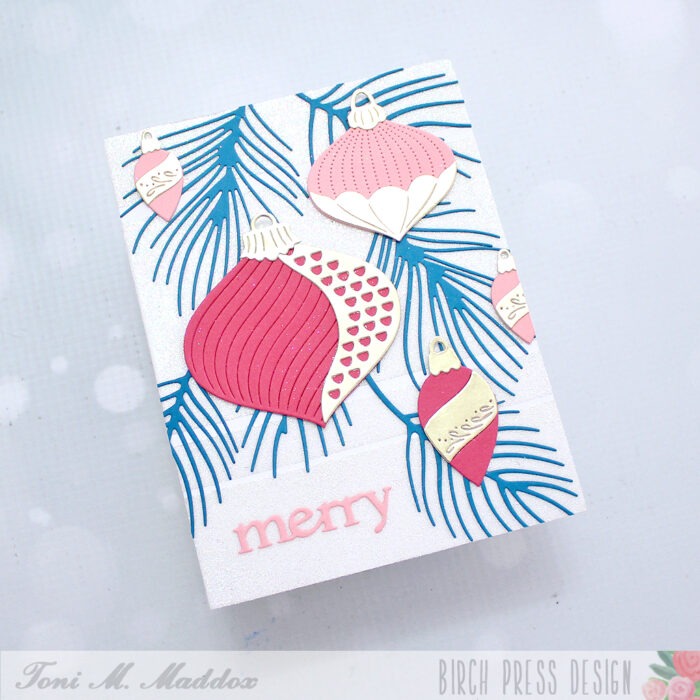
Hello, friends! Toni here with you today with another holiday card, this time using the Block Print Ornament series.
To create the base of the card, I used various widths of Scor-Tape burnished with glitter for a subtle white-on-white striped effect for the background.
Next I cut out the Simple Evergreen Sprigs using Memory Box Lagoon 6×6 paper (I LOVE that there’s a solid-core paper option now).
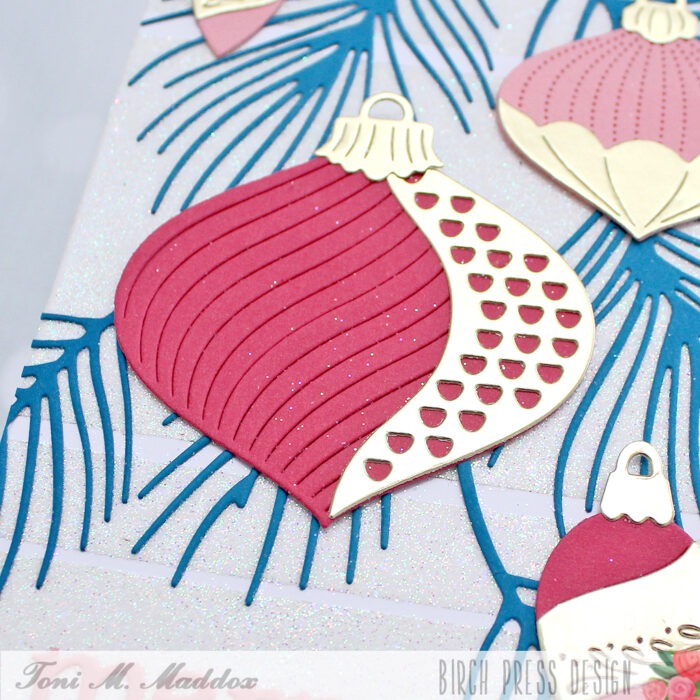
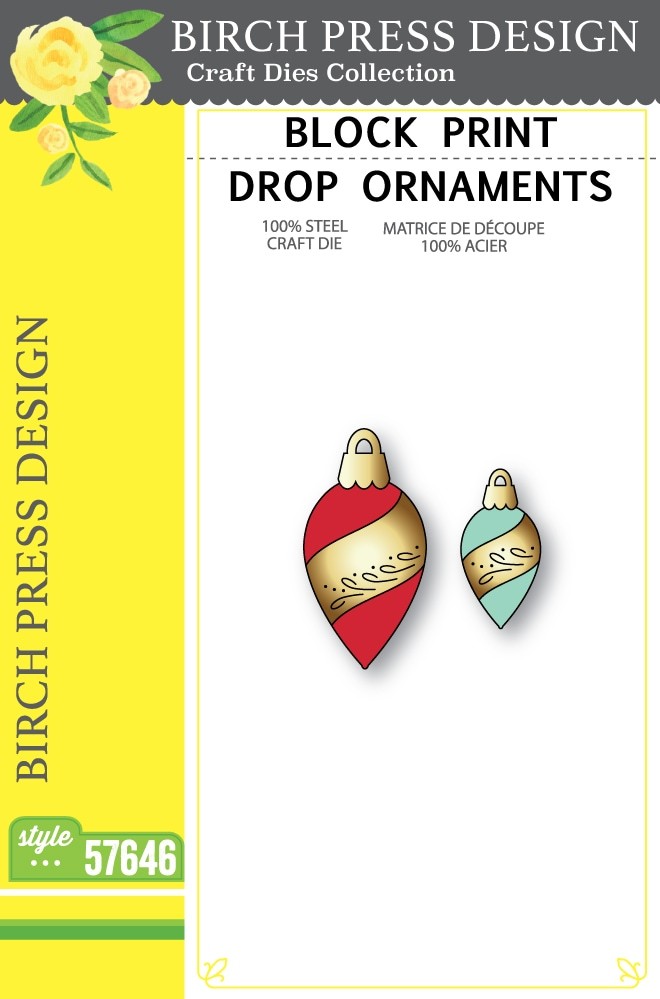
Next, I cut out the Block Print Wave, Block Print Petal and Block Print Drop Ornaments from Memory Box Blush 6×6 cardstock and a gold foil from my stash.
I finished the card using part of the Dapper Merry Christmas sentiment. So so pretty!
Feel free to visit my blog, Frankie Helps Craft, for a full list of supplies used and to check out my other creations.
I hope you enjoyed today’s card and have a great rest of your week!
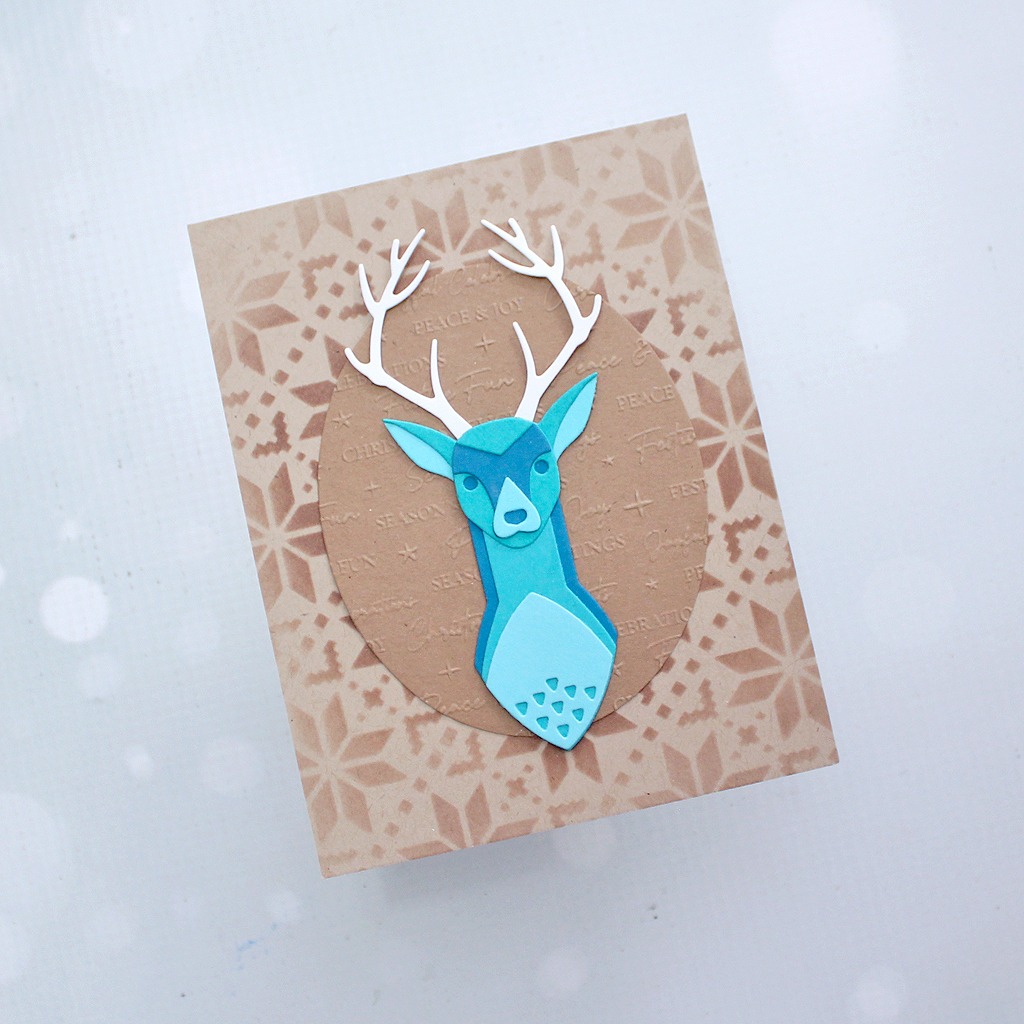
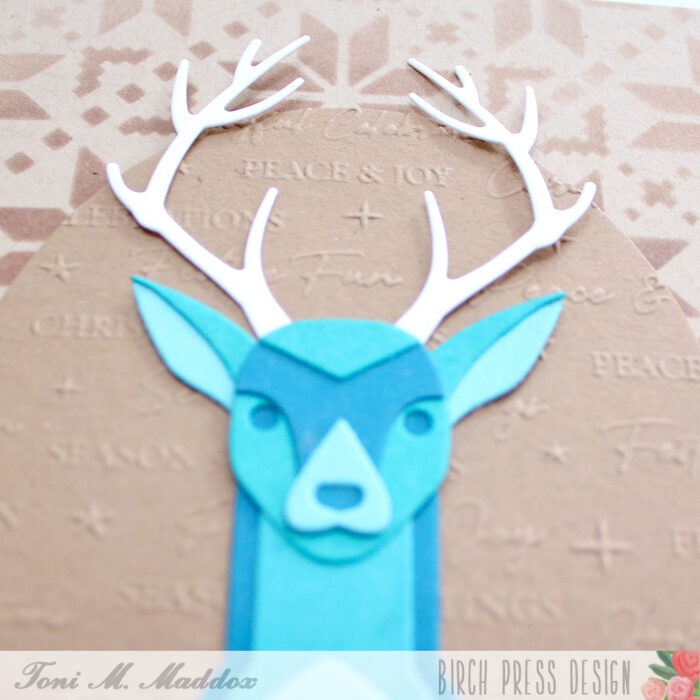
Hello, my crafty friends. Toni here and today I’m sharing a masculine holiday card with unconventional colors.
For the background, I kept everything very neutral using Catherine Pooler Macchiato with the Poppy Stamps Nordic Motif Stencil (used at an angle) on the front.
The diecut oval is cut from kraft cardstock then embossed with holiday sentiments.
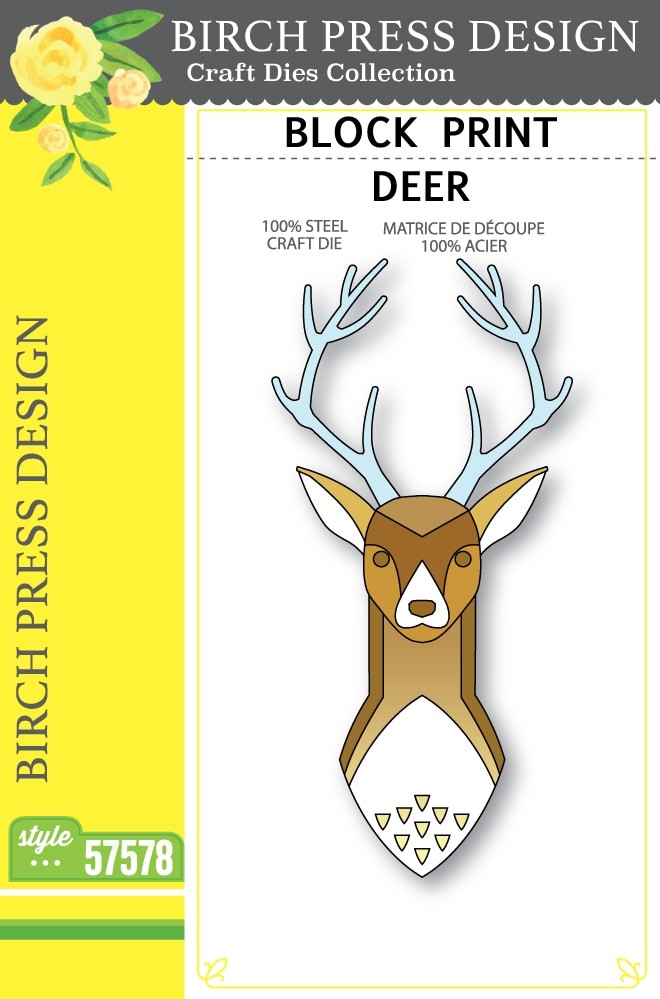
I got my hands on some Memory Box Lagoon 6×6 paper and thought it would really jazz up the Block Print Deer. I love it so very much!
Feel free to visit my blog, Frankie Helps Craft, for a full list of supplies used and to check out my other creations.
I hope you enjoyed today’s card and have a great rest of your week!
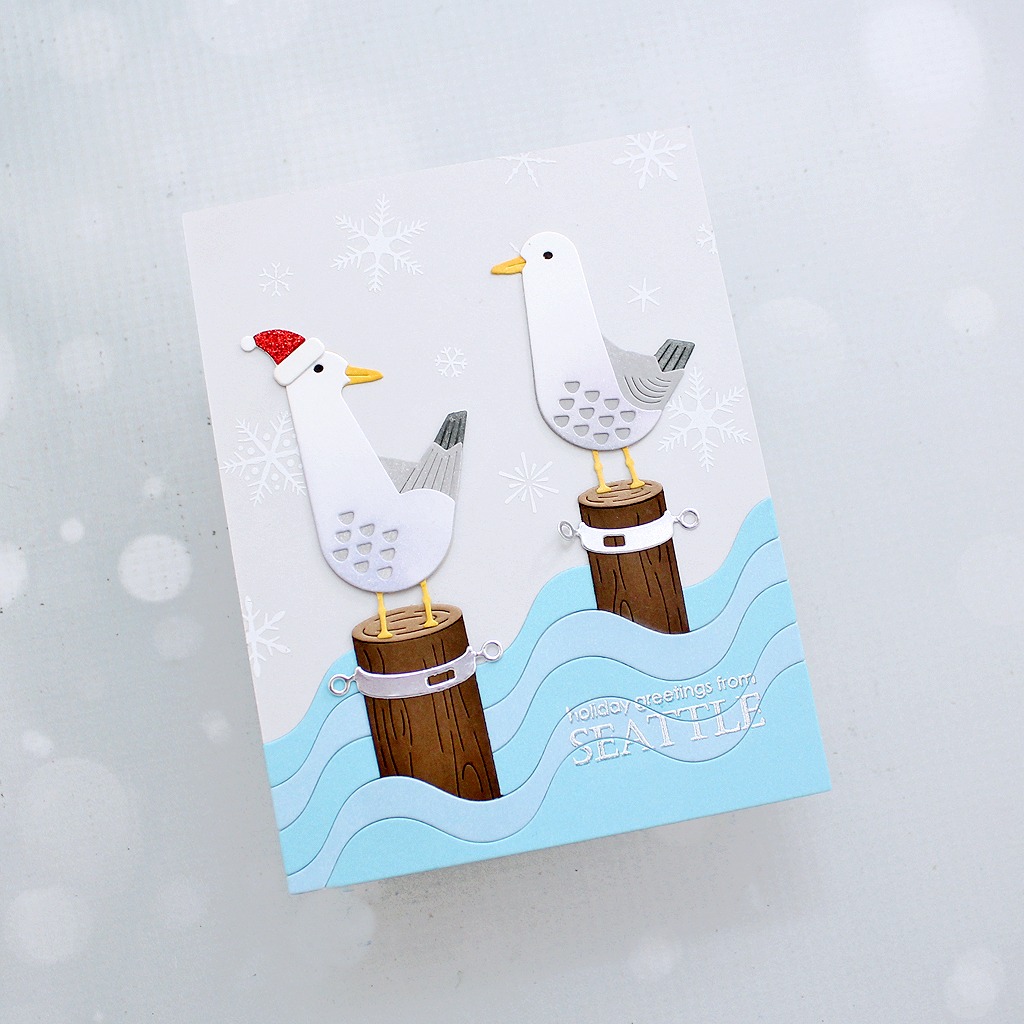
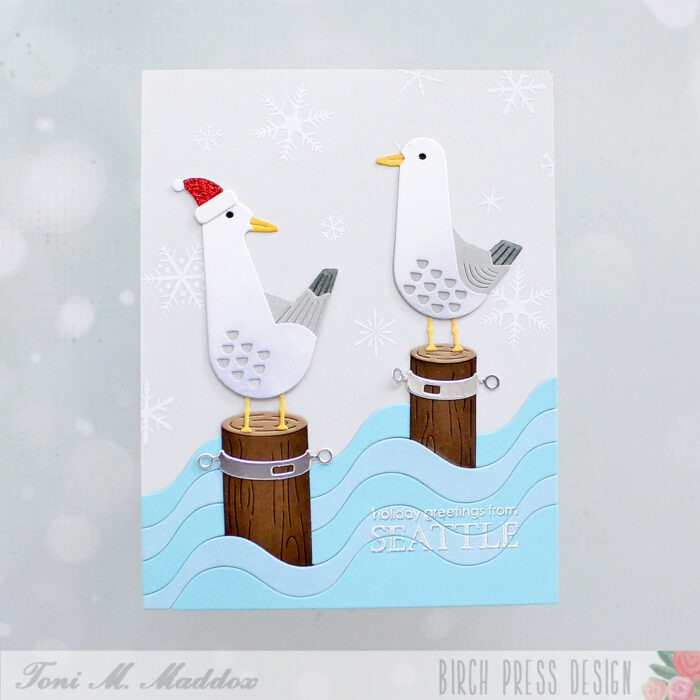
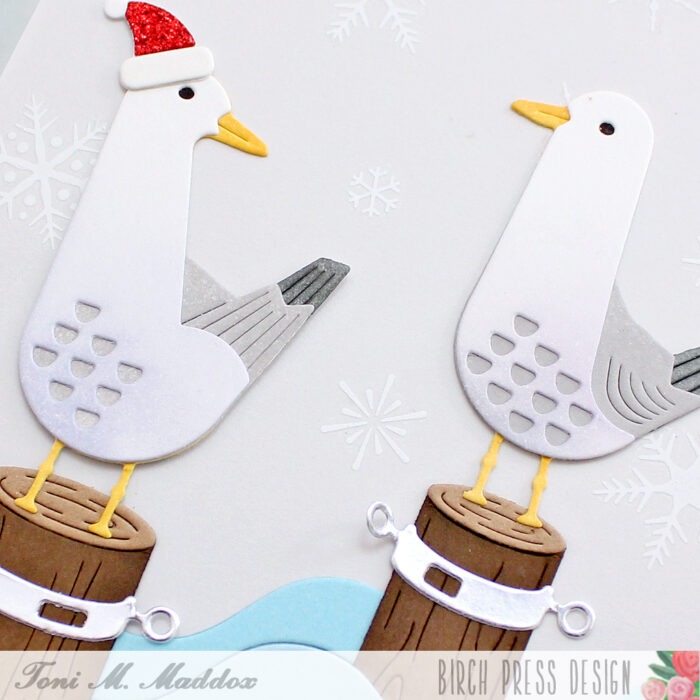
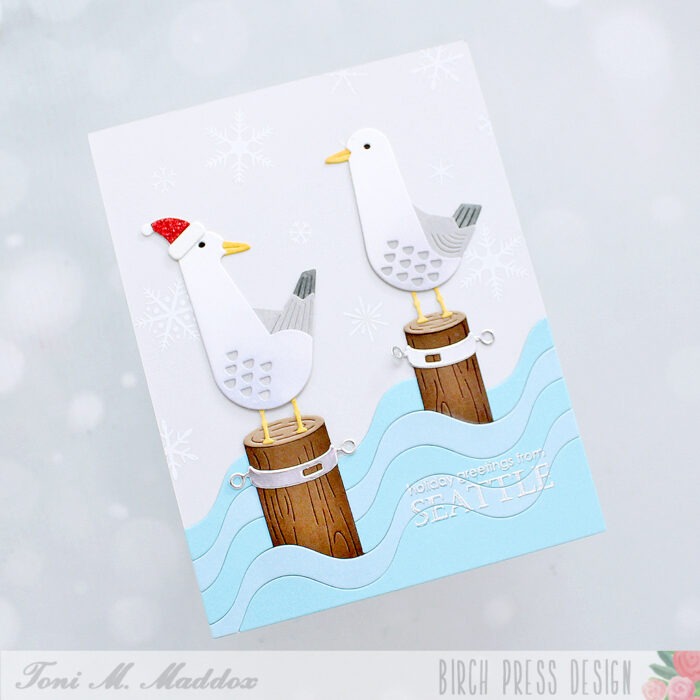
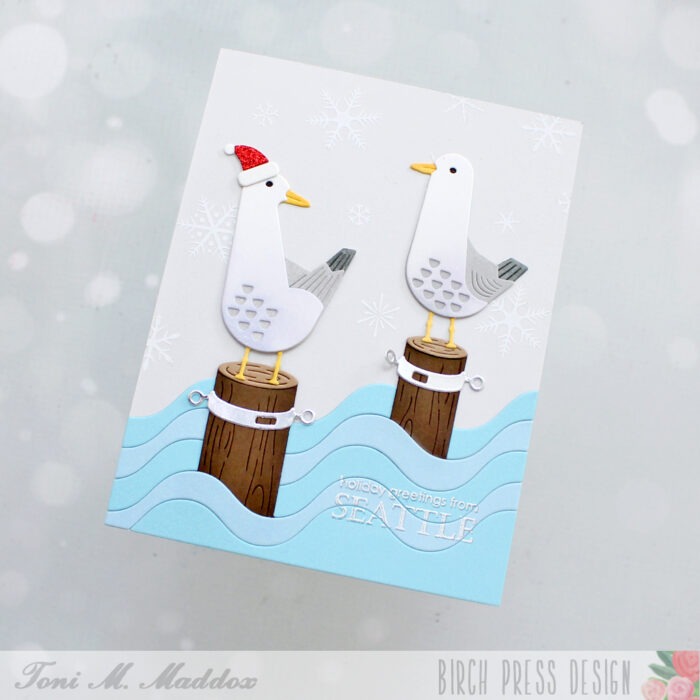
Ahoy, friends, and happy holidays a little early. Toni here with a holiday card inspired by living in the Pacific Northwest.
I started the card by rubbing a few Memory Box Snowflake Rub-on Transfers onto a pale gray card front.
I then added the Birch Press Design Corner Waves cut from Memory Box Lagoon 6×6 cardstock.
While I had the diecutting machine out, I cut out the Waterfront Pilings, Curious Seagull and Happy Seagull then sponged them with Catherine Pooler inks.
I’m giving you a sneak peek of the upcoming release with that glittery hat. Cuteness awaits!
You can see the full list of supplies used on my blog, Frankie Helps Craft, as well as check out my other makes.
I hope you enjoyed today’s card and have a great rest of your week!
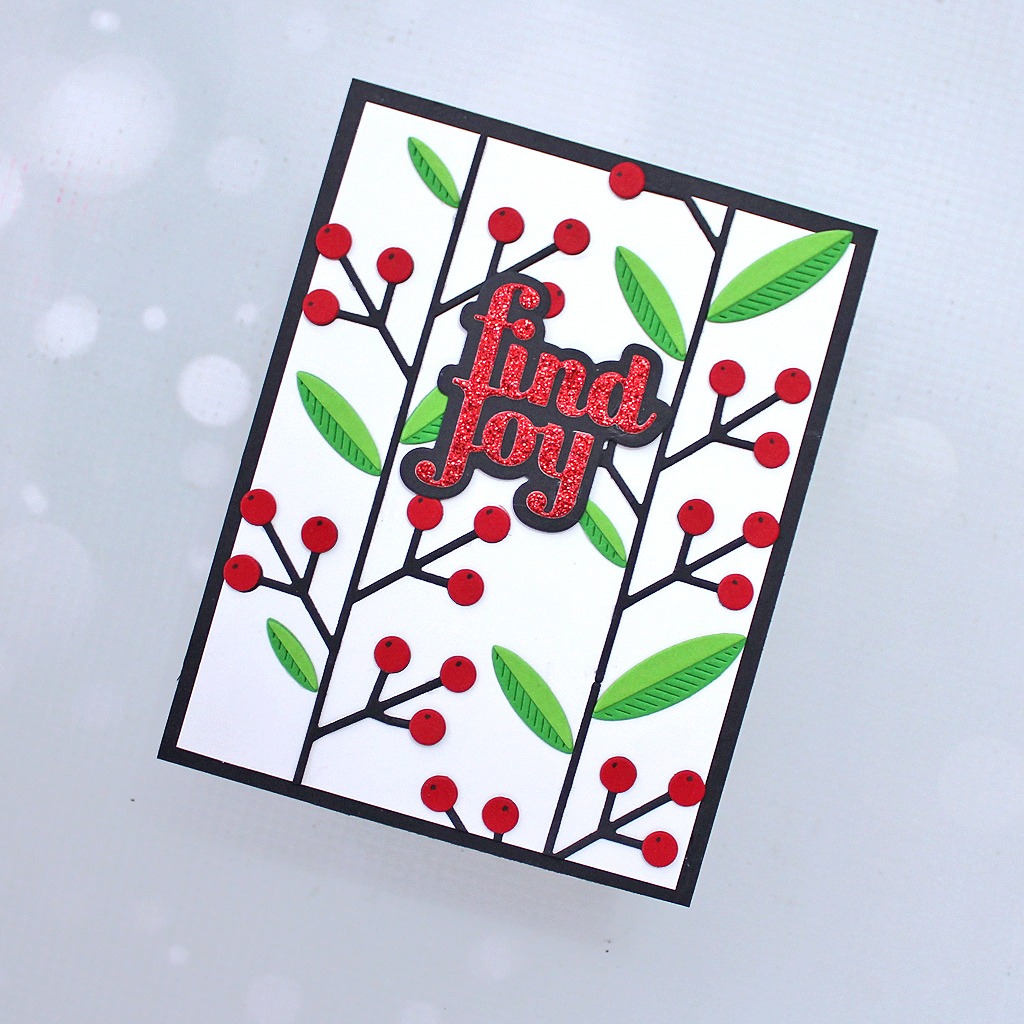
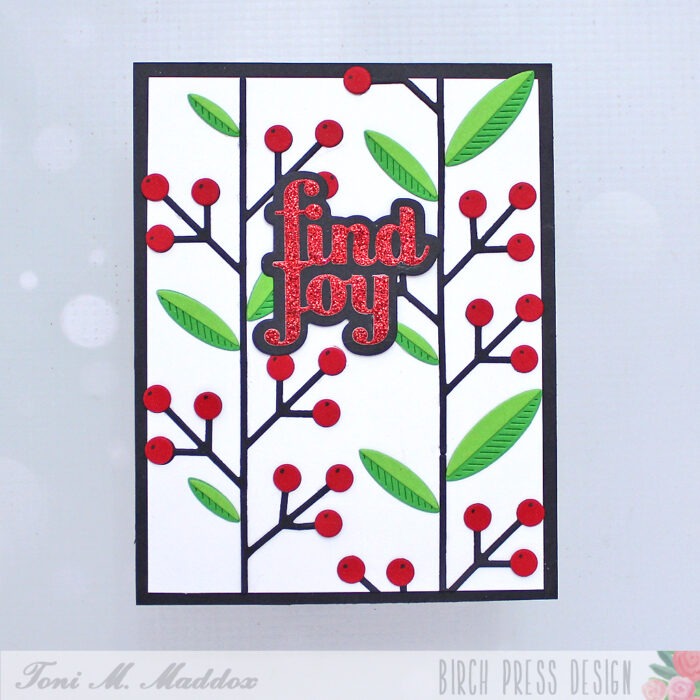
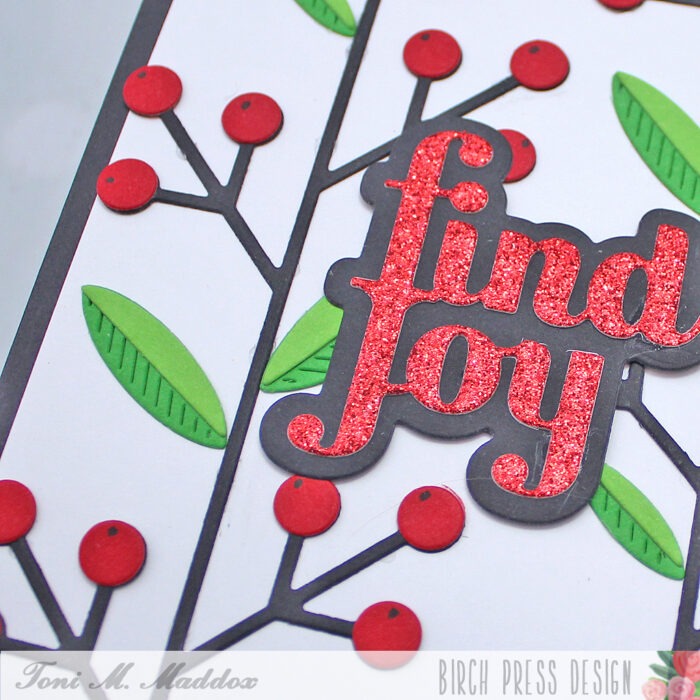
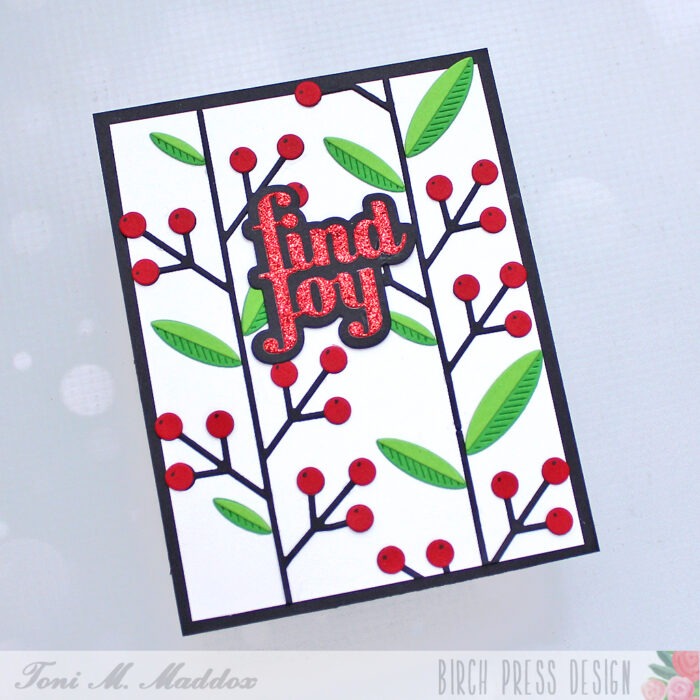
Hello, everyone! Toni here with a stylized greenery holiday card.
I was really struck by the stark lines of the Block Print Stems & Berries set. How could I really allow that to shine on the card?
I used bright Memory Box Cherry Red, Cilantro, and Leaf Sprout cardstock without sponging, making the design really pop on that white base.
And how could I not use red glitter cardstock for the Find Joy word die. Mounting that on black along with the card base and stems in black–chef’s kiss!
Be sure to visit my blog, Frankie Helps Craft, for a full list of ingredients and to check out my other projects.
I hope you enjoyed today’s card and have a great rest of your week!
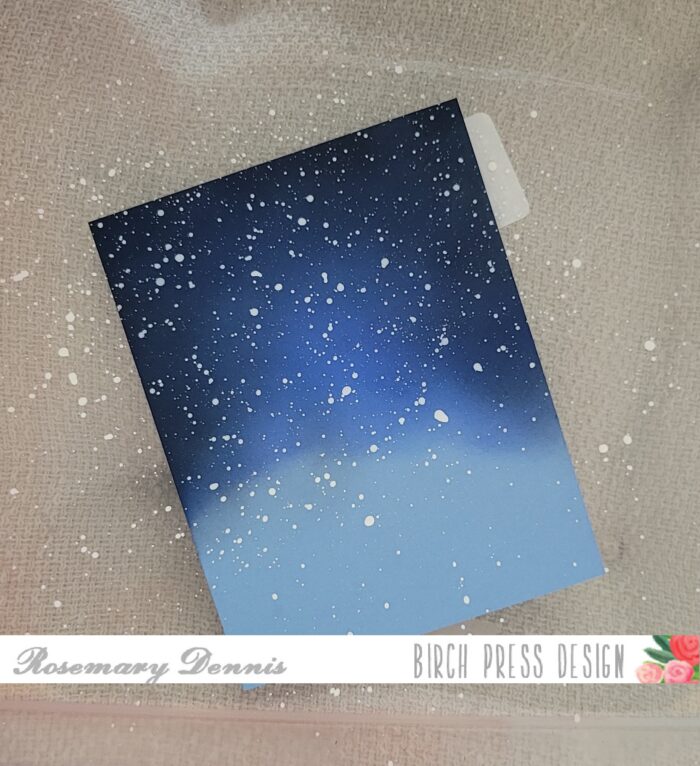
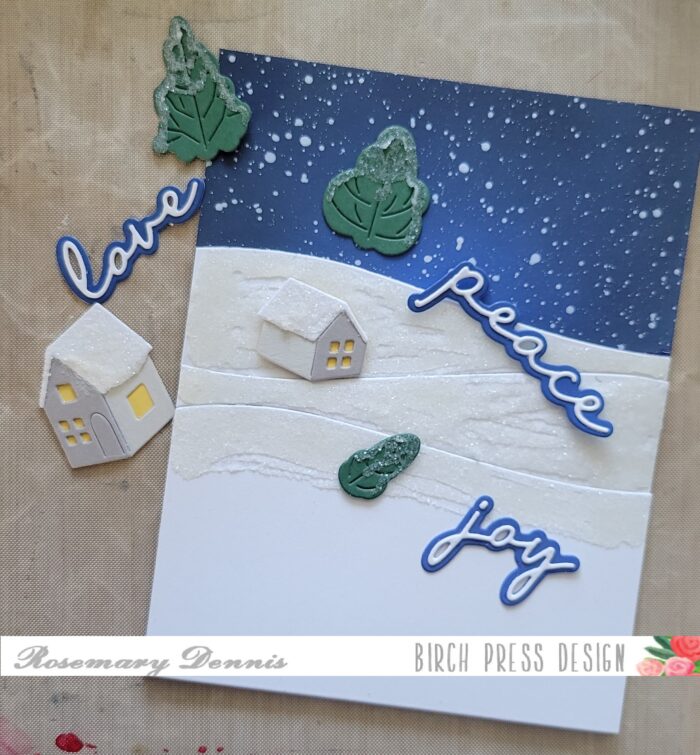
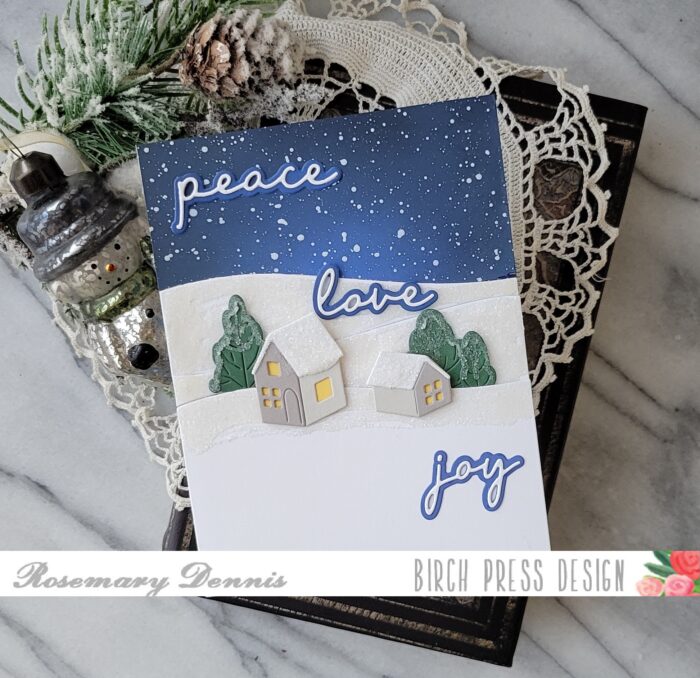
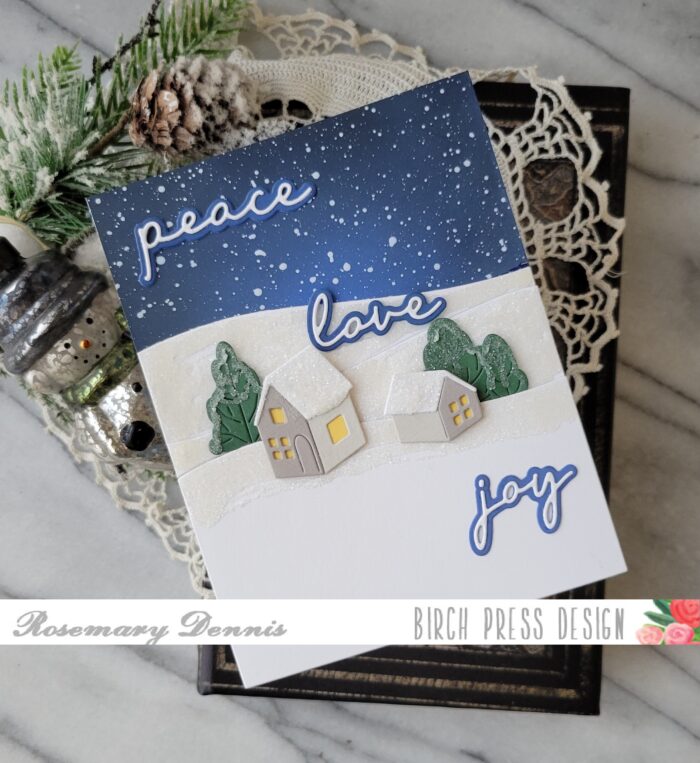
Hello, hello! Rosemary here on the blog today with a snowy scene card that was so much fun to make! Let’s have a look.
For my card I used the new Littletown Home, Wavy Hillside, and Peace Love Joy word die sets. The next few photos will show a little bit of my process for creating the card. I try to remember to take these kinds of photos, but sometimes get so involved in the process that I forget. This time I remembered!
I started by cutting piece of light blue cardstock from the Lagoon 6×6 cardstock pad to 5 1/2 by 4 1/4. I pulled out several distress oxide inks in shades of blue and blended them onto the top of the cardstock. I knew I would be covering up the bottom so no need to waste time and ink there! Once I had the blues blended to my liking I added in some black using Black Soot distress oxide. I used Blueprint Sketch, Prized Ribbon and Chipped Sapphire for the blues (could only fit the Chipped Sapphire in the photo).
Once the ink blending was done I put the panel into my splatter box and liberally splatted the panel with white acrylic paint. I let the panel dry and moved on to the next step in my card process: creating the wintry hills for my little houses!
I used Glossy Accents to cover the hill pieces, but I didn’t cover the cardstock pieces completely as you can see in the above photo. I did this because I wanted a more realistic snow look to each piece. Giving it the look of high and low areas in the snow that are there in real life. I then covered each piece with Rock Candy glitter and let them dry.
Now it was time to make the little houses, trees and sentiments. I die cut the houses from white, grey and yellow cardstocks and then adhered them together. Glossy Accents was added to the roofs and then Rock Candy glitter for that icy, snowy look. For the trees I simply added some liquid adhesive and then sprinkled on the Rock Candy Glitter. I had a scrap of the light blue cardstock so I ink blended that with the blue distress inks I used and die cut the shadow layer of each word from that. The words were die cut from white and then adhered to the shadow layer with liquid adhesive.
For the snowy hills I adhered the bottom one with foam tape. The middle layer was adhered with thin foam squares and the top layer with liquid adhesive. I layered the hills this way so that I could tuck the trees behind the bottom hill layer and the houses. The trees were adhered with a combination of liquid adhesive and thin foam squares. The houses were adhered in the same manner. The sentiments were adhered simply with liquid adhesive.
I hope you enjoyed today’s card and seeing a little bit of the process I used to create the card. Thanks for stopping by and have a wonderful day!
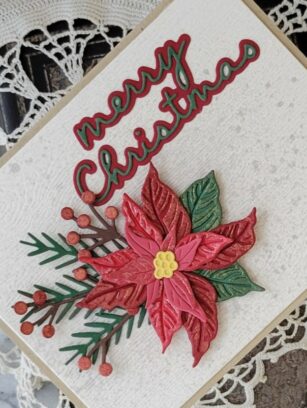
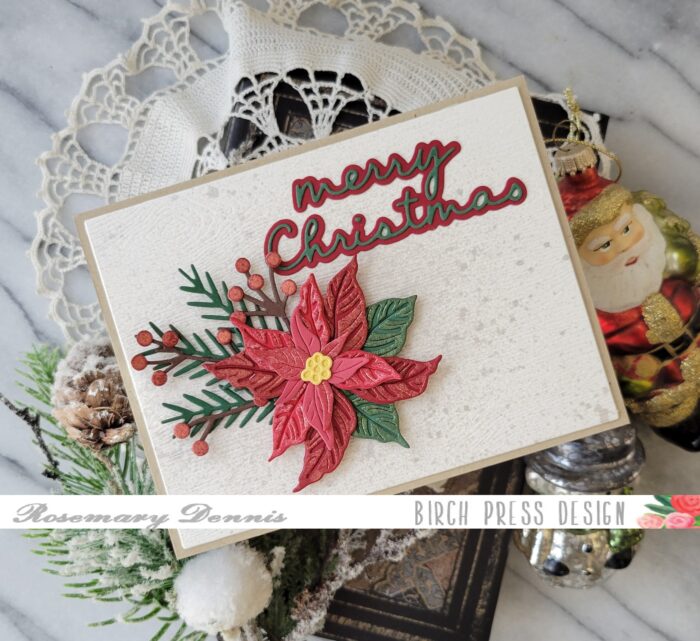
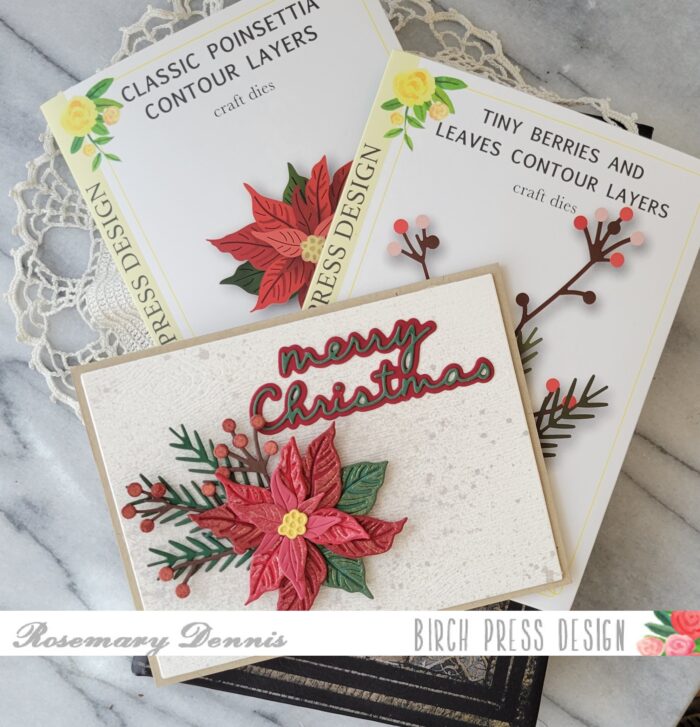
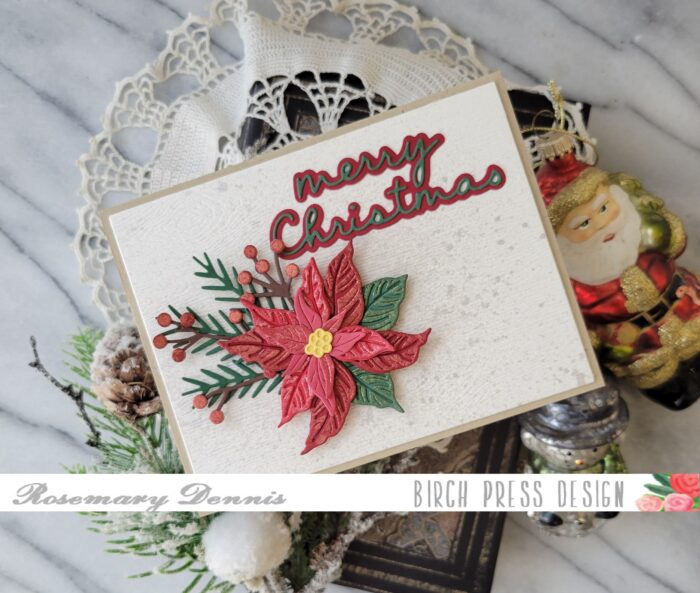
Hello everyone! Rosemary here on the blog today. Can you believe it is already September? I can’t. Today I have a Christmas card to share with you that I made with several new Birch Press Design products. Let’s have a look at what I made.
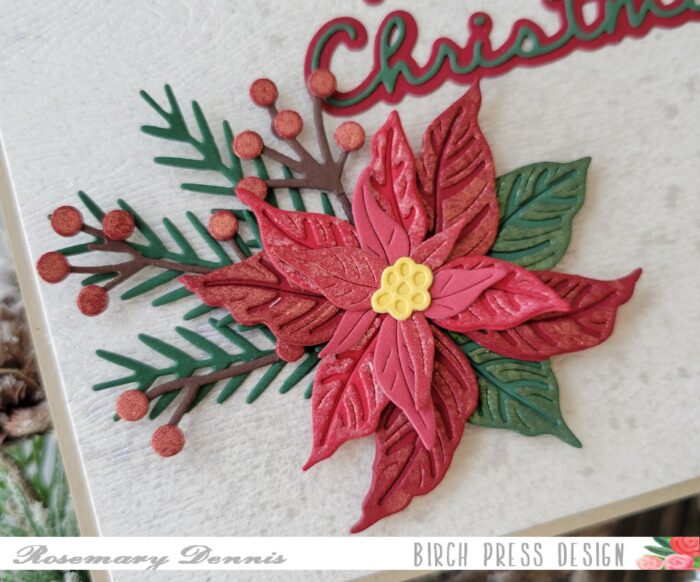
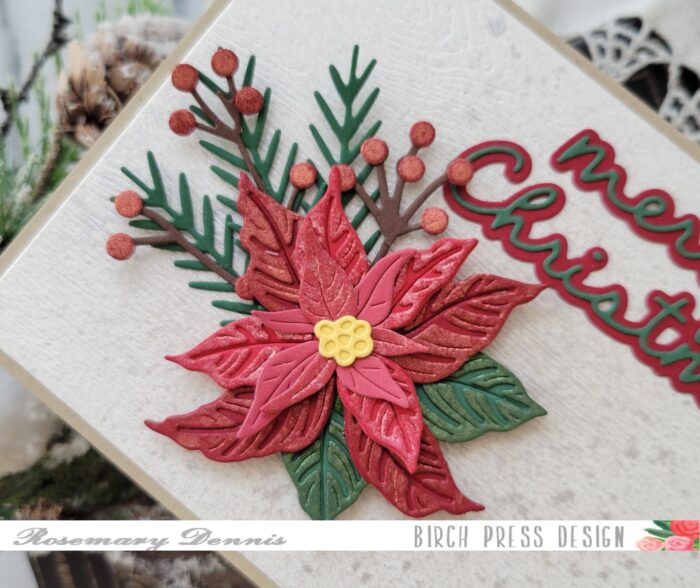
I love the Birch Press Design Poinsettia Contour Layer dies and the new Classic Poinsettia Contour Layers die set is no exception. It is so beautiful! I started by die cutting the layers from three shades of red Memory Box cardstock and one shade of green Memory Box cardstock. I then took the the top layer of each layer of the poinsettia and sprayed them with either Tart Cranberry or Peppermint Stick distress mica sprays. The top layer of the leaf was sprayed with Tree Lot distress mica spray.
Once the layers were dry I adhered them together with liquid adhesive. The center of the flower was die cut from yellow Memory Box cardstock and layered together with liquid adhesive. I did the same with the leaves. All the layers of the flower were then adhered together with liquid adhesive, as well as the leaves.
I die cut the pieces from the Tiny Berries and Leaves Contour Layers die from dark green and brown cardstock. The berries were die cut from dark red Memory Box cardstock and sprayed with Tart Cranberry mica spray. I cut down the berry stems to fit my design and then adhered the little berries to the stems with liquid adhesive.
In the close up photos you can see some of the pretty shimmer from the mica sprays. I arranged the leafy stems and the berry stems and then glued them together with liquid adhesive. I did have to trim off a bit of the bottom before apply liquid adhesive to the piece and adding the flower on top as you see in the photos. The sentiment is the new Merry Christmas Confection Script die set and it was die cut from the same cardstock used for the poinsettia and leaves. I adhered the two pieces with liquid glue and let it dry.
For the background I die cut some cream woodgrain Memory Box cardstock with a rectangle die and then sprayed the piece with Frozen Fog distress mica spray. Once the panel was dry I adhered two additional die cut rectangles behind it for a bit of dimension and then adhered it to my kraft cardstock base with double sided tape. The flower cluster and the sentiment were added to finish the card. Now I have another Christmas card to add to my stash!
I hope you enjoyed today’s card. Thanks for stopping by and have a wonderful day!
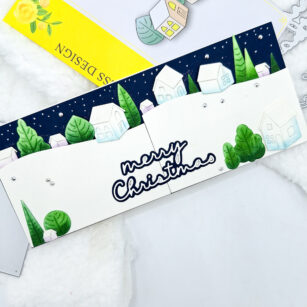
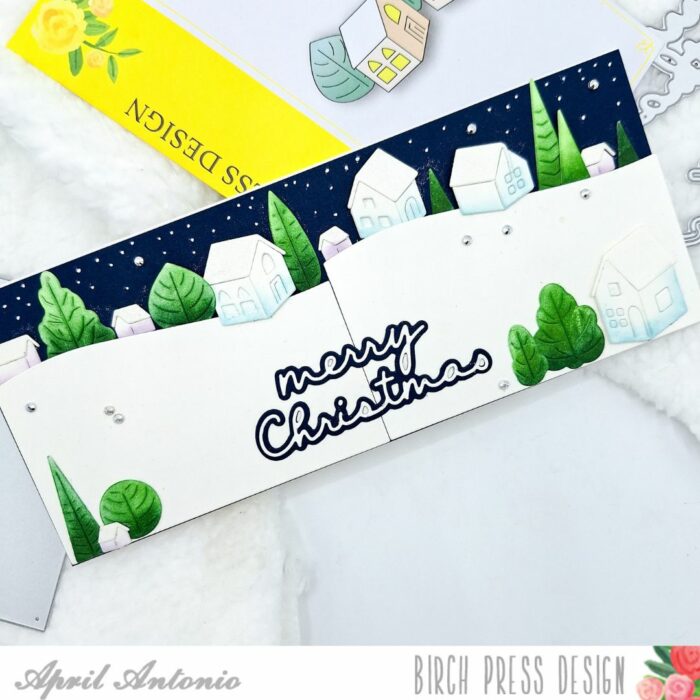
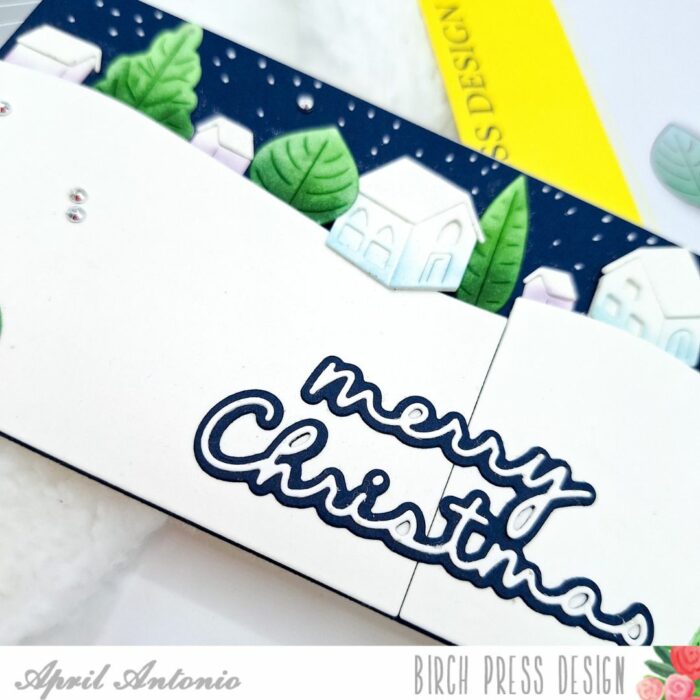
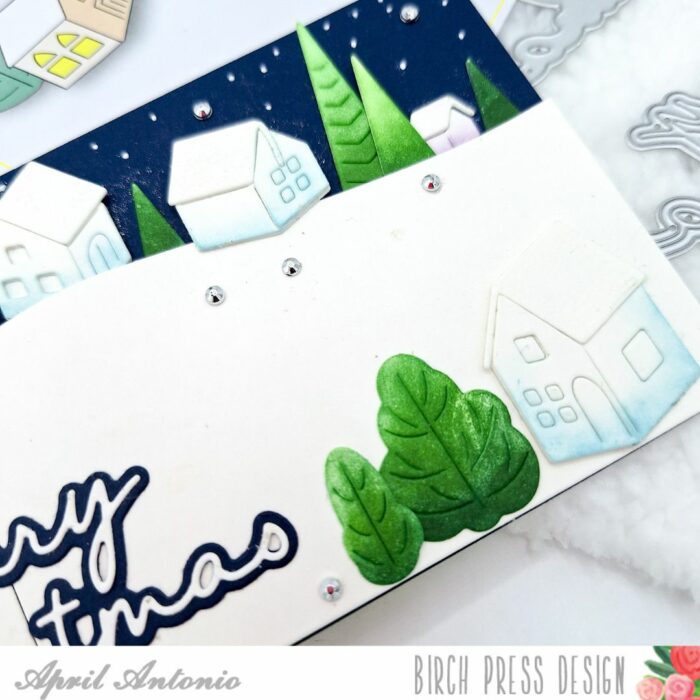
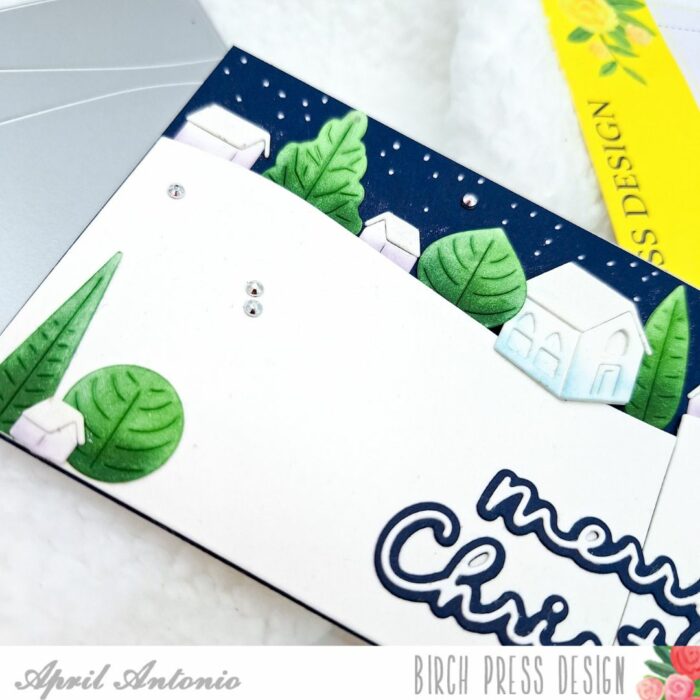
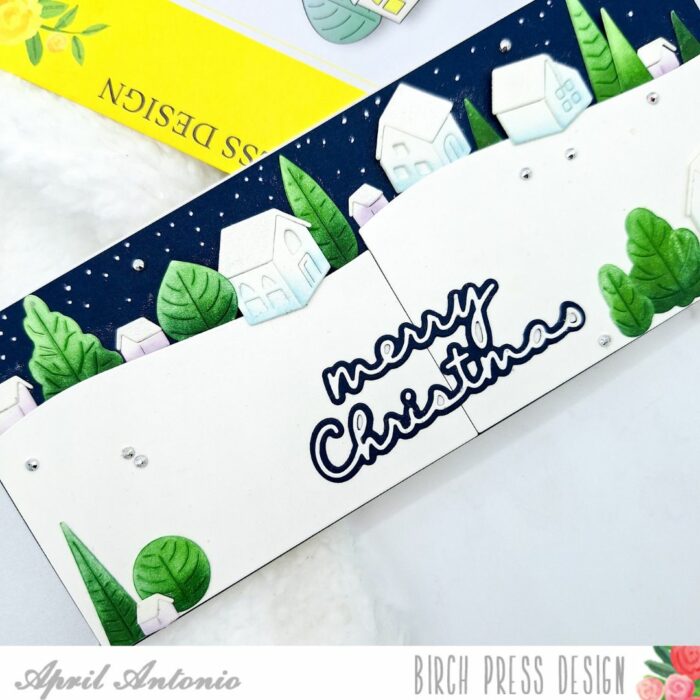
Hello friends! Design Team member April here today sharing an early Christmas card using some of the products from the new holiday release. With Autumn almost upon us, everything is about to speed up, so why not start on creating some holiday cheer?! Also, these new dies are just too cute to put down!
Here’s how I pulled this card together:
I grabbed a pre-cut slimline card base in white, and glued a dark blue cardstock mat to the background to represent the night sky. I used the new Wavy Hillside die set and cut the largest die from white cardstock twice. I glued the die cuts twice to the front of the slimline card using foam tape, and made sure to leave a little room at the top so that I could later tuck in some of the houses and trees.
I cut the Littletown Village, Littletown Church, and Littletown Home die sets all from white card stock, and assembled them accordingly. I then did some light ink blending in blue and purple on the bottom of each building, and did some darker ink blending in green on the trees. I then arranged the trees and houses across the hillside tucking some behind the ‘snow’ and placing some on top. I also added some to the bottom of the card front in either corner.
For my sentiment I used the Merry Christmas Confection Script die with the shadow in the same dark blue as my background and the letters cut out from white cardstock.
Finishing touches: I used a white gel pen to add some ‘falling snow’ to the dark blue background. I also added some silver jewels from the Memory Box Christmas Fairy Jewels set, and used a glitter pen to add some sparkle to the roofs of the buildings.
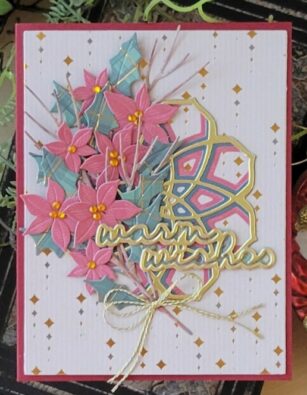
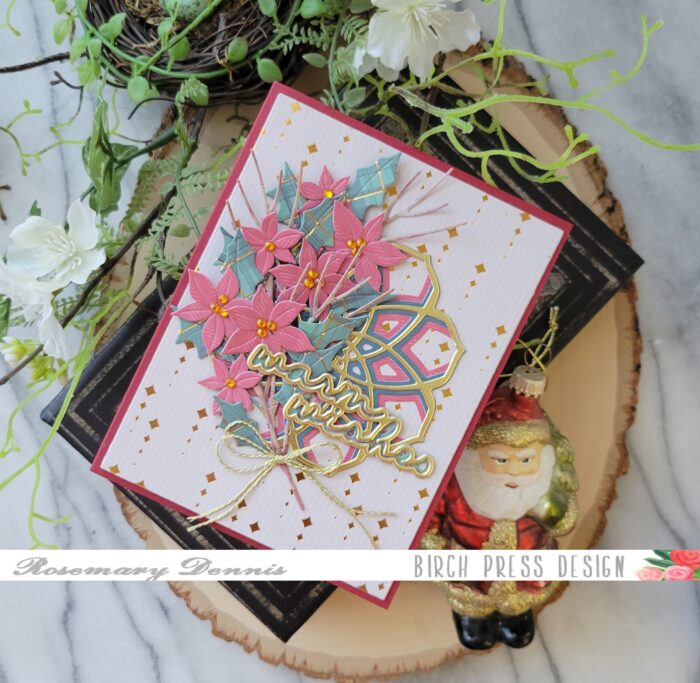
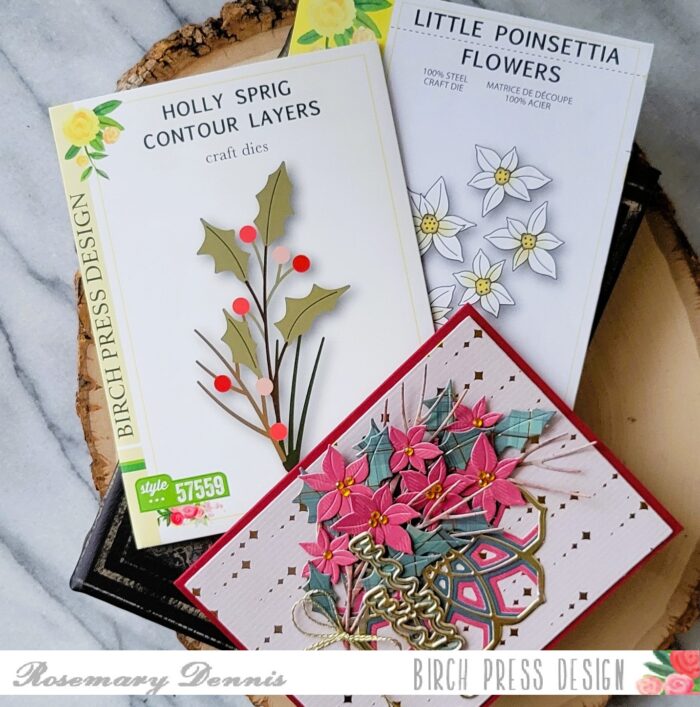
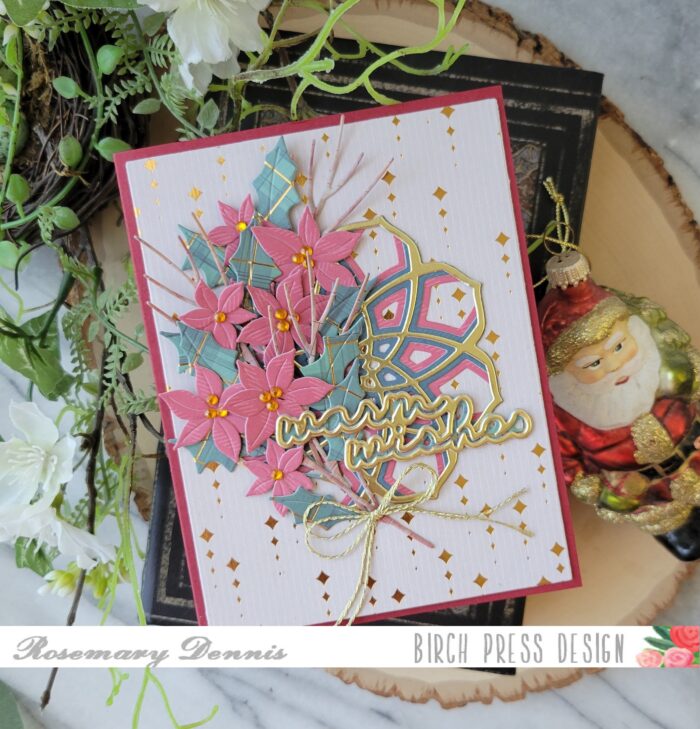
Hello, hello! Rosemary here today with a holiday card to share that I made using the following products from the new release: Holly Sprig Contour Layers, Little Poinsettia Flowers and Warm Wishes Confection Script. I also used the tried and true Cora Layering die set. Let’s have a look.
As I was looking through the new die set I noticed that the Little Poinsettia Flowers would work perfectly with the Holly Sprig Contour Layers die set. To create my little flowers I used patterned paper from the new Yuletide Cheer 6×6 pad from Memory Box. The die is all one piece allowing you to die cut as many flowers as you need very quickly. I cut the die twice in order to make enough flowers for three holly sprigs. I adhered the flowers using liquid adhesive and added yellow fairy jewels to the center of the flowers.
I then die cut the holly sprigs from a green plaid paper from the Memory Box Yuletide Plaid 6×6 pad. Since there are touches of gold foiling on all the papers I decided to die cut the sprigs from that side of the patterned paper for that little bit of added sparkle and shine. There are also little pine like sprigs in the Holly Sprig die set. I die cut those from the reverse side of another piece of Yuletide Plaid that had a brown hue to it. I adhered the flowers to the Holly Sprigs on the spots where the berries are supposed to be. I really like the look!
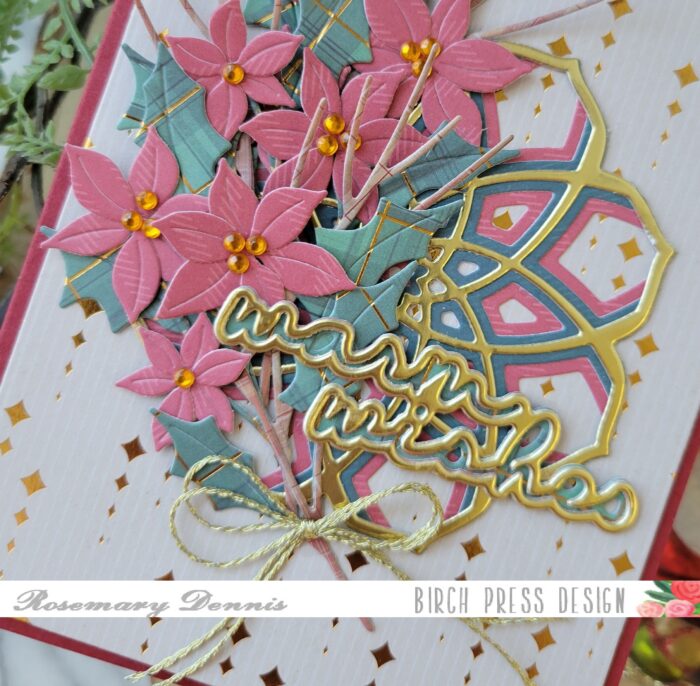
For the background I decided to use another piece of paper from the Yuletide Cheer pad that featured gold foiling. I tried just layering the three holly sprigs on to the background but decided I needed a little something else. So I went through my layering die sets and settled on the Cora Layering set. I die cut the bottom and middle layers from the patterned papers I used for the flowers and stems and the top layer from gold metallic cardstock. I adhered the layers with liquid adhesive and then added it to the background paper. Because the patterned paper is thin I die cut additional rectangles of the same size from white cardstock and adhered them behind the patterned paper rectangle using liquid adhesive. I weighted everything down so it would dry flat.
I die cut the Warm Wishes Confection Script from the green plaid paper, as well as from the gold metallic cardstock and adhered the layers together with liquid glue. Once the background was dry I layered on the holly sprigs that I created with liquid glue. I tucked some of the little pine sprigs into the arrangement at various points. I finished off the card with a bow tied from gold metallic thread and the sentiment.
I really like die cutting using patterned papers, especially papers with a subtle pattern to them, as it adds so much texture and interest to a card. I hope you enjoyed today’s card. Thanks for stopping by and have a wonderful day!
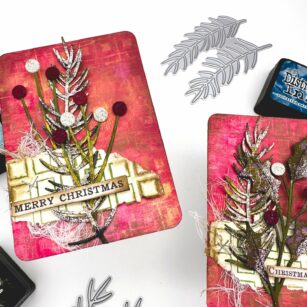
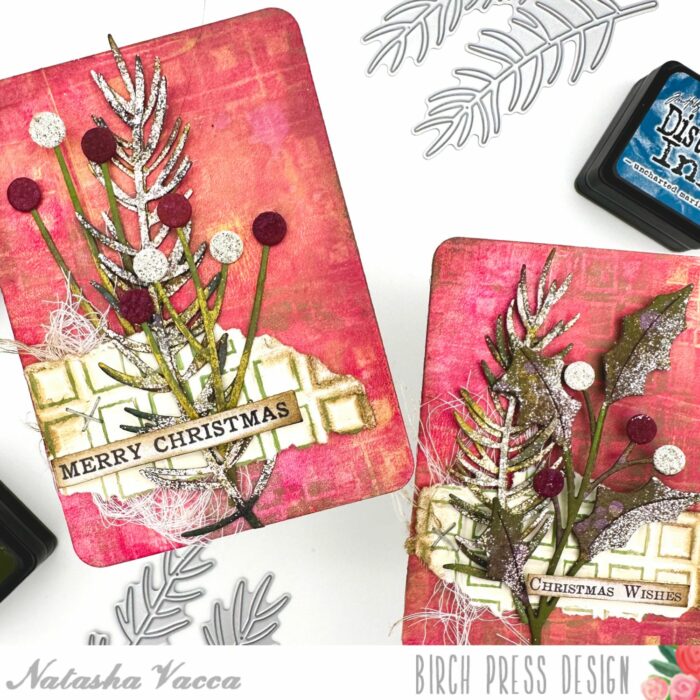
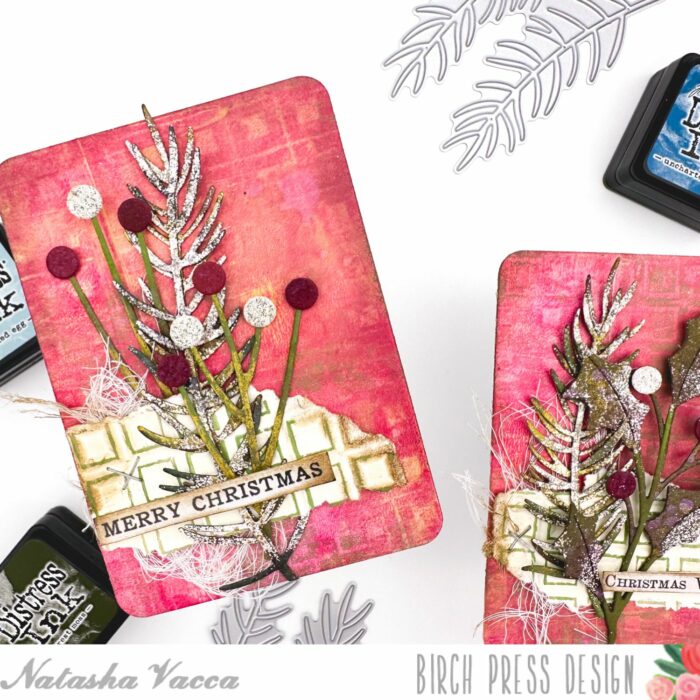
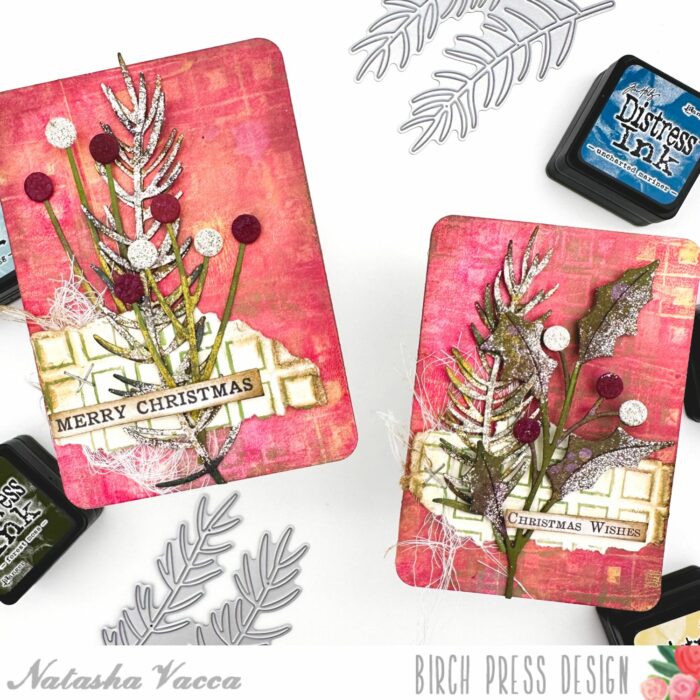
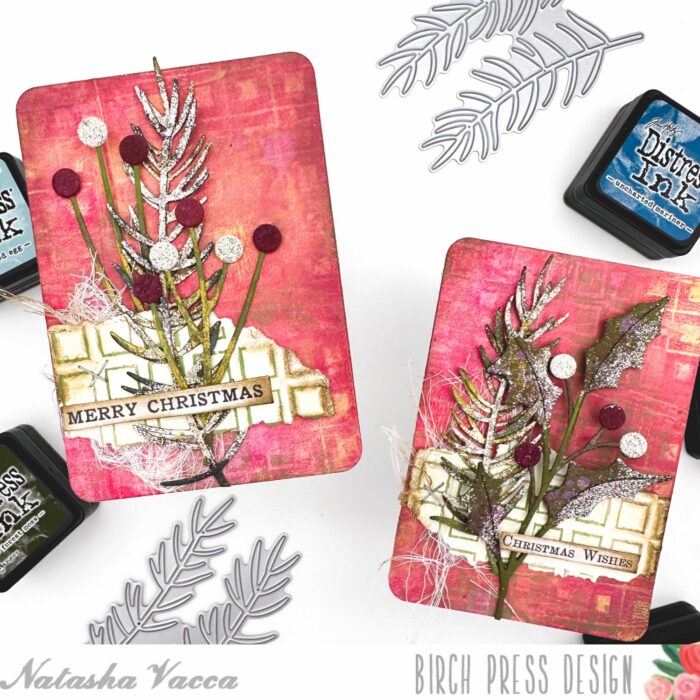
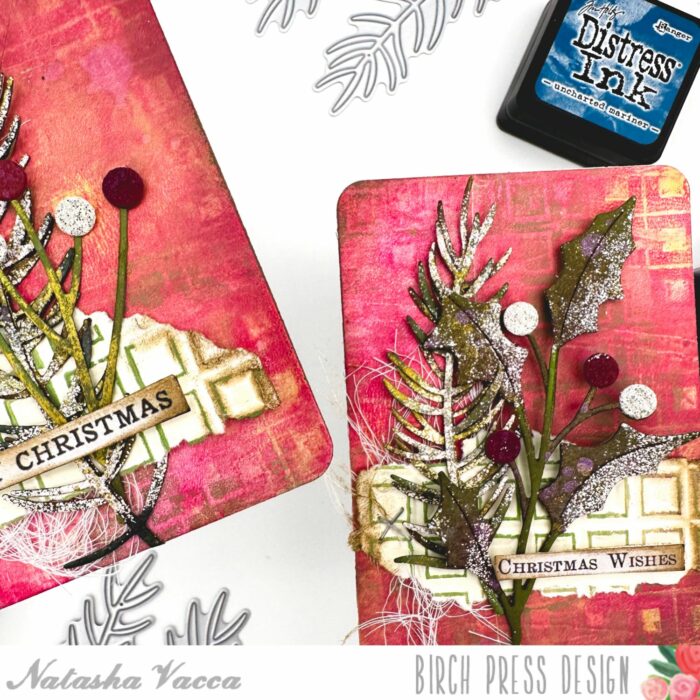
Hello Birch Press friends, it is Natasha here today sharing a couple of ATC’s (Artist Trading Cards) using the Holly Sprig and Pine Needle Twigs die sets. I had a lot of fun creating these, let’s get started!
I started by die cutting both the Holy Sprig and Pine Needle Twigs die sets using paper pads from Memory Box. I used the following pads: Blush, Greenery, Earth Neutral, and the Festive Glitter Pad. For each of the die cuts I used a combination of dye inks, sprays, as well as embossing powder to add texture to each of the die cuts. Once everything was completed, I adhered all the layers together using liquid glue.
Next I chose a gelli print background from my stash. The background was made on my gelli plate using the Geometric Crystals embossing folder. I dry embossed the folder, then used the dry embossed panel to create prints on my gelli plate. I also kept the dry embossed panel as an extra piece for additional layers. I trimmed the panel down into 2 ATC’s. I then inked the edges using Distress Ink.
Next I determined the layout for each ATC. I added additional texture to each ATC with a piece of cheesecloth, as well as pieces of the Geometric Embossing folder. I adhered everything using liquid glue and foam tape.
I completed the project with 2 small sentiment strips from my stash. I had a lot of fun creating these and I hope you enjoyed them!
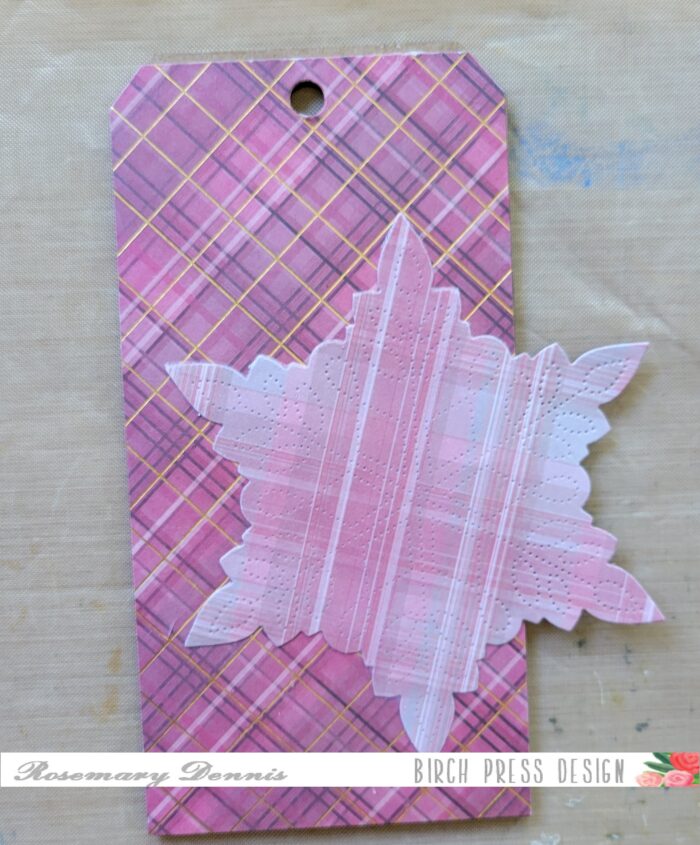
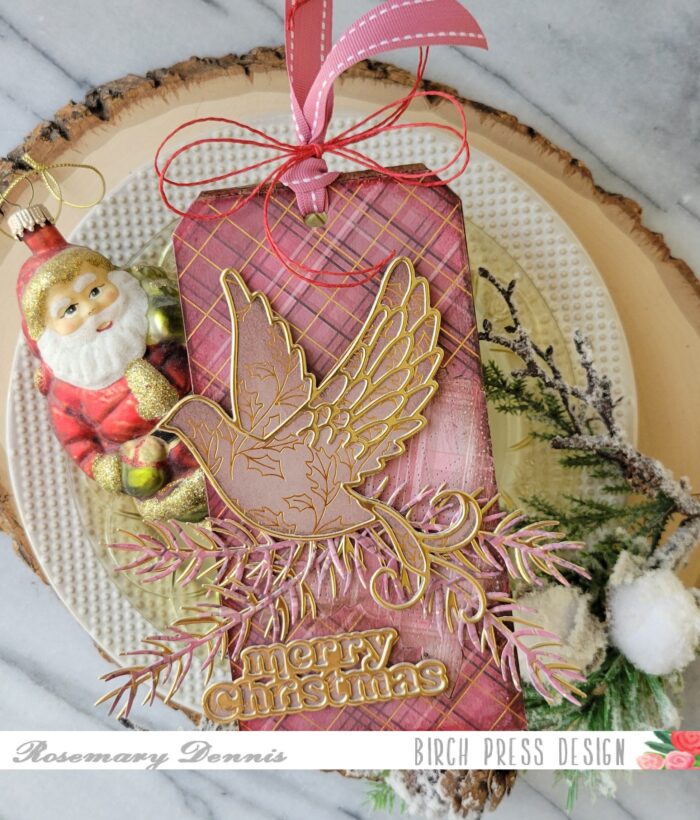
Hello! Rosemary here on the blog today. Today is July 25th and so I decided to make a “Christmas in July” project. I used several older products and one newly released product for today’s project. Let’s have a look at what I made.
Today’s project is a large tag that can be used as a deco piece at Christmas time. I really enjoy making these kinds of projects to share. I started with a Tim Holtz thickboard tag. I pulled out a piece of plaid paper from the Poinsettia Plaid 6×6 pad that had various shades of red in it and trimmed it down to fit the tag. The top of the paper has a hole in it so that the pad can be hung and I used that to my advantage. I aligned the hole in the paper with the hole on the tag, trace around the tag and then trimmed out the paper. There was a little bit of the tag not covered at the very top, but in the end you don’t really notice it.
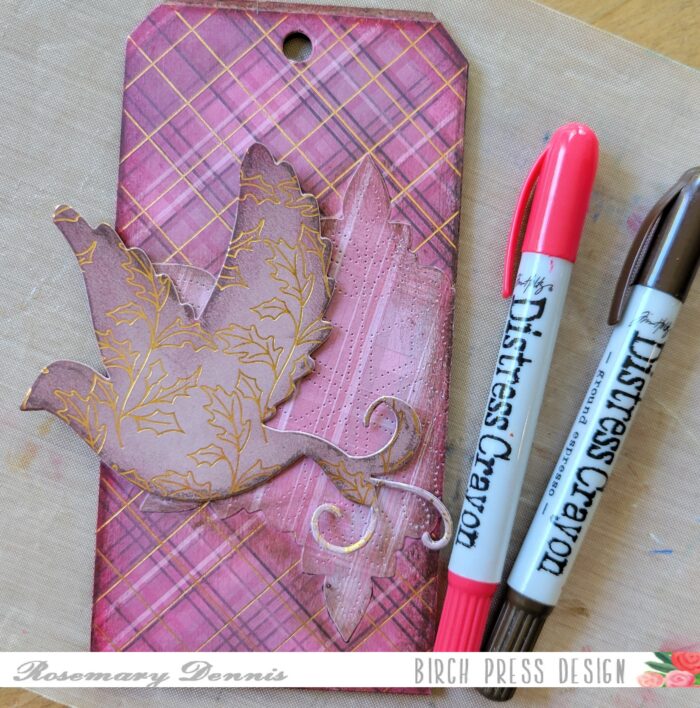
I then adhered the paper tag to the thickboard tag using distress collage medium and let it dry. I then decided to add another layer of texture to the tag by adding the large Pinpoint Snowflake that I die cut from the reverse side of the paper used for the tag. I adhered the snowflake to the tag using the collage medium, as well, and once things were dry trimmed off the one side. Once I had the base of my tag put together I worked on the focal point of the tag. For this I used the pretty Adornment Dove die set. Initially I die cut solid layer of the dove from three different papers from the Poinsettia Garland 6×6 pad and determined which one I wanted to use. As you can see I went with the lightest paper dove.
I then die cut the top layer from gold foil cardstock from the Vintage Pastel Mirror 6×6 pad. To give the base layer of the dove a little more stability I adhered the other two doves I wasn’t using behind the main one. The Vintage Merry Christmas sentiment was also die cut from the same papers and adhered together. I used liquid adhesive for both. Then I got out distress crayons in festive berries and ground espresso to blend onto the edges of the dove, the tag and around the snowflake. Once I had done that the small gap at the top of the tag almost completely disappeared!
As I was working on my tag the newest release from Birch Press Design landed in my mailbox. It is absolutely gorgeous! So I decided to make sure to incorporate one of the new products from the release into my project. I made the decision to use the Pine Needle Twigs Contour Layers dies. I die cut them from scraps of the paper I used, as well as the gold foil cardstock and then layered them together using liquid adhesive.
Once they were dry I began layering the elements on to my tag. I started with the Pine Needle Twigs using liquid adhesive to attach them. I used a combination of liquid adhesive and foam squares to attach the dove. Foam squares were also used to attach the sentiment. I finished off my tag with some ribbon looped through the hole in the top and then tied with some red twine.
I hope you enjoyed today’s project. I had a lot of fun making it! Thanks for stopping by and have a wonderful day!