Category: Contour Layers

  • A “Thank You” Card in Soft Purplesby April Antonio

    A “Thank You” Card in Soft Purples
    by April Antonio

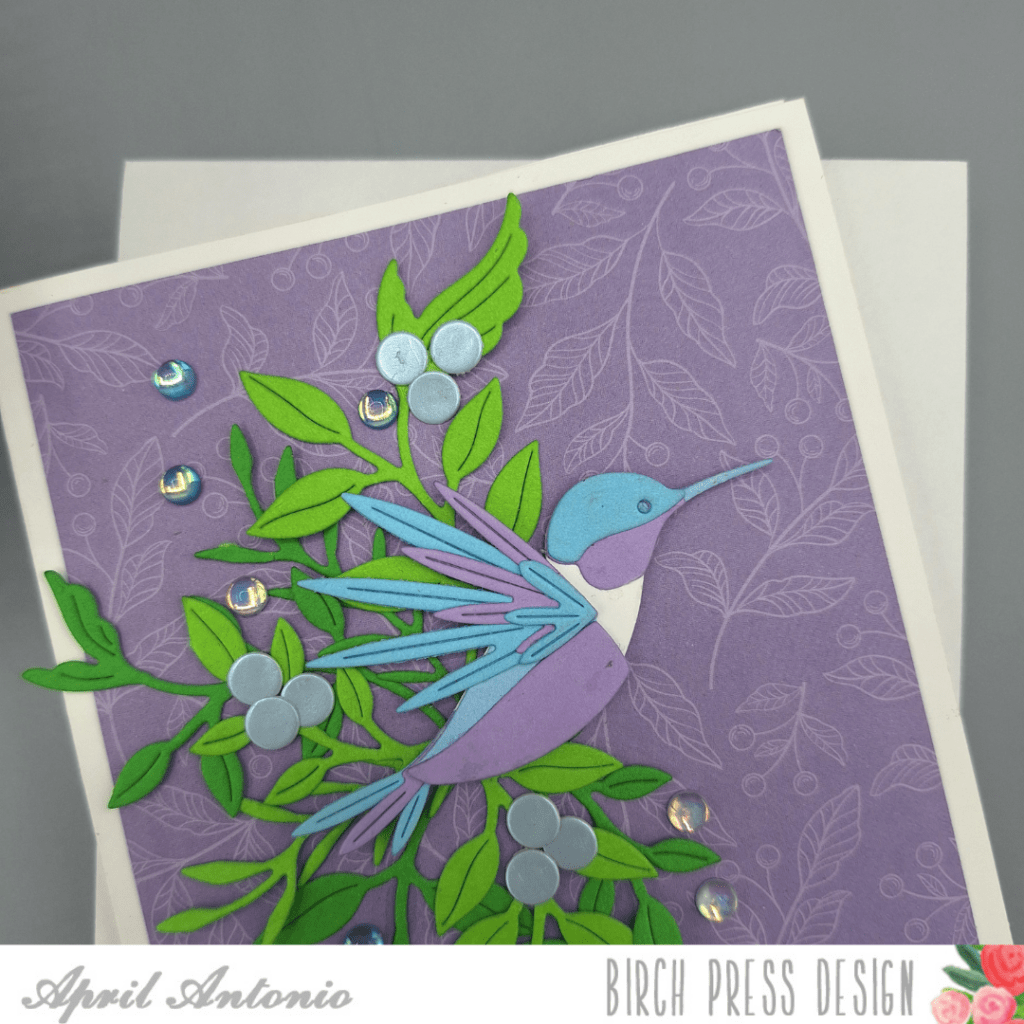
    There’s something about a hummingbird mid-flight that makes a card feel alive — and when you set one against a soft, dusky purple background, the whole thing turns into a little moment of calm. This is a “Thank You” card I made using the Block Print Soaring Hummingbird, and I’m so happy with how serene and pretty it came out. Let me walk you through how it came together.

    Starting with the base

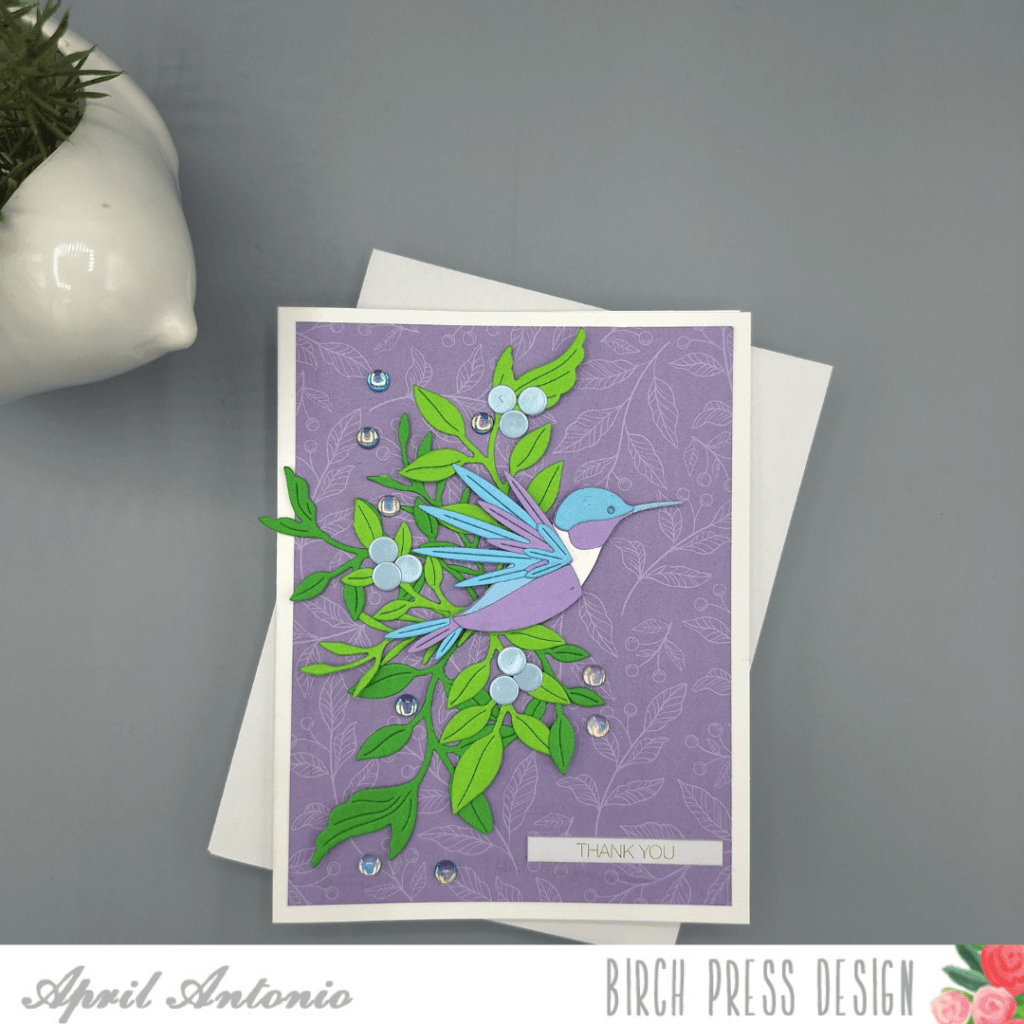
    I kept the foundation clean and simple — a crisp white card base — so all the color and detail could really sit front and center. With a design this layered, I find it helps to start neutral and let the dies do the talking.

    A soft, leafy background

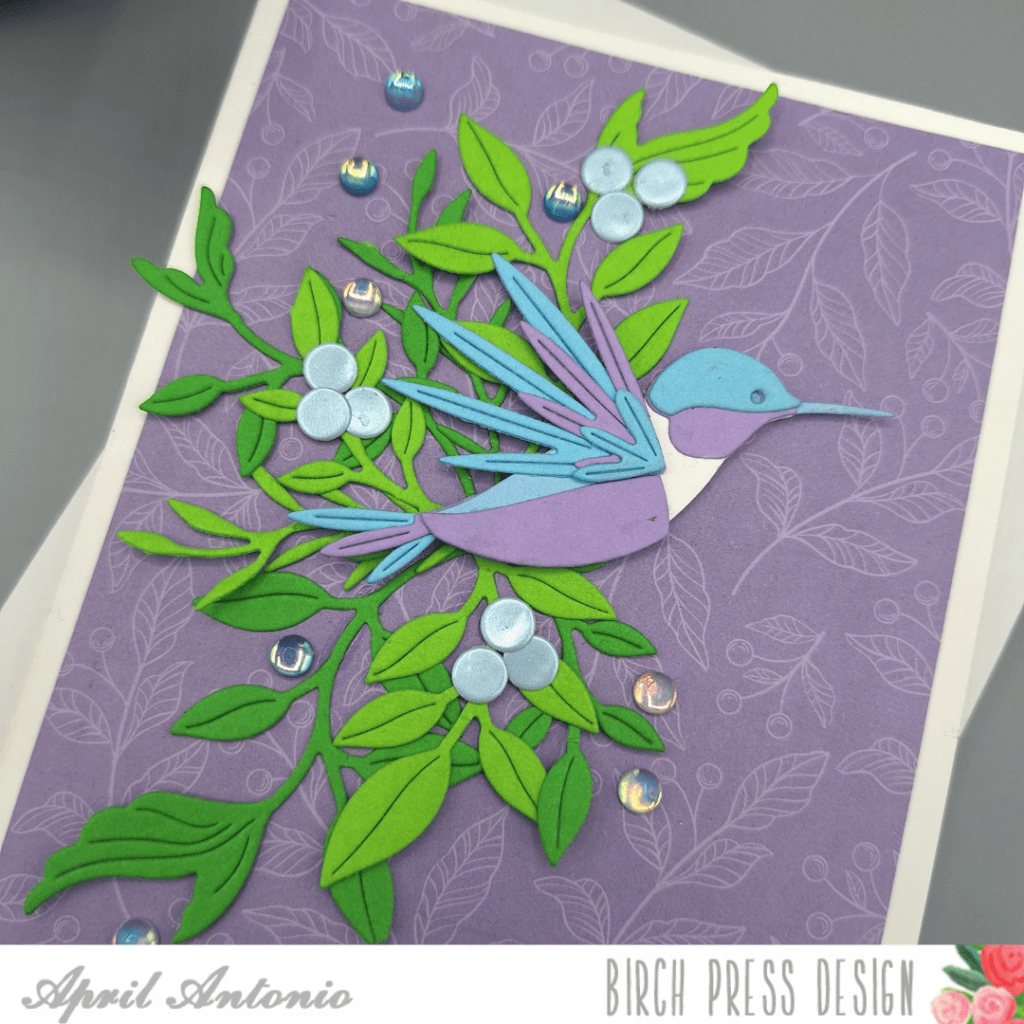
    Before adding anything else, I built out the background panel in a gentle dusky purple using a patterned paper sheet from the Lavender Bloom Paper pack from Memory Box. I love the way the tone-on-tone leaf-and-berry pattern fades into the cardstock — it gives the panel depth and movement without ever competing with the main scene. That subtle botanical layer is what makes the bright greens and the hummingbird pop the way they do.

    Die cutting the foliage

    Next came the greenery, and this is where the card really started to feel like a little garden. I cut the leaves and branches from a mix of greens using the Foliage Bunch die set. Working with two greens instead of one gives the foliage so much more dimension; some leaves come forward, others recede, and suddenly you’ve got a believable little thicket for your bird to fly through.

    Building the hummingbird

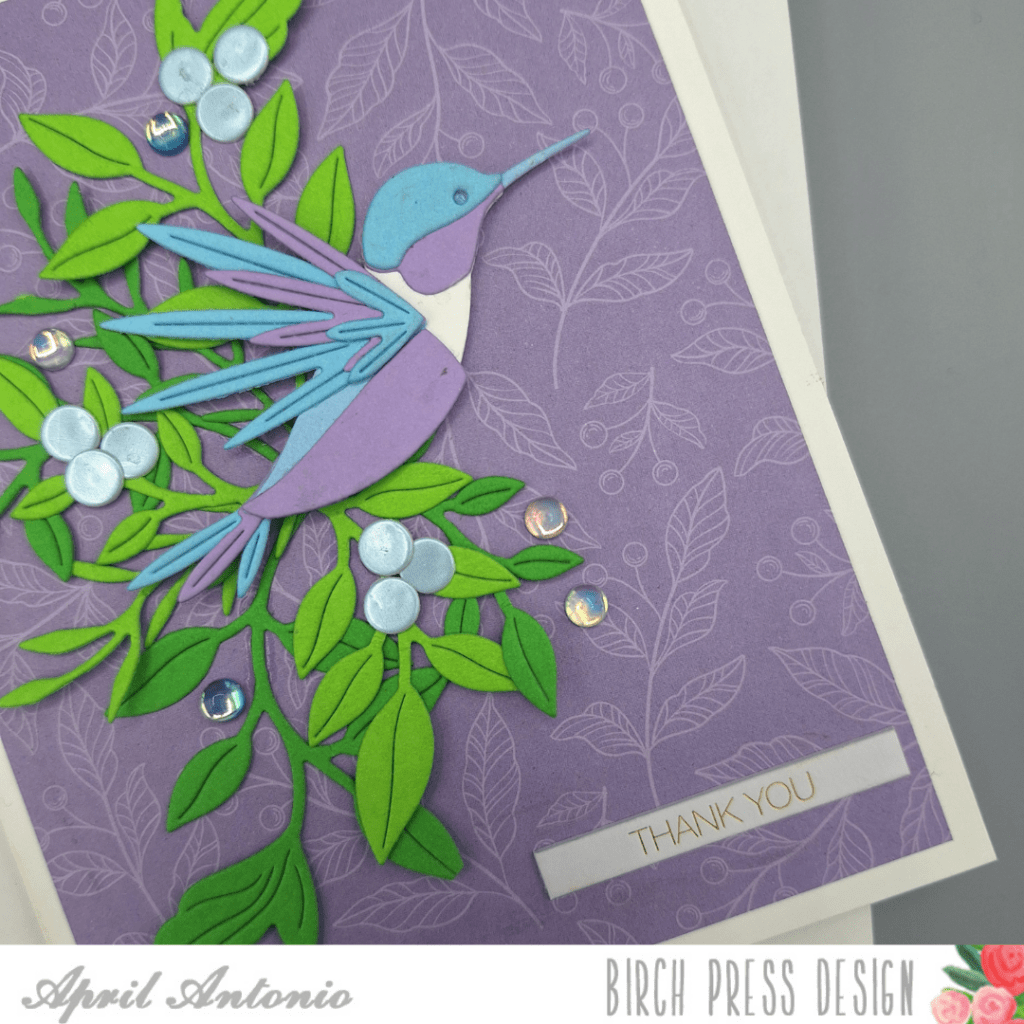
    Now for the star of the show. The Block Print Soaring Hummingbird is such a beautiful, layered die — those long, fanned wing feathers are what give it that gorgeous sense of motion. For this version I went cool and dreamy: a soft lilac body paired with layers of sky blue and periwinkle across the wing and tail. I used cardstock colors from Memory Box in Blueberry Mist and Lavender Bloom.

    I foam mounted the finished hummingbird up off the foliage so it sits of the panel.

    A scatter of berries

    To tie the scene together a bit more I took the berry die from the Block Print Mod Branches die set and cut some pastel blue ‘berries’ out. I added clusters of soft blue berries nestled in among the leaves.

    Adding the sentiment

    For the greeting I kept it short and warm — a simple “thank you” in the lower right corner using one of the beautiful gold foil greetings from Memory Box (p.s. they also come in a beautiful gold foil on black!). I love using these sentiments, especially when I’m short on time, because they are beautiful and easy to adhere to any card.

    The clean little gold sentiment is just enough; with so much happening in the florals and the bird, the card didn’t need a long phrase.

    Finishing touches

    To finish, I scattered a handful of iridescent gems across the panel since I can’t resist adding some sparklies!

    The finished card

    The end result is a card that feels soft, a little bit magical, and genuinely peaceful — exactly the energy I want a thank-you to carry. The dusky purple background lets all those cool blues and fresh greens breathe, and the hummingbird brings just enough movement to keep your eye dancing around the whole scene.

    Have you made a card with the Block Print Soaring Hummingbird]? I’d love to see your version — tag Birch Press and share what you’ve created!

    Happy crafting,

    April

  • Boho Butterfly Birthday by Rosemary Dennis

    Boho Butterfly Birthday
    by Rosemary Dennis

    Hello everyone! Rosemary here with a sweet birthday card and tag made with the Linear Boho Butterflies dies and pretty papers from the Memory Box Anemone Grove 6×6 pad. Let’s look at what I created:

    As I started thinking about how I wanted to use the Linear Boho Butterflies dies I thought it would be fun to use some patterned paper. I looked through my Memory Box 6×6 pads and settled on the Anenome Grove pad. I went with papers that both had a light purple hue to them and a subtle pattern.

    I wasn’t exactly sure how I was going to use the butterflies so I decided to die cut multiples from each piece of patterned paper. The bodies of the butterflies were also die cut from the same papers. As I played around with ideas I thought it would be fun to use the Pinpoint Contour Plate to provide some movement on the background. The panel was die cut from white cardstock and set aside.

    There are three large butterflies and two tiny butterflies in the die set. I decided to layer all three of the larger butterflies together by alternating the different patterned papers. The look is very subtle, but pretty. I also layered the two tiny butterflies in the same manner. To finish off the butterflies I added clear Memory Box fairy jewels to the bodies of all the butterflies. To keep the subtle purple going I ink blended a light purple ink around the edges of the background panel and then added the butterflies and sentiment to the card.

    After I finished the card I still had one large layered butterfly and two tiny layered butterflies left. So I thought it would be fun to make a little tag. I used a scrap of white cardstock and die cut it with the Pinpoint Contour Plate and then die cut it further with a Memory Box Curved Cap Pinpoint Layers die. I added the same light purple ink around the edges and stamped the sentiment. Both sentiments are from the Plain and Simple Birthday Greetings. I finished with a little bow made with purple twine.

    I love how both the card and the tag turned out. I hope you enjoyed today’s project. I had a lot of fun creating them.

    Thanks for stopping by and have a wonderful day.

  • A Spring Garden Card by April Antonio

    A Spring Garden Card
    by April Antonio

    Sometimes two dies come together and create something that just feels like pure Spring joy — and that is exactly what happened with this card. The Block Print Radiant Butterfly and Block Print Daisy Flower dies were practically made for each other, and I had so much fun bringing this little garden scene to life.

    Building the garden scene

    The card base is Memory Box Powder Blue cardstock — and from the moment I cut it I knew this was going to be a happy card. That soft blue sky color sets the whole mood — fresh, airy, and full of possibility. Memory Box is a sister brand to Birch Press Design, and their cardstock is my go-to for all my Birch Press projects. The colors are rich, the weight is perfect for die cutting, and they coordinate beautifully with the Block Print die collection.

    The daisies

    The Block Print Daisy Flower die creates the most beautifully detailed daisies. The die set comes with two flower sizes — one taller and one slightly shorter — to give the composition a natural, garden-grown feel. Both I cut from heavy weight white cardstock with the flower centers in Memory Box Golden Wheat. The stems and leaves are cut from Memory Box Key Lime and Leaf Sprout, which together create that lovely variation of greens you see in a real garden. Using two different greens side by side adds so much depth to what could easily be a flat background element.

    The star of the show

    The Block Print Radiant Butterfly is everything. The wing layers in this die set are stunning — so detailed, so satisfying to piece together — and the combination of Memory Box Summer Squash and Orange Peel for the upper and lower wing layers gives this butterfly such warmth and vibrancy against that cool blue background. The antennae are cut from the Memory Box Glossy Paper Pack in Black, which adds that crisp finishing detail that really brings the whole butterfly to life.

    The butterfly is foam mounted over the daisy stems so it feels like it’s truly landing in the garden — that little bit of dimension makes such a difference in the finished card.

    The finishing touch

    I finished the card with a happy birthday sentiment from the Open Studio Greeting Tabs. Simple, clean, and lets the garden scene do all the talking.

    The result is a card that feels genuinely alive — like you caught a summer garden at just the right moment, butterfly wings still mid-flutter. I hope it inspires you to pull out your own Radiant Butterfly die and see what garden scenes you can create!

    A little sneak peek for the curious

    If you’ve ever looked at a layering die and wondered where to even begin with all those pieces — you’re not alone. I’ve been working on cut maps for my Birch Press dies to help map out the layering order before I start, and I made one for this butterfly. I’m not ready to share the full tutorial just yet, but if you look closely at the photo below, you might get a little preview of what’s coming. 😉

    Stay tuned — there’s more to come on this one!

    I’d love to see what you’ve made — tag Birch Press Design and share your version!

    Happy crafting,

    April


  • Spring Butterflies by Toni M Maddox

    Spring Butterflies
    by Toni M Maddox

    Are you ready for nicer weather, my friends? Toni here and I’m very much looking forward to spring so I channeled that into a cheerful card.

    To create the background, I used two layers of the Flora Plate set, one from Memory Box Cilantro cardstock and the other from Key Lime.

    Next, I cut out a branch from the Floral Arch Contour set from kraft. I then added Abundant Branch blossoms which I had cut from Memory Box Summer Squash cardstock.

    Creating the butterflies might have been my favorite part. I cut the Linear Boho Butterflies from Memory Box Golden Wheat cardstock then sponged them with an orange and magenta ink to create a gradient. They’re so pretty!

    Finally, I added the Thinking of You Vintage Sentiment, using black on white to really draw the eye.

    I hope you enjoyed today’s card and have a great rest of your week!

    Feel free to visit my blog, Frankie Helps Craft, for a full list of supplies used and to check out my other creations.

  • Blue Heron Hello by Toni M Maddox

    Blue Heron Hello
    by Toni M Maddox

    Happy New Year, my friends! Toni here with an Asian-inspired any occasion card.

    To create the medallion, I used the Arista Layer Set.

    Notice how I used vellum for the first layer to make a subtle contrast to the texture base layer.

    Next, I constructed the Block Print Majestic Heron using a shimmer cardstock in ombre shades of blue. I love that sparkle!

    I used the same cardstock for the Hello Scripted sentiment.

    I hope you enjoyed today’s card and have a great rest of your week!

    Feel free to visit my blog, Frankie Helps Craft, for a full list of supplies used and to check out my other creations.

    Supplies

  • Just Because | by Crystal Komara

    Just Because | by Crystal Komara

    Hello readers! This is Design Team member Crystal Komara here with you today sharing a card that I made using products from the Block Print Ocean inspired collection. Yes, this is my third card this month using some of these products, because it is such a beautiful collection, particularly if you are into the nautical theme.

    The base of this A2 sized card is made from 110 lb. Neenah Solar White Smooth cardstock. I used a piece of pre-watercolored background paper as the first layer. I keep a stack or supply of watercolored backgrounds and alcohol ink backgrounds, because it’s SO much easier to just pull from them, rather than creating on the fly.

    Using the Block Print Majestic Whale and Block Print Whale duo, I die cut the whales from a navy blue cardstock and white cardstock. I used a liquid adhesive to adhere the components together and then once the whale pieces were assembled, I added the whales to the card using 3M foam adhesive for added dimension.

    Using the Sea Kelp and Mini Fish dies, I die cut the key from a lighter blue and a green cardstock. I stamped the sentiment on a white circle in navy ink.

    What a majestic whale! It makes for such an elegant card. Thanks for visiting and have a wonderfully creative day.

  • Underwater Hugs | by Toni M Maddox

    Underwater Hugs | by Toni M Maddox

    Hello, everyone! This underwater scene was so fun to create. I love seahorses. And that jellyfish–look at it!

    My first step was to sponge the blue card base with Catherine Pooler inks and one layer of the two-part Light Ray Stencil. I spattered this with water and set aside.

    Next I fussy cut the sand layer using a piece of scrap kraft cardstock and sponged it with CP Sand Castle ink.

    I cut a few of the Block Print Sea Kelp & Mini Fish from a shimmery green and silver cardstock. I sponged the Sea Kelp with CP ink for a bit of shading.

    I diecut the Block Print Proud Seahorse, Block Print Floating Jellyfish, and Block Print Dancing Crabs from a few Memory Box cardstocks with shimmery cardstock scraps for highlights.

    I sponged the cardstocks, including the Sugar Script Big Hugs sentiment, with CP inks. I assembled the final scene, tucking the creatures in among the greenery. So cute!

    Do visit my blog, Frankie Helps Craft, for a full list of ingredients and to check out my other projects.

    I hope you enjoyed today’s card and have a great rest of your week!

    Supplies

  • Origami Asian Cranes | by Toni M Maddox

    Origami Asian Cranes | by Toni M Maddox

    Hi, everyone! Today’s card has an Asian flavor with its papers and cranes.

    I chose an origami paper from my stash that reminded me of lily pads and lotus pods. It’s a rather busy pattern so I cut an arch from vellum and layered that on top to soften the area behind the birds.

    Next, I cut Corner Waves in two neutral colors to represent sand and two from shimmery blue for water.

    With the background set, it was time to work on the Block Print Seaside Crane and Block Print Standing Crane.

    I used a shimmery orange for the flashy bits of the herons and a glittery gold cardstock for the legs and beaks to pull in the gold from the origami paper.

    I pulled one of my favorite Vintage Everyday Greetings sentiment stamps out and embossed it in Ranger Princess Gold on vellum. I accidentally overheated it just enough to create a sandy texture. A good oops!

    Feel free to visit my blog, Frankie Helps Craft, to see the full list of supplies used as well as check out my other projects.

    I hope you enjoyed today’s card and have a great rest of your week!

    Supplies

  • Block Print Passion Fruit Flower Butterflies | by Crystal Komara

    Block Print Passion Fruit Flower Butterflies | by Crystal Komara

    Hello friends and happy Tuesday! Welcome back to another post with Design Team member Crystal Komara. Today I have gotten a little extra creative and turned the new Block Print Passion Fruit Flower dies into butterflies. It sort of happened by serendipity – or a fortunate accident, but I’m not mad!

    The base of this A2 sized card is made from 110 lb. Neenah Solar White smooth cardstock. This is my go-to cardstock for all my card bases because it is nice and sturdy. First, to create the background I cut a 5 1/4″ x 4″ piece of lilac purple paper and adhered it directly to the white card base.

    Using Plate B of the Flora Plate Layer Set, I cut a piece of white cardstock and adhered this directly over the lilac purple cardstock to create visual interest.

    Now for the flower/butterflies: Using the Block Print Passion Fruit Flower dies, I create flowers from various colors of purple cardstock (with green stamens. I create a total of four flours and then I accidentally dropped two of them on the flower and they kind of fell into a butterfly shape and I thought hmmmm. . . . if I cut off the stems and glue them together, they DO look like butterflies, so I went with it!

    I adhered two of the flowers together to create a butterfly and then I added a second set to the front of the card.

    Lastly I added a tab foil sentiment from Memory Box Company (a sister company of Birch Press Design) and voila – a butterfly card made from flowers!

    Thanks for visiting and have a wonderfully creative day!

  • Flashy Fintastic Hello | by Toni M Maddox

    Flashy Fintastic Hello | by Toni M Maddox

    Hello, everyone! It’s summer and the water’s fine! Toni here with you today sharing a card made using some cute fishies from the new release. I love them so so much!

    I wanted a school of fish, like what you might see in a giant aquarium. To achieve that I cut out a variety of fish using Memory Box cardstock.

    • Block Print Pond Fish, Striped Fish, & Angelfish: Key Lime, Lavender Bloom, Summer Squash
    • Block Print Swimmer Fish (middle right): Orange Peel, Summer Squash & Lavender Bloom
    • Block Print Swimmer Fish (middle): Orange Peel, Summer Squash & Key Lime
    • Block Print Glider Fish: Key Lime, Lavender Bloom, Summer Squash, Orange Peel & Powder Blue

    I used Catherine Pooler inks with the cardstock to create variations in color for each fish.

    For the sentiment I used the Sugar Script Big Hello die and outline in Summer Squash and sturdy black. The sentiment embossed on vellum is Lawn Fawn which coordinates so perfectly.

    I added some glam with a no-shed aqua glitter cardstock as the card front. Swoon!

    Feel free to visit my blog, Frankie Helps Craft, for a full list of supplies and to check out my other projects.

    I hope you enjoyed today’s card and have a great rest of your week!

    Supplies