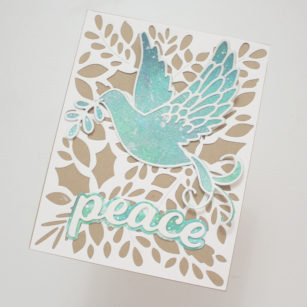
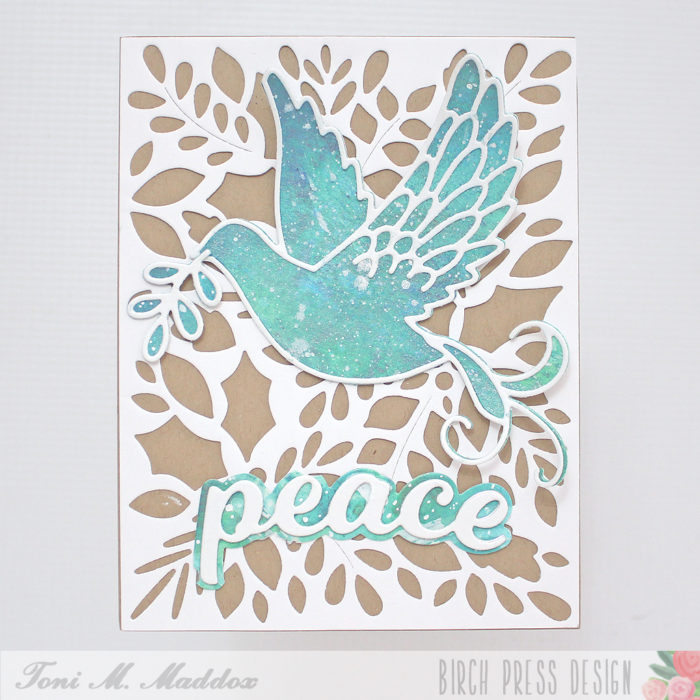
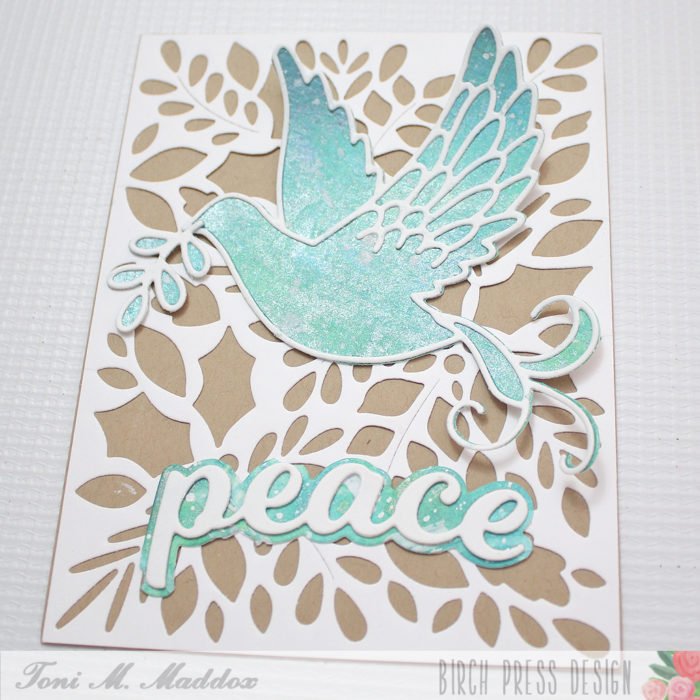
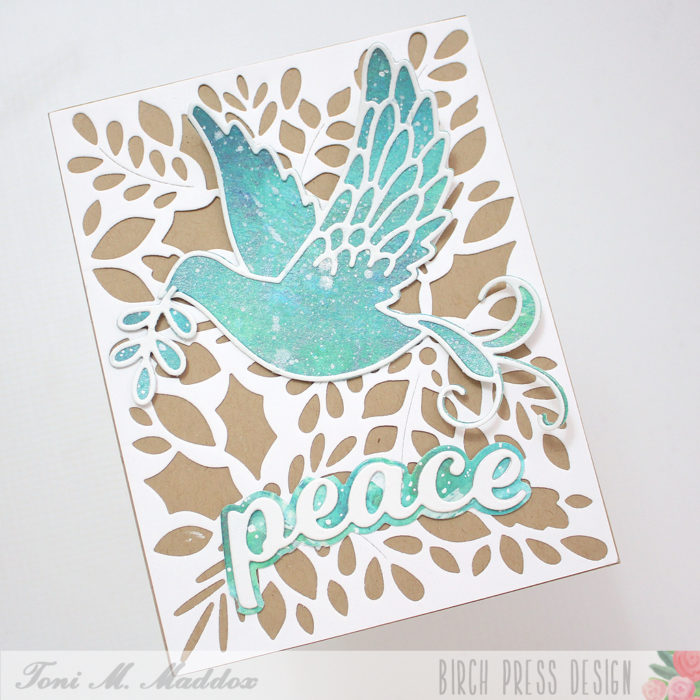
Hello, Birch Press fans! Toni here with you today sharing a watercolored holiday card.
I started the card by cutting out a BPD Herbarium Plate layer out of white and mounting it on kraft.
The BPD Adornment Dove dies are a set of two, one that I used to cut the watercolored panel and the other for the white outline.
I cut the BPD Peace Honey Script outline in the same watercolored paper (check out that fab shimmer!) and mounted the word in white on top. Super easy and pretty card–my favorite type!
I hope you enjoyed today’s card and have a great rest of your week!
Hello Birch Press friends! I am excited to be back today to share a birthday card using the beautiful Prime Peony Duo Contour Layers dies! I had a lot of fun and enjoyed using fall colors for my card today! So let’s get started!
For today’s card I started with the Prime Peony Duo layers dies and the Sunny Orange paper pad collection from Memory Box. I chose 3 shades of orange from the pad (dark, medium, and lighter shade). Prior to die cutting I added some distress oxide ink in similar shades to add a bit more contrast to my paper. I added water droplets to the paper for added texture as well. I die cut the larger peony, as well as the smaller peony from each color. This allowed me to create 6 Peony flowers in total. Once the floral images were die cut, I worked to arrange each flower. Using 3 different shades of card stock allowed me to create contrast within each floral bud.
Next I adhered the floral die cuts together using liquid glue. To add a bit more interest and depth to the flowers I used dye inks with a sponge dauber to add more texture and depth to each flower.
Next I die cut the stem and leaf for each flower using the Lush Green paper pad collection from Memory Box. On the stem I also added some ink blending using oxide ink, as well as dye inks for more depth. I then adhered the leaf die cuts together using liquid glue.
Next I trimmed a piece of wood grain white card stock to an A2 panel. I then adhered this to an A2 card base. I then adhered a coordinating strip of paper on the left side of the card front. I then adhered my flowers, stems, and leaf images to the front card panel. I added foam tape to each flower. To add a bit more texture I added a twine bow to the card panel and completed the birthday card with a sentiment from my stash.
Thank you so much for stopping by today! I had a lot of fun and I will be back soon!
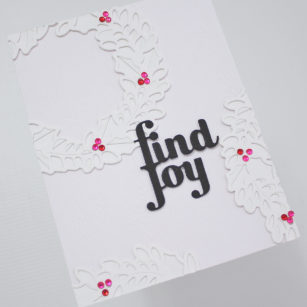
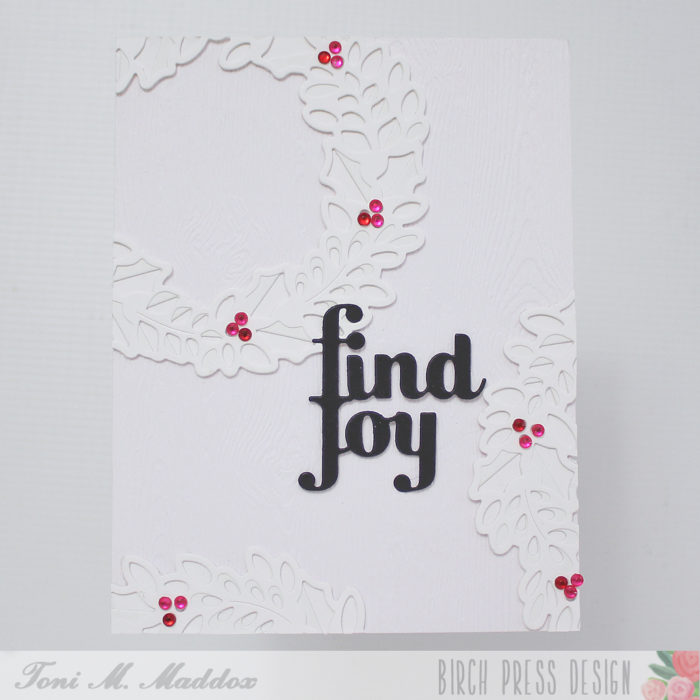
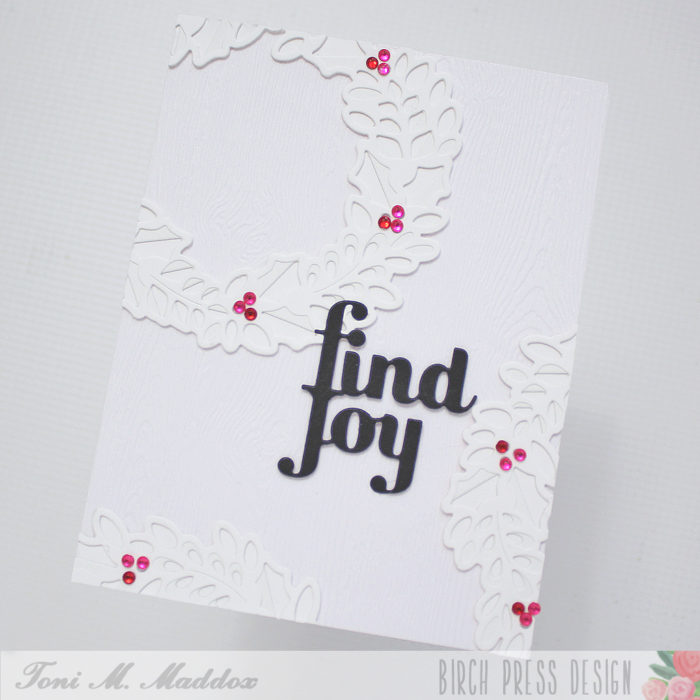
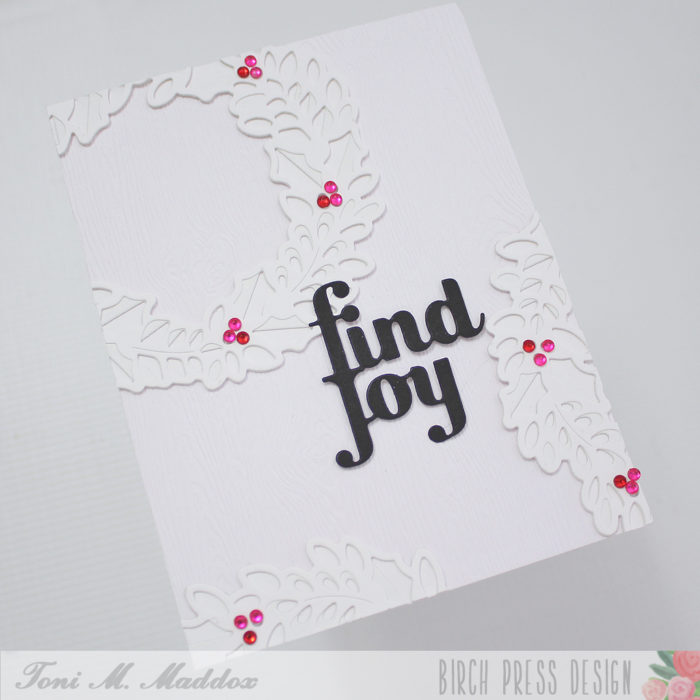
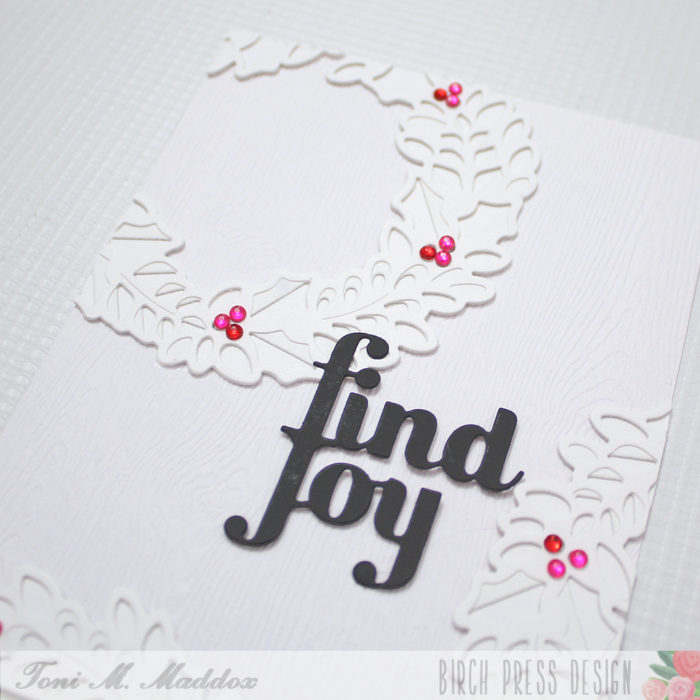
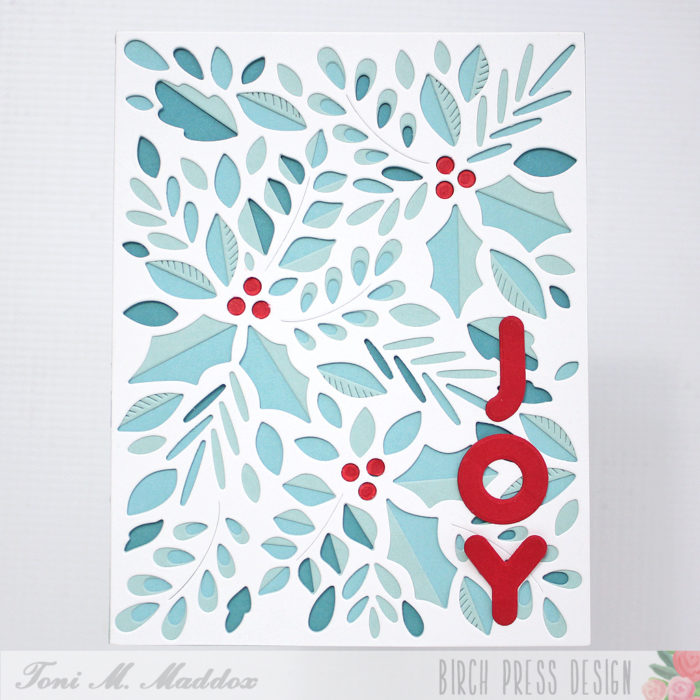
Hello, everyone! Toni here with you today sharing a white on white card for a throughly modern take on the classic wreath.
I cut out the Holly Wreath Plate Layer Set twice, adhering the resulting wreaths onto a woodgrain background.
I used Memory Box Open Studio Fairy Jewels as berries. These are self-adhesive but I used glue as well since I wasn’t adhering them to a solid surface.
I cut the BPD Find Joy out of black and mounted it on foam tape.
I hope you enjoyed today’s card and have a great rest of your week!
Hello friends! I am excited to be back on the blog today to share a sparkly Merry Christmas design with you! Today’s card uses several new products from Birch Press Designs latest release! I had a lot of fun, so let’s get started!
I started with a pre-made background for today’s card. I liked the subtle layer of pink and was excited to pair this with blues, white, and lots of sparkle! I started by die cutting the Meridian Ornament Layers set using white card stock, as well as the Festive Glitter paper pad set. I cut layer A and C using white card stock, then layer B was die cut using the Festive Glitter pad. Once these were die cut, I adhered these together using liquid glue. For the ornament topper, I used the Christmas Ornament Pop Up Easel die set. I die cut the topper with white card stock, then added sparkle using embossing powder. I adhered this to the top, then set the ornament aside.
Next I knew I wanted to create a bit of dimension behind my ornament for added texture and interest. I used 2 die sets, Eucalyptus Stems and Berries Contour Layers and Fuddled Leaf Branches Contour Layers. I die cut several of each of these using the Stormy Blue paper pad from Memory Box. Once they were die cut, I added a bit of oxide ink to the fuddled leaves, as well as some embossing powder for added texture. On the berries I die cut an extra set of the berries and added embossing powder as well. I then adhered the top layer of the berries onto the stems.
Next I die cut a few snowflakes using the Felicity Snowflakes die set using the Festive Glitter pad. I used the same color of glitter card stock as I used in my ornament. I then die cut my sentiment using the Handwritten Merry Christmas die set. I die cut the shadow layer using vellum and then the Handwritten sentiment using 2 paper pads: Vintage pastel Mirror Pad and the Festive Glitter Pad. I adhered these together using liquid glue.
Next I trimmed down my pink background panel and added a bit of embossing powder to the edges. I then added a bit of ink to darken the edges a bit to add a vintage look. I then prepared all my die cuts by adding foam tape for added dimension. I then adhered these down to my card panel using a combination of adhesive (liquid glue and foam tape). I added my sentiment to the ornament to complete my card!
I had so much fun creating today’s sparkly Christmas card! Be sure to check out the amazing new holiday items! I know you will love them! I will be back soon with more inspiration!
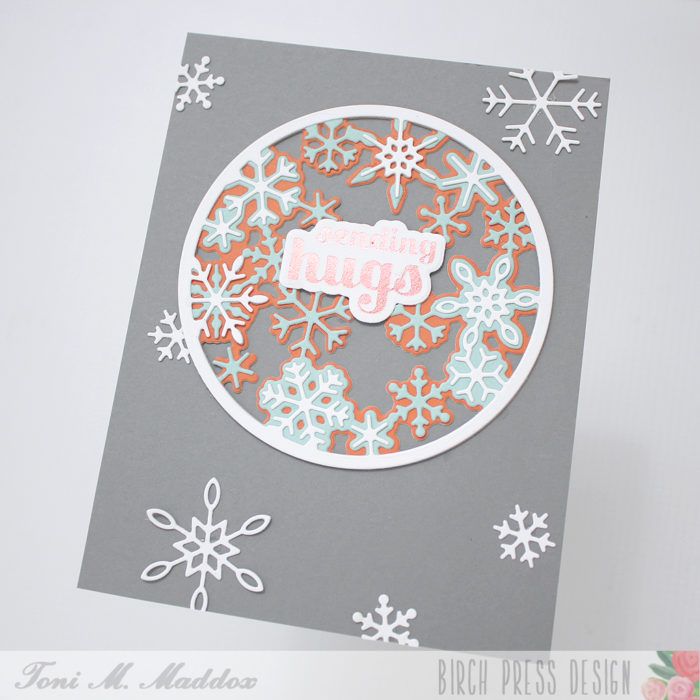
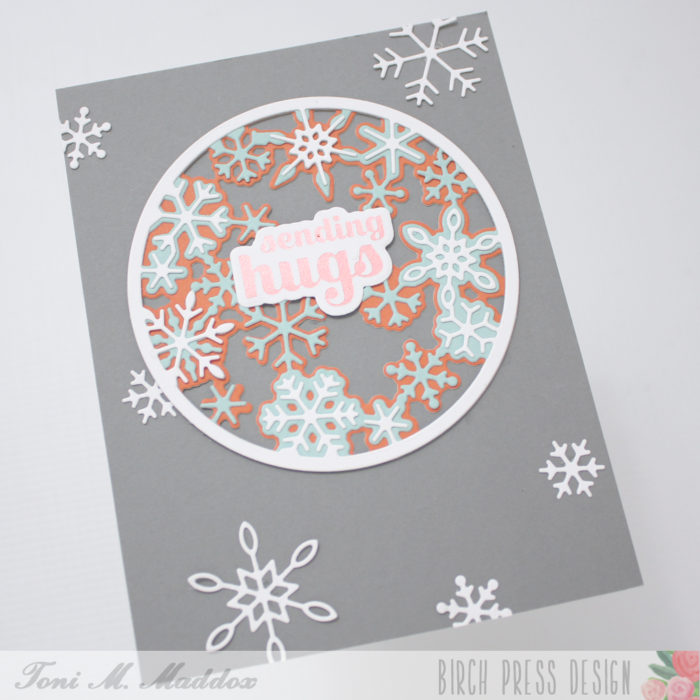
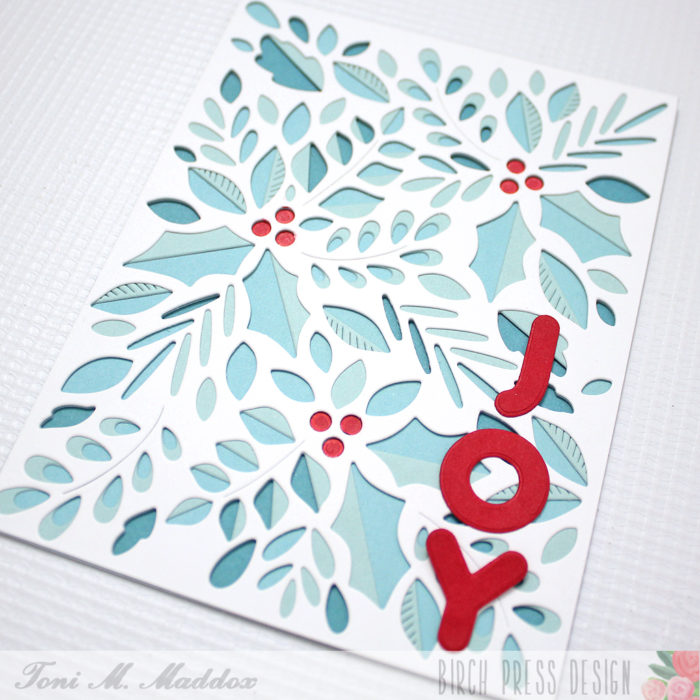
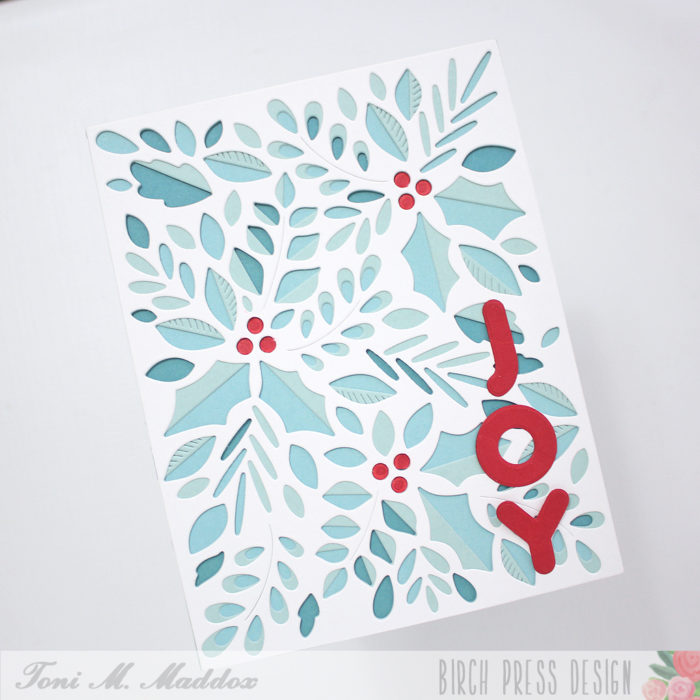
Hello, everyone! Toni here with you today sharing a card using my beloved blue and red combo, this time for a holiday card.
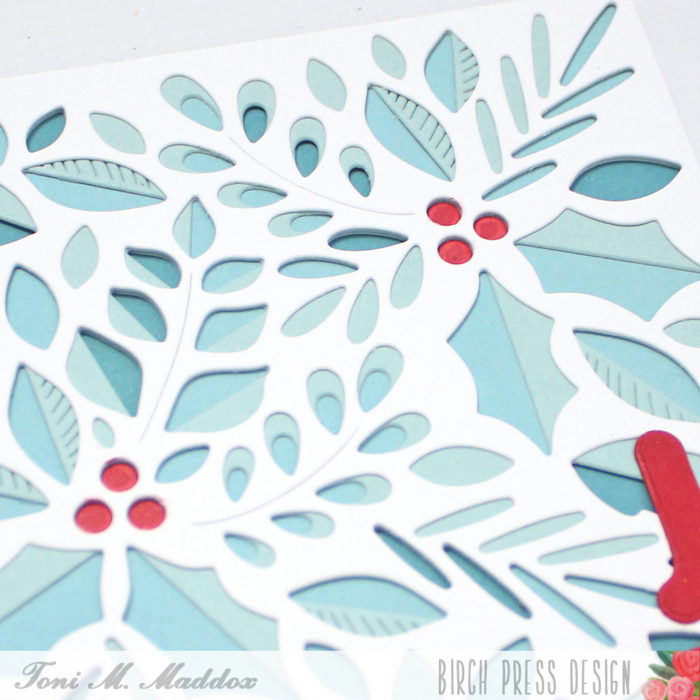
I cut out the two bottom layers of the BPD Herbarium Plate Layer Set out of Memory Box Fresh Aqua 6×6 cardstock and the top layer out of white. I mounted this on a dark aqua base.
I love the faux shading the layers and paper create. Did you notice the shade lines as well? Brilliant!
I used a Copic to color the berries red and added “Joy” cut from the BPD Mod Alphabet die set.
I hope you enjoyed today’s card and have a great rest of your week!
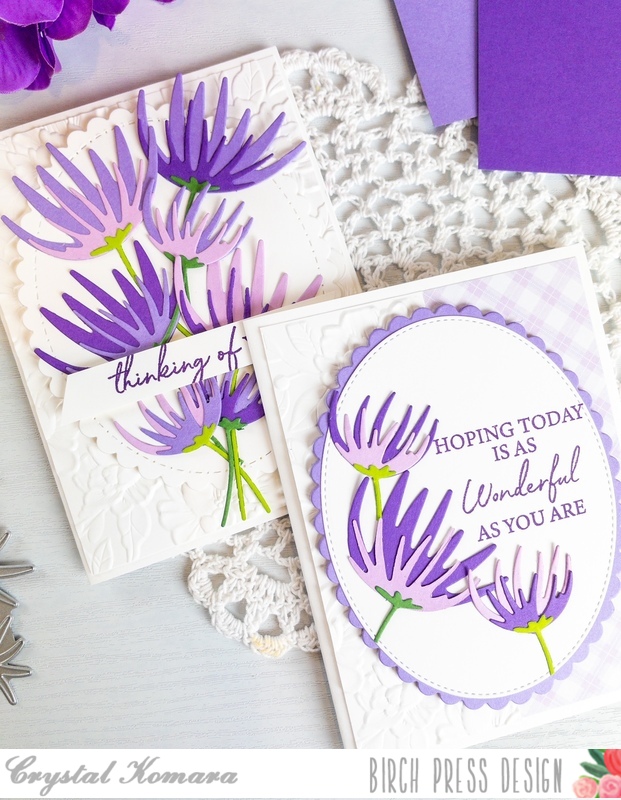
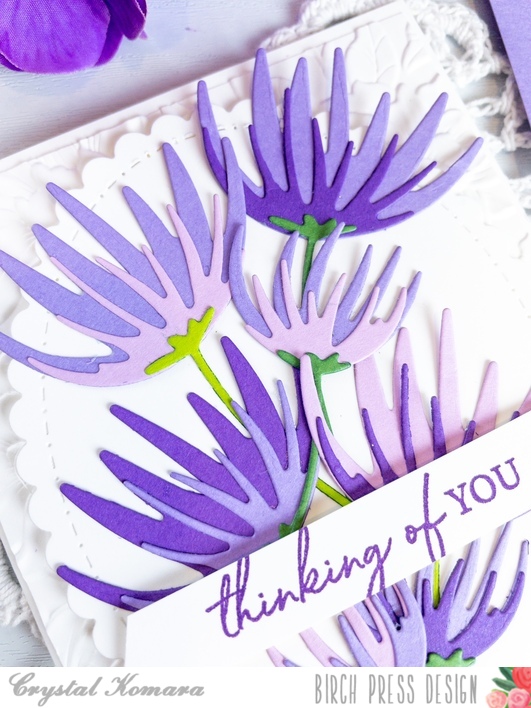
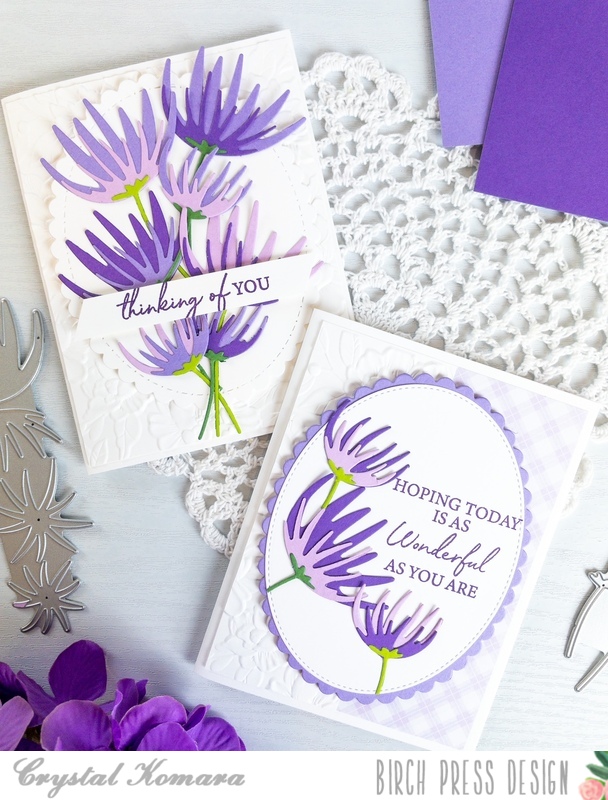
Hello friends! This is Design Team member Crystal Komara here with you today sharing my passion for the color purple! I used the Wispy Blooms Contour Layering Dies to create these two monochromatic cards, however, you could re-create them in any color imaginable and have a rainbow assortment to choose from.
For this first card, I used a piece of 80 lb. Neenah Solar White Smooth cardstock as the base of my card. I also cut a 5 1/4″ x 4″ piece of the same white cardstock for the first layer. I ran this sheet of cardstock though my Big Shot using the Blooming 3D embossing folder (from Memory Box). I die cut one large white oval circle and adhered it to the center of the card.
Using the Wispy Blooms Contour Layering dies, I cut multiple flowers from three different purple colors of cardstock in the 6″ x 6″ Twilight paper pack. I die cut the stems from two shades of green cardstock found in the 6″ x 6″ Lush Green paper pack. I adhered all the flowers together with a fine-tip liquid glue. I adhered the flowers to the center of the scalloped circle to create one giant bouquet. Lastly, I stamped the sentiment “thinking of you” in purple ink on a thin strip of white cardstock. This sentiment is from the Classic Sentimental Wreath stamp set.
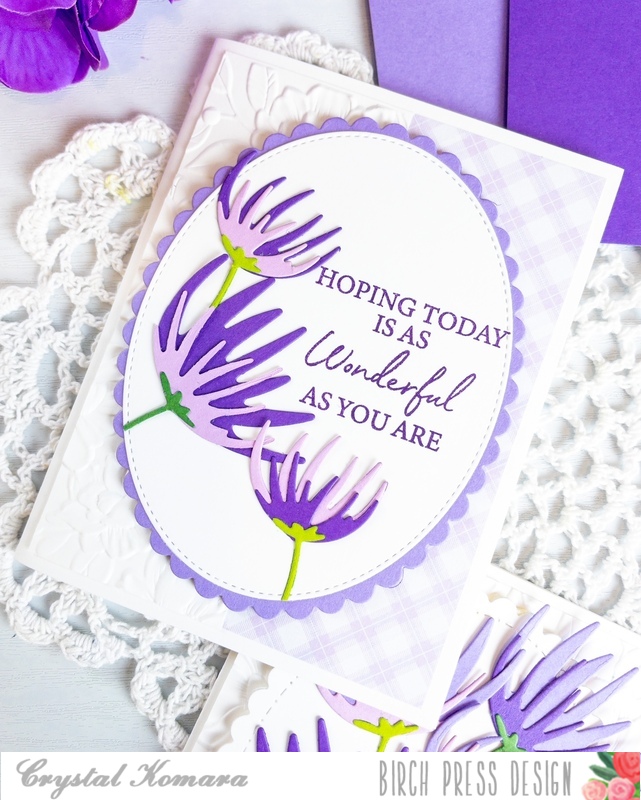
Because I had so many flowers leftover, I decided to create a second card using them, rather than waste them:
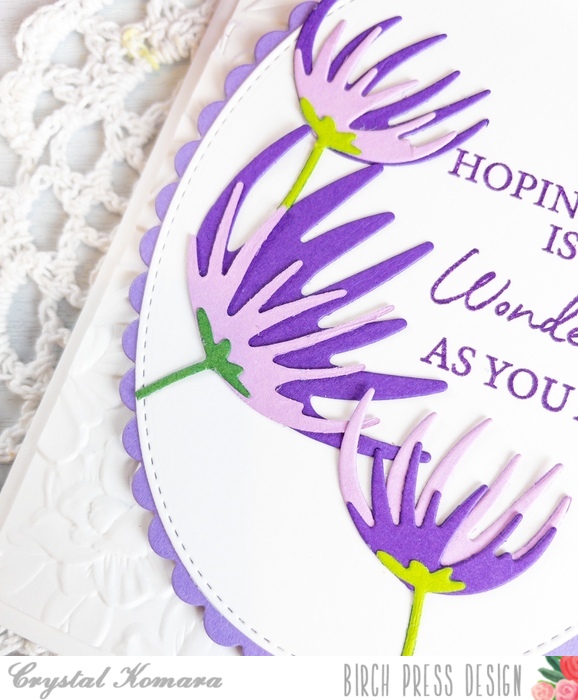
The base of this A2 sized card is also made from 80 lb. Neenah Solar White Smooth cardstock. I embossed a 5 1/4″ x 3″ piece of the same white cardstock using the Blooming 3D embossing folder (from Memory Box) and used a 5 1/4″ x 2″ piece of purple plaid paper for the other side. This paper is from the Spring Plaid slim paper from Memory Box. I die cut a large scalloped oval from Twilight cardstock and a smaller white oval for the center. I stamped the sentiment “hoping today is as wonderful as you are” in purple ink on the white oval. This sentiment is from the Kind Hearts clear stamp set. I adhered some of the leftover flowers into this white oval frame. I found that more than three flowers was too much, so I limited it to just the three.
I hope you have enjoyed these cards! Thank you for visiting and have a wonderfully creative day!
Hello Birch Press friends – it is Natasha here and I am excited to be up on the blog today! Today I am using the beautiful Eucalyptus Stem and Berries Contour Layers die set! I love this set and had so much fun creating colorful leaves and berries on today’s card! So let’s get started!
I started by creating colorful backgrounds using dye based pigment powders. You can create a similar look by using powders, inks, watercolors, whatever you have in your stash! I always work in layers to create texture within my backgrounds! Once I had my backgrounds created, it was time to do the die cutting! I love the Eucalyptus Stem and Berries set and this set was perfect to create some colorful leaves/berries! I die cut 4 leaf stems and 3 berry stems! On the berries I also die cut the “add on” berry layer. I love the added texture this provided! I adhered these to my berry stems using liquid adhesive! I set my leaves and berries aside to work on the background panel of my card!
Next I looked through my gel print stash! I found a light colored gel print, as well as a page from a book. I used both of these to create a background. I tore the section of the book panel gel print and adhered this to the other gel print. Next I die cut a piece of white card stock using the Viola Plate die set. I chose to use Layer A. I love these layered sets, as you can use all 3, as well as choose only 1 layer for a beautiful look as well! They are truly versatile!
I glued Layer A of the Viola Plate (White card stock) on top of my gel print backgrounds! I love the subtle touch of texture this provides, as well as the softness of the beautiful die cut!
Next I adhered the background panel onto an A2 card base. I then decided on the placement of the leaves and berries. Then I adhered them to the card front using both liquid glue and foam tape. I love the added dimension on the leaves and berries!
To complete my card I chose the Hugs Sugar Script Hot Foil Plate and die set. I foiled the hugs sentiment using a pink foil from my stash and then die cut the sentiment using the included die in the set! I added a few Fairy Drops to complete my card!
Thanks so much for stopping by today! I had a lot of fun! I hope today’s card inspires you to create! I will be back soon!
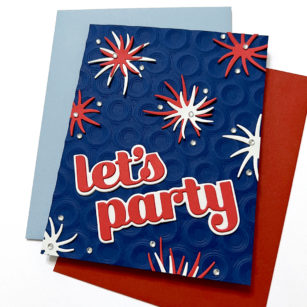
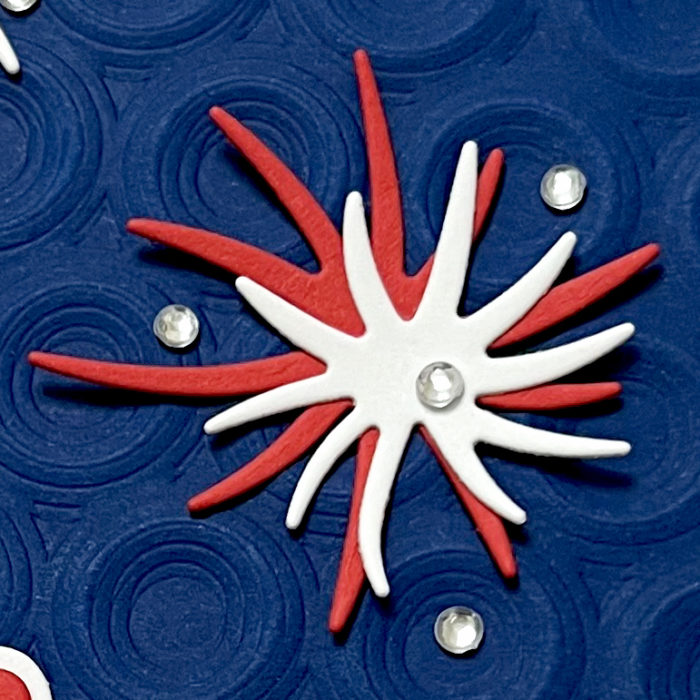
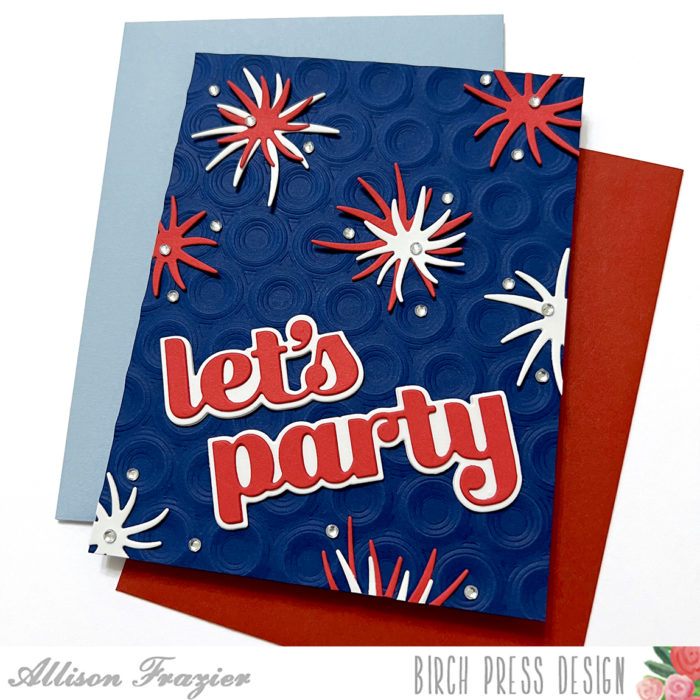
Hello, Birch Press Friends, and Happy 4th of July! Allison here, and today I’m sharing this festive card featuring the Wispy Blooms Contour Layers die set. I love finding new ways to use my supplies, so why not make fireworks out of flowers?
I started my card with an A2 panel of blue card stock, which I embossed with the Ringadings 3D embossing folder. I then adhered that to a blue A2 card base.
I cut the two wispy shapes from the die set out of white and red card stock. These extra wispy shapes are not part of the layering flowers, but they might be my favorite part of the die set. I have used them before as background texture, and I think it was back then that I got this idea to make them into fireworks. I adhered these shapes around the card panel. For some of the fireworks, I layered one of the smaller pieces onto the larger one.
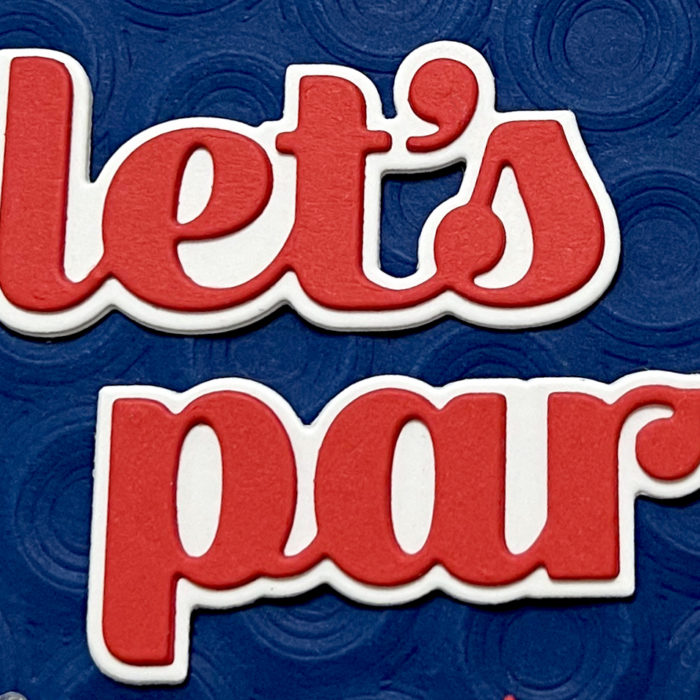
For the sentiment, I used the Let’s Party Sugar Script die. I cut the shadow out of white card stock, and the words out of red card stock. I doubled up both the shadow and the word for dimension and then glued these onto the panel at an angle.
To finish up the card, I scattered some clear fairy jewels all around the design.
Thank you so much for joining us today. I hope this card inspires you and brings a smile to your face!
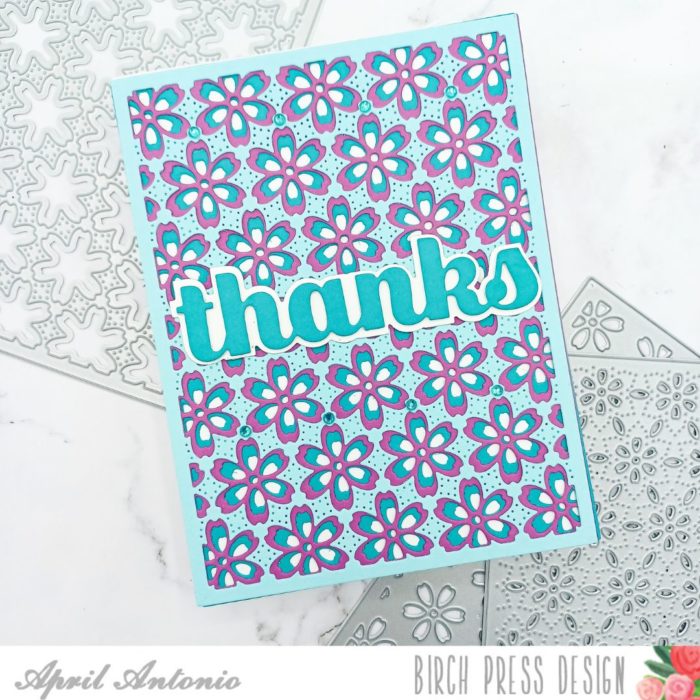
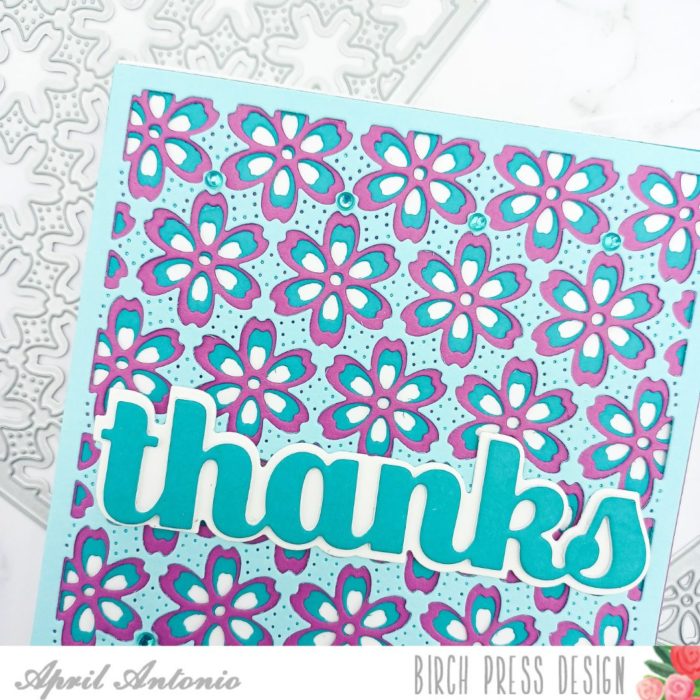
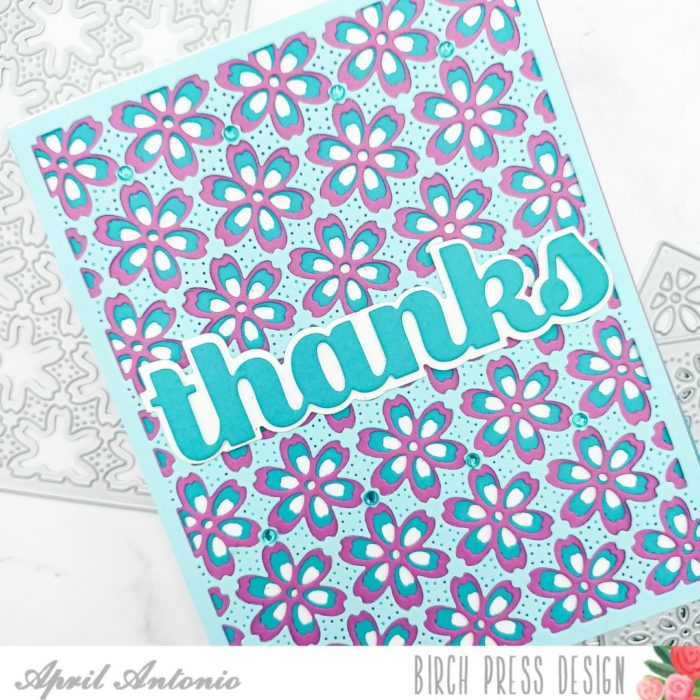
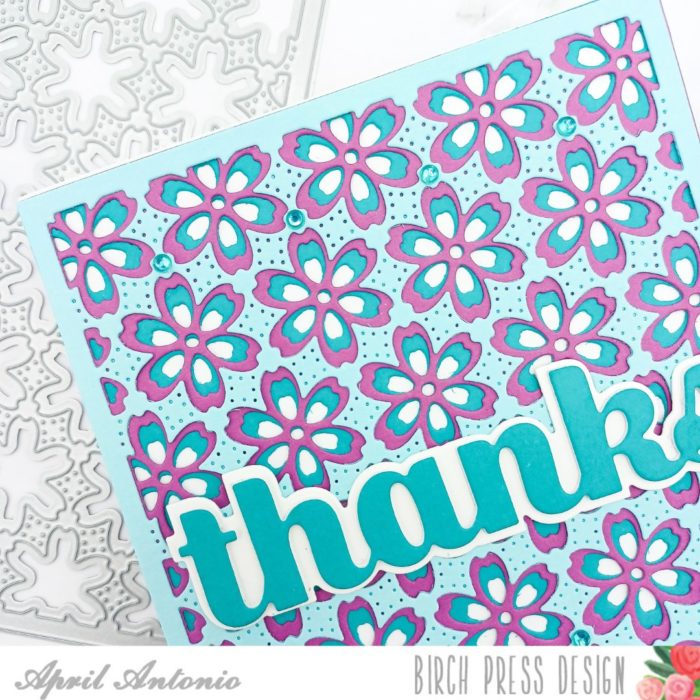
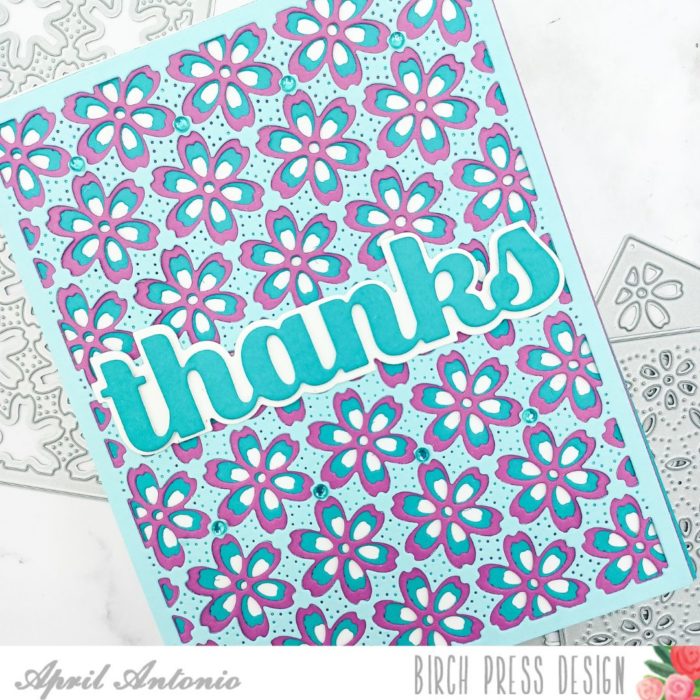
Hello and happy Saturday! Welcome back to the Birch Press Design blog. April here sharing a new card project. I am really excited about today’s post because I have been struggling with incorporating more color when I use the layering dies and finally made a card that I feel matches what I saw in my head.
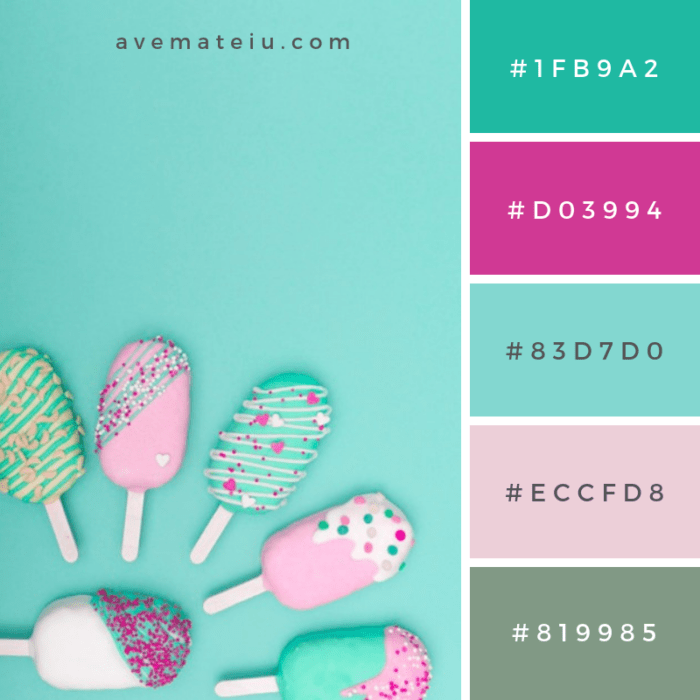
Today’s card started with some inspiration from a color palette I found online that I really liked. I like to save color palettes I like to a folder on my phone, and then look them up when I need some crafting inspiration.
The photo above is the color palette that I found. I just love the teal and pinks. Now, it’s not an exact match, but close enough for me.
I started by pulling the Flora Plate Layer die set, and choosing three of the above colors that I thought would layer well together.
From what I know about color (which isn’t much!) I thought the lighter colors would be best on top, and the darker colors on the bottom.
So I purposely cut the top layer from the light blue, the bottom layer from the darker teal, and added the fuschia color in the middle of the sandwich to break up the blue colors.
Next, I grabbed that same teal color from the bottom layer and decided I wanted to highlight it on top by using it with the Big Thanks Sugar Script. I cut the ‘thanks’ in the teal and the shadow from white in order to anchor the thanks better to the page.
Lastly, I grabbed my Christmas Fairy Jewels pack and placed some of the teal jewels across the top and bottom rows of the card.
That is the finished card! I really love the pierced details on this top layer, and how dynamic the fuchsia color looks as it peeks from behind the layers.