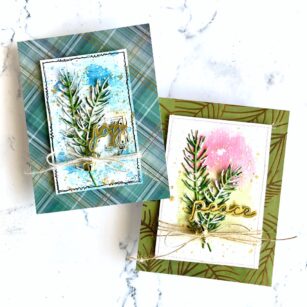
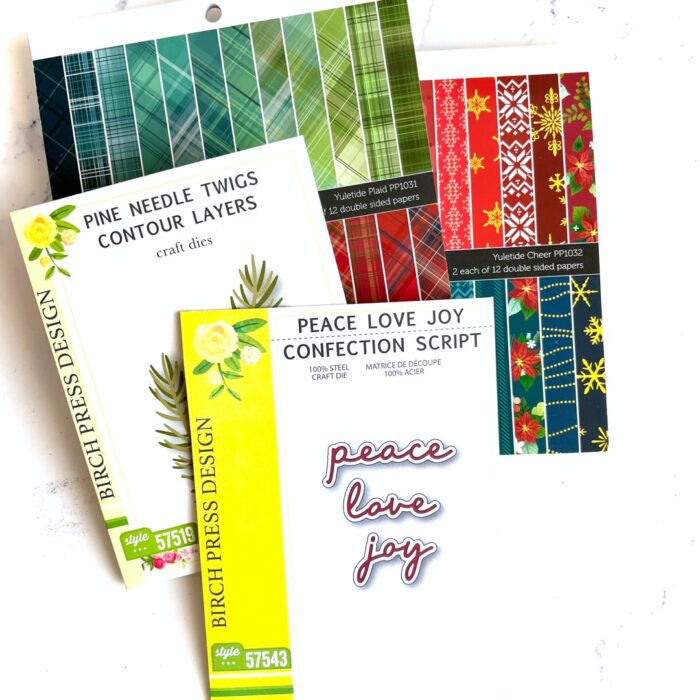
Hello, friends! This is Sandhya, sharing a pair of holiday cards featuring the latest holiday collection dies from Birch Press Design. I made my cards by pairing the gorgeous Yuletide Cheer and Yuletide Plaid pattern papers with the Pine Needle Twigs Contour Layers. For my sentiment, I used the Peace Love Joy Confection Script dies.
I started with the gorgeous foiled pattern papers from the Yuletide Cheer and Yuletide plaid 6X6 paper packs. I trimmed it down to make 4.25″ X 5.5″ panels for my 2 cards. I also used the same pattern papers to die cut the sentiments and with gold shadows.
Next, I die-cut the pine needles out of 2 shades of green cardstock and assembled 4 layered needles. I picked up 2 pieces of watercolor cardstock and ink smooshed with Distress inks to create a couple of interesting backgrounds for the die-cut needles.


For the blue panel, I used a black marker to draw stitched details and adhered some music paper and pattern paper to create a mixed media effect. For the pink and green panel I actually stitched around the panel and adhered the pine needles. Next, I used white gouache to splatter on both panels and some snow like effect on the pine needles. I also added some gold splatters.


Then I added the sentiment die-cuts and tied it all together with jute twine. I found some jingle bells in my stash and added them to the bow to add a tinkle to my cards. Finally, I attached the panels to the card bases to complete my holiday cards. This brings us to the end of today’s post. I hope this inspires you to get crafty today!

Supplies:


Warm Wishes | by Sandhya Iyer
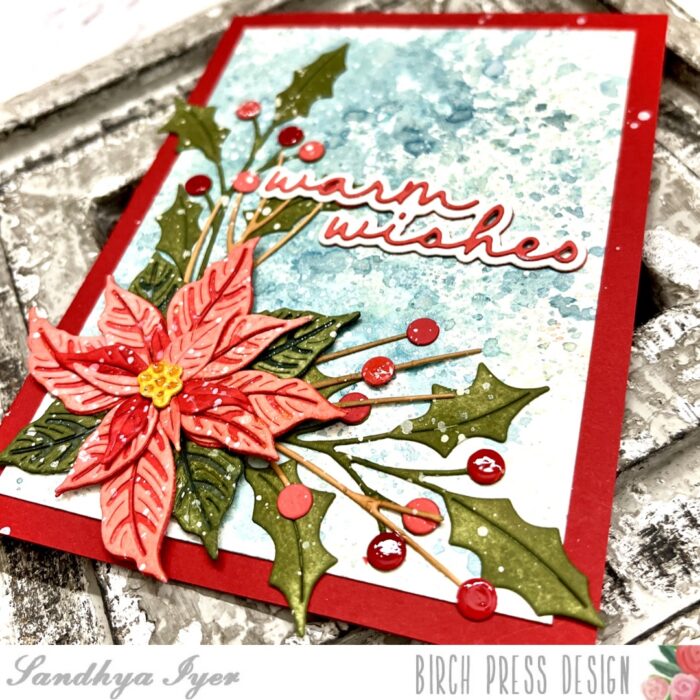
Hello, friends! This is Design Team member, Sandhya Iyer, and today I am sharing a holiday card featuring the latest collection of holiday dies from Birch Press Design. I used the Classic Poinsettia Contour Layers, Holly Sprig Contour Layers and Warm Wishes Confection Script dies to make my holiday-themed card.
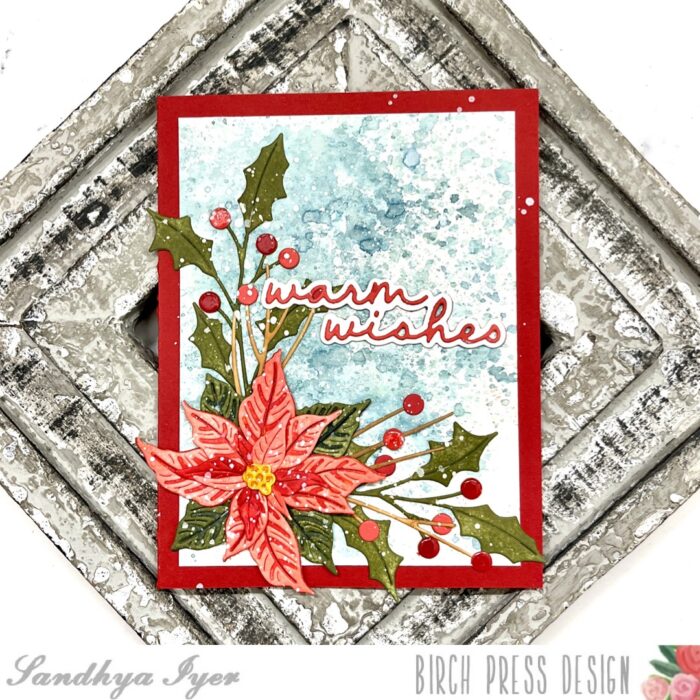
I started by die-cutting the layers for the poinsettia and holly sprig out of watercolor cardstock. Next, I pulled out dye inks in shades of peachy corals and red and inked up the layers. I used mossy green shades for the leafy foliage.

Next, I assembled the poinsettia flower and holly sprig and set them aside. Then, I trimmed a watercolor panel to be a bit smaller than an A2 card base and worked on my background. I used Tim Holtz mica sprays to create a shimmery blue effect. Then I arranged the die-cut foliage to the bottom left of the card panel. I also used glossy accents on a few berries and the poinsettia center for more drama.
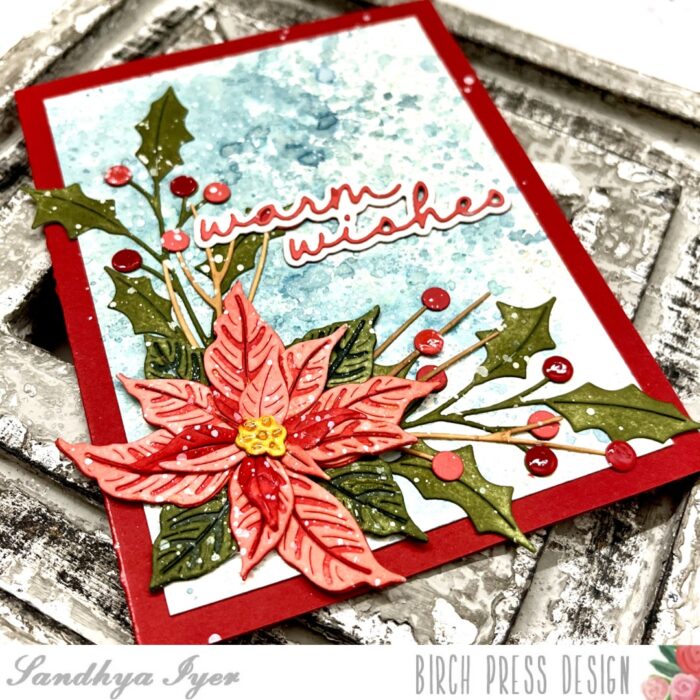
Finally, I used the ‘warm wishes’ confection sentiment die to create an elegant sentiment die-cut. I adhered the panel to a red A2 card base and finished with a generous white splatter.
This brings us to the end of today’s post. Thank you so much for stopping by and I hope you have fun crafting today!
Supplies:


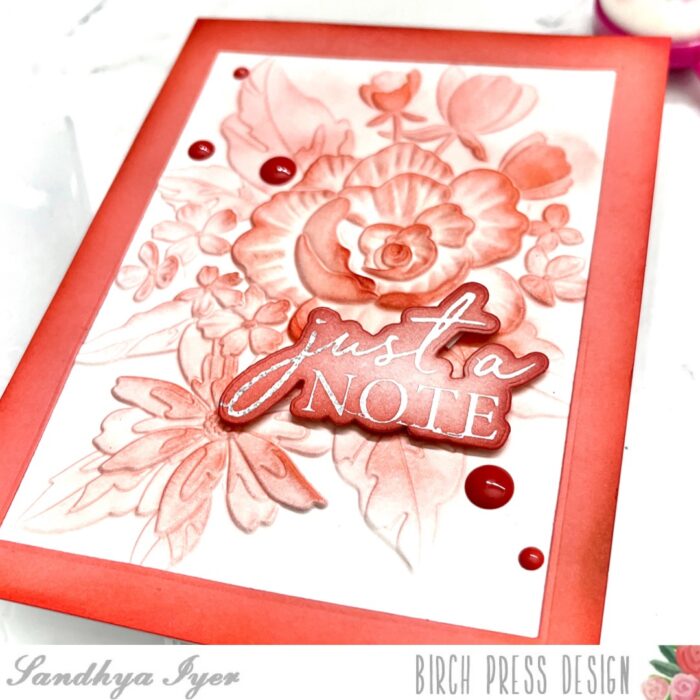
Just a Note | by Sandhya Iyer
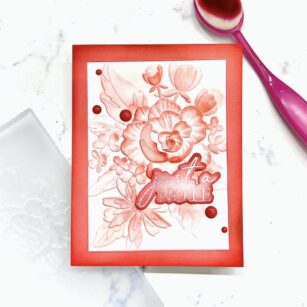
Hello, friends! This is Design Team member, Sandhya Iyer, and today I am sharing a monochrome floral card. For this project, I used the gorgeous Cheerful Floral 3D Embossing Folder and Just a Note hot foil plate and die set.
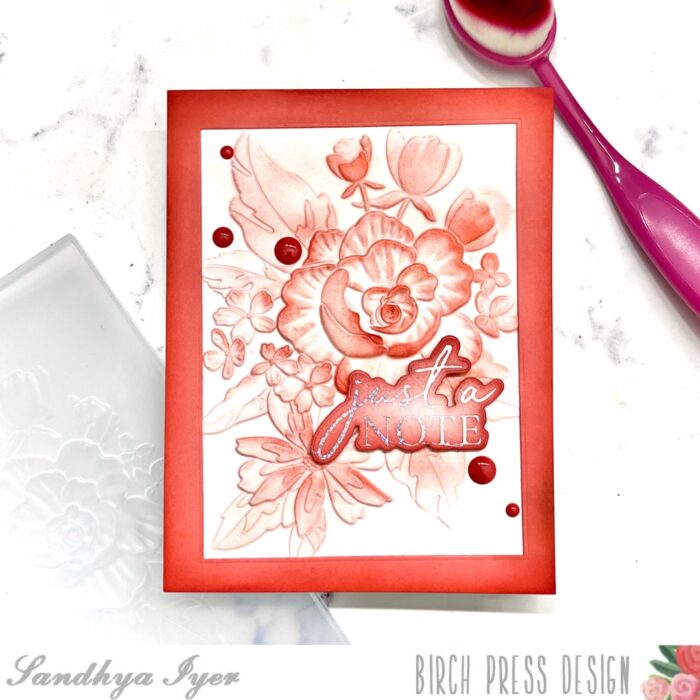
I started by embossing a piece of watercolor cardstock using the the Cheerful Floral 3D Embossing Folder. Next, I pulled out dye inks in shades of peachy corals and used a blending brush to gently ink up the raised portion of the embossed panel.

Next, I ink cut out a rectangular frame from coral-colored cardstock. I inked around the edges to add more interest. Then, I adhered the frame over the embossed floral panel.
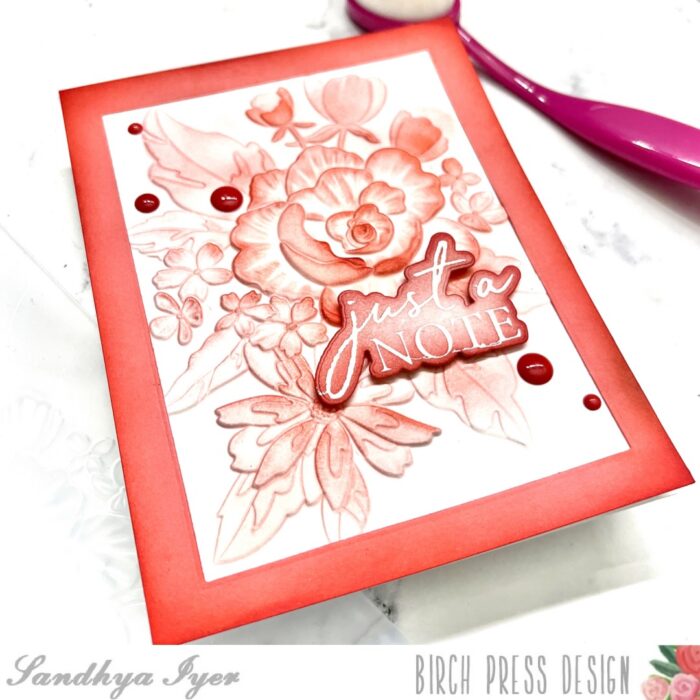
Finally, I used the ‘just a note’ Hot Foil Plate and Die Set to create a glittery silver foiled sentiment die-cut. I inked around it in the same color and popped it over the floral panel with some foam tape. Then, I attached the panel to a white A2 card base and finished off with a few coordinating enamel dots.
This brings us to the end of today’s post. Thank you so much for stopping by and I hope you have fun crafting today!
Supplies:


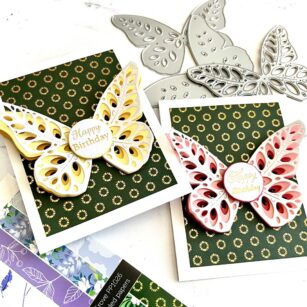
Butterfly Birthday Greetings | by Sandhya Iyer
Hello, friends! This is Sandhya, sharing a pair of birthday cards featuring the Eloquent Butterfly Layer Dies. I paired the gorgeous Anemone Grove foiled pattern papers and foiled greeting tabs with the butterflies to make 2 mini cards.
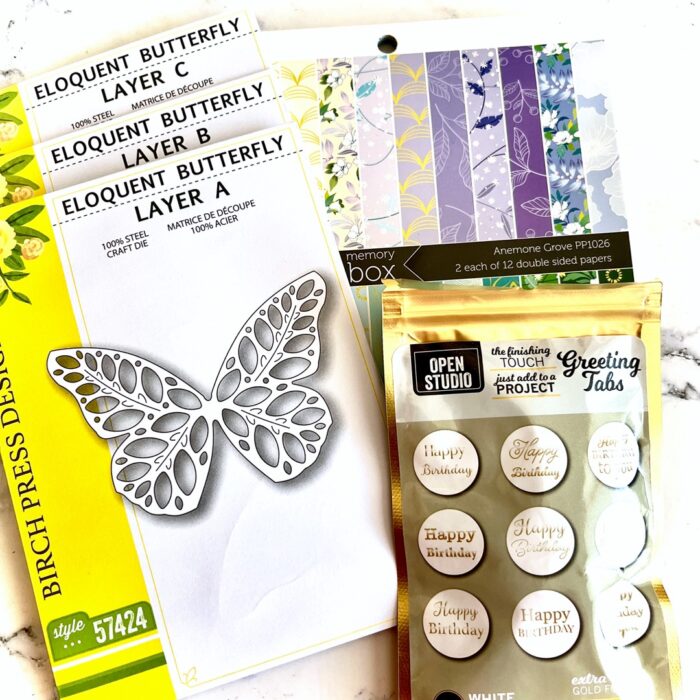
I started with the gorgeous foiled pattern papers from the Anemone Grove 6X6 paper pack. I picked the dark green colored paper and trimmed it down to make smaller panels measuring 3″X5″. I then adhered the panels to white card bases making 3.5″X5.5″ cards.


Next, I die-cut Layer A of the butterfly out of white card stock. For layer B I used a lighter layer of pink and yellow and for layer C I used a darker yellow and blush pink cardstock from the Sunrise and Blush paper packs. I assembled the butterfly layers and added a happy birthday tab to the center.


Finally, I attached the butterflies to the card bases to complete my two birthday notecards. These were super quick and easy to put together. I hope this inspires you to get crafty today!
Supplies:


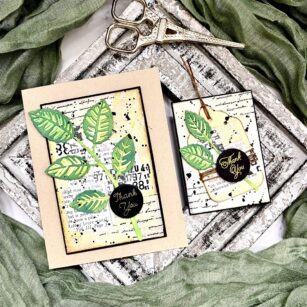
Thank You Card and ATC Duo | By Sandhya Iyer
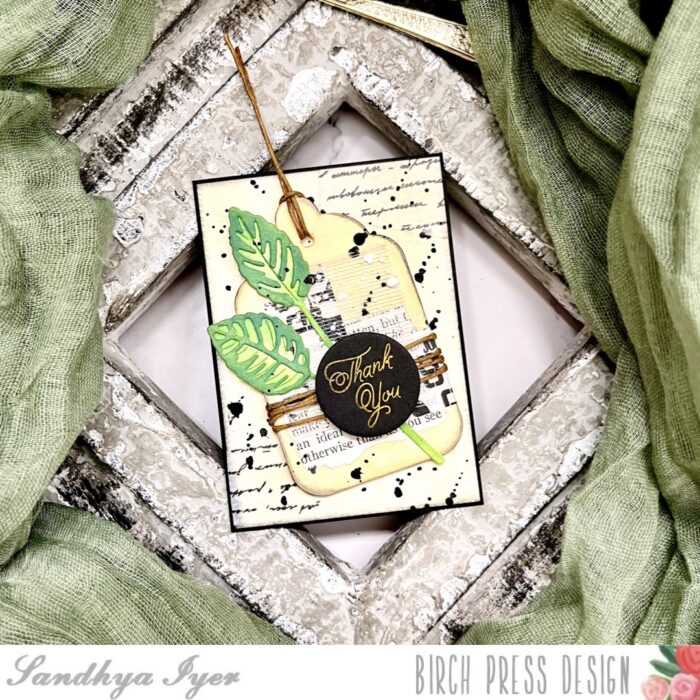
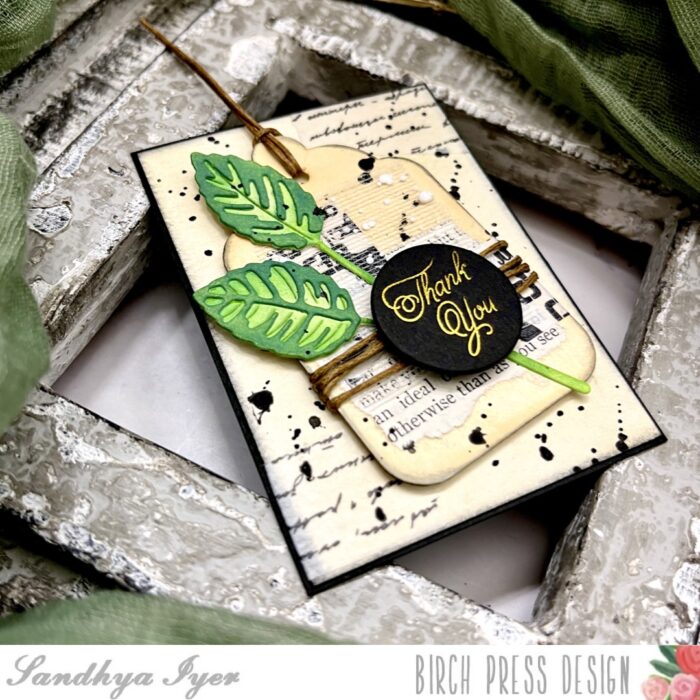
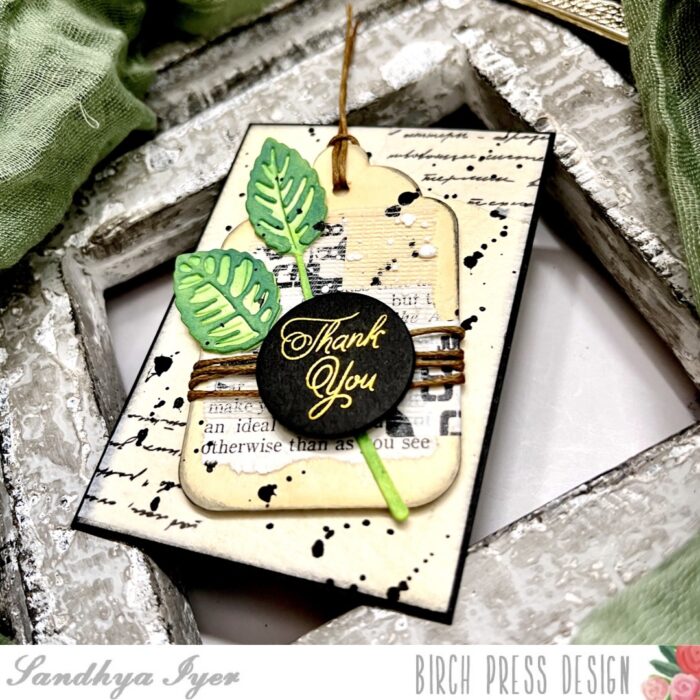
Hello, friends! This is Design Team member Sandhya Iyer and I am sharing a thank you card and Artist Trading Card (ATC) duo. For my focal point, I chose the Rose Leaves Contour Layers die set. I used the Thank You Foil Greetings black circle tabs for the sentiment.
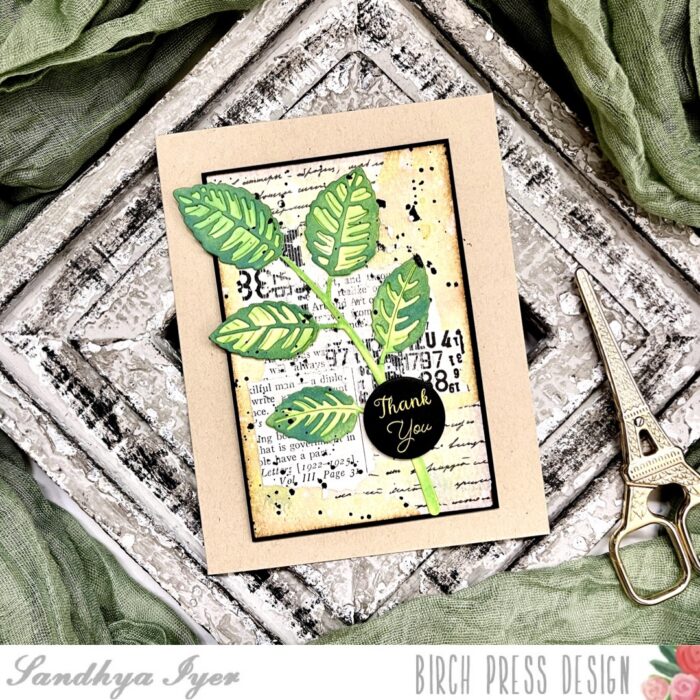
I started by die-cutting the Rose Leaves Contour Layers out of watercolor cardstock. Next, I pulled out Distress Oxide inks in varying shades of green and used a blending brush to ink the leafy layers. For the delicate and more detailed pieces, I leave them attached to the area around them after die-cutting and ink them before popping them out.
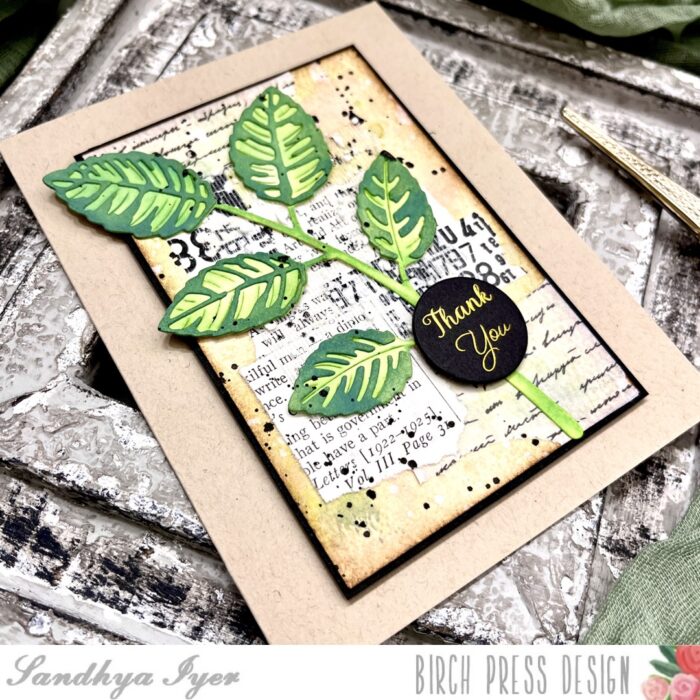
Next, I smooshed some green and pink ink on my craft mat and inked a watercolor panel. I layered on Antique Linen Distress ink over that for a vintage look. Then I added more interest and texture to the background using pages from an old book, washi tape, and snow gauze.
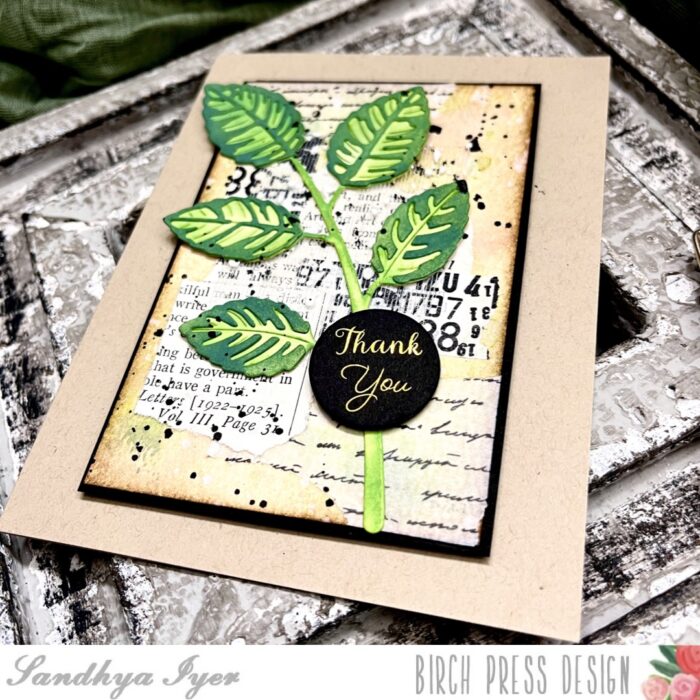
I adhered the larger leaf to the panel and added the thank you sentiment tab. Then I added a generous splatter of black ink. Finally, I added a black mat to the panel and attached it to a kraft card base.
I repeated the same process with tiny variations to create my ATC. Instead of the watercolor panel, I picked a small tag from my stash and inked it with Distress ink.
As this is a mini tag, I added some twine for added interest and assembled the focal cluster with the mixed media tag, the inked die-cut leaves, and the sentiment tab.
This brings us to the end of today’s post. Thank you so much for stopping by and I hope you have fun crafting today!
Supplies:


You are the Best | by Sandhya Iyer
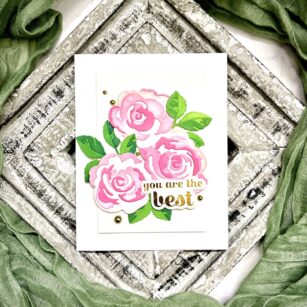
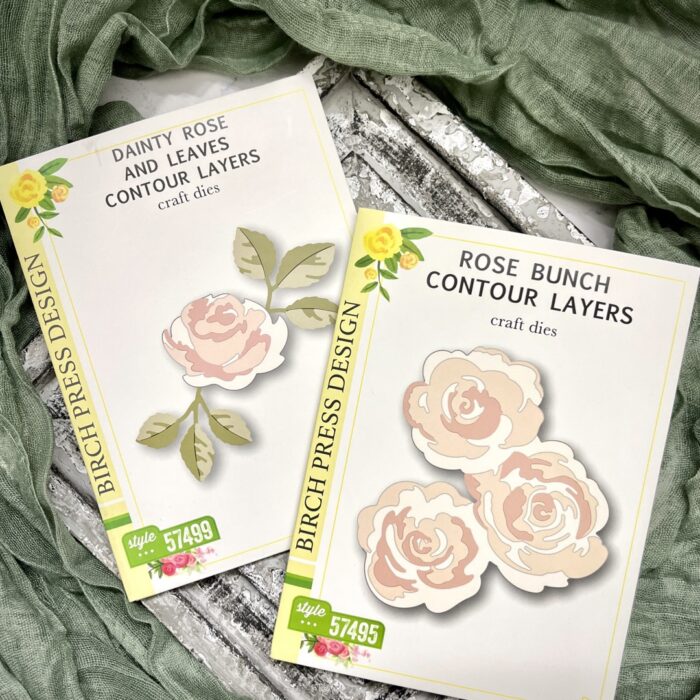
Hello, friends! This is Design Team member, Sandhya Iyer, and today I am sharing a floral card featuring the gorgeous Rose Bunch Contour Layers and the Sugar Script Sentiments 2 Hot Foil Plate and Die Sets. Oh! And I did grab the Dainty Rose and Leaves Contour Layers set to create my greens.
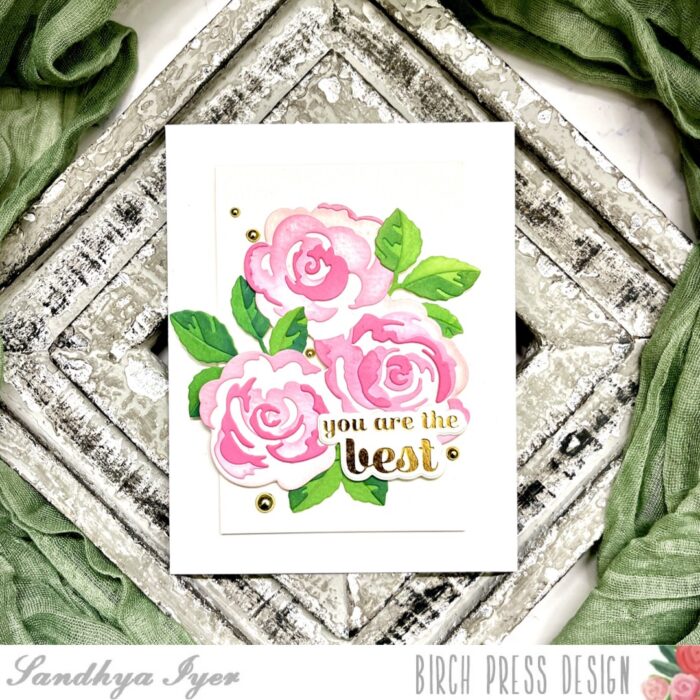
I started by die-cutting the rose bunch contour layers out of watercolor cardstock. Next, I pulled out Distress Oxide inks in varying shades of pink and used a blending brush to ink up the rose layers. For the delicate and more detailed pieces, I leave them attached to the area around them after die-cutting and ink them before popping them out.

I repeated the same process to create three sets of inked leaves from the Dainty Rose and Leaves Contour Layers. I arranged them to my liking and adhered them down to a small panel cut out of watercolor cardstock.
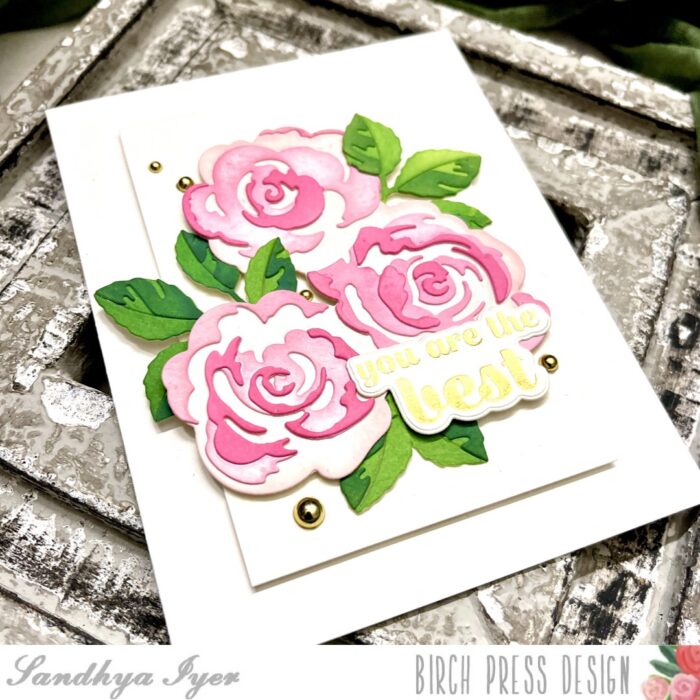
Finally, I used the ‘you are the BEST’ sentiment from the Sugar Script Sentiments 2 Hot Foil Plate and Die Set to create a gold foiled sentiment die-cut. I popped it over the floral panel with some foam tape. Then, I attached the panel to a white A2 card base and finished off with a few gold embellishments.

This brings us to the end of today’s post. Thank you so much for stopping by and I hope you have fun crafting today!
Supplies:


Gladiolus Greetings | By Sandhya Iyer
Hello, friends! Design Team member, Sandhya here with a fresh pair of cards to share. The gorgeous new Vintage Sentiment dies pair beautifully with the foiled pattern papers. I chose to pair the two and added some vellum foliage for added dimension.


I started with the gorgeous foiled pattern papers from the Glimmering Gladiola 6X6 paper pack. I picked the peach and purple colored papers and trimmed them down to make smaller panels. Next, I cut out mats for these panels with coordinating cardstock from my stash. I die-cut the Vintage sentiment words out of the center area of these panels before attaching the pattern paper to them.


Then I went on to die cut the shadow layer for the sentiment dies out of white cardstock and assembled the sentiments. I used plenty of foam tape to attach the matted panels to white card bases. Before attaching the sentiment, I decided to add more dimension and movement. So I die cut some vellum leaves using the Lush Leaves Contour Layers Die set and the Oval Leaf Branches Die set.
Finally, I attached the foliage and sentiment die-cuts to the cards and finished off with a few clear drop embellishments.
Supplies:


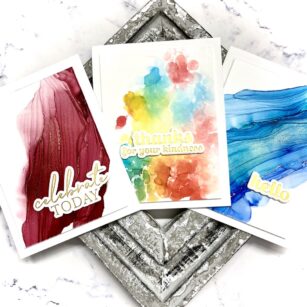
Foiling Fun with Alcohol Inks | By Sandhya Iyer
Hello, friends! This is Design Team member, Sandhya Iyer. I welcome you to check out a set of cards featuring the latest sentiment hot foil plates and dies. After I created a bunch of gorgeous golden foiled sentiments, I was inspired to create a rich alcohol ink background with gold details.


I used gold foil and my Glimmer machine to foil the Hello, thanks for your Kindness and Celebrate Today sentiments on white cardstock. I like to use Hammermill smooth cover stock for the best foiling results. Next, I used coordinating dies to cut out the sentiments and set them aside.


Next, I used alcohol inks from my stash to create my colorful panels. While the alcohol ink brand doesn’t really matter, the gold lines work best only with Pinata Brass. I trimmed glossy photo paper to create my panels. Then I used a tiny fine-tipped bottle filled with 90% Isopropyl alcohol to drop alcohol diagonally across the panel. Next, I added 1-2 drops of alcohol ink and a drop of Brass on the little river of alcohol. Finally, I moved a hair dryer set to low heat gradually across the length of the alcohol pool. I went back and forth to create the ripple effect. For the final panel, I added few drops of alcohol inks on a piece of bubble wrap and spritzed it with isopropyl alcohol. I then gently stamped the pattern on the next panel.


Finally, I attached the alcohol ink art panels to A2 card bases using foam tape. Then I finished off by popping on the foiled sentiments with more foam tape. This brings us to the end of today’s post. Thank you so much for stopping by and I hope you have fun crafting today!
Supplies:

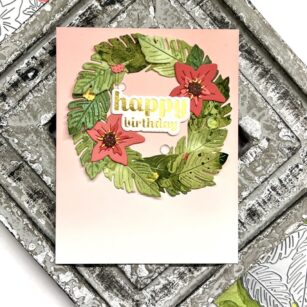
Spring Birthday Card | By Sandhya Iyer
Hello, friends! This is Design Team member Sandhya Iyer and today I am sharing a spring-themed birthday card where I mix up a bunch of fun products. The star of the show is the foiled sentiment from the Sugar Script Sentiments 2 hot foiled plate and die set. I also used the Wiegela Leaf Contour Layers Die Set and the Gentle Flower and Leaves Contour Layers for the flowers and leaves.
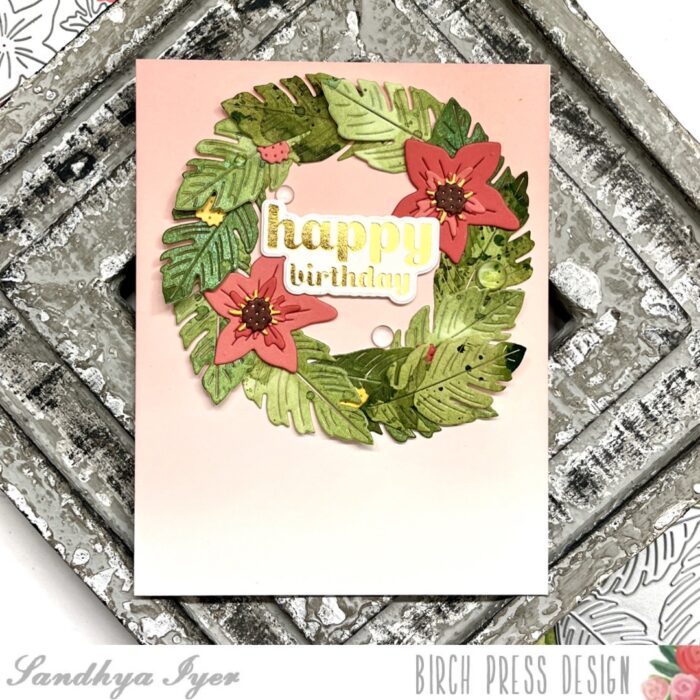
I started by using Distress Mica Stain and Distress Spray stains in different shades of green to create a few ink-smooshed panels. Then, I used the Wiegela Leaf die to cut out several leaves to build my wreath. Next, I used Saltwater Taffy Distress Oxide to ink blend an ombre background. I traced a circle on this panel and adhered the leaves to form a wreath.
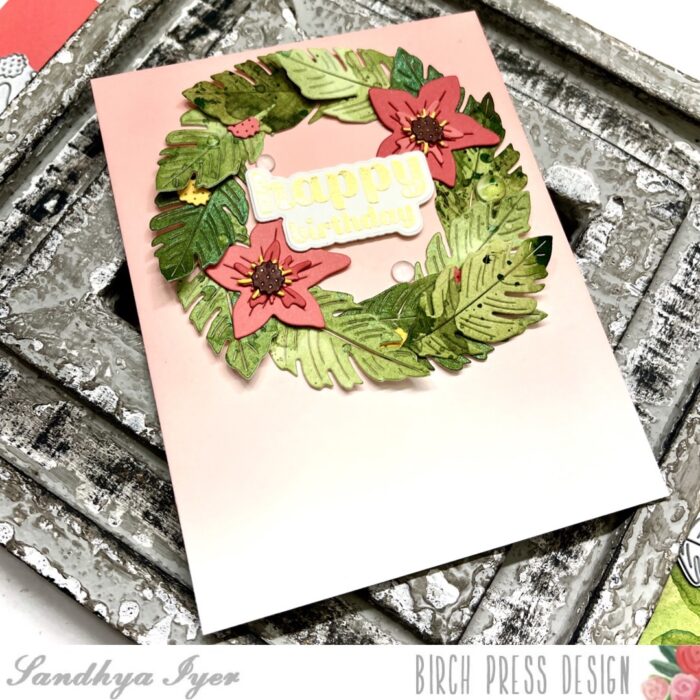
Next, I grabbed the Sunrise and Blush solid core cardstock packs and die cut a couple of flowers using the Gentle Flower die set. I colored in the center with a brown copic marker for additional contrast. I also kept the extra pieces of colorful centers to tuck under the leaves. I used gold foil and my Glimmer machine to create my birthday sentiment and added it to the center of the wreath using some foam tape.
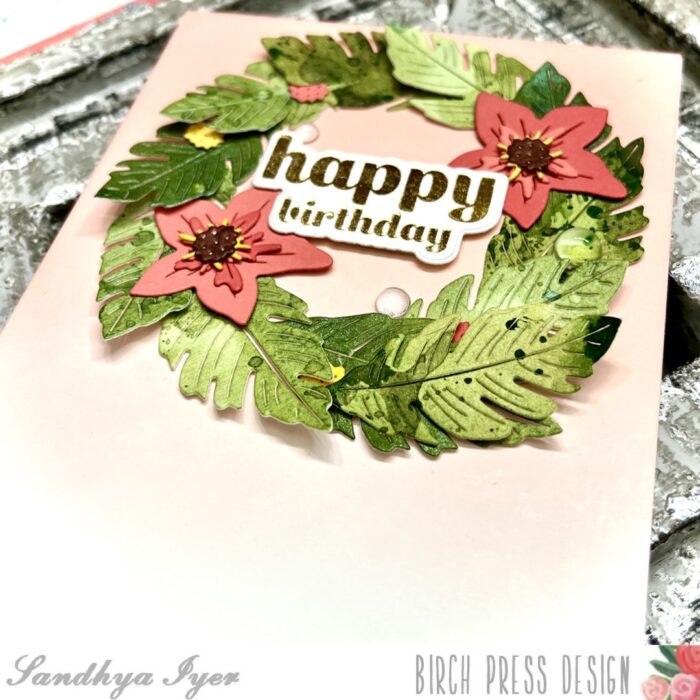
Finally, tucked in the flowers and little centres that look like buds/berries. I attached the completed panel to a white card base and finished with a few clear drop embellishments. This brings us to the end of today’s post. Thank you so much for stopping by and I hope you have fun crafting today!
Supplies:


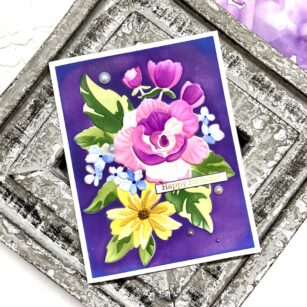
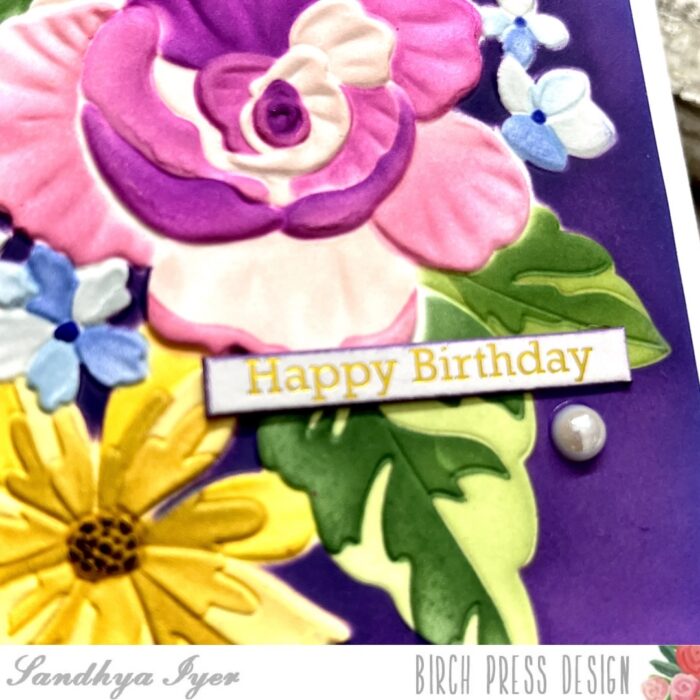
Floral Birthday Wishes | By Sandhya Iyer
Hello, friends! This is Design Team member Sandhya Iyer here today and I am sharing a floral birthday card featuring a gorgeous new coordinating embossing folder and stencil set. The Cheerful Floral 3D Embossing Folder and Die and coordinating Stencil set from Memory Box is fun to play with and creates gorgeous embossed florals for card fronts. Another fun new product I instantly fell in love with is the Happy Birthday Foil Greetings White Tabs. There are birthday and thank-you versions of these tabs as well as black and white versions.
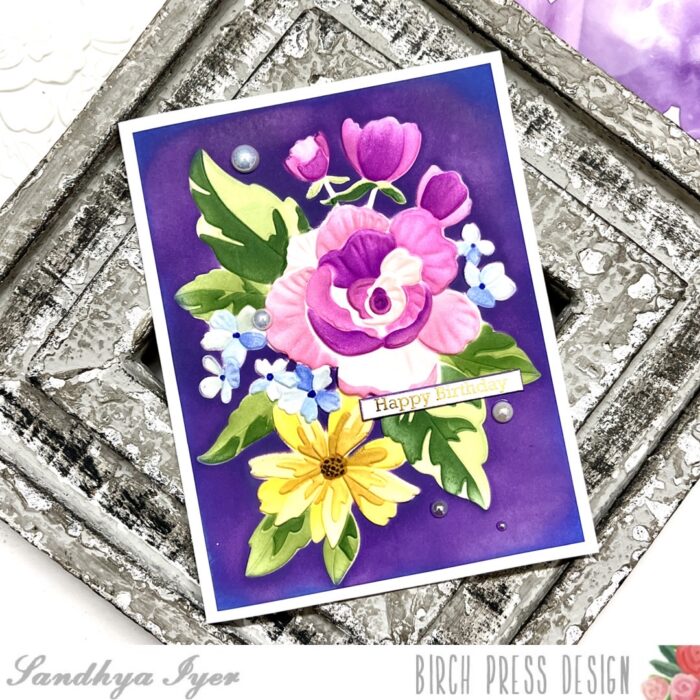
I started by gently spritzing a white card panel with water to make it damp. Then, I placed it inside the 3D embossing folder and ran it through my die-cutting machine. Next, I used the layering stencil set to ink blend my way through the layers. The floral swag looked amazing just like that.
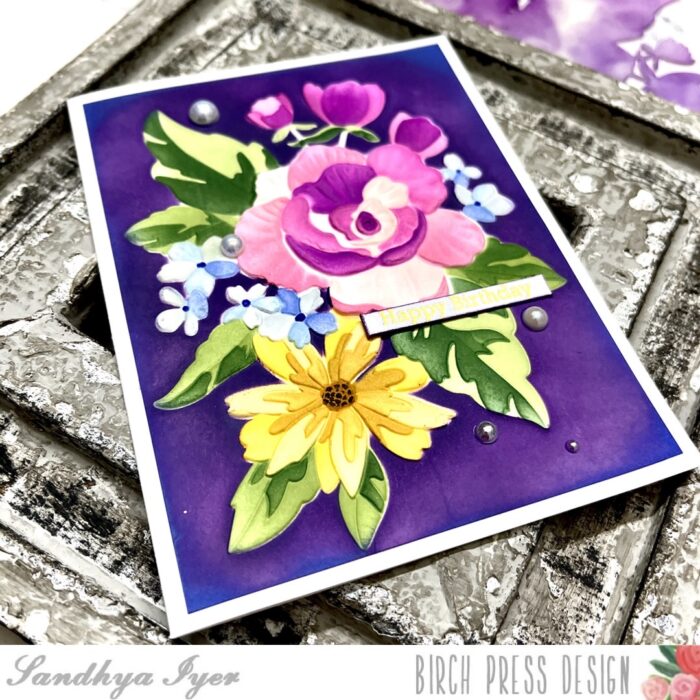
But then I saw the masking stencil and wanted to give it a go. So I masked the colored floral swag and ink blended a purple background with Distress oxide ink. Honestly, I was super nervous going over the background with such a dark color. But I secured my masking stencil with strong magnets and the background blending went pretty smoothly.
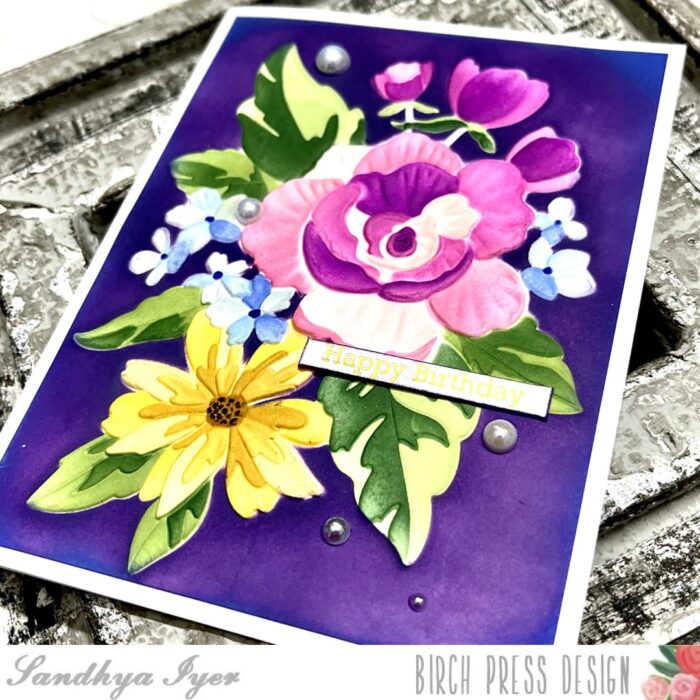
Finally, I ink-blended around the edges with blue distress oxide to add more interest. I also inked around the edges of the birthday tab and adhered it to the panel. I attached the completed panel to a white card base and finished off with a few pearl embellishments.
This brings us to the end of today’s post. Thank you so much for stopping by and I hope you have fun crafting today!


