Category: Stamps

  • Colorful Floral Cluster | by Allison Frazier

    Colorful Floral Cluster | by Allison Frazier

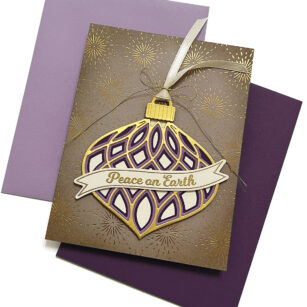
    Hello, Birch Press friends! Today, I am sharing this card featuring a cluster of layered florals. There are so many amazing floral dies in the Birch Press collection, and I used a lot of them today! I love using a dark background – I think it provides a really dramatic pop.

    I started my card by creating the layered roses first. For each of the roses, I chose three different shades of card stock for the layers. I used the Dainty Rose and Leaves Contour Layers set to create the yellow and orange roses. I used the Morning Rose and Triple Buds Contour Layers set to create the large pink rose. I used this same set and two shades of pink card stock for the buds and one shade of green card stock for the stems.

    For the orange flowers, I used the Star Flowers Contour Layers set. I used two shades of orange card stock, as well as yellow for the center of the flowers. For all of the leaves, I used two die sets – the Jovial Blooms and Leaves Contour Layers and the Tiny Tuft Flowers and Leaves Contour Layers. Once I had all of my dies cut, I assembled the layers with liquid glue and then started arranging everything onto a dark brown A2 card base.

    Once I was happy with the arrangement, I started glueing elements down, starting with the leaves and any other elements that were going to go behind something else, such as the smaller orange flowers and the pink buds. Once I got to the top elements, I used a couple different thicknesses of foam tape to adhere the orange and yellow roses. I heat embossed my sentiment with gold embossing powder. This sentiment comes from the Lingo Thanks Stamp Set. Before adhering my sentiment to the card, I splattered the whole thing with white acrylic paint.

    For a final touch, I added some fairy jewels to the center of the large, pink rose. I love how it all turned out! Thank you so much for joining us today. I hope this card inspires you and brings a smile to your face. 

    Wishing you a crafty day,
    Allison


    Supplies


    Supplies


  • Best Wishes On Your Journey Together  | by Crystal Komara

    Best Wishes On Your Journey Together | by Crystal Komara

    Hello friends and happy May! I feel like May is the unofficial start to summer, which also means that wedding season is upon us. This is Design Team member Crystal Komara here today to inspire you with a wedding/love themed card using a variety of product from Birch Press Design.

    Card details:

    The base of this A2 sized card is made from 80 lb. Neenah Solar White smooth cardstock. This is my go-to white cardstock for e-v-e-r-y-t-h-i-n-g! To create the background of this card I used Layer Plate C of the Flora Plate Layer set, and I die cut it from white cardstock. I mounted that die cut piece onto a piece of white cardstock for a white-on-white look and then mounted both pieces onto black cardstock before adhering it to the card base.

    For the largest heart I used the Flora Heart Layer C. I die cut Layer A and Layer B from red cardstock. I adhered the two layers together with a fine-tip liquid glue. Then I adhered those of a piece of white cardstock and fussy cut a heart shape background. I adhered this heart to the card using 3M foam adhesive for added dimension.

    To create the two smaller hearts, I die cut Layer A of the Kinsley Heart Layer Set from white cardstock. I adhered this over a sheet of red cardstock and then fussy cut the individual hearts out.

    For the sentiment, I stamped the font in black ink on white cardstock. This sentiment is from the Kind Hearts clear stamp set. I then used a heart punch to punch the sentiment out. I adhered the sentiment too the card using 3M foam adhesive.

    I hope you have enjoyed today’s card. Thank you for visiting and have a wonderfully creative day!

    Supplies

  • Shaker Star Flowers | by Crystal Komara

    Shaker Star Flowers | by Crystal Komara

    Hello readers and happy Wednesday! This is Design Team member Crystal Komara here today sharing one of my favorite (and seemingly easiest) interactive cards to make – a shaker card! I made this card very monochromatic in purple and white, but if purple really isn’t your color, there are endless possibilities and color combinations you could use instead with these beautiful Star Flowers Contour dies.

    Card details:

    The base of this A2 sized card is made from 80 lb. Neenah Solar White Smooth cardstock. For the background, I cut a 5 1/4″ x 4″ piece of the same Neenah White cardstock and ran it through my Big Shot using the Pinpoint Radial Plate.

    Using the Star Flowers Contour Dies, I cut the flowers from two different colored purple cardstock and one purple glitter cardstock (for the center of the flowers). I adhered the layers of the flowers together with a fine-tip liquid glue.

    To create the shaker component, I die cut Layer A of the Roundabout Layer Set from white cardstock. I then fussy cut a solid white background of this same shape to create a white frame. I adhered a piece of clear acetate to the back of this frame. I added about 1 tablespoon of sequins to the card and then layered the shaker frame on top.

    I stamped the sentiment “to my friend” in purple ink on white cardstock and used a circle punch to punch it out. This sentiment is from the Kind Hearts clear stamp set.

    I love a card that can be made so easy to change simply by alternating the colors or the sentiments. Thanks for visiting and have a wonderfully creative day!

    Supplies

  • Rainbow Roundabout | by Crystal Komara

    Rainbow Roundabout | by Crystal Komara

    Hello readers! This is Birch Press Design Team member Crystal Komara here with you today sharing some rainbow inspiration using the Roundabout Layer Set. I love creating rainbow colored cards, I just find them so cheerful and uplifting!

    Card details:

    The base of this A2 sized card is made from 80 lb. Neenah White Solar Smooth cardstock. Using the same Neenah white cardstock, I cut a 5 1/4″ x 4″ piece and ran it through my Big Shot using the Blooming 3D embossing folder from Memory Box Co. (a sister company of Birch Press Design).

    Continue reading below to see how I created and assembled the rainbow roundabout itself, it was a little bit tricky!

    Step 1: Die cut Layer A of the Roundabout Layer Set from white cardstock.
    Step 2: Die cut Layer B of the Roundabout Layer Set from gold glitter cardstock.
    Step 3: Die Cut Layer A from the Roundabout Layer Set from all the colors of the rainbow – ROYGBIV. Red, orange, yellow, green, blue, indigo and violet.
    Step 4: Save the large solid circles for another card!
    Step 5: Adhere Layer A (white cardstock) over Layer B (gold glitter cardstock) using a fine-tip liquid glue.
    Step 6: Piece all the little shapes back into the die in a rainbow array.

    I then adhered 3M foam adhesive to the back of the roundabout and adhered it to the center of the card.

    Using the Hello Honey Script word die, I die cut the back shadow layer from black cardstock and the thinner top outline from white cardstock. I adhered both layers together with a fine-tip liquid glue and then adhered the entire sentiment to the card using 3M foam adhesive for added dimension.

    I also created a second card using the leftover solid circles that were die cut from the Roundabout Layer Set.

    This mini slimline card measures 6 1’2″ x 3″. Honestly, I made up my own dimensions on this card, so don’t take these measurements as being any sort of a “professional” size! I placed all the die cut circles leftover from the Roundabout Layer Set in a rainbow array horizontally across the card. I stamped the sentiment “sending you sunshine, laughter and hugs” in Memento Tuxedo Black ink. This sentiment is from the Kind Hearts clear stamp set.

    Using the same Hello Honey Script word die, I die cut the back shadow layer from black cardstock and the thinner top outline from white cardstock. I adhered both layers together with a fine-tip liquid glue and then adhered the entire sentiment to the card using 3M foam adhesive for added dimension.

    I hope you have enjoyed these two very colorful ways to use the Roundabout Layer Set. Thanks for visiting and have a wonderfully creative day!

    Supplies

  • Phlox Hugs and Smiles | by Toni M Maddox

    Phlox Hugs and Smiles | by Toni M Maddox

    Hello, Birch Press fans! Toni here with you today sharing a card that just makes me happy–I love the colors and the blossoms. So pretty!

    I cut out randomly size strips of Memory Box Sunny Orange and Stormy Blue 6×6 cardstock which I adhered to the card base, leaving empty areas so the white base acted as another color strip.

    I used the die that comes with the Gilded Petalpoint Hot Foil Plate to cut out a “sun” which I sponged with Distress Oxide Mustard Seed. I stamped one of the Brush Sentiments on top of that in Versafine Clair Nocturne.

    I cut out the Phlox Blooms and Leaves Contour Layers using the same cardstock, then adhered them randomly over the card front, nestling them in and around the sun. Easy, peasy!

    I hope you enjoyed today’s card and have a great rest of your week!

    Supplies

  • Spring Green Wreath | by Rosemary Dennis

    Spring Green Wreath | by Rosemary Dennis

    Hello everyone! St. Patrick’s day is tomorrow and with that in mind I decided to create a wreath using the new Phlox Blooms and Leaves Contour Layers dies in multiple shades of green with some gold thrown in for good measure! As I began to create my card I decided that I also wanted to provide some interest in the background so I die cut my cardstock with the Pinpoint Contour plate die. I also knew that I wanted to have a shaker element in card so to create that I used the Classic Sentimental Wreath stamp and die set for that element.

    I die cut the panel with the Pinpoint Contour die and then positioned the wreath die from the Classic Sentimental Wreath stamp and die set in the top center of the panel and die cut the wreath. I then added low tack tape to the back of the panel to keep the wreath in place. As you can see, I then stamped the solid wreath image in a light green ink, die cut it and then layered it on top to form the base for my wreath. I then started building the shaker element.

    I had previously foiled the center medallion from the Gilded Petalpoint hot foil plate in gold so I decided to use that as my backer behind the opening. I added a piece of acetate to the back of the panel and then added foam strips to the back to create the well for the sequin mix. I added the mix and because I’m a little particular about how my sequins look I did actually flip the majority of the sequins over so they are facing in the “right” direction, lol! You can just see the foiled medallion peeking out through the sequins. Then I die cut the smaller phlox flower die from two shades of green cardstock and layered everything alternating the colors. I did originally die cut the leaves from the set in another shade of green and mirror gold cardstock, but the ended up opting to us a smaller leaf from the Dainty Rose and Leaves Contour Layers dies.

    Once all the flowers and leaves were layered and dry I set about creating the wreath. I alternated the flowers for interest and then tucked the leaves in where they best fit. I finished off the wreath with pretty green/gold crystals from the Christmas Fairy Crystals pack. Here in the close up you can see more of the foiled medallion in the background.

    I finished off the card with the sentiment from the Contempo Greetings stamp and die set. I really like this stamp and die set. There are so many great sentiments and dies to cut them out! I stamped the sentiment in watermark ink, applied gold embossing powder, heat set and then die cut. I thought about trying to place the sentiment on the wreath, but ultimately ended up tucking up underneath the wreath.

    Have a fun St. Patrick’s day!

    Supplies

  • The Best Things | Rosemary Dennis

    The Best Things | Rosemary Dennis

    Hello everyone! Have you seen all the beautiful projects the design team has created with the February release? Absolutely amazing! With so many great products to pick from I had a hard time deciding what to create with, but knew for sure I was going to use the new Gilded Petalpoint hot foil plate. It is so beautiful and I can’t wait to try it with the matching stencils!

    I started off my card by foiling white cardstock with matte gold foil and then die cutting the panel down to fit my card front. The Gilded Petalpoint hot foil plate comes with the main plate and then a center circle plate. I foiled the panel with just the main plate so that the center would be open.

    Once I had the foiling done I had to decide which die set I was going to use and I settled on the Delicate Floral Buds Contour Layers die set. I die cut all the flowers from two shades of aqua blue cardstock and the stems and leaves from a bright lime green. To provide some interest I alternated the colors on the buds and love how they turned out. I centered the sentiment from the Classic Sentimental Wreath stamp set inside the circle and stamped it in black ink.

    Before adhering all my floral buds I decided to add some additional interest to the background by adding splatters of distress mica sprays in Fresh Balsam and Shiny Bauble. To make sure that I didn’t cover the background with too much of the mica sprays I simply added a small amount of each spray to an acrylic block, picked up the liquid with a small paint brush and then tapped it on. It worked perfectly and I love the subtle shine that the mica sprays provide.

    I arranged all the floral buds in a crescent shape around the sentiment and adhered them with liquid adhesive. To give the arrangement movement and lift I added the liquid adhesive only a portion of each stem. To finish off the arrangement I pulled out the Christmas Ornament Pop Up Easel die set and die cut the bow from matte gold cardstock from the Vintage Pastel Mirror Pad. I adhered that with liquid adhesive and then added an aqua colored fairy crystal from the Christmas Fairy Crystals pack to the center of the bow. Foam adhesive was used to adhere the panel to an off white cardstock base.

    I hope you enjoyed my project today. Have a lovely day!

    Supplies

  • To My Friend | by Crystal Komara

    To My Friend | by Crystal Komara

    Hello friends and happy Valentine’s (or Galentine’s) day to you all! This is Design Team member Crystal Komara here today. I wish you a day filled with love, happiness and a lot of something sweet! I have one last love or heart themed card to share with you for this season.

    Card details:

    The base of this A2 sized card is made from Neenah Solar White Smooth cardstock. Using Layer A of the Flora Layering Plates, I cut the background layer from white cardstock. Using the new Banner Heart Layer set, I cut Layer A (the top layer) from magenta pink cardstock. I used the I cut Layer B (the middle layer) from black cardstock. I cut Layer C (the bottom layer) from a magenta pink glitter cardstock. I adhered all three layers together using a fine tip liquid glue. Then once the layers were dried, I adhered the hearts to the card using 3M foam adhesive for added dimension.

    *Note, I cut two of each layer of the Banner Hearts die so that my card would have two hearts on it. Lastly, I stamped the sentiment “to my friend” in magenta ink on a piece of white cardstock. This stamp is from the Kind Hearts stamp set. I then used a small punch to punch out the heart and adhered it on the top of the card.

    Happy Valentine’s Day, my crafty friends! Thanks for visiting and be sure to spread the love today and always.

    Supplies

  • Love You | by Rosemary Dennis

    Love You | by Rosemary Dennis

    Hello and happy Friday everyone! Rosemary here with a trio of love themed cards that I created using the fall out pieces from a card that I previously created using the Banner Heart layered die set.

    When I created the original card, I wasn’t thinking that I would make another three cards, but I quickly realized that I couldn’t just throw away the fall out pieces that were left after I die cut the Banner Heart layers from the glitter cardstock I used. That got me thinking about how I could use the dies and the fall out pieces in a different way.

    I decided to use each layer of the die to emboss the cardstock and then layer on the corresponding fall out pieces. I die cut three panels of white cardstock and got to work embossing each panel.

    There can be some trial and error when using your dies to emboss, but I was super happy when all three embossed perfectly the first time. The impress I got is very deep because I had to use my thick embossing mat as I wasn’t able to find the thinner one. To emboss a die on cardstock you need to make sure that you use an embossing mat. The mat is flexible, usually tan in color and comes with your die cutting machine.

    To emboss with your dies, use low tack tape to keep the die in place on your cardstock. For me my embossing sandwich was die cutting platform, cutting plate, embossing mat, cardstock and die (cutting edge facing down) and additional cardstock shims. For everyone else who has the correct embossing mat the sandwich would be cutting platform, cutting plate, embossing mat, cardstock and die (cutting edge facing down). Then run it through your die cutter. Some people like to lightly spray their cardstock with water in order to make it a little more pliable so the cardstock doesn’t crack. I didn’t do that with my cardstock, but the cracking was minimal.

    Here is a close up of one of the cards. I found that the embossing left me with really nice impressions on each panel. Layering in the fallout pieces was super easy. I finished off each card with the same sentiment from the Contempo Greetings stamp set and Fairy Jewels that coordinated with the colors of glitter cardstock that I used from the Memory Box Glitzy Glitter 6×6 pad and the Delicate Pastel Glitter 6×6 pad.

    I hope you will enjoyed my cards and that you will give embossing with your dies a try sometime. Have a wonderful day!

    D7

    Supplies

  • Glittering Hugs | by Crystal Komara

    Glittering Hugs | by Crystal Komara

    Hello crafty friends and happy Wednesday! This is Design Team member Crystal Komara here with you today sharing some Valentine’s Day themed inspiration, but in non-traditional colors. I’m all for the lovey-dovey, over-the-top, red and pink hearts everything, but what if you want to tone it down just a bit and tell your friends you’re thinking of them? Well, keep reading because here’s my version of sending some love and hugs that isn’t so mushy-gushy romantic.

    First, I LOVE this color combination of mint green, teal green, gold and white. It’s classic and it’s elegant. You can also see what it looks like here with a Christmas themed card. Or here, where I added just a touch of baby pink color too! Clearly, it’s a combination I love as I have used it frequently.

    Card details:

    The base of this A2 sized card is made from Neenah Solar White Smooth cardstock. This is my go-to white cardstock for e-v-e-r-y-t-h-i-n-g! It’s great for card bases, layering, die cutting, distress oxide blending and Copic coloring For the very first base layer I cut a piece of teal green cardstock to measure 5 1/4″ x 4″ from the Lush Green 6″ x 6″ paper pack. Using the Kinsley Heart Layering Plates, I cut Layer C (the bottom layer) from gold glitter cardstock. Next I cut Layer B (the middle layer) from mint green cardstock, also found in the Lush Green 6″ x 6″ paper pack.

    I cut Layer A (the top layer) from white cardstock. I adhered all three layers together with a fine-tip liquid adhesive before adhering them all to the card base. I then cut a 5 1/2″ x x 1 1/2″ strip of white cardstock and adhere it to the bottom third of the card. This allowed me to place the words “hugs” onto a white background in order for it to stand out against the detailed die. I used the Big Lingo Type Hugs die here. I cut the bottom thicker layer from teal green cardstock and the top thinner layer from gold glitter cardstock. Lastly, I stamped the sentiment “thinking of you” from the Lingo Thanks Clear stamp set in teal ink on white cardstock. I adhered the sentiment strip to the card using 3M foam adhesive for added dimension.

    Gosh, I just looooooove this color combination so much. I hope you have enjoyed today’s card as well. Thank you for visiting and have a wonderfully creative day!

    Supplies