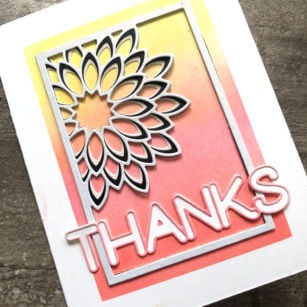
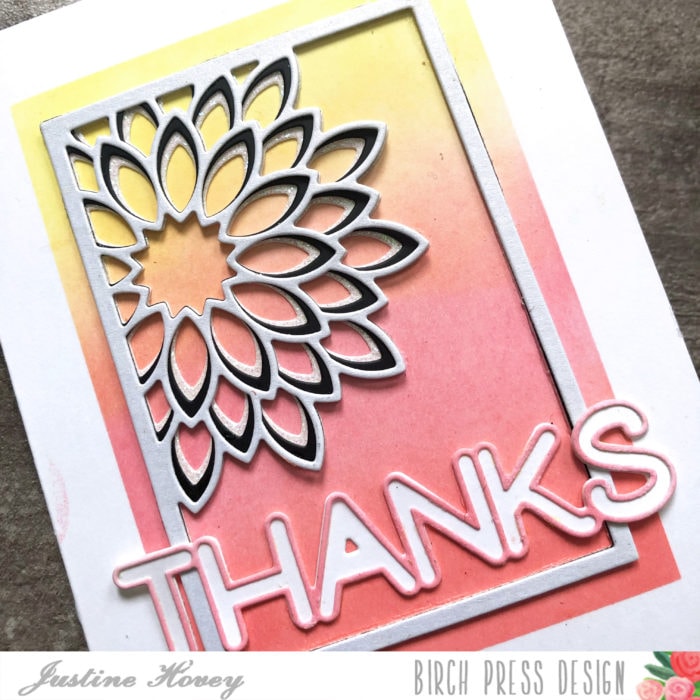
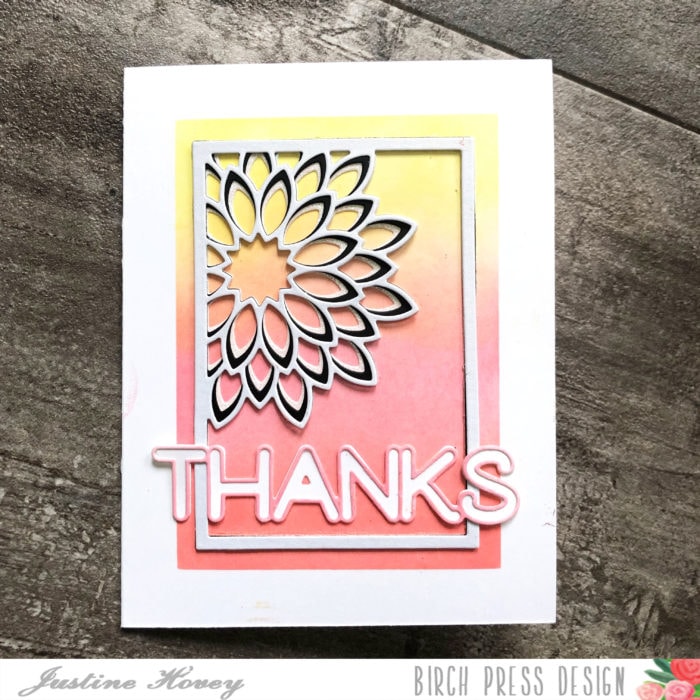
I wanted to create a technique video today featuring ink blending, masking and layering dies. Using the Dahlia Mini Frame layering set, I created a focal point for the die by adding oxide ink to my background. I wanted my background to have a spring tone to it since I’m quite over winter at this point. I love creating bright cards with bold colour that still includes a lot of white space.
For the Dahlia Die, I used a combination of glitter cardstock, satin cardstock and pearlescent cardstock to give a subtle elegance to the card. The sentiment was created by adding some pink ink to cardstock and die cutting the frame.
I hope you enjoyed all of todays techniques and tips in the video. I look forward to creating my next layering card soon!
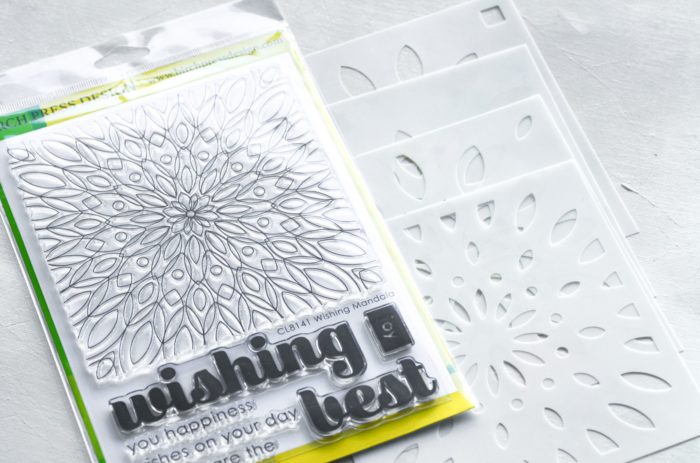
Hello everyone! Have you heard about our item of the month?
The February Item of the Month is the Wishing Mandala Stamp and Stencil Bundle – separately these items would come to $44, but since they are the item of the month they are at a special price of $34.99 and the customers get 100 bonus points (you must have an account to receive and redeem points – don’t worry, it’s easy to set one up).
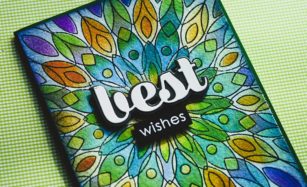
The Wishing Mandala stamp set has a large mandala image – perfect for coloring and creating an amazing background.
The set also includes some word images – and the big “wishing” and “best” images can be die cut with our Big Wishing Sugar Script and Big Best Sugar Script dies (these are sold separately).
This mandala image is begging to be colored, and to get your creative juices flowing, check out this video where we show you how to use watercolor to color in the stamped image. You’ll love how they create layers of overlapping color and brilliant blending.
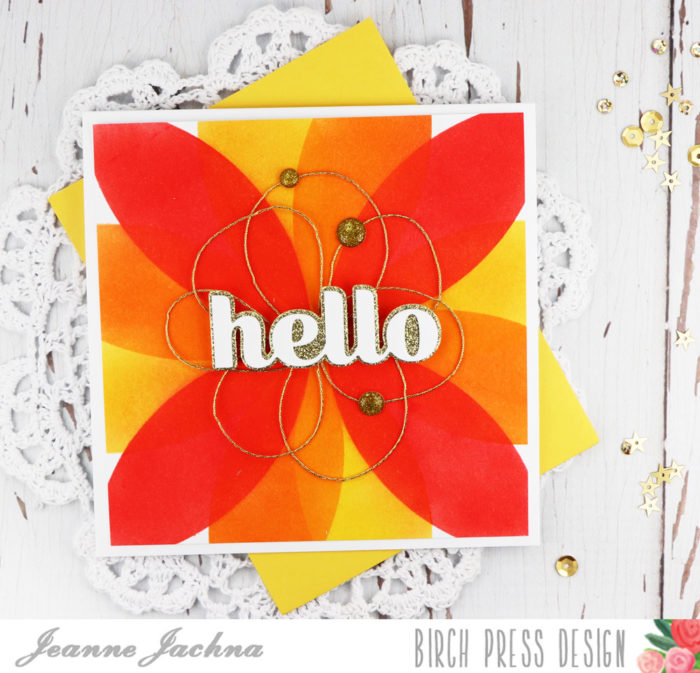
It’s New Year’s Eve! I hope you’re rested and ready to stay up late to ring in 2019! Today I’m playing with the Petal Burst Stencil from the store because the finished card reminds me of a firework!
There’s loads of new stencils in the store to work with. You can see them all here. The color combinations are only limited to your imagination. I used only four colors of distress ink – Squeezed Lemonade, Mustard Seed, Spiced Pumpkin and Candied Apple. I started by cutting a panel of white card stock the same size as the stencil (6×6″). I adhered the panel to my glass craft mat with double sided tape. Then I taped the stencil over the panel with removable wash tape and inked Candied Apple in all four openings. Next I wiped the stencil with a cloth to remove any excess ink, rotated the stencil, adhered it in place and inked the Spiced Pumpkin. The stencil has marks etched into the plastic to help you align each turn of the petals. When all the layers were inked and dried I cut the panel to 5″ square and adhered it to a 5.25″ square card base.
I attached a glue dot to the center of the inked panel and carefully arranged gold twine in a flower panel to the card base. The sticky string center is covered with a Big Hello Sugar Script die cut sentiment. Additional gold enamel dots were added to keep the twine in place and add extra glimmer. Wishing you a healthy and happy 2019! And in case you missed it.. Better hurry! Today is the last day of our After Christmas Sale!
Hi everyone, I hope you have had fantastic Christmas!
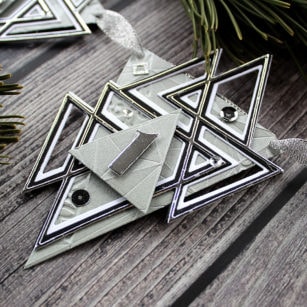
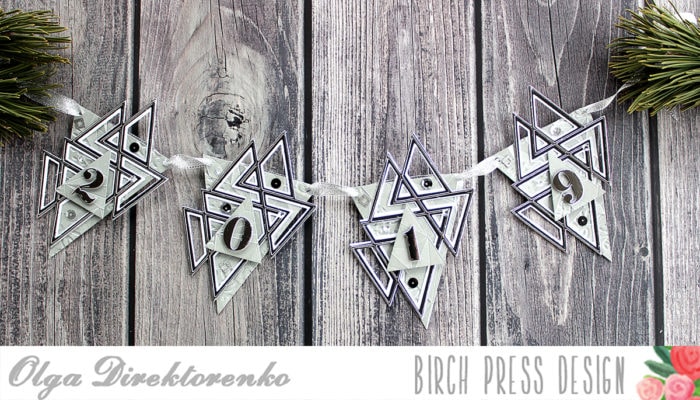
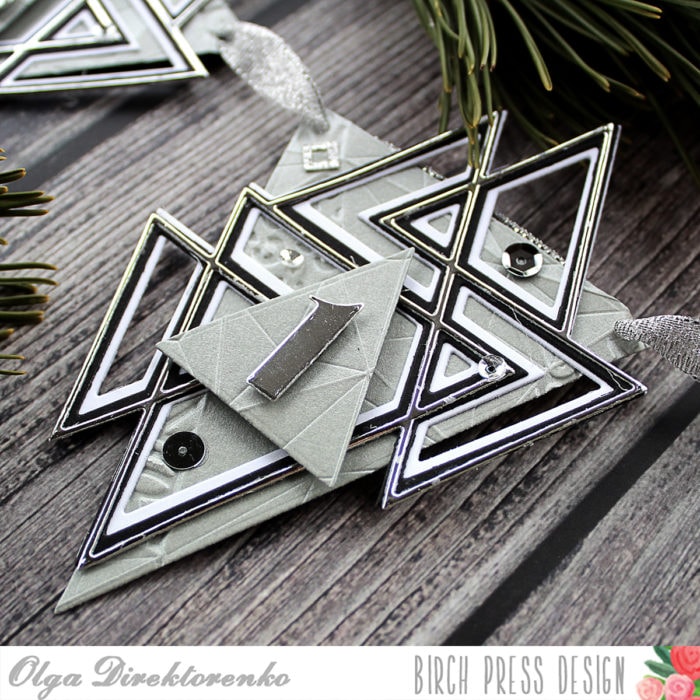
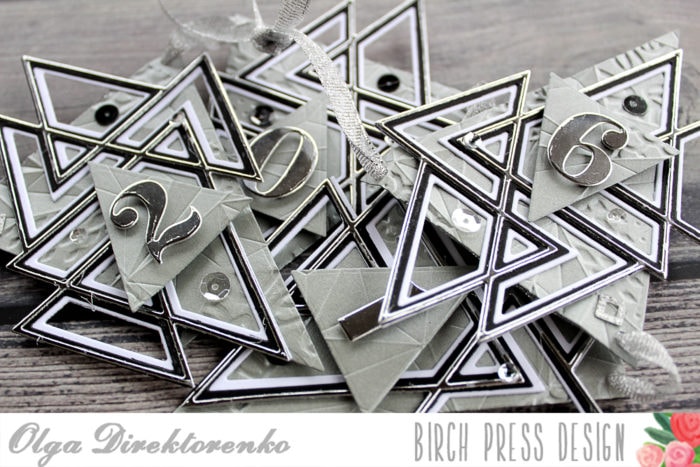
The project I have created today is a little home decor piece. These New Year banners are really easy to create – it’s the intricate shape of the die that makes them so special and unique. Once you have all the elements die cut you can put the entire project together really quickly.
I have used some triangle dies from the latest Birch Press release as well as the number set. I have layered the intersecting triangles, then added them to an embossed triangle banner base and mounted the last small triangle with a letter on top of everything. Then all there is left to do is to add some sequins and a ribbon!
Watch the step by step video tutorial if you want to know how to create this project step by step!
Have a very special, bright and inspirational Year 2019!!! Hooray! Happy New Year!
Have you checked out the new releases in the store? You’re going to love all the new products including dies, stamps and STENCILS! Today I’m sharing a card made with the new Stargazer die! When I saw it for the first time I kept seeing a color wheel! I couldn’t wait to start playing with it so add lots of beautiful colors! I started by cutting the Stargazer Layer A from white card stock and adhering it to the Stargazer Layer C die cut. Next I flipped it over and added double sided adhesive foam tape to the back. Next I inserted colorful die cut card stock pieces inside the openings. The adhesive foam tape provides some hold but you will still need to add glue over the white card stock to hold the cuts in place. The tape gives you a steady surface to adhere to and allows you to stick the finished Stargazer to your card base. I embellished my card with enamel dots so you can see the added dimension from the foam. The dots are slid under the raised Stargazer die cut. The center star cuts are in rainbow order with the outer circle filled with variations (lighter and darker shades) of the center colors. The Simple Peace word die comes with an outline (cut from gold here) and a detailed (cut from white) word die cut. I love that I can stack the die cuts or just use the letters if I like. Would you like a chance to win the Stargazer Layer A die cut? Click here to jump to our Instagram account where you’ll find details on how to enter to win. All you need to do is follow us and tag a friend.
We’ll be having more Instagram prizes throughout the month so check back often! Finished Size 4.25 x 5.5″
Supplies
Are you a Coffee Lover? Then you need to check out Amy Tsuruta’s Coffee Lovers Blog Hop! She’s arranged an amazing week long event with loads of sponsors and opportunities for you to see and share Fall/Winter coffee themed projects and win prizes along the way. Birch Press Design is a proud sponsor of the event because what’s better than friends, coffee and crafting?! You can get all the details here on Amy’s Blog! I’m playing along with this pretty card! And of course there is a prize on this blog post too! Birch Press Design makes the most beautiful, innovative dies on the market. They’re layering dies make elegance easy. The focal point of my design – that gorgeous wreath – is actually five layers of colorful card stock. I cut the Layers A through D with ombre shades of green card stock. The base that the wreath sits on – the Mandala Circle Base – is cut from red card stock adding a pop of red to the green layers. The Morning Cup die from Poppystamps is cut from gold foil and layered over ivory card stock. I decorated the cup with leaves left behind from cutting the wreaths. It reminds me of the Lenox Holiday Collection china. Don’ you just love that big dollop of whipped cream over the coffee/cocoa? I love the different shades of green revealed through each layer of the die cut openings. The background is a panel of aqua card stock topped with the largest Tall Triangle die cut from a lighter shade of aqua card stock. The Simple Joy word die includes a background die (cut from white) and the clean outline letters (cut from red). The background die is embossed so placing the skinny detailed letters is easy. Want a chance to win a $20 gift certificate for the store? All you need to do is leave a comment by midnight US EST on December 7. The winner will be announced on December 11 here on the blog!
December 11-2018 addendum… And the winner is… Lisa has been contacted by email! Thanks for joining us and for all your lovely comments!
Gorgeous! Just love the Birch Press dies… so beautiful! So many on my wish list for sure! Thanks so much to Birch Press for being a Super Sponsor again!
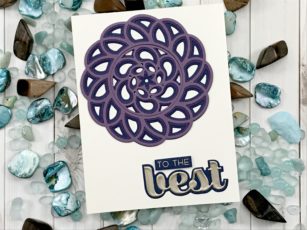
Hello Everyone!
Let’s layer some cardstock together! I am just amazed at how this looks on a card… It is coming out of the card or going in, it does not matter, it is just beautiful, RIGHT?
So let’s make one together! You want to first chose your cardstock so you can see just how the colors will look together. I chose to stay in a cool tone and chose a dark blue and then two shades of purple. I made my card base ivory, so the colors would not be so bright. Ivory will help to tone them down.
Next let’s get out our die cutting machine and let’s go to town! You want to make sure you have matched up the card stock with the proper die! And while we are there let’s cut out our sentiment to get it ready as well! With this die you will have a total of 6 pieces, 2 for each color. You will have the outer ring and then the center circle… What is great is you can decide which piece you want to use for your card! Of course, I chose EVERYTHING! LOL
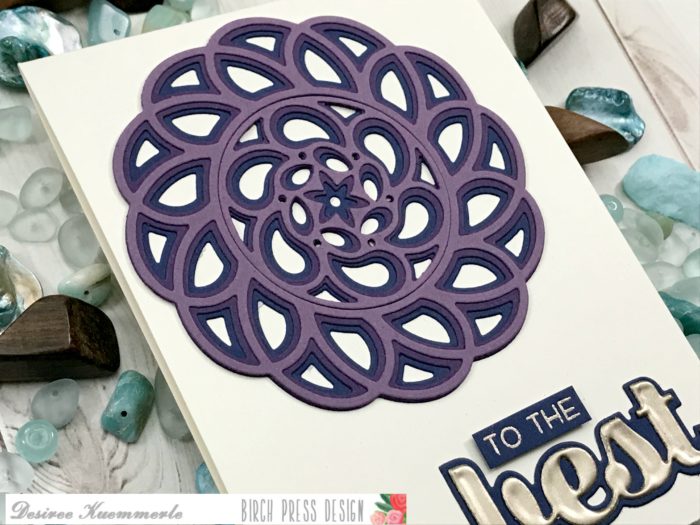
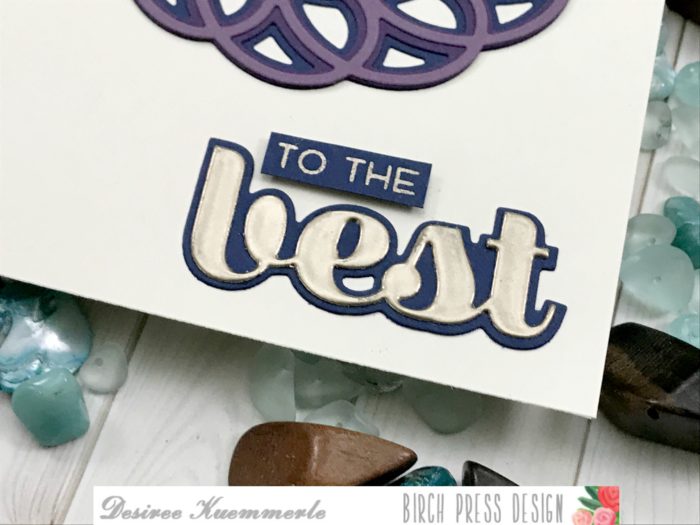
I used a liquid glue to adhere all my focal pieces together and set it aside under an acrylic block to make sure they adhered together! While that is drying let’s work on our sentiment. I chose the Best Friend Clear Stamp Set along with the Big Best Sugar Script Die Set.
I die cut my background of my sentiment our of the same dark blue card stock used previously and an ivory for ‘best’. Now it really does not matter which color you make this since we will be using our embossing powder to completely cover it! Yup that’s right, pull out your clear embossing ink and over that die cut! Cover it with your embossing powder of choice. I chose Liquid Platinum. Heat set and repeat! I actually did this process twice so I could get the look of metal for my sentiment. I stamped my top portion of my sentiment on a piece of scrap dark blue card stock and heat embossed that as well in Liquid Platinum.
Once everything is dry its time to put our card together! I pulled out a Standard A2 size card base and placed my Splash Die cut in the upper left-hand corner again placing an acrylic block to make sure it stays secured to my card. I then grabbed my sentiments and positioned them down in the bottom-right hand corner. I placed the larger sentiment first and then layered the smaller just above.
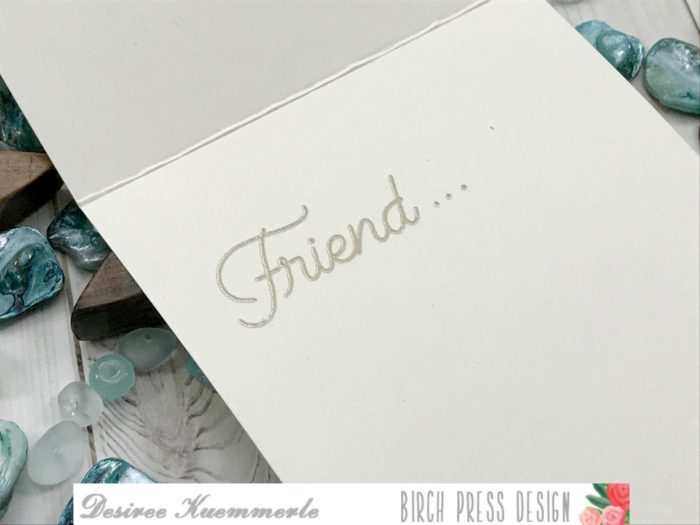
But I also wanted to add a sentiment on the inside. I chose “Friend”. I thought it kinda completed the thought of the card.
If you want to see more details just click on the video below and see our project come together step by step! Along with a few laughs of course!
I hope you enjoyed today’s project… Make sure you stay tuned for more wonderful projects coming soon! Have a great day and always remember… Be Creative!


 It’s New Year’s Eve! I hope you’re rested and ready to stay up late to ring in 2019! Today I’m playing with the Petal Burst Stencil from the store because the finished card reminds me of a firework!
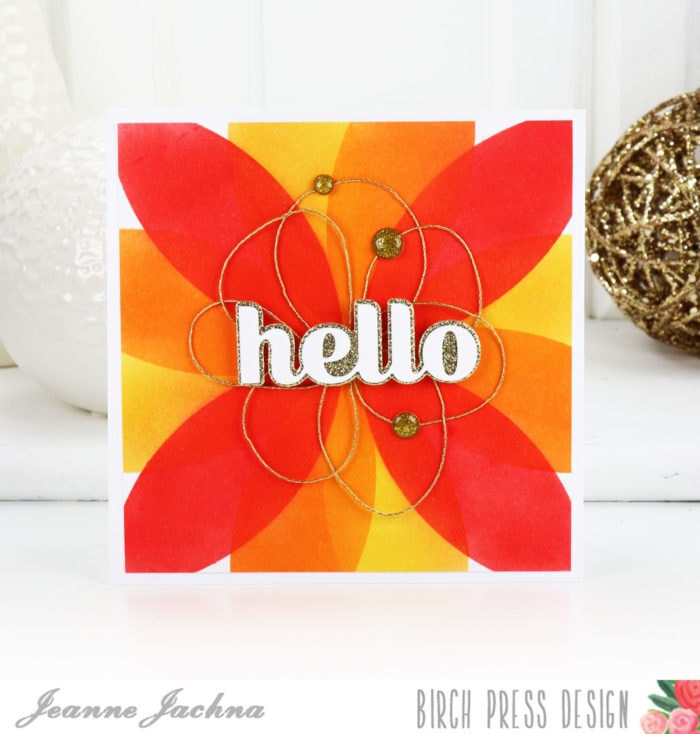
 I started by cutting a panel of white card stock the same size as the stencil (6×6″). I adhered the panel to my glass craft mat with double sided tape. Then I taped the stencil over the panel with removable wash tape and inked Candied Apple in all four openings. Next I wiped the stencil with a cloth to remove any excess ink, rotated the stencil, adhered it in place and inked the Spiced Pumpkin.
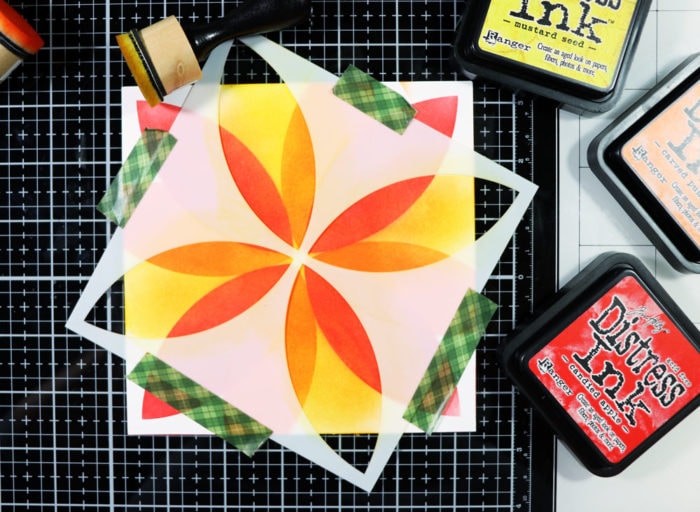 The stencil has marks etched into the plastic to help you align each turn of the petals.
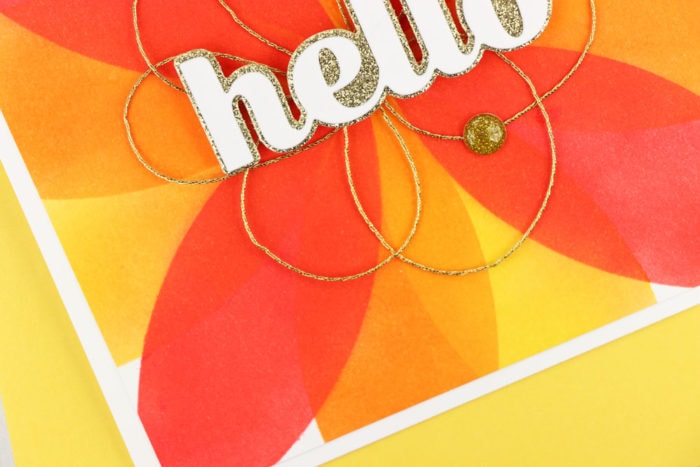 When all the layers were inked and dried I cut the panel to 5″ square and adhered it to a 5.25″ square card base.
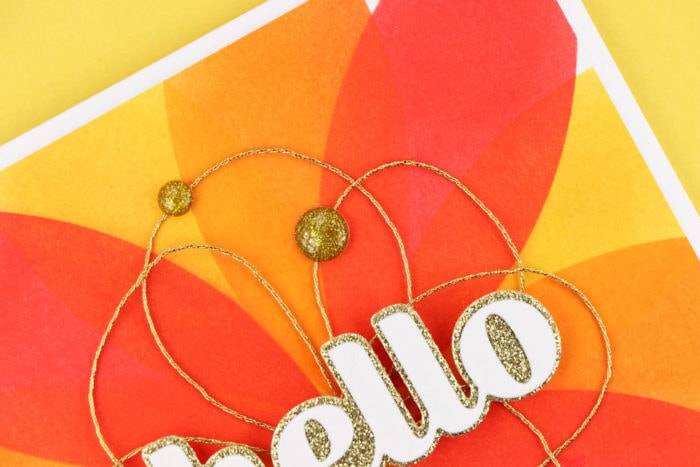
 Wishing you a healthy and happy 2019! And in case you missed it..
 Better hurry! Today is the last day of our After Christmas Sale!


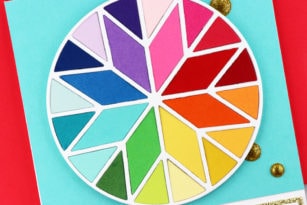
 Have you checked out the new releases in the store? You’re going to love all the new products including dies, stamps and STENCILS! Today I’m sharing a card made with the new Stargazer die!
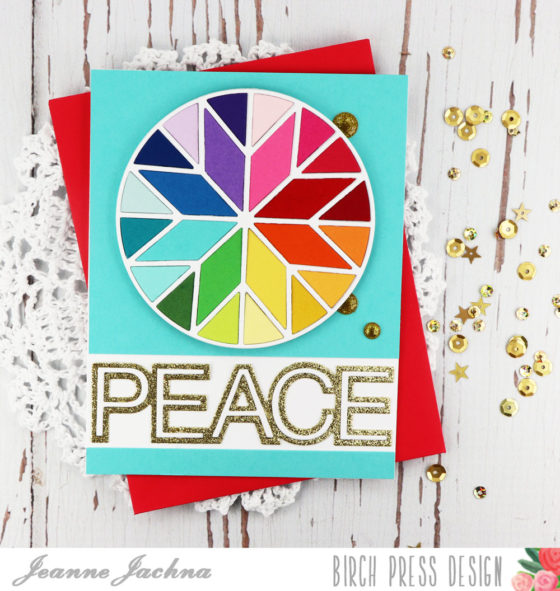 When I saw it for the first time I kept seeing a color wheel! I couldn’t wait to start playing with it so add lots of beautiful colors!
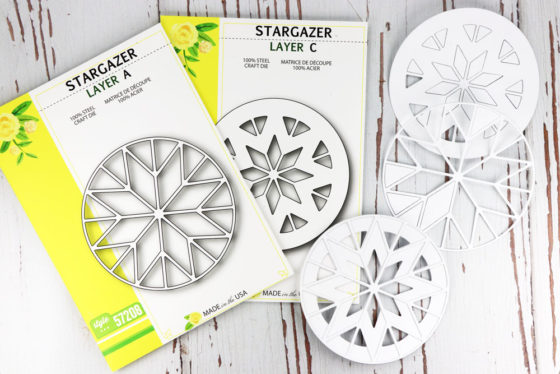 I started by cutting the Stargazer Layer A from white card stock and adhering it to the Stargazer Layer C die cut.
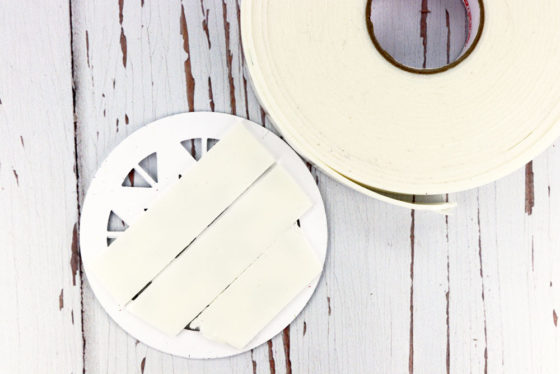 Next I flipped it over and added double sided adhesive foam tape to the back.
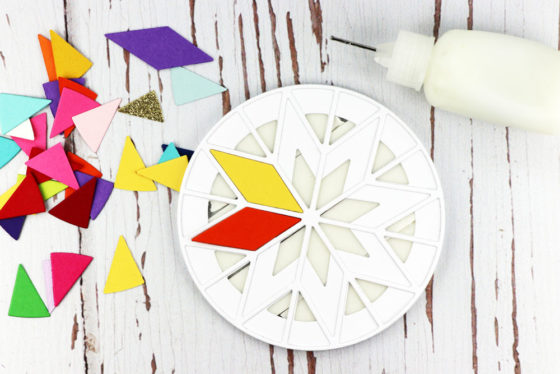 Next I inserted colorful die cut card stock pieces inside the openings. The adhesive foam tape provides some hold but you will still need to add glue over the white card stock to hold the cuts in place. The tape gives you a steady surface to adhere to and allows you to stick the finished Stargazer to your card base.
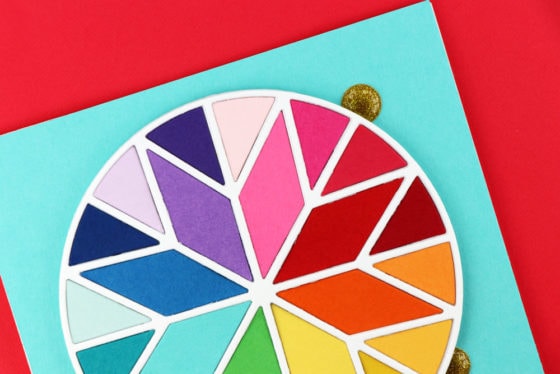 I embellished my card with enamel dots so you can see the added dimension from the foam. The dots are slid under the raised Stargazer die cut.
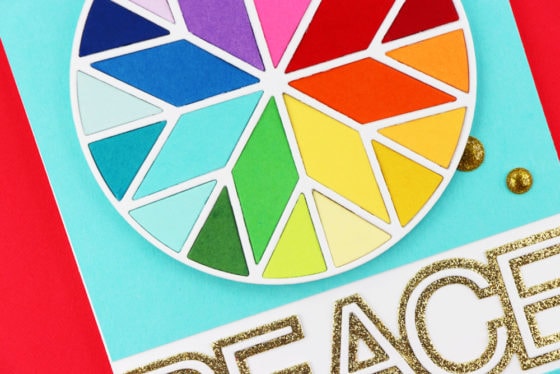 The center star cuts are in rainbow order with the outer circle filled with variations (lighter and darker shades) of the center colors.
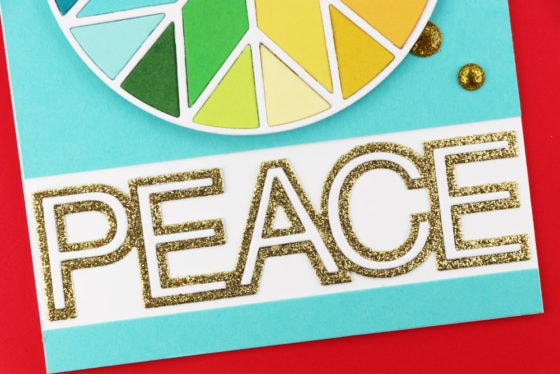 The Simple Peace word die comes with an outline (cut from gold here) and a detailed (cut from white) word die cut. I love that I can stack the die cuts or just use the letters if I like.
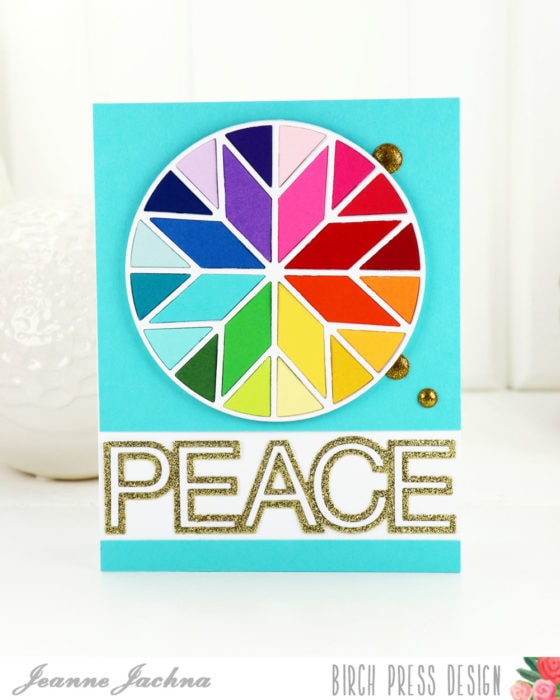 Would you like a chance to win the Stargazer Layer A die cut?
  Finished Size 4.25 x 5.5″


 Are you a Coffee Lover? Then you need to check out
 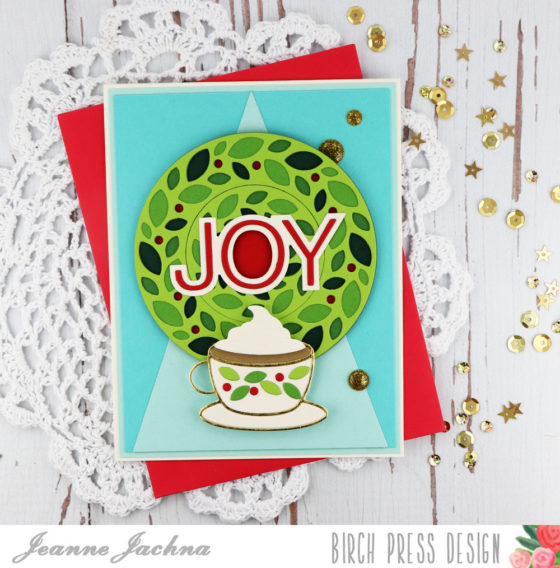 I’m playing along with this pretty card! And of course there is a prize on this blog post too!
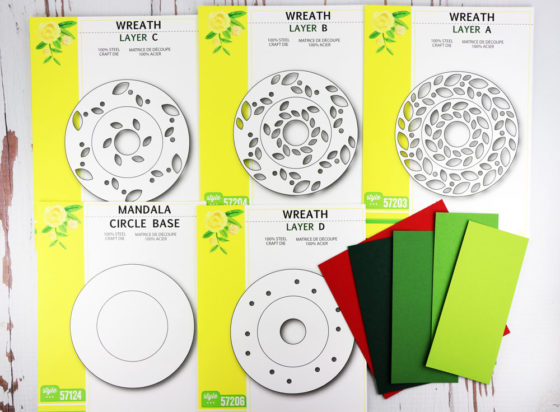 Birch Press Design makes the most beautiful, innovative dies on the market. They’re layering dies make elegance easy. The focal point of my design – that gorgeous wreath – is actually five layers of colorful card stock. I cut the Layers A through D with ombre shades of green card stock. The base that the wreath sits on – the Mandala Circle Base – is cut from red card stock adding a pop of red to the green layers.
 The Morning Cup die from Poppystamps is cut from gold foil and layered over ivory card stock. I decorated the cup with leaves left behind from cutting the wreaths. It reminds me of the Lenox Holiday Collection china. Don’ you just love that big dollop of whipped cream over the coffee/cocoa?
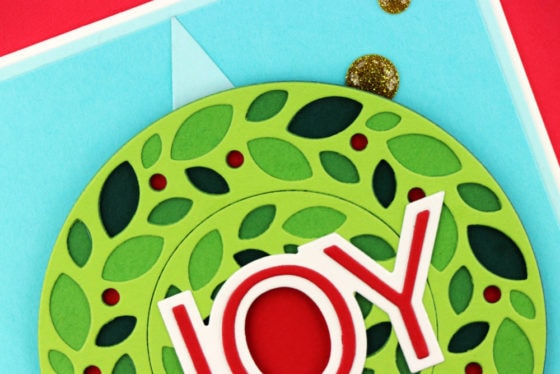 I love the different shades of green revealed through each layer of the die cut openings.
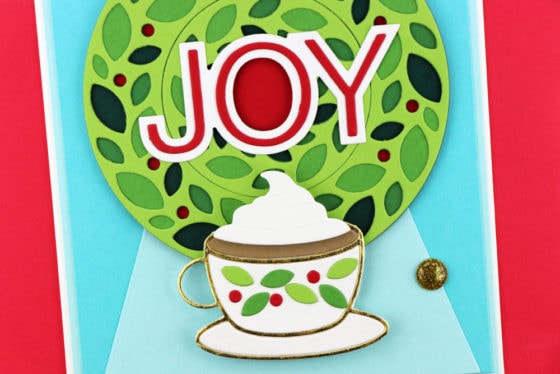 The background is a panel of aqua card stock topped with the largest Tall Triangle die cut from a lighter shade of aqua card stock. The Simple Joy word die includes a background die (cut from white) and the clean outline letters (cut from red). The background die is embossed so placing the skinny detailed letters is easy.
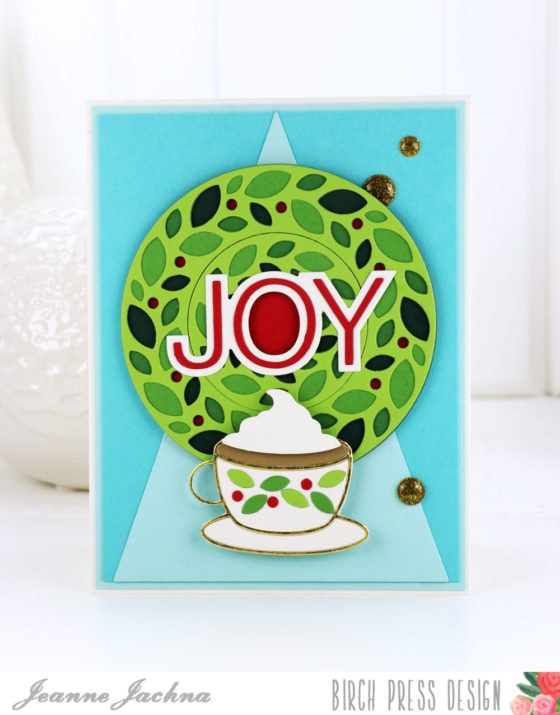 Want a chance to win a $20 gift certificate for the store? All you need to do is leave a comment by midnight US EST on December 7. The winner will be announced on December 11 here on the blog!


LisaBzibziak
November 30, 2018 — 9:12 pm