
Hi there, it’s Tracey today and I will be sharing an all die cuts card and video tutorial using the Flora Heart Layers die set, the Cherish Plate die set and the Simple Love sentiment die.

I created two custom ink blended panels from Bristol Smooth cardstock. The first was a 3″ square that will be the base layer for my layered Floral Heart and a second smaller rectangular panel will fit the Simple Love sentiment die. I blended the ink on both panels with distress oxide ink in rainbow order—picked raspberry, orange marmalade, moved law and peacock feather.
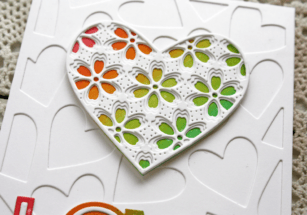
Once they were blended I flicked some clean water on to the panel and lifted some of the colour with paper towel. Once it was dry I cut the largest heart from the Perfect Hearts die set, it fits perfectly behind the Flora Heart Layers dies.

Each layer from the Flora Heart Layers die set was cut from heavyweight white cardstock and I used liquid adhesive the glue the layers together. To complete the heart I glued the layered heart to the rainbow base layer.

I cut layer A from the Cherish Plate die set also from white cardstock and glued it to the font of a white top folding card base. The Simple Love Die set comes in two pieces. I cut the larger of the two Dies from the second ink blended panel and then the detail layer from white cardstock. The smaller letters were glued to the sentiment with liquid adhesive.

I added the heart and the sentiment to the card base. Leaving the card like this allows you to customize the inside to say whatever you want for the occasion. Thanks so much for stopping by today and watch the video below for more details on how I put this card together.

Supplies


Comments
3 responses to “Building an All Die Cut Card by Tracey McNeely”
Tracey, this card just make me happy, it’s delightful!
So pretty! Love this!
So bright and happy. Love the clean white on white